Clas Ohlson GA4662 User manual

ENGLISH SVENSKA NORSK SUOMI
18-2061/36-1734
Baby Monitor
Model/Modell/Malli: GA4662


3
ENGLISH
Baby Monitor
Art. No. 18-2061/36-1734 • Model GA4662
Please read the entire instruction manual before use and save it for future reference.
We apologise for any text or photographic errors and any changes in technical data.
This package contains
• Camera
• Monitor
• Cable with SCART and 3.5 mm plug
• Two AC/DC adaptors (9V DC, 400mA for the camera and 9V DC,
1000mA for the monitor)
• Belt clip/mounting plate with screws and plugs
• Table stand (ts both the camera and the monitor)
• Instruction Manual
Description
Monitor
1. Antenna
2. LCD screen
3. Indicator for low batteries
4. Channel indicators
5. Channel selector
NOTE: The camera and the monitor
must be set on the same channel
6. VOX button (sound activated auto
mode)
7. Settings buttons (+ and -)
8. MODE-button
9. ON/OFF switch/Volume control
10. Connector for AC/DC adaptor
6V DC 1000mA
11. Hole for hanging
12. Adjustor for setting of sound sensitivity
in the VOX mode.
13. Battery cover
14. AV connector

4
ENGLISH
Camera
1. IR diodes
2. Microphone
3. Photo sensor
4. Channel selector
NOTE: The camera and the monitor must be set on the same channel
5. Lens
6. ON/OFF switch/Indicator lamp for on and off
7. Hole for hanging
8. Battery cover
9. Connector for AC/DC adaptor 6V DC 400mA
10. Antenna
Safety
• Do not place the product where it could fall into water or other liquid.
• Keep the device and all of its parts out of the reach of children.
• Do not open the casing. Repairs should only be carried out by a qualied tradesman.
• Do not overload wall sockets or extension cables since it may cause re or electric
shocks.
• Only use the product with suitable batteries or with recommended AC/DC adaptor.
• Store and use the camera in spaces free of dust and moisture.
• Do not store the device in cold places. When it returns to normal temperature
moisture can build up within the casing which can damage the circuit boards.
• Do not store the device in hot places. High temperatures may shorten the longevity
of electronic products and melt or damage some plastics.
• Do not expose the device for knocks and blows.
• Remember that you are using common radio waves and that sound and picture can
be transmitted to other 2.4 GHz receivers. Signals from nearby rooms can also be
transmitted. To protect your personal integrity you should always shut off the camera
when it is not being used.

ENGLISH
Getting Started
1. The camera
1.1PowerSupply
The camera operates on either 3x LR6 batteries (rechargeable NiMH batteries
or alkaline batteries) or an AC/DC adaptor connected to the power supply.
Insertingthebatteries
1. Open the battery cover on the back of the camera. (1)
2. Insert 3x LR6 batteries. Follow the markings for plus (+) and minus (-) in the battery
compartment. (2)
3. Shut the battery compartment and make sure it locks properly.
NOTE:Never mix old and new batteries. Change all batteries at the same time.
Take the batteries out if the alarm clock is not to be used for a long time.
4. Press the ON/OFF switch so it comes to position ON. The green indicator lamp lights
up. (3)

6
ENGLISH
UsingtheAC/DCadaptor
1. Connect the adaptor to the switch and then to the wall socket. Choose the correct
AC/DC adaptor – it should be marked DC 6V 400mA. (1)
2. Set the on/off switch to position ON. The indicator lamp will come on. (2)
1.2Channelsetting
Set the desired channel by setting the channel selector in position 1, 2, or 3. (3 above)
NOTE: The camera and the monitor must be set on the same channel
1.3Camerasetting
Place the camera in a suitable spot; turn it towards the spot you want to supervise and
adjust the angle by turning the lens head up or down.

7
ENGLISH
1.4Mountthecameraonawall
The included attachment can be used as belt clip or wall bracket for one of the devices.
NOTE:The reception on the monitor should be tested before you place the camera.
Ask somebody to hold the camera for the spot you have chosen while you check the
monitor’s reception. If you have interferences and other problems, look in the chapter
troubleshooting. You may have to choose a different spot in the room to mount the
camera on.
1. Drill two holes with a 33 mm gap where you want to mount the camera.
2. Attach the mounting plate on the wall with the included screws and plugs. (1)
3. Place the camera so that the pin on the mounting plate ts in the hole on the back of
the camera. Push it in lightly and then angle the camera down to lock it in place. (2)
1.5Nightvision
The camera is equipped with 6 high intensity LEDs to take sharp pictures in dark spaces.
When the built-in photo sensor sensors that the light is not sufcient the LEDs are
automatically activated.

8
ENGLISH
2. The monitor
2.1PowerSupply
The camera operates on either 3x LR6 batteries (rechargeable NiMH batteries or
alkaline batteries) or an AC/DC adaptor connected to the power supply.
Insertingthebatteries
1. Open the battery cover on the back of the monitor. (1)
2. Insert 3x LR6 batteries. Follow the markings for plus (+) and minus (-) in the battery
compartment. (2)
3. Shut the battery compartment and make sure it locks properly. (3)
NOTE: Never mix old and new batteries. Change all batteries at the same time. Take
the batteries out if the alarm clock is not to be used for a long time.
4. Turn on the monitor by turning the control. (4)
The indicator lamp for channel 1 lights up. Choose the same channel as the camera by
pushing repeatedly on the channel selector (CH). (5)
5. Adjust the volume to desired level.
UsingtheAC/DCadaptor
1. Connect the adaptor to the monitor (1) and then to the wall
socket (2). Be careful choosing the right AC/DC adaptor.
It should be marked DC 6V 1000mA.
2. Turn on the monitor The indicator lamp for channel 1 lights
up. Choose the same channel as the camera by pushing
repeatedly on the channel selector (CH).
3. Adjust the volume to desired level.

ENGLISH
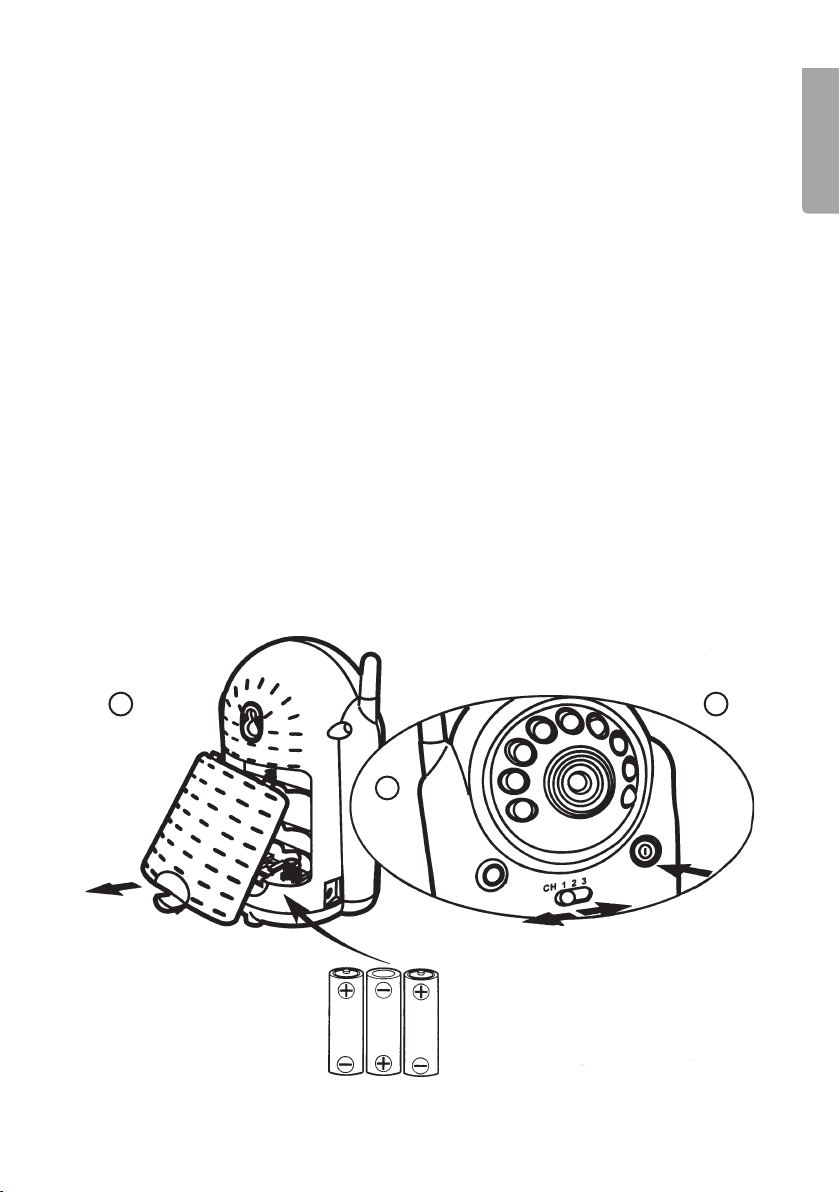
Chargingthebatteries
The monitor’s battery compartment can be used as battery charger.
NOTE: Only rechargeable NiMH batteries.
1. Open the battery cover on the back of the monitor.
2. Insert 3x rechargeable LR6 batteries. Follow the markings for plus (+)
and minus (-) in the battery compartment.
3. Shut the battery compartment and make sure it locks properly.
4. Connect the AC/DC adaptor marked DC 6V 1000mA to the monitor rst (DC IN),
and then to the wall socket.
5. The red LED lights up when the charging begins.
6. When the batteries are charged the red indicator lamp shuts off.
NOTE:
• Only use rechargeable NiMH batteries! If you are using a non suitable battery it may
explode.
• When the indicator lamp on the monitor blinks green it is time to change batteries.
• When the indicator lamp on the monitor blinks red the wrong typ of batteries are
being used.
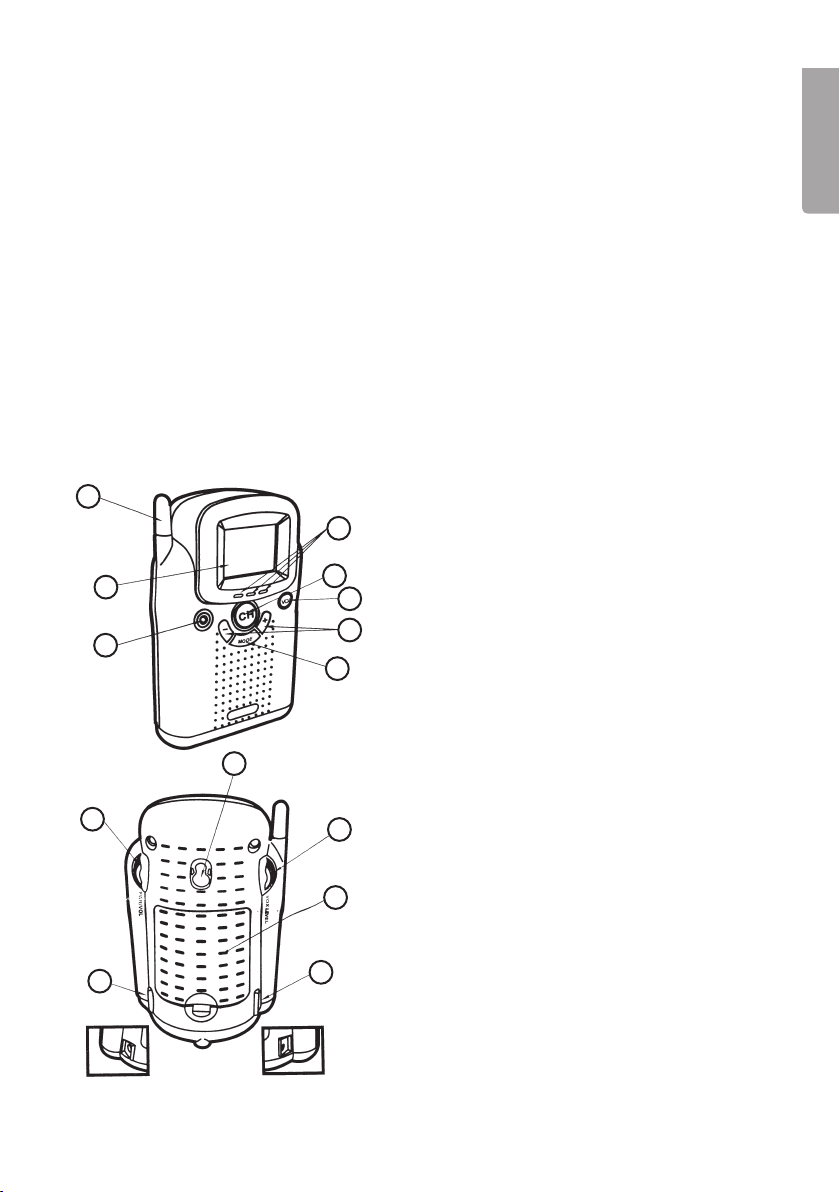
2.2Placementofthemonitor
The included attachment can be used as belt clip or wall bracket for one of the devices.
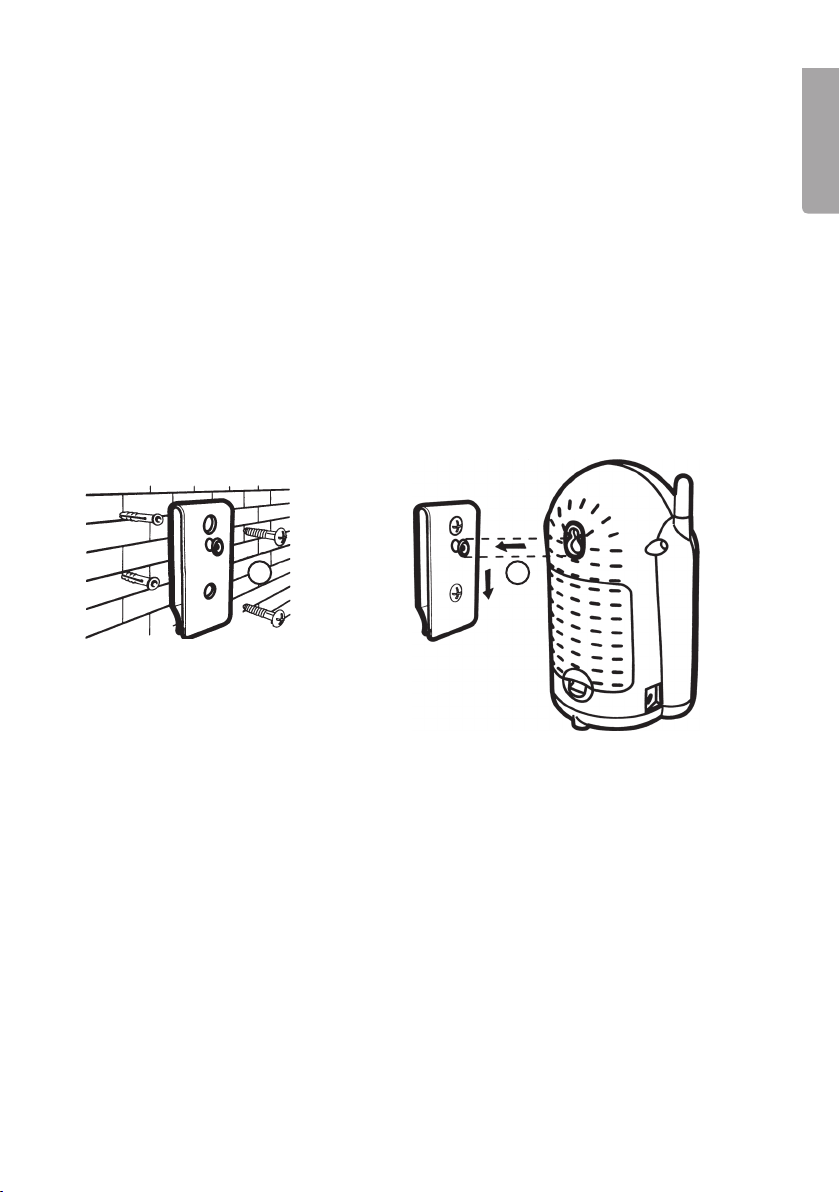
2.3Tomountthemonitoronawall
1. Drill two holes with a 33 mm gap where you want to mount the monitor.
2. Attach the mounting plate on the wall with the included screws and plugs. (1)
3. Place the camera so that the pin on the mounting plate ts in the hole on the back of
the camera. Push it in lightly and then angle the camera down to lock it in place. (2)
2.4Tablestand
Place the monitor on the table stand to get a different angle.

10
ENGLISH
Other functions
To record on a VCR
1. With the monitor a SCART cable with a 3.5 mm connector is included. It can also be
used for a VCR when recording.
2. Connect the 3.5 mm connector to the outlet marked A/V out on the monitor (1). Then
connect the other end of the cable (SCART) to the VCR. (2)
Mode for sound activation (auto – mode)
In the mode for sound activation you can set the sensitivity for how high the sound level
should be for the monitor to be activated. Follow these steps to use the sound activation
function:
1. Press the VOX button on the front of the monitor. This shuts off the monitor but the
indicator for ON is lit. (1)
2. Set the sensitivity on a suitable level between 0 and 9. 0 for the lowest sensitivity and
9 for highest sensitivity. (2)
3. When a sound in the same room as the camera reaches the pre-set level the screen
on the monitor will be activated automatically. It shuts off again after approx. 30
seconds. NOTE: In the mode for sound activation the monitor can only recognize
signals from one camera at a time.

11
ENGLISH
Clock
1. Press the plus(+) button to see the clock.
2. Press the minus (-) button to hide the clock.
3. To set the clock:
• Hours
Press MODE repeatedly until the digits for hours blink. Then use the plus (+)
and minus (-) buttons to set the right time.
• Minutes
Press MODE repeatedly until the digits for minutes blink. Then use the plus (+)
and minus (-) buttons to set the right time.
To adjust the strength of the light on the display
1. Press MODE repeatedly until the symbol for strength of light blinks.
2. Then use the plus (+) and minus (-) buttons to set the right strength of light.
To adjust the contrast on the display
1. Press MODE repeatedly until the symbol for strength of contrast blinks.
2. Then use the plus (+) and minus (-) buttons to set the right contrast.
Time-keeping
1. Press the MODE button repeatedly until the time-keeping appears on the display.
2. Press the plus (+) button to start and stop the timekeeping.
3. Press the minus (-) button to reset the time – keeping.
Care
• Finger prints and dirt on the camera lens can decrease the camera’s performance
drastically. Do not touch the camera lens with your ngers.
• Would the lens get dirty, use a soft cloth to clean it.

12
ENGLISH
Errors and corrections
Ifyougetnosignalatall
• Check that both camera and monitor are turned on.
• Make sure that all connections are secure.
• Check that the camera and the monitor are set on the same channel.
• If the camera and the monitor operate on batteries, replace all the batteries.
Ifthesignalispoororifinterferencesappear
• Check that the camera and the monitor are set on the same channel.
• If there is a microwave oven between the camera and the monitor, shut it off
or move it.
• Check that the devices are within each others range (approx. 100 m if
the space is open).
• If the indicator for ON is lit but only sound and no picture reaches the monitor it could
be in the sound activation mode. Press the VOX button to turn on the screen.
Recycling
Follow local ordinances when disposing this product. If you are unsure about the
disposal of this product contact your municipality.
Technical Data
Camera
Frequency 2.4 GHz
Channels 3 channels
Modulation method FM
Antenna Built-in, omni-directional
Picture sensor 1/3" CMOS sensor
Lens f 6.0 mm, F 1.8
External measurements 8.6 x 13.5 x 5.8 cm.
Weight 185 g (excluding batteries):
Power Supply DC 6V, 400 mA or 3 x LR6-batterier
Operating temperature 0°C - 40°C
Monitor
Frequency 2.4 GHz
Channels 3 channels
Modulation method FM
Antenna Built-in, omni-directional
Screen 1.5" LTPS-TFT LCD
Colours Full colour screen
External measurements 8.6 x 13.5 x 6.7 cm.
Weight 155 g
Power Supply DC 6V, 1,000 mA or 3 x rechargeable NiMH LR6-batterier
Operating temperature 0°C - 40°C

13
SVENSKA
Babymonitor
Art. Nr. 18-2061/36-1734 • Modell GA4662
Läs igenom hela bruksanvisningen före användning och spara den sedan för framtida bruk.
Vi reserverar oss för ev. text- och bildfel samt ändringar av tekniska data. Vid tekniska
problem eller andra frågor, kontakta vår kundtjänst (se adressuppgifter på baksidan).
Förpackningen innehåller
• Kamera
• Monitor
• Kabel med SCART- respektive 3,5 mm anslutning
• Två batterieliminatorer (DC 6 V, 400 mA för kameran
och DC 6 V, 1000mA för monitorn)
• Bältesfäste / Fästplatta med skruvar och pluggar
• Bordsställ (passar till både kameran och monitorn)
• Bruksanvisning
Beskrivning
Monitor
1. Antenn
2. LCD-skärm
3. Indikatorlampa för dåliga batterier
4. Kanalindikatorer
5. Kanalväljare
OBS!Kameran och monitorn måste
vara inställda på samma kanal.
6. VOX-knapp (Ljudaktiverat auto-läge)
7. Inställningsknappar (+ och -)
8. MODE-knapp
9. Strömbrytare/Volymkontroll
10. Anslutning för batterieliminator
DC 6 V, 1000 mA
11. Upphängningshål
12. Ratt för inställning av ljudkänsligheten
i VOX-läget
13. Batterilucka
14. AV-anslutning
Babymonitor
Art. Nr. 18-2061/36-1734 • Modell GA4662

14
SVENSKA
Kamera
1. IR-dioder
2. Mikrofon
3. Fotosensor
4. Kanalväljare.
OBS! Kameran och monitorn måste vara inställda på samma kanal.
5. Lins
6. Strömbrytare/Indikatorlampa för av och på
7. Upphängningshål
8. Batterilucka
9. Anslutning för batterieliminator DC 6 V, 400mA
10. Antenn
Säkerhet
• Placera inte apparaten så att den kan falla ner i vatten eller annan vätska.
• Håll apparaten och alla dess delar utom räckhåll för barn.
• Öppna inte höljet. Reparationer får endast utföras av kvalicerad personal.
• Överbelasta inte vägguttag eller skarvsladdar eftersom detta kan orsaka brand
eller elektriska stötar.
• Använd produkten endast med lämpliga batterier eller med föreskriven
batterieliminator.
• Förvara och använd kameran i utrymmen fria från damm och fukt.
• Förvara inte apparaten i för kalla utrymmen. När den återgår till normal temperatur
kan fukt bildas inuti höljet, vilket kan skada kretskorten.
• Förvara inte apparaten i för varma utrymmen. Höga temperaturer kan förkorta
livslängden på elektroniska produkter och förvränga eller smälta somliga plaster.
• Utsätt inte apparaten för stötar och slag.
• Tänk på att du använder allmänna radiovågor när apparaten är i drift och att ljud och
bild kan sändas till andra 2,4 GHz-mottagare. Även samtal i närliggande rum kan
sändas. För att skydda din personliga integritet ska du alltid stänga av kameran när
den inte används.

1
SVENSKA
Att komma igång
1. Kameran
1.1Strömförsörjning
Kameran drivs av antingen 3 st LR6-batterier (uppladdningsbara NiMH-batterier
eller alkaliska batterier) eller en batterieliminator ansluten till elnätet.
Attsättaibatterierna
1. Öppna batteriluckan på baksidan av kameran. (1)
2. Sätt i 3 st LR6-batterier. Följ markeringarna för plus (+) och minus (-)
i batterifacket. (2)
3. Stäng batteriluckan och se till att den låser fast ordentligt.
OBS!Blanda aldrig gamla och nya batterier utan byt samtliga batterier samtidigt.
Ta ur batterierna om du inte har tänkt att använda apparaten under en längre tid.
4. Tryck på strömbrytaren så att den kommer i läge ”på” (ON). Den gröna
indikatorlampan börjar lysa. (3)

16
SVENSKA
Attanvändabatterieliminatorn
1. Anslut batterieliminatorn först till kameran och sedan till elnätet. Välj rätt
batterieliminator – den ska vara märkt DC 6 V, 400 mA. (1)
2. Sätt strömbrytaren i läge ”på” (ON). Indikatorlampan börjar lysa. (2)
1.2Kanalinställning
Ställ in önskad kanal genom att sätta kanalväljaren i läge 1, 2 eller 3. (3 ovan)
OBS!Kameran och monitorn måste vara inställda på samma kanal.
1.3Kamerainställning
Placera kameran på lämplig plats, rikta den mot den plats du vill övervaka
och justera vinkeln genom att vrida linshuvudet uppåt eller nedåt.

17
SVENSKA
1.4Attmonterakameranpåväggen
Det medföljande fästet kan användas som bältesfäste eller som väggfäste för en av
enheterna.
OBS!Mottagningen på monitorn bör testas innan du sätter kameran på plats.
Be någon att hålla kameran på den plats du har valt för den medan du kontrollerar
monitorns mottagning. Om du får störningar eller andra problem, titta i avsnittet om
felsökning. Du kanske behöver välja en annan plats i rummet att montera kameran på.
1. Borra två hål med 33 mm mellanrum där du vill montera kameran.
2. Sätt fast fästplattan på väggen med hjälp av de medföljande skruvarna och
pluggarna. (1)
3. Placera kameran så att piggen på fästplattan passar in i fästhålet på baksidan av
kameran. Tryck lätt inåt, för sedan kameran nedåt för att xera den på plats. (2)
1.5Mörkerläge
Kameran är utrustad med 9 högintensitets lysdioder för att kunna ta upp klara bilder
i mörka utrymmen. När den inbyggda fotosensorn känner att ljuset inte räcker till
aktiveras dessa lysdioder automatiskt.

18
SVENSKA
2. Monitorn
2.1Strömförsörjning
Monitorn drivs av antingen 3 st LR6-batterier (uppladdningsbara NiMH-batterier) eller en
batterieliminator ansluten till elnätet.
Attsättaibatterierna
1. Öppna batteriluckan på baksidan av monitorn. (1)
2. Sätt i 3 st LR6-batterier. Följ markeringarna för plus (+) och minus (-) i batterifacket. (2)
3. Stäng batteriluckan och se till att den låser fast ordentligt. (3)
OBS!Blanda aldrig gamla och nya batterier utan byt samtliga batterier samtidigt.
Ta ur batterierna om du inte har tänkt att använda apparaten under en längre tid.
4. Slå på monitorn genom att vrida på ratten. (4) Indikatorlampan för kanal 1 börjar lysa.
Välj samma kanal som kameran genom att trycka upprepade gånger på kanalväljaren
(CH). (5)
5. Justera volymen till en lämplig nivå.
Attanvändabatterieliminator
1. Anslut batterieliminatorn först till monitorn (1) och sedan till
elnätet. (2) Var noga med att välja rätt batterieliminator – den
ska vara märkt DC 6 V, 1000 mA.
2. Slå på monitorn. Indikatorlampan för kanal 1 börjar lysa.
Välj samma kanal som kameran genom att trycka upprepade
gånger på kanalväljaren.
3. Justera volymen till en lämplig nivå.

1
SVENSKA
Attladdabatterierna
Monitorns batterifack kan användas som en batteriladdare.
OBS!Endast uppladdningsbara NiMH-batterier.
1. Öppna batteriluckan på baksidan av monitorn.
2. Sätt i 3 st laddningsbara LR6-batterier. Följ markeringarna för plus (+)
och minus (-) i batterifacket.
3. Stäng batteriluckan och se till att den låser fast ordentligt.
4. Anslut batterieliminatorn märkt DC 6 V, 1000mA först till monitorn (DC IN),
sedan till vägguttaget.
5. Den röda indikatorlampan tänds när laddningen påbörjas.
6. När batterierna är färdigladdade släcks den röda indikatorlampan.
OBS!
• Använd endast uppladdningsbara NiMH-batterier! Om du använder ett felaktigt
batteri kan det explodera.
• När indikatorlampan på monitorn blinkar grönt är det dags att byta batterier.
• När indikatorlampan på monitorn blinkar rött används fel typ av batterier.
2.2Monitornsplacering
Det medföljande fästet kan användas som bältesfäste eller som väggfäste
för en av enheterna.
2.3Attmonteramonitornpåväggen
1. Borra två hål med 33 mm mellanrum där du vill montera monitorn.
2. Sätt fast fästplattan på väggen med hjälp av de medföljande skruvarna och
pluggarna. (1)
3. Placera kameran så att piggen på fästplattan passar in i fästhålet på baksidan av
kameran. Tryck lätt inåt, för sedan kameran nedåt för att xera den på plats. (2)
2.4Bordsställ
Sätt monitorn i bordsstället för att få en annan vinkel.

20
SVENSKA
Övriga funktioner
Att spela in på en videobandspelare
1. Med monitorn följer en kabel med SCART- respektive 3,5 mm anslutning som kan
anslutas till en videobandspelare för inspelning.
2. Anslut 3,5 mm-kontakten på kabeln till uttaget märkt ”A/V out” på monitorn. (1)
Anslut sedan den andra änden av kabeln (SCART-anslutningen) till videoenheten. (2)
Läge för ljudaktivering (auto-läge)
I läget för ljudaktivering kan du ställa in känsligheten för hur hög ljudnivå det ska vara för
att monitorn ska aktiveras. Följ dessa steg för att använda ljudaktiveringsfunktionen:
1. Tryck på VOX-knappen på framsidan på monitorn. Detta stänger av bildskärmen,
men indikatorn för ”på” lyser. (1)
2. Ställ in känsligheten på lämplig nivå mellan 0 och 9. 0 för lägst känslighet och 9 för
maximal känslighet. (2)
3. När något ljud inne i samma rum som kameran når den förinställda nivån kommer
bildskärmen på monitorn att aktiveras automatiskt. Den stängs av igen efter ca 30
sek. OBS! I läget för ljudaktivering kan monitorn endast känna av signaler från en
kamera i taget.
Table of contents
Languages:
Other Clas Ohlson Baby Monitor manuals