Clean Air Optima CA-509Pro Smart User manual

Read these instructions carefully before you start using the Air Purifier and keep the manual for later usage.
Clean Air Optima Intelligent Air Purifier CA-509Pro Smart
© Copyright: Clean Air Optima
®
Manual
User manual
Gebrauchsanweisung
Gebruiksaanwijzing
Mode d’emploi
Manual del usuario
Instrukcja obsługi
Uživatelská příručka
Manual de utilizare
Naudotojo vadovas
Kasutusjuhend
Lietošanas pamācība
Руководство пользователя
Прирачник за користење
Find more languages on:
www.cleanairoptima.com/
info/manuals

2
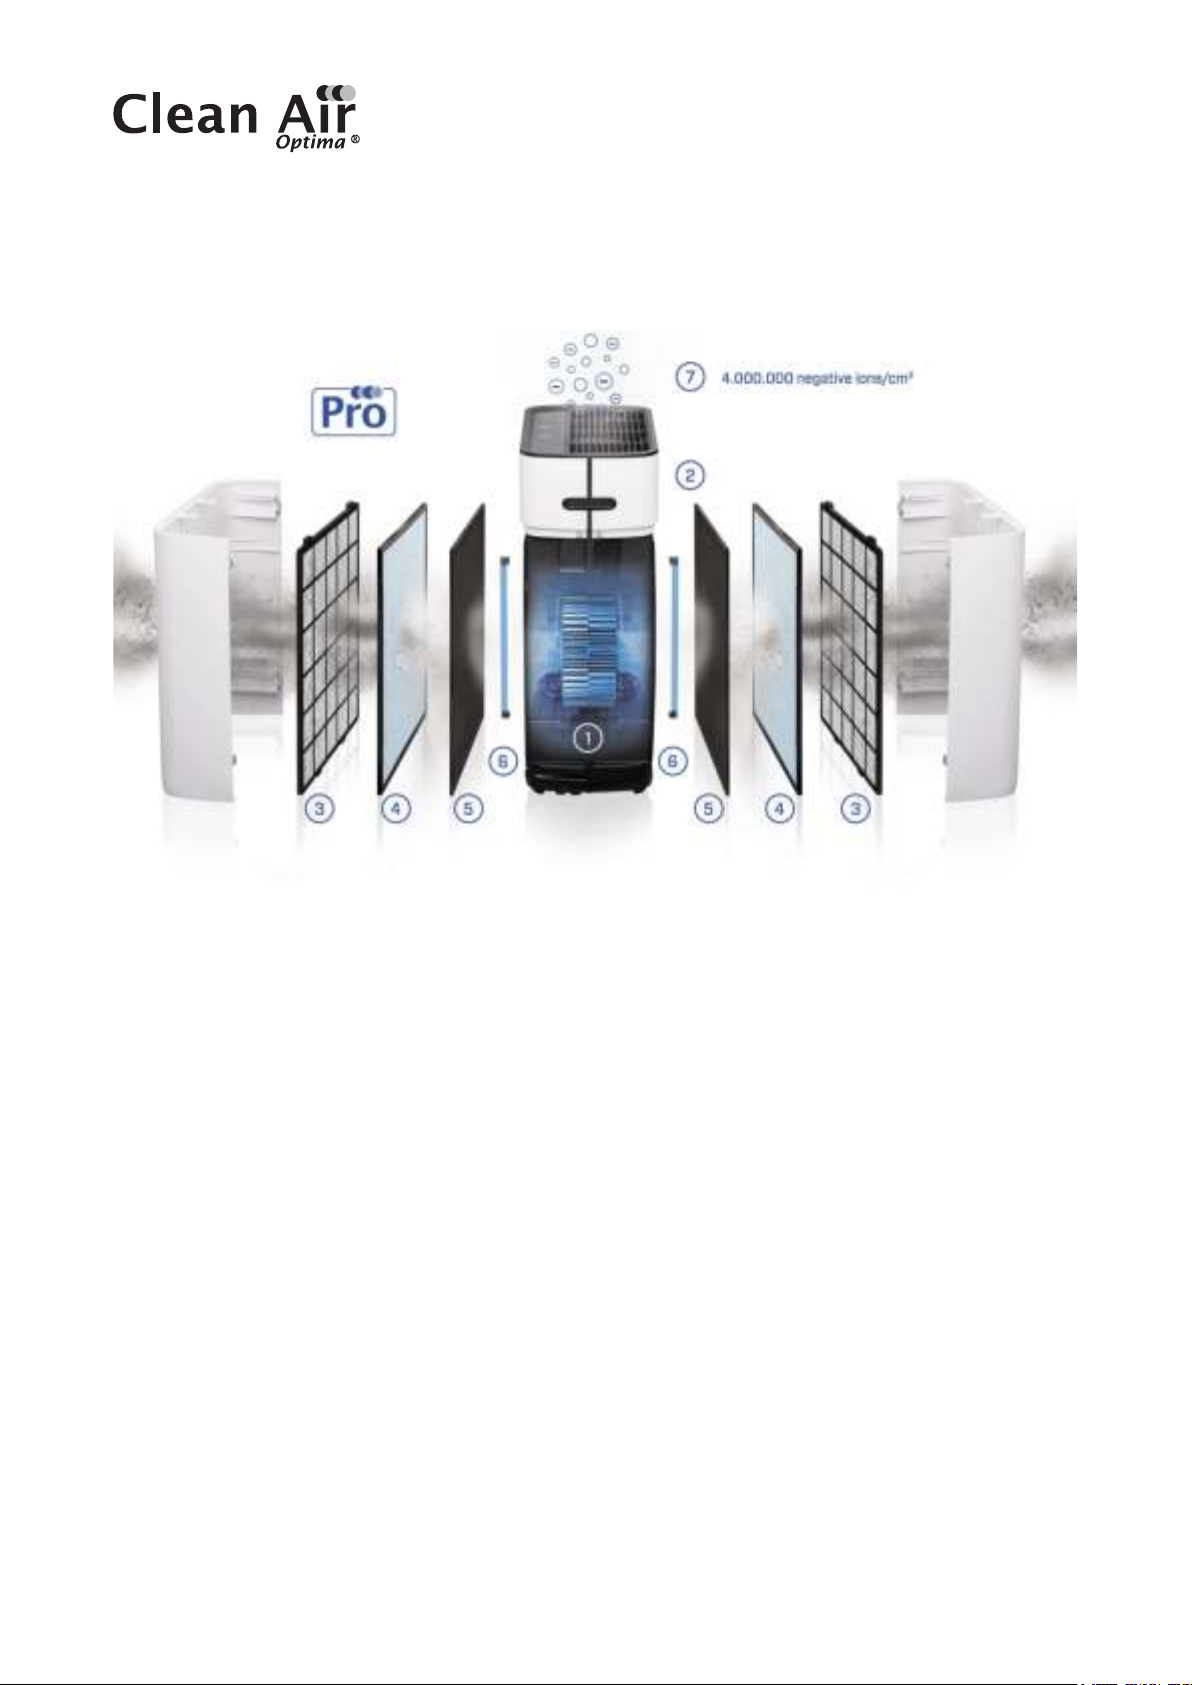
Dual Airflowsystem - Dual Filtersystem - Dual Ionizer
fordoubleairpurification!
1. Dual Fan
2. Intelligent Particle Sensor™
3. Pre-filter
4. Nano-Zilver True HEPA Filter
5. Activated Carbon Filter
6. UV LED lamp
7. Dual Ionizer

3
Doppeltes Lufstromsystem - doppeltes Filtersystem -
doppelterIonisator für doppelte Lufreinigung!
1. Doppel-Ventilator
2. Intelligent Particle Sensor™
3. Vorfilter
4. Nano-Zilver True HEPA-Filter
5. Aktivkohlefilter
6. UV Led Lampe
7. Doppelter Ionisator

4
Dubbel luchtstroomsysteem - dubbel filtersysteem -
dubbeleionisator voor dubbele luchtzuivering!
1. Dubbele ventilator
2. Intelligent Particle Sensor™
3. Voorfilter
4. True HEPA-filter van Nano-Zilver
5. Actieve-koolfilter
6. UV LED lamp
7. Dubbele ionisator

5
Dual Airflowsystem - Dual Filtersystem - Dual Ionizer
pourunedoublepurification d'air!
1. Double ventilateur
2. Intelligent Particle Sensor™
3. Préfiltre
4. Filtre nano-argent True HEPA
5. Filtre à charbon actif
6. Lampe UV LED
7. Double ioniseur
6
Sistema dual de circulación de aire - Sistema de filtrado dual -
Ionizador dual para una doble purificación del aire
1. Ventilador dual
2. Intelligent Particle Sensor™
3. Prefiltro
4. Filtro HEPA Nano-Zilver True
5. Filtro de carbón activo
6. Lámpara LED UV
7. Ionizador dual

7
Podwójny system przepływu powietrza – Podwójny system filtrów –
Podwójny jonizator zapewniający podwójne oczyszczanie powietrza!
1. Podwójny wentylator
2. Intelligent Particle Sensor™
3. Filtr wstępny
4. Filtr HEPA Nano-Zilver True
5. Filtr z węglem aktywnym
6. Lampa diodowa emitująca światło ultrafioletowe
7. Podwójny jonizator

8
Duální systém proudění vzduchu – duální systém filtrů –
duálníionizátor pro dvojité čištění vzduchu
1. Duální ventilátor
2. Inteligentní senzor částic Intelligent Particle Sensor™
3. Předřazený filtr
4. Filtr Nano-Zilver True HEPA
5. Filtr s aktivním uhlím
6. UV LED lampa
7. Duální ionizátor

9
Sistem dublu de fluxuri de aer - Sistem filtru dublu -
Ionizatordublupentru purificarea dublă a aerului!
1. Ventilator dublu
2. Senzor inteligent de particule™
3. Prefiltru
4. Filtru Nano-Zilver True HEPA
5. Filtru cu carbon activ
6. Lampă cu LED UV
7. Ionizator dublu

10
Dviguba oro srauto sistema, dviguba filtravimo sistema ir dvigubas
jonizatorius užtikrina dvigubą oro valymo efektą!
1. Dvigubas ventiliatorius
2. „Intelligent Particle Sensor™“
3. Pirminis filtras
4. „True HEPA“ filtras su sidabro nanodalelėmis
5. Aktyvintosios anglies filtras
6. UV LED lempa
7. Dvigubas jonizatorius

11
Kaks õhuvoolusüsteemi – kaks filtrisüsteemi – kaks ioniseerijat
õhukahekordseks puhastamiseks!
1. Kaks ventilaatorit
2. Intelligent Particle Sensor™
3. Eelfilter
4. Nano-Zilver True HEPA filter
5. Aktiivsöega filter
6. UV LED-pirni
7. DUO-ioniseerija

12
Divu gaisa plūsmu sistēma—Divu filtru sistēma— Divi jonizētāji
divkāršai gaisa attīrīšanai!
1. Divi ventilatori
2. Intelligent Particle Sensor™
3. Priekšfiltrs
4. Nano-Zilver True HEPA filtrs
5. Aktīvās ogles filtrs
6. UV LED lampa
7. Divi jonizētāji

13
Системадвойноговоздушногопотока-Системадвойной
фильтрации-Двойнойионизатордлядвойнойочисткивоздуха!
1. Вентилятор двойного действия
2. Интеллектуальный датчик частиц (Intelligent Particle Sensor™)
3. Фильтр предварительной очистки
4. Фильтр Nano-Zilver True HEPA
5. Фильтр с активированным углем
6. УФ светодиодная лампа
7. Двойной ионизатор

14
Двоенсистемнапротокнавоздухот-двоенсистемнафилтри-
двоенјонизаторзадвојнопрочистувањенавоздухот!
1. Двоен вентилатор
2. Intelligent Particle Sensor™
3. Пред-филтер
4. Нано-сребрен True HEPA филтер
5. Филтер со активен јаглен
6.
UV LED сијалички
7. Двоен јонизатор
15
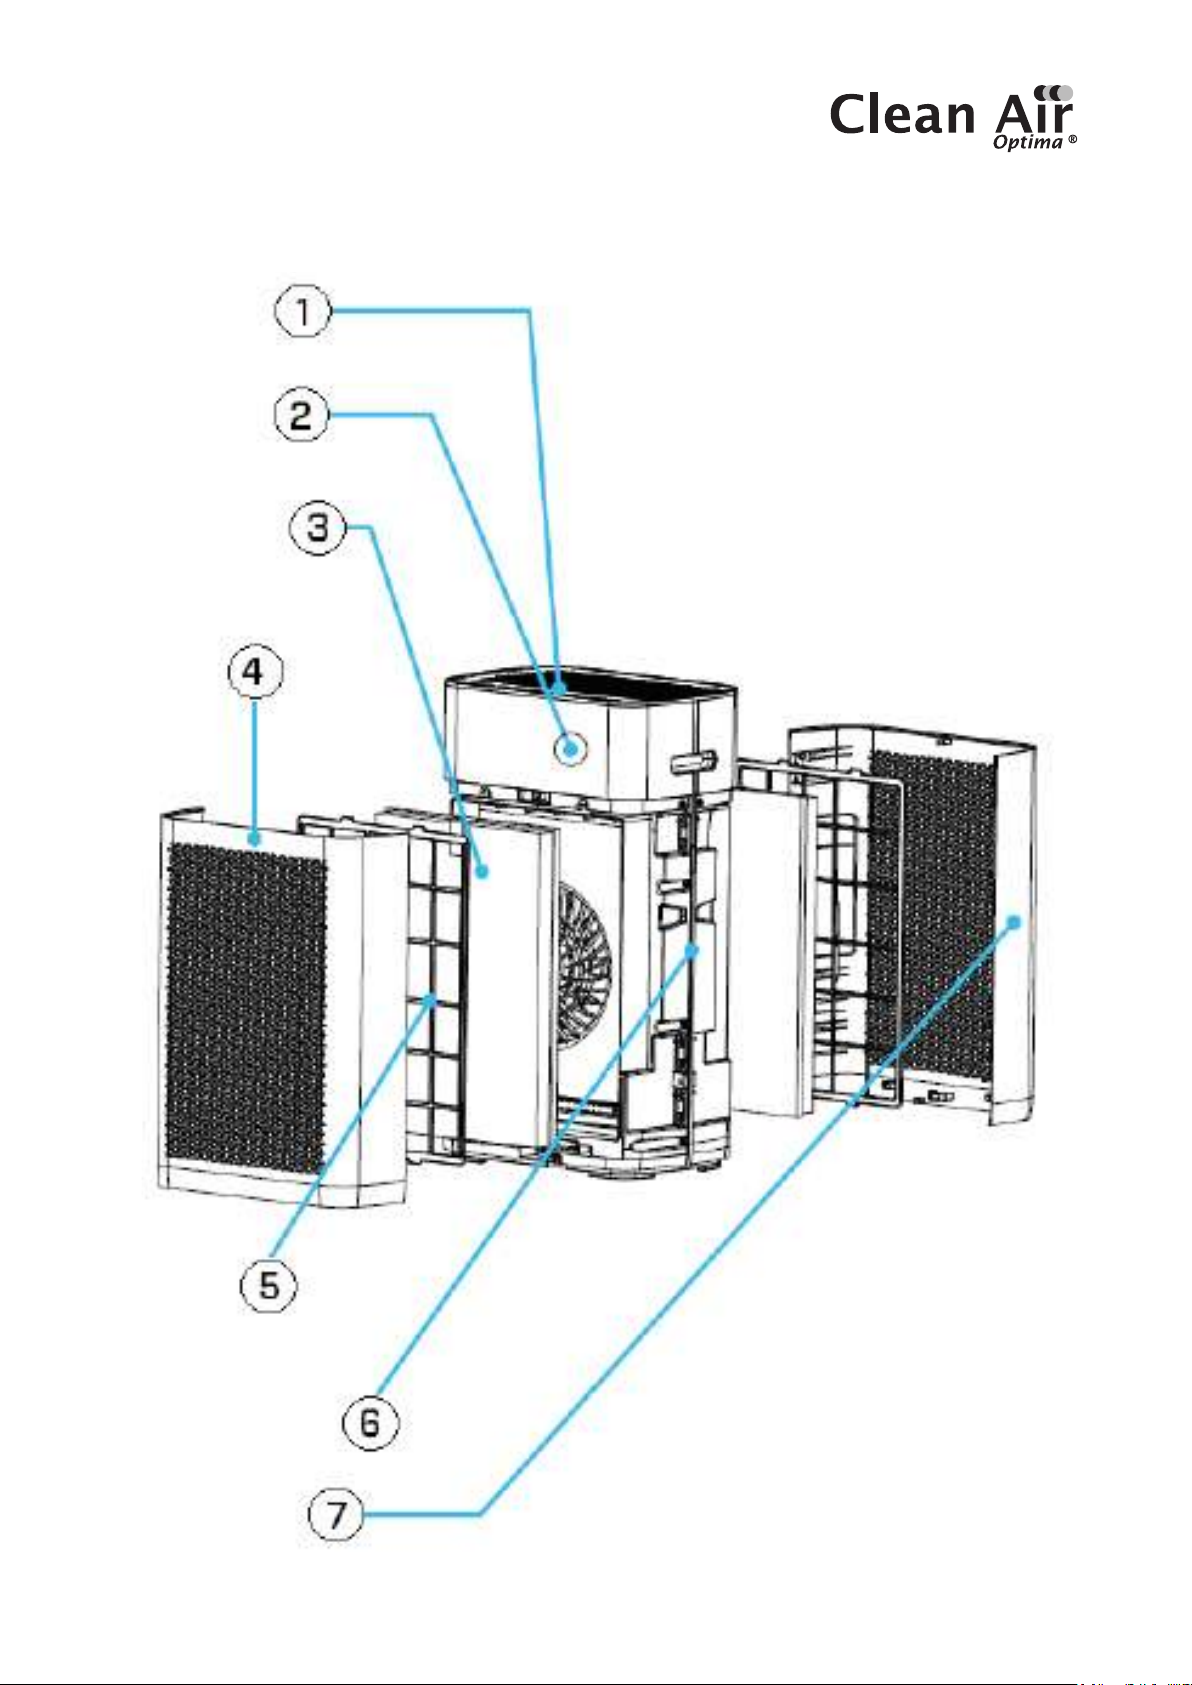
CA-509Pro Smart Parts / Main unit
16
English
Thank you for purchasing the Clean Air Optima Intelligent Air Purifier CA-509Pro
Smart.
We wish you many years of healthy indoor air with this ecient and eective product.
Ensure that all safety precautions are followed when using this electrical appliance for the proper
operation of the device. These instructions describe the safety precautions to be observed
during operation. They are meant to prevent injuries and to avoid damaging the device.
Before using your new Clean Air Optima Intelligent Air Purifier CA-509Pro Smart.
Remove the sealing from the filters first, see page 5. How to use.
Description of the appliance
The appliance consists of the following main components:
1. Control panel
2. Digital monitor indoor air quality
-PM2.5 Particle measurement
-Relative air humidity in %
-Temperature in °C
3. Composite filter: TRUE HEPA and Activated carbon filter
4. Front panel
5. Pre-filter
6. Main part of the air purifier
7. Rear panel

17
Safety warnings
This device may only be used in accordance with this safety instructions. Take the following
steps to minimize the risk of personal injury caused by for example electric shocks or fire.
1. Only for indoor use. Do not use or store outdoors.
2. The appliance is not intended to be used by children or persons with reduced physical,
sensory or mental capabilities, unless they are supervised by a person responsible
fortheirsafety.
3. Do not use the device when there is visible damage on the electrical cord or on the device
itself. Donot repair the device yourself in case of damage. Never pull the device by its cord.
If the power cord is damaged, then it must be replaced by an authorized service person
toprevent electric shock or fire.
4. Repairs may only performed by authorized service personal. Do not try to repair the device
yourself to prevent electric shock or fire.
5. Always remove the plug from the cord when the device is not being used.
6. Only use power cords provided.
7. Pull the plug when you do not use the device or when you clean internal or external parts of it.
8. For safety use put the device in a steady, horizontal position. Do not move while using.
9. Do not use the device in rooms where inflammable liquids or gases are stored, close to
heat sources or in particulary humid rooms like the bathroom.
10. Never insert any other object into the body to avoid breakdown.
11. Never cover the air inlet and air outlet grid.
12. Never dissemble or replace the device’s inner parts.
13. When the device is running, do not touch the air inlet and outlet grilles, and do not insert
thehandle or any object into the air outlet to avoid injury or damage to the air purifier.
14. To keep the inlet and outlet air grille of the air purifier unimpeded, do not place objects
above or near the front cover of the air purifier.
15. Do not put heavy objects on the unit.
16. Please avoid places with direct sunlight. There is a risk that the device discolors.
17. Never immerse the unit in water or other liquids.
18. Do not touch the power cord with wet hands.
19. Clean the Pre-filter regularly, if the Pre-filter is saturated with dust, it will lead to poor
purifying eect. The power consumption will increase, it can cause failure.
20.The normal operating environment of the device is 0 °C to 40 °C degrees.
21. Use, maintain and clean the device as described in this manual.

18
How to use (Filter installation for the front and the back)
The device needs to be positioned at least 30 cm from walls and furniture to obtain a good
airflow. Make sure that the air in-and outlets are not blocked.
1. Disassemble the panel
Press on the red indicated icon
on the left and right side on the
air purifier with both fingers, see
figure. Pull the panel towards you
like indicated by the blue arrows.
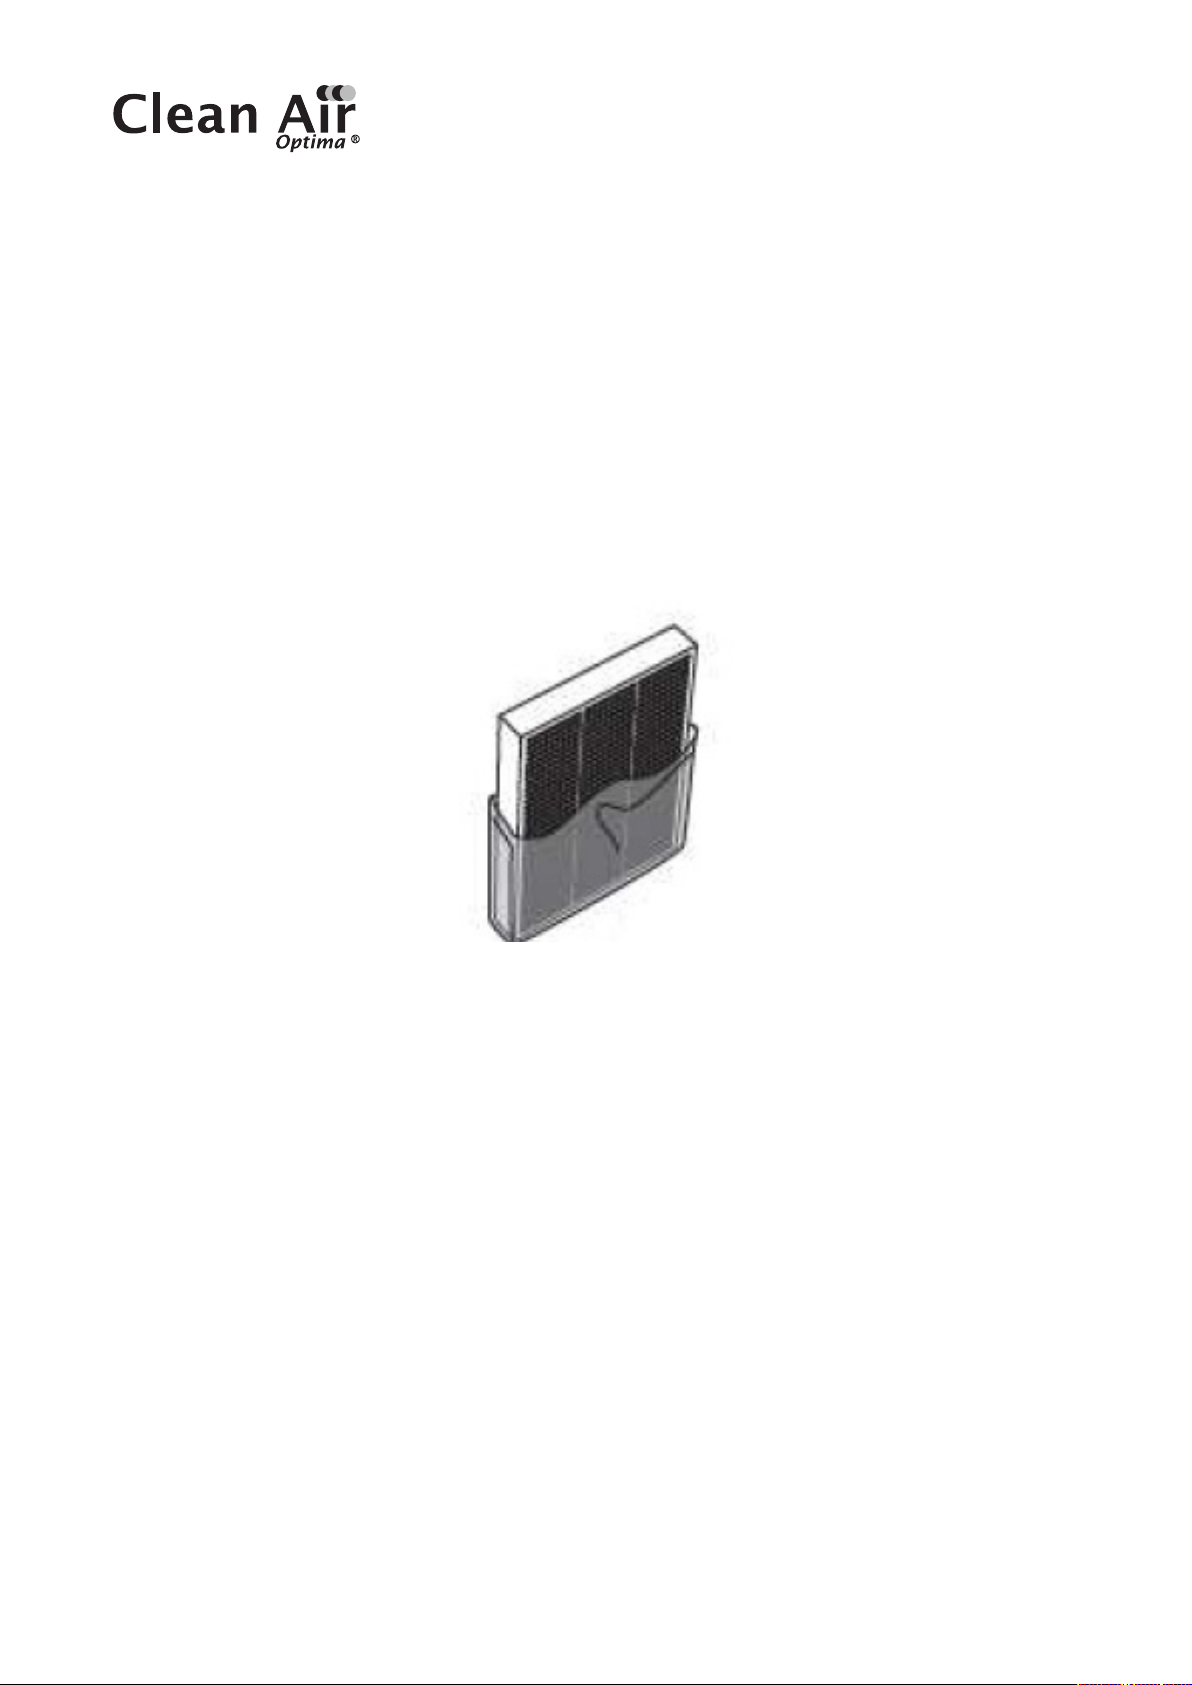
2. Install the composite filter
Remove the sealing from
thefilters. Place the filters
back into the device. The tap
onthebottum and the top must
be visible at the front (The HEPA
side from the filter is visible).
3. Install the Pre-filter
Install the Pre-filter with the black
bulge outward. Put its lower part
into the bottom slot and push
thetop (with the arrows on it)
gently into the upper slot.
4. Install the panel
Push the front panel parallel along
the upper and lower edges in the
direction shown in blue, see figure.
When you are hearing a click,
thenthe panel is installed.

19
Control Panel / Operation Instruction
1 Power Button
Pressing the Power button you turn the device on and o.
(Default is Auto mode after turning on the device).
2 Mode
Pressing the Mode button for Auto and Sleep function.
In the setting Auto the integrated smart sensor (Intelligent Particle Sensor™) measures and
regulates air quality automatically. The fan, controlled by a sensor anticipates automatically
to what extent indoor air is polluted by particles size PM2.5 and adapting to the 3 dierent
speeds accordingly.
In the setting Sleep the indicator light is bright. The indicator light including the digital display
will go o after 5 seconds. Press any key to restart the indicator light and the digital display.
The indicator light and digital monitor will goes out again after 5 seconds. (The fan is running
inthe lowest speed level).
3 Speed
By pressing the Speed button, you can change the speed level. The 3 fan speeds oer
individual air flow. (1-2-3 means the wind speed increases).
4 Timer
Press on the Timer button to set the timer to “switch of automatically” in a range between
1,4and 8 hours. The number of hours selected can be read on the display of the timer.
5 UV LED lamp
The UV LED lamps should be replaced after 8,000 hours of operation, or if the indicator light
(UV) on the display goes out.
6 Filter
If the indicator light flashes, the composite filter (HEPA and Activated Carbon Filter) must be
replaced. The composite filter has a lifespan of 2.000 hours.
7 WiFi
WiFi indicator.
2 + 3 Child Lock
Child lock protects from unwanted use of the device.
The child lock is switched on / o by pressing simultaneously both Mode and Speed buttons.
The indicator light child lock will be bright.
3 + 4 Filter Reset
Reset the timer for the composite filter by pressing and holding the button Speed and Timer
(for about 3 seconds). If the indicator light goes out, the timer has been successfully reset.
20
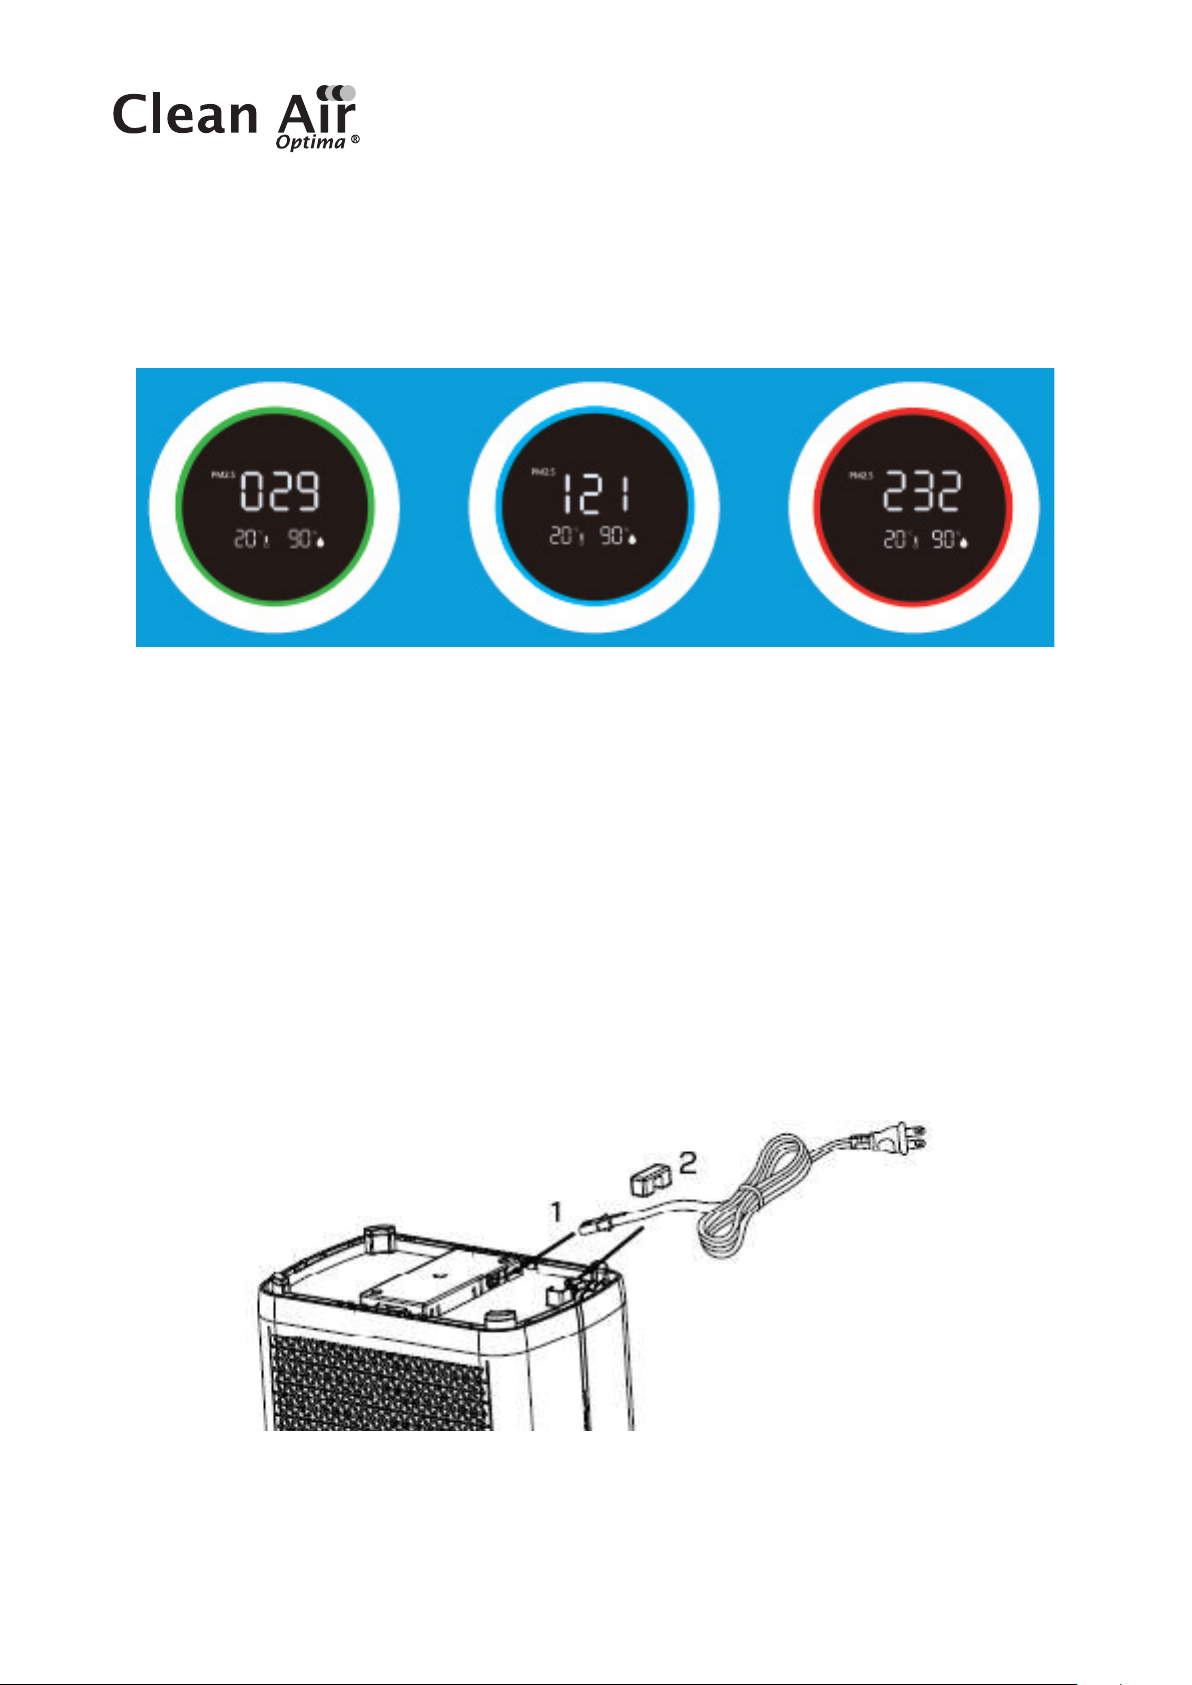
Digital Monitor
The digital monitor on the front side of the air purifier CA-509Pro Smart indicates
automatically andexactly current air quality by measuring the level of Particle measurement
PM2.5, indoorhumidity and temperature.
Green - Good: 0-80ug/m³Blue - Average: 80-150ug/m³Red - Bad: 150 ug/m³or more
Particulate matter of 10um (PM10) and smaller 2,5 um (PM2.5) can get into the lungs and
belongs to the top 10 threats for human health. These small particles develop through typical
indoor processes such as cooking, baking, frying, smoking, as well as heating or are also
transported in big quantities into indoor air because of transportation, industry, construction,
biological material (pollen, bacteria, mites, and viruses), imported particles from other regains
such as (airplane) exhaust gases and volcano eruptions.
Allergens such as pollen and dust cause serious and long-term health threats to millions
ofpersons each spring: the numbers are increasing constantly.
Measurement of relative humidity and temperature
Important aspects for eective air purification: relative humidity between 45 - 60% and room
temperature of about 20 - 23 °C
Power Cord
1. Remove the power cord glue from the bottom of the device and insert the end of the power
cord into the socket at the bottom of the device (as shown in figure 1).
2. Put the power line into the wire slot and fix it with the wire pressing adhesive (as shown
infigure 2).
Table of contents
Languages:
Other Clean Air Optima Air Cleaner manuals

Clean Air Optima
Clean Air Optima Smart CA-510Pro User manual

Clean Air Optima
Clean Air Optima Smart CA-510Pro User manual

Clean Air Optima
Clean Air Optima CA-704 User manual

Clean Air Optima
Clean Air Optima CA-508 User manual

Clean Air Optima
Clean Air Optima Compact Smart CA-503B User manual

Clean Air Optima
Clean Air Optima CA-503T Compact Smart User manual

Clean Air Optima
Clean Air Optima CA-502Pro Mini User manual

Clean Air Optima
Clean Air Optima CA-506 User manual


