Clean Air Optima CA-704 User manual

Model: CA-704 / CA-707
Read these instructions carefully before you start using this Clean Air Optima® device and keep the manual for later usage.
Clean Air Optima® 2in1: Dehumidifier & Air Purifier
© Copyright: Clean Air Optima
®
Manual
(EN) User manual
(DE) Gebrauchsanweisung
(NL) Gebruiksaanwijzing
(FR) Mode d’emploi
(ES) Manual del usuario
(PL) Instrukcja obsługi
(CZ) Uživatelská příručka
(RO) Manual de utilizare
(LT) Naudotojo vadovas
(EE) Kasutusjuhend
(LV) Lietošanas pamācība
Find more languages on:
www.cleanairoptima.com/
info/manuals
(RU) Руководство
пользователя
(MK) Прирачник за
користење

2
CA-704 / CA-707
Main unit

3
English
Thank you for purchasing the Clean Air Optima® 2in1: Dehumidifier & Air Purifier
CA-704 / CA-707.
We wish you many years of healthy indoor air with this ecient and eective product. Ensure
that all safety precautions are followed when using this electrical appliance for the proper
operation of the device. These instructions describe the safety precautions to be observed
during operation. They are meant to prevent injuries and to avoid damaging the device.
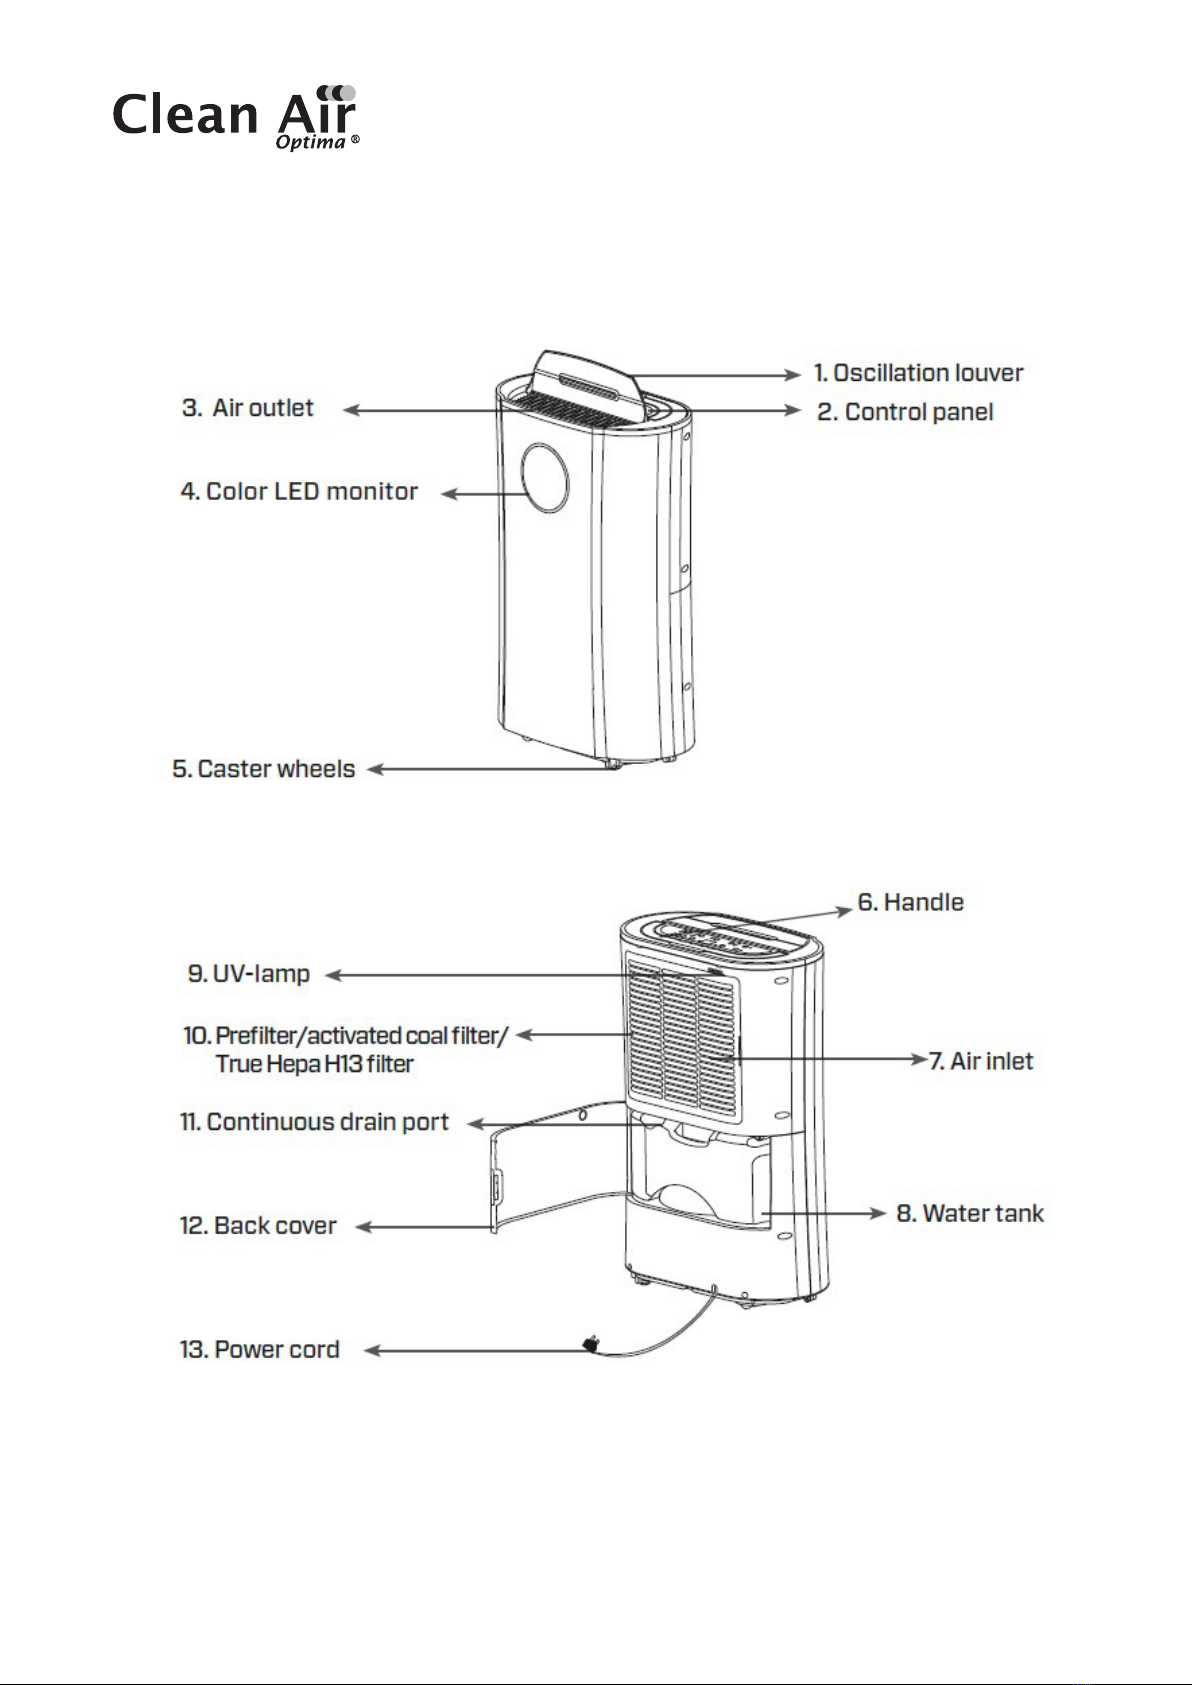
Description
This Clean Air Optima® device consists of the following main components:
1 . Oscillation louver
2. Control panel
3. Air outlet and Ionizer position
4. Color LED monitor indicates relative humidity in blue (below 60%), green
(between 60% - 80%) and red (above 80%)
5. Caster wheels
6. Handle
7. Air inlet
8. Water tank
9. UV-C Lamp
10. Air inlet and filter frame compartment, includes: Pre-filter, Activated Carbon Filter,
True HEPA H13 Filter
11. Continuous drain port
12. Back cover
13. Power cord

4
Safety warnings
This device may only be used in accordance with this safety instructions. Take the following
steps to minimize the risk of personal injury caused by for example electric shocks or fire.
1. Leave the device to stand for at least two hours before use, especially after
transportation.
2. Only for indoor use. Do not use or store outdoors.
3. Use proper voltage: AC 220V – 240V, 50Hz.
4. Allow a free space of min. 20 cm around the air inlet and air outlet of the device.
5. The appliance is not intended to be used by children or persons with reduced physical,
sensory or mental capabilities, unless they are supervised by a person responsible
for their safety.
6. Do not use the device when there is visible damage on the electrical cord or on the device
itself. Do not repair the device yourself in case of damage. Never pull the device by its
cord. If the power cord is damaged, then it must be replaced by an authorized service
person to prevent electric shock or fire.
7. Repairs may only performed by authorized service personal. Do not try to repair the
device yourself to prevent electric shock or fire.
8. Do not touch the power cord and plug with wet hands.
9. Always switch o the device before disconnecting the plug.
10. Never attempt to turn o the device by disconnecting the plug.
11. Pull the plug when you do not use the device or when you clean internal or external parts
of it.
12. For safety use put the device in a steady, horizontal position. Do not move while using.
13. Refrigerant: R290. This refrigerant complies with European environmental regulations.
No part of the cooling circuit may be perforated.
14. Do not use the device in rooms where inflammable liquids, gases are stored or close
to heat sources like radiator, fire place or heat-generating devices like ceramic heater.
15. Never insert any other object into the body to avoid breakdown.
16. Never cover the air inlet and air outlet grid.
17. Never dissemble or replace the device’s inner parts.
18. Use and store the device not under 5°C or above 32°C.
19. Do not tip the unit to any side when the water tank is full.
20. Do not put heavy objects on the unit.
21. Please avoid places with direct sunlight. There is a risk that the device discolors.
22. Never immerse the device in water or other liquids.
23. Empty the water tank regularly. In extreme conditions the water tank may be full after a
few hours operation.
24. Clean the Pre-filter regularly, if the Pre-filter is saturated with dust, it will lead to poor
purifying and dehumidifying eect. The power consumption will increase, it can cause
failure.
25. Replace the Activated Carbon Filter and True HEPA H13 Filter every 3 – 6 months, if the
Activated Carbon Filter and True HEPA H13 Filter are saturated, it will lead to poor
purifying and dehumidifying eect. The power consumption will increase, it can cause
failure.
26. Use, maintain and clean the device as described in this manual.

5
Installation
Make sure that the distance from the device is 20 cm away from walls and furniture, see the
illustration below.
Before using your new Clean Air Optima® 2in1: Dehumidifier & Air Purifier CA-704 /
CA-707.
Remove the sealing from the filters first, see page 9.

6
Control panel / Operation instruction
Power
Press the Power Button to activate the device
Press the Power Button again, the device turns o.
MODE
Press the MODE Button to select one of four desired programs:
1. Smart Mode: Desired humidity set to 55% relative humidity and the fan is auto-
matically adjusted depending on the current humidity level.
The desired humidity can not be changed in this mode.
2. High/ Low Mode: Select the Fan speed, the desired humidity can then be
adjusted using the +and -buttons.
3. Fan Mode: Continuous air purification (low fan speed, no dehumidifying
function).
Air purification
If the desired humidity level is reached at a constant level, you can switch to program
3 to use the device for continuous air purification.
Humidity Button
By pressing the up or down button, you can select the desired humidity
level. The required humidity level is displayed (from 35% to 80% in
increments of 5%). Once you select your desired humidity level, simply stop pressing
the +or -button and your humidity level will be set.
When the humidity level in the room reaches the set humidity level, the device will
stop dehumidifying.
When the room’s actual humidity level increases again above your set humidity level,
then the device will start dehumidifying and air purifying again.
If the relative humidity is set to 35%, the compressor will only stop when the water
tank is full.
UV and ION
After pressing once, the UV function is switched on.
After pressing twice, the ION function is switched on.
After pressing three times, the UV and ION functions are switched on.
After pressing four times, the UV and ION functions are switched o.
UV sterilization technology is accepted for more than fifty years and it has been
proven that it can considerably reduce the number of bacteria and polluting
substances in the air safely.

7
Pressing the Negative Ion Button will activate the negative ion generator with a total
capacity of > 3.000.000 negative ions / cm²that are spread through out the entire
room and thereby neutralize pollutants and smells. Negative ions attach onto dust
particles, microorganisms and other unwanted particles in the air and connect them
to each other. This way, the particles become heavier than air and fall onto the
ground so that you can no longer breathe them in.
Negative ions are most found in the forest, mountains and by the sea.
Negative ions ensures fresh and healthy air.
Timer
Press the Timer Button to set 0-24 hours timing. Use button + and -to
set the time period (0-24 hours). When the device is operating, the timer that is set
indicates when the device switches o. If the device is in stand-by mode, the timer
that is set is to instruct the device when to turn on.
Sleep
Press the Sleep Button and the sleep mode is activated, the display will turn o (The
fan is running in the lowest speed level).
Press the Sleep Button to switch back again in the settings before.
Laundry Mode
Press the Laundry Mode button and the drying mode is activated.
The humidity is set at 35% and is not adjustable. The compressor does not stop and
continues to run until the water tank is full or if the function is turned o.
OSC oscillating function/ Child lock
The oscillation function ensures good air distribution in the room. Oscillating
distributes the air evenly. There are two positions, fixed or moving.
Child Lock is switched on / o by pressing the Child Lock Button for ca. 3 seconds.
Child Lock protects from unwanted use of the device.
Water Tank Full Indicator Light
When the water tank is full, the device will stop automatically. The Water Tank Full
Indicator Light turns on and lights up. Drain the water tank, and return the water
tank to the body of the device, the Water Tank Full Indicator Light will turn o. The
device will work automatically again.
Defrosting Indicator Light
The evaporator in the dehumidifier may defrost automatically if it is operated with a
room temperature less than 18 °C. The defrosting device in the dehumidifier may
start up and operate for some time (about 8 minutes) automatically.
- During the defrosting operation, the dehumidification function and air purification function
may intermit.
- Don’t turn of the power or pull out the power plug of the device during the defrosting
operation.

8
Water Drainage
The Water Tank Full Indicator Light will light up when the water tank is full. Take out the water
tank and empty the water inside. Then put the water tank back into the dehumidifier correctly,
see the illustration below.
• Open the back cover
of your device
• Hold the water tank
by its handIe
• Pull the water tank
out carefully
• Empty the water tank
Continuous Drainage
For continuous operation you can use the drain hose of 1 meter long that is included.
Remove the water tank and install the hose to the water drain hose connection correctly,
seethe illustration below.
Maintenance
Cleaning the housing of the Clean Air Optima® dehumidifier
1. Switch o the device and pull the plug.
2. Use a soft and humid piece of cloth to clean the device. Do not use chemical solvent such
as benzene, alcohol or gasoline.
3. Make sure that no water gets into the device, do not sprinkle with water.

9
Replacing of filters
The Clean Air Optima CA-704 / CA-707 is equipped with a filter lifespan surveillance mecha-
nism that signals that the filter (HEPA + Activated Carbon Filter) have to be replaced after 500
working hours. To show that the filter need to be replaced, the dehumidifier emits a double zero
indicator light. Reset the timer for the filter by pressing and holding the laundry button
for about 3 seconds. If the indicator light goes out, the timer has been successfully reset.
Depending on the use, the Activated Carbon Filter and True HEPA H13 Filter has a lifespan of
approx. 3 – 6 months. The Pre-filter and UV-C lamp are permanent, no replacement needed.
Take out the filters from the filter frame compartment. After filter replacement or filter
cleaning reinstall the filters back into the filter frame compartment and assemble back to the
device, see the illustration below.
Filter cleaning
The best eect for a longer lifespan of the Filters is reached by cleaning the filters once a
month. If indoor air is extremely polluted, we advice to clean the filters more often ca. once per
two weeks.
Clean the Pre-filter, Activated Carbon Filter and True HEPA H13 Filter carefully with a brush or
your vacuum cleaner. That way bigger dust particles like lint, hair, dust and dander of pets can
be removed from the filters.

10
Room temperature increases during operation
The Clean Air Optima® dehumidifier doesn’t have a cooling function. The device will produce
heat during operation and increase the room temperature between 1 °C to 4 °C.
Dehumidifying capacity
The illustration below shows the dehumidifying capacity of the Clean Air Optima® dehumidifier.
By dierent temperatures and relative humidity, the dehumidifier may have dierent
dehumidifying capacities.
Humidity 80%
Dehumidifying capacity
Room temperature
Warning!
Do not damage the filters, the filters must not be cracked. Damaged filters needs to be
replaced.
Never wet or rinse the filters (Only for Activated Carbon Filter and True HEPA H13 Filter)
withwater. Filters that are rinsed with water needs to be replaced.
Signs for used up filters that needs to be replaced
(Only for Activated Carbon Filter and True HEPA H13 Filter)
Increased sound, reduced air flow, congested filters, rising presence of smells. Filters needs
also to be replaced by new ones when the True HEPA H13 Filter changes its color from white to
grey or black. If the True HEPA H13 Filter remains white, there is NO need to replace the filters.
How to order filters:
Contact Clean Air Optima® Customer Service tel. + 31 (0) 742670145 or visit our webshop:
https://www.cleanairoptima.com/accessoires/mg/44/
Clean Air Optima® dehumidifier storage
If the dehumidifier will not be used for an extended period of time:
1. Drain the water tank completely and make sure that there is no water stocked
inside the water tank.
2. Unplug the device and fold up the power supply cord.
3. Remove and clean the filters. After cleaning reinstall the filters back into the device.
4. Store the dehumidifier in a cool, dry location, away from direct sunlight, extreme
temperature and excessive dust.

11
Troubleshooting
The following is a troubling shooting guide to help you solve any issues that you may have
using the Clean Air Optima® dehumidifier CA-704 / CA-707.
Problem Possible Cause Solution
Device does not
switch on
Ineciency
dehumidification
The power cord does not
connect correctly
The water tank is full or water
tank is not in the correct
position
The filters are blocked by dust
The air inlet and outlet have
ablockage
The setting humidity is higher
than environmental humidity
The dehumidifier is in
Continuous air purification
MODE
Connect the power plug and
power socket correctly
Drain the water tank and replace
the water tank to the correct
position
Clean or replace the filters
Clean the blockage from the air
inlet and outlet
Set the humidity at least 5%
lower than environmental
humidity
Change the operation MODE
Noise The device is installed askew
The filters are blocked
Make sure the device is installed
uprightly
Clean or replace the filters
Operation stops during
spot dehumidifying The room temperature is higher
than the usable operating
temperature
The dehumidifying operation will
be started automatically when
the temperature lowers
Washed clothes are
not dried
The room temperature is to low
Washed clothes are hard to be
dried under low temperature
conditions

12
WARNING!
If the above recommended solutions do not work, please contact Clean Air Optima® technical
support at the telephone number for your region. Do not attempt to disassemble, reassemble,
or repair the device as this may void the warranty.
Specifications CA-704
Model CA-704
For rooms up to 40m²/ 100m³/ 430ft²
Rated voltage 220V - 240V, 50Hz
Rated power 165W
Fan capacity 180 m³/h
Dehumidifying capacity 12 liters per day at 30°C and 80%RH
Working temperature range 5°C - 32°C
Water tank 4 liter
Air purification with: Pre-Filter, Activated Carbon Filter, True HEPA H13 Filter,
UV-C lamp, Ionizer
Filter performance 99,97%, Sterilization rate 99.9%
Negative ion >3.000.000 ions/cm²
Sound level Silent fan < 38dB(A) Low / 42dB(A) High
Drain hose 1 meter
Dimensions 580 x 380 x 205mm
Weight 13.3kg
Colour White/ black
Refrigerant R290 / 50g
Complies with EU regulations CE / WEEE / RoHS
Specifications CA-707
Model CA-707
For rooms up to 70m²/ 175m³/ 750ft²
Rated voltage 220V - 240V, 50Hz
Rated power 270W
Fan capacity 180 m³/h
Dehumidifying capacity 20 liters per day at 30°C and 80%RH
Working temperature range 5°C - 32°C
Water tank 4 liter
Air purification with: Pre-Filter, Activated Carbon Filter, True HEPA H13 Filter,
UV-C lamp, Ionizer
Filter performance 99,97%, Sterilization rate 99.9%
Negative ion >3.000.000 ions/cm²
Sound level Silent fan < 39dB(A) Low / 42dB(A) High
Drain hose 1 meter
Dimensions 580 x 380 x 205mm
Weight 13.8kg
Colour White / black
Refrigerant R290 / 75g
Complies with EU regulations CE / WEEE / RoHS

13
Ask your retailer or your municipality for updated information regarding
the disposal of the packaging and of the device.
Danger
Natural refrigerant propane (R290)!

14
Service
Warranty Certificate for the Clean Air Optima® Dehumidifier
CA-704 / CA-707.
Date of purchase: …………………………………………………………………………………………
Customers name: …………………………………………………………………………………………
Address: …………………………………………………………………………………………………….
Telephone: ………………………………………………………………………………………………….
Email: ………………………………………………………………………………………………………..
Seller’s name: ……………………………………………………………………………………………...
Address: …………………………………………………………………………………………………….
1. Please fill in completely this Warranty Certificate. Send it with the invoice and the unit,
postage pre-paid and using the original packing box, to your distributor. Make sure to include
the appropriate return postage for the package.
2. Please enclose a short description of the damage, fault or malfunction, and the circum-
stances under which these problems arose.
The Clean Air Optima® Dehumidifier CA-704 / CA-707 is subjected to strict
testing procedures before leaving the factory. If within two years from the date of purchase
the product does not perform according to the specifications, because of factory defects, the
purchaser is entitled to free repairs or replacement of parts upon presentation of this warranty
(provided that the malfunction or damage to the device and/or parts occurred under normal
operating conditions). What is covered: All parts defective in material and workmanship. For
how long: two years from purchase date. What we will do: Repair or replace any defective parts.
Other Conditions
The provisions of this warranty are in lieu of any other written warranty whether express or
implied, written or oral, including any warranty of merchantability or fitness for a particular
purpose. The manufacturer’s maximum liability shall not exceed the actual purchase price paid
by you for the product. In no event shall the manufacturer be liable for special, incidental,
consequential, or indirect damages. This warranty does not cover a defect that has result-
ed from improper or unreasonable use or maintenance, faulty assembly, accident, natural
catastrophes, improper packing, or unauthorized tampering, alteration, or modification as
determined solely by us. This warranty is void if the label bearing the serial number has been
removed or defaced.

15
Thank you
for reading!
Share your feedback about the Clean Air Optima®
Dehumidifier CA-704 / CA-707 on:
www.cleanairoptima.com
For frequently asked questions about the CA-704 / CA-707
go to: www.cleanairoptima.com and search for the CA-704 /
CA-707
Download PDF instruction manual on:
www.cleanairoptima.com/info/manuals
Watch all Clean Air Optima® Product
animation video’s on:
www.youtube.com
Clean Air Optima International B.V. | David Ricardostraat 9-7 / 9-9 | 7559 SH Hengelo (ov)
The Netherlands | Phone: +31 (0) 74 - 2670145
Clean Air Optima Germany GmbH | Enschedestraße 14 | 48529 Nordhorn | Germany
Phone: +49 (0) 5921 879-121

16
CA-704 /CA-707
Hauptgerät

17
Deutsch
Vielen Dank, dass Sie sich für den Clean Air Optima® 2 in 1 entschieden haben:
Luftentfeuchter und Luftreiniger CA-704 /CA-707.
Wir wünschen Ihnen viele Jahre gesunde Raumluft mit diesem ezienten und eektiven
Produkt. Treen Sie für die ordnungsgemäße Funktion dieses elektrischen Geräts unbedingt
alle Sicherheitsvorkehrungen, wenn Sie das Gerät verwenden. Diese Anleitung beschreibt
die Sicherheitsvorkehrungen, die im Betrieb zu beachten sind. Sie sind dafür vorgesehen,
Verletzungen vorzubeugen und Beschädigungen am Gerät zu vermeiden.
Beschreibung
Dieses Clean Air Optima® Gerät besteht aus den folgenden Hauptkomponenten:
1. Schwingungsschlitz
2. Bedienfeld
3. Luftauslass und Ionisatorposition
4. Der Farb-LED-Monitor zeigt die relative Luftfeuchtigkeit in Blau (unter 60 %),
Grün(zwischen 60 % - 80 %) und Rot (über 80 %) an
5. Laufrollen
6. Gri
7. Lufteinlass
8. Wassertank
9. UV-C-Lampe
10. Lufteinlass- und Filterrahmenfach, einschließlich: Vorfilter, Aktivkohlefilter,
True HEPA H13-Filter
11. Wasserablass
12. Verschluss
13. Stromkabel

18
Sicherheitshinweise
Dieses Gerät darf nur in Übereinstimmung mit diesen Sicherheitshinweisen verwendet werden.
Führen Sie die folgenden Schritte aus, um das Verletzungsrisiko für Personen (z.B.durch
Stromschläge oder Feuer) zu minimieren.
1. Lassen Sie das Gerät vor dem Gebrauch mindestens zwei Stunden stehen, vor allem nach
dem Transport.
2. Nur für Innenräume geeignet. Nicht im Freien verwenden oder lagern.
3. Die richtige Spannung verwenden: AC 220V – 240V, 50Hz.
4. Lassen Sie um den Lufteinlass und den Luftauslass des Geräts einen Freiraum
vonmindestens 20 cm.
5. Das Gerät ist nicht für die Verwendung durch Kinder oder Personen mit eingeschränkten
körperlichen, sensorischen oder geistigen Fähigkeiten bestimmt, es sei denn, diese Personen
werden von einer für ihre Sicherheit verantwortlichen Person beaufsichtigt.
6. Verwenden Sie das Gerät nicht, wenn sichtbare Schäden am Netzkabel oder am Gerät selbst
vorhanden sind. Reparieren Sie das Gerät nicht selbst, wenn es beschädigt ist. Ziehen Sie
das Gerät niemals an seinem Kabel. Wenn das Netzkabel beschädigt ist, muss es von einer
autorisierten Person ausgetauscht werden, um einen Stromschlag oder Brand zu vermeiden.
7. Reparaturen dürfen nur von befugtem Servicepersonal durchgeführt werden. ZurVermeidung
von Stromschlägen und Bränden sollten Sie nicht versuchen, das Gerät selbst zu reparieren.
8. Das Netzkabel nicht mit nassen Händen berühren.
9. Immer das Gerät ausschalten, bevor Sie den Netzstecker abziehen.
10. Versuchen Sie niemals, das Gerät durch Ziehen des Steckers auszuschalten.
11. Den Netzstecker aus der Steckdose ziehen, wenn Sie das Gerät nicht benutzen oder wenn Sie
innere oder äußere Teile des Geräts reinigen.
12. Zur Sicherheit das Gerät in eine stabile, horizontale Position stellen. Während des Gebrauchs
nicht bewegen.
13. Kältemittel: R290. Dieses Kältemittel entspricht den europäischen Umweltvorschriften.
KeinTeil des Kühlkreislaufs darf perforiert sein.
14. Verwenden Sie das Gerät nicht in Räumen, in denen brennbare Flüssigkeiten oder Gase
gelagert werden, in der Nähe von Wärmequellen oder in besonders feuchten Räumen
(wieim Badezimmer).
15. Nie andere Gegenstände in das Gehäuse einführen, um Ausfällen vorzubeugen.
16. Nie den Lufteinlass und das Luftauslassgitter abdecken.
17. Nie die inneren Teile des Geräts zerlegen oder ersetzen.
18. Verwenden und lagern Sie das Gerät nicht unter 5°C oder über 32°C.
19. Neigen Sie das Gerät nicht zur Seite, wenn der Wassertank voll ist.
20. Keine schweren Gegenstände auf das Gerät stellen.
21. Bitte Orte mit direktem Sonnenlicht vermeiden. Es besteht die Gefahr, dass das
Gerätausbleicht.
22. Das Gerät niemals in Wasser oder andere Flüssigkeiten eintauchen.
23. Den Wassertank regelmäßig entleeren. Unter extremen Bedingungen kann der Wassertank
bereits nach wenigen Stunden voll sein.
24. Der Vorfilter sollte regelmäßig gereinigt werden, da ein mit Staub gesättigter Vorfilter zu einer
schlechten Reinigungs- und Entfeuchtungswirkung führt. Die Leistungsaufnahme steigt,
eskann zu Ausfällen führen.
25. Tauschen Sie den Aktivkohlefilter und den True HEPA H13-Filter alle 3 bis 6 Monate aus. Wenn
der Aktivkohlefilter und der True HEPA H13-Filter voll sind, wird die Reinigungs- und Entfeuch-
tungswirkung beeinträchtigt. Die Leistungsaufnahme steigt, es kann zu Ausfällen führen.
26. Verwenden, warten und reinigen Sie das Gerät wie in dieser Anleitung beschrieben.

19
Installation
Achten Sie darauf, dass das Gerät 20 cm von Wänden und Möbeln entfernt steht (sieheAbbil-
dung unten).
Vor Verwendung Ihres neuen Clean Air Optima® 2 in 1 Luftentfeuchter und Luftreiniger
CA-704 /CA-707.
Entfernen Sie zuerst die Versiegelung von den Filtern (siehe Seite 23).

20
Bedienfeld/Bedienungsanleitung
Leistung
Drücken Sie die Power-Taste, um das Gerät einzuschalten.
Wenn Sie erneut auf die Taste Power drücken, schaltet sich das Gerät aus.
MODUS
Drücken Sie die MODE-Taste, um eines der vier gewünschten Programme auszu-
wählen:
1. Intelligenter Modus (Smart): Die gewünschte Luftfeuchtigkeit wird auf 55 %
relative Luftfeuchtigkeit eingestellt und das Gebläse wird automatisch an die
aktuelle Luftfeuchtigkeit angepasst. Die gewünschte Luftfeuchtigkeit kann in
diesem Modus nicht geändert werden.
2. Hoch/Niedrig-Modus (Low/ High): Wählen Sie die Gebläsegeschwindigkeit, die
gewünschte Luftfeuchtigkeit kann dann mit den +und -Tasten eingestellt
werden.
3. Fan-Modus: Kontinuierliche Luftreinigung (niedrige Gebläsegeschwindigkeit,
keine Entfeuchtung).
Luftreinigung
Wenn die gewünschte Luftfeuchtigkeit stabil erreicht ist, können Sie auf Programm
3umschalten, um das Gerät zur kontinuierlichen Luftreinigung zu verwenden.
Humidity-Taste
Durch Drücken der +oder -können Sie die gewünschte
Luftfeuchtigkeit einstellen. Die gewünschte Luftfeuchtigkeit wird ange
zeigt (von 35 % bis 80 % in Schritten von 5 %). Sobald Sie die gewünschte Luft
feuchtigkeit aus gewählt haben, lassen Sie die Taste einfach los und die Luft
feuchtigkeit ist eingestellt. Wenn die Luftfeuchtigkeit im Raum den eingestellten
Wert erreicht, stoppt das Gerät die Luftentfeuchtung. Wenn die tatsächliche Luft
feuchtigkeit im Raum wieder über den eingestellten Wert ansteigt, beginnt das Gerät
erneut mit der Entfeuchtung und Luftreinigung. Wenn die relative Luftfeuchtigkeit
auf 35 % eingestellt ist, schaltet sich der Kompressor erst ab, wenn der Wassertank
voll ist.
UV und ION
Nach einmaligem Drücken wird die UV-Funktion eingeschaltet.
Nach zweimaligem Drücken wird die ION-Funktion eingeschaltet.
Nach dreimaligem Drücken werden die Funktionen UV und ION eingeschaltet.
Nach viermaligem Drücken werden die Funktionen UV und ION ausgeschaltet.
Die UV-Entkeimungstechnologie ist seit über fünfzig Jahren anerkannt und kann
nachweislich die Zahl der Bakterien und Schadstoe in der Luft erheblich und
sicher reduzieren.
Other manuals for CA-704
1
This manual suits for next models
1
Table of contents
Languages:
Other Clean Air Optima Air Cleaner manuals

Clean Air Optima
Clean Air Optima CA-503T Compact Smart User manual

Clean Air Optima
Clean Air Optima CA-502Pro Mini User manual

Clean Air Optima
Clean Air Optima CA-506 User manual

Clean Air Optima
Clean Air Optima CA-509Pro Smart User manual

Clean Air Optima
Clean Air Optima Compact Smart CA-503B User manual

Clean Air Optima
Clean Air Optima Smart CA-510Pro User manual

Clean Air Optima
Clean Air Optima CA-508 User manual

Clean Air Optima
Clean Air Optima Smart CA-510Pro User manual