Clearlight HALOONE User manual

USER MANUAL


Contents
01. Welcome to HALOONE™Halotherapy . . . . . . . . . . . . . . . . . . . . . . . . . . . . . . . . . . . . . . . . . . . . . . . . 2
02. Intended Use . . . . . . . . . . . . . . . . . . . . . . . . . . . . . . . . . . . . . . . . . . . . . . . . . . . . . . . . . . . . . . . . . . . 3
03. Safeguards . . . . . . . . . . . . . . . . . . . . . . . . . . . . . . . . . . . . . . . . . . . . . . . . . . . . . . . . . . . . . . . . . . . . . 3
04. Safety Precautions . . . . . . . . . . . . . . . . . . . . . . . . . . . . . . . . . . . . . . . . . . . . . . . . . . . . . . . . . . . . . . . 4
05. Packaging. . . . . . . . . . . . . . . . . . . . . . . . . . . . . . . . . . . . . . . . . . . . . . . . . . . . . . . . . . . . . . . . . . . . . . 5
06. HALOONE™Unit . . . . . . . . . . . . . . . . . . . . . . . . . . . . . . . . . . . . . . . . . . . . . . . . . . . . . . . . . . . . . . . . 6
07. Installation . . . . . . . . . . . . . . . . . . . . . . . . . . . . . . . . . . . . . . . . . . . . . . . . . . . . . . . . . . . . . . . . . . . . . 7
08. Operating the HALOONE™. . . . . . . . . . . . . . . . . . . . . . . . . . . . . . . . . . . . . . . . . . . . . . . . . . . . . . . . . 9
09. Cleaning and Maintenance. . . . . . . . . . . . . . . . . . . . . . . . . . . . . . . . . . . . . . . . . . . . . . . . . . . . . . . . 12
10. Storage and Disposal . . . . . . . . . . . . . . . . . . . . . . . . . . . . . . . . . . . . . . . . . . . . . . . . . . . . . . . . . . . . 12
11. Troubleshooting . . . . . . . . . . . . . . . . . . . . . . . . . . . . . . . . . . . . . . . . . . . . . . . . . . . . . . . . . . . . . . . . 13
12. Specifications. . . . . . . . . . . . . . . . . . . . . . . . . . . . . . . . . . . . . . . . . . . . . . . . . . . . . . . . . . . . . . . . . . 14

1. Welcome to HALOONE™Halotherapy
History of Halotherapy
Halotherapy has been popular in Europe for many decades after doctors discovered that workers in the
local salt mines seemed to have few respiratory ailments when compared to the general public. During
and after the Second World War people started spending time in the empty salt mines with good results.
Some abandoned mines were eventually turned into clinics. As the understanding of Halotherapy grew
and results were documented, specialized salt machines were designed to deliver fine salt particles
into a room or enclosure to replicate the atmosphere of the mines. These machines have historically
been very expensive. Spas and clinics started building entire halotherapy rooms made of blocks of
salt brought up from these mines or from the Himalayas. Halotherapy was first identified as a healing
modality in the spa industry around 2013 and has been a growing trend since. The HALOONE™gives the
user the opportunity to experience this healing salt regimen at home, anytime.
HALOONE™Halotherapy
The HALOONE™has been designed and engineered to provide beneficial salt sessions for use in the
home or sauna. The HALOONE™is the only Halotherapy device available today that offers our unique
and proprietary salt mist delivery system (patent pending). The HALOONE™unit provides the optimal
method to control the size and quantity of salt particles for ideal absorption. The intuitive and smart
design sets the HALOONE™ahead of the field in both ease of use and effectiveness making it the
preferred salt healing solution.
2

2. Intended Use
This HALOONE™unit is intended for dry salt inhalation solely and strictly in accordance with this Manual
including (without limitation) only using HALOONE™salt capsules provided by the manufacturer. Users
must comply with this Manual and any supplemental installation, operation and maintenance instructions
provided by the manufacturer. Any other use of the HALOONE™is not considered in accordance with
these terms and the intended use. The manufacturer/supplier is not liable for any damage to persons
and/or property that may arise from improper use. The user alone incurs this risk.
The HALOONE™unit is designed to be used in a room up to 12’ x 12’ (3.5m x 3.5m). The HALOONE™
can also be used inside a sauna up to a maximum temperature of 140°F (60°C) for no more than one
consecutive hour. The HALOONE™unit is not designed for continuous use in the sauna and should be
removed after each use if the sauna is used for multiple sessions in a day.
The HALOONE™unit will provide a fine salt mist in any room or sauna where it is operated. Care should
be taken to cover, seal and/or remove any electronic equipment or objects that could be affected by fine
salt particles. Please let common sense guide you when choosing which rooms to use the HALOONE™.
With normal use, the HALOONE™should not cause any problems to the room environment, but
manufacturer/supplier assumes no liability or responsibility for any claims or damages that may arise
except as expressly set forth in the HALOONE™warranty.
3. Safeguards
During a single session, the HALOONE™can distribute approximately 20ml of 3% saline in aerosol form.
Saline mist can have a corrosive effect on various materials such as metal, concrete and electronic
devices. Those items may be damaged as a result and should not remain near the HALOONE™while
in operation.
• The HALOONE™can be mounted to a wall or placed on a level and flat surface. When wall
mounting the unit, please make sure it is level.
• Only use saline cartridges provided by HALOONE™. Using other solutions may have adverse effects
on functionality and damage the device.
3
• We recommend regular cleaning and vacuuming of surfaces in the room the unit is operated in to
remove any salt dust.
• The HALOONE™can be operated when plugged in to an electrical outlet or using the internal
rechargeable battery. Please ensure that the operating environment is within specifications indicated
in this manual.
4. Safety Precautions
Please read the following thoroughly before using the HALOONE™:
• The HALOONE™is not intended for use by persons (including children) with reduced physical,
sensory or mental capabilities, or lack of experience and knowledge, unless they have been given
supervision or instruction concerning use of the appliance by a person responsible for their safety.
• Please install the unit according to the installation instructions
• Do not damage or modify the power adapter and USB charging cable
• Do not install the power adapter or cable if damaged
• Do not pull on the cable when unplugging the power adapter or from unit
• Do not plug in or unplug the adapter or the cable with wet hands.
• Do not drop the unit or subject it to shock.
• Do not modify the unit. Also, no one other than an authorized service technician should take apart or
repair the unit.
• Keep out of reach of children from 8 years or below
• The HALOONE™is only to be used and charged with the power adapter provided
• The unit contains batteries that are only replaceable by an authorized technician
• HALOONE™is intended for use at temperature between 50°F and 140°F (10°C and 60°C). Do not
leave it in environment above 140°F (60°C)
• Do not use liquid other than HALOONE™saline solution. Doing so may damage the device and may
be hazardous to the user.
• Do not use excessive force when touching any metal outlets. Doing so may cause the unit to
malfunction.
• Do not use if the unit itself, the power adapter or charging cable are damaged or defective.
4

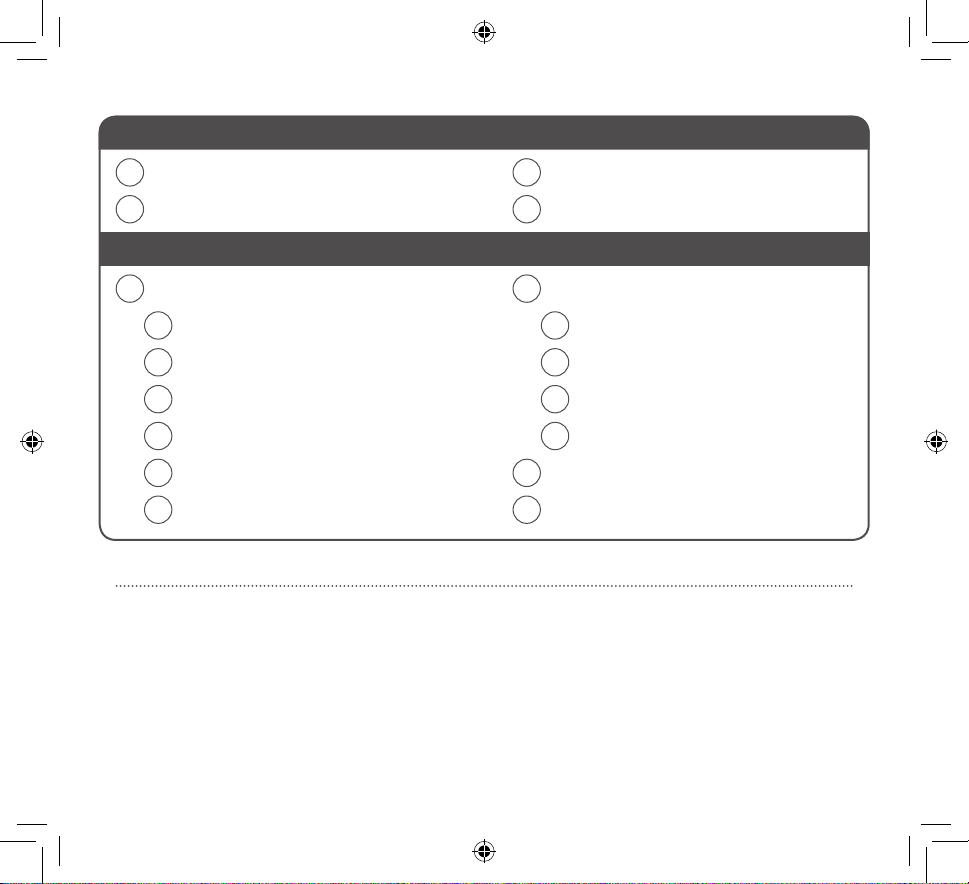
5. Packaging
HALOONE™Main Unit1
Wall Mount Bracket (front)
2
Wall Mount Bracket (back)3
Power Adapter
4
USB-C Cable
6
Optional Plug (region specific)
5
Wall Mount Screw x47
User Manual8
1 2 3
7
6
4
5
8
5

6. HALOONE™Unit
26
8
3 41
7
5
5A
5B
5C
5D
5E
5F
6A 6B 6C
6D
6
Emotive Light
8
Saline Capsule Holder2
Mist Outlet
1 Air Inlet3
Charging Port4
Indicator Panel
6
Overheating Indicator
6A
Empty Water Tank Indicator
6B
Charging Indicator
6C
Battery Level Indicator
6D
Control Panel5
Fan Switch
5A
Fan Hi/Lo Indicator
5B
Power Switch
5C
Device Status Indicator
5D
Emotive Light Switch
5E
Emotive Light Operation Mode Indicator
5F
Timer
7
User Interface
Main Unit
7
7. Installation
Wall Mount
The HALOONE™can be installed on a wall using the included wall mount. Care should be taken to make
certain that the wall chosen for installation of the mounting bracket does not contain electrical lines or
water pipes directly behind where the screws will be inserted.

Screw the wall bracket
to the desired wall using
the included screws
* Ensure that wall
mount base is level
using the included
level
1 2
When using the unit in
a sauna we recommend
removing the level from
the wall mount
Tabletop Placement
The HALOONE™can be run while placed on any flat and stable surface. We recommend placing the unit
a minimum of three feet from the floor for maximum dispersion of the salt.
3 4
Attach the wall mount
cover to the bracket
Dock the main unit onto
the wall mount
8

≥ 3ft
9
8. Operating the HALOONE™
Starting a new session
When the power adapter is not connected the unit will automatically
turn off in 1 minute if it is not operating, to conserve the battery life.
1 min
1
To turn on the HALOONE™, press and hold the POWER button for 2
seconds.
• The unit is now in Stand-By mode.
• Press the POWER button one more time and the unit will turn on.
• The status indicator is blue when the unit is on.
• The timer will start counting down.
220 min

Pausing A Session
• The session stops automatically when the water tank is empty.
• You can also press and hold the POWER button for 2 seconds to
pause your session.
4
When the unit is empty:
• Remove the saline capsule holder and remove the empty capsule if
still in the unit.
• Place one saline solution capsule into the holder.
• Insert the capsule holder back into the device.
• The empty tank indicator will turn off.
If the unit’s internal saline solution level is low or empty, the session will
not start:
• The status indicator will blink blue.
• The empty tank indicator will turn on.
3
10

Charging The HALOONE™
• Connect the USB-C cable to the power adapter.
• Open the rubber cover that conceals the charging port and insert the
end of the USB-C cable into the unit.
• Plug the power adapter into an electrical outlet.
• The unit is charging when the battery level indicator blinks.
• When the unit is fully charged, the charging indicator will turn off and
the battery level indicator will stop blinking.
Fan Control
• The internal fan increases the saline mist distribution.
• When the session starts the fan is set to low speed.
• Toggle the fan speed between high and low by pressing the fan
button.
• The fan speed indicator changes accordingly.
Emotive Light Control
• The relaxing emotive light works in 3 modes:
a. Breathing
b. On
c. Off
• When the session starts the emotive light defaults to breathing
mode.
• Press the emotive light button to cycle through the different modes.
• The indicator will change accordingly.
11

9. Cleaning and Maintenance
The air inlet can be opened to clean any salt residual.
• Use a clean soft cloth with a neutral detergent or lukewarm water to clean the unit.
• Gently brush the outlet area to clean any residual salt.
12
10. Storage and Disposal
If you will not be using the unit for a prolonged period, please store the unit after performing the following
procedure:
1. Unplug the power adapter and charging cable if connected.
2. Remove the saline cartridge holder and empty out all of the saline solution still in the device.
3. Leave the unit open overnight so the internal parts can dry.
4. Do not store this product in areas with high temperatures or humidity.
Please dispose of this product and packaging in accordance with local regulations.
DO NOT touch or push the metal outlet nozzle with excess force.
Doing so may damage the unit.
Important Note:
DO NOT submerge the unit in water. This will damage the unit.

No power. The product
won’t turn on
Is the battery discharged?
• Plug in the power adapter to charge the device
Is the power adapter correctly connected?
• Check if the power adapter/cable is connected to unit and the
electrical outlet
• Check if you are using the power adapter/cable supplied with the unit
Unit turns on for a short
time, then turns off
Is there enough saline solution in the water tank?
• Insert a new cartridge
Is the battery discharged?
• Check the battery level indicator
• Plug in the power adapter to charge the device
The unit turns on, but
you cannot start a new
session
Is there enough saline solution in the water tank?
• Check indicator and replace cartridge if necessary
Is the environment too hot or too cold?
• Check if the over temperature indicator is on
• Remove the device from hot / cold environment
Is the battery discharged?
• Check the battery level indicator, the device is designed so that it
cannot be started if the battery level is too low to protect the battery
The product will not
charge
Is the power adapter correctly connected?
• Check if the power adapter/cable is connected to unit and the
electrical outlet
• Check if you are using the power adapter/cable supplied with the unit
Is the environment too hot or too cold?
• Check if the over temperature indicator is on
• Remove the device from hot / cold environment
11. Troubleshooting
Check the following if the product appears to be broken or operating abnormally.
13
Manufactured and Distributed by:
Clearlight Infrared
1077 Eastshore Hwy
Berkeley, CA 94710 USA
+1-510-601-1775
© 2020 Clearlight Infrared
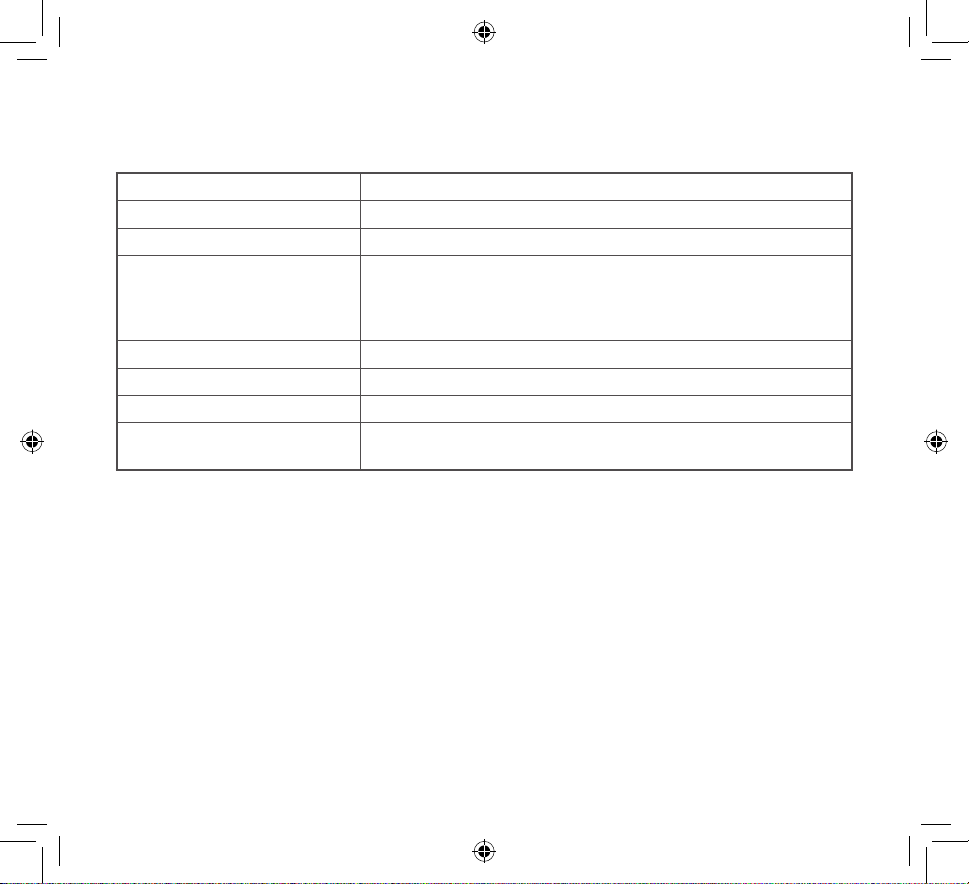
Product Name HALOONE™
External Dimensions 13 x 8.7 x 4 in (330 x 221 x 103 mm)
Unit Weight (Main Unit) 2.85 lbs (1.3 kg )
Power Source 1. Dedicated 45W USB PD power adapter
Power supply 100~240V AC 50/60Hz
Output: 15V 3A
2. Internal 5000mAh Lithium battery
Operating Temperature 50°F~104°F (10°C ~40°C)
Main Unit Power Consumption Approximately 35W
Main Unit Material PC/ABS
Accessories Wall Mount Bracket, Power Adapter, Optional Plug (region
specific), USB-C Cable, Screws, User Manual
12. Specifications
14

“HALOONE” and the HALOONE logo are the trademark of Clearlight Sauna

Other manuals for HALOONE
1
Table of contents
Other Clearlight Medical Equipment manuals


