ClearPlus WH2-HF User manual

WH2-HF
High Flow Series Premium Multi-Stage
Whole House Filter System w/ 5 Micron Carbon Block
Package Contents:
• two 2) heavy-duty Pentek Big Blue 20” filter housing 1” NPT) w/ pressure relief buttons
• one 1) mounting bracket and related lag bolts and washers
• one 1) Hydronix SDC-45-2010 multi-gradient sediment filter
• one 1) Pentek EP-20BB 5 micron carbon block filter
• one 1) 1” housing coupler used to join the 2 filter housings
• one 1) spanner wrench & one 1) roll of Teflon tape
The WH2-HF high-flow series whole house filter package features dual stage filtration for a wide range of
common contaminants that affect the clarity, taste, and odor of residential water. It is designed specifically
for customers seeking higher than average water flow rates and less pressure drop. This system features
Hydronix's unique multi-depth poly sediment filter. This filter uses the entire depth of its media by trapping
the largest sediment particles on the outside of the filter, then gradually stepping down the size of particles it
will reject as the water moves closer to the core of the filter, finally ending at 10 microns. The result is longer
filter life and higher flow rates less pressure drop). The polypropylene media is highly resistant to bacteria,
making this an excellent choice for well water treatment applications.
This filter is followed by Pentek’s EP Series 5 micron carbon block filter which features greater chlorine
removal and dirt-holding capacity than competitor’s filters of a similar size. The high porosity-design helps
prevent the cartridge from clogging before its absorption capacity is exhausted, maximizing the utilization of
the activated carbon media. The carbon block filter has excellent chlorine reduction characteristics and is
also commonly used to remove chlorine disinfection by-products THM's), and a wide range of organic and
volatile organic compounds VOC's) that affect water clarity, taste, and odor. Minimum chlorine reduction of
90% at over a filter life of 40,000 gallons at a flow rate of 4 GPM 151,400 L @ 15.1 LPM). This system is
also a popular choice for well water owners requiring filtration down to a level of 5 microns for a whole house
UV sterilizer, especially where elevated levels of organic contaminants are present organic contaminants can
absorb UV light).
Specifications
Housing Material: Polypropylene
Housing O-Ring Material: Buna-N
Housing Pressure Drop: 1 PSI at 15 Gallons Per Minute 0.1 bar at 57 LPM)
SDF-45-20 0 Filter Pressure Drop:
1 PSI at 20 Gallons Per Minute 0.1 bar at 76 LPM)
Pentek EP-20BB Filter Pressure Drop: 2.5 PSI @ 4 Gallons Per Minute 0.17 bar @ 15.1 LPM)
Maximum Recommended Flow Rate: 6 Gallons Per Minute 23 LPM)
Recommended Operating Temp. Range: 40-100˚F 4.4 to 37˚C)
Maximum Recommended Pressure: 90 PSI 6.2 bar)

Typical Installation:
Note: We recommend that this product be installed by a professional plumber. If you
install this product yourself, please ensure that your installation meets all local building
and plumbing codes. The following instructions are meant only as a general guide and
should not be considered a substitution for your local plumbing and / or building codes.
You will need the following plumbing supplies:
• two 2) shut-off valves with suitable sized unions to connect to your incoming and outgoing
water lines. You can select threaded, compression or sweat soldered) fittings on the shut-
off valves as desired.
• plumber’s cement or Teflon tape for all threaded fittings.
The plumbing connections on the inlet and outlet of the water filter housings are 1” inside
diameter female) NPT threaded fittings. You may require additional plumbing adapters to
connect to your selected shut-off valves. Your plumber will have all of these items, or they can be
purchased at your local hardware or plumbing supply store at minimal cost take these
instructions to the store with you so the store clerk can make sure you get everything you need).
Note: In older homes with galvanized piping all fittings should be threaded.
STEP . Select an installation location. There are a variety of ways to install your filter system
into a main or branch water line. As a general recommendation, this system should be installed
on the main cold water line after the pressure tank or water meter. Select an installation
location with convenient access for regular filter replacements and maintenance.
STEP 2. Shut off the main water supply and drain the pipes. Opening the highest and lowest
fixtures in the house will help drain the pipes.
STEP 3. Using a pipe cutter, cut out a section of your main water line at the point where you
want to install your filter system. There will probably be some water remaining in the system, so
be sure to have a bucket and some rags handy to clean up any small spills. Make sure that the
section of water line you remove is appropriately sized such that all of the components of the
system including the shut-off-valves, adapters, and the black filter caps will fit snuggly when
assembled. If in doubt, cut a smaller section at first – you can always remove a slightly larger
section upon final assembly if necessary.
STEP 4. Assemble the components according to the diagram below. Use the 1” housing coupler
provided with this package to connect the 2 black housing caps. We recommend installing shut-
off valves both upstream and downstream of the filter housings. A shut-off valve is not required
on the upstream side of the housing if the filter will be located within a couple of feet of the main
line shut-off valve. Plumber’s cement or Teflon tape should be used on all threaded
fittings. Secure the mounting bracket to the black cap of the filter housing using the lag bolts
and washers provided. Secure the bracket to the wall with suitable anchors based on the material
of your wall. Remember that the filters will be heavy when full of water so secure to the wall well.
Allow enough space below the black caps to accommodate the blue housing sumps plus a
minimum of an additional 3 inches of clearance.
IMPORTANT WARNINGS:
Use extreme caution when soldering any connections between the main water line and the
shut-off valve or between the shut-off valves & filter housings if your filter housings are
connected to the pipes, or serious damage to the filter housings could occur. If at all
possible, solder all connections before the pipe is connected to the filter housings.
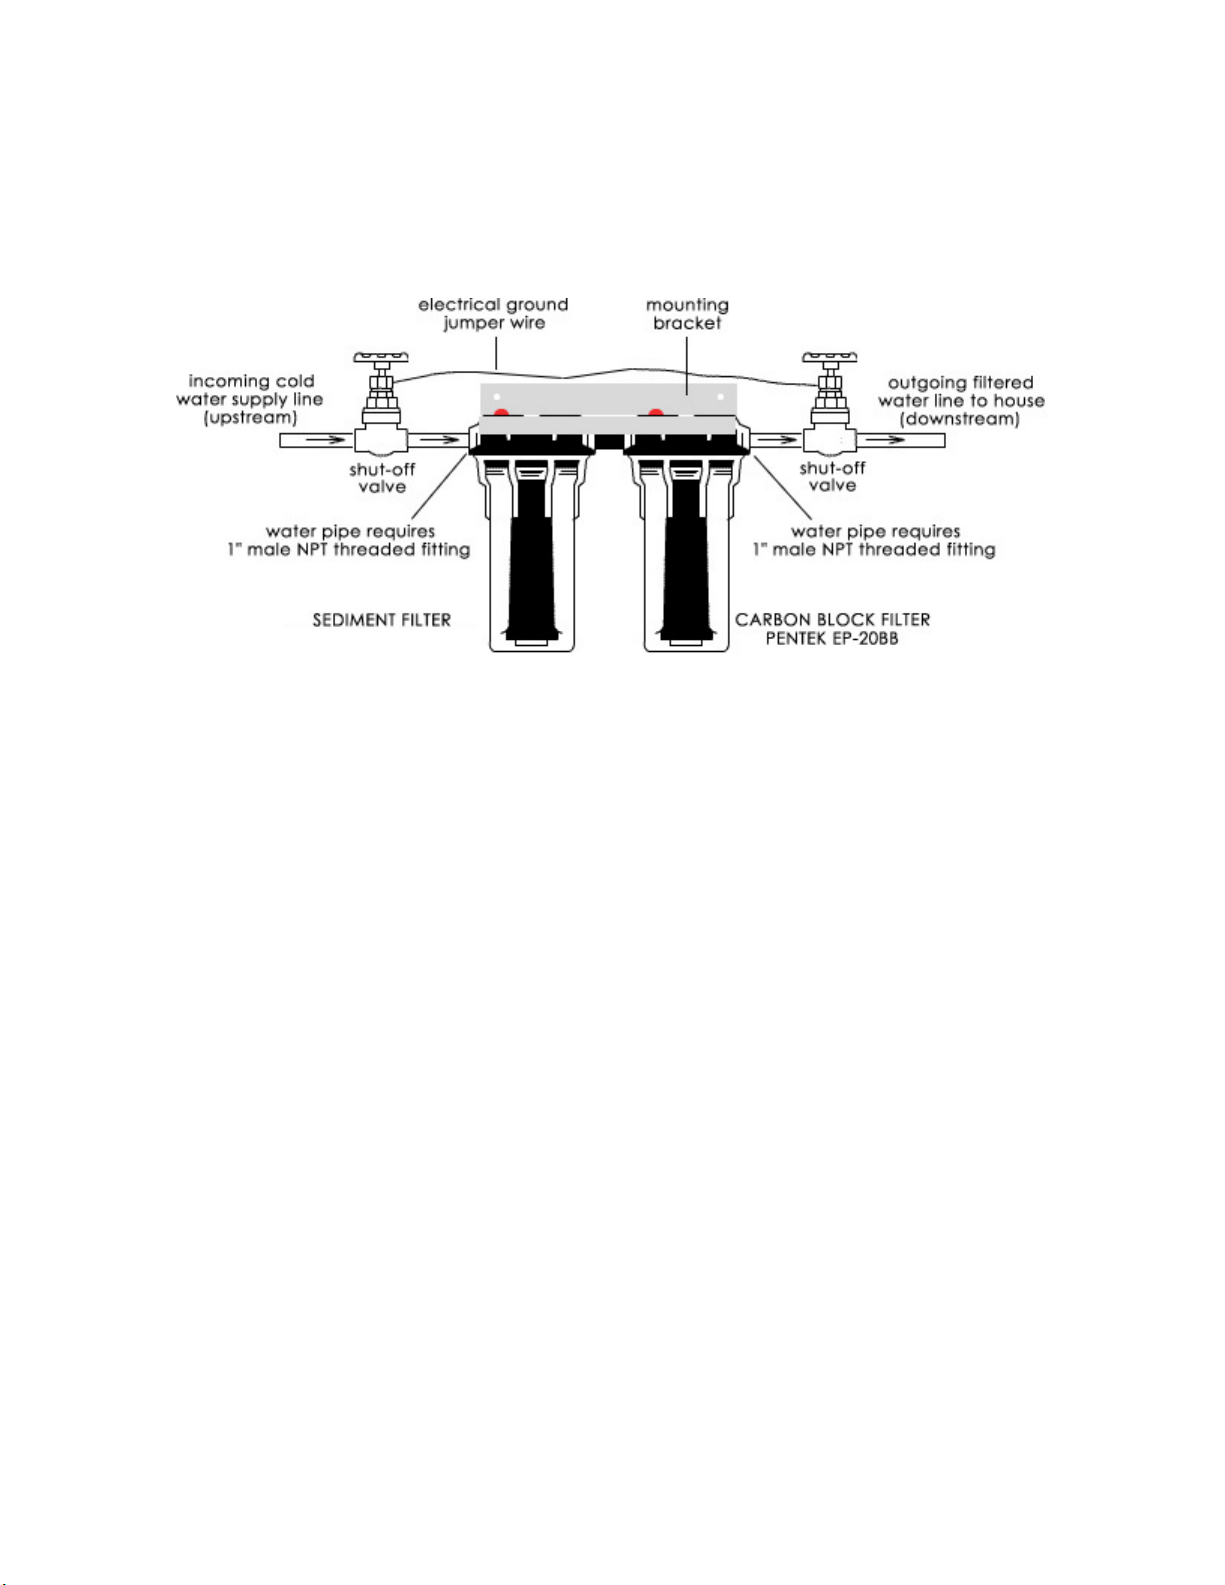
If your water pipes are metal (galvanized or copper), they may be used to ground electrical
systems, appliances, or your phone line. If this is the case, be sure to install regulation
ground clamps to the metal pipe on each side of the plastic filter housing and connect a
jumper wire between the 2 clamps (#4 gauge solid copper wire recommended).
Alternatively, your plumbing code MAY allow you to connect the jumper wire to the 2 shut-
off valves (see diagram). Consult a certified electrician or plumber if you are unsure.
STEP 5. Remove the protective plastic wrap from the filter cartridges and place each in its
appropriate blue housing sump. At the bottom of the sump, there is a raised portion in the middle
standpipe) that will help center the filter in the housing. The standpipe will fit inside the hole
that runs through the middle of the filter cartridge. Check to make sure that the O-ring is seated
properly in the grove at the top of the blue housing sump, then screw each blue housing sump
containing the filter cartridge onto its black housing cap. Use the spanner wrench to tighten. Do
not over-tighten. Excessive force is not required to obtain a good seal.
STEP 6. Turn on the water and inspect all plumbing connections very carefully for leaks. Also
inspect the seal between the black housing caps and the blue housing sumps to ensure that the
O-ring has formed a good seal. Tighten this connection again using the spanner wrench if
necessary. If this connection still leaks, turn off the water supply and check to make sure that the
filter is aligned properly in the housing and repeat your test for leaks. When you are confident
that all connections are sound, run cold water for 5 minutes at any faucet to purge air out of your
system and flush the filter before use. New cartridges may release “fines” very fine black
powder) after installation. Wait one hour, and flush again for another 5 minutes prior to using the
water.
Important Notes:
1. The manufacturer recommends that the blue housing sumps be replaced every 10 years or if
you notice any cracks or damage.
2. This filter system should not be used with water that is microbiologically unsafe or of unknown
quality without adequate disinfection before and/or after the system.
3. Water filter systems should never be exposed to freezing temperatures - severe damage to the
filter and housings could result. Such damage is not covered under any warranty.
HYDRONIX SDC-45-2010

4. After prolonged periods of non-use such as a vacation), it is recommended that the system be
flushed thoroughly for at least 5-10 minutes before using the water.
5. The contaminants or other substances removed or reduced by this water treatment device are
not necessarily in your water.
6. If you suspect that your water pressure will at any time exceed the maximum rating of 90 PSI
6.2 bar), a pressure regulator must be installed before the system. It is recommended that the
pressure regulator be set at 75 PSI 5.2 bar) or less.
Maintenance and Filter Replacement Information:
To maintain the optimal performance of your whole house water filter system, filters should
always be replaced in accordance with manufacturer specifications. Filters may need to be
replaced more frequently then specified, depending on the level of contaminants, particularly
sediments, in your water supply. If significant water pressure reduction is noticed, the filter may
have become clogged. We recommend that you keep a “Filter Replacement Log” attached to your
system where you can record the date of filter changes, and that you write a note on your
household calendar reminding you of filter replacement schedules.
Replacement Filters:
Hydronix SDC-45-20 0 - replace every 6- 2 months
Pentek EP-20BB – replace every 40,000 gallons (6-9 months)
Replacement Filters can be Obtained as Follows:
Phone Toll Free 1-866-376-2690 or
Order Online at: www.home-water-purifiers-and-filters.com
Filter Cartridge Replacement Procedure:
1. Turn off the water supply to the system using the shut-off valves you installed on the inlet
and outlet of the filter housing. Depress the red pressure release button on the top of the
filter housing cap to allow any pressure inside the housing to escape, thereby allowing the
blue filter sump to be removed easier.
2. Unscrew the blue sump bottom of the housing) from the cap using your spanner wrench
included with original purchase of your system).
3. Locate and remove the large O-ring. Try not to remove any of the lubricant. The housing
O-ring should be replaced at least once annually or at each filter change if any damage to
the O-ring is noted kinked, cracked, stretched, etc.), or if any leakage between the black
housing cap and the blue housing sump is detected and does not seal after tightened with
the spanner wrench. Put the O-ring in a safe place where it will not get dirty or otherwise
contaminated. Replacement O-Ring: Pentek Buna-N Big Blue O-Ring # 5 22
4. Take out the old filter cartridge and discard it.

5. Scrub the bottom of the housing and cap with dish soap and warm water using a sponge or
soft cloth. Fill 1/3 with water and add about 2 tablespoons of household bleach. Scrub to
disinfect we recommend that you use rubber gloves). Rinse all parts thoroughly!
6. Lubricate the O-ring with food-grade silicon lubricant if needed. Insert O-ring in the
groove at the top of the blue sump and press into place. Make sure the O-ring is
seated level in the groove!
7. Remove the protective plastic wrapping from the new filter cartridge and insert the
cartridge into the housing sump, making sure that it slips over the standpipe in the bottom
of the housing.
8. Screw the blue sump onto the black housing cap tighten using the spanner wrench. Do
not over tighten.
9. Turn on the water supply slowly to allow the system to fill with water. Depress the red
pressure release button on top of the unit again to release any trapped air. Inspect
carefully for leaks. If a leak is found, first inspect the O-ring to ensure that it is seated
properly before tightening the sump more. Tighten using the spanner wrench as necessary
to achieve a good seal and stop leaks.
10. New cartridges may release “fines” very fine black powder) after installation. Flush the
system by running water from a nearby faucet for 5 minutes. Wait one hour, and flush
again for another 5 minutes prior to using the water.
Table of contents
Other ClearPlus Water Filtration System manuals


Popular Water Filtration System manuals by other brands


KIRAMI
KIRAMI MF-250 installation manual

Pentair
Pentair Everpure Endurance Twin System manual

A.O. Smith
A.O. Smith ADR75-V-ET-1 user manual

Vissani
Vissani VK-6006 Use and care guide

GF
GF 1840 Operating and maintenance instructions

Good Water Warehouse
Good Water Warehouse GOLDLINE-50 Installation & service guide


