Clemas & Co I-GUM User manual

I-GUM
BATTERY POWERED
OPERATOR MANUAL
Clemas & Co. Unit 5 Ashchurch Business Centre, Alexandra Way, Tewkesbury,
Gloucestershire, GL20 8NB.
Tel: 01684 850777 Fax: 01684 850707
Email: info@clemas.co.uk Web: www.clemas.co.uk

CONTENTS
Important Safety Instructions
Package Check List
Preparation For Use
Installation 1
Installation 2
Using the machine
Turning OFF the machine
Maintenance
Trouble shooting
Machine Parts
Accessory
Electrical Diagram
Exploded drawing and spare parts list
Product Specification
Instruction for control panel
01~03
04
06~09
05
06~07
08
09
10~11
11
12
13
Safety Data Sheet
14
15
16~23
24~26

Maintenance/service people
(not i-gum operators)
need to keep a distance to
the integrated magnets in i-gum
for 6 inch/15 cm when they are
doing maintenance on i-gum
and are wearing a pacemaker,
this is just a precausion advise
READ ALL INSTRUCTIONS
BEFORE USING THE
MACHINE
R
LITHIUM-ION BATTERY
Nominal Voltage:24V
Energy/Capacity: 353 Wh”
SAFETY ADVICE
Do not crush, pierce
or damage in any way.
Do not heat or incinerate.
Do not short-circuit.
Do not dismantle.
Do not immerse in any liquids.
Only charge between
5 C~40 C/41 F~ 104 F
and discharge
5 C~45 C/41 F~113 F
R
ooo o
o o oo
IMPORTANT SAFETY INSTRUCTIONS
READ ALL INSTRUCTIONS BEFORE USING THIS MACHINE
01

IMPORTANT SAFETY INSTRUCTIONS
READ ALL INSTRUCTIONS BEFORE USING THIS MACHINE
DO NOT OPERATE THE MACHINE WITHOUT READING AND UNDERSTANDING THE
OPERATING INSTRUCTIONS. IF THE MACHINE IS OPERATED INCORRECTLY IT CAN POSE
DANGER TO THE OPERATOR AND OTHERS AND WILL INVALIDATE THE MANUFACTURERS
WARRANTY. BEFORE USE, READ AND UNDERSTAND THE FOLLOWING:
1. A Risk Assessment for the works to be undertaken.
2. MSDS Chemical Data Sheet.
3. Risk Assessment for Chemical use.
IMPORTANT NOTICE:
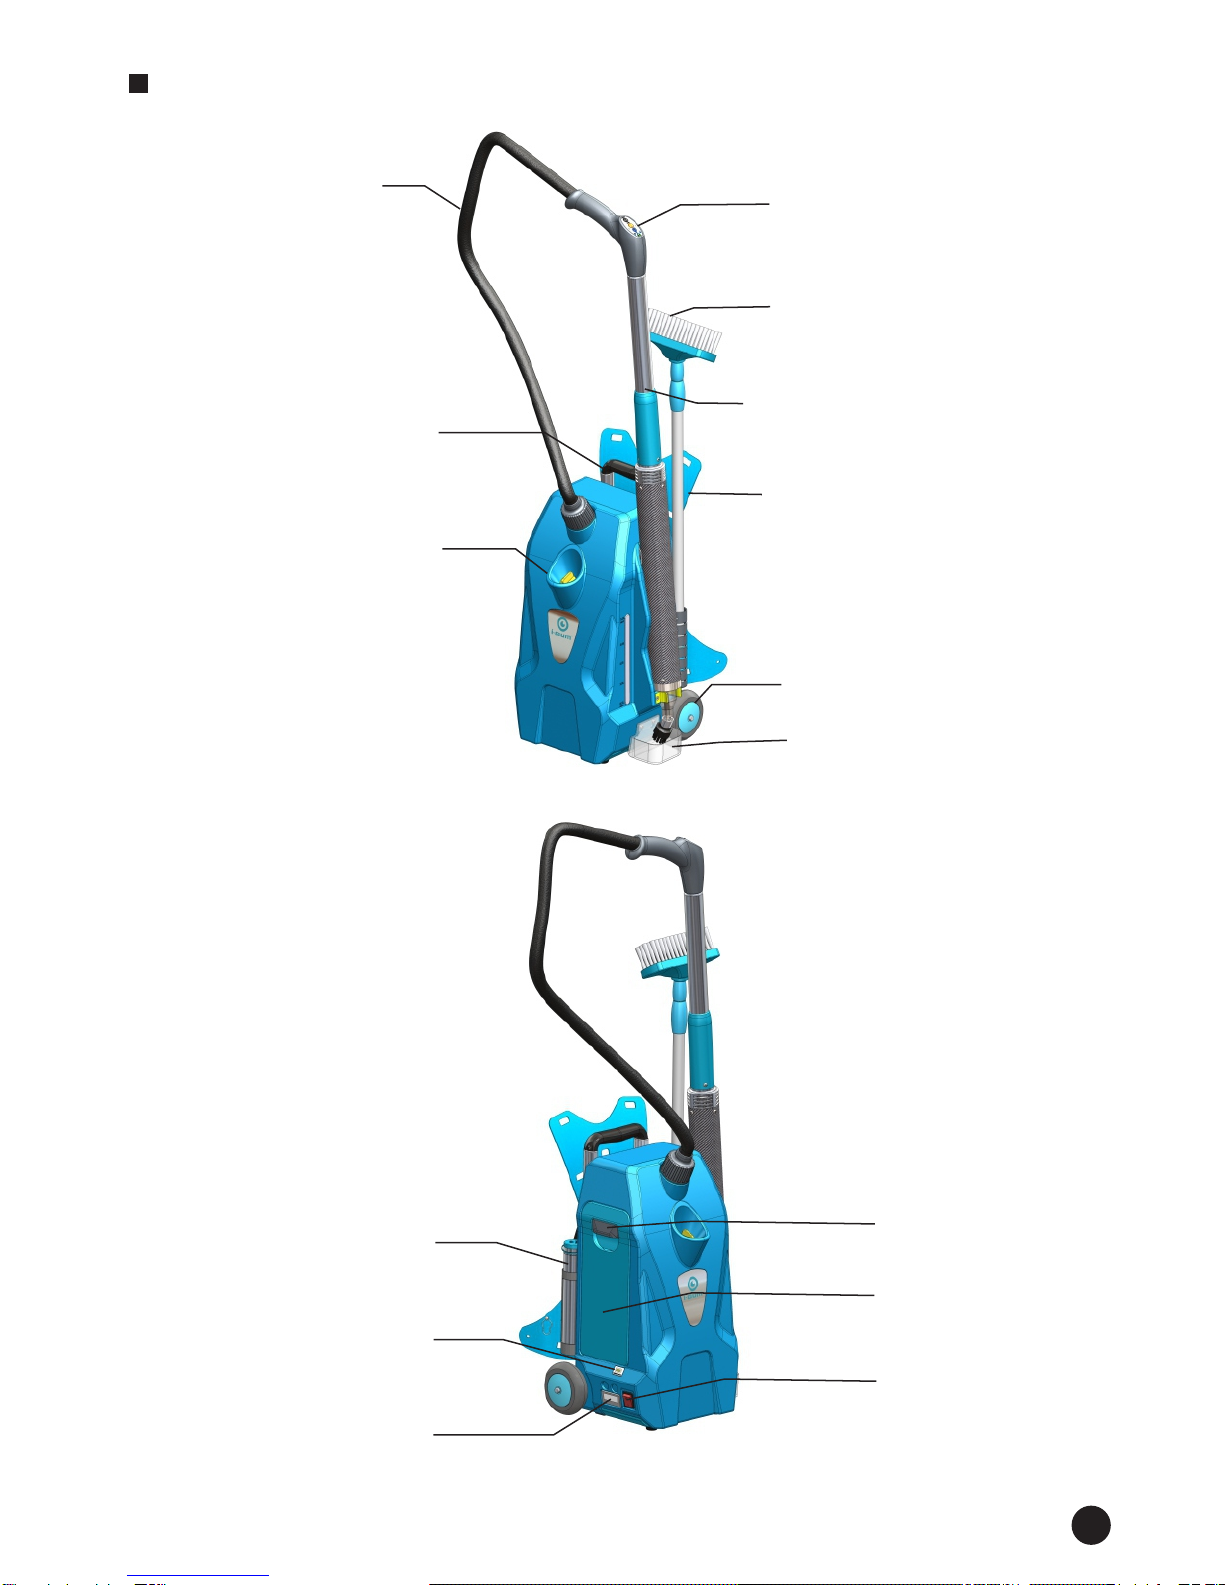
Before inserting the batteries and gum removal solution correctly fit the machine
to the operator by adjusting the straps as required. The machine’s body has been designed to
be kept upright at all times when the batteries are inserted to drawer and gum removal
solution is in the water tank. This is important to the operation of the machine.
Cautions when using the machine:
Keep the body upright at all times when operation or when chemical or
batteries inserted.
The rechargeable battery has been designed to be fully charged BEFORE
each use
Only use the approved solution and batteries for the safe use of the machine.
Using other consumable items in the machine invalidated the warranty and
will lead to damage of the internal parts of the machine and also may pose
a risk to the operative.
Make sure the operator has read and understood these instructions before
attempting to use the machine and is fully trained in its operation.
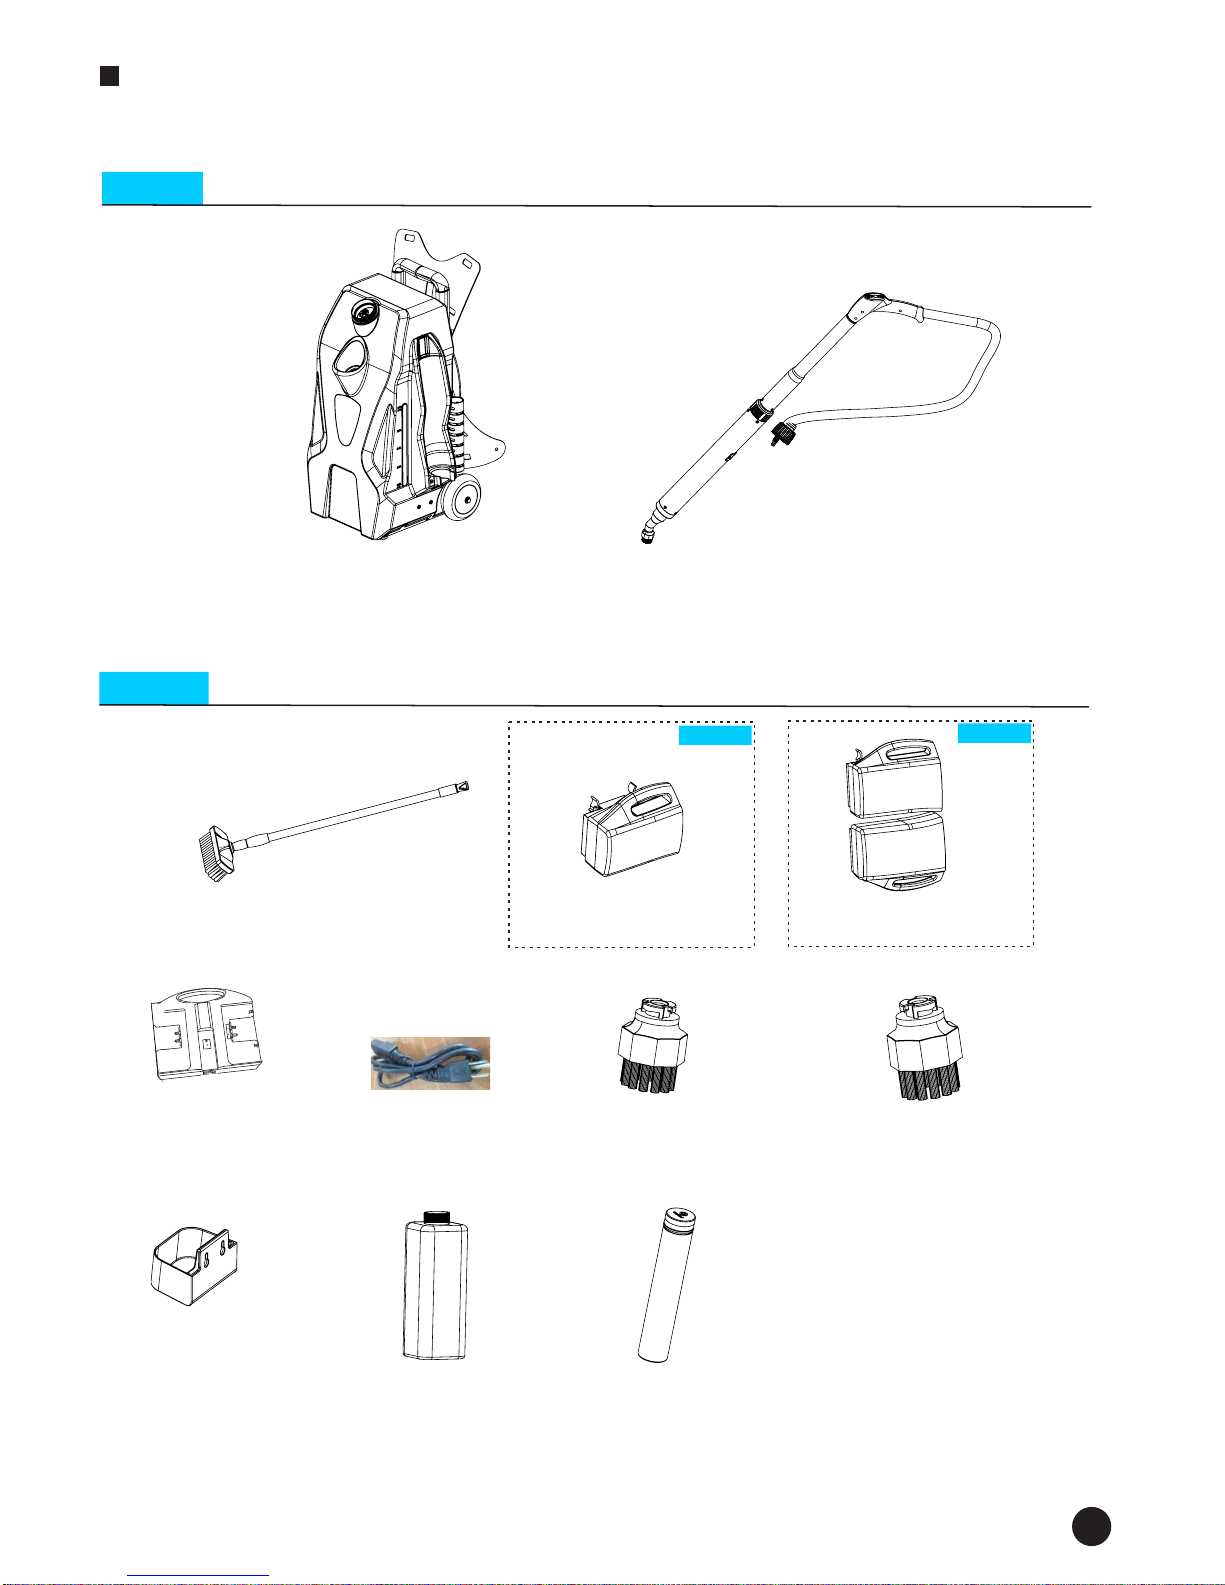
Consumable Items:
Chemical (2 Litres) will last for approximately 2 hours of continual use. 4x chemical
bottles will last for approximately 8 continual hour’s operation.
The brushes will wear according to the surface being cleaned. Each Brush will last
for approximately 4 hours. 2x Brushes will last for 8 hours continual operation.
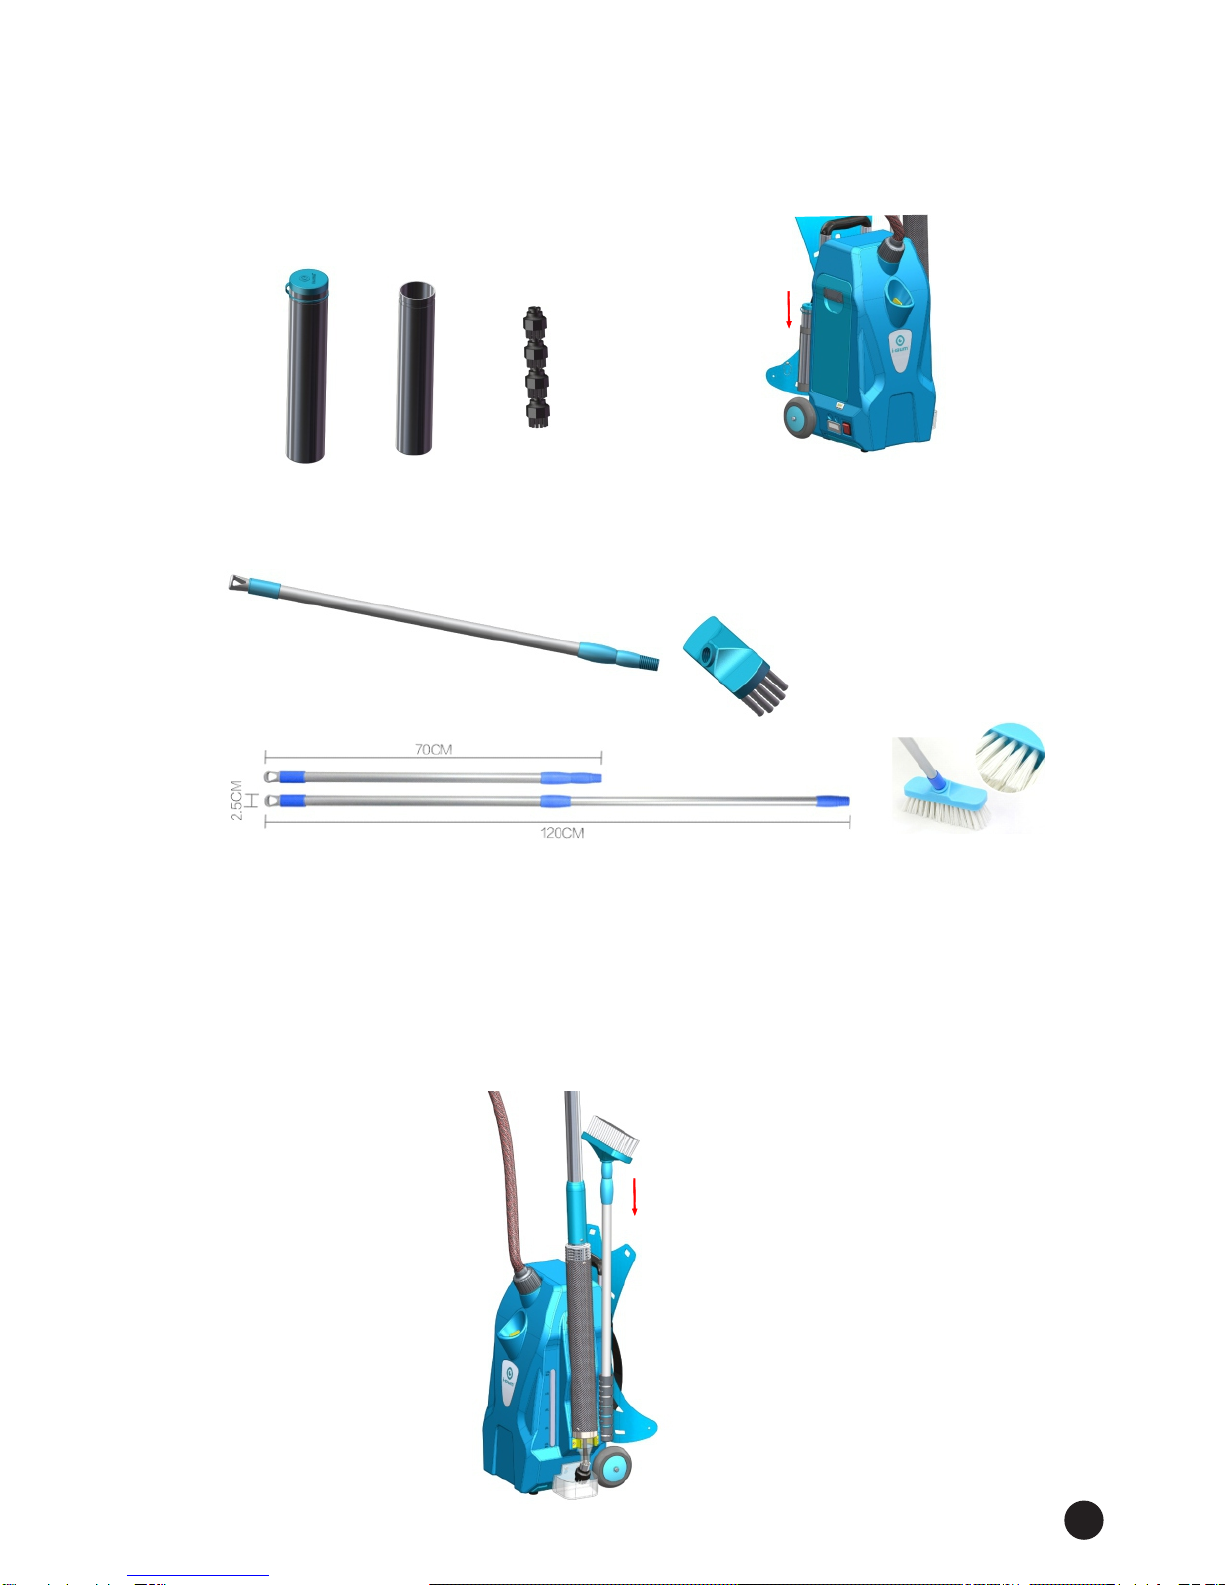
Only use the specifically designed brush as this has a jet incorporated for machine
to work correctly.
Choose a steel wire brush for solid urban surface such as concrete, natural stone,
tarmacadam, asphalt and other common urban surfaces. Choose a nylon brush
for soft surfaces such as manmade flooring, sandstone, heavy-duty carpet.
02

IMPORTANT NOTICE:
Always complete a test patch on the above surfaces to make sure no damage occurs to
the flooring of surface
Service Pack:
When a machine is purchased, it require a service pack. Each service pack provides a
continuous 8 hours operation and consists of:
4x Chemical Bottles
1x Nylon wire Brush
3x Steel wire Brush
03
Warranty:
The Chewing Gum Removal machine should only be operated with the service
packs supplied. Using alternative supplies may cause damage to the machine
and cause a risk to the operative. Using alternative supplies voids manufacturer's
warranty.

Package Check list:
Broom with telescopic handle 1x Top Battery 1x
Nylon Wire Brush 1x
Water Drop Disk 1x Brush Storage Tube 1x
Accessory:
Battery Charger 1x Power Cable Steel Wire Brush 3x
Top Battery 1x
Bottom Battery 1x
MAIN BODY 1x LANCE 1x
Machine:
When you open the color box and you can find the parts as below showing:
Chemical bottles 4x
(Option2)
04
(Option1)

Machine parts:
Lance
Control panel
Trolley handle
Broom
Shoulder harness
& Waistband
Water drop disk
Wheels
Hose
Fluid inlet hole
Brushes Storage Tube
Battery Power Display
Battery Drawer
Drawer Handle
Power Switch
Timer
05

Installation1.
1. Install the water drop disk to body. 2. Screw a steel wire or nylon wire brush
onto the end of the nozzle of the lance.
close
open
3. Place the lance in the lance holder of body. There are 2 magnets which hold the lance in position.
(The lance needs to be removed before the machine is fitted to the operative.)
06
Preparation For Use

5. Assembly the brush to telescopic wand for the BROOM.
4. Open the brush storage tube cap and you can place the brushes in the tube.
Insert the brush storage tube to the holder of body.
6. Insert the broom to broom holder of body.
(The Broom needs to be removed before the machine is fitted to the operative.)
07

( option)
Open the battery storage drawer and install the batteries to the battery housing.
Then push the storage drawer back (must be pushed into location).
(You also can install one battery, the machine also can work.)
open close
3. Insert Batteries
Installation 2
Before operating the machine:
1. Ensure that the battery has been fully charged before each operation.
Before you charge the battery, please read the INSTRUCTION MANUAL OF BATTERY
CHARGER first. The manual is in the package of the charger box. please keep the manual.
2. Pour solution into fluid tank.
Take off the fluid inlet cap and then pour solution into the fluid tank. (one bottle is for each time).
08
Preparation For Use

pour fluid into boiler to avoid boiler heating up without fluid.
INSTRUCTION FOR CONTROL PANEL
ON/OFF Button: Power supply for handle control.
RINSE Button,InFIRSTuse, press the RINSE button for about 1 minute to
In NORMAL use, we do not need to press this button for 1 minute, because
(The LED light will flush when we press the RINSE button)
H/L Button, Adjust the fluid flowing in low speed or high speed.
(Flowing speed indicator light will be bright, and the heating LED will flush)
Battery Power Indicator
00000000
Timer for machine
using hours
Main Switch
For Power Supply
INSTRUCTION FOR BODY CONTROL PANEL
INSTRUCTION FOR WATER LEVEL INDICATOR
The fluid tank capacity is 2.5L. Each use,
we can input one chemical bottle into the tank.
When low on fluid, the LED light of tank
side will flash and the heater in lance will stop
working and the heater indicator will flash.
When you pour Chemical into fluid tank, And
then restart the main switch of body, the LED
light will be bright, and press on/off button on
handle, the heater will start to heat.
09
Preparation For Use
the fluid will flow to boiler from pipe after few seconds.
Rinse indicator light
Flowing speed indicator light
Heating indicator light

Using the machine:
LOGIC FOR FIRST TIME OPERATION ( Just for the first using )
Turn on the Mainswitch on body
Turn on ON/OFF button on lance control panel
Press RINSE button on lance control panel
RISEN INDICATOR LIGHT flush, and pump will run in full speed.
Release RINSE button on lance control panel
After about 1 minute, the fluid come out from brush of lance
Fluid in boiler will start to heat up and the heating indicator will flash,
the pump will automaticlly switch over to the low speed.
The steam will come out from the hole of brush, and the heating indicator will
be bright. After few seconds, the steam temperature will be raised.
After about 20 seconds, fluid will be heated to steam,
and the steam will come out from brush of lance
Change the L/H selector button for pump speed,
Andyoucangetless/moresteam.
Place the brush on the piece of flattened gum, Agitate the flattened
gum with the brush until you see it disintegrate by using circular
motions-do not scrub or apply pressure. The weight of the lance with
agitation is all that is required.
Remove the lance from the gum and use a broom to sweep across
the area to ensure the gum has been destroyed or if further cleaning
is needed.
As gum deposits are all different there will be varying times taken to
destroy each piece.
10

Using the machine:
LOGIC FOR NORMAL USE
Turn on the Main switch on body
Turn on ON/OFF button on lance control panel
Fluid in boiler will start to heat and heating indicator light will flush.
Andpumpwillautomaticswitch-overtolowspeed
After about 20 seconds, the fluid will be heated to steam
and steam will come out from brush of lance
Change the L/H selector button for pump speed.
Andyoucangetless/moresteam.
Place the brush on the piece of flattened gum, Agitate the flattened
gum with the brush until you see it disintegrate by using circular
motions-do not scrub or apply pressure. The weight of the lance with
agitation is all that is required.
Remove the lance from the gum and use a broom to sweep across
the area to ensure the gum has been destroyed or if further cleaning
is needed.
As gum deposits are all different there will be varying times taken to
destroy each piece.
Turning OFF the machine:
Turn off ON/OFF button
on lance control panel.
Turn off the Main
switch on the body.
Open the drawer and take out
the batteries from battery housing.
Charge for batteries.
123
4Place the lance to holder of body.
Insert the broom to broom holder of body.
5
(DO NOT press Rinse button to wait for 1 minute)
11
The steam will come out from the hole of brush, and the heating indicator will
be bright. After few seconds, the steam temperature will be raised.

Maintenance
1. During interruptions of the cleaning process, always place the lance
into the holder of body. And always place the machine upright on dry
floor surface.
2. When the water drop disk is full, please empty and wash it, and then
install back to body.
3. The yellow rubber bung must be pushed to the inlet hole, when you
finish the fluid input. Otherwise dirt will infect the water tank.
DO NOT put any other fluid into the tank unless approved
by the manufacturer.
4. Make sure the batteries are charged 100% on the first charge.
Machine maintenance
The BATTERY VERSION I-GUM machine requires very little maintenance. Wipe down the
machine periodically with a clean cloth. And wipe down the lance, and change the new brush
for the lance. DO NOT spray water directly over the top of machine or top connector cap.
5. The top cap for hose connector is assembled by the factory,
DO NOT disassemble the hose connector cap unless qualified.
The connectors are showed as the picture:
connect to 2 poles
circle male connector
connect to transparent
pipe 6x4mm
connect to 7 poles
circle male connector
12

Trouble shooting
PROBLEM CAUSE SOLUTION
No power to machine No battery insert to battery drawer Insert to battery drawer
Power switch failure Replace power switch
cable or wire in hose broken Replace cable or wire for hose
No steam come out The tank does not have any chemical in Input the chemical from bottles
The battery does not have energy charge the battery
The pump does not run Replace pump
The steam outlet hole is blocked Change to use a new brush
Water level indicator
LED light is flushing
The chemical is low in the tank Pour the chemical into tank
Fluid leak from tank
The rubber bung is not fitted correctly Fit the rubber bung
Fluid tank is broken Replace fluid tank
The machine is being overturn
Battery can not be
charged
The battery life is over Change to use new battery
Charge is bad
13
Make sure the machine is upright
and the fluid will drain from the
bottom of the machine
Replace for a new one

PRODUCT SPECIFICATION
battery version i-gum
Product Size (body unit): 347*330*500 mm
Lance Size: 60*1100 mm
Weight (Included 1x battery): 10.5 kg
Lance Weight: 1.6 kg
Broom Extended Length: 1.3 M
Li-ion Battery:
DC24V (25.2V,14Ah, 353
Wh”)
Tank Capacity: 2.5 L
OperationTimeofBattery:About50min/1Battery
Battery Drawer : Can install 2x Batteries
Fluid Flow Speed Class: Low, High
Trolley Handle: YES
Transport Wheel: YES
Backpack For Body Unit: YES
Water Shortage Warning: YES
Control Panel in Handle: YES
Fluid Heater: DC 24V, 250W
14

RED(红),"+"
BLACK(黑),"-"
YELLOW(黄),"-"
BLUE(蓝),"+"
Blue Connector
Gray Connector
blue
red
black
yellow
Li-ion Battery (Blue)
(+ , -)
(- , +)
Li-ion Battery(Gray)
Lance
Body
12
34
Timer DC6~36V
106.2071.0
off
on
Main switch 4P /16A, 250V
106.2194.0
Fluid Pump 50ml/DC24V
106.0130.1
Battery Power Display
106.2100.1
Main PCB Board
Battery Version
106.2070.1
wire for timer
106.2079.3
wire for pump
106.2079.4
wire for main switch
106.2079.9
Cable wire for battery supply
106.2189.0
wire for water detecting connector
106.2079.5
wire for tank LED light
106.2079.8
LED light PCB for Fluid Tank
106.2185.0
7 Poles Circle female connector
S.106.2046.4
Cable to main PCB board for heater power
106.2189.2
Fluent In-line heater DC24V,250W
106.2169.0
PCB Board for heater in lance
106.2170.0
Cable for lance heater
106.2189.1
7 Poles Circle male connector
S.106.2046.3
Control panel PCB board
106.0002.8
Fluid level sensor pin
106.2166.0
Battery drawer
wire for tank led light
106.2079.8
ELECTRICAL DIAGRAM BATTERY I-GUM DC24V
15

I-GUM LANCE EXPLODED DRAWING
Exploded drawing and spare part list
16
page 1/8

Item Part No. Discription Material Q'ty
1 106.0002.8 Control Panle PCB Battery Version PCB 1
2 97.2004.31_remark Handle cover right, Gray 431C, PA66+20%GF 1
3 97.2003.31_remark Handle cover left, Gray 431C PA66+20%GF 1
4 106.0002.2 Handle Wand AL 1
5 106.1151.0 Soft Rubber For Lance Handle Rubber 1
6 106.1111.5 M4*6 Hex-sokect Botton Head Screw SUS 304 1
7 106.1002.1 Lance AL Top Cap AL 1
8 106.2000.3 Lance carbon fibre sleeve Carbon Fibre 1
9 02.0005.1 Sealed rivet Alu 4*8mm AL 2
10 106.2149.0 Steell part for lance top magnet SUS 201 1
11 106.1111.23
M4*16 PAN HEAD SELF-TAPPING SCREW
SUS 304
4
12
106.2173.0
Top fitting housing for heater
ABS, UL94-V0
1
13
106.2191.0
RSFR-H TUBE
9*62MM 1
14 106.2190.0 Silicon tube 8* 5*60mm Silicon rubber 1
15 106.0005.9 Bottom steel ring for lance SUS 403 1
16 106.0005.8 Brush holder AL 1
17 106.1111.19 M3*12 Flat head machining screw SUS 304 2
18 106.2171.0 Rubber for brush holder Rubber 1
19 106.0013.1 Brush with nylon bristle, 1.0mm outlet hole PA66+20%GF 1
(19) 106.0014.1 Brush with steel bristle, 1.0mm outlet hole PA66+20%GF 1
20 69.0022.1 Screw M3*10 SUS 304 1
21 72.0206.1 Screw Counter sunk bolt M4*8_SS SUS 304 3
22 106.0205.0 Steel tube for outlet connector SUS 304 1
23 106.1111.9 M4*8 Flat head machining screw SUS 304 3
24 106.0005.5 SUP END CAP AL 1
25 106.2172.0 Top fitting housing for heater ABS, UL94-V0 1
26 106.2192.0 G1/8 Connector for heater Cu-h68 1
27 106.2169.0 Fluent in-line heater, DC24V, 250W
SUS 304
1
28
106.2045.2 Retaining Valve
Cu
1
29
106.2193.0
G1/8 Quick connector for retaining valve
Cu
1
30
106.2170.0
PCB board for heater in lance
PCB
1
31
S.106.2046.3
7 poles circle male connector with wires
PVC, Cu
1
32
106.2189.2 Cable for lance heater power supply
PVC, Cu
1
33
106.2105.0
Hose end cap
ABS
1
34
106.2168.0
Support Cap for hose connector
PA66+15%GF
1
35
106.0021.0
Hose connector cap
POM, UL94-V0
1
36
106.0023.0
Protection hose outside
25mmx1.5M PU, steel 1
37 106.0118.0 Transparent pipe for fluid output 6*4mm PU 2.8M
38 106.1144.0 Rubber stoper for handle Rubber 1
39 00.0002.62 Screw st3*14 cross SUS 304 3
40 106.2105.1 Hose end cap for handle ABS, UL94-V0 1
41 106.1111.4 M3*6 Pan head self-tapping screw SUS 304 6
42 106.0002.6 Cantrol panel ABS, UL94-V0 1
43 106.2002.5 Control panle sticker PC 1
LANCE
spare parts list
17
page 2/8

BODY UNIT EXPLODED DRAWING1 18
page 3/8
Table of contents
Other Clemas & Co Ultrasonic Jewelry Cleaner manuals
Popular Ultrasonic Jewelry Cleaner manuals by other brands

Shenzhen Langee Ultrasonic Electric Appliance
Shenzhen Langee Ultrasonic Electric Appliance UC-6300 user manual

LEUCHTTURM
LEUCHTTURM SAUBER User instruction manual

Apollo Seiko
Apollo Seiko SRC-3000 Operation manual

E-MAG
E-MAG Emmi-Lens Instructions for use

IRIS
IRIS IC-FDC1U user manual

KingKar
KingKar HHO Operation manual