Clenergy V-ezRack SolarRoof User manual

1 / 10
999-1009 Min'an Rd, Huoju Hi-tech Ind. Dev. Zone
Xiang'an District 361101, Xiamen, Fujian, China
E: sales@clenergy.com.cn | W: www.clenergy.com.cn
Tel: +86 592 311 0088 | SHA:603628
1. Introduction
B50 Rail and Accessories constitute a system
that is widely used for PV Module mounting on
tin roofs. To make it robust and longevity, it is
manufactured from aluminium alloy and
stainless steel. With unique design, Z-module, it
provides high efficient installation and the
compatibility with most of frame PV-Modules in
the market.
Before system installation, please read the
installation manual carefully. The manual
provides the following content: (1) simple
introduction of installation; (2) product
installation specification;
Please use it according to the installation
instruction manual. Please pay attention to
safety when installing the product, and construct
it according to local laws and regulations. You
can confirm the latest installation manual on
www.clenergy.com if necessary.
The installer is solely responsible for:
•Complying with all applicable local or national
building codes, including any updates that may
supersede this manual;
•Ensuring that PV-ezRack and other products
are appropriate for the particular installation and
the installation environment;
•Using only PV-ezRack parts and installer
supplied parts as specified by PV-ezRack
project plan (substitution of parts may void the
warranty and invalidate the letter of
certification);
•During installation, ensure that the
self-tapping screws and metal screw have
sufficient strength and shear force;
•Keep the roof waterproof system intact;
•Recycling: Recycle according to the local
relative statute;
•Removal: Reverse installation process;
•Ensuring that there are no less than two
professionals working on panel installation;
•Ensuring the installation of related electrical
equipment is performed by licenced
electricians;
•The upper and lower limit of the torque of the
locking screws must be checked regularly at
least once a year.
•Changes and deviations from the planning
documents must be approved by Clenergy.
.
Contents
Introduction 01
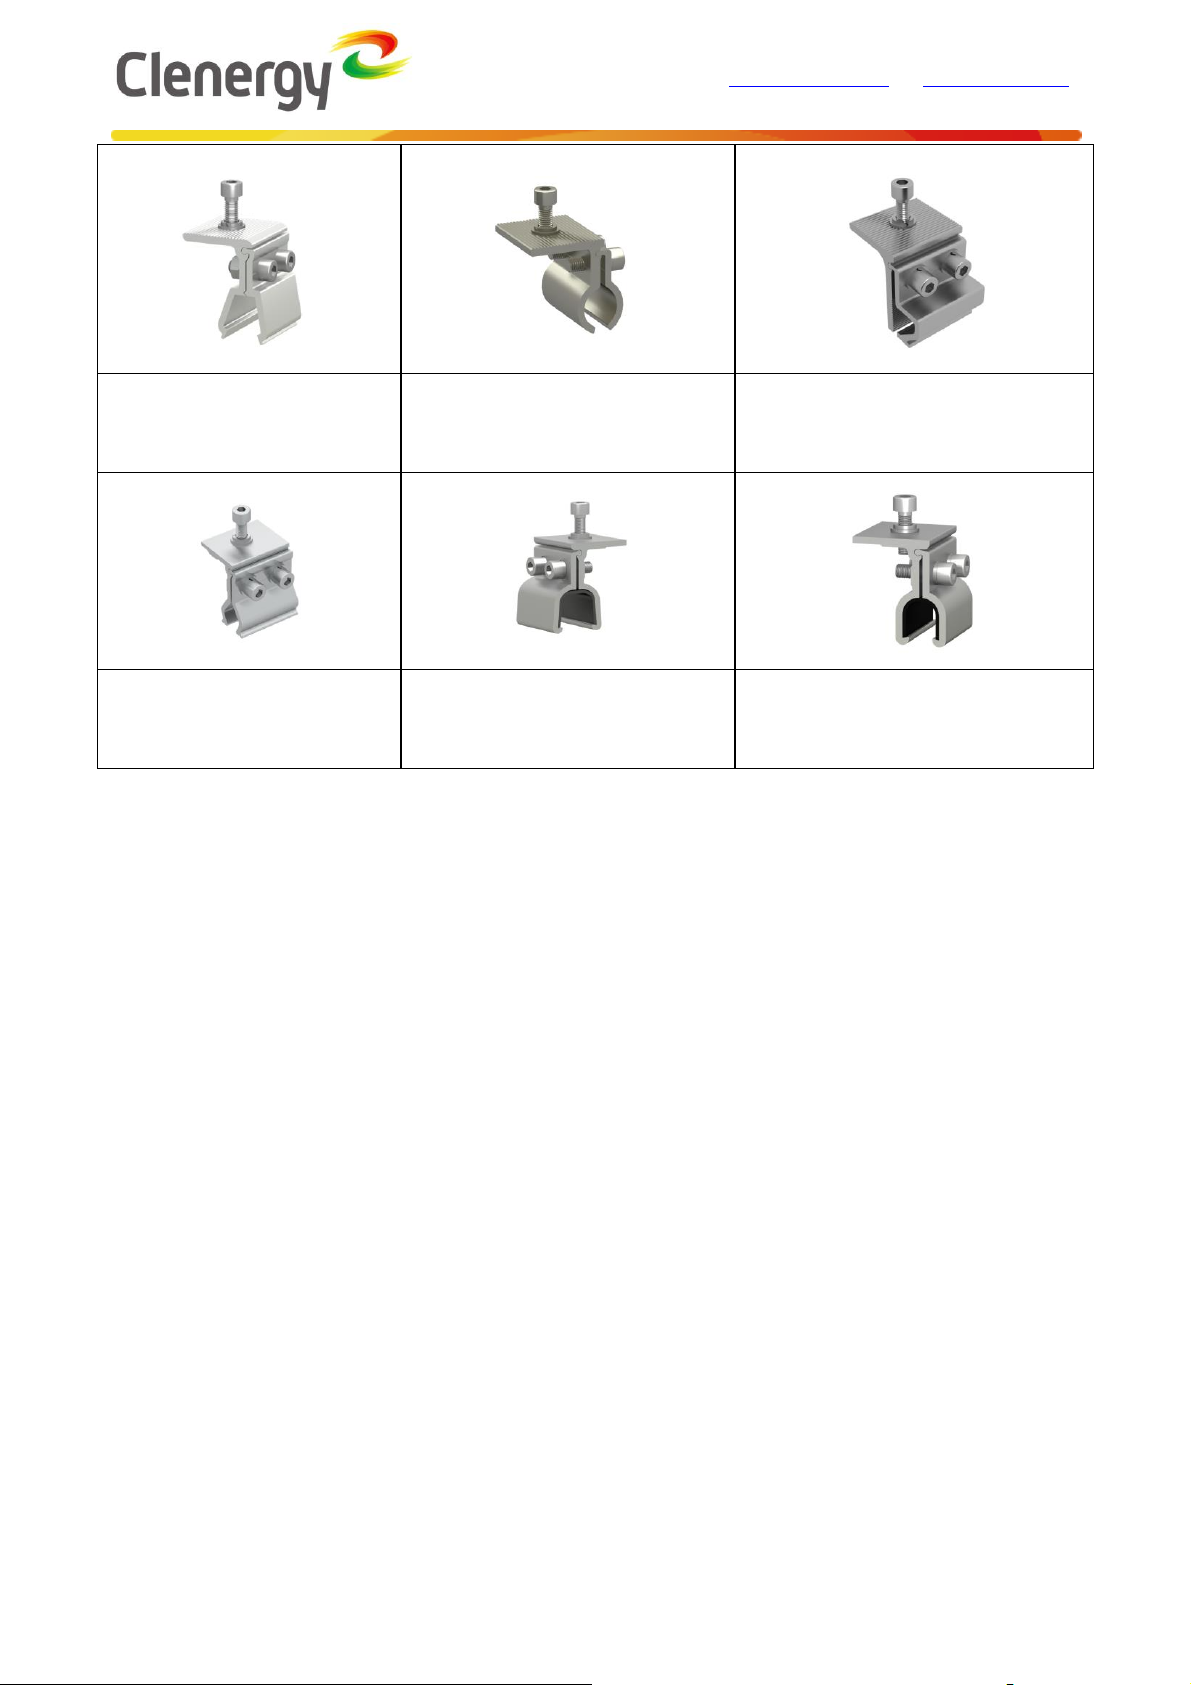
Tools & Component 02
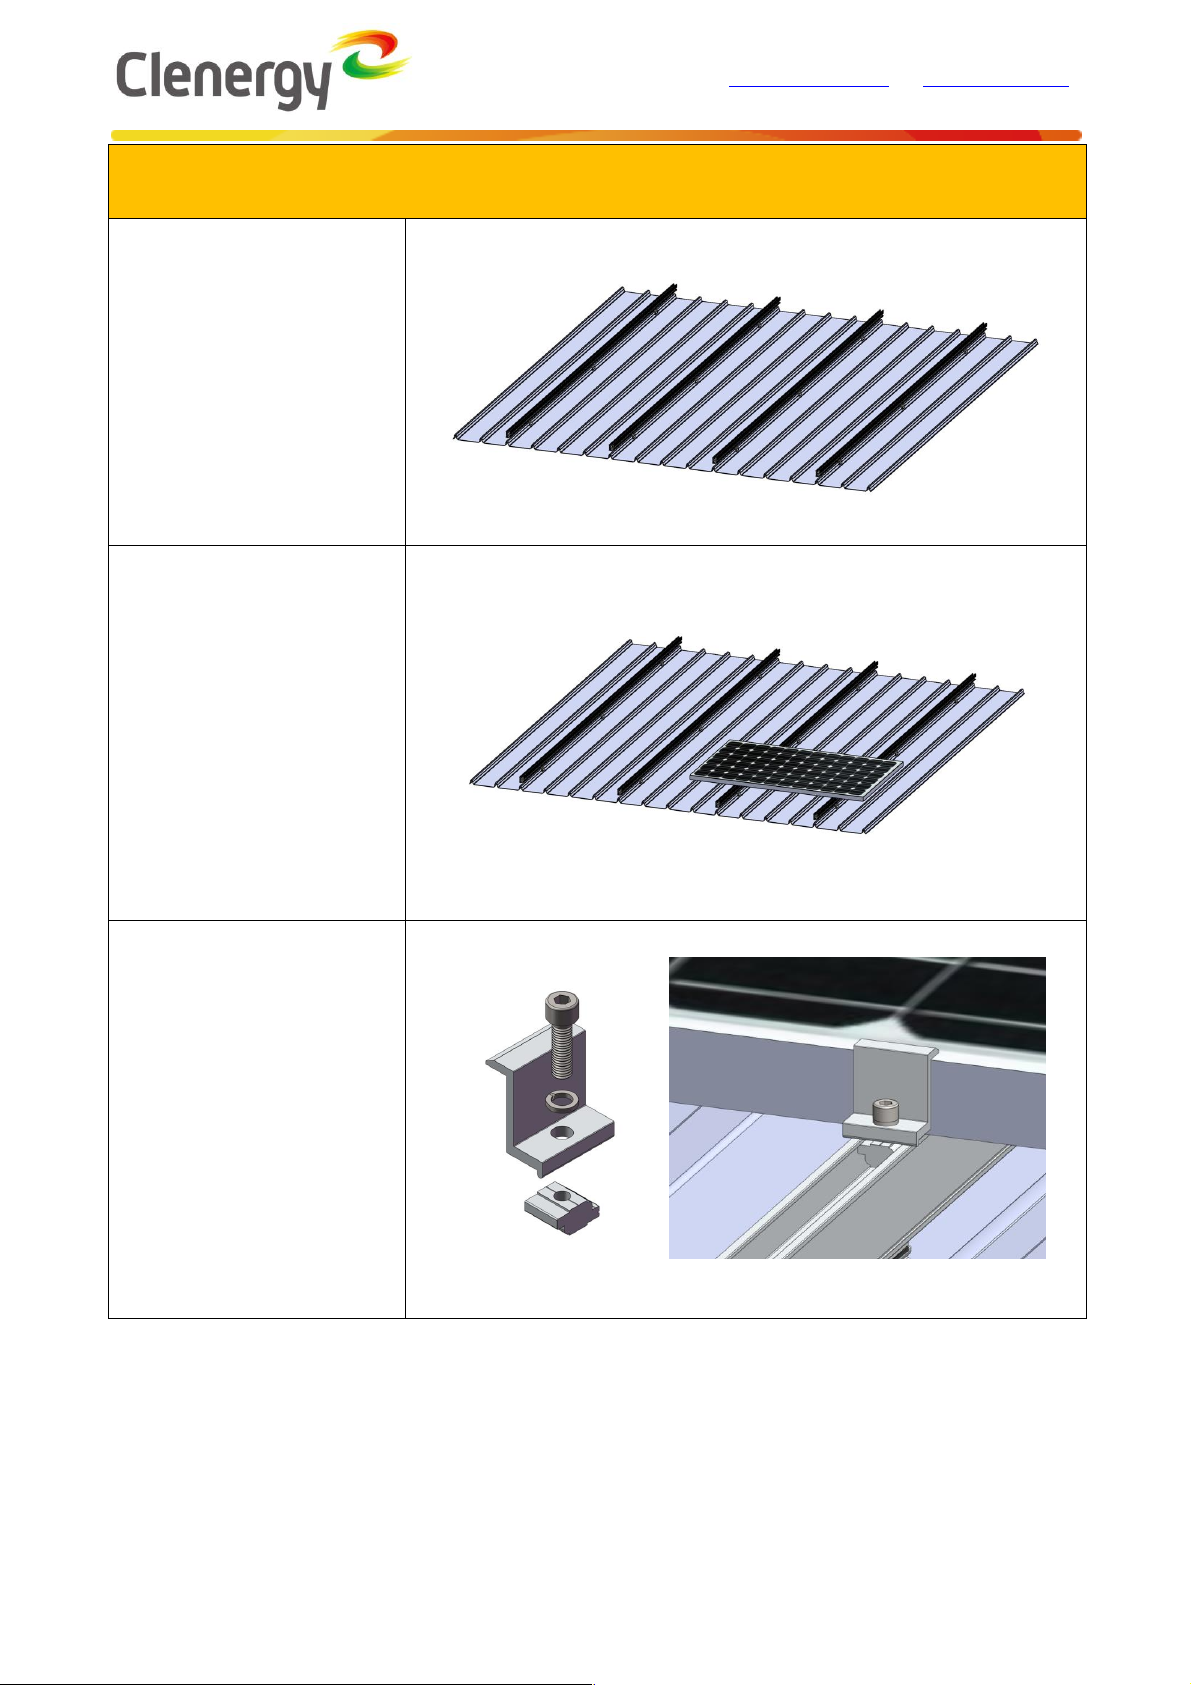
System Overview 04
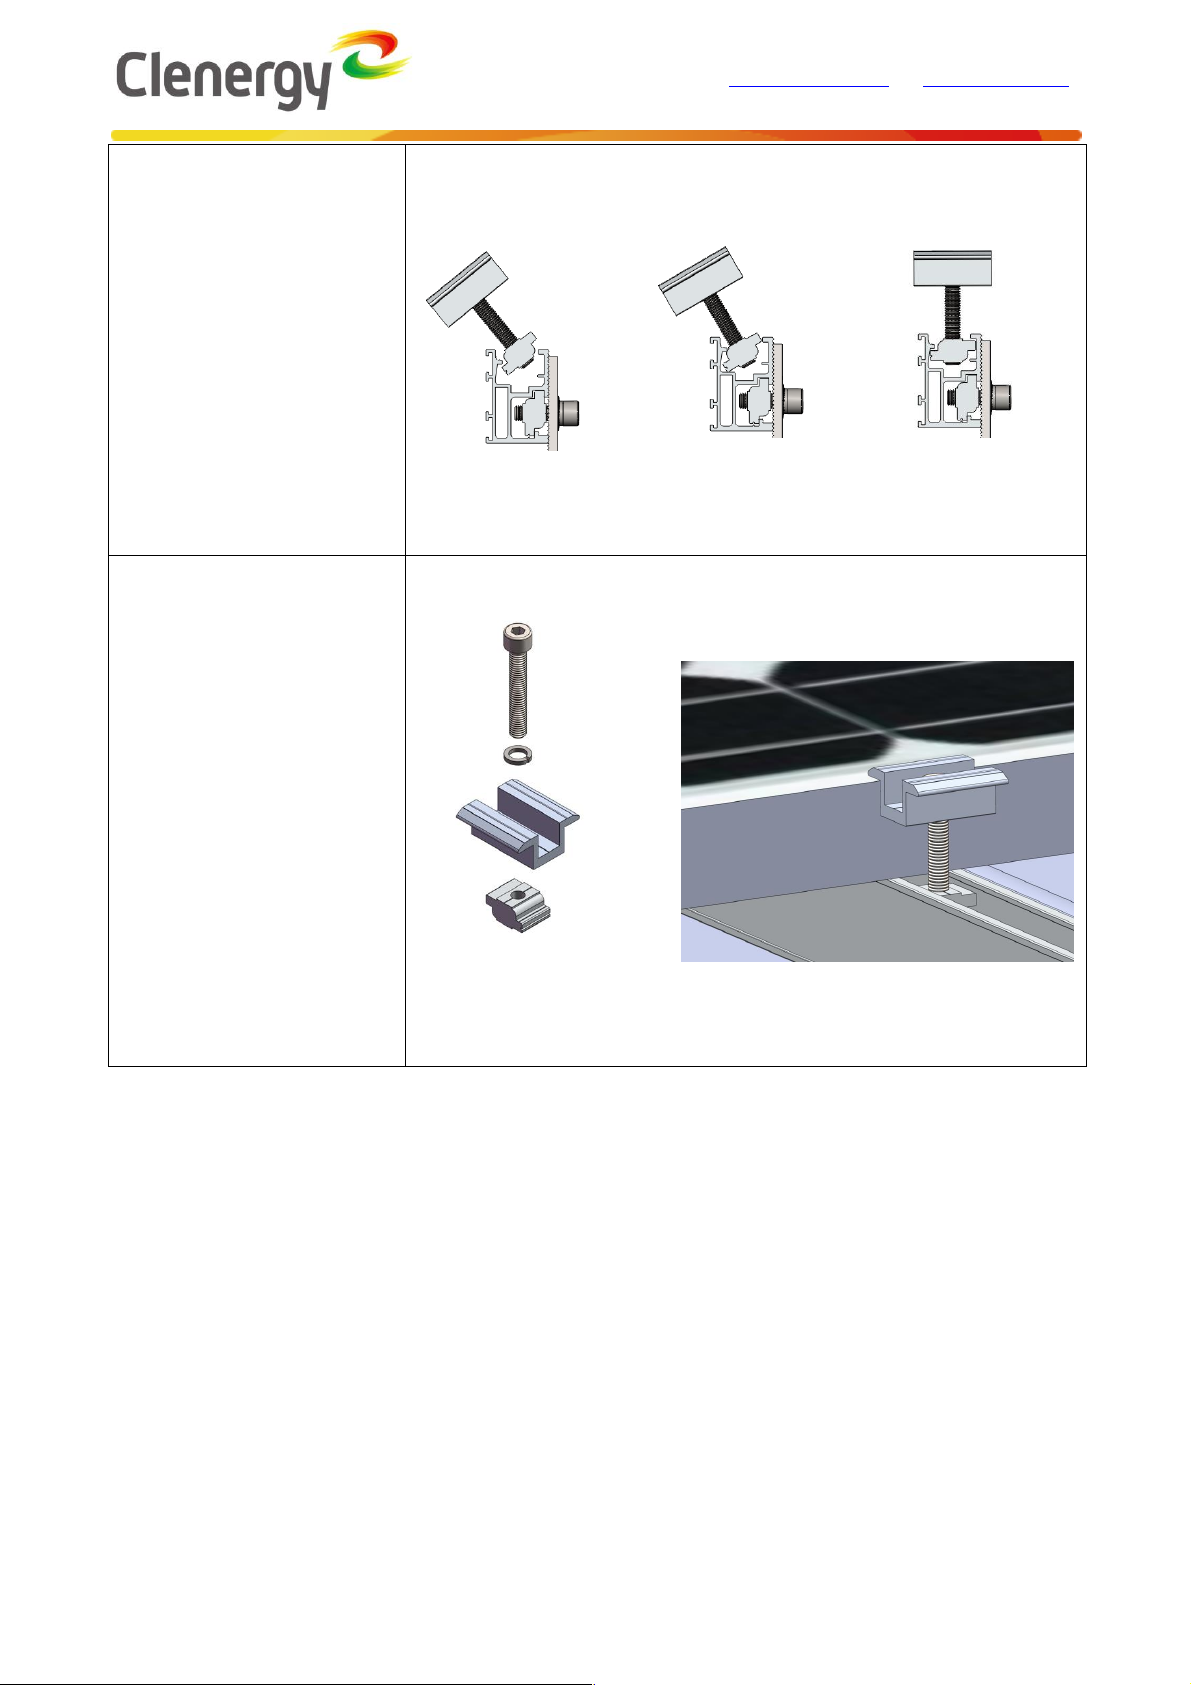
Installation Instruction 06

2 / 10
999-1009 Min'an Rd, Huoju Hi-tech Ind. Dev. Zone
Xiang'an District 361101, Xiamen, Fujian, China
E: sales@clenergy.com.cn | W: www.clenergy.com.cn
Tel: +86 592 311 0088 | SHA:603628
2. Tools & Components
2.1 Tools
Tools
Marker Pen
Screw Driver
Torque Wrench
Allen Key 6mm for M8 Hexagon
Socket Screw
Ta p e
String
Note:The tools in the figure are only used for installation of rack system (not included in
supply scope), please consult system installation personnel about installation of electronic
parts.
2.2 Components
Components
ER-IC-ST35(40)U18
U18 Inter Clamp
ER-EC-ST30/35/40/45
End Clamp
ER-R-B50
B50 Rail
ER-SP-B50
Splice for B50 Rail
ER-RC-AE/01
Rail Clamp

3 / 10
999-1009 Min'an Rd, Huoju Hi-tech Ind. Dev. Zone
Xiang'an District 361101, Xiamen, Fujian, China
E: sales@clenergy.com.cn | W: www.clenergy.com.cn
Tel: +86 592 311 0088 | SHA:603628
ER-I-13-TH
Klip-lok Interface for Hidden
26
ER-I-16-TH
Klip lok interface for Standing
seam 22
ER-I-18-TH
Interface for Standing Seam 20
ER-I-20A-TH
Klip-lok interface for
Angularity 18A
ER-I-31/45/M8
Klip-lok Interface 400- 700HS
ER-I-32/45/M8
Klip-lok Interface 406 with
U-opening

4 / 10
999-1009 Min'an Rd, Huoju Hi-tech Ind. Dev. Zone
Xiang'an District 361101, Xiamen, Fujian, China
E: sales@clenergy.com.cn | W: www.clenergy.com.cn
Tel: +86 592 311 0088 | SHA:603628
3. System Overview
3.1 Overview of PV-ezRack SolarRoof
①End Clamp
②U18 Inter Clamp
③B50 Rail
④Rail Clamp
⑤Klip-lok Interface
①
②
③
④
⑤

5 / 10
999-1009 Min'an Rd, Huoju Hi-tech Ind. Dev. Zone
Xiang'an District 361101, Xiamen, Fujian, China
E: sales@clenergy.com.cn | W: www.clenergy.com.cn
Tel: +86 592 311 0088 | SHA:603628
3.2 Precautions during Stainless Steel Fastener Installation
Improper operation may lead to deadlock of Nuts and Bolts. The steps below should be applied to
stainless steel nut and bolt assembly to reduce this risk.
3.2.1 General installation instructions:
(1) Apply force to fasteners in the direction of thread
(2) Apply force uniformly, to maintain the required torque
(3) Professional tools and tool belts are recommended
(4) In some cases, fasteners could be seized over time. As an option, if want to avoid galling or
seizing of thread, apply lubricant (grease or 40# engine oil) to fasteners prior to tightening.
3.2.2 Safe Torques
Please refer to safe torques defined in this guide as shown in Installation Instructions. In case power
tools are required, Clenergy recommends the use of low speed only. High speed and impact drivers
increase the risk of bolt galling (deadlock) If deadlock occurs and you need to cut fasteners please
make sure that there is no load on the fastener before you cut it. Avoid damaging the anodized or
galvanized surfaces.

6 / 10
999-1009 Min'an Rd, Huoju Hi-tech Ind. Dev. Zone
Xiang'an District 361101, Xiamen, Fujian, China
E: sales@clenergy.com.cn | W: www.clenergy.com.cn
Tel: +86 592 311 0088 | SHA:603628
4. Installation Instructions
4.1 Klip-lok Interface Installation
According your plan, mark
the position of Klip-lok
Interface on the tin roof with
Marker Pen and String.
Place Klip-lok Interface on
the marked position, as
shown figures on the right.
4.2 Rail Installation
4.2.1
To connect multiple rails
together, slide half of splices
on the rear side of the
pre-assembled rails. Fasten
the first M8 Allen bolt firmly
using the Allen key. Now
slide the next rail segment
into the other half of splice.
4.2.2
Tighten the second M8
Allen bolt using the Allen
key. The connection is
finished. An expansion gap
at the rail joints is
recommended. For this
purpose, leave a gap about
the same width as a finger

7 / 10
999-1009 Min'an Rd, Huoju Hi-tech Ind. Dev. Zone
Xiang'an District 361101, Xiamen, Fujian, China
E: sales@clenergy.com.cn | W: www.clenergy.com.cn
Tel: +86 592 311 0088 | SHA:603628
between the rail joints and
then loosely tighten the M8
Allen bolt.
Note:
Skip this step if the rail is
long enough and no need to
splice.
4.2.3
Affix the Rails and Klip-lok
Interface by Rail Clamp.
Recommend torque of M8
bolt is 18N.m
4.2.4
Repeat above steps and
install the rest of Rails.
Adjust Rails’position with
String, and align all ends of
Rails.

8 / 10
999-1009 Min'an Rd, Huoju Hi-tech Ind. Dev. Zone
Xiang'an District 361101, Xiamen, Fujian, China
E: sales@clenergy.com.cn | W: www.clenergy.com.cn
Tel: +86 592 311 0088 | SHA:603628
4.3 PV Module Installation
4.3.1
According to your plan,
install all Rails.
4.3.2
Mark the position of
PV-Module on Rails with
Marker Pen. Stretch a String
as a reference to align
PV-Module. Place the first
PV-Module on the marked
position.
4.3.3
Slide and affix the End
Clamp to the side face of
PV-Module, as shown in the
figures on the right. Fasten
the bolt refer to below
recommend torque.
Recommend torque of M8
bolt is 13N.m

9 / 10
999-1009 Min'an Rd, Huoju Hi-tech Ind. Dev. Zone
Xiang'an District 361101, Xiamen, Fujian, China
E: sales@clenergy.com.cn | W: www.clenergy.com.cn
Tel: +86 592 311 0088 | SHA:603628
4.3.4
To buckle to Clamps with
Z-module, put one leg of Z
module into the channel of
the Rail first, then press
second leg of Z module into
the channel.
4.3.5
Buckle the Inter Clamp into
the Rail and affix it to the
side face of PV-Module.
Don’t fasten the bolt to
make the installation of
second PV Module easier.

10 / 10
999-1009 Min'an Rd, Huoju Hi-tech Ind. Dev. Zone
Xiang'an District 361101, Xiamen, Fujian, China
E: sales@clenergy.com.cn | W: www.clenergy.com.cn
Tel: +86 592 311 0088 | SHA:603628
4.3.6
Place the second PV
Module, with its side face
parallel to the stretched
String, and fasten the Inter
Clamp.
Note:
Pay attention not to touch
the stretched String when
placing the PV Modules
Recommend torque of M8
bolt is 13N.m
4.3.7
Following the above steps
to install other PV-Modules
of this line and fasten the
End Clamp at another side
of end.
4.3.8
Repeat above steps to
install the rest PV-Modules.
The distance of any
adjacent face of PV-Module
should be 20mm.
20
Other Clenergy Solar Panel manuals

Clenergy
Clenergy PV-ezRack SolarTripod User manual

Clenergy
Clenergy PV-ezRack SolarTerrace III Technical manual

Clenergy
Clenergy PV-ezRack SolarTerrace II-A User manual

Clenergy
Clenergy PV-ezRack SolarTerraceIII-A Technical manual

Clenergy
Clenergy PV-ezRack SolarRoof Series Technical manual

Clenergy
Clenergy PV-ezRack SolarBase User manual
Popular Solar Panel manuals by other brands

Carbest
Carbest POWER SOLAR PANEL 120 User instruction

joule
joule ACAPELLA installation manual

SolarVenti
SolarVenti PR30 MONTAGE

Chicago Electric
Chicago Electric 90599 and Installation and service instructions

Kyocera
Kyocera KD Series Assembly and maintenance instructions

Panasonic
Panasonic BP-5917C40 Technical handbook