Clic HF 11 User manual

1 cm
0,6 cm
2.5 cm
12
C
A
DB
F
E
D
F
2 cm
3 cm
4 cm
3
Öffnung für Beschwerungstab |
Opening for weight bar
1 cm
0,6 cm
2.5 cm
12
C
A
D
B
F
E
D
F
2 cm
3 cm
4 cm
3
Öffnung für Beschwerungstab |
Opening for weight bar
1 cm
0,6 cm
2.5 cm
12
C
A
D
B
F
E
D
F
2 cm
3 cm
4 cm
3
Öffnung für Beschwerungstab |
Opening for weight bar
1 cm
0,6 cm
2.5 cm
12
C
A
DB
F
E
D
F
2 cm
3 cm
4 cm
3
Öffnung für Beschwerungstab |
Opening for weight bar
1 cm
0,6 cm
2.5 cm
12
C
A
DB
F
E
D
F
2 cm
3 cm
4 cm
3
Öffnung für Beschwerungstab |
Opening for weight bar
1 cm
0,6 cm
2.5 cm
12
C
A
DB
F
E
D
F
2 cm
3 cm
4 cm
3
Öffnung für Beschwerungstab |
Opening for weight bar
1 cm
0,6 cm
2.5 cm
1
2
C
A
DB
F
E
D
F
2 cm
3 cm
4 cm
3
Öffnung für Beschwerungstab |
Opening for weight bar
1 cm
0,6 cm
2.5 cm
1
2
C
A
DB
F
E
D
F
2 cm
3 cm
4 cm
3
Öffnung für Beschwerungstab |
Opening for weight bar
1 cm
0,6 cm
2.5 cm
12
C
A
DB
F
E
D
F
2 cm
3 cm
4 cm
3
Öffnung für Beschwerungstab |
Opening for weight bar
E FA B C D
HINNO AG, Blegistrasse 19, 6340 Baar, Switzerland, Tel. +41 (0)41 377 38 77, Fax +41 (0)41 377 38 60, info@hinno.ch, www.hinno.ch
’Clic Flächenvorhangsystem mit Hohlsaum
’Clic panel curtain system with slot
’Clic HF 11
Montageanleitung
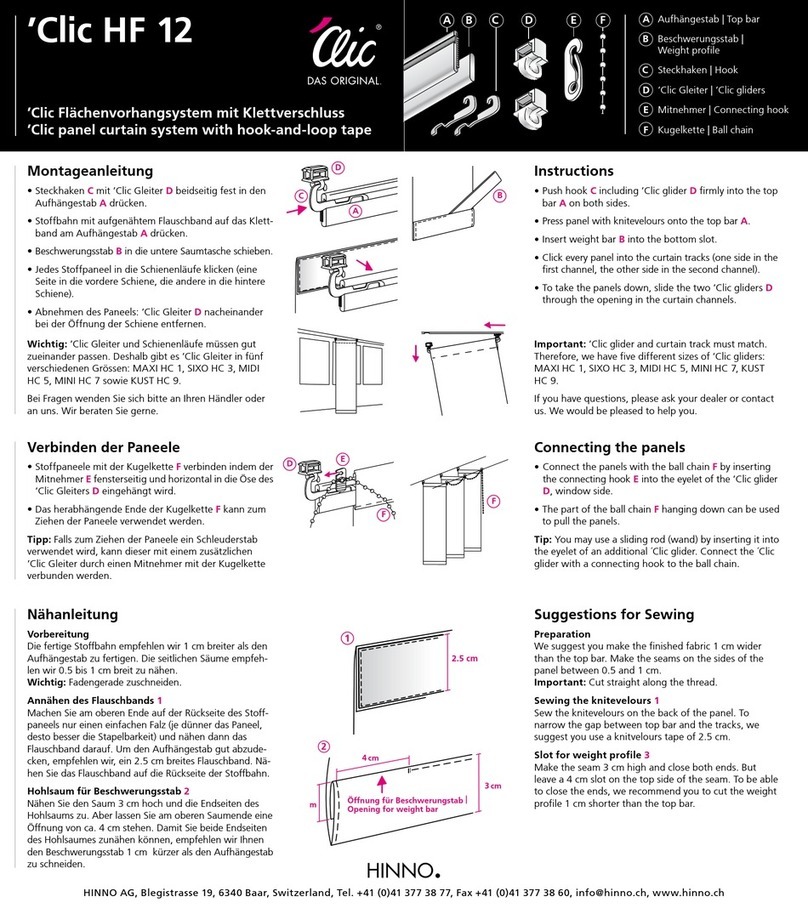
• Aufhängestab Adurch oberen Saum schieben.
• Steckhaken Cmit ’Clic Gleiter Dbeidseitig fest in den
Aufhängestab Adrücken.
• Beschwerungsstab Bin die untere Saumtasche schieben.
• Jedes Stoffpaneel in die Schienenläufe klicken (eine
Seite in die vordere Schiene, die andere in die hintere
Schiene).
• Abnehmen des Paneels: ’Clic Gleiter Dnacheinander
bei der Öffnung der Schiene entfernen.
Wichtig: ’Clic Gleiter und Schienenläufe müssen gut
zueinander passen. Deshalb gibt es ’Clic Gleiter in fünf
verschiedenen Grössen: MAXI HC 1, SIXO HC 3, MIDI
HC 5, MINI HC 7 sowie KUST HC 9.
Bei Fragen wenden Sie sich bitte an Ihren Händler oder
an uns. Wir beraten Sie gerne.
Instructions
• Slide top bar Athrough upper slot.
• Push hook Cincluding ’Clic glider Dfirmly into the top
bar Aon both sides.
• Insert weight bar Binto the bottom slot.
• Click every panel into the curtain tracks (one side in the
first channel, the other side in the second channel).
• To take the panels down, slide the two ’Clic gliders D
through the openings in the curtain channels.
Important: ’Clic glider and curtain track must match.
Therefore, we have five different sizes of ’Clic gliders:
MAXI HC 1, SIXO HC 3, MIDI HC 5, MINI HC 7, KUST
HC 9.
If you have questions, please ask your dealer or contact
us. We would be pleased to help you.
Connecting the panels
• Connect the panels with the ball chain Fby
inserting the connecting hook Einto the eyelet
of the ’Clic glider D, window side.
• The part of the ball chain Fhanging down can be used
to pull the panels.
Tip: You may use a sliding rod (wand) by inserting it into
the eyelet of an additional ´Clic glider. Connect the ´Clic
glider with a connecting hook to the ball chain.
Verbinden der Paneele
• Stoffpaneele mit der Kugelkette Fverbinden indem der
Mitnehmer Efensterseitig und horizontal in die Öse des
’Clic Gleiters Deingehängt wird.
• Das herabhängende Ende der Kugelkette Fkann zum
Ziehen der Paneele verwendet werden.
Tipp: Falls zum Ziehen der Paneele ein Schleuderstab
verwendet wird, kann dieser mit einem zusätzlichen
’Clic Gleiter durch einen Mitnehmer mit der Kugelkette
verbunden werden.
Nähanleitung
Vorbereitung
Die fertige Stoffbahn empfehlen wir 1 cm breiter als den
Aufhängestab zu fertigen. Die seitlichen Säume empfehlen
wir 0.5 bis 1 cm breit zu nähen.
Wichtig: Fadengerade zuschneiden.
Hohlsaum für Aufhängestab 1
Nähen Sie den Hohlsaum 3 cm hoch. Wir empfehlen an
den oberen Ecken des Saumes einen kleinen Fixierstich
anzubringen, damit der Aufhängestab im Saum gut sitzt.
Variante 2:Wenn Sie der Freiraum zwischen Aufhänge-
stab und Schiene stören sollte, können Sie oberhalb des
Hohlsaumes für den Aufhängestab ein «Köpfchen» von ca.
0.6 cm Höhe nähen.
Hohlsaum für Beschwerungsstab 3
Nähen Sie den Saum 3cm hoch und die Endseiten des
Hohlsaums zu. Aber lassen Sie am oberen Saumende eine
Öffnung von ca. 4cm stehen. Damit Sie beide Endseiten
des Hohlsaumes zunähen können, empfehlen wir Ihnen
den Beschwerungsstab 1 cm kürzer als den Aufhängestab
zu schneiden.
Suggestions for Sewing
Preparation
We suggest you make the finished fabric 1 cm wider
than the top bar. Make the seams on the sides of the
panel between 0.5 and 1 cm.
Important: Cut straight along the thread.
Slot for top bar 1
Sew the seam 3 cm high. We suggest further to make
a small stitch on each side of the seam, so that the top
bar stays well in place. Alternative 2:If you wish to
eliminate the distance between top bar and curtain
track, you could sew a small heading of about 0.6 mm.
Slot for weight profile 3
Make the seam 3 cm high and close both ends. But
leave a 4 cm slot on the top side of the seam. To be able
to close the ends, we recommend you to cut the weight
profile 1 cm shorter than the top bar.
A Aufhängestab | Top bar
B Beschwerungsstab |
Weight profile
C Steckhaken | Hook
D ’Clic Gleiter | ’Clic gliders
E Mitnehmer | Connecting hook
F Kugelkette | Ball chain

1 cm
0,6 cm
2.5 cm
12
C
A
DB
F
E
D
F
2 cm
3 cm
4 cm
3
Apertura per barra di carico |
Fente pour la barre de lestage
1 cm
0,6 cm
2.5 cm
12
C
A
DB
F
E
D
F
2 cm
3 cm
4 cm
3
Öffnung für Beschwerungstab |
Opening for weight bar
1 cm
0,6 cm
2.5 cm
12
C
A
D
B
F
E
D
F
2 cm
3 cm
4 cm
3
Öffnung für Beschwerungstab |
Opening for weight bar
1 cm
0,6 cm
2.5 cm
12
C
A
DB
F
E
D
F
2 cm
3 cm
4 cm
3
Öffnung für Beschwerungstab |
Opening for weight bar
1 cm
0,6 cm
2.5 cm
12
C
A
D
B
F
E
D
F
2 cm
3 cm
4 cm
3
Öffnung für Beschwerungstab |
Opening for weight bar
1 cm
0,6 cm
2.5 cm
12
C
A
DB
F
E
D
F
2 cm
3 cm
4 cm
3
Öffnung für Beschwerungstab |
Opening for weight bar
1 cm
0,6 cm
2.5 cm
12
C
A
DB
F
E
D
F
2 cm
3 cm
4 cm
3
Öffnung für Beschwerungstab |
Opening for weight bar
1 cm
0,6 cm
2.5 cm
1
2
C
A
DB
F
E
D
F
2 cm
3 cm
4 cm
3
Öffnung für Beschwerungstab |
Opening for weight bar
1 cm
0,6 cm
2.5 cm
1
2
C
A
DB
F
E
D
F
2 cm
3 cm
4 cm
3
Öffnung für Beschwerungstab |
Opening for weight bar
E FA B C D
HINNO AG, Blegistrasse 19, 6340 Baar, Switzerland, Tel. +41 (0)41 377 38 77, Fax +41 (0)41 377 38 60, info@hinno.ch, www.hinno.ch
’Clic HF 11
Systema di tende a panello ’Clic con orlo
Système ’Clic pour panneaux japonais avec ourlet
Istruzione di montaggio
• Infilare l’asta di sospensione Anell’orlo superiore.
• Premere con forza da entrambi i lati il gancio Ccon lo
scivolo ’Clic Dnell’asta di sospensione A.
• Infilare la barra di carico Bnella tasca dell’orlo inferiore.
• Cliccare ogni pannello di stoffa nelle guide di scorri-
mento (un lato nella guida anteriore, l’altro nella guida
posteriore).
• Togliere il pannello: Togliere gli scivoli ’Clic D uno
dopo l’altro dall’apertura della guida.
Importante: Scivolo ‘Clic e guide di scorrimento devo-
no essere ben adatte l’una all’altra. Per questo gli scivoli
‘Clic sono ottenibili in cinque diverse grandezze: MAXI
HC 1, SIXO HC 3, MIDI HC 5, MINI HC 7, KUST HC 9.
In caso di domande si prega di rivolgersi al rivenditore o
a noi, vi daremo volentieri i consigli richiesti.
Instruction de montage
• Glisser le tringle Aà travers l’ourlet supérieur.
• Fixer solidement des deux côtés le crochet Cavec le
glisseur ’Clic Dsur le chariot A.
• Glisser la barre de lestage Bdans la poche inférieure
de l’ourlet.
• A l’aide des glisseurs ’Clic D, cliquer chaque panneau
de tissu dans les deux rails (un glisseur dans le rail
avant et un glisseur dans le rail arrière).
• Démontage du panneau : Retirer le premier glisseur
’Clic Ddu rail et basculer le tringle Avers le bas. Reti-
rer le deuxième glisseur ’Clic D.
Important : Les glisseurs ‘Clic et la dimension des rails
doivent être bien adaptés. Il existe à cet effet cinq diffé-
rentes dimensions de glisseurs ‘Clic: MAXI HC 1, SIXO
HC 3, MIDI HC 5, MINI HC 7, KUST HC 9.
Pour toutes questions, veuillez vous adresser à votre re-
vendeur ou chez nous, nous vous conseillons volontiers.
Istruzione di cucitura
Preparazione
Consigliamo di preparare il telo di stoffa finito più largo
di 1 cm rispetto all’asta di sospensione e di cucire gli orli
laterali con una larghezza di ca. 0.5 a 1 cm.
Importante: Tagliare seguendo la direzione del filo.
Orlo per asta di sospensione 1
Cucire l’orlo alto 3 cm. Consigliamo di eseguire una
piccola cucitura di fissaggio presso gli angoli superiori
dell’orlo, per permettere un buon alloggiamento dell’asta
di sospensione nell’orlo. Varianti 2:Se lo spazio libero
tra asta di sospensione e guida dovesse disturbare, è
possibile cucire sopra l’orlo per l’asta di sospensione una
«testina» di circa 0.6 cm.
Orlo per barra di contropeso 3
Cucire l’orlo alto 3 cm e chiudere i lati terminali dell’orlo.
Nella parte terminale superiore dell’orlo lasciare un’aper-
tura lunga circa 4 cm.
Fil rouge pour coudre
Préparation
Nous recommandons de confectionner le panneau de
tissu terminé plus large de 1 cm que le rail de suspension
et de coudre les ourlets latéraux d’une largeur de 0.5 à
1 cm environ.
Important: Découper dans le sens des fibres.
Ourlet à jour pour tringle 1
Cousez un ourlet à jour d’une hauteur de 3 cm. Nous
recommandons de poser aux deux extrémités supérieures
de l’ourlet un petit point de fixation afin que le chariot
s’adapte bien dans l’ourlet. Variation 2:Si l’espace
libre entre le chariot et le rail vous dérange, vous pouvez
coudre au-dessus de l’ourlet creux une petite tête de
0.6 cm environ.
Ourlet pour barre de lestage 3
Nous recomanndons une couture de 3 cm de hauteru, de
fermer les deux côtés et de laisser ouverte une fente de 4 cm.
Raccorder les panneaux
• Relier les panneaux de tissus à l’aide de la chaîne à
boules F. Raccrocher à cet effet le crochet pour chaîne
Edu côté fenêtre à l’oeillet du glisseur ’Clic D.
• Le bout restant de la chaîne à boules Fpeut être utilisé
pour tirer les rideaux.
Autres indications: Si souhaité, un lance rideau
peut être raccroché à l’oeillet d’un glisseur ´Clic addi-
tionnel. Relier ce glisseur avec un crochet pour chaîne
avec la chaîne à boules.
Collegamento dei pannelli di stoffa
• Collegare i pannelli di stoffa con la catena F,
agganciando il trascinatore Edal lato finestra e
orizzontalmente nell’occhiello dello scivolo ’Clic D.
• Il terminale pendente della catena Fpuò essere
usato per tirare i pannelli.
Ulteriori indicazioni: Se desiderato, fissare un
bastone tiratenda alla catena con scivoli ’Clic supple-
mentari attraverso il trascinatore.
AAsta di sospensione | Tringle
BBarra di contropeso |
Barre de lestage
CGanci | Crochets
D Scivoli ’Clic | Glisseurs ’Clic
E Traino | Crochet de connexion
F Catena | Chaînette à boules
Other Clic Window Blind manuals
Popular Window Blind manuals by other brands
IKEA
IKEA FYRTUR 100 manual
Louvolite
Louvolite Roller Duo Roll Fitting and operating instructions
Vista
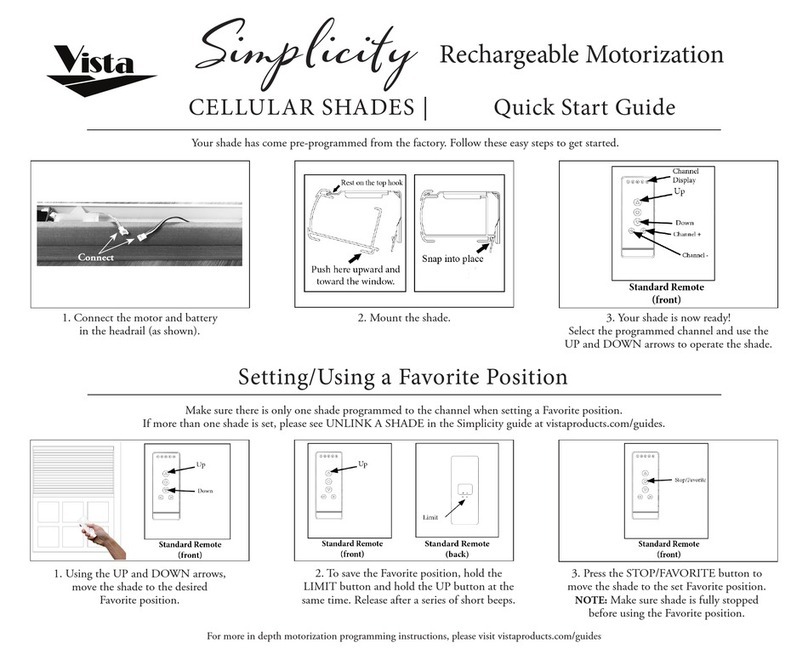
Vista Simplicity Cellular Shades quick start guide
Stobag
Stobag Universal US3510 installation instructions
Plissees
Plissees DF Comfort 20 Assembly and operating instructions
Motion
Motion CMD-03 Setup guide

rollease acmeda
rollease acmeda MULTI-LINK installation manual

Electra
Electra Roller How to install

Gimenez Ganga
Gimenez Ganga Saxun Stor Glass Avant Assembly and installation manual
Smith & Noble
Smith & Noble Board Step by step installation instructions
shadetec
shadetec VS 2 Assembly manual
Markilux
Markilux 620 tracfix Operation manual
