CLIMAQUA VIDA 30 User manual

A
A
1LED®
AUFBAU
MONTAGE
MONTAGGIO
SET UP
VIDA 30
1
6
7
2
3
4
5
Stecker und Schalter vom Wasser fern halten
Gardez la prise et le régulateur hors de l’eau
Tenere la spina e l’erogatore fuori dall’acqua
Keep plug and switch out of the water
CLIMAQUA® PUMP 600 OUTDOOR
CLIMAQUA® 1LED
Austauschbar
Echangeable
Scambiabile
Replaceable
Wassertank
Réservoir d’eau
Serbatoio di acqua
Water tank
DEUTSCH
Aufbau- und Pegeanleitung VIDA
AUFBAU
1. Netzkabel ohne Adapter von oben durch das Rohr im Tank schieben und unten
durch Kabelausgang schieben.
2. Verbindungsstücke von Pumpe und LED ineinander stecken und verschrauben.
3. Deckel auf das Rohr aufsetzen.
4. Schlauch mit Pumpe und Kupferrohr verbinden.
5. Die Pumpe in den Wassertank legen und Brunnenteile zusammenfügen.
6. Kaltes Wasser in den Wassertank giessen und den Wasserstand mindestens
ca. 2cm über der Pumpe halten. Wenn möglich entmineralisiertes Wasser verwenden
oder regelmässig CLIMAQUA® AQUA SOFT und ALGICID dem Wasser beigeben.
7. Das Netzkabel an das Stromnetz anschliessen.
ANWEISUNGEN
»Der Stecker muss vor jeder Manipulation am Gerät aus der Steckdose gezogen
werden.
»Keine beschädigten Netzkabel verwenden. Beschädigte Netzkabel sofort
reparieren lassen.
»Die Pumpe nie trocken laufen lassen und sofort austauschen, wenn sie
beschädigt ist.
»Den Brunnen regelmässig reinigen.
»Vor der Reinigung oder diversen Manipulationen immer den Stromstecker
herausziehen.
»Die Pumpe muss alle 3 bis 4 Monate gereinigt werden. Dazu können die
Frontpartie und der Rotor entfernt werden (Abb. Rückseite).
»Die Wassermenge kann am Regulator der Pumpe eingestellt werden.
»Das CLIMAQUA® 1LED (Beleuchtung) kann mühelos mit einem
Schraubenzieher ersetzt werden.
»Aussenbrunnen sind nicht für den Einsatz im Haus geeignet.
Ȇberwinterung: sicherstellen, dass der Brunnen an einem vor Temperaturen
geschützten Ort überwintert wird. Pumpe wird durch Eis oder Frost beschädigt.
JEDES STÜCK EIN UNIKAT. HANDGEMACHT.
HAFTUNGSAUSSCHLUSS
Unregelmässigkeiten in Stein und Verarbeitung charakterisieren das
handgearbeitete Naturprodukt. Die Garantie deckt nur Mängel ab, welche die
Funktion des Produktes beeinträchtigen.
Nicht ohne Schutz auf kratzempndliche Unterlage stellen.
Den Brunnen nie auf wasserempndliche Möbel/Boden/Umgebung stellen.
Spritzgefahr!
Der Hersteller übernimmt keine Haftung bei Nichteinhalten dieser Vorschrift.
VIELEN DANK UND VIEL FREUDE MIT IHREM BRUNNEN VON CLIMAQUA®
FRANÇAIS
Instructions de montage et d’entretien VIDA
MONTAGE
1. Enler le cordon d’alimentation sans l’adaptateur par le haut, à travers le tube
dans le réservoir et en bas, à travers la sortie du câble.
2. Emboîter les pièces de raccordement de la pompe et de la LED, puis visser.
3. Poser le couvercle sur le tuyau.
4. Relier le tuyau avec la pompe et le tube de cuivre.
5. Placer la pompe dans le réservoir d’eau et assembler les composants de la
fontaine.
6. Verser de l’eau froide dans le réservoir d’eau et maintenir le niveau d’eau au
moins 2cm au-dessus de la pompe. Si possible, utiliser de l’eau déminéralisée
ou ajouter régulièrement CLIMAQUA® AQUA SOFT et ALGICIDE à l’eau.
7. Brancher le cordon d’alimentation sur le secteur.
INSTRUCTIONS
»Toujours enlever la prise de courant avant toute manipulation.
»Ne pas utiliser un câble d’alimentation endommagé. Il faut le faire
immédiatement réparer.
»Ne jamais laisser fonctionner la pompe à sec et la remplacer immédiatement si
elle est endommagée.
»La pompe doit être nettoyée tous les 3 à 4 mois. Pour ce faire, la partie avant et
le rotor peuvent être démontés (voir verso).
»Nettoyer la fontaine d’extérieur régulièrement.
»Avant le nettoyage ou d’autres manipulations, toujours débrancher la prise
d’alimentation.
»La quantité d’eau peut être réglée par le régulateur de la pompe.
»Le CLIMAQUA® 1LED est facilement remplaçable avec un tournevis.
»La fontaine d’extérieur n’est pas conçue pour l’utilisation à l’intérieur.
»Hivernage : assurez-vous que la fontaine est mise en hivernage dans un
lieu protégé contre les températures extrêmes. La pompe pourrait être
endommagée par la glace ou le givre.
CHAQUE PIÈCE EST UNIQUE. FABRIQUÉ À LA MAIN.
CLAUSE DE NON-RESPONSABILITÉ
Les imperfections légères de la pierre ou de la nition sont une caractéristique des
produits naturels fabriqués à la main. La garantie couvre uniquement les défauts
ayant un impact sur la fonctionnalité du produit.
Ne pas placer sans protection sur un sol craignant des égratignures. Ne jamais
placer la fontaine sur un meuble/sol/environnement sensible à l’eau. Risque
d’éclaboussures! Le fabricant ne pourra être tenu responsable en cas de non-
respect de cette recommandation. Veuillez conserver ce manuel d’utilisation.
MERCI ET PROFITEZ BIEN DE VOTRE FONTAINE CLIMAQUA®
ITALIANO
Istruzioni per il montaggio e la manutenzione di VIDA
MONTAGGIO
1. Inserire il cavo di alimentazione senza adattatore dall’alto, attraverso il tubo nel
serbatoio e far passare l’estremità del cavo verso il basso.
2. Inlare l’uno nell’altro i raccordi della pompa e il LED ed avvitare.
3. Posizionare il coperchio sul tubo.
4. Collegare il tubo essibile con la pompa e il tubo di rame.
5. Posizionare la pompa nel serbatoio dell’acqua e congiungere le parti della
fontana.
6. Versare acqua fredda nel serbatoio dell’acqua e mantenerne il livello ad
almeno 2 cm sopra la pompa. Se possibile, utilizzare acqua demineralizzata o
BEDIENUNGSANLEITUNG
INSTRUCTIONS
ISTRUZIONI
INSTRUCTIONS
>
>
>
>
Top in der Mie posionieren
Posionnez le top au millieu
Posizionare il top nel mezzo
Place the top in the middle
AQUASOFT
ALGICID
H2O
®
NATURE AT HOME
WWW.CLIMAQUA.SWISS
aggiungere all’acqua CLIMAQUA® AQUA SOFT e ALGICID regolarmente.
7. Collegare il cavo di alimentazione alla spina.
ISTRUZIONI D’USO
»Prima di qualsiasi intervento o manutenzione sulla fontana, staccare sempre la
spina dalla presa di corrente.
»Prima della pulizia o di altri interventi di manutenzione, è sempre necessario
staccare la spina.
»Non usare cavi di alimentazione danneggiati. In caso di danneggiamento, farli
riparare immediatamente.
»Non fare funzionare mai la pompa a secco. In caso di danneggiamento, sostituirla
immediatamente.
»La pompa deve essere pulita ogni 3 a 4 mesi. Per pulirla, è possibile rimuovere il
pannello frontale e il rotore (vedi verso).
»Pulire la fontana da esterni regolarmente.
»Il usso dell’acqua può venir regolato tramite l’apposita regolazione nella pompa.
»Il CLIMAQUA® 3LED (l’illuminazione) può esser facilmente sostituito con un
cacciavite.
»Le fontane da esterni non sono adatte all’uso in ambienti interni.
»In inverno, fare in modo che la fontana possa svernare in un posto in un protetto
dalle temperature, in quanto, con il ghiaccio e il gelo, la pompa si danneggia.
OGNI ESEMPLARE È UN PEZZO UNICO. FATTO A MANO.
ESONERO DA RESPONSABILITÀ
Le irregolarità della pietra e della lavorazione caratterizzano il prodotto naturale
realizzato manualmente. La garanzia copre soltanto i difetti che compromettono la
funzionalità del prodotto.
Non appoggiare senza protezione su pavimenti sensitivi al grafo. La fontana
non deve mai essere posizionata su mobili/superci o in ambienti sensibili
all’acqua. Pericolo di spruzzi! Il produttore non si assume alcuna responsbilità in
caso di mancato rispetto di questa norma. Conservare queste istruzioni d’uso.
VI RINGRAZIAMO E VI AUGURIAMO PIACEVOLISSIMI MOMENTI CON LA
VOSTRA FONTANA DI CLIMAQUA®
ENGLISH
Assembly and Maintenance Instructions VIDA
ASSEMBLY
1. Push the power cable (without the adapter) through the tube in the tank from
above and slide it through the cable hole at the bottom.
2. Put the pump and LED connectors into each other and screw together.
3. Place the cover on the pipe.
4. Connect the tube to the pump and copper pipe.
5. Place the pump in the tank and put all the fountain parts together.
6. Pour cold water into the water tank and ensure that the water level always stays
roughly 2cm higher than the pump. If possible, use demineralised water, or
regularly add CLIMAQUA® AQUA SOFT and ALGICID to the water.
7. Connect the power cable to the mains.
INSTRUCTIONS
»The plug must be removed from the socket before making any adjustments to the
device.
»Do not use damaged power cords. Repair them immediately.
»Never let the pump run dry and replace it immediately, once it is damaged.
»The pump must be cleaned every 3 to 4 months. In so doing, the front section and
rotor may be removed (see back for drawing).
»Clean the outdoor fountain regularly.
»Before cleaning or handling the pump in any way, always pull the power
»plug from the wall socket.
»The amount of running water can be adjusted with the regulator on the pump.
»The CLIMAQUA® 3LED can easily be replaced with an screw driver.
»Outdoor fountains are not suitable for installation indoors.
»Winter storage: In winter, ensure that the fountain is stored in a location where it
will not be subjected to freezing temperatures: the pump will be damaged by ice
or frost.
EACH PIECE IS UNIQUE. HANDMADE.
DISCLAIMER
This handmade natural product is characterized by irregularities in the stone and
workmanship.
The warranty only covers defects which impair the functionality of the product.
Do not place without protection on scratch-sensitive oors. Never place the fountain
on water-sensitive furniture, oors or surroundings. Risk of splashing! The
manufacturer accepts no liability for failure to observe this provision. Please keep
these operating instructions handy.
THANK YOU VERY MUCH. WE HOPE YOU ARE DELIGHTED WITH YOUR
FOUNTAIN FROM CLIMAQUA®
CLIMAQUA® PRODUKTE SIND UNIKATE UND WERDEN AUS NATÜRLICHEN
MATERIALIEN VON HAND GEFERTIGT. BESUCHEN SIE UNSERE
WEBSEITE, UM MEHR ÜBER DIE CLIMAQUA® WELT ZU ERFAHREN. DORT
ZEIGEN WIR IHNEN WEITERE FOUNTAINS, SOWIE ABER AUCH DAS GANZE
SORTIMENT AN CLIMAQUA® FLAMES UND CLIMAQUA® PLANTERS.
LES PRODUITS CLIMAQUA® SONT UNIQUES ET FABRIQUÉS À LA MAIN À
PARTIE DE MATÉRIAUX NATURELS. POUR PLUS D’INFORMATIONS SUR
L’UNIVERS DE CLIMAQUA®, NOUS VOUS INVITONS À VISITER NOTRE SITE
INTERNET. VOUS Y TROUVEREZ D’AUTRES FONTAINES ET L’ENSEMBLE DE
L’ASSORTIMENT DE CLIMAQUA® FLAMES ET CLIMAQUA® PLANTERS.
I PRODOTTI CLIMAQUA® FOUNTAINS SONO ESEMPLARI UNICI PRODOTTE
A MANO E CON SOLI MATERIALI NATURALI. VISITI IL NOSTRO SITO PER
SAPERNE DI PIÙ SULL’UNIVERSO CLIMAQUA®. POTRÀ TROVARE MOLTI
ALTRI MODELLI DI FONTANE, OLTRE CHE L’INTERO ASSORTIMENTO
CLIMAQUA® FLAMES E CLIMAQUA® PLANTERS.
CLIMAQUA® PRODUCTS ARE UNIQUE PIECES, MADE BY HAND OUT
OF NATURAL MATERIALS. VISIT THE WEBSITE AND DISCOVER THE
WORLD OF CLIMAQUA®. YOU’LL FIND OUT THE COMPLETE RANGE OF
NATURAL FOUNTAINS AND LEARN ABOUT THE LARGE PROGRAM OF THE
CLIMAQUA® FLAMES AND CLIMAQUA® PLANTERS.
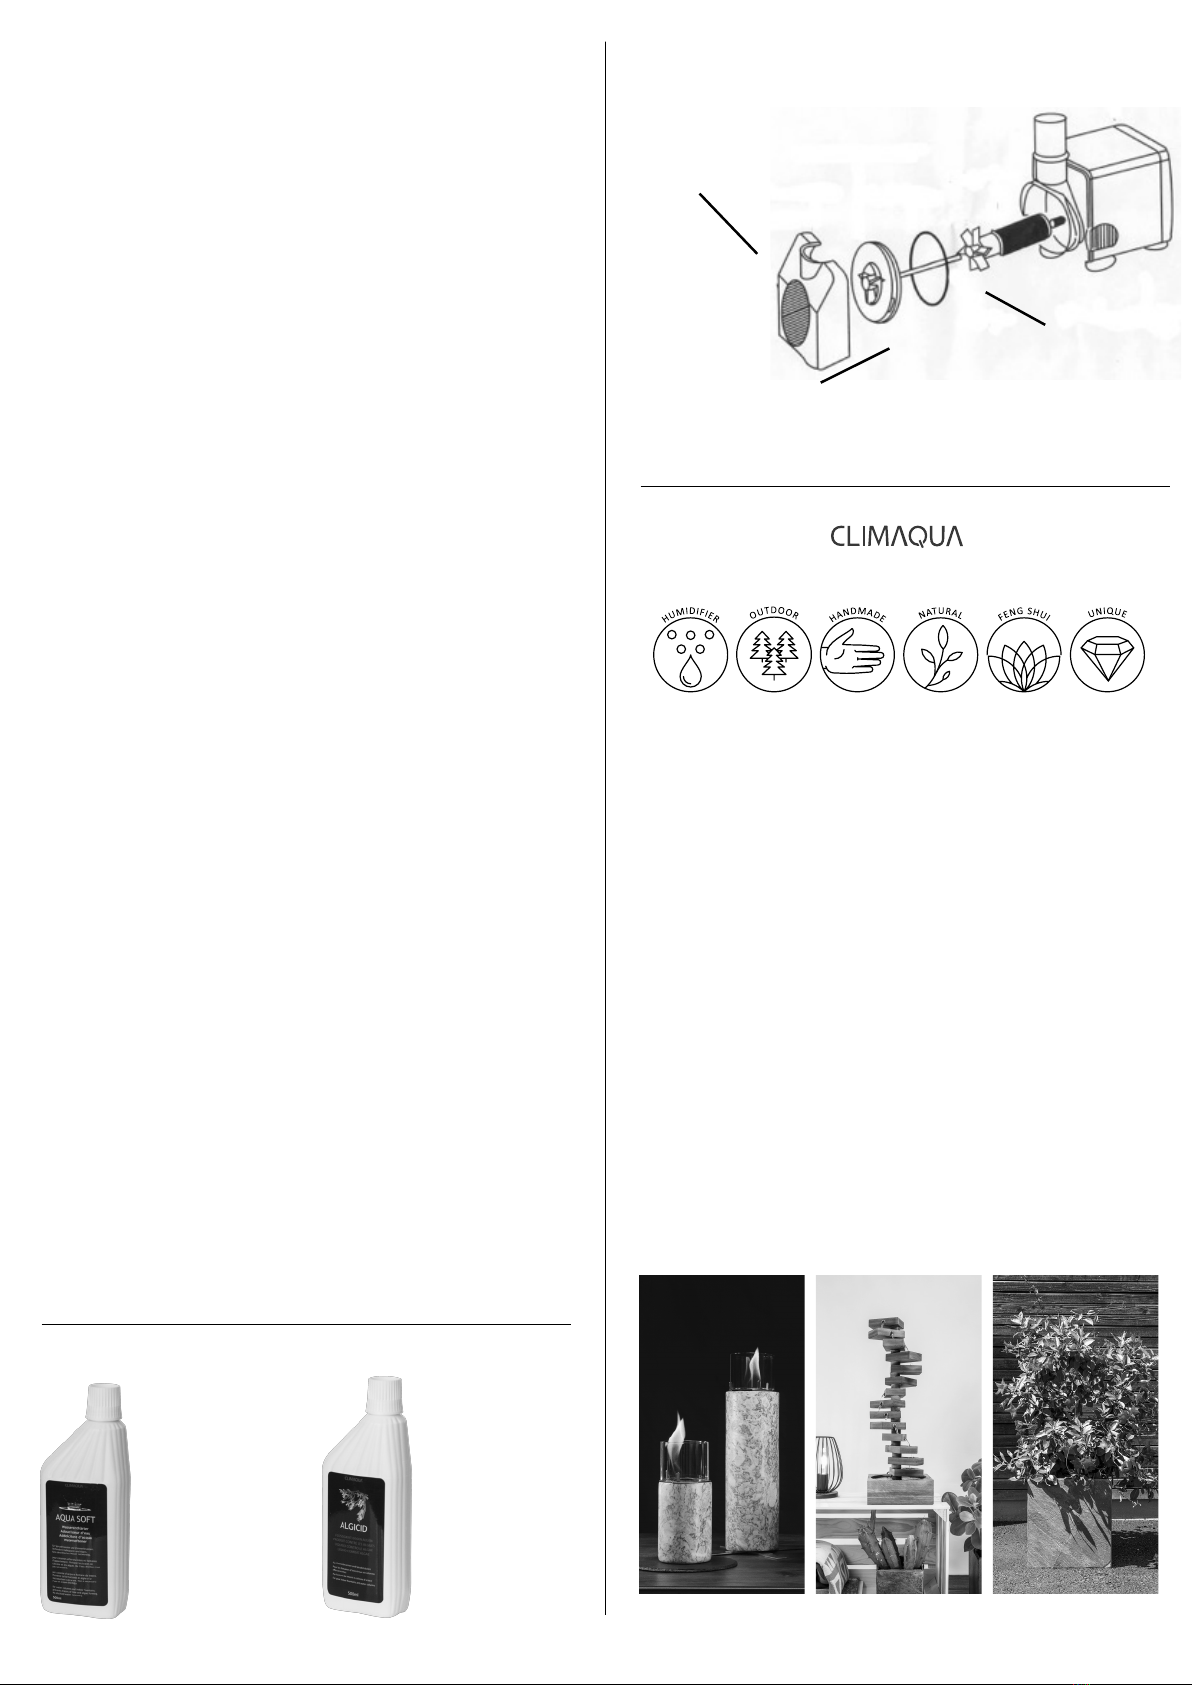
ÖFFNEN DER PUMPE
OUVRIR LA POMPE
APRIRE LA POMPA
OPEN THE PUMP
®
NATURE AT HOME
FLAMES PLANTERSFOUNTAINS
Wasserdruckregler und Frontpartie
Réglage de la pression d’eau et plaque frontale
Regolazione del usso d’acqua e coperchio
Water pressure regulator and front part
Rotor reinigen
Nettoyer le rotor
Pulire il rotore
Clean the rotor
Vorsichtig von Hand öffnen
Ouvrir soignesement à la main
Aprire a mano con attenzione
Carefully open by hand
<
CLIMAQUA®
AQUA SOFT
Wasserenthärter
adoucisseur d’eau
addolcitore d’acqua
water softener
CLIMAQUA®
ALGICID
Gegen Algen
contre les algues
contro le alghe
combat algae
This manual suits for next models
1
Popular Folding Machine manuals by other brands

Martin Yale
Martin Yale 959AF Installation, maintenance & operating instructions

KRUG+PRIESTER
KRUG+PRIESTER Ideal 8324 operating instructions

IDEAL
IDEAL 8330 operating instructions

IDEAL
IDEAL 8330 operating instructions

Morgana
Morgana Digifold 5000P Operator's manual

RIGOLI
RIGOLI RIG.801 Operator's manual


