CNB XNET ITE1030 User manual
Ver. 1.0
XNET Network Vandal Dome Camera
(ITE1030)
User Manual

XNET User Manual
2 / 43
Important Not ces
The copyright of this manual is owned by CNB Technology Inc.
It is illegal to copy and distribute this manual without permission.
Damages caused by misuse and by use of parts not recommended will
not be applicable for support.
Contact the store or the manufacturer immediately if (you thin ) there
is any problem with the product.
Contact the store or the manufacturer before disassembling the
product for alteration or repair.
XNET is a trademar of CNB Technology Inc.
This product complies for CE (Europe) and FCC (USA) regulations for
industrial/home-use electrical device.
About th s Manual
A compatibility and durability test ensures this product’s high performance.
This manual is for XNET Networ product users only, and it describes operations related to
XNET Networ products.
Please read this manual thoroughly paying attention to cautions and warnings before using
the product even if you have used similar products before.

XNET User Manual
3 / 43
Appendix
[Warn ng] Th s symbol prov des a caut on for handl ng XNET network
cameras.
[Note] Th s symbol prov des a useful t p for handl ng XNET network
cameras.

XNET User Manual
4 / 43
Index
Appendix .............................................................................................................................. 3
Index ..................................................................................................................................... 4
1. System Administration .................................................................................................... 5
1.1. Logging On .......................................................................................................................... 5
1.1.1. Using Internet Explorer ............................................................................................................... 5
1.1.2. ID and Password ......................................................................................................................... 5
1.2. Configuring Camera ............................................................................................................ 7
1. . Web Viewer (Index.html) ..................................................................................................... 9
1.4. Status Window .................................................................................................................... 11
1.5. Configuring Users .............................................................................................................. 12
1.6. Setting Date &Time............................................................................................................ 14
1.7. Maintaining Server Configurations ..................................................................................... 16
1.8. System / Log ..................................................................................................................... 18
1.9. Configuring Video .............................................................................................................. 20
1.10. Configuring RTP .............................................................................................................. 22
1.11. Camera Conditions .......................................................................................................... 24
1.12. Configuring TCP/IP parameters ....................................................................................... 27
1.1 . Configuring IP Filtering .................................................................................................... 29
1.14. Configuring HTTP ............................................................................................................ 1
1.15. Configuring UPnP/DynDNS/Bonjour ................................................................................
1.16. Configuring CMS ............................................................................................................. 5
1.17. Configuring Event Type ................................................................................................... 6
1.18. Configuring Motion Detection area .................................................................................. 8
1.19. SMTP Setup .................................................................................................................... 40
1.20. Configuring FTP .............................................................................................................. 42
XNET User Manual
5 / 43
1. System Administration
1
1.
.1
1.
.
L
Lo
og
gg
gi
in
ng
g
O
On
n
You can log on as an administrator using either Internet browser or ‘CMS’ software. (This manual will describe
about using Internet browser only.)
1
1.
.1
1.
.1
1.
.
U
Us
si
in
ng
g
I
In
nt
te
er
rn
ne
et
t
E
Ex
xp
pl
lo
or
re
er
r
Ty e the IP Address of the XNET roduct in the address bar and ress enter.
e.g.) http://192.168.123.100
If the HTTP ort has been changed from the default value, enter the new ort as shown below:
IP Address of the XNET: Port No.
e.g.) http://192.168.123.100:8080
1
1.
.1
1.
.2
2.
.
I
ID
D
a
an
nd
d
P
Pa
as
ss
s
o
or
rd
d
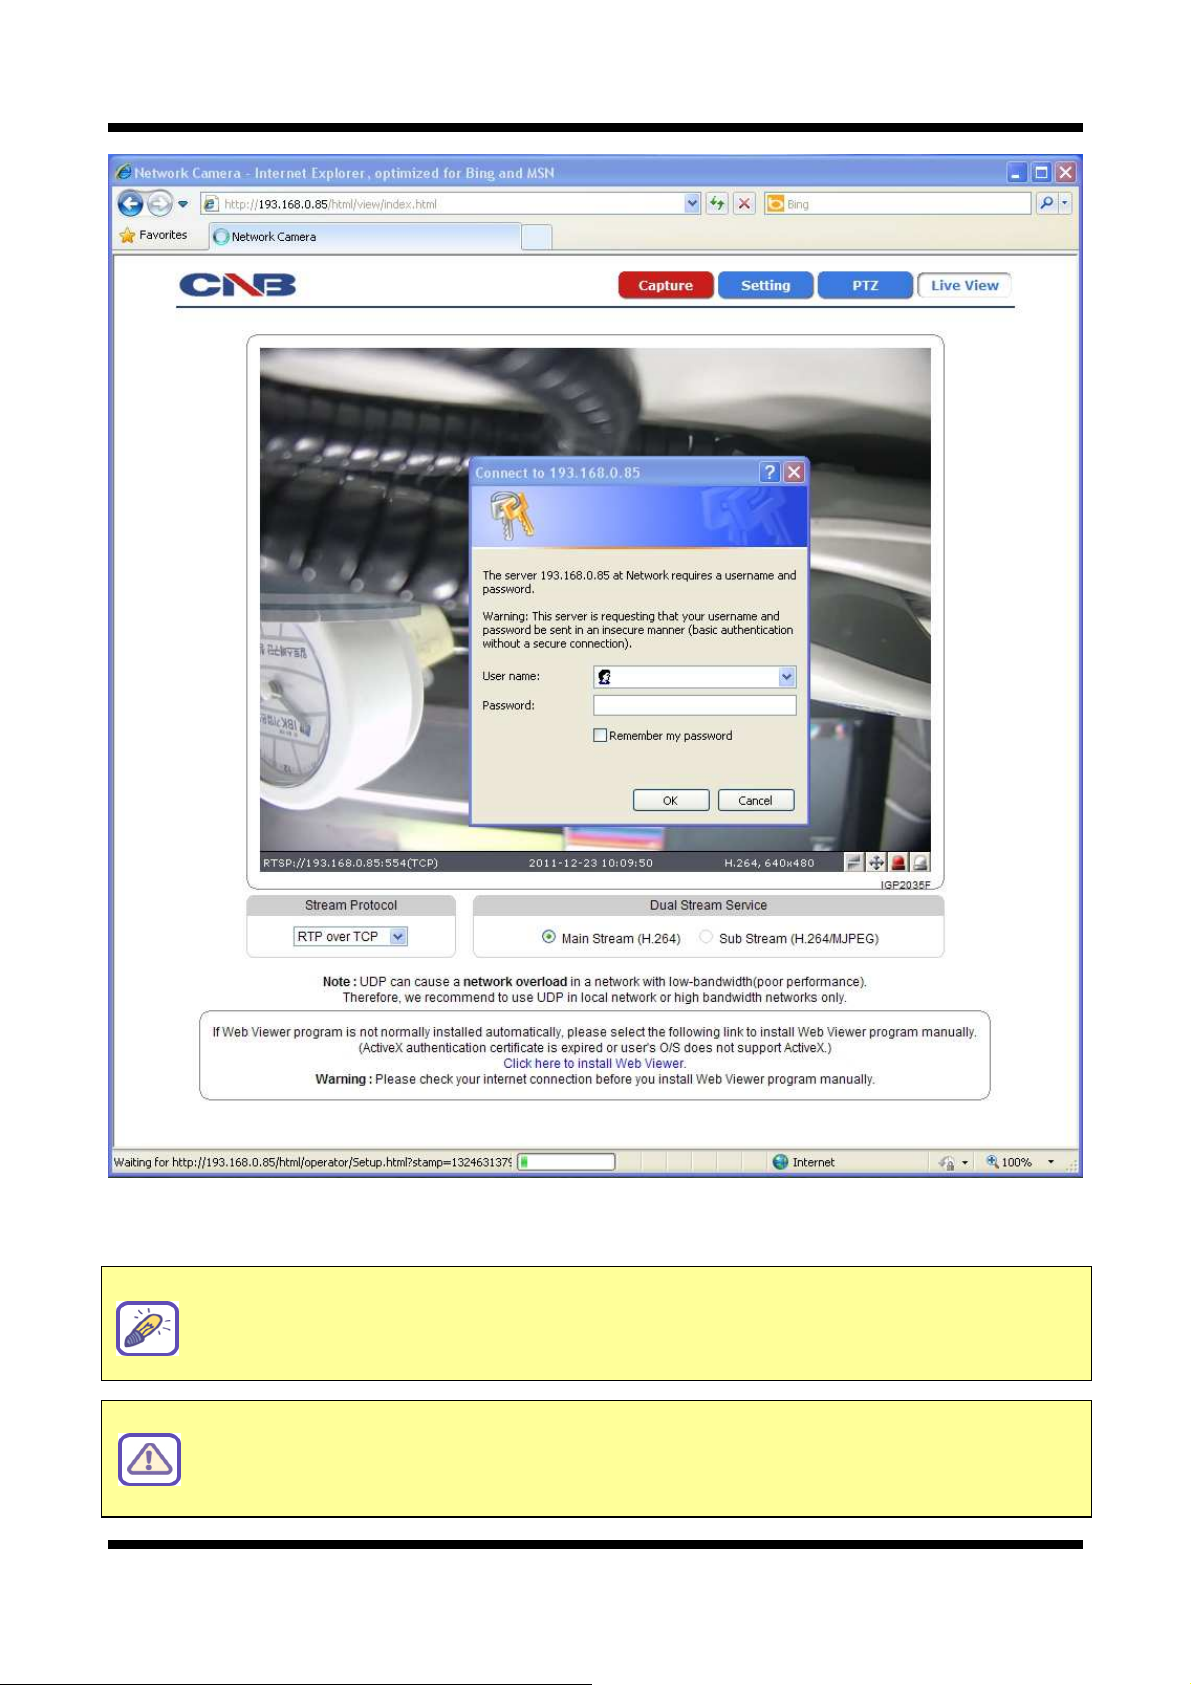
If you are logging in as an administrator, the Log-In box will a ear as shown in figure 1-1. Basic Setu age
will a ear when you enter id and assword.
Enabling 『Enable anonymous viewing』
option at Users setup page allows users to
monitoring Live view without a log-in prompt, however, accessing to other menu
requires a log-in prompt. Please refer to 『1.5. Configuring Users』 for more details.
Once user login to networ camera through Internet Explorer, it won’t as user to login
again until username or password is modified. Thus, please close Networ camera’s
Internet Explorer window for security after monitoring live view or modifying its setting
values.
XNET User Manual
6 / 43
F gure 1-1 Log- n w ndow
The default user name and assword is “root” and “admin” res ectively.
If you forget the administrator’s password, “Factory Reset” is the only way to regain
access. However, since this will retrieve all default settings, you need to configure the
networ settings using IP installer software again.
For security purpose, it is recommended to change the administrator’s id and
password from their default values. Please be careful not to forget them or expose
them to others. Please refer to
[1.5
]
for detail
.

XNET User Manual
7 / 43
1
1.
.2
2.
.
C
Co
on
nf
fi
ig
gu
ur
ri
in
ng
g
C
Ca
am
me
er
ra
a
When you log in as an administrator, XNET’s Basic Setu age will a ear as shown in Figure 1-2. Setu
ages for different features can be accessed from this age. Access to each feature is controlled by different
user grou s (Administrator, O erator, and Viewer.)
F gure 1-2 Bas c Setup Page
Basic Setup Page can be accessed from Operator group level and up. If you want to
access Administrator level page in this user level, you need to log in as Administrator.
Please refer to the following table for access authority:
Sub Menu
Ma n Menu

XNET User Manual
8 / 43
● Accessible
▬ Not Accessible
Function Access
Administrator Operator Viewer
Index Page ● ● ●
Users
Setu Page ● ▬ ▬
Date&Time
Setu Page ● ● ▬
Maintain Server
Setu Page ● ▬ ▬
System / Log
Setu Page ● ▬ ▬
Video
Setu Page ● ● ▬
RTP
Setu Page ● ● ▬
Camera Condition
Setu Page ● ● ▬
TCP / IP
Setu Page ● ▬ ▬
IP Filtering
Setu Page ● ▬ ▬
HTTP / HTTPS
Setu Page ● ▬ ▬
UPnP / DynDNS / BJR
Setu Page ● ▬ ▬
CMS
Setu Page ● ▬ ▬
Event Ty e
Setu Page ● ● ▬
Motion Detection
Setu Page ● ● ▬
SMTP
Setu Page ● ● ▬
FTP
Setu Page ● ● ▬
[D agram 1-1] User Access Author ty
XNET User Manual
9 / 43
1
1.
.3
3.
.
W
We
eb
b
V
Vi
ie
e
e
er
r
(
(I
In
nd
de
ex
x.
.h
ht
tm
ml
l)
)
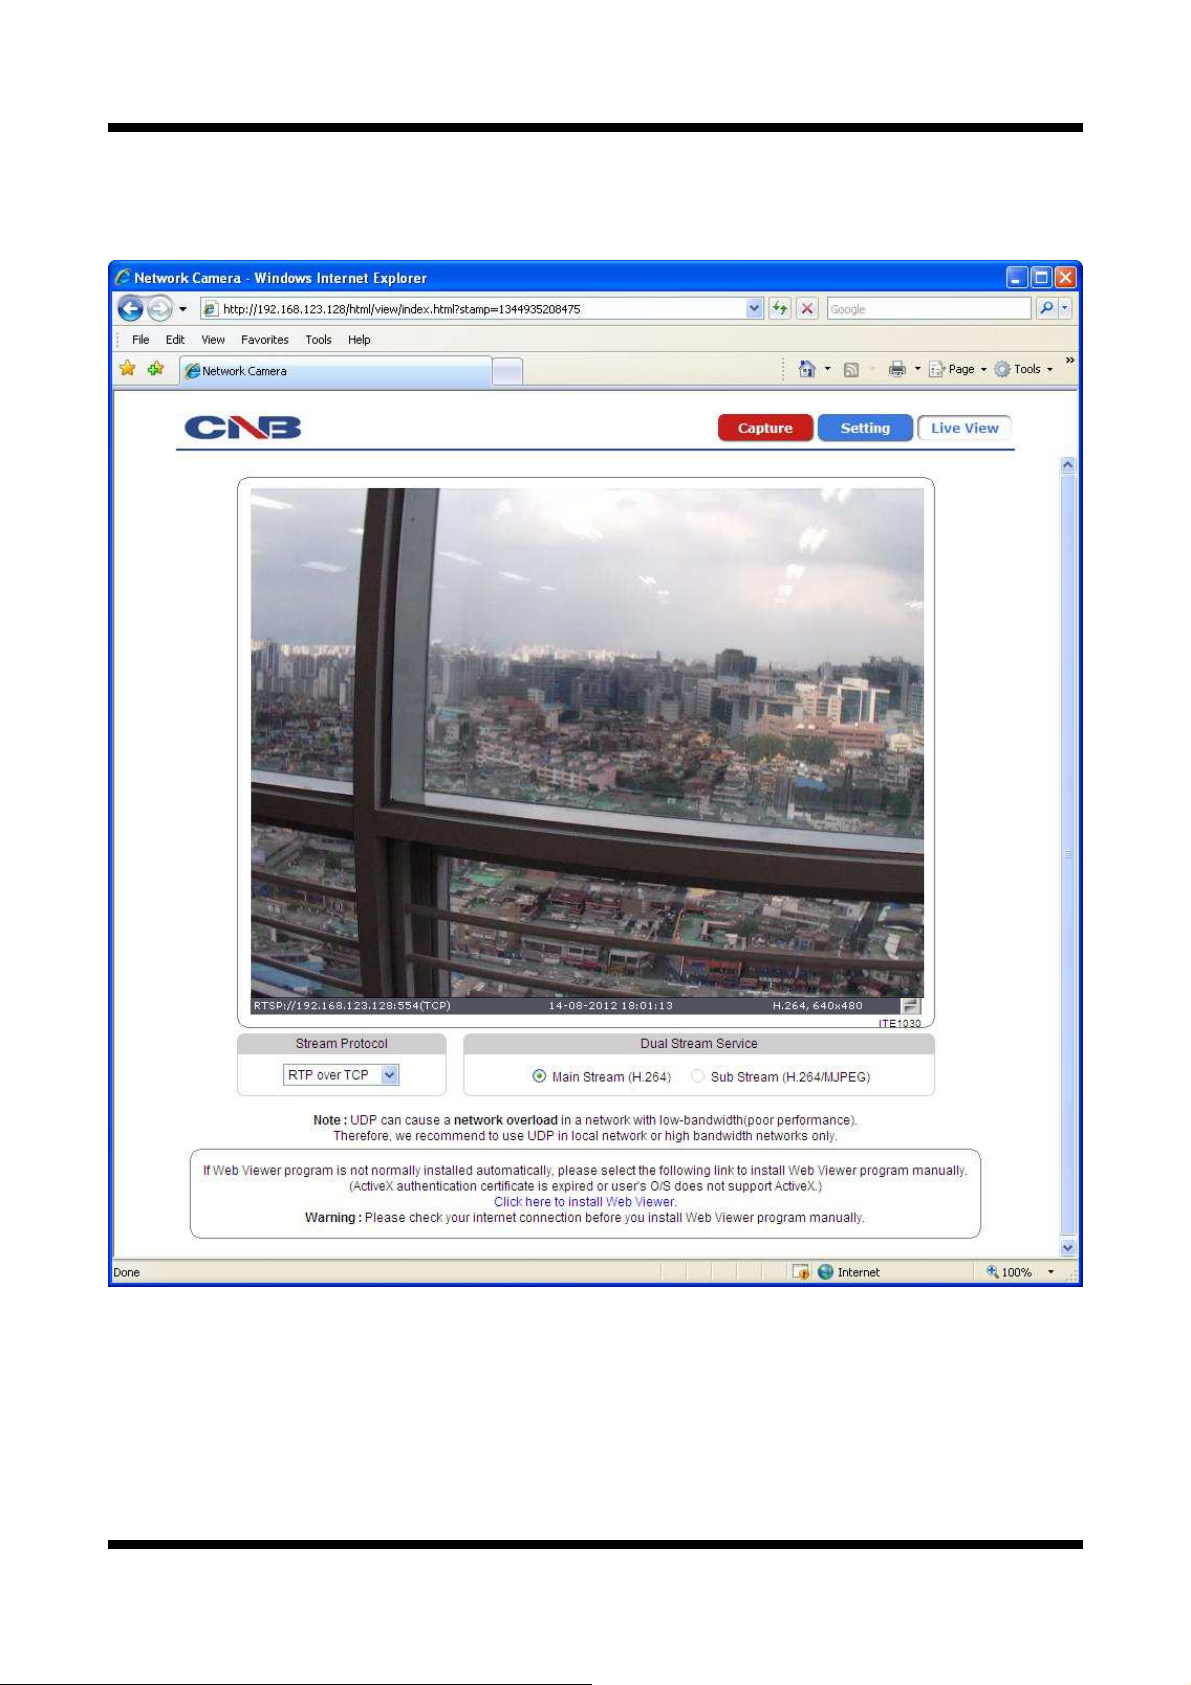
When you access an XNET roduct, Web Viewer age will a ear automatically. Viewer area dis lays the
video out ut from the camera, and menu bar contains ta s that lead to each feature setting age.
F gure 1-3 Web V ewer Page

XNET User Manual
10 / 43
I EM DESCRIP ION
Ca ture - Ca tures the still image and dis lays on a o -u window.
[Save to] c:\XNETCa ture
Setting -
O ens u Basic Setu Page.
Setu age for each XNET feature can be o ened from this Menu
screen.
(Please refer to 1.4 for detail)
Live View -
O en u Motion Index View age.
Index View Page will dis lay Video as well as setting u Stream
Protocol (TCP / UDP) and Codec (when using Dual Stream).
Stream Protocol - A Stream Protocol can be selected when selecting EditBox
(RTP over TCP / RTP over UDP / RTP over HTTP / RTP Multicast)
Dual Stream
Service
Main Stream When this box is checked, Main Stream Video is dis layed.
Sub Stream
When this box is checked, Sub Stream Video is dis layed.
(H.264/MJPEG) Dual-Codec needs to be enabled in Video Setu Page
in order for Sub Stream Video to be dis layed.
(Please refer to 1.10 for detail)

XNET User Manual
11 / 43
1
1.
.4
4.
.
S
St
ta
at
tu
us
s
W
Wi
in
nd
do
o
Status age dis lays XNET System’s Version and its Ethernet address.
Click [ ▷Status] button to o en the age shown in Figure 1-4.
F gure 1-4 Status Page
XNET User Manual
12 / 43
1
1.
.5
5.
.
C
Co
on
nf
fi
ig
gu
ur
ri
in
ng
g
U
Us
se
er
rs
s
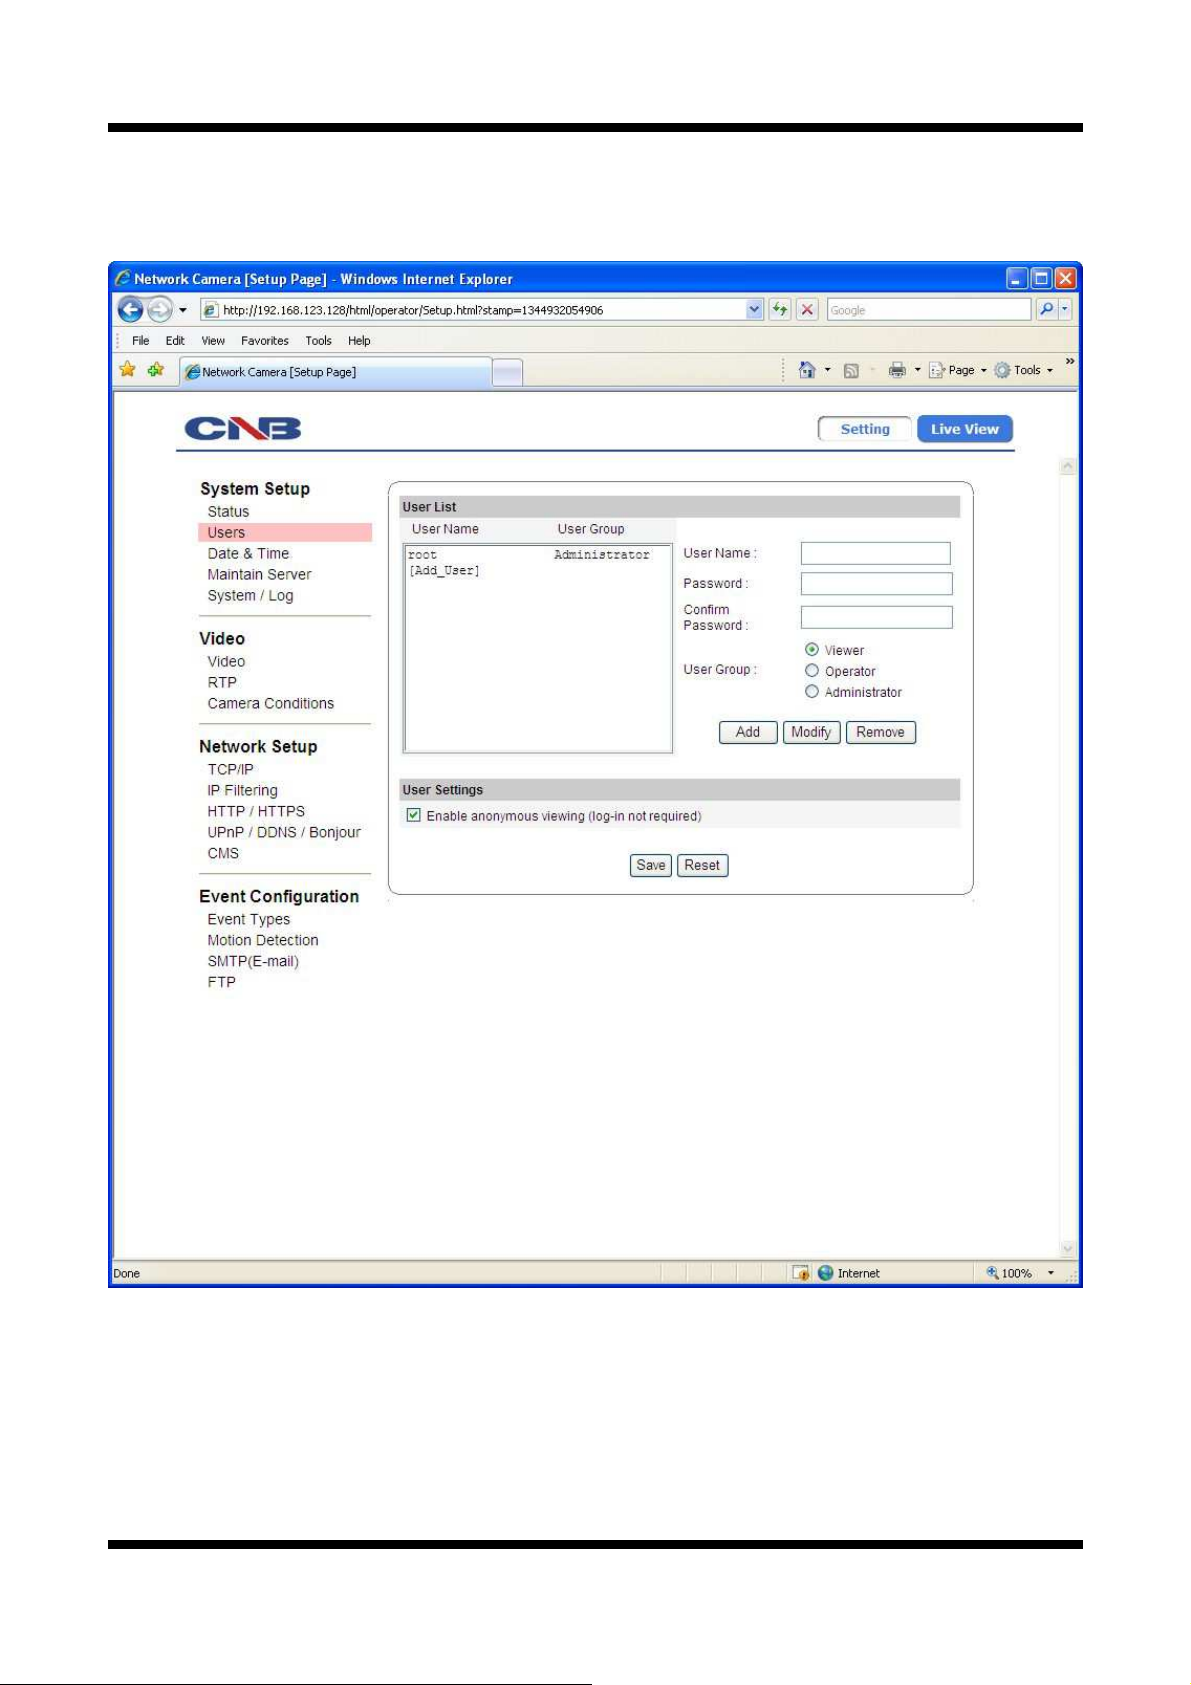
This can give or limit authority to users for controlling Video and other features of XNET system.
Click [ ▷Users] button to o en the age shown in Figure 1-5.
F gure 1-5 Users Conf gurat on Page

XNET User Manual
13 / 43
I EM DESCRIP ION
User List -
Dis lays list of registered users.
"root" is the system’s administrator. "root" cannot be added or deleted.
Only the assword for “root” can be changed.
Add -
This adds a new user.
Select “[Add_User]” ta in User List Box. To add a new user, enter
User name, Password, and User grou then click Add button.
U dated User list can be viewed in User List Box.
- U to 10 users can be added.
- Authority of different User Grou s
-『User name』must start with al habet and its length must be
from 1 to 16.
-『Password』length must be from 1 to 8.
Modify -
Modifies information for each user.
Select a user in User Listbox, enter new Password/ User Grou , and
click modify button to save the changes.
U dated detail can be viewed in User List Box.
Remove -
Removes a user.
Select a user in User Listbox and click remove button to remove.
U dated user list can be viewed in User List Box.
User Settings
Enable
anonymous
viewing
Turns Anonymous Viewer mode on or off.
When enabled, Web Viewer can be accessed without a log-in rom t.
Save - A lies and saves the configurations
Reset - Recalls reviously saved configurations.
Please disable 『Enable anonymous viewing』function if resisted users at 『User List』
only want to monitor networ camera’s live view.
Administrator Full control of the XNET system.
Operator Refer to [Diagram 1-1]
Viewer View camera’s video signal only.
XNET User Manual
14 / 43
1
1.
.6
6.
.
S
Se
et
tt
ti
in
ng
g
D
Da
at
te
e
&
&T
Ti
im
me
e
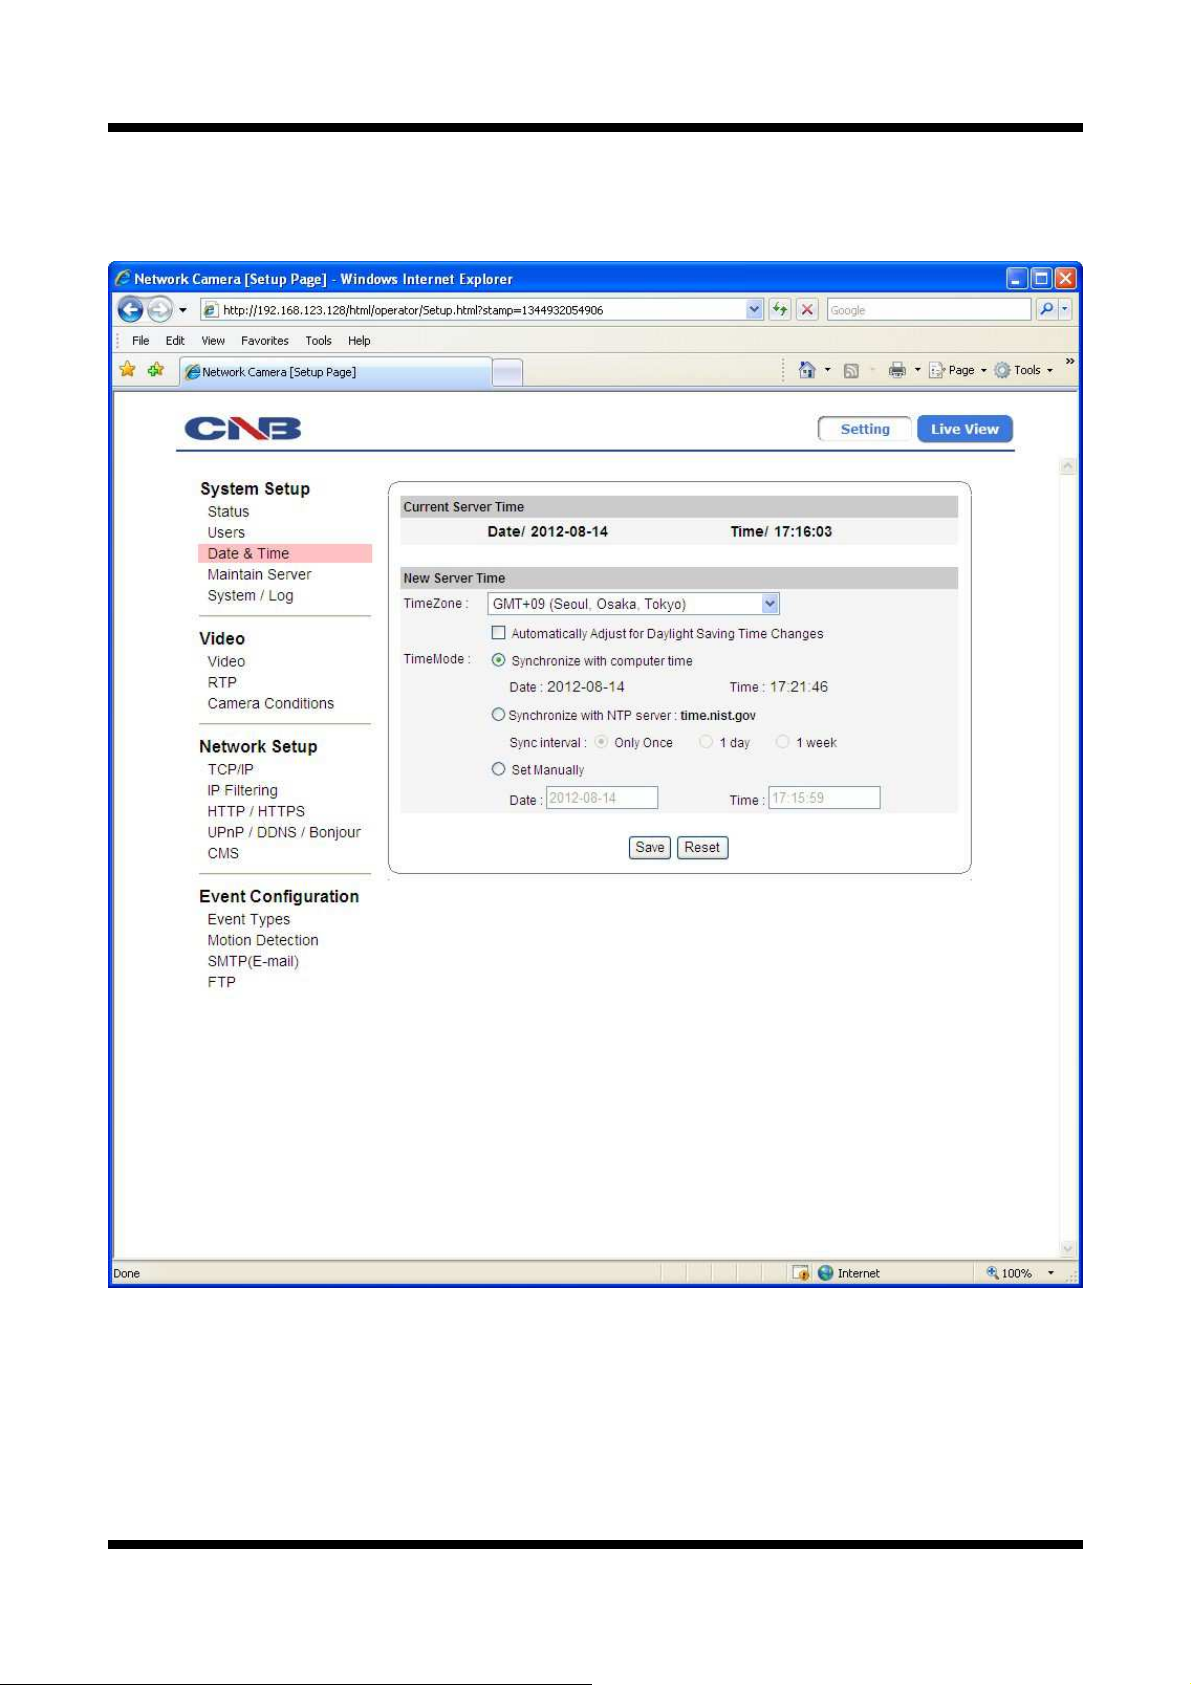
This age will change Date and Time of XNET system.
Click [ ▷Date & ime] to o en the age shown in Figure 1-6.
F gure 1-6 Date and T me Page

XNET User Manual
15 / 43
I EM DESCRIP ION
Current Server ime - Dis lays time of XNET system.
New Server ime
Time Zone Selects Time Zone. <Default : GMT+09>
Automatically Adjust for
Daylight Saving Time
Changes
Enables/ Disables Daylight Saving time.
Time Mode
Sets Date and Time of the Server.
『Synchronize with computer time』
- Synchronizes time and date of Client PC to Server.
『Synchronize with N P server』
- Synchronizes server’s time and date to NTP Server.
(Enter NTP Server address in Network Setu Page)
- Set NTP Server u date eriod
None No u date eriodically
1 day Once a day
1 week Once a week
『Set Manually』
- Set date and time of Server manually.
Save - A lies and saves the configurations
Reset - Recalls reviously saved configurations.

XNET User Manual
16 / 43
1
1.
.7
7.
.
M
Ma
ai
in
nt
ta
ai
in
ni
in
ng
g
S
Se
er
rv
ve
er
r
C
Co
on
nf
fi
ig
gu
ur
ra
at
ti
io
on
ns
s
This age configures system arameters such as system restart, factory default settings, system u grade,
saving configurations, saving images, and other additional features.
Click [ ▷Maintain Server] to o en the age shown in Figure 1-7.
F gure 1-7 Server Ma ntenance Page
XNET User Manual
17 / 43
I EM DESCRIP ION
Maintain
Server
Restart Restarts the system. It takes about 45 seconds.
Light Default Resets all arameters exce t for TCP/IP settings.
This restore will be followed by a 45 seconds system reset.
Factory Default
Resets all arameters to Factory Default setting.
This will be followed by a 45 seconds system restart.
Delete Log
Files Delete Logs Delete all saved Log Messages.
Backup Backu
This saves current camera’s configurations to Client PC as a file
(xnetconfig.dat).
Back u file can be restored to other XNET cameras.
This will be followed by a 45 seconds system reset.
Restore Restore
This loads u settings from a saved Backu file.
Click restore button after selecting backu files in Client PC. O tional
check boxes can be used to select settings to be excluded from the
restore rocess.
『except CP/IP & H P parameters』
『except Camera Condition parameters』
『except Users parameters』
『except IP Filter parameters』
『except Motion Detection parameters』
This will be followed by a one-minute system reset.
System
Update U date
Use this to u date the system.
Select location of U date file in Client PC and click U date button.
This will be followed by two minutes system restart.
U grade File can be downloaded from http://www.cnbtec.com
Please do not disconnect power and LAN cable from
the XNET while the upgrade is in process. It might
cause a system error.

XNET User Manual
18 / 43
1
1.
.8
8.
.
S
Sy
ys
st
te
em
m
/
/
L
Lo
og
g
System / Log age rovides network camera’s configuration, language, and error information to users.
Click [ ▷System / Log] button to o en the age shown in Figure 1-8.
F gure 1-8 System / Log Page

XNET User Manual
19 / 43
I EM DESCRIP ION
System
Settings
System
Overview Dis lays current configurations for XNet o tion ages.
System LED
Control
System LED Enable / Disable System LED.
Event LED Enable / Disable Event LED.
Language File
Upload - U load language files.
Language File can be downloaded from http://www.cnbtec.com
Language File
List
List Dis lay the list of saved language files.
Set
Set a language file to the system.
Please select a language file from the list and then select Set button to
a ly the language file to the system.
Web Page language will be modified to the set language.
Del
Delete a language file from the list.
Please select a language file from the list and then select Del button to
remove from the list.
If you delete the currently set language file from the list, then web age
language is set to the default language – English.
Log Report
Log List Dis lay the list of currently saved Log files.
Load List
Loads u Log Message file stored in the network camera.
Log Message file can be sorted by date and index.
Click Load List button to view message list in the Log List.
Logs View Select a file from the『Log List』and click 【Logs View】button to view.
Logs Del Select a file from the 『Log List』and click 【Logs Del】button to
delete.
Save Logs
Click [Save Logs] button to save the Log file to PC. The log file is saved
to PC as a TARGZIP file format (*.tgz), and it can be also downloadable
from the network camera’s FTP server.
XNET User Manual
20 / 43
1
1.
.9
9.
.
C
Co
on
nf
fi
ig
gu
ur
ri
in
ng
g
V
Vi
id
de
eo
o
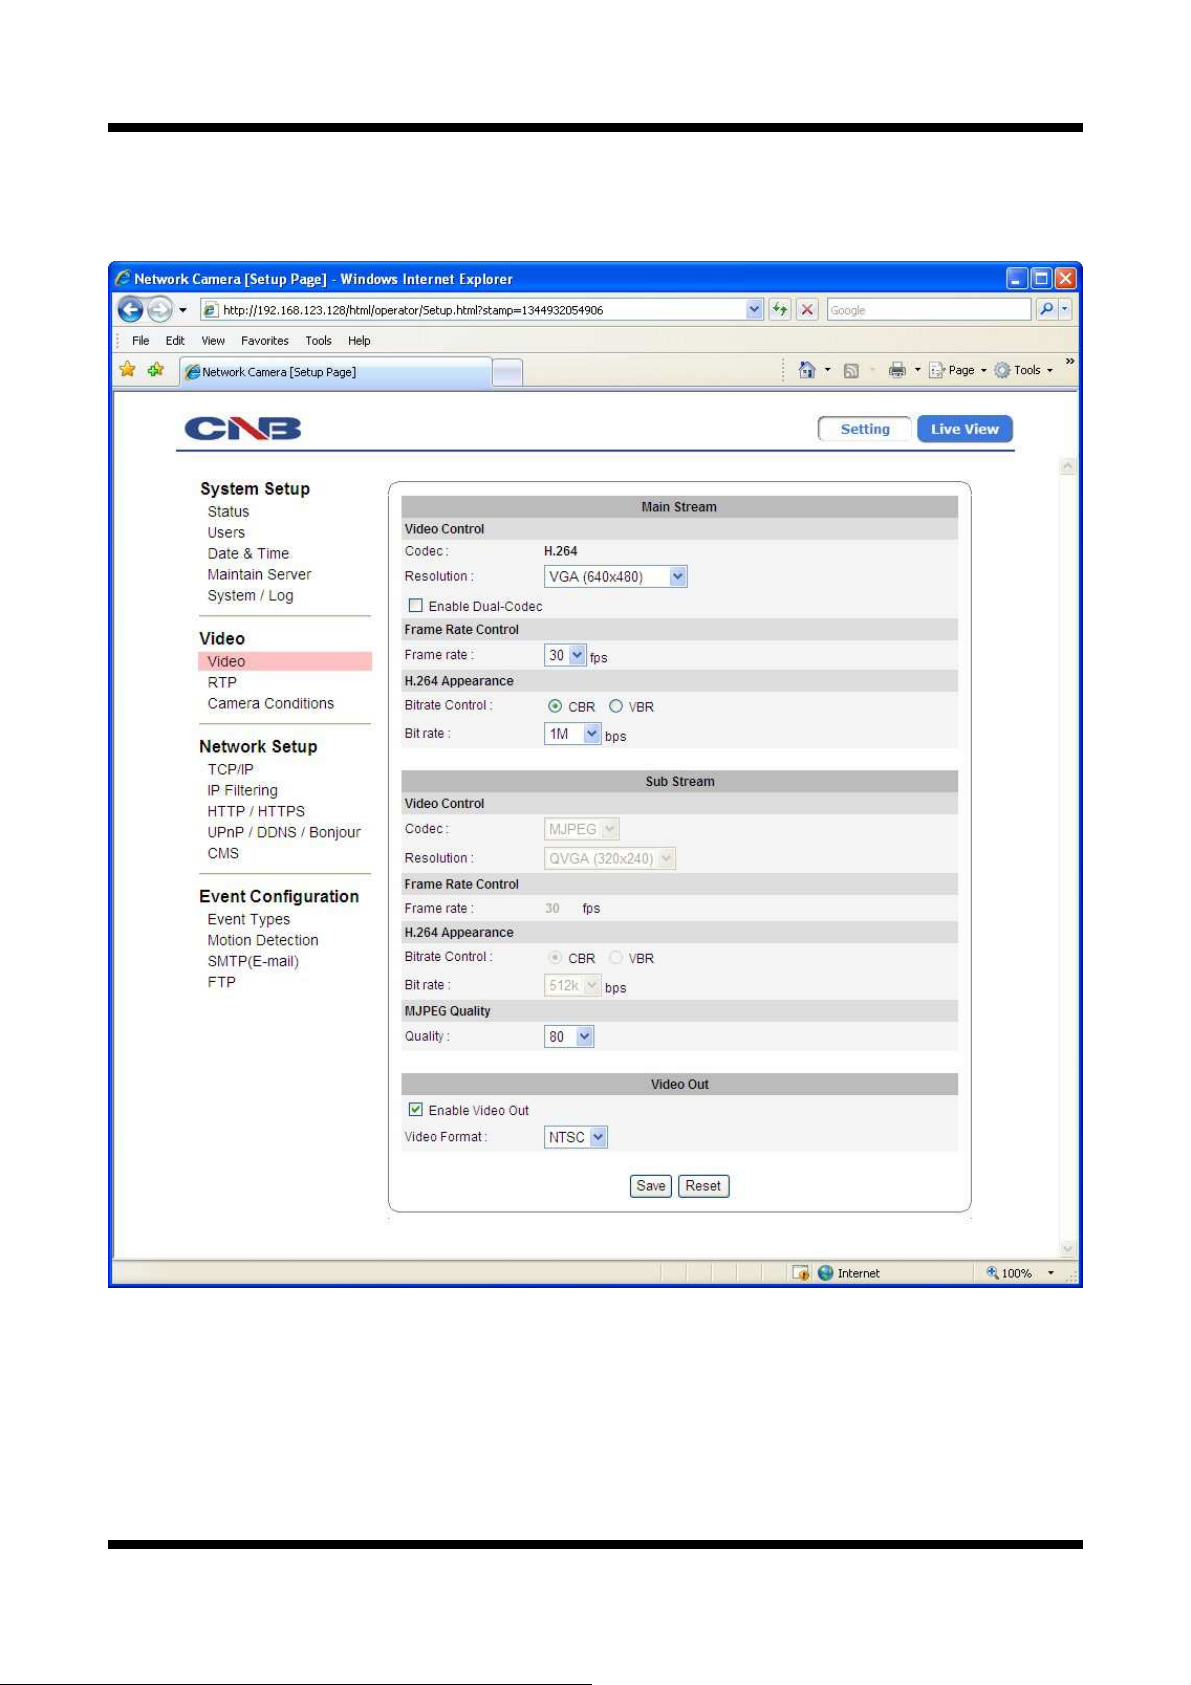
XNET’s Video features can be configured in this age.
Click [ ▷Video] button to o en the age shown in Figure 1-9.
F gure 1-9 V deo Conf gurat on Page
Table of contents
Other CNB Security Camera manuals


CNB
CNB ALPHA 300 User manual

CNB
CNB XNET IBP5030CR User manual

CNB
CNB XNET IDC4000T User manual

CNB
CNB IXP3035VR User manual

CNB
CNB Xpeed s2000 series User manual

CNB
CNB ISS2000 Series User manual

CNB
CNB LDM-24VF User manual

CNB
CNB IXP3035VR User manual

CNB
CNB IDP4030VR User manual

CNB
CNB PM1063N User manual


