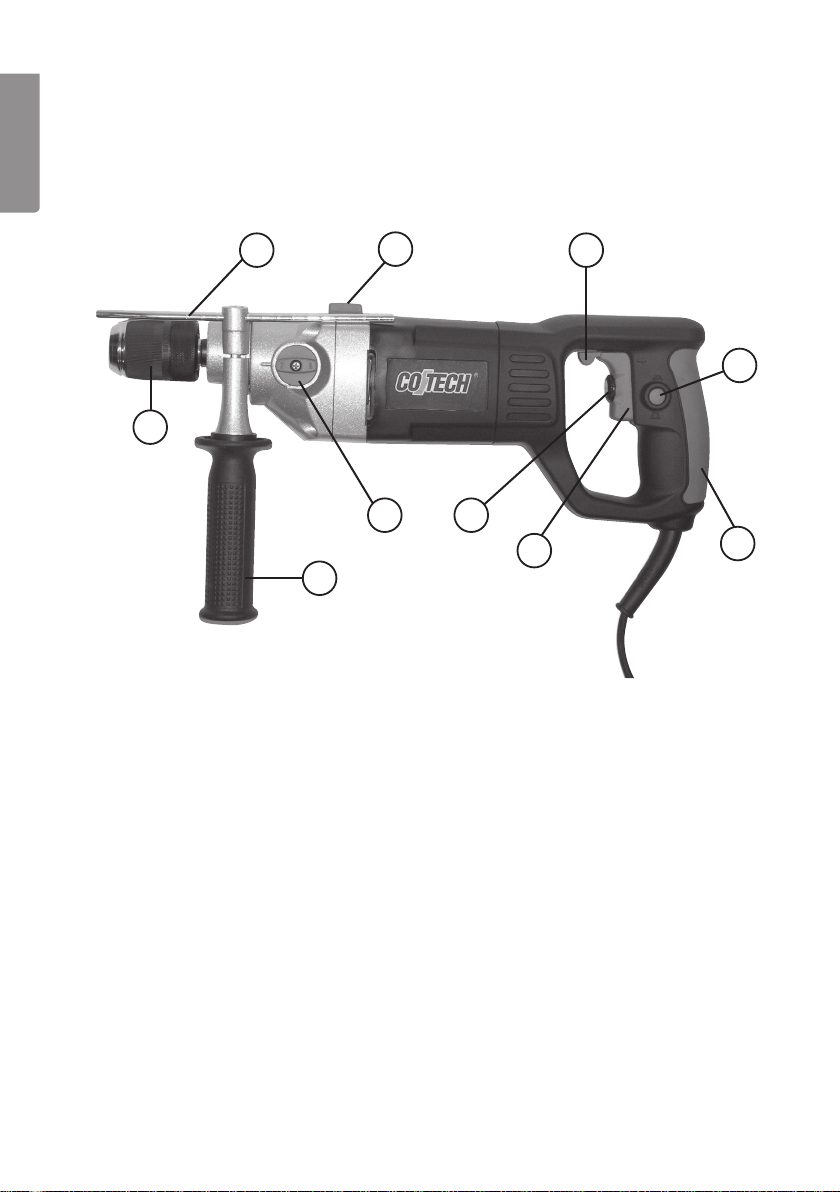
CO/Tech CT-2410-UK User manual

Important!
Read the entire instruction manual carefully
and make sure that you fully understand
it before you use the equipment. Keep the
manual for future reference.
Viktig information:
Läs hela bruksanvisningen noggrant och
försäkra dig om att du har förstått den innan
du använder utrustningen och spara den för
framtida bruk.
Viktig informasjon:
Les disse anvisningene nøye og forsikre deg
om at du forstår dem før du bruker enheten
og oppbevar dem for senere bruk.
Tärkeää tietoa:
Lue nämä ohjeet huolellisesti ja varmista
että olet ymmärtänyt ne, ennen kuin alat
käyttää laitetta. Säilytä ohjeet myöhempää
tarvetta varten.
Slagborrmaskin
Slagbormaskin
Iskuporakone
Art.No Model
18-3044 CT-2410-UK
30-9319 CT-2410
ENGLISHSVENSKANORSKSUOMI
Impact Drill
Ver. 200802

ENGLISH
Impact Drill (low speed)
Art. no. 18-3044 Model: CT-2410-UK
30-9319 CT-2410
Please read the entire instruction manual before using and save for future use.
We apologise for any text or photo errors and any changes of technical data.
If you have any questions concerning technical problems please contact our
Customer Service Department (see address on reverse.)
Table of Contents
General Safety Instructions 3
Product Description 6
Use 7
Tips for use 10
Care and Maintenance 11
Disposal 11
Specications 11

ENGLISH
General safety instructions
Warning! Read all the instructions. Failure to adhere to the following instructions
may lead to electric shocks, res and/or serious injury. The term “electrical hand
tools” in the warning text below is referring to your mains operated or battery
operated hand tool. SAVE THE INSTRUCTIONS
1) The work space
a) Keep the work space clean and well illuminated. Cluttered and poorly lit
areas invite accidents.
b) Do not use electrical hand tools in explosive environments, i.e. nearby
ammable liquids, gas or dust. Electrical hand tools generate sparks that
could easily ignite dust or fumes.
c) Keep away from children and other spectators while using the electrical
hand tool. Distractions can make you lose your concentration and control.
2) Electrical safety
a) The electrical hand tool’s plug must t correctly in the wall socket. Never
modify the plug in any way. Never use an adaptor together with earthed
electrical hand tools. Unmodied plugs and suitable wall sockets decrease the
risk of electric shock.
b) Avoid body contact with earthed objects, such as pipes, radiators, ovens
or refrigerators. There is an increased risk of electrical shock if your body is
earthed.
c) Do not expose the electrical hand tool to rain or other wet conditions. If
water gets inside an electrical hand tool it increases the risk of electrical shock.
d) Do not misuse the lead. Never use the lead to carry, drag or pull the plug
out of the wall socket. Keep the lead away from heat, oil, sharp edges and
movable parts. Damaged or tangled leads increase the risk of electrical shock.
e) When you use an electrical hand tool outdoors; use an extension
cord suitable for this purpose. Use of an extension cord for outdoor use
decreases the risk of electrical shock.

ENGLISH
3) Personal safety
a) Pay attention to what you do and use common sense when using
electrical hand tools. Never use an electrical hand tool if you are tired or
under the inuence of drugs, alcohol or medication. One moment of not
paying attention while using an electrical hand tool may result in serious injury.
b) Use protective equipment. Always use safety glasses. Using protective
equipment such as a face mask, slip resistant protection shoes, a helmet and
ear plugs when needed decreases the risk of injury.
c) Avoid unexpected start. Make sure that the switch is set to OFF before you
connect the device to the wall socket. Never carry an electrical hand tool with
one nger on the trigger or never connect the hand tool to a wall socket when
the switch is set to ON, since it may result in injury.
d) Remove all service tools/keys before switching on the hand tool.
A forgotten service tool on a rotating part of the electrical hand tool may result
in injury.
e) Do not overreach. Make sure you stand steady and well balanced at all times.
This gives better control in unexpected situations.
f) Wear suitable clothing. Do not wear loose tting clothes or jewellery. Keep
hair, clothes and gloves away from movable parts. Loose tting clothes,
jewellery or long hair could get caught in movable parts.
g) If the equipment for suctioning or collecting dust is available make sure
it is connected and used properly. Using technical aids may reduce dust
related hazards.
4) Use and maintenance of the electrical hand tools
a) Do not overdrive the hand tool. Use a hand tool suitable for the work you are
to perform. At the correct rate of feed, the correct tool will carry out the work
better and more safely.
b) Never use the electrical hand tool if the switch does not work properly
to turn on and shut off the tool. All electrical hand tools that can not be
operated by the switch are dangerous and must be repaired.
c) Unplug the lead from the wall socket before making any adjustments,
changes of accessories or storing the electrical hand tool away. These
precautions reduce the risk of unexpected start of the electrical hand tool.
d) Store electrical hand tools that are not being used out of reach from
children. Do not let people unfamiliar with the electrical hand tool or its
instructions use it. Electrical hand tools can be dangerous if they get into the
hands of inexperienced users.

ENGLISH
Specific Safety Regulations for Impact Drills
Ear protectors should be worn when using the impact drill.
Exposure to high levels of noise can cause hearing impairment.
Use the supplied side handle when using the impact drill.
Losing control of the drill could result in personal injury.
e) Maintenance of electrical hand tools. Check if something is incorrectly set, if
movable parts are getting jammed, or parts are broken or something else that
might cause the electrical hand tool to malfunction. If something is damaged it
must be repaired before use. Many accidents are caused by poorly maintained
electrical hand tools.
f) Keep the tools sharp and clean. Properly maintained cutting tools with sharp
blades are less likely to jam and are easier to control.
g) Use the electrical hand tool, accessories and such according to the
instructions and in a way suitable for the type of electrical hand tool
used. Using the electrical hand tool for work other than that for which it is
intended could result in a dangerous situation.
5) Service
a) Repairs and service should only be performed by qualied persons, and only
with original spare parts. This guarantees the safety of the electrical hand tool.
Product marking with safety symbols
Read all the instructions.
Use hearing protection.
Use dust mask and protective goggles.

ENGLISH
Product Description
Powerful, low speed impact drill with gearbox and stepless variable speed control.
1. Power Switch
2. Safety Lock Button
3. Soft-Grip Handle
4. Forward/Reverse Selector
5. Quick Chuck
6. Impact/Normal Action Selector
7. Stepless Variable Speed Control
8. Gear Selector (High/Low)
9. Side Handle
10. Depth Stop
3
5
64
2
87
9
10
1

ENGLISH
Use
Chuck
The impact drill has a keyless quick chuck (1.5-13 mm).
1. Hold the rear collar of the chuck and
twist the front collar anticlockwise until
the jaws are wide enough apart to
allow the drill bit to enter.
2. Make sure that the jaws of the chuck
are kept free of debris and foreign
objects so that the drill bit/tool can be
rmly seated. Tools that are not held
rmly in the jaws of the drill can cause
personal injury.
3. Insert a drill bit or other tool.
4. Hold the rear collar of the chuck and
twist the front collar until the jaws lock
onto the tool or bit.
Warning: Do not try to tighten the chuck by holding the rear collar whilst starting
the drill, this could result in personal injury. Moreover, the chuck tightens better if
the two collars are gripped and tightened by hand.
Side Handle
1. Screw the side handle anticlockwise
to undo it.
2. Fix the side handle in the desired
position. Set the depth stop if it is
needed.
3. Screw the side handle clockwise to
lock both the handle and depth stop.

ENGLISH
Power Switch
1. Plug the lead into a wall socket after
inserting a tool into the chuck and
tightening it.
2. Start the impact drill by gently pulling
the power switch (1), check that the tool
rotates in the correct direction. Release
the power switch to stop the drill.
3. When the chuck is rotating, the power
switch can be locked by pressing the
lock button (2) and releasing the power
switch. To stop the drill, pull the power
switch and then release it.
Changing Direction of Rotation
1. Stop the drill.
2. Turn the selector (4) to the right or left to
select the direction of rotation.
Note: The drill will not work if the selector is
between settings. The selector switch must
be fully turned in the desired direction.
Stepless Variable Speed Control
1. Start the drill by pulling the power
switch (1).
2. Turn the speed selector (7) on the
handle anticlockwise to reduce speed or
clockwise to increase speed.
3. The speed selector limits how far the
power switch can be pulled in.
Note: Always start drilling at a low speed if
drilling without a pilot hole or centre-punch
mark. As a rule, use higher speeds with thin
drill bits and lower speeds with thicker bits.
Cleaning and polishing usually require a
high speed.

ENGLISH
High Gear & Low Gear
1. Stop the drill completely.
2. Turn the gear selector switch (8) to
the desired gear ratio. Chose 1 for the
lowest gear (0-900 rpm) or 2 for high
gear (0-2500 rpm).
Note: Always use the lowest gear when
the machine is under the greatest load, it
provides a higher torque and better cooling.
Warning: Do not move the gear selector
unless the chuck is completely stationary.
Make sure that the switch is turned all the
way until it stops.
Impact Drilling or Normal Drilling
1. Stop the drill completely.
2. Set the selector switch (6) to the desired
drill action.
3. When the arrow points to the hammer
symbol, the drill is set on impact drill
mode.
4. When the arrow points to the drill bit
symbol, the drill is set on normal drill
mode.
5. Select impact drilling for hard materials
(concrete, stone, etc) and normal drilling
for steel, aluminium and wood, etc.
Warning: Do not move the gear selector
unless the chuck is completely stationary.
Make sure that the switch is turned all the
way until it stops.
8

10
ENGLISH
Useful Tips
- After having worked the drill hard for a while let the motor run for a few minutes
(until the air leaving the ventilation slits is at room temperature) without any
load, to cool it down.
- Use the side handle to help maintain full control when drilling.
- Only use sharp tools.
- Use Titanium coated drill bits for hard metals and Tungsten Carbide tipped drill
bits for concrete/tiles. If in doubt read the packet.
- Fasten the workpiece down securely. Use clamps or vices when you can, this
will leave you with both hands free to manoeuvre the machine with, which
increases precision.
- If you are drilling into thin materials it is important that you place a small piece
of waste material behind the hole to be drilled, otherwise there is a risk of
burring on the back.
- Hold the drill perpendicular to the workpiece before you start drilling (look from
several directions) make sure that you do not tilt the drill when drilling.
- Do not press too hard (so that the machine loses speed) let the tool do the job!
Reduce pressure before the drill breaks through the material.
- Let the drill bit spin and lift it up after drilling through, it allows the machine to
cool down and the drill bit is freed of dust and wood chips.
Things to consider when drilling into wood and plastic
- For wood and other soft materials there are several types of tools, chose the
tool most suitable for the work to be done. Test drill on a piece of waste rst.
- The tool can overheat if you don’t pull it up often to free it of sawdust.
- Place a small piece of waste material behind the hole to be drilled before
starting to drill otherwise there is a risk of burring around the edges of the hole
on the back.
Things to consider when drilling into metal
- Mark the hole using a centre punch.
- The tool can overheat if you use the wrong speed. Use cooling liquid suitable
for your material e.g. methylated spirit for aluminium (cast iron and brass are
cut dry).
- Use a low gear and low speed for big holes.
- Be extra careful with the clamping of thin or sharp metal objects so that they do
not come loose and cause damage or injury, use a vice if possible.

11
ENGLISH
Things to consider when drilling into concrete, tile or brick
- Use Tungsten carbide tipped drill bits.
- Use a drill with hammer/impact action and work carefully, applying constant
pressure.
- The material residue comes out of the drilled hole as powder or dust, wear a
dust mask.
Care and Maintenance
- Before using the drill, make sure that all the screws are tightened. When
impact drilling the machine will vibrate a great deal.
- Make sure the cool air vents on the machine are free and open.
- Clean with a damp cloth when needed using only mild detergent. Never use
solvents or strong detergents.
Store the instruction manual together with the drill.
Disposal
Follow local ordinances when disposing of this product. If you are
unsure about how to dispose of this product contact your municipality.
Specifications
Mains Supply 230 V AC, 50 Hz
Power 1050 W
No-Load Speed: 0-900/2500 rpm
Chuck Capacity 1.5 - 13 mm
Drilling Capacity: Steel: 13 mm
Concrete: 20 mm
Wood: 40 mm

1
SVENSKA
1
Slagborrmaskin
Art. nr. 18-3044 Model: CT-2410-UK
30-9319 CT-2410
Läs igenom hela bruksanvisningen före användning och spara den sedan för
framtida bruk. Vi reserverar oss för ev. text- och bildfel samt ändringar av tek-
niska data. Vid tekniska problem eller andra frågor, kontakta vår kundtjänst
(se adressuppgifter på baksidan).
Innehållsförteckning
Generella säkerhetsföreskrifter 13
Produktbeskrivning 16
Användning 17
Användningstips 20
Skötsel och underhåll 21
Avfallshantering 21
Specikationer 21

1
SVENSKA
Generella säkerhetsinstruktioner
Varning!
Läs alla instruktioner. Om nedanstående instruktioner inte följs kan detta leda till
elektrisk stöt, brand och/eller allvarlig skada. Termen ”elektriskt handverktyg” i
varningstexten nedan refererar till ditt nätanslutna eller batteridrivna handverktyg.
Spara dessa instruktioner!
1) Arbetsutrymmet
a) Håll arbetsutrymmet rent och väl upplyst. Belamrade och mörka utrymmen
inbjuder till olyckor.
b) Använd inte elektriska handverktyg i explosiva miljöer, som i närheten
av lättantändliga vätskor, gaser eller damm. Elektriska handverktyg gene-
rerar gnistor som kan antända damm eller ångor.
c) Håll undan barn och åskådare medan du använder det elektriska hand-
verktyget. Störningsmoment kan göra att du tappar kontrollen.
2) Elektrisk säkerhet
a) Det elektriska handverktygets stickpropp måste passa i vägguttaget.
Modiera aldrig stickproppen på något vis. Använd aldrig adapter tillsam-
mans med jordade elektriska handverktyg. Omodierade stickproppar och
passande vägguttag minskar risken för elektrisk stöt.
b) Undvik kroppskontakt med jordade föremål, som rör, element, köksspis
eller kylskåp. Det nns ökad risk för elektrisk stöt om din kropp är jordad.
c) Utsätt inte det elektriska handverktyget för regn eller våta förhållanden.
Om vatten tränger in i ett elektriskt handverktyg ökar det risken för elektrisk
stöt.
d) Misshandla inte nätsladden. Använd aldrig nätsladden för att bära, dra eller
rycka stickproppen ur vägguttaget. Håll nätsladden undan från värme, olja,
vassa kanter och rörliga delar. Skadade eller trassliga nätsladdar ökar risken
för elektrisk stöt.
e) När du använder ett elektriskt handverktyg utomhus, använd en skarv-
sladd anpassad för detta ändamål. Användning av en skarvsladd för utom-
husbruk minskar risken för elektrisk stöt.

1
SVENSKA
3) Personlig säkerhet
a) Var uppmärksam på vad du gör och använd sunt förnuft när du använder
ett elektriskt handverktyg. Använd inte ett elektriskt handverktyg om du
är trött eller påverkad av droger, alkohol eller medicinering. Ett ögonblicks
ouppmärksamhet när du använder ett elektriskt handverktyg kan resultera i
allvarlig personskada.
b) Använd skyddsutrustning. Bär alltid skyddsglasögon. Användning av
skyddsutrustning som andningsskydd, halksäkra skyddsskor, hjälm och hörsel-
skydd vid behov minskar risken för personskada.
c) Undvik oavsiktlig start. Se till att strömbrytaren är i läge ”OFF” innan du an-
sluter stickproppen till vägguttaget. Att bära ett elektriskt handverktyg med ett
nger på strömbrytaren/avtryckaren eller att ansluta ett elektriskt handverktyg
till elnätet när strömbrytaren är i läge ”ON” inbjuder till olyckor.
d) Tag bort alla serviceverktyg/nycklar innan du slår på det elektriska hand-
verktyget. Ett kvarglömt serviceverktyg på en roterande del av det elektriska
handverktyget kan reslutera i personskada.
e) Sträck dig inte för långt. Se till att du står stadigt med god balans hela ti-
den. Detta möjliggör bättre kontroll i oväntade situationer.
f) Bär lämplig klädsel. Bär inte löst sittande kläder eller smycken. Håll hår, klä-
der och handskar undan från rörliga delar. Lösa kläder, smycken eller långt hår
kan fastna i rörliga delar.
g) Om utrustning för utsugning och uppsamling av damm nns tillgängligt,
se till att denna är ansluten och används ordentligt. Användning av dessa
hjälpmedel kan minska dammrelaterade faror.
4) Användning och underhåll av det elektriska handverktyget
a) Pressa inte det elektriska handverktyget. Använd ett elektriskt handverktyg
som är avsett för det arbetsmoment du utför. Korrekt elektriskt handverktyg gör
jobbet bättre och säkrare med avsedd matningshastighet.
b) Använd inte det elektriska handverktyget om strömbrytaren inte slår på
och stänger av verktyget. Alla elektriska handverktyg som inte kan kontrol-
leras med strömbrytaren är farliga och måste repareras.
c) Tag stickproppen ur vägguttaget innan du utför några justeringar, byter
tillbehör eller lägger undan det elektriska handverktyget för förvaring.
Dessa åtgärder i förebyggande syfte minskar risken för att starta det elektriska
handverktyget oavsiktligt.

1
SVENSKA
d) Förvara elektriska handverktyg som inte används utom räckhåll för barn
och låt inte personer som inte är förtrogna med det elektriska handverk-
tyget eller dessa instruktioner använda det. Elektriska handverktyg är far-
liga om de kommer i händerna på ovana användare.
e) Underhåll elektriska handverktyg. Kontrollera om något är felinställt, om rör-
liga delar kärvar, om delar har gått sönder eller något annat som kan påverka
funktionen av det elektriska handverktyget. Om något är skadat måste det
repareras före användning. Många olyckor beror på dåligt underhållna elektriska
handverktyg.
f) Håll verktygen vassa och rena. Ordentligt underhållna skärverktyg med
vassa eggar är mindre benägna att kärva och lättare att kontrollera.
g) Använd det elektriska handverktyget, tillbehör och liknande enligt in-
struktionerna och på det sätt som är ämnat för just den typen av elek-
triskt handverktyg, och ta även hänsyn till arbetsförhållandena och den
typ av arbete som ska utföras. Användning av det elektriska handverktyget
för arbeten andra än vad det är ämnat för kan resultera i en farlig situation.
5) Service
a) Låt behörig personal utföra service och reparationer, endast med origi-
nalreservdelar. Detta garanterar att säkerheten på det elektriska handverkty-
get behålls.
Särskilda säkerhetsregler för slagborrmaskin
1. Bär hörselskydd vid arbete med en slagborrmaskin.
Bullerexponering kan orsaka hörselskador.
2. Använd medföljande handtag vid arbete med slagborrmaskinen.
Tappad kontroll av slagborrmaskinen kan orsaka personskador.
Produktmärkning med säkerhetssymboler
Läs hela bruksanvisningen!
Använd alltid skyddsglasögon/visir och hörselskydd.

1
SVENSKA
Produktbeskrivning
Kraftfull lågvarvad slagborrmaskin med växellåda och steglös
varvtalsreglering.
1. Strömbrytare
2. Låsknapp för strömbrytare
3. Mjukt handtag
4. Omställning för höger- eller vänstergång
5. Snabbchuck
6. Omställning för slagborrning eller normal borrning
7. Steglös varvtalsreglering
8. Omställning för låg- eller högväxel
9. Sidohandtag
10. Djupanslag
3
5
64
2
87
9
10
1

1
SVENSKA
Användning
Chuck
Slagborrmaskinen är försedd med en
nyckellös snabbchuck (1.5 – 13 mm).
1. Håll i den bakre delen av chucken och
vrid den främre motsolts tills öppning-
en är så stor att borren går i.
2. Se till att chucken och dess öppning
hålls rena från skräp och främmande
föremål så att borren eller verktyget
kan löpa fritt. För löst fastsatta borrar
eller verktyg kan orsaka personskador.
3. Sätt i en borr eller annat verktyg.
4. Håll i den bakre delen av chucken och
vrid den främre medsols så att den
låser fast borren.
Varning: Försök inte dra åt chucken genom att hålla i chuckens ytterdel och sam-
tidigt starta borrmaskinen, det kan resultera i olycksfall. Dessutom låser chucken
bättre om man håller i både fram- och bakdel och drar åt med handkraft.
Sidohandtag
1. Vrid sidohandtaget motsols för att
lossa det.
2. Ställ sidohandtaget i önskad position.
Ställ in djupanslaget vid behov.
3. Vrid sidohandtaget medsols för att
låsa handtag och djupanslag.

1
SVENSKA
Strömbrytare
1. Anslut stickproppen till ett eluttag efter
att du har satt i ett verktyg i chucken
och dragit åt.
2. Starta slagborrmaskinen genom att
trycka in strömbrytaren (1) sakta,
kontrollera att verktyget roterar åt rätt
håll. Släpp strömbrytaren för att stoppa
maskinen.
3. När chucken roterar kan du låsa ström-
brytaren genom att trycka in låsknappen
(2) och släppa strömbrytaren. Tryck
in och släpp strömbrytaren när du vill
stoppa borrmaskinen.
Växla rotationsriktning
1. Stoppa borrmaskinen.
2. Vrid omställningsvredet (4) till vänster
eller höger för önskad rotationsriktning.
Obs! Borrmaskinen fungerar inte om om-
ställningsvredet är i ett mellanläge. Vredet
måste vridas till fullo till önskad rotations-
riktning.
Steglös varvtalsreglering
1. Starta borrmaskinen genom att trycka
in strömbrytaren (1).
2. Vrid på inställningsratten (7) på hand-
taget motsols för att minska varvtalet,
och medsols för att öka varvtalet.
3. Inställningsratten reglerar hur långt
strömbrytaren kan tryckas in.
Obs! Starta alltid på låg hastighet vid
borrning utan förborrat hål eller körnslag.
Använd som regel högre hastighet med
tunna borrar och lägre hastighet med
grova borrar. Putsning och polering kräver
som regel hög hastighet.

1
SVENSKA
Hög- och lågväxel
1. Stoppa borrmaskinen helt.
2. Vrid omställningsvredet (8) till önskat
hastighetsområde och vridmoment. Välj
”1” för lägsta hastighetsområde (0 - 900
v/min) eller läge ”2” för högsta hastig-
hetsområde (0 - 2500 v/min).
Obs! Använd alltid den lägsta växeln när
maskinen belastas hårt, det ger högre vrid-
moment och bättre kylning.
Varning: Rör inte omställningsvredet om
inte chucken står helt stilla. Se till att vredet
är i rätt läge, vrid vredet fullt till dess stopp-
lägen.
Slagborrning eller normal borrning
1. Stoppa borrmaskinen helt.
2. Vrid omställningsvredet (6) till önskad
borrningsmetod.
När symbolen för en hammare visas vid
pilen (riktning mot chucken) används
maskinen som en slagborrmaskin.
När symbolen för en borr visas vid pilen
(riktning mot chucken) används maski-
nen som en vanlig borrmaskin.
Välj slagborrning för hårda material (be-
tong, sten etc.) och välj normalborrning
för stål, aluminium och trä etc.
Varning: Rör inte omställningsvredet om
inte chucken står helt stilla. Se till att vredet
är i rätt läge, vrid vredet fullt till dess stopp-
lägen.
8

0
SVENSKA
Användningstips!
- Låt motorn gå obelastad i några minuter (tills kylluften har rumstemperatur) för
att kylas efter att du har belastat slagborrmaskinen hårt.
- Använd sidohandtaget, det ger extra kontroll på borrningen.
- Använd endast verktyg med god skärpa.
- Till hårda metaller används Titanbelagda borrar och betong/kakel används bor-
rar med hårdmetallskär, läs på förpackningen!
- Sätt fast ämnet som ska bearbetas ordentligt. Använd tvingar eller skruvstäd där
det går, då kan du använda båda händerna till att styra borrmaskinen vilket ger
större precision.
- Om du borrar i tunna material är det viktigt att du placerar en spillbit bakom det
tänkta borrhålet innan du börjar borra, annars är det stor risk att hålet får fula
kanter på baksidan.
- Rikta in borrmaskinen vinkelrät mot arbetsstycket innan du börjar borra (titta från
era vinklar), se till att du inte trycker borrmaskinen snett när du borrar.
- Tryck inte för hårt (så att maskinen tappar fart), låt verktyget göra jobbet!
Minska trycket innan borren går igenom.
- Låt borren snurra när du har borrat igenom och lyfter upp maskinen, då kyls
borrmaskinen ner och borren rensas från spånor.
Tänk på detta när du borrar i trä och plast
- För trä och andra mjukare material nns era olika typer av verktyg t.ex., Hål-
såg, at träborr etc, välj det som passar bäst! Provborra en spillbit först.
- Verktyget kan överhettas om du inte drar upp det ofta för att rensa bort spånor.
- Placera en spillbit bakom det tänkta borrhålet innan du börjar borra, annars är
det stor risk att hålkanten isas på baksidan.
Tänk på detta när du borrar i metall
- Märk ut borrhålet och gör ett märke med en körnare.
- Verktyget kan överhettas om du använder fel hastighet. Använd gärna kylvätska
som är avsett för ditt material t.ex., T-röd till aluminium (gjutjärn och mässing
bearbetas torrt).
- Använd lägsta växeln och lågt varvtal till stora hål.
- Var särskilt noga med fastspänningen för tunna eller vassa metallföremål så att de
inte lossnar och ger skärskador vid borrningen, använd gärna ett skruvstycke.
This manual suits for next models
3
Table of contents
Languages:
Other CO/Tech Drill manuals

CO/Tech
CO/Tech RHD 18 User manual

CO/Tech
CO/Tech DJC110-108-UK User manual

CO/Tech
CO/Tech ZJ4116-J11 User manual

CO/Tech
CO/Tech HL-DT108-37-UK User manual

CO/Tech
CO/Tech PLCD25 User manual

CO/Tech
CO/Tech Z1J-TD10-13E-UK User manual

CO/Tech
CO/Tech Z1C-HW2-2600E User manual

CO/Tech
CO/Tech Z1J-TD12-13E2-UK User manual

CO/Tech
CO/Tech Z1C-DW-30C-UK User manual

CO/Tech
CO/Tech HL-DR10TLi-2180-UK User manual