Coaster VENTURE Daily User manual

COASTER CYCLES
VENTURE
OWNER’S MANUAL
coastercycles.com info@coastercycles.com (406) 203-4422 Made in Montana

www.coastercycles.com p. 2
www.coastercycles.com p. 3
CONTENTS
Introduction 4
Warnings 5
Model Overview 6
Specications 7
Components - Venture 8-9
Your Safety 10-11
Start Your Ride 12-13
Finish Your Ride 14
Components
Battery 15
Drivetrain 16
Braking 17
Controller 18
Operation 19
Maintenance 20-22
Contact 23

www.coastercycles.com p. 4
www.coastercycles.com p. 5
Thank you for choosing Coaster Cycles. The goal of this Owner’s
Manual is to familiarize you with the features, setup, and safe
operation of your new Coaster Cycles Venture.
This Manual will also cover specications and general maintenance
best practices for your Venture.
For other product information or specic parts, please visit us at
coastercycles.com/support.
INTRODUCTION
INSPIRATION
Although it is impossible to warn you about all safety
considerations associated with riding your Coaster
Venture, we have developed this manual to assist you
in making decisions about the handling and operation
of your new trike.
Your Venture comes equipped with a pedal assist
system that makes moving heavy loads easier on
the rider. The Drive Unit Controller provides you with
information on the power assist level, speed, battery
You WILL be KILLED or
SERIOUSLY HURT by not
following instructions.
You CAN be KILLED or
SERIOUSLY HURT by not
following instructions.
You CAN be HURT by not
following instructions.
CAUTION
WARRANTY
Coaster Cycles provides a warranty against defects in
materials and workmanship for all original equipment
as specied below.
Chassis, fork, *motor, and *battery to the original
owner for one year from date of purchase.
Parts and accessories including bearings, dierential,
and wheels to original owner for two years from date
of purchase.
This warranty does not cover normal wear and tear,
improper maintenance, corrosion, damage caused
by aftermarket accessories, damage or failure due
to accident, misuse, abuse, or neglect.
The owner may incur labor charges for part
replacement or changeover covered by the original
manufacturer’s warranty or non-proprietary products.
*Covered under original manufacturer’s warranty.
DANGER
WARNING
DISCLAIMER
Coaster Cycles is continuously improving our product
line and the information about it. We reserve the
right to edit the information in this manual. The most
current version of the manual will be made available
online, along with how-to videos for maintaining our
products. Coaster Cycles is not held responsible for
omissions or inaccuracies in any printed and online
materials.
!DANGER!
Read this manual and all other manuals provided
by the specic manufacturer before riding your
Coaster Venture for the rst time. Failure to read
and understand safety information can result in
severe injury or death.
SUPPLEMENTAL INFORMATION
Enviolo Technical Manual
Bosch Drive System
- Battery Manual
- Intuvia Display Manual
- Drive Unit Manual
Labels
- Located on the Venture and individual
manufacturer’s parts.
CLASSIFICATION
In the United States, the Coaster Venture is designated
as a Class 1 eBike. This means that the motor provides
pedal assistance with a max speed of 20 mph.
Familiarize yourself with the ebike rules and
regulations in your Country, State, and City. National
and regional requirements may vary.
WARNINGS
Pay close attention to the following warnings throughout
the manual. Failure to follow safety warnings may
result in serious injury or death.

www.coastercycles.com p. 6
www.coastercycles.com p. 7
The Venture is the lightest and most
maneuverable Coaster Cycles model with
13.5 cu ft of storage capacity and a top
loading cargo box.
Features Include:
- LED Lighting Package
- Disc Brakes
- Steel Frame with Aluminum Cargo Box
- eCargo Rated Tires
- Bosch Cargo Line Motor
- Stepless Manual Mid-Drive
VENTURE OVERIEW VENTURE SPECIFICATIONS
Paint Powder Coat Cardinal WH01
Front Tire Size 26” x 2.35”
Rear Tire Size 26” x 2.35” or 20” x 2.35”
Weight 170lbs
Dimensions (Inches) 88 L x 36 W x 41 H
Cargo Capacity 13.5 cu ft
Suggested Rider Height 4’10”- 6’6”
Max Rider Weight 264 lbs
Cargo Load Capacity 200 lbs
Recommended
Tire Pressure 35 psi
Motor Bosch Cargo Line 85 Nm
Battery 36V 500Wh Lithium Ion
Drivetrain Manual Shifting - Internal Geared
Hub 380% Gear Range

www.coastercycles.com p. 8
www.coastercycles.com p. 9
VENTURE COMPONENTS
1. Headset
2. Front Brake Lever
3. Rear Brake Lever
4. Brake Fluid Reservoir
5. Shifter
6. Onboard Computer
7.Fork
8. Headlight
9. Frame Lock
10. Tire
21. Speed Sensor Magnet
22.RearDierential
23. Bumper
24. Cargo Box
25. Cargo Lid
26. Bosch Battery
27.Saddle
28. Seat Post
29. Seat Post Clamp
11. Rim
12. Spoke
13. Disc Brake Rotor
14. Pedals
15. Bosch Motor
16. Crank Arm
17.ChainGuard
18. Chain
19. Mid-Drive
20. Speed Sensor
10
11
12
13
7
1
2
28
29
27
4
3
6
9
7
14
15
23
16
26
18
25
21
20
17
19
24
8
22
1. Headset
2. Front Brake Lever
3. Rear Brake Lever
4. Brake Fluid Reservoir
5. Shifter
6. Onboard Computer
7.Fork
8. Headlight
9. Frame Lock
10. Tire
21. Speed Sensor Magnet
22. Rear Dierential
23. Bumper
24. Cargo Box
25. Cargo Lid
26. Bosch Battery
27.Saddle
28. Seat Post
29. Seat Post Clamp
11. Rim
12. Spoke
13. Disc Brake Rotor
14. Pedals
15. Bosch Motor
16. Crank Arm
17. Chain Guard
18. Chain
19. Mid-Drive
20. Speed Sensor
10
11
12 14
72
28
29
27
4
36
9
5
15
23
16
26
19
25
21
20
18
24
8
13
VENTURE COMPONENTS

SAFETY
www.coastercycles.com p. 10
www.coastercycles.com p. 11
Your Coaster Venture has many built-in safety features. You must also take an
active role in your safety and the safety of others around you. Please read all safety
instructions and other manufacturer’s instructions before use.
GIVE IT A GO
We recommend a test ride in a safe
environment to familiarize yourself with
the unique handling characteristics of a
tricycle before riding on the road.
Your Coaster Venture is heavier and
faster than a traditional bicycle. Start
your test ride without eAssist and then
incrementally increase the assist level
to become familiar with the motor. Give
yourself plenty of space when negotiating
trac while learning to ride.
THINK SAFETY
We want your riding and delivery
experience to be safe and fun! Here are
some tips to help familiarize yourself with
riding a tricycle:
Avoid the following:
- Fast Maneuvers
- Jumps
- Stunts
- Rough Roads or O-Road
- Any maneuvers that add severe stress to
the chassis or components.
VISIBILITY
The Venture is equipped with multiple visibility aids including
a headlight, brake light, and reective decals. Always use your
lights to make yourself more visible to others in trac. Utilize
hand signals when turning to alert fellow road users of your
intentions.
!WARNING!
Keep your reectors and lights clean, adjusted, and
adequately fastened to your Coaster. Wear bright,
reective clothing while riding in poor light conditions to
improve your visibility.
!WARNING!
Damage to the battery or a short circuit in the electrical
system could lead to the battery overheating or
potentially catching re. Read all Bosch user manuals for
proper storage, maintenance, and usage.
PROTECT
Helmets are an essential component to
protect you while riding. Always wear a
helmet that meets safety standards and
regulations. Read helmet instructions for
FULLY CHARGED
The Coaster Venture uses a lithium-ion battery for long life in
a lightweight package. Make sure that the battery is securely
mounted on the bike. Charging the battery before each use
will ensure that the pedal assist lasts as long possible. Maintain
the Bosch battery as instructed by the Bosch user manual.
MAINTENANCE
Keeping your Coaster well maintained will improve
the rider experience and reduce downtime. A daily
check veries that the trike it is ready for use. If
your Venture is part of a eet, creating a daily
checklist for your riders is a helpful way to keep
things running smoothly.
Regularly cleaning your bike of dirt and debris
keeps the powder coat looking pristine. Wipe all
lights and high visibility reectors with a soft cloth.
Mild soap and water will do the trick.
This manual provides general maintenance
information for various components of the Venture.
Refer to specic manufacturer’s repair manuals for
detailed repair and maintenance guidance.
!WARNING!
Improper repairs or adjustments may
damage your Coaster and could lead to
accident, injury, or death.

8. TURNING
Slow down before initiating turns to help maintain
the balance of your Venture. Practice riding with
varying loads to understand how dierent loading
conditions aect the maneuverability of the trike.
Use caution on any downhill and off-camber
corners.
Exercise extreme caution if you encounter obstacles,
wet or oily surfaces, gravel, grating, or any other
pathway hazard. Use caution when maneuvering
your Coaster close to pedestrians and other
vehicles.
9. BRAKING
Always ride with both hands on the handlebar for
better control while braking. Smooth braking and
turning will aid in maintaining control while riding.
Complete most of your braking before entering
a turn. This will help prevent any load shift from
aecting the vehicle balance in the middle of a
corner.
Always engage both front and rear brakes at the
same time when slowing for a turn or coming to
a complete stop.
RIDING TIPS
www.coastercycles.com p. 12
www.coastercycles.com p. 13
START YOUR RIDE
1. 360ºINSPECTION
Start with a 360º visual inspection of your
Coaster Venture before each ride to ensure safe
and smooth operation. Check that all tires are
properly inated and inspect the wheels to verify
that that they are securely mounted. Conrm
that the brakes are functioning correctly.
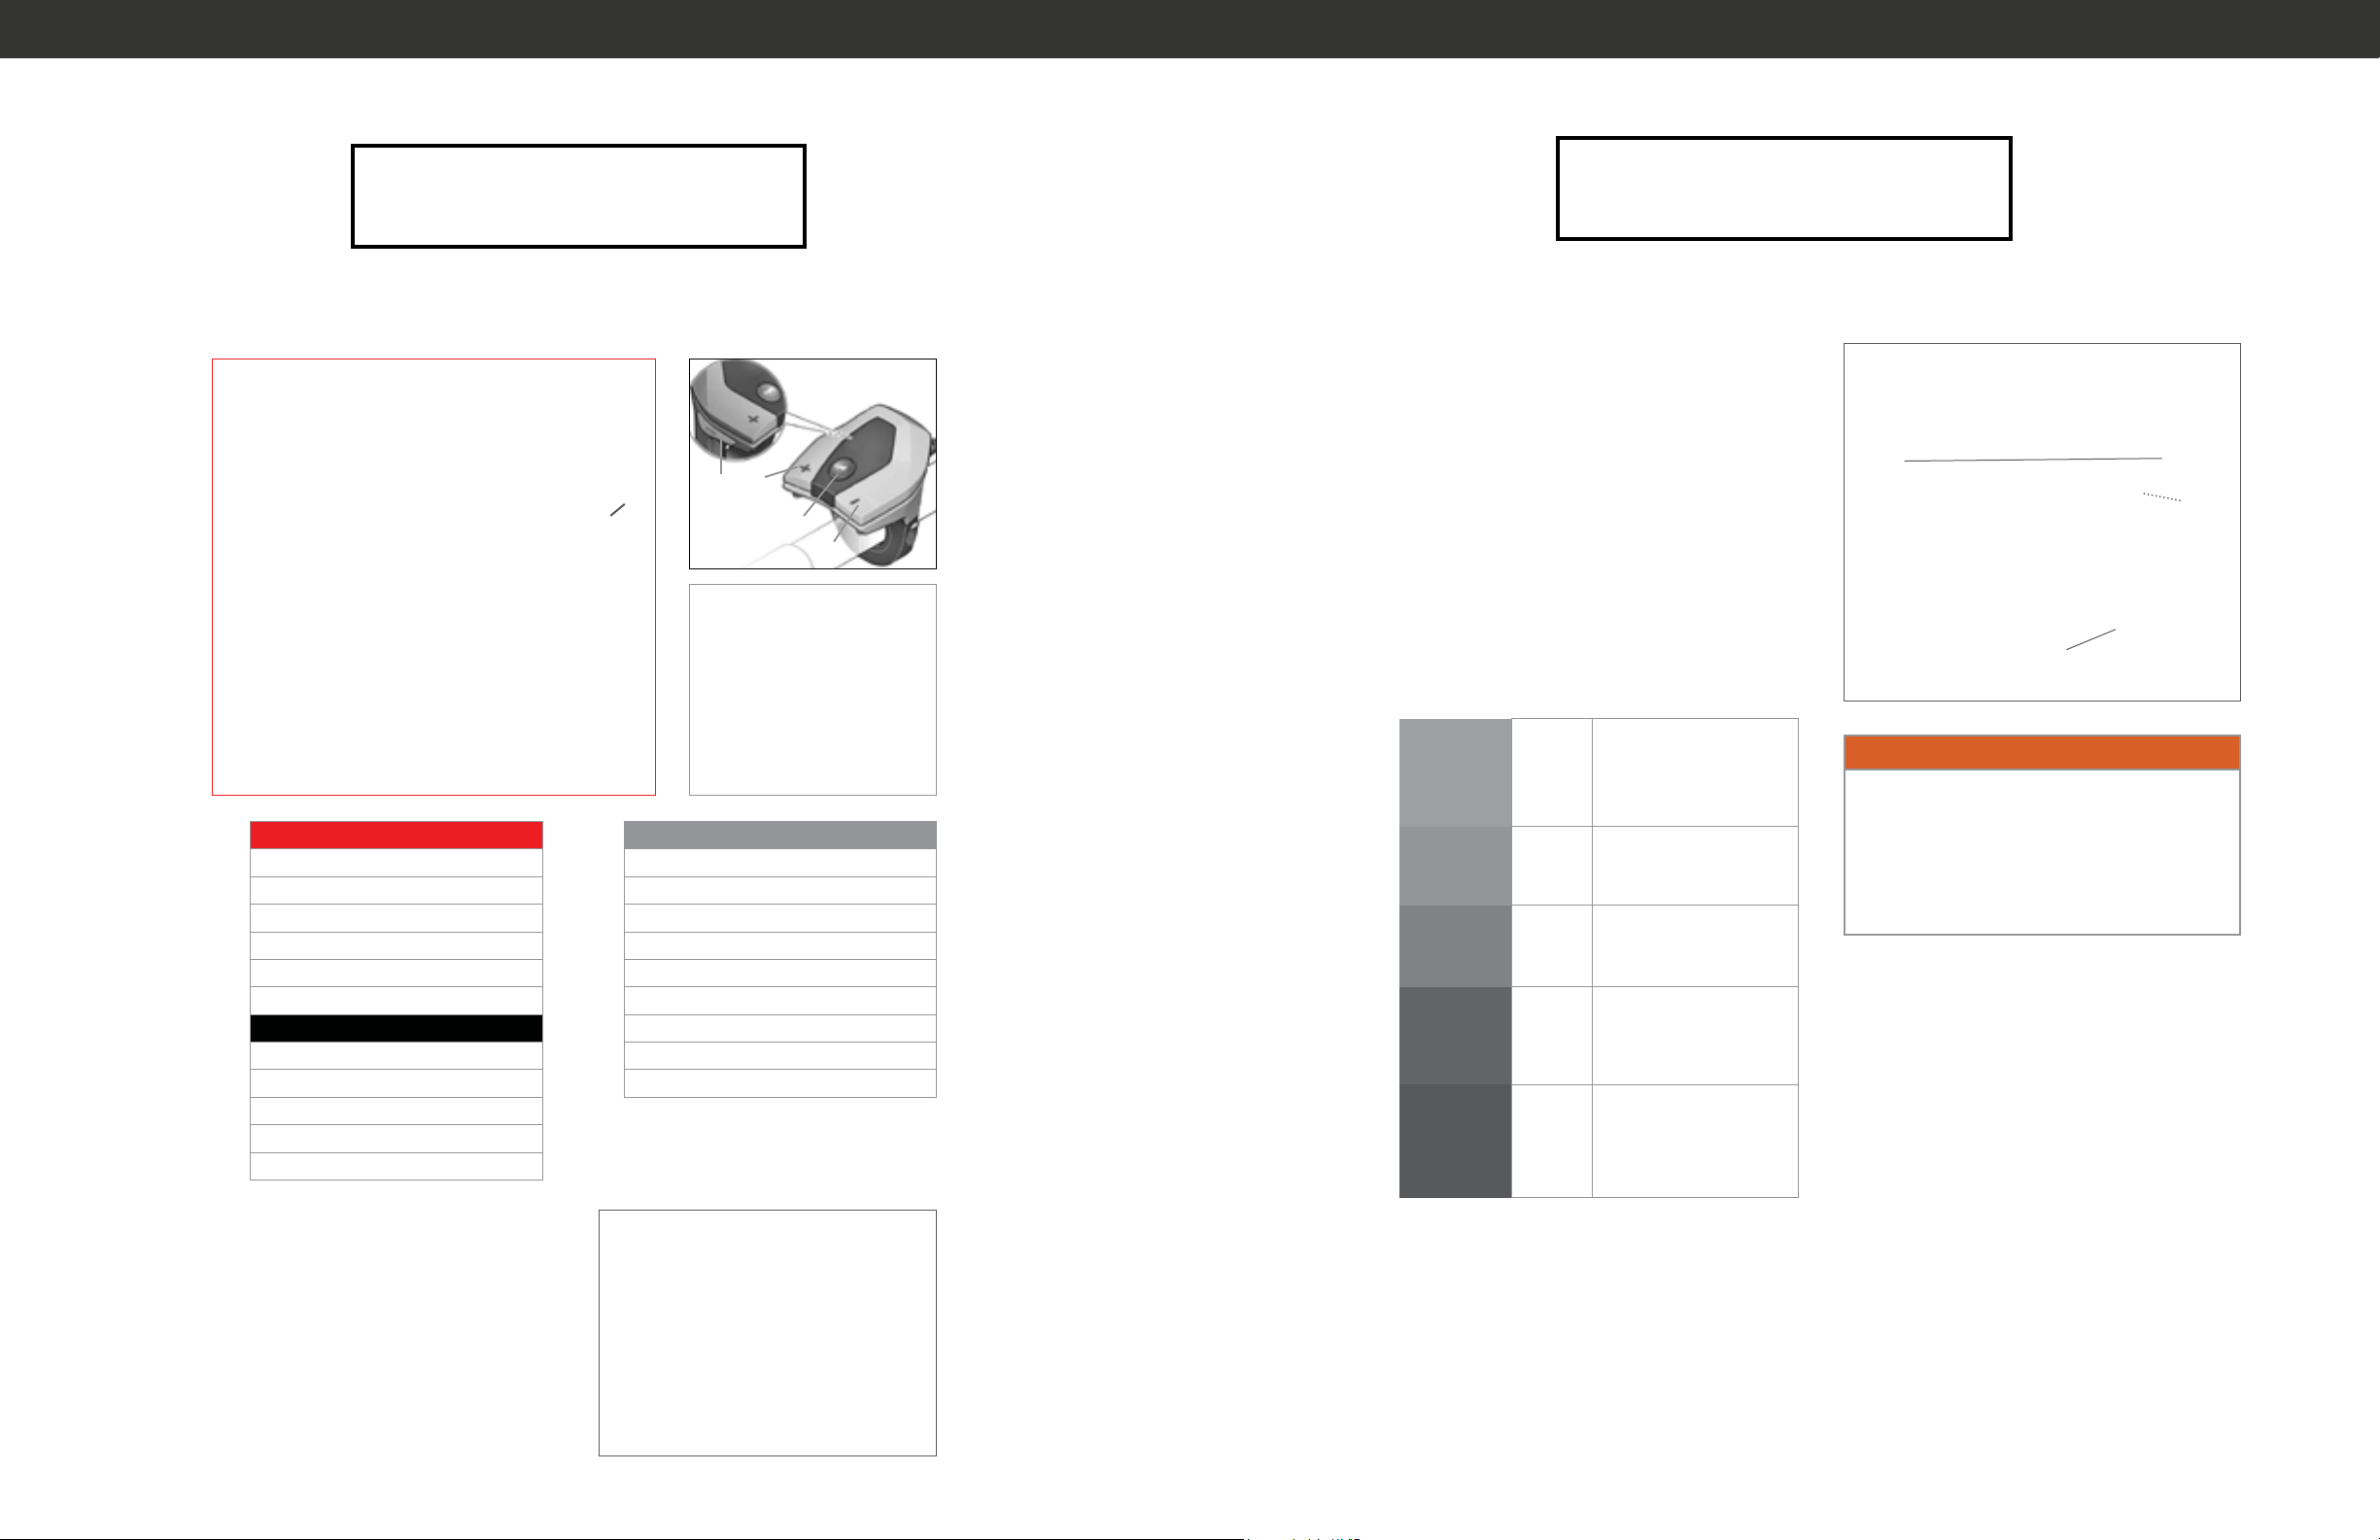
3. INSTALL BATTERY
When inserting the battery into the holder,
press on the battery until you hear an audible
click. Verify that the battery is secure and fully
charged before riding.
2. ADJUST
Adjust the saddle height with the quick release
located on the seat post collar.
Standing next to the bike, start with the seat
at hip height and adjust based on preference.
Mount the trike and verify that the setup suits
your riding position. Never extend the seat post
past the minimum insertion line.
4. RIDING MODE
Turn on the power to the Controller by pressing
the power button. Adjust controls while in a
safe position.
Use the “+” and “-” keys to select riding mode.
See page 19 for detailed instructions.
5. BRAKE & WHEEL RELEASE
Release the front parking brake by compressing
the brake lever and turning the lock clockwise.
Release the rear parking brake by compressing
the brake lever until the brake lock disengages
Ensure that the front frame lock is disengaged
using the appropriate key.
7. GET MOVING
Sit on the saddle with both hands on the
handlebar and both feet on the pedals.
Check your surroundings before pulling into
the bike lane or roadway.
Video of our start-up procedure is located at
http://www.coastercycles.com/getting-started/
6. SHIFTING
Shifting is completed by twisting the shifter on
the right grip. Start with the trike in a low gear
by turning the shifter away from the rider. As
your speed increases, rotate the shifter back
toward yourself.
The Venture can be shifted while stopped and
when the drivetrain is under load.
!WARNING!
Never overload your Coaster. This will impact
vehicle handling and possibly aect warranty
claims.
!WARNING!
Always give enough distance between yourself
and other vehicles, particularly when using
eAssist. Other drivers and riders may not be
able to estimate your speed.
!WARNING!
Any tricycle carries a potential risk of tipping.
Avoid abrupt maneuvers and high speed
turns.
How far can I ride?
Your Venture is capable of 14-22 miles with a fully
charged battery.
That distance will depend on several factors: cargo
load, speed, ambient temperature, and the chosen
assistance level.
Riding at a higher cadence (70-90rpm) will optimize
the eciency of the drive unit.
To plan your trip use the online range calculator at
http://www.bosch-ebike.com/range

www.coastercycles.com p. 14
www.coastercycles.com p. 15
FINISH YOUR RIDE
1. PARKING
When possible, park your Venture perpendicular
to the roadway, with your rear wheels touching
the curb and parking brakes engaged. Parking
this way will facilitate pulling away from the
curb and safely entering trac.
2. BRAKING
Engage both parking brakes and frame lock:
1. Compress the front brake and turn the lock
counterclockwise.
2. Compress the rear brake and engage the
parking lever.
3. Engage the frame lock around the front wheel.
See more information on the operation of all
brakes on page 17.
4. BATTERY CHARGE
Turn o the Bosch battery and remove it from
the battery holder. In a safe and well ventilated
area, plug it into the charger. You can leave the
battery connected to the bike if you are close
to a power source.
3. CARGO LOCK
Close and lock the cargo box.
BATTERY
With impressive mileage and long service life, Bosch
batteries are an ecient power source. These high-
quality lithium-ion batteries have a built-in system that
recognizes potential sources of error and eciently
protects cells against overheating.
Checking the battery charge:
On the Battery (A):
1. Press the On/O button (a) on the battery.
2. Check the ve green LED’s of the charge control
indicator. Each green light represents 20% charge. All
ve lights indicate a fully charged battery.
On the Display (B)
1. Press the On/O button on the Intuvia display.
2. Check the battery charge-control indicator. Each
bar of the battery symbol indicates 20% charge. All
ve bars indicate a fully charged battery.
Charging the battery (C):
On the Coaster Venture
1. Park your Venture close to a 110V outlet.
2. Turn On/O button (a) to switch o the battery.
3. Check the charger for any damage and then insert
the charger (c) into the socket on the lower Bosch
battery holder.
4. Connect the main cable of the battery charger into
outlet.
O the Coaster Venture
1. Press the On/O button (a) to switch the battery o.
2. Remove the battery from the battery holder.
4. Place the battery on a clean surface.
5. Insert the charger plug into the socket on the battery.
6. Connect the main cable of the battery charger into
a 110V outlet.
Removing Battery:
1. Press the On/O button (a) to switch the battery o.
2. Place the dedicated key (m) into the battery lock (j)
and turn clockwise.
3. Tilt battery out of the top part of the battery holder.
4. Pull battery out of the bottom of the holder to remove
from the Venture and attach to charger.
Attaching Battery (D):
1. Insert the battery into the
contacts (k) on the lower battery holder.
2. Tilt the battery into the upper holder (j) and press
A B
C
Dj
k
l
BATTERY
a
c

DISC BRAKES
Your Coaster Venture comes equipped with hydraulic disc
brakes, making for easy and repeatable stopping.
Before riding, verify which brake lever controls the front
and rear brake. Apply both brakes at the same time with
equal pressure for smooth braking.
Verify that your brakes are working before heading out
onto the road.
DRIVETRAIN BRAKING
www.coastercycles.com p. 16
www.coastercycles.com p. 17
CHAIN
The front chain is 3/32” wide and is rated to carry
loads associated with a motor-driven drivetrain.
The rear chain is 1/8” wide and corrosion-
resistant, designed to survive repeated exposure
to the elements.
A fully enclosed chain guard on the Coaster
Venture prevents premature wearing of the
drivetrain and fewer service issues.
INTERNAL GEAR HUB
Your Coaster Venture is equipped with a stepless mid-drive hub that is manually shifted. Riders may
change gears by using the handlebar shifter in order to control desired cadence and eort level.
DIFFERENTIAL
We use a dependable and grease-lubricated
dierential for our rear axle. The component
allows the rear wheels to spin independently to
facilitate turns. PARK IT
There are a few things to remember when parking your
Coaster ECT for a delivery or at the end of the day. With
a few steps, you can leave your bike secure.
Activate Brake
1. Pull firmly and hold the right front brake lever (v)
toward the hand grip.
2. Push small locking lever (w) toward the hand grip until
engaged.
3. To release, pull rmly on the brake lever and the locking
lever will automatically disengage.
Bring Your Keys
Taking your keys with you leaves your Coaster protected
from unauthorized riders.
FRAME LOCK
A secure frame lock, located around your front wheel, helps
protect against unauthorized use of the Venture when you
stop to make a delivery.
To Lock
1. Rotate key clockwise.
2. Push down lever to engage lock bar.
3. Remove key.
To Unlock
1. Rotate key clockwise.
2. Lock bar lever will automatically release.
wv

Assistance
Level
3
7
eASSIST SETTINGS
The level of assistance can be adjusted via the
Controller (7). The assistance level can be changed
anytime, even while riding.
To increase the assistance level use the controller
and press the “+” button (9) on the Controller
until the desired assistance level is displayed on
the on-board computer.
To decrease the assistance level, press the “–”
button (10).
CONTROLLER OPERATIONS
www.coastercycles.com p. 18
www.coastercycles.com p. 19
ON-BOARD COMPUTER FUNCTION ON-BOARD COMPUTER INFORMATION
1. i- Display Function a. Drive Unit Assistance Indicator
2. Lights b. Assistance Level Indicator
3. On-Board Computer c. Headlight Indicator
4. Holder for Computer d. Text Indicator
5. On/O Button e. Value Indicator
6. Reset Button f. Speed Indicator
CONTROLLER FUNCTION g. Shift Recommended - Higher Gear
7. Controller Unit h. Shift Recommended - Lower Gear
8. i- Display Function i. Battery Charge Indicator
9. -Reduce Assistance (Scroll Down)
10. +Increase Assistance (Scroll Up)
11. Push Assistance - Walk Button
1
2
6
5
4
3
7
9
10
11
a
b
c
d
h
g
f
e
i
DRIVE UNIT - ON-BOARD COMPUTER AND CONTROLLER
Inserting and Removing On-Board Computer
To insert the On-Board Computer, slide the
Computer into the holder as shown.
To remove the Computer, press the lock
latch (15) and slide the on-board computer
toward the front out of the holder.
For additional security while parked, you
can remove the on-board computer to
prevent theft of your Venture.
4
3
15
16
USB
Port
8
Assistance levels for your Coaster ETC
!WARNING!
The Walk Assist function should only be used
when pushing the Coaster Venture. When
Walk Assist is activated, the pedals may turn.
Keep your legs clear of the moving pedals to
avoid the risk of injury.
No Assist
OFF
Motor assistance is o
and can be operated
unassisted. Push
assistance can not be
activated.
ECO
Maximum riding
range and eective
assistance.
TOUR
Uniform touring
assistance for long
touring range.
SPORT
Powerful assistance
continuous stopping
and starting.
Maximum
Assistance
TURBO
High cadence riding
supporting maximum
assistance.
WALK
To activate the Walk Assist function, briey press
the “WALK” button (11) on your on-board computer.
After activation, press button “+” button within 3
seconds and keep it pressed. The eBike drive is
now switched on.
Note: Walk Assist cannot be activated in the “OFF”
assistance level.

Regular maintenance must be completed to ensure long-term safe operation of
your Coaster Venture. All service and repairs should be completed by a qualied
individual.
MAINTENANCE
IMPORTANT SAFETY PRECAUTIONS
- Turn o and remove the battery before starting
any maintenance.
- Keep open ames, sparks, and cigarettes away
from your Venture to reduce any possibility of
a re.
CLEANING
Keeping components clean is an excellent start
to any maintenance schedule.
Use a damp, soft cloth and mild soap and water
to clean dirt from the frame, cargo box, and other
components. Avoid spraying water and soaking
compnents, especially the drive system and any
lubricated parts.
STORAGE
For long-term storage, remove
the Bosch battery from your
Venture. Store battery at room
temperature in a dry and well-
ventilated location.
Your Coaster Venture should
also be stored in a dry and
well-ventilated area. Avoid
extreme temperatures (<32
F (0 C) or >105 F (40 C)).
Dry all components, lubricate
the chain, and cover your
Venture to prevent dirt and
debris from damaging any
parts.
Storing under these conditions
will maximize the battery
charge and service life of your
delivery investment.
MAINTENANCE
SERVICE RECOMMENDATIONS (MILES)
www.coastercycles.com p. 20
www.coastercycles.com p. 21
!CAUTION!
Keep water away from any lubricated or
electrical components.
SPOKES
Check spoke tension weekly
for excessively loose or
rattling spokes which may
compromise the integrity of
the wheels.
Riding with heavier loads can
lead to more wear and tear on
the chassis, wheels, and other
components.
CHAIN
Check the chain for dirt,
wear, and tension. Proper
lubrication of the chain will
keep things running smoothly
and increase the life of the
chain.
Use a bike-specific chain
lubricant and avoid getting
lubrcant on any braking
surfaces or painted parts.
TIRES
It is necessary to check and
maintain the tires on your
Coaster for safe and ecient
riding.
As part of your daily 360º visual
inspection, always verify that
all three tires have minimal
wear and are inated to 35 psi.
!WARNING!
Incorrect chain
tension can cause
increased wear on drive
components and cause
your Coaster to become
dicult to ride.
COASTER ECT INSPECTION SCHEDULE Daily Weekly Every 500 Every 1000
360º Visual Inspection x
Tire Pressure x
Lighting x
Battery x
Spoke Tension x
Chain Lubrication x
Chain Wear x
Cog Wear x
Tire Wear x x
Headset x
Pads - Front Disc Brakes x
Rotor - Front Disc Brakes x
Pads - Rear Disc Brakes x
Rotor - Rear Disc Brakes x
Motor x

COASTER ECT REPLACEMENT PARAMETERS
Pads - Front Disc Brakes
Pads must have >1mm of compound. Replace pads at 3000 miles regardless of thickness.
Rotor - Front Disc Brakes
Rotor must be >1.8mm thick. Replace pads at 3000 miles regardless of thickness.
Pads - Rear Disc Brakes
Replace when there is <1.5mm of brake pad left.
Rotor - Rear Disc Brakes
When either side of the braking surface is worn by more than 0.5mm - 0.75mm.
Motor
Have the motor of your Venture checked annually by a Bosch Service Center.
Headset
Tighten star nut if the headset is not spinning smoothly or has play.
Lighting
Replace any light if not working correctly.
www.coastercycles.com p. 22
www.coastercycles.com p. 23
MAINTENANCE
COASTER VENTURE PART
REPLACEMENT SCHEDULE (MILES) Every 2000 3000
Rear Tires x
Front Tire x
Front Drive Chain x
Rear Drive Chain x
Shifter Cables x
CONTACT
COASTER CYCLES
Coaster Cycles are
proudly assembled in
Montana, USA
We are pleased to be
a part of the Made in
Montana program.
CONTACT
Coaster Cycles
9257 Bonner Mill Rd
Bonner, MT 59823
(406) 203-4422
BATTERY DISPOSAL
Please do not dispose
of batteries with
household waste.
Recycle all batteries,
packaging, and parts
in an environmentally
friendly method.
You may recycle your
Bosch battery pack by
calling (800) 822-8837.
coastercycles.com
youtube.com/coastercycles
facebook.com/coastercycles
instagram @coastercycles
twitter.com/coastercycles
This manual suits for next models
3
Table of contents