Coaster 900749 User manual

Fine Furniture for every stage of life
COASTERFURNITURE.COM
900749
Grandfather Clock
ASSEMBLY INSTRUCTIONS
COASTER FINE FURNITURE
REVISION 3: 07/12/2022 PAGE 1 OF 12

1PC
8PCS
QTYFIGUREDESCRIPTION DESCRIPTION QTYFIGURE
2PCS
BOLTφ8*40mm
FIXING BARS
Z
1
2
3
4
5
6
HARDWARE IDENTIFICATION
PART NAME FIGURE QTY PART NAME FIGURE QTY
ATOP UNIT 1PCE
BASE UNIT
BACK PANEL
1PC
F
1PC
G
PENDULUM
2PCS
H
DECORATION
WEIGHTS
4PCS
I
DECORATION
CHAINS
1PC
BFRONT DOOR
1PC
C
DRIGHT SIDE
PANEL
LEFT SIDE
PANEL
1PC
CABLE TIE
LONG SCREW
SHORT SCREW
PLASTIC ANCHOR
1PC 1PC
1PC
1PC
PARTS IDENTIFICATION
CAUTION: PRODUCT IS FRAGILE. TO AVOID BREAKAGE AND POSSIBLE INJURY HANDLE WITH CARE!
ASSEMBLY TIPS:
Warning!
1. Remove hardware from box and sort by size.
2. Please check to see that all hardware and parts are present prior to start of assembly.
3. Please follow attached instructions in the same sequence as numbered to assure fast & easy assembly.
1. Don’t attempt to repair or modify patrs that are broken or defective. Please contact the store immediatelly.
2.This product is for home use only and not intended for commercial establishments.
ITEM:900749
SIZE D
2 PCS
ALKALINE BATTERIES REQUIRED ASSEMBLY TOOLS REQUIRED
COASTERFURNITURE.COM
Your clock is fitted with a Westminster Chiming movement. This has an automatic night silence function that silences the
Chimes between 10.00 P.M. and 5.00 A.M.(last strike 9:00PM, first strike 6:00AM).
Before the clock leaves the factory, the clock has been set at 5:55AM.
Please make sure you have 2 x D Alkaline batteries, as these are not included. You will also need a screwdriver.
PAGE 2 OF 12
ASSEMBLY TIME PER UNIT: 20 MINUTES BY 2 PERSONS

E
FF
①
D
C
D
E
C
F
F
①
①
C
C
D
NOTES: PLEASE MAKE SURE CLOCK IS IN LEVEL POSITION, OTHERWISE
IT WILL NOT OPERATE PROPERLY.
STEP 1-1 STEP 1-2
STEP 2-1 STEP 2-2
STEP 3
ITEM:900749
COASTERFURNITURE.COM
PAGE 3 OF 12

D①
①
C
①
①
A
A
A
E
A
D
C
STEP 4-1 STEP 4-2
STEP 5
STEP 6
ITEM:900749
COASTERFURNITURE.COM
PAGE 4 OF 12

hole
hook
hole
G
H
short chain
long chain
weight
pendulum H
G
I
②
B
D
STEP 7-1 STEP 7-2
STEP 8
STEP 9
ITEM:900749
COASTERFURNITURE.COM
PAGE 5 OF 12

WALL
⑥④
③
BACK OF THE CLOCK
ATTENTION: ANTI TIPPING SAFEGUARD
STEP 10
FURNITURE TIPPING RESTRAINT
WARNING
Injury may result from tipping furniture.
This restraint is not a substitute for proper adult supervision.
This restraint may provide protection against tipping furniture.
Do not allow children to climb on furmiture.
Failure to detach this restraint before moving furniture may
result in injury and damage.
ITEM:900749
COASTERFURNITURE.COM
PAGE 6 OF 12

BATTERY HOLDER
turn the longer
hand only
picture
1
picture
2
picture
3
picture
4
45.
TAKE OFF PAPER LABEL
H
1.TO START THE CLOCK
Li the up-cover from the back of the top unit(A), you will find a battery holder. Open the
battery cover, insert 2 new 1.5 volt "D" alkaline batteries into the Battery Holder and making
sure the battery is as indicated(picture 1). Push the bob of pendulum(H) lewards to let the
clock run(picture 3).
2.TO SET TIME: Turn the minute hand(Longer hand)clock wise tenderly until the desired time
is obtained on the dial. Do not push too hard or turn the hand counter clockwise (never turn
the short hand), otherwise it will cause damage of movement(picture 4).
3. TO ADJUST MELODY SELECTION: The button in position( ): this selection will only
have the striking sound every hour. The button in position( ): this selection will have both
the striking sound and Westminster chime every hour. The button in position( ): this
selection will only have the Westminster chime every hour. The clock will not sound from
10:00 pm to 5:00 am(picture 2).
4.TO ADJUST TIME: Press the "time adj" button for adding the time of striking. For example,
if the clock counts 2 times at 4 o’clock, please press button two times then it gives corrected
strike(picture 2).
5. TO ADJUST VOLUME CONTROL: To turn button rightward or leward to obtain the
desired sound(picture 2).
Operating the clocks as following pictures.
*DON’T PUT BATTERIES INTO THE MOVEMENT BEHIND OF PENDULUM DRIVER.
ITEM:900749
COASTERFURNITURE.COM
PAGE 7 OF 12

TROUBLESHOOTING
Here are a few symptoms that are associated with 'Defective Batteries' or 'Incorrect Installation'
and do not indicate that the clock itself is defective:
Problem
Your clock strikes six(6) times on every hour.
Solution
Change the chime section batteries, and set time and chime again by following "SETTING TIME AND
CHIME"procedure.
Problem
Your clock starts to chime erratically on every hour.
Solution
Press the "Set" Button of TIME ADJ, the clock will chime, and increase one chime per push, push to
the correct chime.
If this method still does not solve the problem, replace the chime battery, and set time and chime
again by following the "SETTING TIME AND CHIME" procedure.
Problem
Your clocks chimes are getting quieter and quieter.
Solution
Change the chiming section batteries and turn the volume down to about half way.
Problem
Your clock does not chime at 10 pm.
Solution
Your clock has an Automatic night mute with the last strike at 9pm and the first strike at 6am.
Problem
Can I change when the night mute starts and stops?
Solution
No, this function is not available.
Problem
You clock does not chime during the day.
Solution
Reset the clock according to the "SETTING TIME AND CHIME" procedure.
CAUTION
Do not mix Old and New batteries. Do not mix Alkaline, and Standard(Carbon - Zinc) or
Rechargeable(Nickel - Cadmium) batteries.
ITEM:900749
COASTERFURNITURE.COM
PAGE 8 OF 12

BATTERY HOLDER
(Figure 1) (Figure 2) (Figure 3)
■The time cannot be adjusted by adjusting the hour hand (short hand), please turn the
minute hand (long hand) clockwise.
(Note: Turn the minute hand counterclockwise, and cannot go past the 12 o'clock position,
otherwise it will damage the timekeeping contacts of the movement, resulting in failures
such as no timekeeping or no music.)
■Before the clock leaves the factory, the clock hands have been set at 5:55AM. If the clock
display is not this time, please turn the minute hand clockwise to adjust to 5:55AM, and then
insert the battery.
■The first chime is set to 6:00 AM. The chime will stop automatically from 10:00 PM to 5:00 AM.
(The night stop function is programmed before leaving the factory. The user cannot change
it)
■Once the battery is removed, the movement will be automatically initialized. Aer reloading,
the time will be reported again from 6:00 in the morning.
Regarding the timekeeping and pendulum troubleshooting methods:
ITEM:900749
PAGE 9 OF 12
COASTERFURNITURE.COM
X

ITEM:900749
PAGE 10 OF 12
COASTERFURNITURE.COM
1.Solution for not reporting the time with chime:
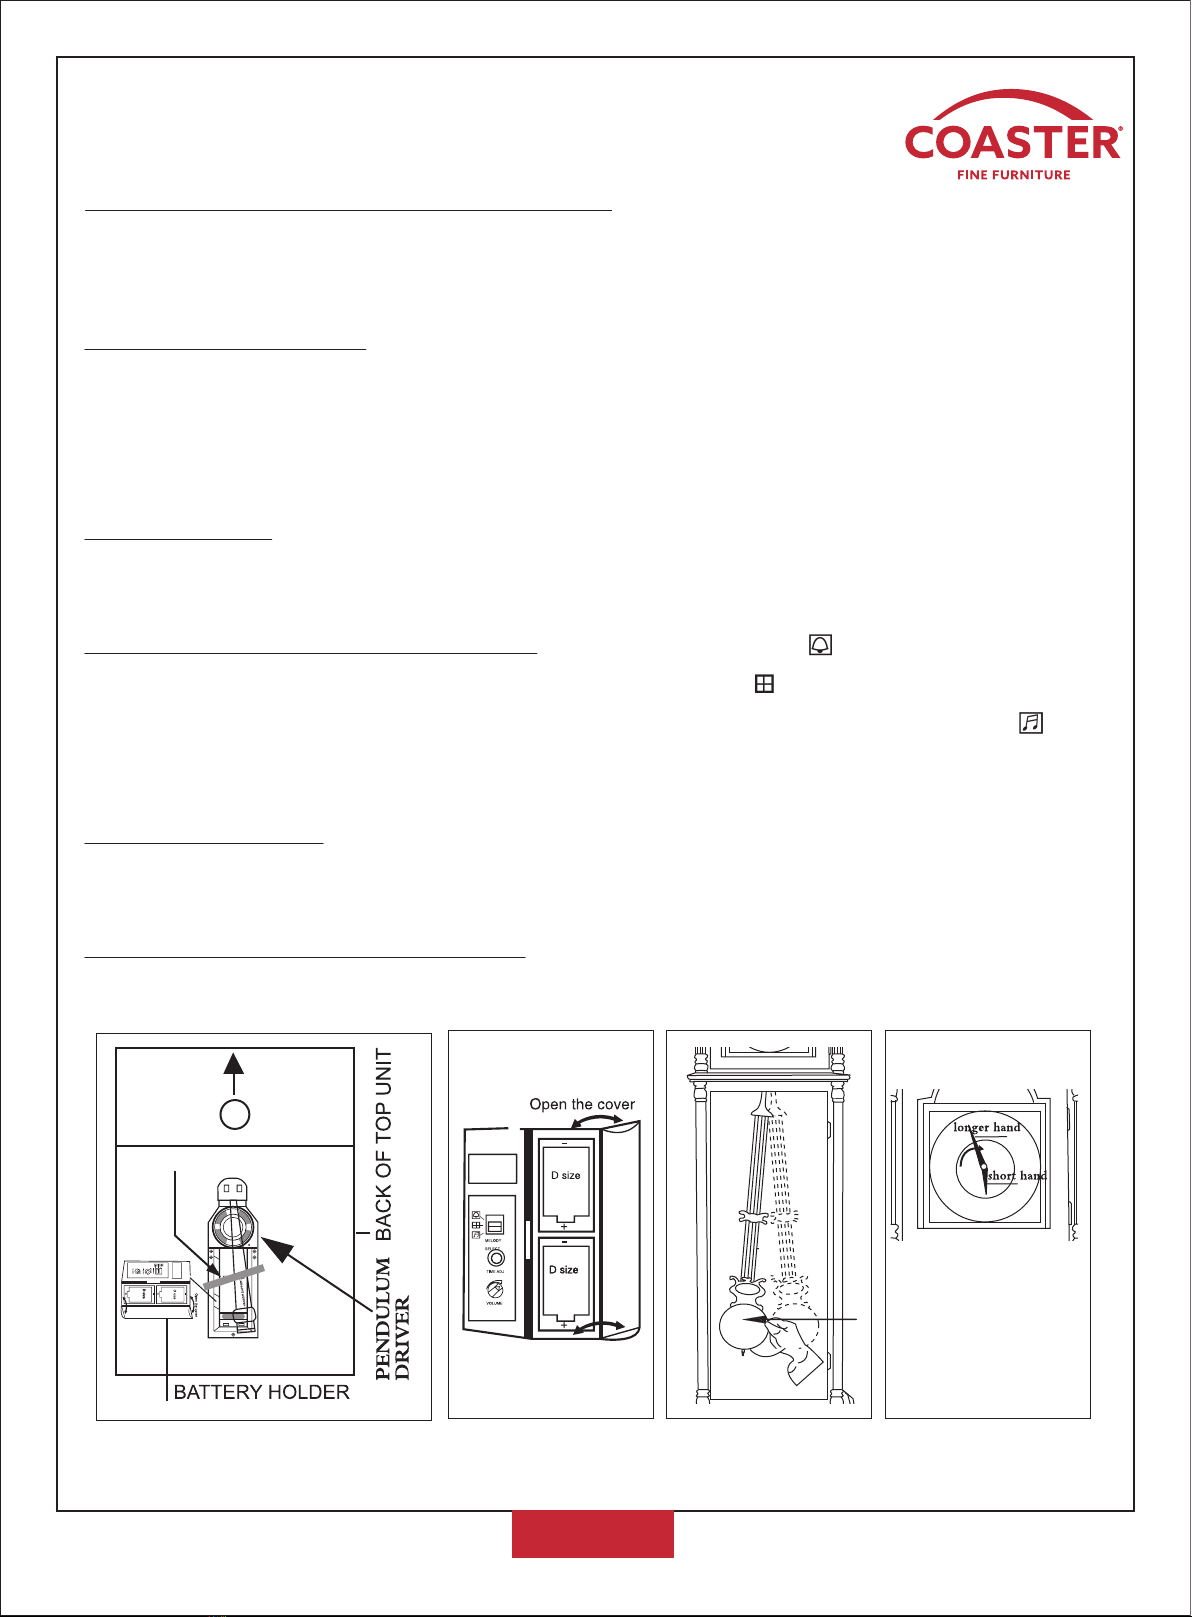
a.Rotate the volume button (Figure 2 VOLUME) to the maximum position.
b.Check whether the positive and negative positions of the battery are correct (Figure 1). If it
is inaccurate, please reinstall it according to the icon.
c.If the positive and negative poles of the battery are correct and the problem is still not
resolved, adjust the time to 5:55 clockwise using the minute hand, remove the battery,
wait for a while, and place it again. Then adjust the minute hand to 6:00 to tell the time
and music.
d.Or use the TIME ADJ button on the battery box (Figure 2) to solve problem (c.) above, each
time you press, no more than 8 times, you can hear the time and music. The time signaling
this time is 6:00 AM. Then use the minute hand to adjust the hour hand clockwise to the
actual local time.
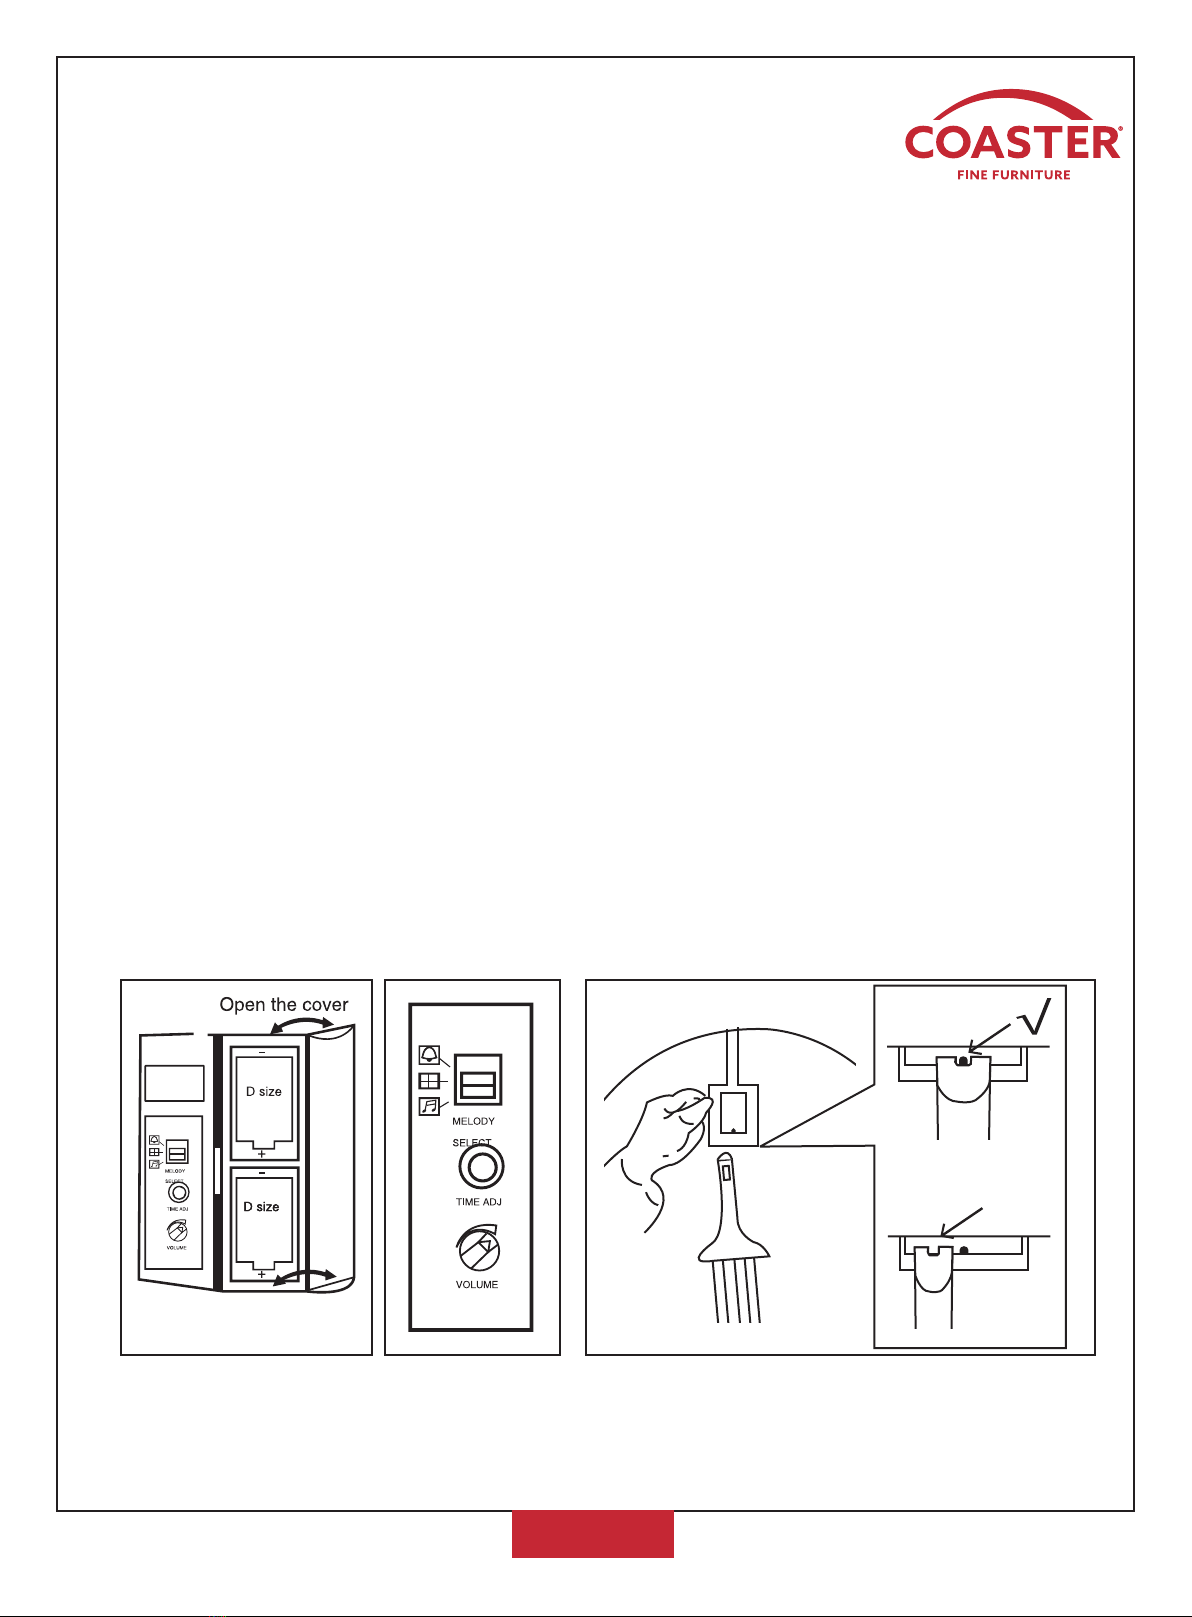
2.When there is no music when telling the time, push the sliding button of MELODY SELECT
(Figure 2) to the middle position( ).
3.If there is music without telling the time, push the sliding button of MELODY SELECT (Figure
2) to the middle position( ).
4.The time telling time is inconsistent with the displayed time. It can be adjusted by the TIME
ADJ button (Figure 2) on the battery box. Each time you press it, an hour will be added, and
so on. Note that the TIME ADJ key is aer 12 o'clock, and it is 1:00 when you press it again.
5.The hourly timekeeping time is inconsistent with the displayed time. Please set the clock to
5:55 without placing the battery. Aer placing the battery, manually or automatically go to
6:00, and the clock will show time as 6:00 AM.
6.The time is not reported at 10 o'clock during the day, but reported 10 o'clock at night. The
main reason is that the clock defaults to night as day. You can press the TIME ADJ (Figure 2)
button on the battery box for 12 times to change the time to day or night time.
7.When the product leaves the factory, the hour hand is set at 5:55. When disassembling the
protective tape on the movement, you must be careful to avoid touching the pointer and
each line to prevent the clock hand from shiing and the line loose.
8.The solution for the clock not reporting the time on the hour, explain the cause of the
accident. (Note: Do not manually turn the minute hand clockwise too fast. Turn lightly; do not
turn for less than 15 seconds. Otherwise, at least the above problems will occur.)
Solution 1:Pull out the second cap manually when you hear the time report, then pull
out the minute hand in the same way and reinstall it to the 12 o'clock position, and
then manually rotate the minute hand clockwise to the 12 position to confirm whether

ITEM:900749
PAGE 11 OF 12
COASTERFURNITURE.COM
the hour is signaled, otherwise , repeat the same procedure again. It can be repeated
several times to achieve the best results. Finally put back the seconds cap.
(Note: Keep the two clock hands in parallel position, and they cannot touch each other,
neither can touch the face of the clock, nor touch the glass of the front clock)
Solution 2:Set the time to the time when you hear the time signal, immediately
remove the battery, remove the second cap, remove the minute hand, and re-set the
minute hand to the 12 o'clock position, and set the clock to 5:55. position, replace the
battery. Automatically or manually dial to 6:00, the hour hand tells the time for 6:00AM.
Then manually adjust to the actual local time, and then install the seconds cap.
9.If the battery is insufficient, please replace the battery in time.
(Note: If the positive and negative poles of any battery are reversed, they must be removed
first and then installed again. All are taken down to initialize the clock. Then install it
correctly. It is not possible to mix an old battery with a new battery, let alone replace it with
another type of battery. Be sure to use a large battery of the same model size D. A bad
battery can also cause the clock to work infrequently.)
10.Possible conditions of the clock caused by insufficient battery power: Inaccurate time
reporting, random time reporting, always reporting one time. Or the volume of timekeeping
and music is getting weaker and weaker. If the battery is low, it will leak, and corrode the
metal circuit and cause the clock to malfunction. Even damage the battery box. If any of the
above problems are found, replace the battery in time.
11.If the clock does not report time suddenly, the swing range of the rocker is small or does not
swing, the general situation is that the battery power is insufficient, or the connection line
between the rocker and the battery box is poor, and you need to reinsert it and confirm
whether it is secure.
12.How to tell the time, the volume is normal, the swing range of the pendulum is unstable, or
it shakes, etc. In addition to the battery power attenuation, it is usually caused by the hook
of the pendulum not hanging to the middle position of the beam of the pendulum rod. In the
middle position (Figure 3), and make sure that the pendulum head and the clock body are
parallel. Don't deviate, twist, etc.
13.You need to manually push the pendulum head to the le or right, so that the pendulum
head does not touch the inner wall of the clock case. The pendulum will automatically swing
right and le normally.

PAGE 12 OF 12
ITEM:900749
COASTERFURNITURE.COM
Table of contents
Other Coaster Clock manuals
Popular Clock manuals by other brands

Oregon Scientific
Oregon Scientific RMB899P user manual

QLOCKTWO
QLOCKTWO EARTH 13.5 Instructions for use

LA CROSSE CLOCK
LA CROSSE CLOCK 433-3846 quick start guide

La Crosse Technology
La Crosse Technology WT-8005U quick start guide

Thoughtfully Designed
Thoughtfully Designed TDC002 instruction manual

Oregon Scientific
Oregon Scientific RM313PU user manual