Cobra 19 Plus User manual

TABLE OF CONTENTS
Model 19 Plus
DESCRIPTION PAGE NUMBER
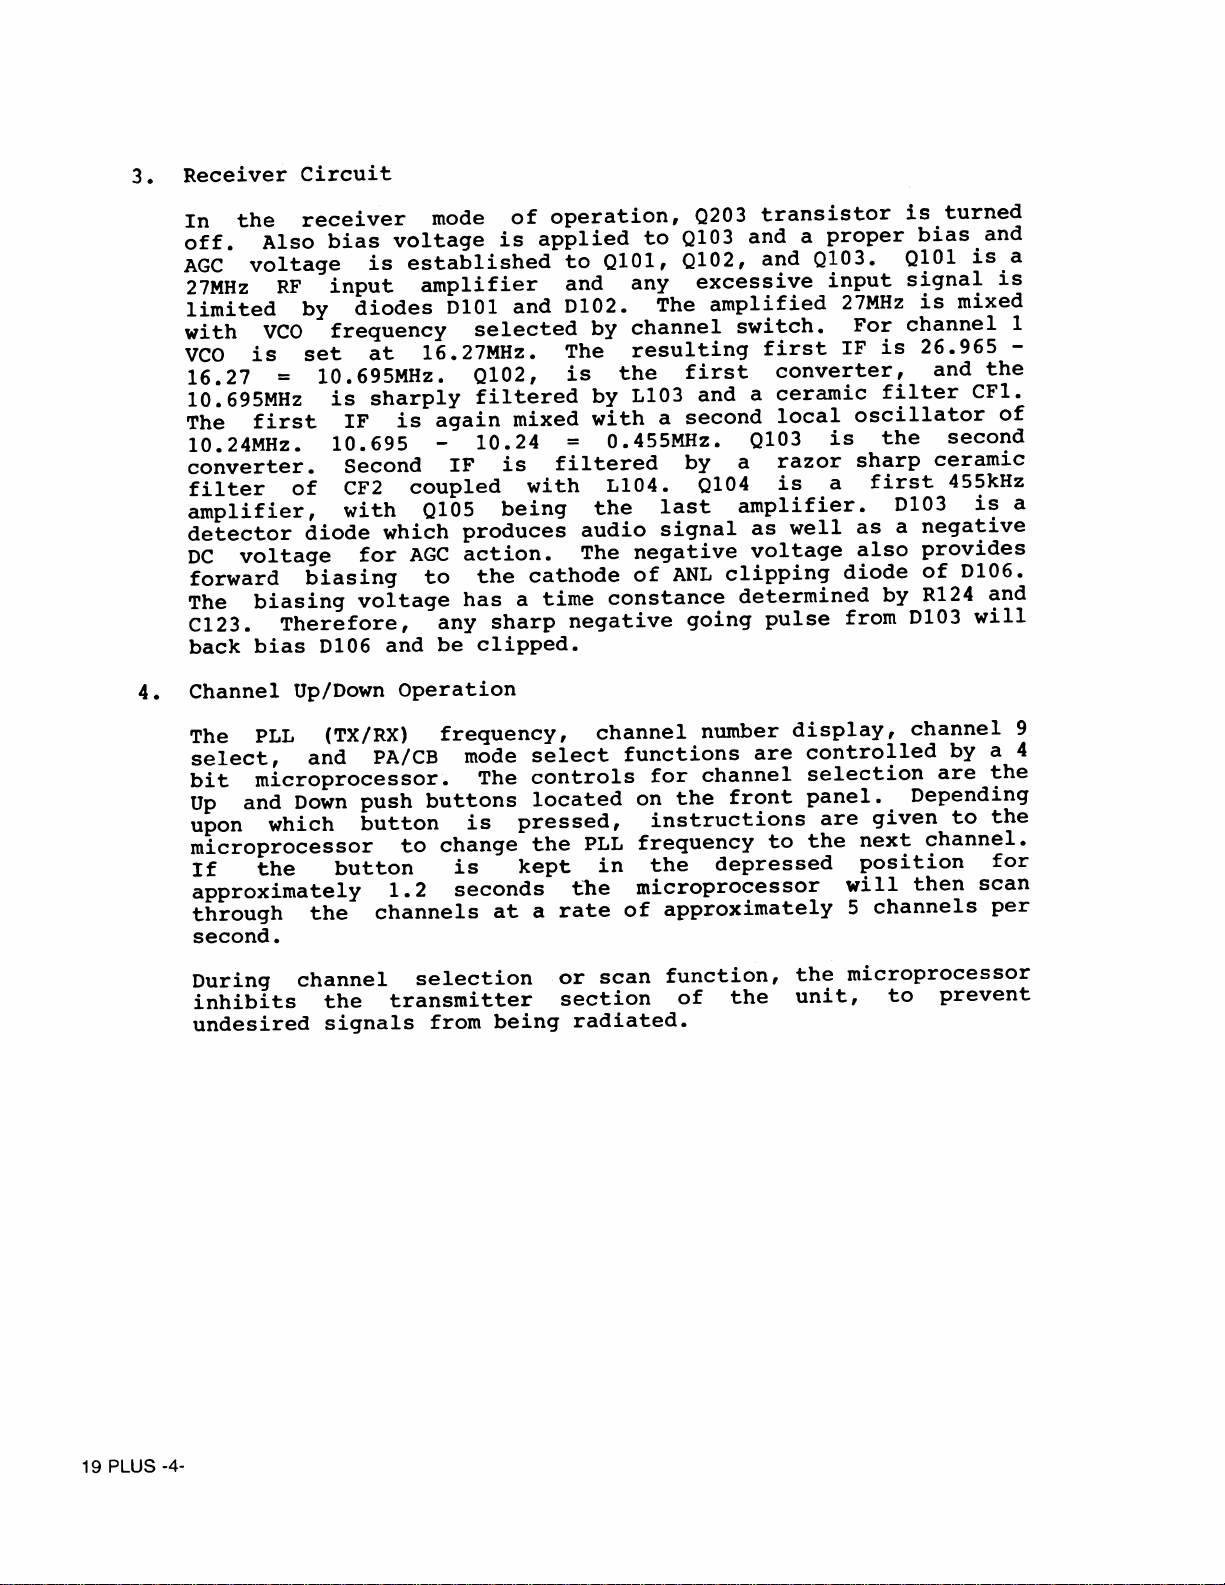
OPERATING THEORY- PLL FRE . SYNTHESIZER....................................................................1-4
FRE UENCY CHART (TABLE 1).......................................................................................
.
..................5
BLOCK DIAGRAM..................................................................................................................................... 6
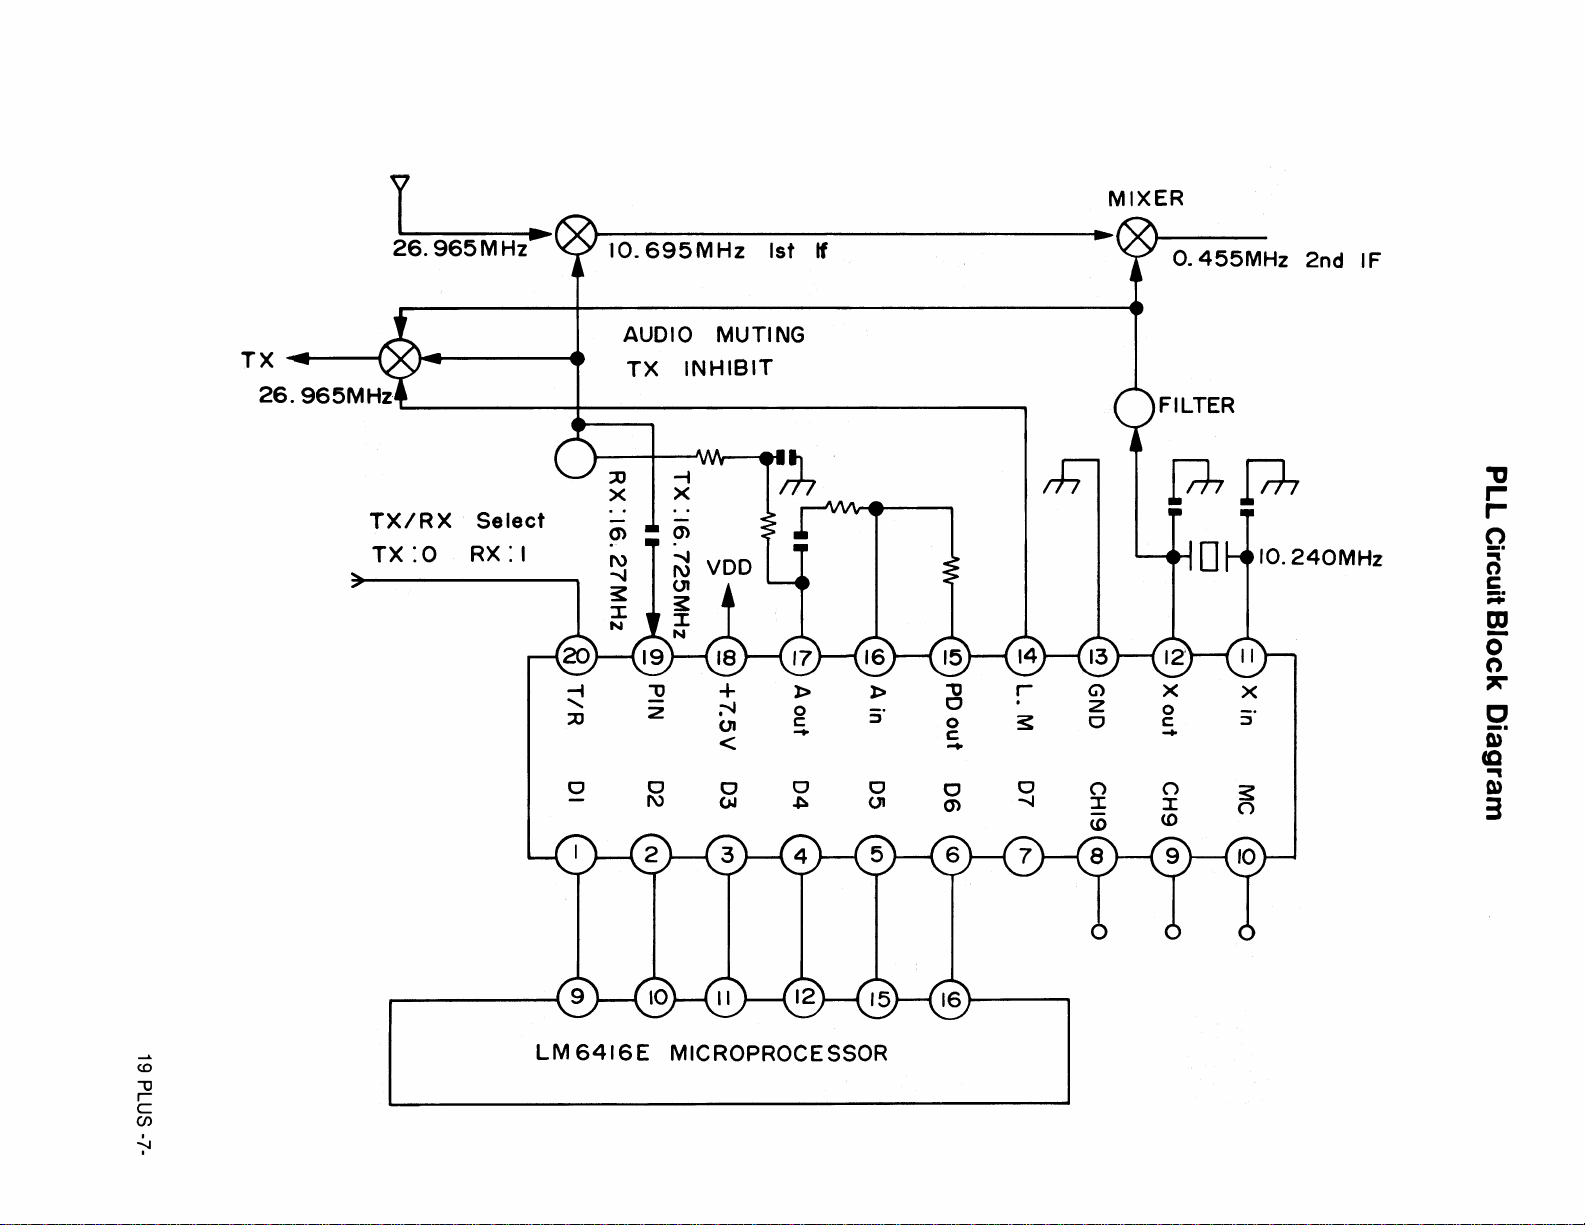
PLL CIRCUIT BLOCK DIAGRAM
.............................
.
............................................................................7
ALIGNMENT PROCEDURE
................
8-11
TEST E UIPMENT SET-UP
................................................
12
VOLTAGE CHART, IC’S & TRANSISTORS...................................................
.....................................
13
PARTS LAYOUT, PCB401068-F, TOP VIEW.......................................................................................14
COMPOSITE LAYOUT, PCB401068-F, TOP VIEW...............................
.
.........................................
14
COMPOSITE LAYOUT, PCB 401377-C, 401261-B, TOP VIEW
........................................................
14
PARTS LAYOUT, PCB401068-F, BOTTOM VIEW
...........
..
.................................................................15
PARTS LAYOUT, PCB 401377-C, 401261-B, BOTTOM VIEW............................................................15
COMPOSITE LAYOUT, PCB401068-F, BOTTOM VIEW.....................................................................16
COMPOSITE LAYOUT, PCB 401377-C, 401261-B, BOTTOM VIEW...................................................16
COPPER PATTERN, PCB401068-F, BOTTOM VIEW.........................................................................17
COPPER PATTERN, PCB 401377-C, 401261-B, BOTTOM VIEW.......................................................17
WIRING DIAGRAM, CHASSIS & MIC PINS..........................................................................................18
PCB 401068-D WIRING DIAGRAM.........................................................................................................19
SEMICONDUCTOR PIN CONFIGURATION..........................................................................................20
I.C. DIAGRAMS, LM6416E, LC7131, TA7310P.....................................................................................21
I.C. DIAGRAMS, KIA7217AP, TL489CP, MC78L08CT
...........................................................................
22
EXPLODED VIEW PARTS LIST.............................................................................................................23
EXPLODED VIEW
................................................
24
SCHEMATIC DIAGRAM..................................................................................................... 25
PARTS LIST........................................................ 25

OPERATING THEORY OF PLL FREQUENCY SYNTHESIZER
FOR MODEL 19 PLUS
1. Fundam ntal Th ory Of PLL Circuitry
Th purpos of PLL (Phas Lock d Loop) circuit is to g n rat
multipl numb r programabl fr qu nci s from a signal r f r nc
fr qu ncy with quartz rystal accuracy.
A basi PLL circuit consists of r f r nc oscillator, VCO, phas
comparator and DC filt r (Iow pass filt r).
With th abov circuit th VCO (Voltag Controll d Oscillator)
fr qu ncy is ff ctiv ly lock d to th r f r nc oscillator, and
its accuracy is as good as th r f r nc oscillator.
Sinc th CB radio's adjac nt chann l spacing is 10 kHz (or
multipl of 5 kHz), our purpos should b to produc multipl s
of programabl fr qu nci s that ar spac d apart by 10 kHz.
Th r for th basi PLL circuitry is xpand d as follow:
19 PLUS -1-

Th most important part of VCO circuitry is a voltag controll d
variabl capacitor call d varicap or varactor diod whos
capacitanc dép nds on DC voltag appli d to its cathod .
Controlling dc Voltag
Voltag D p nd nt
0 Capacitor
◄
------------
Varactor Diod
T 0
___________
___
DC Voltag
Th varactor diod is r sponsibl for s tting VCO fr qu ncy, and
onc s t it régulât s th VCO fr qu ncy against th r f r nc .
Th VCO fr qu nci s ar chos n in 16 to 17 MHz rang as shown on
tabl 1. To obtain transmit signal th VCO is mix d with
10.24MHz. As an xampl for chann l 1:
10.24 + 16.725 = 26.965MHz
For r c iv r mod th VCO is us d as a first local oscillator.
Exampl , chann l 1:
26.965 - 16.27 = 10.695MHz
Th abov first IF of 10.695MHz is mix d again with 10.24MHz
crystal oscillator fr qu ncy which s rv s as th s cond local
oscillator.
10.695 - 10.24 = 0.455MHz
As can b s n abov th VCO fr qu ncy shifts from 16.725 to
16.27MHz wh n chang d from transmit to r c iv for th sam
chann l 1. Th shift is accomplish d by "r ad only m mory"
incorporat d insid th PLL IC-202 b tw n th s l ctor switch
and th VCO divid r (programabl ). Wh n transmit logi signal
is appli d to th IC-202 through pin 19, th programabl divid r
will divid incoming VCO fr qu ncy by 3345 to produc 5kHz
sampling signal. 16,725-J— 3345 = 5kHz
For th r c iv r mod th programabl divid r will automatically
chang to divid th VCO fr qu ncy by 3254.
16270 3254 = 5kHz
Not that th r f r nc fr qu ncy of 5kHz is obtain d by
dividing th 10.24MHz by 2048 tim s. (5kHz r f r nc is us d
inst ad of 10kHz for division conv ni nc ). S tabl 1 for
transmit/r c iv mod VCO fr qu nci s.
19 PLUS -2-

2. Transmitt r Circuit
IC202 (PLL—LSI), VCO s ction of IC204 (pins 1,2, and 3) ar
op rational r gardl ss of th r c iv or transmit mod . Wh n
th radio is s t to th transmit mod , mix r/amplifi r s ction
of IC204 (pins 4,6,7 and 9), Q203, Q301, Q302 and Q303 ar
activat d. Th VCO fr qu ncy s l ct d by th chann l s l ctor
switch is mix d with 10.24MHz to g n rat d sir d transmit
fr qu ncy. Th mixing is don by a mix r circuit locat d insid
th IC204•
Th r sulting transmit fr qu ncy from pin 9 of IC204 is filt r d
by L301 and L302. Q301 is an amplifi r/switch circuit. Wh n
VCO fr qu ncy is out of "LOCK" condition pin 14 of IC202 pulls
down bias voltag of Q301 to ground disabling Q301 from passing
possibl ill gal fr qu nci s. Q302 is a RF pow r driv r circuit
and Q303 is th final RF pow r amplifi r.
A modulation audio signal is appli d to th coll ctors of Q302
and Q303 through an audio pow r transform r T501. Th audio
signal (mic input) is amplifi d by a singl pow r IC501. Th
modulation limiting is accomplish d by an automatic l v l
control circuit which is as follows:
L305 and C317 ar sériés résonant , and RFC303, L306, RFC304,
C321, 322, 324 and C326 mak up PI-LOW pass filt r. C312 is
factory s l ct d and limits th RF output l v l to within th
FCC limit of 4 watts.
19 PLUS -3-

3. R c iv r Circuit
In th r c iv r mod of op ration, Q203 transistor is turn d
off. Also bias voltag is appli d to Q103 and a prop r biasand
AGC voltag is stablish d to Q101, Q102, and Q103. Q101 is a
27MHz RF input amplifi r and any xc ssiv input signal is
limit d by diod s D101 and D102. Th amplifi d 27MHz is mix d
with VCO fr qu ncy s l ct d by chann l switch. For chann l 1
VCO is s t at 16.27MHz. Th r sulting first IF is 26.965 -
16.27 = 10.695MHz. Q102, is th first Conv rt r, and th
10.695MHz is sharply filt r d by L103 and a c ramic filt r CFl.
Th first IF is again mix d with a s cond local oscillator of
10.24MHz. 10.695 - 10.24 « 0.455MHz. Q103 is th s cond
Conv rt r. S cond IF is filt r d by a razor sharp c ramic
filt r of CF2 coupl d with L104. Q104 is a first 455kHz
amplifi r, with Q105 b ing th last amplifi r. D103 is a
d t ctor diod which produc s audio signal as w ll as a n gativ
DC voltag for AGC action. Th n gativ voltag also provid s
forward biasing to th cathod of ANL clipping diod of D106.
Th biasing voltag has a tim constanc d t rmin d by RI24 and
C123. Th r for , any sharp n gativ going puls from D103 will
back bias D106 and b clipp d.
4. Chann l Up/Down Op ration
Th PLL (TX/RX) fr qu ncy, chann l numb r display, chann l 9
s l ct, and PA/СВ mod s l ct functions ar controll d by a 4
bit microproc ssor. Th Controls for chann l sél ction ar th
Up and Down push buttons locat d on th front pan l. D p nding
upon which button is pr ss d, instructions ar giv n to th
microproc ssor to chang th PLL fr qu ncy to th n xt chann l.
If th button is k pt in th d pr ss d position for
approximat ly 1.2 s conds th microproc ssor will th n scan
through th chann ls at a rat of approximat ly 5 chann ls p r
s cond.
During chann l sél ction or scan function,
inhibits th transmitt r s ction of th
und sir d signais from b ing radiat d.
th microproc ssor
unit, to pr v nt
19 PLUS -4-

FRE UENCY CHART (Table 1)
CH
N 0
CHANNEL
FREQ(MHz)
CRYSTAL VCO FREQUENCY (MHz)
o s e TX RX
126.965 10.24 16. 25 16.2
226.9 5 99 16. 35 16.28
326.985 99 16. 45 16.29
42 .005 99 16. 65 16.31
52 .015 99 16. 5 16.32
62 .025 99 16. 85 16.33
72 .035 99 16. 95 16.34
82 .055 99 16.815 16.36
92 .065 99 16.825 16.3
10 2 .0 5 99 16.835 16.38
11 2 .085 99 16.845 16.39
12 2 .105 >9 16.865 16.41
13 2 .115 99 16.8 5 16.42
14 2 .125 99 16.885 16.43
15 2 .135 99 16.895 16.44
16 2 .155 99 16.915 16.46
1 26.165 99 16.925 16.4
18 2 .1 5 99 16.935 16.48
19 2 .185 99 16.945 16.49
20 2 .205 99 16.965 16.51
21 2 .215 99 16.9 5 16.52
22 2 .225 99 16.985 16.53
23 2 .255 99 1 .015 16.56
24 2 .235 99 16.995 16.54
25 2 .245 99 1 .005 1.6.55
26 2 .265 99 1 .025 16.5
2 2 .2 5 99 1 .035 16.58
28 2 .285 99 1 .045 16.59
29 2 .295 99 1 .055 16.60
30 2 .305 99 1 .065 16.61
31 2 .315 99 1 .0 5 16.62
32 2 .325 99 1 .085 16.63
33 2 .335 99 1 .095 16.64
34 2 .345 99 1 .105 16.65
35 2 .355 99 1 .115 16.66
36 2 .365 99 1 .125 16.6
3 2 .3 5 99 1 .135 16.68
38 2 .385 99 1 .145 16.69
39 2 .395 99 1 .155 16. 0
40 2 .405 99 1 .165 16. 1
19 PLUS -5-

19 PLUS -6-
Block Diagram

-z- smd 61
TX -
26.
PLL Circuit Block Diagram

ALIGNMENT PROCEDURE FOR CB TRANSCEIVER
MODEL 19 PLUS
TEST EQUIPMENT REQUIRED
All T st quipm nt should b prop rly calibrat d.
1. Audio Signal G n rator, 10Hz - 20kHz
2. VTVM 1mV m asurabl .
3. DC Amm t r, 2A .
4. R gulat d Pow r Supply, d 0-20V, 2A or high r,
5. Fr qu ncy Count r, 0-40MHz, high input impédanc typ .
6. RF VTVM prob typ .
7. Oscilloscop , 30MHz, high input impédanc .
8. RF watt m t r, th rmo-coupl typ , 50 ohm, 5W.
9. Standard Signal G n rator, 100kHz-50MHz, 50 ohm unbalanc d.
10. Sp ak r dummy r sistor, 8 ohm, 5W.
11. Circuit T st r, d , 20kV ohm/V.
TEST CONDITIONS
T st voltag = 13.8Vdc +/-5%, unl ss oth rwis sp cifi d.
PLL CIRCUIT ALIGNMENT
a. 10.24MHz Oscillator Ch ck
Conn ct a fr qu ncy count r to IC202, pin 12 and ch ck to s
10.240000MHz +/-100HZ.
Wh n a d f ctiv crystal is r plac d and if th fr qu ncy is
high r than by 100Hz, C208 should b incr as d. If th
fr qu ncy is low r, C208 should b r duc d in capacitanc .
With a factory suppli d crystal a C208 valu of 47 pFd should b
suffici nt, but on som s ts minor valu sél ction may b
n c ssary.
b. VCO Alignm nt
1. S t th Radio to chann l 40 and into th transmit mod (mak
’ c rtain 50 ohm dummy load or Wattm t r is conn ct d to th
ant nna t rminal).
2. Conn ct a circuit t st r b tw n TPI and ground.
3. Adjust 1 2 W to obtain 4.5Vdc.
4. S t th Radio to chann l 1 and into th r c iv mod .
19 PLUS -8-

5. Ch ck to s that th TPI d voltag drops to a l v l
b tw n 0.6 and 1.0 volts. As long as th d l v l stays
b tw n 4.5Vdc for transmit on chann l 40 and 0.6 to l.OVdc
for r c iv on chann l 1, th VCO is s t prop rly.
Th magnitud of th TPI voltag swing is d t rmin d by C216
at th factory. Th optimum valu of C216 was found to b
around 82 pFd. C216 with a valu larg r than 82 pFd will
r duc th voltag swing magnitud and vic v rsa for a
small r valu . If th low r valu drops only to 1.5Vdc,
th n a C216 of 82 pFd should b r duc d to incr as th
rang . This should not b n c ssary wh n factory suppli d
parts ar us d for D208 (Varactor Diod ) and L201 (VCO
Tuning Coil).
TRANSMITTER ALIGNMENT
a. T st S t-up
Volt Ornent
Meter Meter
Not :
Transmitter Alignment Set Up
1. Wh n conn cting audio cabl to th microphon input circuit,
always us shi ld d cabl .
2, Wh n making alignm nt for RF pow r output, always us th
suppli d d cabl .
b. RF Amplifi r Stat Alignm nt
1. R duc pow r supply voltag to 9.0V.
2. S t chann l s l ctor to 19 and conn ct th oscilloscop to
th ant nna conn ctor through a suitabl conn ction pad.
19 PLUS -9-

3. Adjust L301, L302 r L303 and L304 for maximum amplitud of
th scop display.
4. Incr as th pow r supply voltag to 13.8V, and th n adjust
L305 and L306 until th watt m t r indicat s 3.8W.
5. M asur th transmit pow r output at all chann ls, and mak
sur that th pow r output différ nc b tw n any chann ls
is l ss than 0.3W.
6. M asur th transmit fr qu ncy at all chann ls, and mak
sur that th fr qu ncy is within +/-800Hz from th assign d
chann l c nt r fr qu nci s.
c. Transmit Fr qu ncy Ch ck
1. S t th radio into transmit mod with no modulation.
2. Conn ct th fr qu ncy count r to th ant nna load or to th
tab provid d at th watt m t r.
Th fr qu ncy should b within +/-800HZ from ach chann l
c nt r fr qu ncy as tabulat d in Tabl 1.
d. Modulation S nsitivity Alignm nt
1. S t th unit to transmit mod of op ration. F d 1kHz, 30mV
signal to th microphon input circuit, and adjust RV501 so
that 100% modulation is obtain d.
2. To s t th transc iv r into transmit mod without a
microphon , ins rt th plug, wir d as shown b low, into th
MIC jack on th transc iv r. Wh n applying th audio
modulation signal to th microphon input circuit, us th
sam plug.
(1) (2)
A+B
3 . N xt, r duc th signal input l v l to 4.5mV, and mak sur
that th modulation is high r than 60%.
19 PLUS -10-

RECEIVER CIRCUIT ALIGNMENT
a. T st S t-up
R f r to th diagram shown b low:
EXT
RECEIVER ALIGNMENT SETUP
b. S nsitivity Alignm nt
1. S t th signal g n rator to provid 27.185MHz, 1kHz, 30%
modulation, S t th chann l s l ctor to 19«
2. Adjust LI01, L102, L103, L104 and L105 for maximum audio
output across th 8 ohm dummy load r sistor. This alignm nt
should b p rform d by gradually d cr asing th g n rator
output signal to th minimum l v l r quir d for tuning to
avoid inaccurat alignm nt du to AGC action.
c. Squ lch Circuit Alignm nt
1. S t a 50 ohm signal g n rator to g n rat a signal on chann l
19 with an output l v l of 1000 microvolts, modulat d 30f*
with a 1kHz ton .
2. Rotat th squ lch control in füll clockwis dir ction.
3. T mporarily adjust RV101 for maximum audio output, and not
th audio output l v l. Th n adjust RV101 so that th audio
output l v l d crèas s by 6db.
4. N xt, r duc th ant nna input signal l v l to b tw n 79^
and 447 micro^olts. Th r c iv r should squ lch. (Th audio
output l v l should drop to z ro.)
5. R duc th ant nna signal input l v l to z ro, and adjust th
SQ control until th nois output just disapp ars. 19 PLUS -11-

Test Equipment Setup
PLL AND CARRIER SECTION
P.T.T
RECEIVER SECTION
TRANSMITTER SECTION
19 PLUS -12-

Voltage Chart
I) TRANSISTOR
CONDITIONS MEASURED ON I9CH
NO SIGNAL
NO MODULATION
TR NO BEcTR N0 BECTR N0 BEcTR N 0 B E C
ОЮ1 RX 1. 6 5 0 .9 6 12.80 I0 6
S
L03 0 2 TX 0010.61
0 4 0 5
RX 6 .4 3 3 .07 0
TX 0 .3 4 3 .9 4 12.72 TX 0 00 .0 6 0 3 0 3 RX 00 13.0 PA 4.81 5 .46 5 .4 5
0102 RX 1.6 3 0 .9 0 11.85 2 0 I RX 7 .8 2 8 .0 5 2.51 TX 0011.74 TX 6 .4 6 3 .0 8 0 .0 4
TX 0 .2 4 0 12.70 TX 7.81 8 .2 0 2 .48 4 0 I RX 5.78 5.16 13.18
5 0 I
S
H0 .3 7 0 2.51
I03 RX 1 .6 0 1.01 11.0 0 2 0 2 RX 7.78 8 .0 5 2.5 3 TX 5 .7 8 5.14 13.03 S
L0 .6 8 00 .0 5
TX 0 .3 4 0.01 12.67 TX 7 .8 4 8.10 2 .5 6 0 4 0 2 RX 7.94 7.95 0TX 0 .6 8 00 .0 5
I0 4 RX 1.07 0 .3 8 3.29 2 0 3 RX 7 .9 5 7 .9 5 0.91 TX 7.93 7.94 0
5 0 2
S
H0.65 00
TX 0 .0 9 0 0.81 TX 7. 16 7 .94 7.81 4 0 3 RX 0 0 0S
L0 .1 9 0 0 .6 8
I0 5 RX 3 .2 9 2 .5 9 12.90 RX 0 .3 3 0 13. 18 TX 000TX 0 . 1 0 0 .68
TX 0.81 0. 17 12.67 3 0 I TX 1.39 0.81 12.87 п а п а RX 0 .4 2 0 7 .8 0
0Ю 6 SO
H0 .7 000 3 0 2 RX 0013.5 TX 0 .4 0 07.7 9
2) INTEGRATED CIRCUIT
IC N0 PIN RX TX IC N0 PIN RX TX IC N0 PIN RX TX IC NO 1
PIN RX TX
1 0. 21 0.21 21 0 0 13 00IC 100
IC
201 20. 21 0.22 22 0014 1.45 4.10 401 210.81 0 .0 6
32.38 0.41 23 0015 1.74 1.60 311.45 0.06
46.0 5.93 24 0.67 7.81 16 1.74 1.61 410.75 0.07
5 2.0 2.05 25 3.08 3.11 17 1.37 3.06 510.88 0.08
6 2.0 2.0 26 3.08 З.Ю 18 7.57 7.59 6 II. 15 0.08
7NC NC 27 5.23 5.28 19 3.85 3.31 712.80 11.55
85. 13 5.15 28 3.08 3.08 20 7.19 0.81 801.31
96.44 6.49 16.44 6.48 \r 112.71 11.83 IC 113.80 13.50
10 0.07 0.07 IC
202 20.07 0.07 203 200501 212.60 12.28
II 0.07 0.07 30.07 0.07 37.95 7.94 33 .90 3.90
12 6.46 6.50 46.46 6.50 1 Г 12.64 2.56 48. 15 8.02
13 005 6.45 6.49 2 0 4 21.96 1.90 51.51 1.51
14 0060.07 0.07 31.37 1.37 6 3.38 3.30
15 6.45 6.49 7NC NC 41.78 2.56 73.40 3.33
16 0.07 0.07 8NC NC 5 0081.28 1.27
17 6.11 8.1 9NC NC 61.27 7.08 90 0
18 0.03 0.03 10 1.45 4.10 72.12 2.02 10 6.86 6.72
19 5.92 5.88 11 2.83 3.23 85.10 5.50
20 5. 14 5. 16 12 3.83 3.83 91.27 7.08
19 PLUS -13-

ß
CÛ
■
19 PLUS -14-

P.C.B Bottom View
SJ28^
Ï* 0 203 ^ g
i _||“01 T w R4ił ?
g—w- -vw^- oO^L)Ó
01 №19 "^7 У * «245
Я '
LED3 2 I
ooooo
; 5 4 _VW_R4I2
----AW
----
"413
-^T
C40I «» / -4№- Oqo° *o
Л Л«, 3 ÏXsom Ю
I A
_SJ32
. О С.1Я*
Ч /©feJSŁ -S
R ôT^Htè
" " SJ20
----
-----------
SJ30\
----
^
SJI9_ J - ^ £ 7 C203
-sjie OmjaO
- Л _
....
® I,tV"3îQ>ut'f
И У T.CFI flN ourl . , I
« (Æ jS L
,0э*-|г
R306L^b |3
csoeH I-Q T-xL
[y lüü)s
QSiOlJP.
P 7 CI34 - ) |- I
§
—Ifur
C32I
• 2
g
i „
T s
EXT
H
□□□□□
OOOOO
S 4 J I JR.
19 PLUS -15

P.C.B Bottom View
19 PLUS -16-

401377-с'
19 PLUS -17-
40I06S-

Wiring Diagram (Chassis and Microphone Pins)
ANT POWER JACK SPEAKER
VOLUME
POWER
ON/ OFF SW
MIC
DIN JACK
S UELCH GRN (0 .5 -4 -0 .5 )
19 PLUS -18-

BRN ( 3 - 16- 3 )
P.C.B Wiring Diagram
to
I
ш
i
ro
O
>
BRN (3 - 1 3 -3 ) ORG ( 3 - 1 6 - 3 )
19 PLUS -19-
GRN (3 - I3 - 3)
Table of contents
Other Cobra Radio manuals

Cobra
Cobra 19 DX III User manual

Cobra
Cobra UK 29 LTD ST User manual

Cobra
Cobra 19 DX IB User manual

Cobra
Cobra CIR 1000 A User manual

Cobra
Cobra 21 LTD ST User manual

Cobra
Cobra 150GTLDX User manual

Cobra
Cobra 19 DX IV User manual

Cobra
Cobra 19 DX IV User manual

Cobra
Cobra MR HH475 FLOAT BT User manual

Cobra
Cobra 18 WXST II User manual

Cobra
Cobra 75 WX ST Operating instructions

Cobra
Cobra Marine MRF45 User manual

Cobra
Cobra 19 DX IV User manual

Cobra
Cobra 148 GTL ST User manual

Cobra
Cobra 19 DX IV User manual

Cobra
Cobra 29 LTD Classic User manual

Cobra
Cobra 75 All Road User manual

Cobra
Cobra 29 LTD BC User manual

Cobra
Cobra 29 WX NW BT User manual

Cobra
Cobra MARINE MR F45-D User manual