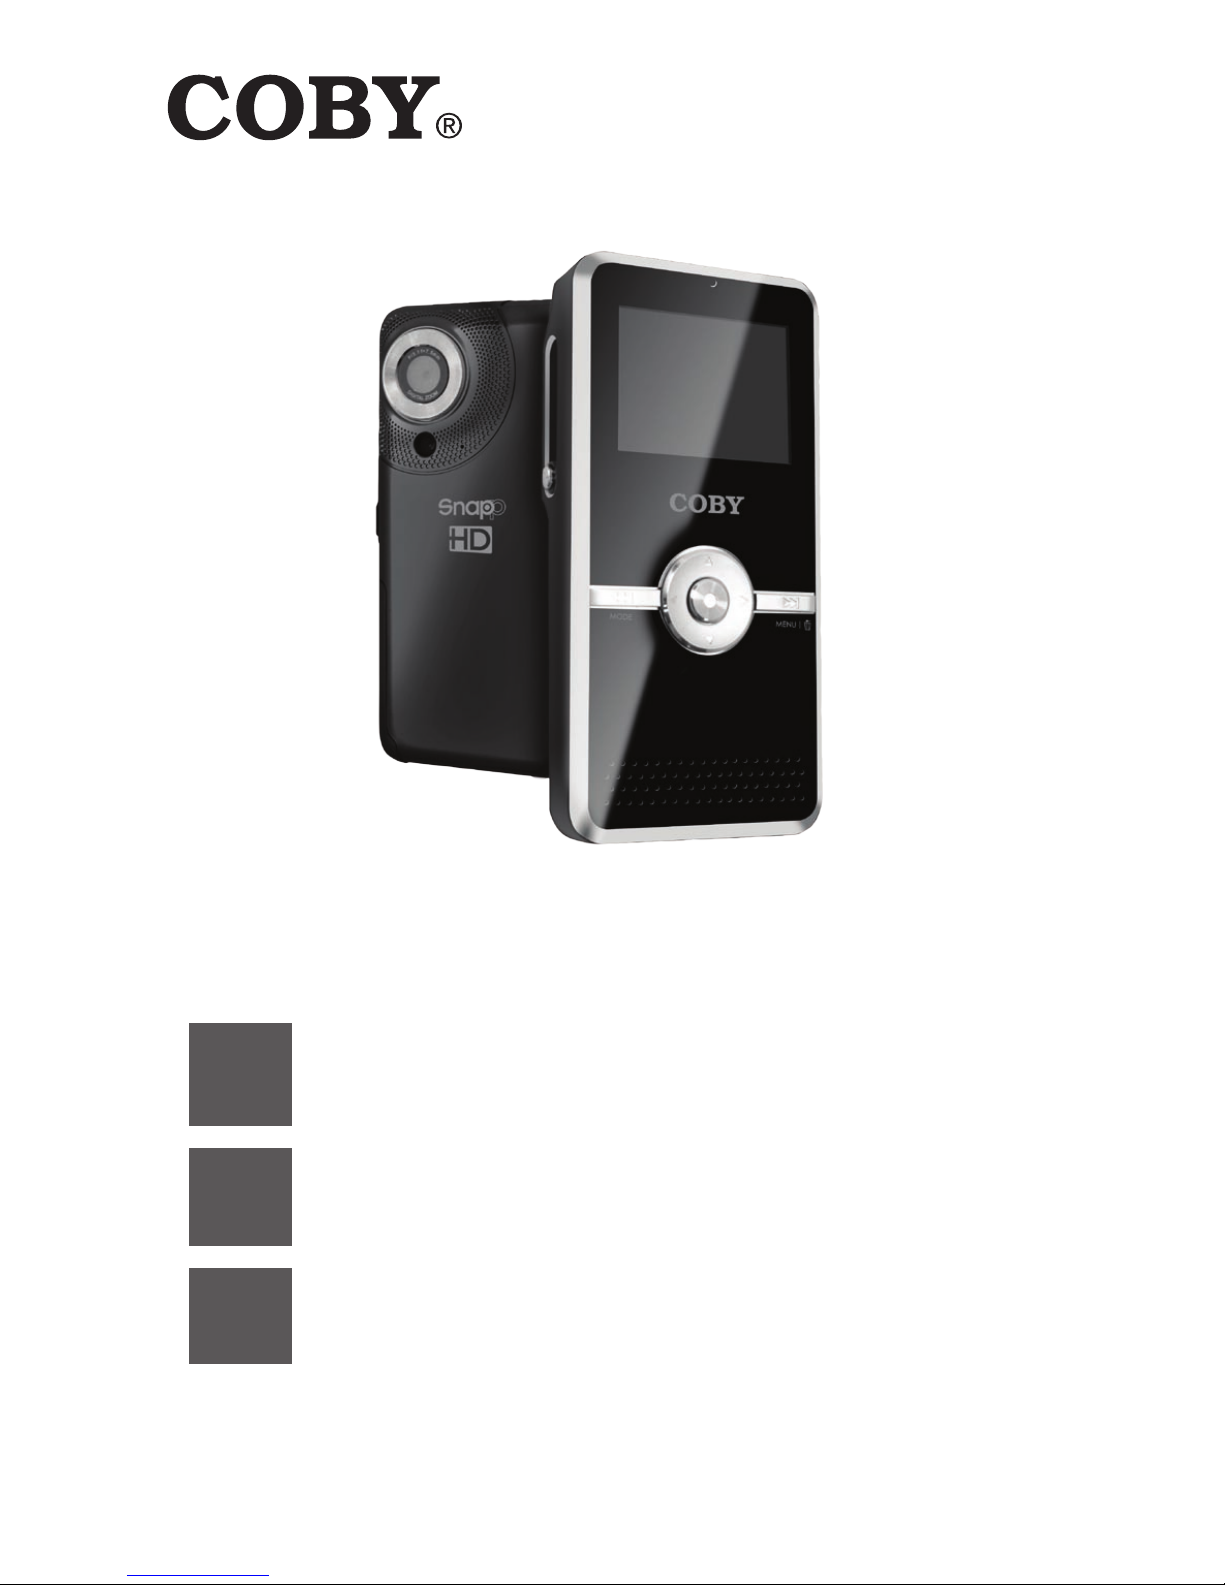
Coby CAM5000 - SNAPP Camcorder - 720p User manual

CAM5000
EN Snapp™ HD Digital Video Camera
Quick Setup Guide .........................................Page 2
ES Snapp™ Videocámara Digital de HD
Guía Rápida de Uso...................................Pagina 16
FR Snapp™ Caméscope Numérique HD
Guide de Démarrage Rapide ........................Page 30
Please read carefully before use • Léa el manual antes de usar •
Veuillez lire ce livret avant utilisation

Page 2 Thank You
English
Thank You
Â
Thank you for your purchase of the Coby SNAPP™ CAM
HD Digital Video Camera. This guide will help you set up and
begin using your new video camera as quickly and easily as
possible. For more detailed instructions, please refer to the
instruction manual.
Package Contents
SNAPP CAM unit
AV cable
USB cable
Installation CD
Lithium-ion battery
Hand strap
HDMI cable
Carrying pouch
Features
Brilliant ” TFT LCD full
color display
Captures video in
p HD resolution
MB built-in Flash
memory
Integrated software
for easy video editing
and uploads†
Advanced features
including multiple lm
modes, digital zoom
(x), and low-light LED
Hi-speed USB . port
for fast le transfers
Integrated SD/SDHC
card slot for memory
expansion up to GB
Rechargeable lithium-
ion battery
Connects easily to
your computer for use
as a webcam†
† Function available in
Windows only.

English
Page 3 Cam5000 At A Glance
CAM5000 at a Glance
Â
1 USB cover Hides the USB connector.
2LCD screen Viewnder display.
3MODE Switch the function mode.
4Up
Down
Left
Right
Record
5Speaker Audio output during video review.
6Battery/
SD card
Load SD or SDHC memory cards to increase
the camcorder’s storage capacity. The
CAM5000 supports up to 16GB capacity cards.
7MENU Access the setup menu to adjust camcorder
options.

Page 4 Cam5000 At A Glance
English
8AV output jack Connect the AV cable to this jack to display
video on a TV.
9HDMI jack Connect an HDMI cable to this jack to display
video on an HDTV.
10 Microphone Captures audio during video recording.
11 Power: press and hold to turn on;
press to turn o.
12 Lens Point the lens towards the subject you want
to capture.
13 USB switch Extend/retract the USB connector.
14 Compensating
lamp
Activate to improve picture quality in low
light situations.
15 Tripod socket
16 Strap mount

English
Page 5 Getting Started
Getting Started
Â
Battery
A rechargeable lithium battery is used in this video camera.
Make sure the battery is fully charged before operating the
video camera for the rst time.
Installing the Battery
Slide the battery cover in the1.
direction indicated by the arrow.
Press the battery holder aside2.
and insert the attached battery
with the positive (+) and
negative (-) poles matching
the directions indicated on the
battery compartment.
Close the battery cover.3.
The batteries used in this device may present a re
or chemical burn if mistreated. Do not disassem-
ble, incinerate, or heat the batteries.
If the unit will not be used for a long time, remove
the batteries to prevent damage or injury from
possible leakage.

Page 6 Getting Started
English
Charging the Battery
Your video camera will charge when connected to a PC via
the USB plug. To begin charging:
Power OFF the video camera; connect the video1.
camera to the PC via the USB connector.
Charging has begun when the charge indicator light2.
turns red. The charge indicator light turns o when
charging is completed.
Turning the Video Camera On/O
To turn on your video camera, press . Press again to turn
o the video camera.
Using a Memory Card
To maximize your video camera’s recording time, you may
wish to use a memory card. Your video camera supports
SD/SDHC card formats. To insert a memory card:
Open the battery/SD compartment door.1.
Insert the SD card with the frontispiece of the card2.
facing toward the LCD screen.
Close the battery door.3.

English
Page 7 Getting Started
To remove a memory card, gently press on the
edge of the card to release it. Gently pull the card
out and close the battery cover.
To avoid damage and loss of data, always power
o the video camera before inserting or removing
a memory card. Do not touch the connection ter-
minals on the backside of the card.
Be sure that your memory card is unlocked before
inserting it into the video camera.

Page 8 Basic Operation
English
Basic Operation
Â
Recording a Video Clip
Power ON the video camera..
Press the MODE button to select Video Mode.2.
Point the lens at the subject you wish to capture.3.
Press4. to begin recording.
Press5. again to stop the video recording.
Taking a Photo
Power ON the video camera.1.
Press the MODE button to select Photo Mode.2.
Point the lens at the subject you wish to capture.3.
Press4. to take a picture.
Playback of Files
Image les are denoted by the Photo icon in the top
lefthand corner of the thumbnail image.
Power ON the video camera.1.
Press the MODE button to select Playback Mode.2.
Use the LEFT and RIGHT buttons to select your3.
desired le.
Video Files:Press to begin playback. Press it
again to pause the video.

English
Page 9 Basic Operation
Photo Files: Pressto view a selected image
in full screen.
Transferring Files
To transfer les from the video camera to your computer:
Power on the video camera and extend the USB con-
nector. Plug the USB connector into your computer’s
USB port.
The LCD screen will display four mode options. Use
the directional keypad and the button to select
USB Mode.
Your computer will automatically recognize the video
camera as an external drive. Follow the prompts on
your computer screen to view les on the camera.
If no prompts appear, you may also access les on the
video camera by opening My Computer and clicking
on the External Drive to which the video camera is
connected.
Copy and paste les from the camera to any folder
on your computer using basic Ctrl+C / Ctrl+V com-
mands.

Page 10 Support
English
Support
Â
If you have a problem with this device, please read
the troubleshooting guide in the product instruction
manual and check our website at www.cobyusa.com for
Frequently Asked Questions (FAQ) and rmware updates.
If these resources do not resolve the problem, please
contact Technical Support.
Address
COBY Electronics Technical Support
- Rust Street
Maspeth, NY
Email
techsupport@cobyusa.com
Web
www.cobyusa.com
Phone
--: Weekdays :AM–:PM EST
Saturdays :AM–:PM EST
--: Weekdays :AM–:PM EST

English
Page 11 Safety Notices
Safety Notices
Â
The lightning ash with arrowhead symbol within an
equilateral triangle is intended to alert the user to the
presence of uninsulated “dangerous voltage” within
the product’s enclosure that may be of sufcient
magnitude to constitute a risk of electric shock.
The exclamation point within an equilateral triangle
is intended to alert the user to the presence of
important operation and servicing instructions in the
literature accompanying the appliance.
For Customer Use:
Enter below the serial number that is located on the rear of the unit.
Retain this information for future reference.
Model No.
Serial No.
WARNING: To prevent re or shock hazard, do not expose this device
to rain or moisture. Dangerous high voltage is present inside the
enclosure. Do not open the cabinet.
Note: If the product suddenly has no response or powers off, an
electrostatic discharge may be the cause. In this circumstance, please
follow the procedures below for recovery:
Remove the batteries and wait for 30 seconds.•

Page 12 Safety Notices
English
Replace the batteries and turn the unit on again.•
For recycling or disposal information about this product,
please contact your local authorities or the Electronics
Industries Alliance: www.eiae.org.
FCC Statement:
This device complies with Part 15 of the FCC Rules. Operation is subject to
the following two conditions:
(1) This device may not cause harmful interference, and
(2) This device must accept any interference received, including interfer-
ence that may cause undesired operation.
Note: This equipment has been tested and found to comply with the limits
for Class B digital devices, pursuant to Part 15 of the FCC rules. These
limits are designed to provide reasonable protection against harmful
interference in a residential installation. This equipment generates, uses
and can radiate radio frequency energy and, if not installed and used in
accordance with the instructions, may cause harmful interference to radio
communications. However, there is no guarantee that interference will
not occur in a particular installation. If this equipment does cause harmful
interference to radio or television reception, which can be determined by
turning the equipment off and on, the user is encouraged to try to correct
the interference by one or more of the following measures:
Reorient or relocate the receiving antenna.•
Increase the separation between the equipment and receiver.•
Connect the equipment into an outlet on a circuit dierent from that to •
which the receiver is connected.
Consult the dealer or an experienced radio/TV technician for help•
Use of shielded cable is required to comply with Class B limits in Subpart B
of Part 15 of the FCC rules.

English
Page 13 Safety Notices
Do not make any changes or modications to the equipment unless
otherwise specied in the manual. If such changes or modications should
be made, you could be required to stop operation of the equipment.
Important Safety Instructions
Read Instructions: All the safety and operating instructions should be 1.
read before the product is operated.
Retain Instructions: The safety and operating instructions should be 2.
retained for future reference.
Heed Warnings: All warnings on the product and in the operating in-3.
structions should be adhered to.
Follow Instructions: All operating and usage instructions should be fol-4.
lowed.
Cleaning: Unplug this product from the wall outlet before cleaning. Do not 5.
use liquid cleaners or aerosol cleaners. Use a damp cloth for cleaning.
Attachments: Use only attachments recommended by the manufacturer. 6.
Use of other attachments may be hazardous.
Water and Moisture: Do not use this product near water (e.g., near a 7.
bath tub, washbowl, kitchen sink, laundry tub, in wet basements, or near
a swimming pool and the like).
Ventilation: Slots and openings in the cabinet are provided for ventila-8.
tion to ensure reliable operation of the product and to protect it from
overheating. These openings should never be blocked by placing the
product on a bed, sofa, rug, or other similar surface. This product should
not be placed in a built-in installation such as a bookcase or rack unless
proper ventilation is provided or the manufacturer instructions have
been adhered to.
Power Sources: This product should be operated only from the type 9.
of power source indicated on the rating label. If you are not sure of the
type of power supply to your home, consult your product dealer or local
power company. For products intended to operate from battery power or
other sources, refer to the operating instructions.

Page 14 Safety Notices
English
Overloading: Do not overload wall outlets, extension cords, or integral 10.
convenience receptacles as this can result in a risk of re or electric
shock.
Object and Liquid Entry: Never push objects of any kind into this product 11.
through openings as they may touch dangerous voltage points or shout-
out parts that could result in a re or electric shock. Never spill liquid of
any kind on the product.
Servicing: Do not attempt to service this product yourself as opening or 12.
removing covers may expose you to dangerous voltage or other haz-
ards. Refer all servicing to qualied service personnel.
Damage Requiring Service: Unplug this product from the wall outlet and 13.
refer servicing to qualied service personnel under the following conditions:
a) when the power-supply or plug is damaged; b) if liquid has been spilled
or if objects have fallen into the product; c) if the product has been exposed
to rain or water; d) if the product does not operate normally by following the
operating instructions. Adjust only those controls that are covered by the
operating instructions as improper adjustment of other controls may result
in damage and will often require extensive work by a qualied technician
to restore the product to its normal operation; e) if the product has been
dropped or damaged in any way; f) when the product exhibits a distinct
change in performance—this indicates a need for service.
Replacement Parts: When replacement parts are required, be sure 14.
that your service technician has used replacement parts specied by
the manufacturer or have the same characteristics as the original part.
Unauthorized substitutions may result in re, electric shock, or other
hazards.
Safety Check: Upon completion of any service or repairs to this product, 15.
ask the service technician to perform safety checks to ensure that the
product is in proper operating condition.
Heat: The product should be situated away from heat sources such as 16.
radiators, heat registers, stoves, or other products (including ampliers)
that produce heat.

English
Page 15 Safety Notices

Page 16 Gracias
Español
Gracias
Â
Gracias por adquirir la cámara de video digital de alta
denición Coby SNAPP™ CAM. Esta guía le ayudará a
congurar y comenzar a usar su nueva cámara de vídeo lo
más rápida y fácilmente como sea posible. Para obtener
instrucciones más detalladas, por favor, consulte el manual
de instrucciones.
Contenidos del Paquete
Unidad SNAPP CAM
Cable AV
Cable USB
CD de instalación
Batería de ion-litio
Correa para mano
Cable HDMI
Bolsa para transporte
Características
Pantalla LCD TFT brillante a todo color de ”
Captura el video en una resolución de alta denición
de p
Posee una memoria Flash de MB
Software integrado para editar y cargar videos
fácilmente†

Page 17 Gracias
Español
Algunas de las características avanzadas que posee
son varios modos de lmación, zoom digital (x) e
indicador LED de luz baja
Puerto USB . para transferencia rápida de archivos
Ranura integrada para tarjeta SD/SDHC para
expandir la memoria hasta GB
Batería recargable de litio-ión
Se conecta fácilmente a su computadora para
utilizarla como una cámara web†
† Función sólo disponible en Windows.

Page 18 Panorama De La Cam5000
Español
Panorama de la CAM5000
Â
1Puerto de USB Cubre el conector USB.
2Pantalla de LCD Visor de búsqueda de imagen.
3MODE Cambiar de modo de función.
4Arriba
Abajo
Izquierda
Derecha
Botón Shutter (obturador)
5Altavoz Salida de audio durante la vista previa del video.
6Cubierta de la
batería/
tarjeta SD
Coloque tarjetas de memoria SD o SDHC para
aumentar la capacidad de almacenamiento de
la grabadora de video. La CAM5000 es compat-
ible con tarjetas con capacidad de hasta 16 GB.
7MENU Acceda al menú de conguración para
ajustar las opciones de la videocámara.

Page 19 Panorama De La Cam5000
Español
8Enchufe de
salida AV
Conecte el cable AV a este enchufe para
visualizar el video en un televisor.
9Enchufe HDMI Conecte el cable HDMI a este enchufe
para visualizar el video en un TV de alta
denición.
10 Micrófono Capta audio durante la grabación de video.
11 Alimentación: presione y mantenga
presionado para encender; presione para
apagar.
12 Lente Apunte la lente hacia el sujeto que desea
captar.
13 Interruptor de
USB
Extender / retraer el conector USB
14 Compensar a
la luz
Mejora la calidad de la imagen en situa-
ciones con poca iluminación.
15 Conexión de trípode
16 Montaje de la correa

Page 20 Para Empezar
Español
Para Empezar
Â
Batería
En esta cámara de video se utiliza una batería recar-
gable de litio.
Instalación de la batería
Deslice la cubierta de la batería en la1.
dirección que indica la echa.
Presione hacia afuera el soporte de2.
la batería e inserte la batería haci-
endo coincidir los polos positivo (+)
y negativo (-) con los símbolos que
se indican en el compartimiento de la batería.
Cierre la cubierta de la batería.3.
Las baterías utilizadas en este dispositivo pueden
producir incendios o quemaduras químicas si se
las trata de manera incorrecta. No desarme, inci-
nere ni caliente las baterías.
Si no se utiliza la unidad durante un período de ti-
empo extenso, retire las baterías para evitar daños
o lesiones potenciales, debido a posibles pérdidas.
Carga de la batería
La cámara de video se cargará cuando esté conectada a una
computadora con el enchufe USB. Para comenzar la carga:
Apague la cámara de video y conéctela a la computa-1.
dora con el connector USB.
Other manuals for CAM5000 - SNAPP Camcorder - 720p
2
Table of contents
Languages:
Other Coby Camcorder manuals

Coby
Coby SNAPP CAM4000 User manual

Coby
Coby SNAPP CAM4000 User manual

Coby
Coby SNAPP CAM5005 Series User manual

Coby
Coby Snapp CAM5002 User manual

Coby
Coby SNAPP CAM5001 User manual

Coby
Coby SNAPP CAM3000 User manual

Coby
Coby SNAPP CAM3005 Series User manual

Coby
Coby SNAPP CAM3000 User manual

Coby
Coby SNAPP CAM4505 User manual

Coby
Coby Snapp CAM4002 User manual