Coby Snapp CAM5002 User manual

For series /
Para la serie /
Pour la série
For series /
Para la serie /
Pour la série
CAM5002
EN Snapp™ HD Digital Camcorder
Instruction Manual...........................................................................Page 2
ES Snapp™ HD Videocámara Digital
Manual de Instrucciones..........................................................Pagina 38
FR Snapp™ HD Caméscope Numérique
Manuel D’instruction.....................................................................Page 76
Please read carefully before use • Léa el manual antes de usar • Veuillez lire ce livret avant utilisation

Page 2 Table Of Contents
English
PACKAGE CONTENTS .................................... 5
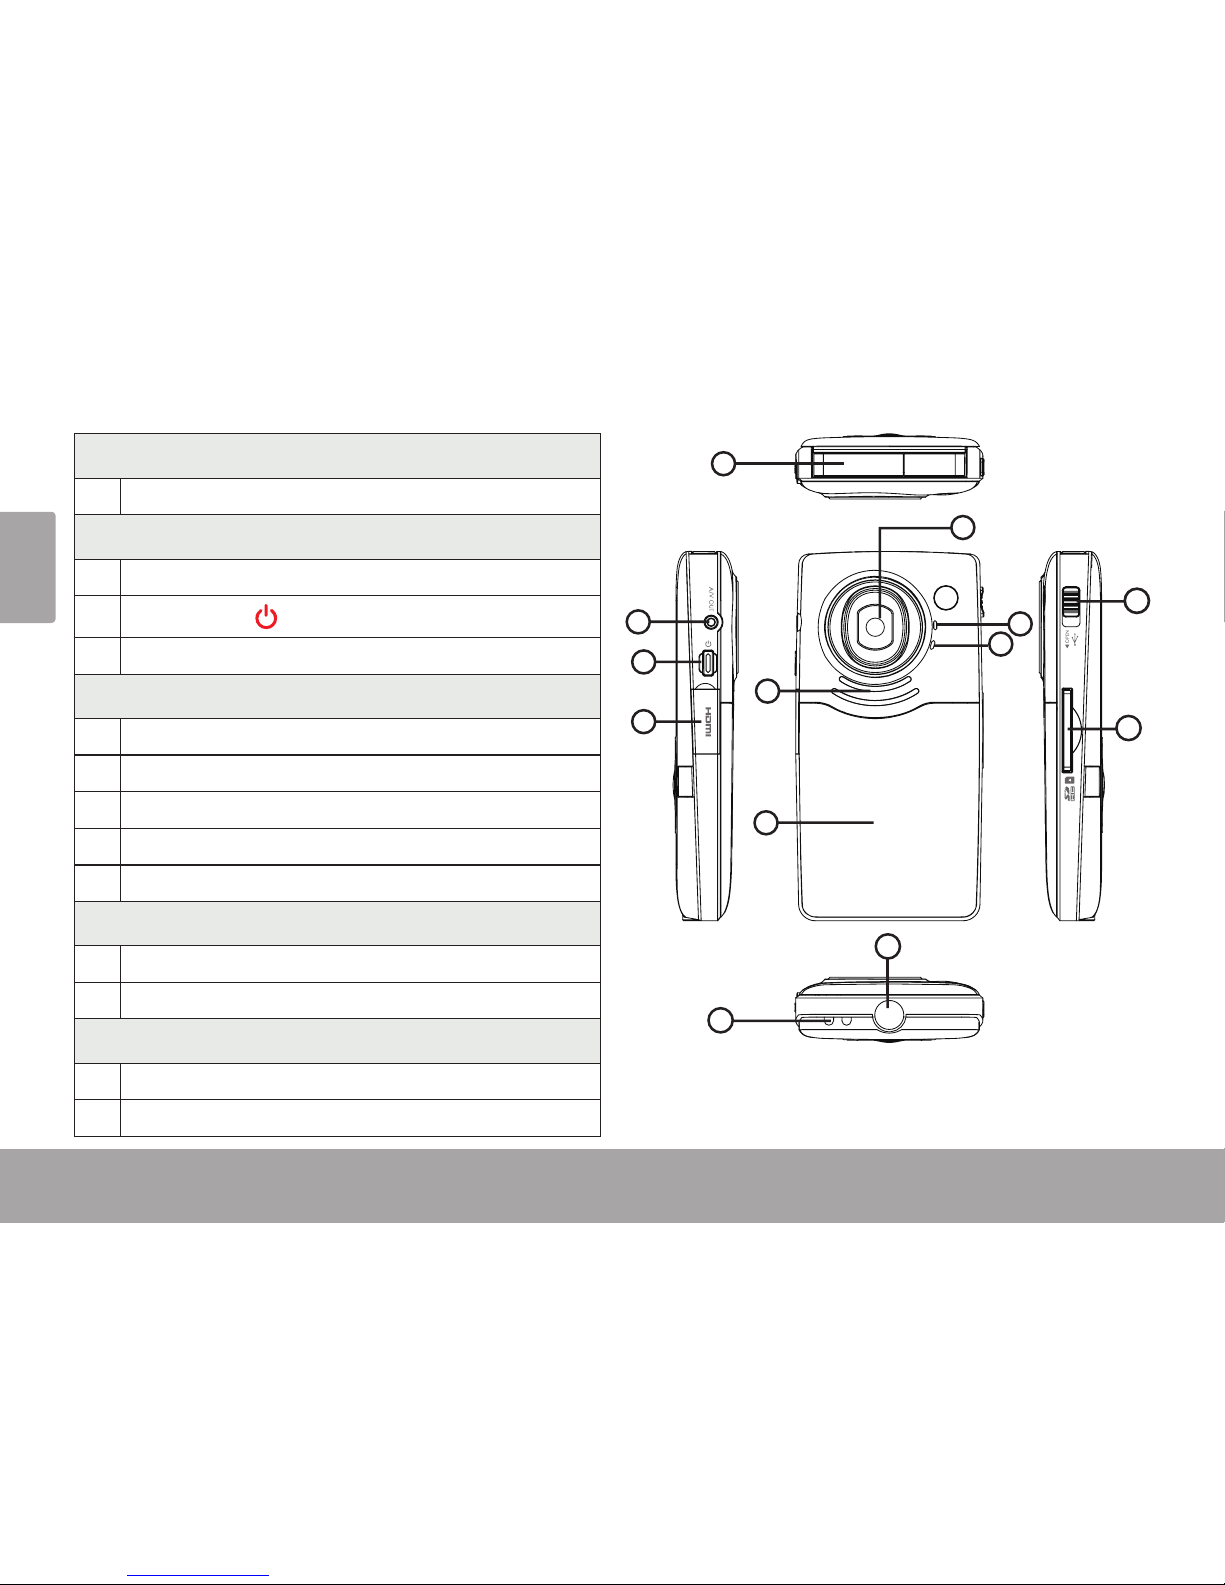
CAMERA AT A GLANCE................................. 6
Front View .......................................................6
Top View..........................................................7
Left View..........................................................7
Rear View........................................................7
Right View.......................................................7
Bottom View ...................................................7
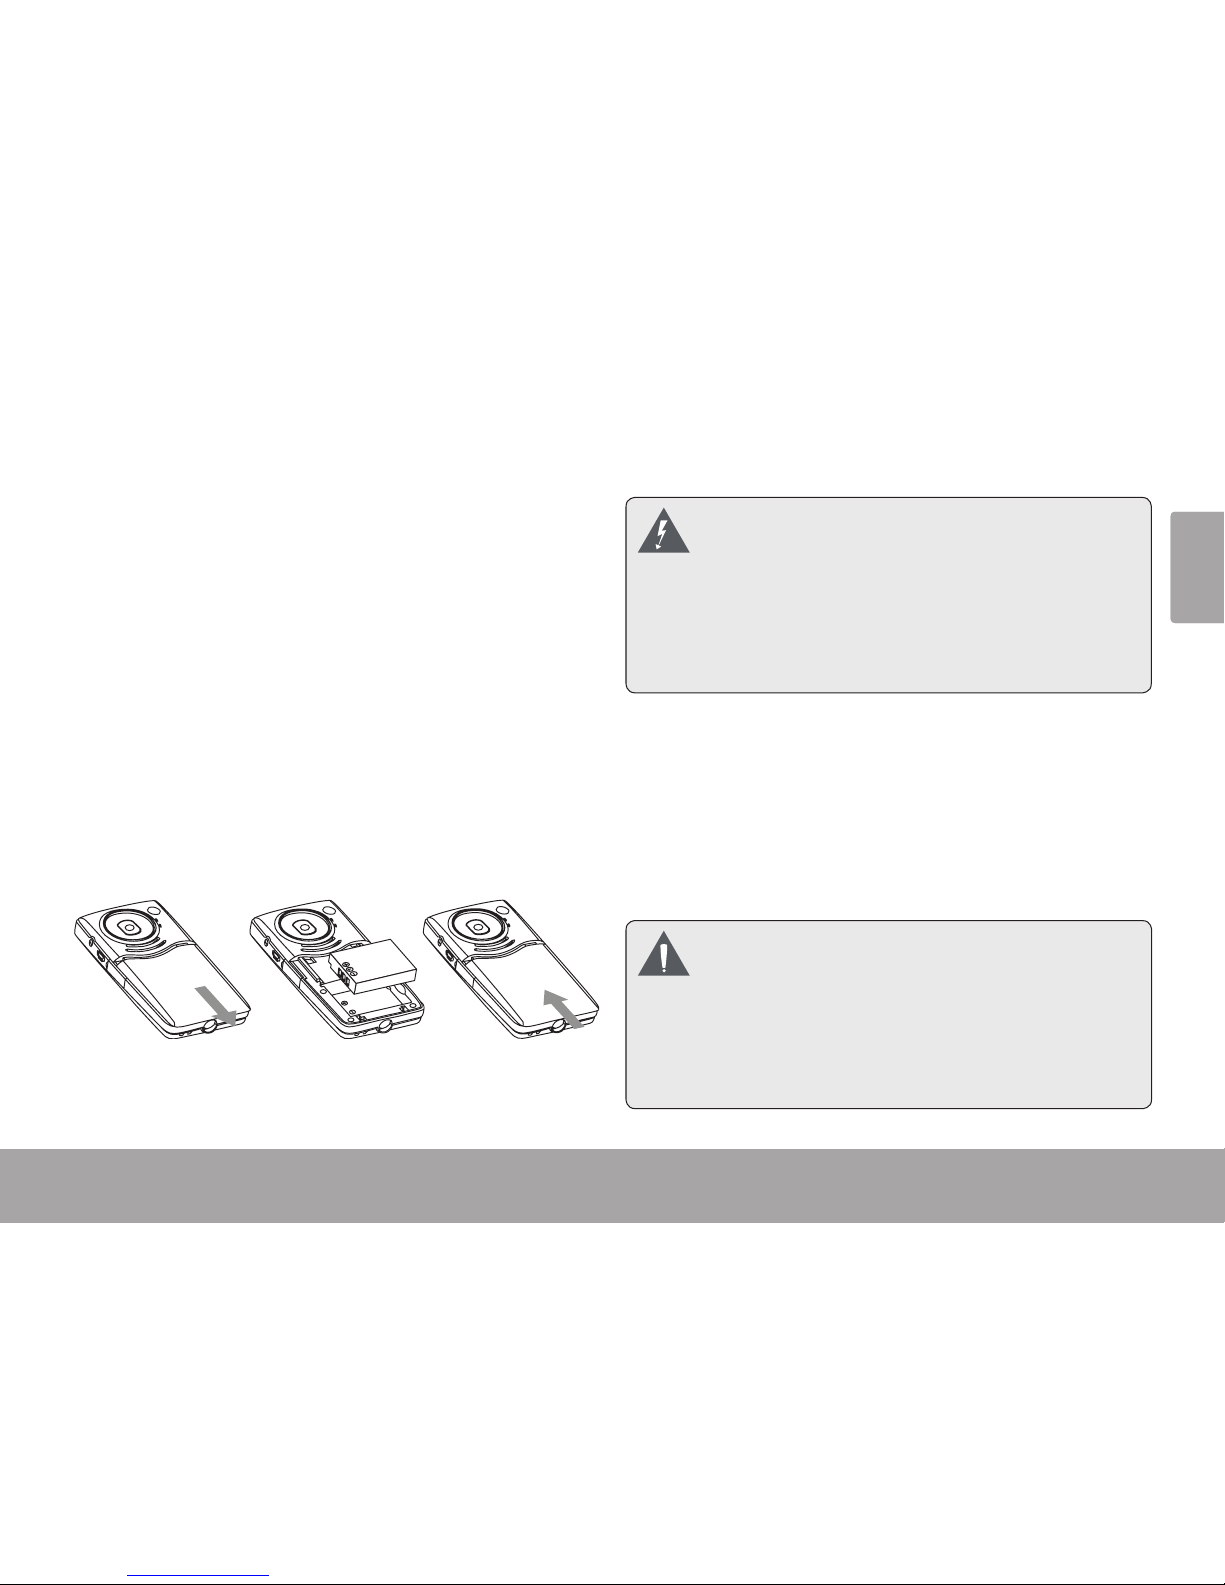
GETTING STARTED........................................... 8
Install the Battery............................................8
Charging the Battery.....................................8
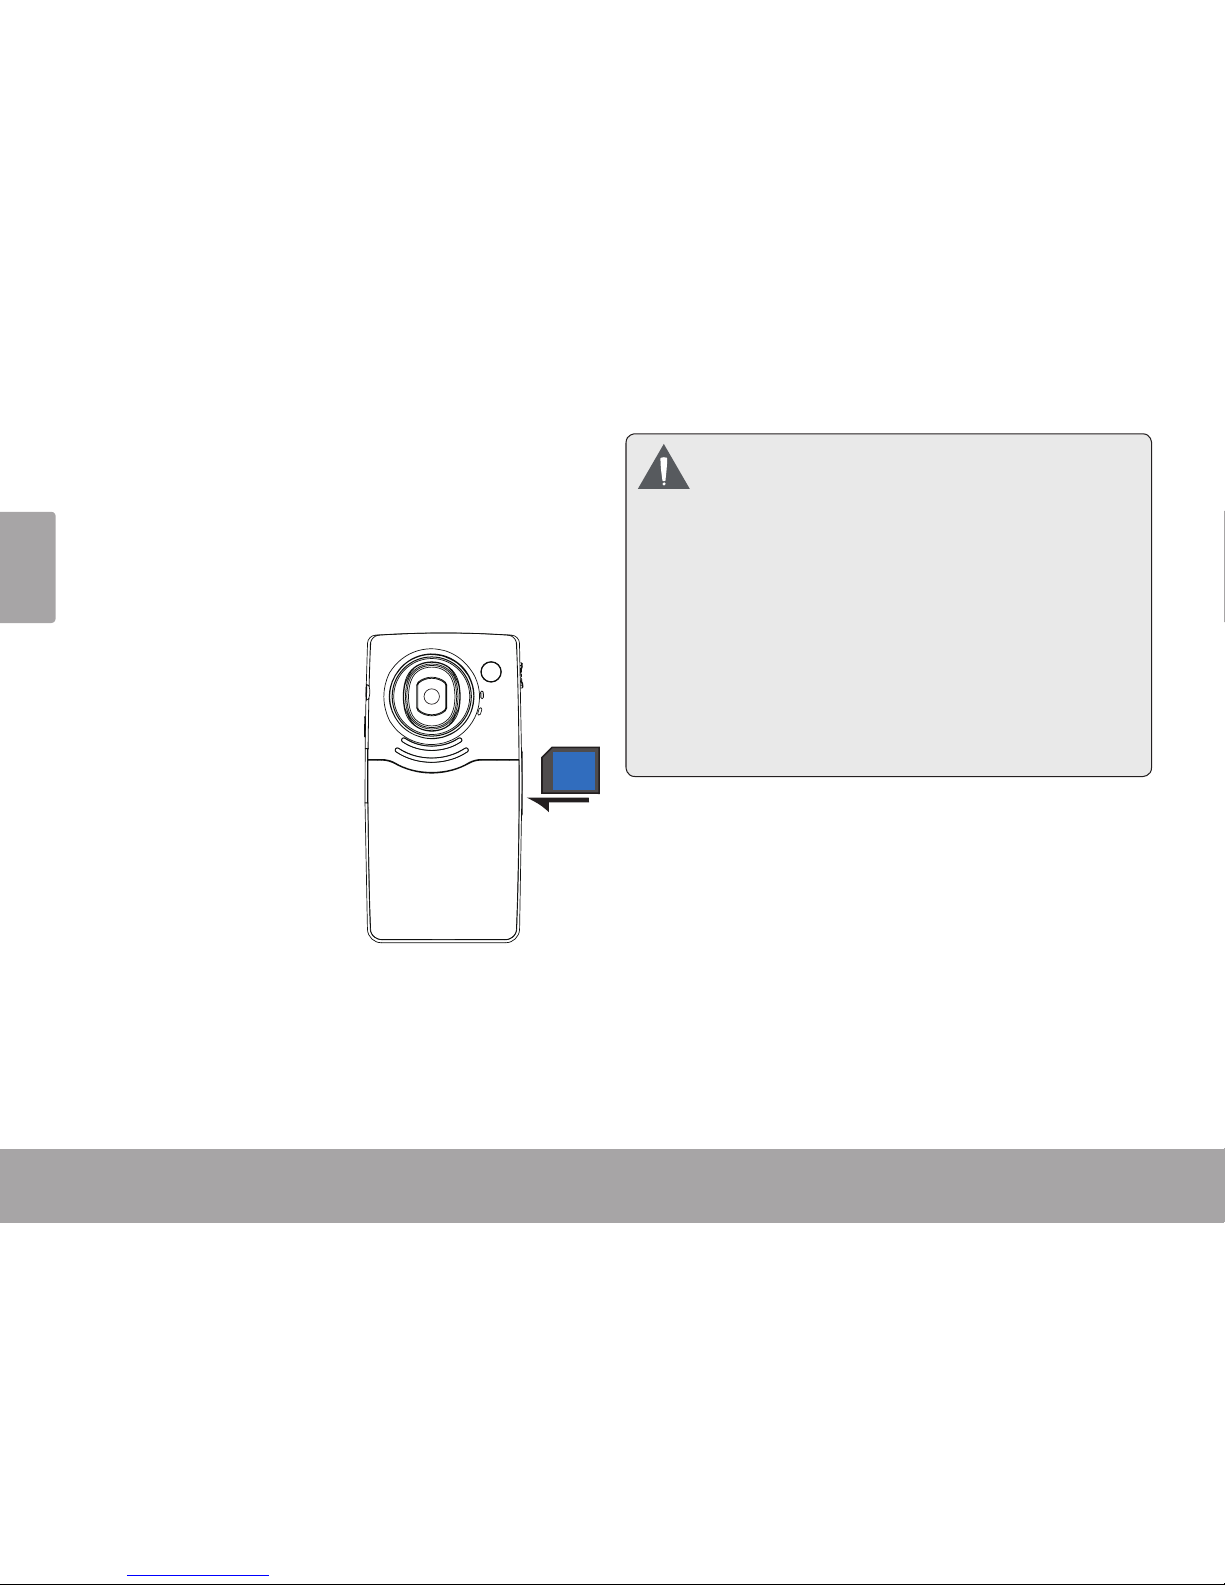
Insert a Memory Card...................................9
USING THE CAMERA .....................................10
Turning the Camera On/Off ....................... 10
Changing Camera Modes......................... 10
Video Mode ................................................. 10
To Record Video.................................11
Zoom....................................................11
Video Size............................................11
Photo Mode...................................................12
To Take a Photo ..................................12
Zoom....................................................12
Photo Size............................................12
Playback Mode.............................................13
Playback Controls..............................13
Deleting Files.......................................13
SETUP MODE ..................................................14
CONNECTING TO A TV .................................16
TRANSFERRING FILES TO A COMPUTER ........18
USING THE INCLUDED SOFTWARE................ 20
Installing muvee™ autoProducer............... 21
Using muvee™ autoProducer..................... 25
Making a muvee™ ...........................26
SPECIFICATIONS........................................... 30
TROUBLESHOOTING & SUPPORT....................31
Table of ContentsÂ

Table Of Contents Page 3
English
IMPORTANT INFORMATION ......................... 33
FCC Statement.............................................34
Important Safety Instructions......................35
Maintenance and Care.............................. 37

Page 4 Package Contents
English
Thank you for purchasing a Coby Snapp™ CAM
HD Digital Video Camera. Please read these instruc-
tions before using your camcorder, and retain them
for future reference. This package includes:
CAM camera
A/V Cable
USB extension cable
Lithium-polymer battery
Installation CD
Hand strap
Pouch
Should any of the above items be missing, please
contact the dealer from whom you purchased this
product.
This package may contain plastic bags or
other materials that pose a hazard to chil-
dren. Be sure to safely dispose of all pack-
ing materials after opening.
Package ContentsÂ

Camera At A Glance Page 5
English
Camera At A Glance Page 5
English
ÂCamera at a GlanceÂ
Front View
LCD screen
MODE
Delete
Left
Right
Up/Zoom In
Down/Zoom Out
Record/OK
1
2
5
6
3
4
78

Page 6 Camera At A Glance
English
Top View
USB Plug
Left View
A/V out jack
Power
HDMI port
Rear View
Lens
Microphone
LED light
Speaker
Battery cover
Right View
USB plug switch
SD/SDHC card slot
Bottom View
Tripod mount
Hand strap mount
1
2
3
4
8
610
11
13
12
5
7
9

Getting Started Page 7
English
Getting Started Page 7
English
Getting StartedÂ
Please read and complete the following steps to
begin using your digital video camera.
Install the Battery
Remove the battery compartment door by slid-1.
ing it toward the base of the camera.
Load the battery pack into the compartment as2.
shown in the diagram. The text on the battery
should be visible and the metal contacts should
face left.
Replace the battery compartment door and3.
snap it into place.
The battery used in this device may present
a re or chemical hazard if mistreated. Do
not recharge, disassemble, incinerate, or
heat the batteries. Used batteries should be
disposed of safely.
Keep batteries out of the reach of children.
Charging the Battery
Turn o the camera.1.
Connect the camera to the USB port of a com-2.
puter. The LED light will turn on while charging
and will turn o when the battery is fully charged.
Fully charge the battery before using the
camera for the rst time.
For instructions on how to connect the cam-
era to a computer, please read the “Trans-
ferring les to a Computer” section of this
manual.

Page 8 Getting Started
English
Insert a Memory Card
This camera records to SD or SDHC memory cards.
The maximum supported card size is GB.
Make sure that the write protection switch on the1.
memory card is set to the “unlocked” position.
Install the memory2.
card by inserting it
gently into the card
slot on the side of the
video camera. Push
the card until it clicks
into place. Make sure
the card is properly
aligned as indicated
by the marking next to
the card slot.
To release and remove the card, press the card in;3.
it will spring out of the slot. Grasp the card by its
edge to remove it.
To avoid data corruption, turn o the digital
video camera before inserting or removing
a memory card.
Avoid touching the gold contacts of the
memory card.
Do not attempt to insert objects other than
an SD or SDHC memory card into the card
slot. A compatible memory card should t
easily into the card slot; if you encounter
resistance, check the alignment of the card.
Do not attempt to force the card in.

Using The Camera Page 9
English
Using The Camera Page 9
English
Â
Turning the Camera On/O
Press to turn the camera on or o.
To save power, the camera will turn itself
o automatically after one minute when
not in use.
Changing Camera Modes
Your video camera includes three modes. Press
to toggle between them.
The mode icon displayed on the upper left corner
of the screen indicates the current camera mode.
Icon Camera
Mode Function
Video Record videos.
Photo Capture still photos.
Playback Review video and photo les.
Video Mode
Place the camera in Video mode to
record videos.
When you turn on your camera, it will enter
Video Mode automatically.
Using the CameraÂ

Page 10 Using The Camera
English
To Record Video
Pressto begin recording.
Pressto stop recording.
Pressto pause recording.
When the camera is recording, the elapsed
recording time is displayed on the upper
right corner of the screen. When the camera
is not recording, the estimated available re-
cording time is displayed instead.
Recording will stop automatically when the
memory card is full
Zoom
To use the camera’s digital zoom function:
Pressto zoom in
Pressto zoom out.
The magnication level is displayed on the
screen.
Video Size
The camera can record at a maximum video size
of x pixels (HD p). To increase record-
ing time, you may wish to record video at a lower
resolution.
The video size is displayed on the upper right
corner of the the screen.
Video Size Resolution
HD x
VGA x
Pressor to change the video size.
Recording must be stopped to change the
video size.

Using The Camera Page 11
English
Photo Mode
Place the camera in Photo mode to
record still photos.
To Take a Photo
Pressto take a photo.
The estimated number of available photos
on the memory card is displayed on the up-
per right corner of the screen.
Zoom
To use the camera’s digital zoom function:
Pressto zoom in
Pressto zoom out.
The magnication level is displayed on the
screen.
Photo Size
The camera can record at a maximum photo size
of MP ( x ). To increase the amount of
photos you can take, you may wish to record pho-
tos at a lower resolution.
The photo size is displayed on the screen:
Photo Size Resolution
M . MP ( x )
M . MP ( x )
M . MP ( x )
Pressor to change the photo size.

Page 12 Using The Camera
English
Playback Mode
Place the camera in Playback mode to
review or delete videos and photos on
the camera.
Playback Controls
Pressor to browse the les on the camera.
If a video le is selected, the video icon will
be displayed on the lower left corner of the
screen.
Pressto play a video le. Press again to
pause video playback.
Press and holdor to scan quickly
through the video le.
Pressor to zoom in or out of a photo le.
When a photo is enlarged, pressto enter
Pan mode.
Press/ or / to pan around the
image.
Pressagain to exit Pan mode.
Pressto zoom out to normal view.
Deleting Files
To delete the current le:
Press.
At the “Delete this File?” prompt, press to
delete, or press again to cancel.
To delete all les:
Press.
At the “Delete this File?” prompt, press or
to select All.
Pressto delete all les, or press to
cancel.

Setup Mode Page 13
English
Setup Mode Page 13
English
ÂSetup ModeÂ
Place the camera in setup mode to adjust the
camera’s internal options (including Date & Time,
Language, TV Out mode, and USB mode).
To enter setup mode:
Press. to place the camera in Video or
Photo mode.
Press2. to enter Setup mode.
Some setup options are related to Video or
Photo mode only. To access to these spe-
cic options, place the camera in Video or
Photo mode before entering Setup mode,
respectively.
To adjust the setup options:
Pressor to select an option.
Pressto start adjusting the selected option.
Pressto leave setup mode.
Menu Item Function
Drive Mode
(Photo only)
O: Shoot photos normally.
On: Shoot photos with a 10 second timer.
Light Freq. Set the light frequency to match the power
frequency used in your area. Adjust this option
to correct for ickering from uorescent lamps
that do not use high-frequency ballasts.
50 Hz: Use with 100 Hz uorescent lighting
(50 Hz power; this is used in Argen-
tina and China).
60 Hz: Use with 120 Hz uorescent lighting
(60 Hz power; this is used in North
America and Brazil).

Page 14 Setup Mode
English
Menu Item Function
Date & Time... Set the camera’s internal clock (Date/Month/
Year, Hours, Minutes).
Language Set the display language for menus and other
interface elements (English, French, Spanish).
TV Out NTSC: Set the TV output to be compatible
with the NTSC TV standard. (NTSC is
used in most of North America.)
PAL: Set the TV output to be compatible
with the PAL TV standard. (PAL is
used in Brazil, Argentina, and China).
USB Computer: Set the USB mode to connect to
a computer for transferring data
(USB MSC).
Printer: Set the USB mode to connect to a
printer for direct photo printing.
Direct photo printing requires a
printer that supports Direct Print
Standard (DPS). To learn how to
use your printer’s DPS function,
please refer to your printer manu-
facturer’s instructions.
Menu Item Function
Sounds... O: Do not play a sound when a key is
pressed.
On: Play a sound when a key is pressed.
Format... Yes: Reset the internal memory of the
camera. This will destroy all photos,
videos, and data stored in memory.
No: Cancel and return to the previous
screen.
Reset All... Yes: Reset all options to their factory-
default state.
No: Cancel and return to the previous
screen.

Connecting To A Tv Page 15
English
Connecting To A Tv Page 15
English
ÂConnecting to a TVÂ
To view your video and photo les on a bigger screen, use the included HDMI or A/V cable to connect
your camera to a television.
If your TV has HDMI input, use a Mini-HDMI
to HDMI cable to connect the camera:
Locate the HDMI input connector on your TV.1.
Connect the large end of the HDMI cable into
the TV (connector type A).
Connect the small end of the HDMI cable to the2.
HDMI output connector of the camera (connec-
tor type C).
Turn on the TV. Set the TV’s input source mode3.
to display the HDMI signal.
HDTV
HDMI
If your TV has composite video input
(yellow/red/white connectors):
Locate the Composite1.
Video input connec-
tors on the TV.
Connect the
cable’s yellow
RCA plug to the
Composite Video
In jack of the TV.
Connect the cable’s red RCA plug to the red
Audio In jack of the TV.
Connect the cable’s mini plug to the A/V output2.
jack located on the camera.
Turn on the TV. Set the TV’s input source mode3.
to display the Composite Video signal.
W R Y
TV

Page 16 Connecting To A Tv
English
When the camera is connected to your TV:
Turn on the camera; the camera will automati-1.
cally switch to playback mode and the camera
screen will turn o.
Use the playback mode controls to play videos2.
or view photos on the TV.
If the TV source mode has been set properly,
you will see the camera’s display on the TV
screen. If you need help setting the TV source
mode, please refer to the documentation
provided with your TV.
Playback is the only mode available when
the camera is connected to a TV via HDMI.

Transferring Files To A Computer Page 17
English
Transferring Files To A Computer Page 17
English
Transferring Files to a ComputerÂ
Connect your camera to a computer to transfer les
from the camera onto your hard drive.
If you are planning to install the software
on the included CD, please install these pro-
grams BEFORE connecting the camera to
your computer.
Locate the USB plug switch on the left side of1.
the camera. Slide the switch down to release
the USB plug.
Connect the USB plug to a USB port on the2.
computer.
If the camera is o, turn it on. Your computer3.
should automatically recognize the video
camera as a removable disk. Follow the prompt
on your computer screen to view les on the
camera.
If no prompt appears, you may access the
camera via “My Computer” on a Windows com-
puter, or via a Finder window on Mac OS X.
Transfer les from the camera to your computer4.
as you would with any external disk (i.e., drag-
and-drop or copy/paste).
The camera must be turned on to connect to
a computer.

Page 18 Transferring Files To A Computer
English
The rst time you connect the camera to a computer, it may take a moment for the computer to rec-
ognize and install the appropriate drivers for the camera.
A USB extension cable has been provided for your convenience. Use this cable to connect if the only
available USB ports are located on the back of your computer, or if the camera is blocked by other USB
devices.
If your computer has an SD card reader, you can simply remove the SD card from the camera and load
it into the card reader to transfer les.

Using The Included Software Page 19
English
Using The Included Software Page 19
English
For your convenience, the following software is
included:
muvee™ autoProducer . Basic.
muvee autoProducer is the latest release in the
range of award-winning autoProducer software.
With over styles, there are many ways to per-
sonalize your home production. Whether you are
trying to create a slideshow or a quick home movie –
muvee autoProducer brings a level of simplicity to
the task. Add your photos and video, select a style,
and let it automatically create and sync a movie to
the beat of your music.
The minimum system requirements for this soft-
ware are:
A computer running Windows , Windows Vista,
or Windows XP.
A computer with an optical DVD/CD-ROM drive.
Processor: Intel Pentium III GHz, AMD Athlon,
or equivalent with MMX support
Memory: MB RAM
Other Requirements: Microsoft DirectX . or
higher, Apple QuickTime (for MOV les)
For more information about DirectX,
please visit the Microsoft support website:
http://support.microsoft.com/kb/179113/.
For more information about Apple Quick-
Time, please visit the Apple website:
http://www.apple.com/quicktime/download/.
Using the Included SoftwareÂ

Page 20 Using The Included Software
English
Installing muvee™ autoProducer
To install muvee autoProducer . Basic:
Load the included software CD
into your computer’s optical DVD/
CD-ROM drive. When the AutoPlay
window appears, click “Open folder
to view les”.
Note: If an AutoPlay window does not
appear, open Windows Explorer and
double-click the DVD/CD-ROM drive
icon to view its contents.
Table of contents
Languages:
Other Coby Camcorder manuals

Coby
Coby CAM5000 - SNAPP Camcorder - 720p User manual

Coby
Coby SNAPP CAM5001 User manual

Coby
Coby CAM3001 User manual

Coby
Coby Snapp CAM4002 User manual

Coby
Coby SNAPP CAM3000 User manual

Coby
Coby SNAPP CAM3005 Series User manual

Coby
Coby SNAPP CAM3000 User manual

Coby
Coby SNAPP CAM4505 User manual

Coby
Coby SNAPP CAM4000 User manual

Coby
Coby SNAPP CAM4000 User manual