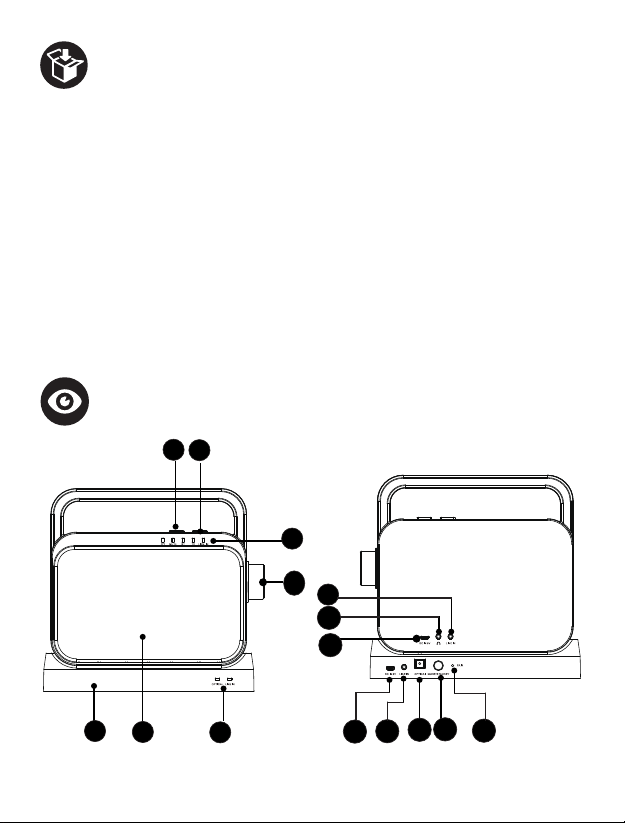
Coby CSTV-130 User manual

R
User Manual Manual de Usuario
CSTV-130
EN ... 01
16
...
ES

In the box
Overview
• 1 x CSTV-130 Wireless TV Speaker
• 1 x Speaker Dock
• 1 x AC Power Adapter
• 1 x Micro USB Charging Cable
• 1 x Optical Cable
• 1 x AUX Cable
• 1 x User Manual
?
7
5
3
2
1
48
11
10
9
12 14 15
13
6
EN 1

Dock
Speaker
Dock LED Indicators - Indicates status of the Dock.
Power/Volume Knob - Turns the Speaker on/o and adjusts
volume level.
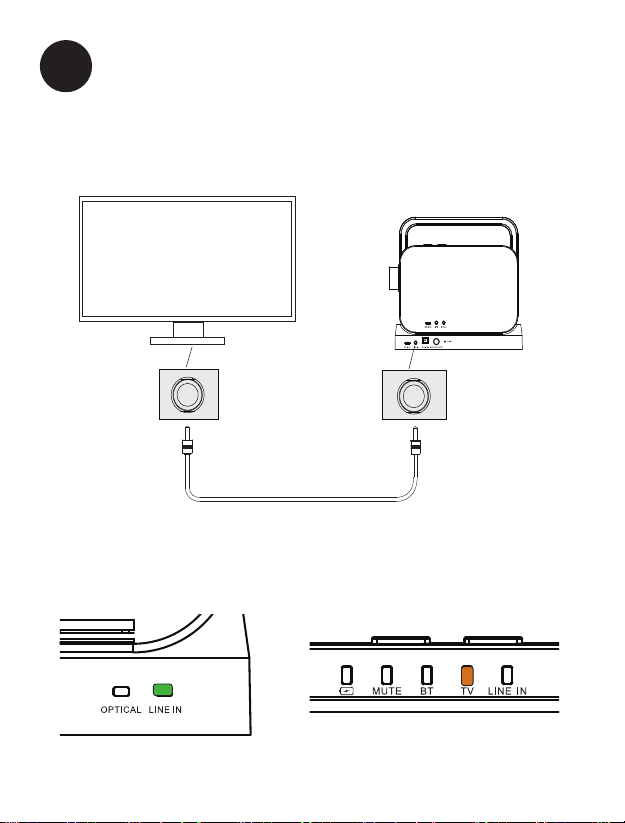
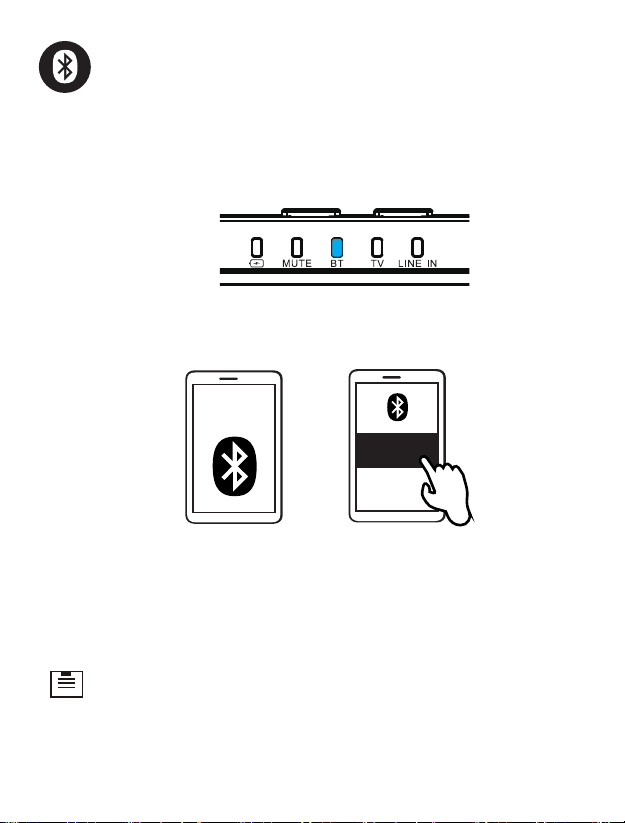
Speaker LED Indicators - Indicates status of the Speaker,
including 5 LEDS to indicate battery status, Mute Mode, Blue-
tooth mode, TV mode, Aux In mode.
Mode Button (Speaker) - Press repeatedly to toggle between
the Speaker’s Bluetooth mode, TV mode and Aux In mode.
Mute Button - Press to mute or resume sound for playback.
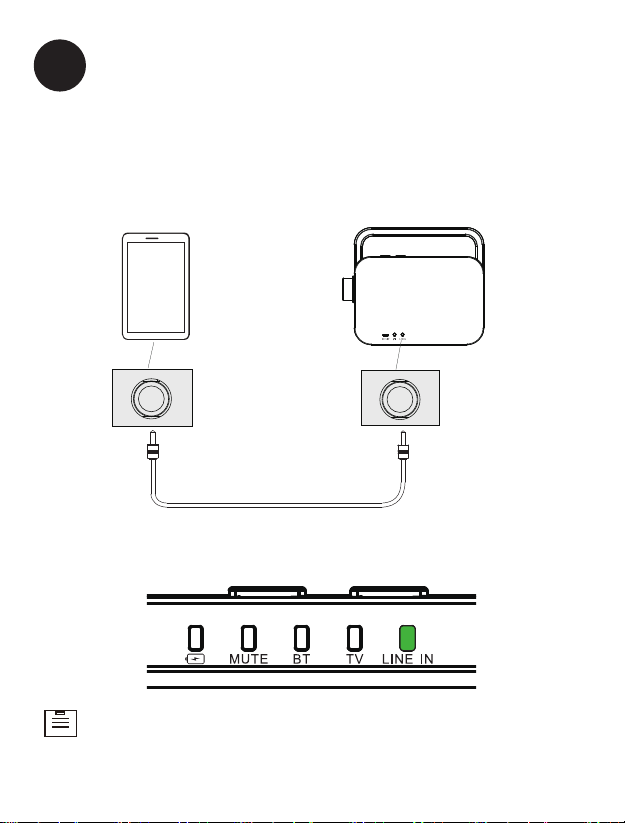
3.5 mm AUX Input Jack (Speaker) - For playing music from
headphone output or AUX Output of another device.
Headphone Output Jack - For listening TV audio with headphones.
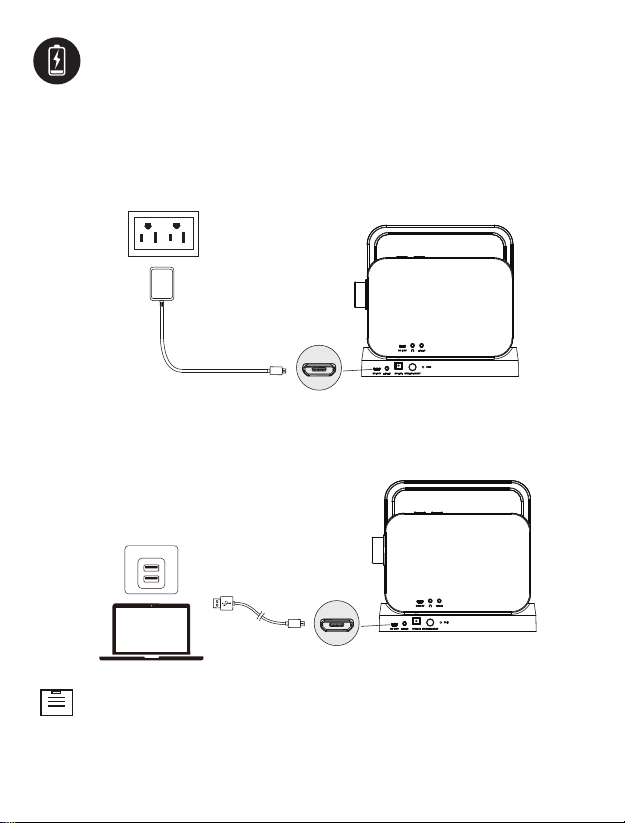
Micro USB Charging Port -
For charging the Speaker.
DC 5V Power Jack -
Power input for the Dock.
3.5 mm AUX Input Jack (Dock) - For playing music from the
headphone output or AUX Output of another device.
Optical Input Port - Alternate connector to TV audio.
Mode/Standby Button (Dock) - Press repeatedly to toggle between
TV Mode and Aux In Mode, press and hold to enter Standby Mode.
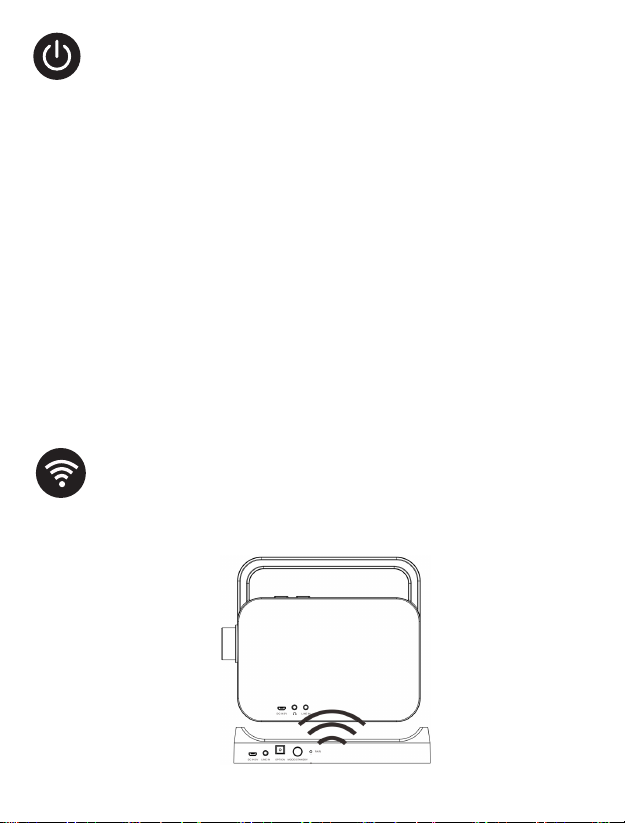
Pair/Reset button - For manually pairing the Speaker with the
Dock or restore the Speaker to factory settings.
7
5
3
2
1
4
8
9
10
11
12
13
14
15
6
EN 2

Charging your Speaker
Method 1
Method 2
?
There are three methods for charging the Speaker.
Connect the supplied Power Adapter to an AC power source and to
the DC 5V Power Jack of the Dock, then place the TV Speaker onto
the Dock with the two metal pins aligned to begin charging.
Connect the supplied USB cable to an USB power source and to the
DC 5V Power Jack of the Dock (Micro USB Port), then place the TV
Speaker onto the Dock to begin charging.
30
AC power
source
Power Adapter
USB power source
30
Note: Some TVs come with USB power output port, you can also di-
rectly plug the supplied USB cable into the TV’s USB port to charge
the speaker. Make sure your TV’s USB power output is 5V/1A so
that it can power the dock on, refer to your TV’s user manual.
EN 3

Method 3
Connect the supplied USB Cable to the Mirco USB Charging Port of
the Speaker and to a USB power source to begin charging.
Battery status indication on Speaker LED
Slowly flashing red
Slowly flashing green
Steady red
Charging
Fully charged
Battery low
USB power source
EN 4

Powering On/Off
Pairing your Speaker and the Dock
To power on the Speaker, turn the Power/Volume button clockwise
until you hear a click.
To power o the Speaker, turn the Power/Volume button counter
clockwise until you hear a click.
To power on the dock, connect the supplied Power Adapter to the DC
5V Power Jack of the Dock and to an AC power source. If the Dock is
powered on, the Dock LED Indicator will light up.
To power o the Dock, disconnect the Power Adapter from the AC
power source.
To set the Dock to Standby Mode, press and hold the Mode/Stand-
by Button on the Dock until the Dock LED Indicator slowly flashes.
?
AUX
IN
1. Power the Speaker on/o
2. Power the Dock on/o
When the Speaker and Dock are both powered on, they will pair
together automatically.
EN 5

TV
Optical Cable
Rubber
protector nubs
Optical Port
Optical Port
Connecting to your TV through an optical
cable (TV Mode)
Step 1. Pull out and remove the rubber protector nubs on both ends
of the supplied Optical Cable.
Step 2. Connect the supplied Optical Cable to the Optical Port of the
Dock and to your TV’s Optical Port.
AUX
IN
Step 3. Press the MODE Button on both the Speaker and Dock to
select TV Mode, the TV LED Indicator on both the Speaker and
Dock will turn orange.
Step 4. Make sure the audio settings on your connected TV are set
to PCM or Optical audio format.
Note: If your TV has the sound settings set to Dolby or another for-
mat, your Speaker may not function properly. You must change the
sound output to PCM or Optical audio. Refer to your TV’s user manual.
EN 6

TV
AUX Cable
AUX In Port
Connecting through an audio cable
( TV Mode)
Step 1. Connect one end of the supplied AUX Cable to the AUX In
(Line In) port of the Dock and to the Headphone Output or AUX Out
port of your device ( Like your TV, smart phone, laptop etc.).
Step 2. Press the Mode Button repeatedly on the Dock to select Line In Mode
and on the speaker to select TV Mode, the Line In LED Indicator on the Dock
will turn green, the Line In LED indicator on the speaker will turn orange.
AUX
IN
AUX Out
Port
EN 7

Connecting through an audio cable
( TV Mode)
Connecting through an audio cable
(AUX In Mode)
AUX
IN
Step
1. Connect one end of the supplied AUX Cable to the AUX In
(Line In) Port of the Speaker and to the Headphone Output or AUX
Out port of your device
(Like your TV, smart phone, laptop etc.).
.
Step 2. Press the Mode Button repeatedly on the Speaker to select
Line In Mode, the Line In LED Indicator on the Speaker will turn green.
Note: When an AUX cable is connected, it will automatically
unpair from any actively paired Bluetooth® device.
AUX Cable
AUX In Port
Headphone
Output Port
Smart phone
EN 8

Step 1. Press the Mode Button on the Speaker to select and enter
Bluetooth Mode, the Bluetooth LED Indicator on the Speaker will
rapidly flash blue.
Step 2. Turn on Bluetooth in your device’s settings and search for
“CSTV-130”, then tap “CSTV-130” to connect.
If the Speaker is successfully paired with your media device, the Blue-
tooth LED Indicator on the Speaker will glow solid blue, and you will
hear a tone notification.
CSTV-130
ON
Note: The Speaker will automatically be paired with your last
successfully connected media device next time they are both
turned on.
?
Bluetooth connection with your device
(Bluetooth Mode)
EN 9

Audio playback
Once your Speaker is connected to an audio device using any of the
connection modes listed above, music and other audio will be play-
able and controlled through that device. There are some controls that
can be performed on the Speaker itself.
To raise or lower the volume of the Speaker, turn the Power/Volume
Knob clockwise or counter clockwise.
To mute or resume your music sound, press the Mute Button.
AUX
IN
Listening music with your headphones
Connect wired headphones or earbuds to the Headphone Output
Jack on the Speaker. You can use the Speaker’s Volume Knob and
Mute Button here as well.
EN 10
Note: The Speaker can be used to play audio both on its
own and while connected to the Dock (Please note that the
distance between the speaker and dock should be within 100
feet.).

Problem Solution
Bluetooth mode is not
working.
1. On your phone’s Bluetooth set-
tings, tap Forget the device to clear
the Speaker’s Bluetooth connection
from your device.
2. Turn your phone’s Bluetooth o,
then turn it on again.
3. Ensure your Speaker is set to Blue-
tooth mode, search for “CSTV-130”,
then tap “CSTV-130” to reconnect.
The Speaker will not pair
with the Dock.
1.Turn o the Speaker.
2.Power on the Dock, use a metal pin
to press and hold the PAIR button for
3 seconds.
3.Turn on the Speaker and press
the PAIR button again to re-pair the
Speaker and the Dock.
Audio from the Speaker
sounds distorted.
Select PCM 2.0 (or PCM stereo) as
the audio output.
The Speaker is not re-
sponsive to any input.
Check if the Speaker’s battery is dead,
and charge it if so. If not, reset the
Speaker by pressing the Pair Button.
?Troubleshooting
EN 11

Model Name CSTV-130
Playtime Up to 8 hours
Power Input for dock 5V, 1 A
Power input for speaker 5V, 1A
Charging time 4 hours
Charge Voltage 3.7 V
Battery Type Rechargeable Lithium-ion
Battery capacity 2500mAh
Power consumption 5W x 2
Driver (full range) 53mm
Range 30m/100 ft
Bluetooth version V 5.0
Frequency 2.4 Ghz
Specications
I
EN 12

Safety Precautions
1. Avoid dropping.
2. Do not disassemble this device.
3. Do not expose this device to rain or moisture or submerge in water.
4. Ideal temperatures are 0°C to 35°C. Avoid extreme temperatures.
5. Keep the device away from excessive heat, such as sunshine, fire
or the like.
6. Do not use the device outdoors during thunderstorms.
7. Use original or certified cables.
8. The Power Adapter is used as the disconnect device for the dock.
Ensure that the socket outlet is easily accessible after installation.
9. Hands must be dry when plugging the power cord into an AC
outlet to prevent electrical shock. Do not damage the power cord
by disassembling, bending, pulling or exposing it to heat as it may
cause a fire or electrical shock.
10. Make sure to completely insert the power plug into an AC outlet.
Insecure connections can cause a fire.
11. Do not use any corrosive cleaner/oil to clean.
12.To prevent damage to your device’s parts or internal circuits, do
not use it in dusty, smoky, damp or dirty environments.
13. Do not use, store or transport the device where flammables or explo-
sives are stored. Using your device in these environments increases the
risk of explosion or fire.
FCC Statement
FCC ID: 2AMSOCSTV-130
This device complies with Part 15 of the FCC Rules. Operation is sub-
ject to the following two conditions:
(1) this device may not cause harmful interference, and (2) this device
must accept any interference received, including interference that may
cause undesired operation.
Warning: Changes or modifications not expressly approved by the
party responsible for compliance could void the user’s authority to
operate the equipment.
Safety Statement
?
EN 13

Notice
This symbol means the product must not be discarded as
household waste, and should be delivered to an appropriate
collection facility for recycling.
Follow local rules and never dispose of the product and re-
chargeable batteries with normal household waste. Correct
disposal of old products and rechargeable batteries helps
prevent negative consequences for the environment and
human health.
This product complies with the radio interference require-
ments of the European Community.
Note: This equipment has been tested and found to comply with the
limits for a Class B digital device, pursuant to Part 15 of the FCC Rules.
These limits are designed to provide reasonable protection against
harmful interference in a residential installation.
This equipment generates, uses and can radiate radio frequency en-
ergy and, if not installed and used in accordance with the instructions,
may cause harmful interference to radio communications. However,
there is no guarantee that interference will not occur in a particular
installation. If this equipment does cause harmful interference to ra-
dio or television reception, which can be determined by turning the
equipment o and on, the user is encouraged to try to correct the in-
terference by one or more of the following measures: (1) Reorient or
relocate the receiving antenna. (2) Increase the separation between
the equipment and receiver. (3) Connect the equipment into an out-
let on a circuit dierent from that to which the receiver is connected.
(4) Consult the dealer or an experienced radio / TV technician for
help.
EN 14

Disclaimer
The Bluetooth® word mark and logos are registered trademarks
owned by the Bluetooth SIG, Inc. and any use of such marks by Fesco
Distributors, Inc. is under license. Other trademarks and trade names
are those of their respective owners.
© 2021 Fesco Distributors, Inc., All rights reserved.
The information contained in this user manual and all accompanying
documentation is copyrighted and all rights are reserved. This pub-
lication may not be copied for commercial purposes in any form, in
whole or in part without the prior written consent of Fesco Group.
The COBY logo is a trademark of Fesco Distributors, Inc., use of COBY
logo for commercial purposes without the prior written consent of
the company may constitute trademark infringement.
All information, design and specifications contained in this manu-
al were correct at the time of this publication. As the product goes
under continuous upgrades and changes, however, the final device
may have slight dierences. The contents of this manual are subject
to change without prior notice, and Fesco Group will not be liable for
any errors contained herein or for incidental or consequential dam-
ages in connection with the furnishing performance or use of this
manual.
EN 15

En el cuadro
Visión general
• 1 altavoz de TV inalámbrico CSTV-130
• 1 x base de altavoz
• 1 x adaptador de corriente CA
• 1 x cable de carga micro USB
• 1 x cable óptico
• 1 x cable auxiliar
• 1 x manual de usuario
?
7
5
3
2
1
48
11
10
9
12 14 15
13
6
ES 16

7
5
3
2
1
4
8
9
10
11
12
13
14
15
6
ES 17
Muelle
Altavoz
Indicadores LED de la base - Indica el estado de la base.
Perilla de encendido / volumen - Enciende / apaga el altavoz
y ajusta nivel de volumen.
Indicadores LED del altavoz - Indica el estado del altavoz, inclu-
idos 5 LED para indicar el estado de la batería, modo de silencio,
modo de Bluetooth, modo de TV, modo de entrada auxiliar.
Botón de modo (altavoz) - Presiónelo repetidamente para alternar
entre el modo Bluetooth del altavoz, el modo TV y el modo Aux In.
Botón de silencio - Presiónelo para silenciar o reanudar el
sonido para la reproducción.
Conector de entrada AUX de 3,5 mm (altavoz) - Para reproducir músi-
ca desde la salida de auriculares o la salida AUX de otro dispositivo.
Conector de salida de auriculares - Para escuchar el audio de
la televisión con auriculares.
Puerto de carga micro USB - Para cargar el altavoz.
Conector de alimentación de 5 V CC - Entrada de alimentación para la base.
Conector de entrada AUX de 3,5 mm (base) - Para reproducir músi-
ca desde la salida de auriculares o la salida AUX de otro dispositivo.
Puerto de entrada óptica - Ponector alternativo al audio del televisor.
Botón de modo / espera (base) - Presione repetidamente para
alternar entre el modo de TV y el modo de entrada auxiliar, pre-
sione y mantenga presionado para ingresar al modo de espera.
Botón Emparejar / Reiniciar - Para emparejar manualmente el al-
tavoz con el Acople o restaure el altavoz a la configuración de fábrica.

Carga de su altavoz
Método 1
Método 2
?
Hay tres métodos para cargar el altavoz.
Conecte el adaptador de corriente suministrado a una fuente de alimentación de
CA y al conector de alimentación de 5 V CC de la base, luego coloque el altavoz
de TV en la base con las dos clavijas metálicas alineadas para comenzar a cargar.
Conecte el cable USB suministrado a una fuente de alimentación USB y
al conector de alimentación CC de 5 V de la base (puerto micro USB),
luego coloque el altavoz del televisor en la base para comenzar a cargar.
30
alimentación de
CA fuente
Adaptador de
corriente
Fuente de
alimentación USB
30
Nota: algunos televisores vienen con un puerto de salida de ali-
mentación USB; puede conectar directamente el cable USB suministra-
do al puerto USB del televisor para cargar el altavoz. Asegúrese de que
la salida de alimentación USB de su televisor sea de 5 V / 1 A para que
pueda encender la base; consulte el manual del usuario de su televisor.
ES 18

Método 3
Conecte el cable USB suministrado al puerto de carga micro USB del
altavoz y a una fuente de alimentación USB para comenzar a cargar.
Indicación del estado de la batería en el LED del altavoz
Rojo parpadeando lentamente
Verde parpadeando lentamente
Rojo fijo
Cargando
Completamente cargado
Bateria BAJA
Fuente de
alimentación USB
ES 19
Other manuals for CSTV-130
3
Table of contents
Languages:
Other Coby Speakers manuals

Coby
Coby CSTV-130 Instruction Manual

Coby
Coby CPA91FD User manual

Coby
Coby CSTV-130 User manual

Coby
Coby CSTW-43FD User manual

Coby
Coby CSTW530 User manual

Coby
Coby DVD988 User manual

Coby
Coby CMB-102 User manual

Coby
Coby CSTW52FD User manual

Coby
Coby Party Blaze CPA910 User manual

Coby
Coby CSBT-328-BLK User manual