Coffee Queen COFFEE User manual
U_EN
Rev. 090914
Your retailer
...............................................................................
...............................................................................
Serveschilledwaterandchilledcarbonatedwater
COFFEE QUEEN
QUEEN AQUA Table Top
QUEEN AQUA
Floor model
User manual

1. Contents. WATER LINE
1. Contents 2
2. Notesfortheuser 3
3. Usingthemachine 4
4. QueenAquaInstallation 5 - 6
4. InstallationQueenAquatabletop 7 - 8
5. Care, replacing a water filter 9
6. Cleaningthemachine 10
7. Important 11
2.

2. Notes for the user. WATER LINE
ThankyouforchoosingaQueenAquawaterdispenser–wehopeyouwillenjoythebenefits
of usingit.Readthroughthemanualcarefullybeforeyouusetheautomatic water dispenser
for the firsttime. This manualcontainsimportantinstructionsforcorrectand safe usage of the
water dispenser.Always keep the manual in a place that is accessible for the user.
Allyouneedto do is connect QueenAquato the water supply.
There is a free-standing floor model as well as one that is integral on a work surface.
Thewateris chilled to the perfect temperature.
Youcanchoose whether youwantchilledwater or carbonated water.
Youcanalsochoosewhether you want water inaglass,jugor bottle.
3.
Product identification: Queen Aqua Queen Aqua table top
Height 1355 470
Width 310 210
Depth 330 330
Electrical connection 230 V/10 A 230 V/10 A
Coldwaterconnection 1/2" 1/2"
Refrigerant HFC-134A HFC-134A
Cooling capacity 17 litres per hour 17 litres per hour
Power Single phase, 293 W Single phase, 293 W
Automaticwater replenishment Yes Yes
Chilledwater Yes Yes
Carbonated water Yes Yes
Gas dome + nipple supplied supplied
Water filter + regulator Integral supplied
Carbon dioxide bottle* No
*You canpurchase a height 580 x width 185 height 580 x width 185
carbon dioxide bottle from
youlocalgas distributor.

3. Using the machine. WATER LINE
4.
Holdaglassbelowthe outlet for the
requireddrink.
Press one of the buttons
Water will continue torunaslongas you
keepthebuttonpressed.
Outlet for chilled drinks
QueenAquahastwooutletsfor chilled drinks
Outlet carbonatedwater
Outlet coldwater

4. Installation. Queen Aqua WATER LINE
IMPORTANT!
Themachine must be disconnected fromthemainswhen
work is done on it.
Pull the power supply cable out of the wall socket.
It is the end customer’s / user’s responsibility to arrange the
waterconnectiontothe machine according to the
manufacturer’sinstructions.
NOTE
WORKING WITH THE CONNECTIONS
Holdtheconnection and press the hose into the connection’s
body as far as possible.
Disconnecting the John Guest connection
Pushthe grey ring towardstheconnectionand pull outthehose.
Ifthewaterhosesneedtobecut,makeastraightcuttoprevent
leakage.
Queen Aqua Installation
1. Placethemachine on a level and waterproof surface.
2. Mountthemachine on the floor cabinet and screw in place
usingthescrews supplied.
(Useaspirit level where necessary and adjust withthe
adjustablefeet).
3. Makesure that there isfree movement ofair behind the
machine. Min. 10cm.
5.
The installation shall be performed by an authorised installer.
4. Installation. Queen Aqua WATER LINE
6.
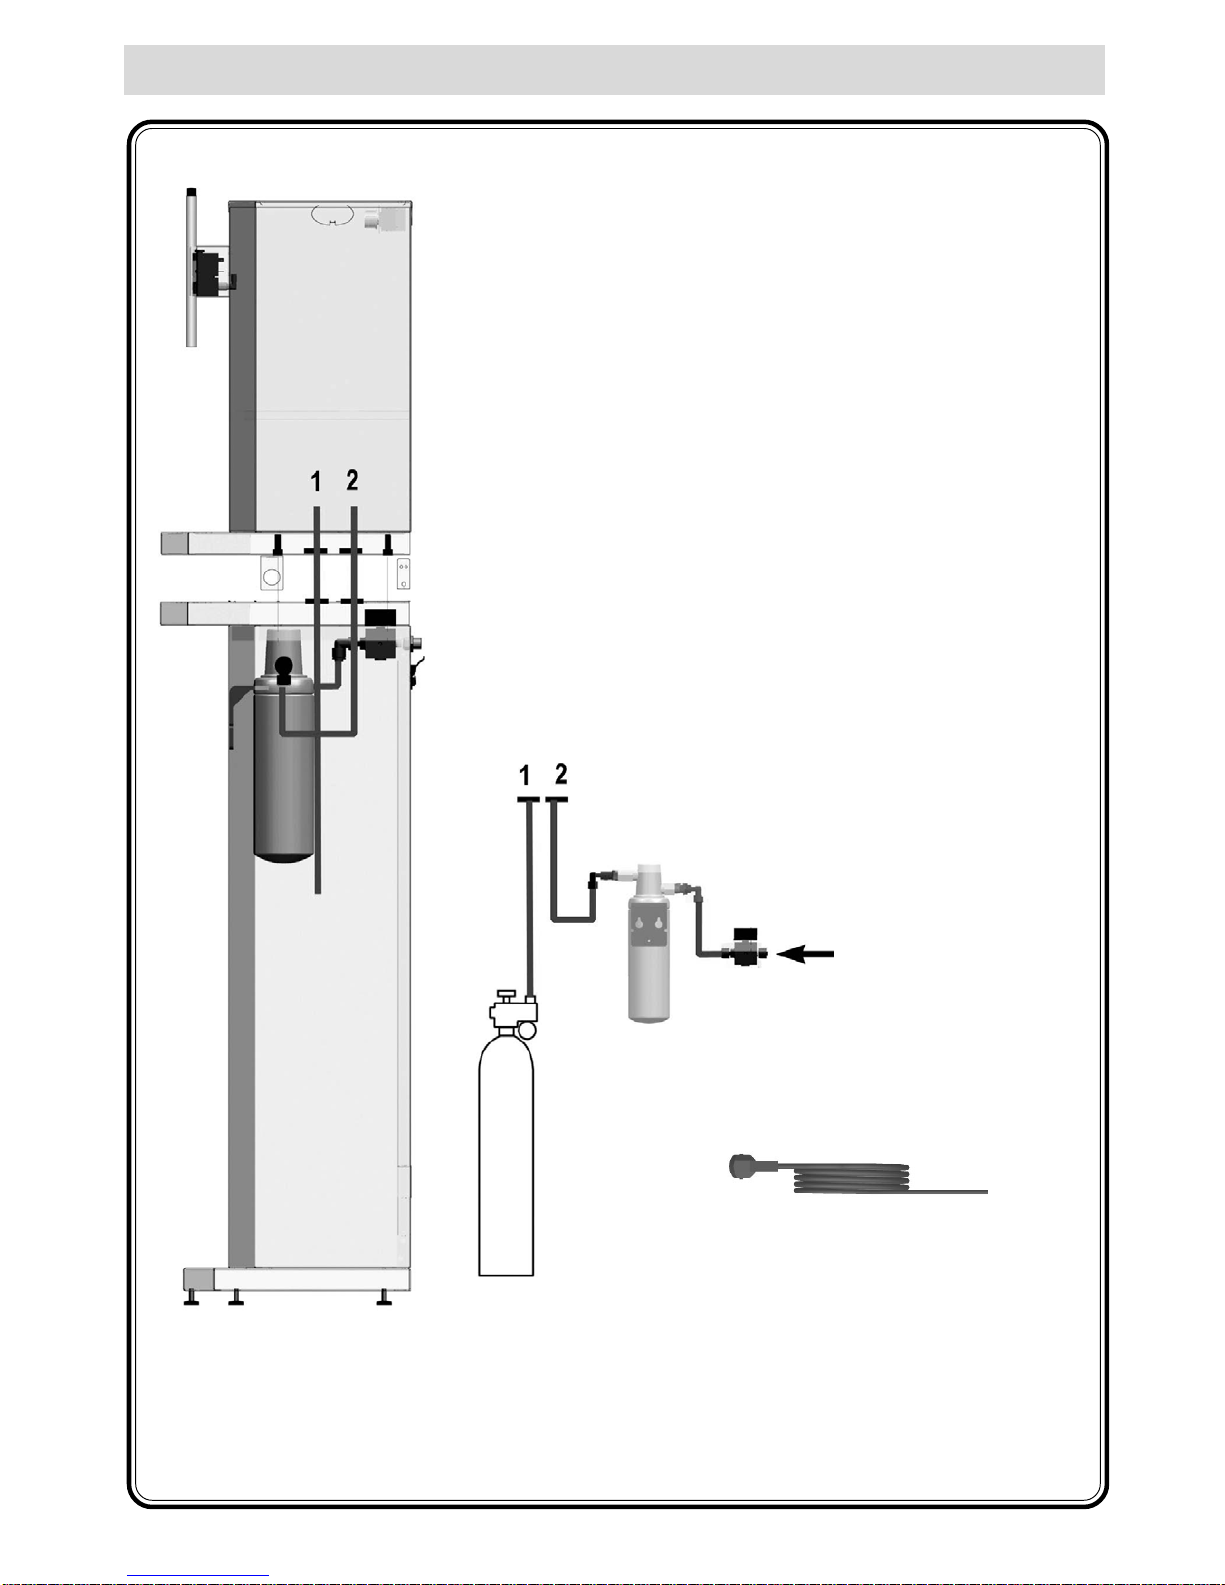
Queen Aqua installation
Installthemachine using the water hosesandgasdome
supplied.
4. Undothe service hatch (A).
5. Mount the gas dome (B) on the carbon dioxide bottle and
then fit the nipple supplied on the gas dome.
Connectthecarbondioxide bottle (C) to the chiller unit.
See 1. (Carbonated water).
6. Connectthehose from the water filter (D) to the chiller
unit. See2. (Cold water).
7. Connect the ½” hose supplied to the machine (E) and
thento the mainswatersupply.
The most appropriate connection is to a tap that can be
turnedoff.
Check to ensure that no kinks or sharp bends are formed on
thehoses during connection.
WaterIN
8. Insert the plug in an earthed 230 V 10Awall
socket.
9. Flushoutapproximately 2.5 litres chilled waterand
thenapproximately2.5 litres carbonated water before
themachineistakeninto use.
C
A
waterfilter with
regulator.
B
E
Connected to
the carbon
dioxidebottle
The installation shall be performed by an authorised installer.
D

4. Installation. Queen Aqua Table Top WATER LINE
Queen Aqua Table Top Installation
1. Placethemachine on a level and waterproof surface.
2. Installthemachineusingthe water filter+regulator,elbow
connections, water hoses and gas dome supplied.
(Useaspirit level where necessary and adjust withthe
adjustablefeet).
3. Makesure that there isfree movement ofair behind the
machine. Min. 10cm.
IMPORTANT!
Themachine must be disconnected fromthemainswhen
work is done on it.
Pull the power supply cable out of the wall socket.
It is the end customer’s / user’s responsibility to arrange the
waterconnectiontothe machine according to the
manufacturer’sinstructions.
NOTE
WORKING WITH THE CONNECTIONS
Holdtheconnection and press the hose into the
connection’s body as far as possible.
Disconnecting the John Guest connection
Pushthe grey ringtowardstheconnection and pulloutthe
hose.
Ifthe water hoses needto be cut,make a straightcut to
preventleakage.
7.
The installation shall be performed by an authorised installer.

4. Installation. Queen Aqua Table Top WATER LINE
8.
Queen Aqua Table Top Installation
4.Mount the gas dome (A) on the carbon dioxide
bottle(B)andthenfitthenipplesuppliedforthe
water hose on the gas dome.
5.Mountusingthe elbow connectionssuppliedunder
thechillerunit 1 and 2.
6.Connect the hose from the carbon dioxide tube to
the cooling unit’s elbow connection. See1.
(Carbonatedwater).
7.Mountthewater filter withregulator(C)and connect
thehosefrom the water filter tothechillerunit’s
elbow connection. See2. (cold water).
8.Connectthe½”hosetothe water filter and then to
themains water supply (D).
The most appropriate connection is to a tap that
canbe turned off.
(Check to ensure that no kinks or sharp bends are
formedon the hoses duringconnection.)
9.Insert the power plug in an earthed wall socket.
10. Flush out approximately2.5litreschilledwater and
thenapproximately2.5 litres carbonated water
before the machine is taken into use.
A
B
C
The installation shall be performed by an authorised installer.
Waterfilter
withregulator
D
WaterIN
(Wheninstallinghosesthat go straight down, two holes need to be drilled
for the incoming hoses. See fig.(A).
Fig. A
5. Replacing water cleaning filter. WATER LINE
9.
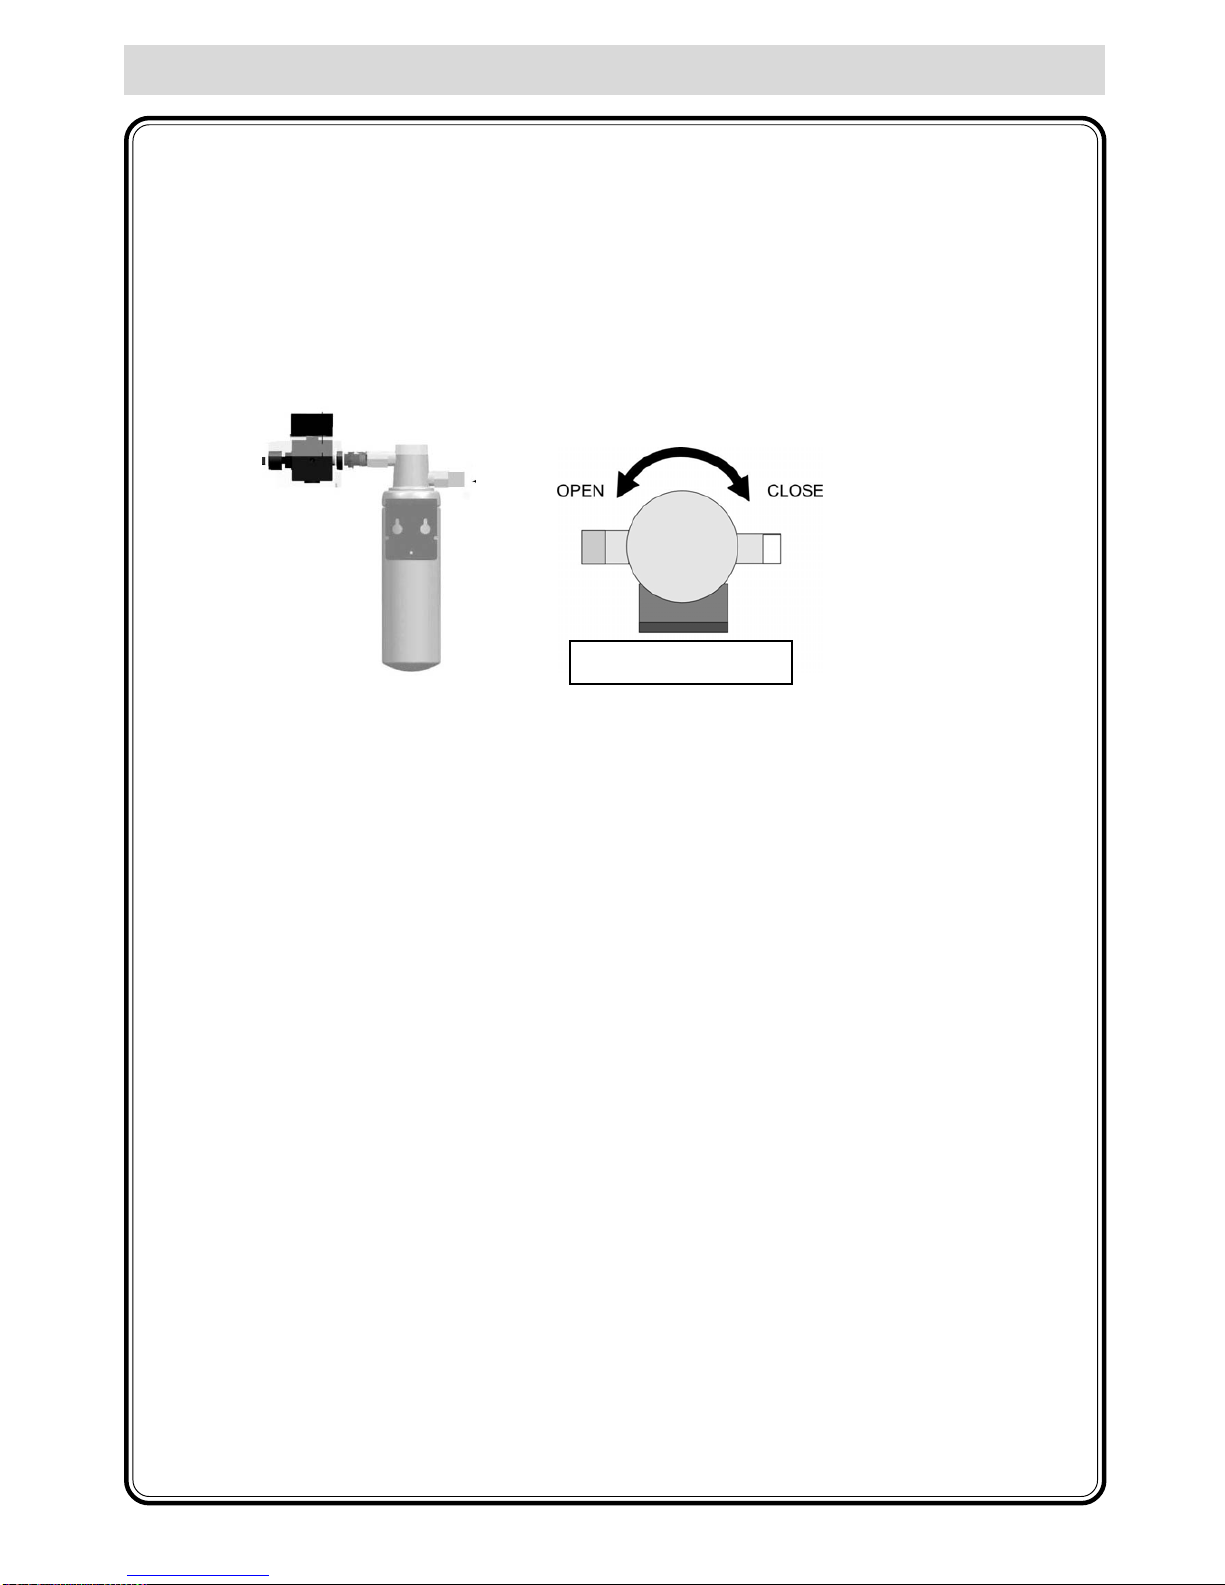
Replacing water cleaning filter. Can changes under water pressure.
1. Loosen filter by turn it 1/4 lap. See fig.1. OPEN
2. Assemble the new filter by turn it 1/4 lap. See fig. 1. CLOSE
To make sure a high quality on drinks replace water cleaning filter every 6 months.
Fig.1
waterfilter
3. IMPORTANT!
Nowpush the buttonforcold water.
Pushuntilwater is coming out in a regularly flow.
OnlyuseCoffeeQueen original water cleaning filter:Articleno: 1505344
Filter from below

6. Cleaning. Daily cleaning. WATER LINE
10.
Outsidecleaning;
use asoft rag and liquid
cleaningagent to prevent
scratches.
Daily cleaning or when needed.
Emptyandcleandriptrayand
drip tray insert daily.

Important
Donotdoanythingto the water dispenser.Inappropriateactioncanleadtopersonalinjuryand
faults.
Thewaterdispenser should stand on alevelsurfacetoworksatisfactorily.
The water dispenser must be placed on a waterproof surface so that any water leakage is visible.
Makesurethat kinks are not formed in theconnectionhoseduringinstallationor when the water
dispenser ispushed into place. Themachine’ssupply and drain connection shallbe checked
regularly.Checkthatnoleakage has occurred inconnectionwithinstallation.
Thewater connection always presents a risk ofleakage irrespective of safety equipment.
The water dispenser must be completely drained of water if it is going to be stored for a long time.
Turn off the water tap if the machine is not going to be used for a long time.
Disconnectthemachine from the electricity supply before doing any workonit.
Thiscanbe done by pulling out theplugfromthewallsocket.
CHILLER SYSTEM
INSTALLATION AND LOCATION:
The system is designed for use in standard environments according to CCN standard 33 2000-3
and is included in climate class N.
It must not be located close to a heat source or be subjected to direct sunlight.
The system is designed for use in an ambient temperature of no lower than 6°C and no higher
than28°C.
Thesystem must not be used or placedin an ambient temperature that islower than 0oC.
ELECTRICAL CONNECTION
Connect the system to 220–240 V, 50 Hz and 10A. The contact for electrical installation shall
complywiththecurrent CSN regulations, EN and ISO standards. If the cable is damaged, it
must be replaced by a qualified person. This is to prevent an accident.
CONNECTION AND SERVICE:
Thecondenser shall be cleanedevery6months in connection withwaterfilterreplacement.
Use compressed air when cleaning.
Carryoutcleaning only once the power supplyisdisconnectedfromthechiller!
Allinstallation work must bedone by aqualified person.
7. Important. WATER LINE
11.

WATER LINE
Art. nr/Art. no. 1730009
FOR SERVICE
please contact
...............................................................................
...............................................................................
...............................................................................
CREM International AB
Box 960, 671 29 ARVIKA, Sweden
Tel:+46(0)570-47700, Fax: +46(0)570-47719
E-mail:[email protected] www.creminternational.com
Yourretailer
This manual suits for next models
1
Table of contents
Other Coffee Queen Water Dispenser manuals


Popular Water Dispenser manuals by other brands

IBC Water
IBC Water AST0715MP-960 Installation & operating instructions

Lancaster Water Treatment
Lancaster Water Treatment X FACTOR LX15 Series Installation, operating and service manual

Elkay
Elkay EMABF8 Series Installation & use manual

Oasis
Oasis Osmosis Home installation manual

Monarch Water
Monarch Water ULTIMATE MINI AQUA HE install guide

Haier
Haier HLM-109B instruction manual


