Coleman FlowClear 90355E User manual

DO NOT RETURN THIS ITEM TO THE STORE
OR WEBSITE WHERE IT WAS PURCHASED.
CONTACT US DIRECTLY WITH ANY QUESTIONS,
OR FOR DEFECTIVE OR WARRANTY CLAIMS.
CALL US DIRECTLY FOR IMMEDIATE HELP!
Toll-Free: 1-855-838-3888
#90355E
FlowClearTM Sand Filter
Owner’s Manual
S-S-005018
www.bestwaycorp.com

SAFETY INSTRUCTIONS
WARNING
IMPORTANT SAFETY INSTRUCTIONS
When installing and using this electrical equipment, basic safety precautions should always be followed, including the following:
READ AND FOLLOW ALL INSTRUCTIONS
WARNING - TO REDUCE THE RISK OF INJURY, do not permit children to use this product unless they are
closely supervised at all times.
WARNING - RISK OF ELECTRIC SHOCK - Connect only to a grounding type receptacle. This product is provided
with a ground-fault circuit-interrupter. If replacement of the plug is needed, use only identical replacement parts.
WARNING - The unit is provided with a ground-fault circuit-interrupter (GFCI). To test the GFCI, push the test button.
The GFCI should interrupt power. Push the reset button. Power should be restored. If the GFCI fails to operate in this manner, the
GFCI is defective. If the GFCI interrupts power to the pump without the test button being pushed, a ground current is flowing,
indicating the possibility of an electric shock. Do not use this pump. Disconnect the pump and have the problem corrected by a
qualified service representative before using.
CAUTION - To reduce the risk of electric shock the pool must be installed no closer than 6 feet (1.8 m) from any
electrical outlet. Do not place portable appliances closer than 5 feet (1.5 m) from the pool.
DO NOT BURY CORD. Locate cord to minimize abuse from lawn mowers, hedge trimmers, and other equipment.
WARNING - To reduce the risk of electric shock, replace damaged cord immediately.
WARNING - To reduce the risk of electric shock, do not use extension cord to connect unit to electric supply; provide a
properly located outlet.
CAUTION:This pump is for use with storable pools only. Do not use with permanently-installed pools. A storable pool is
constructed so that it is capable of being readily disassembled for storage and reassembled to its original integrity. A
permanently-installed pool is constructed in or on the ground or in a building such that it cannot be readily disassembled for storage.
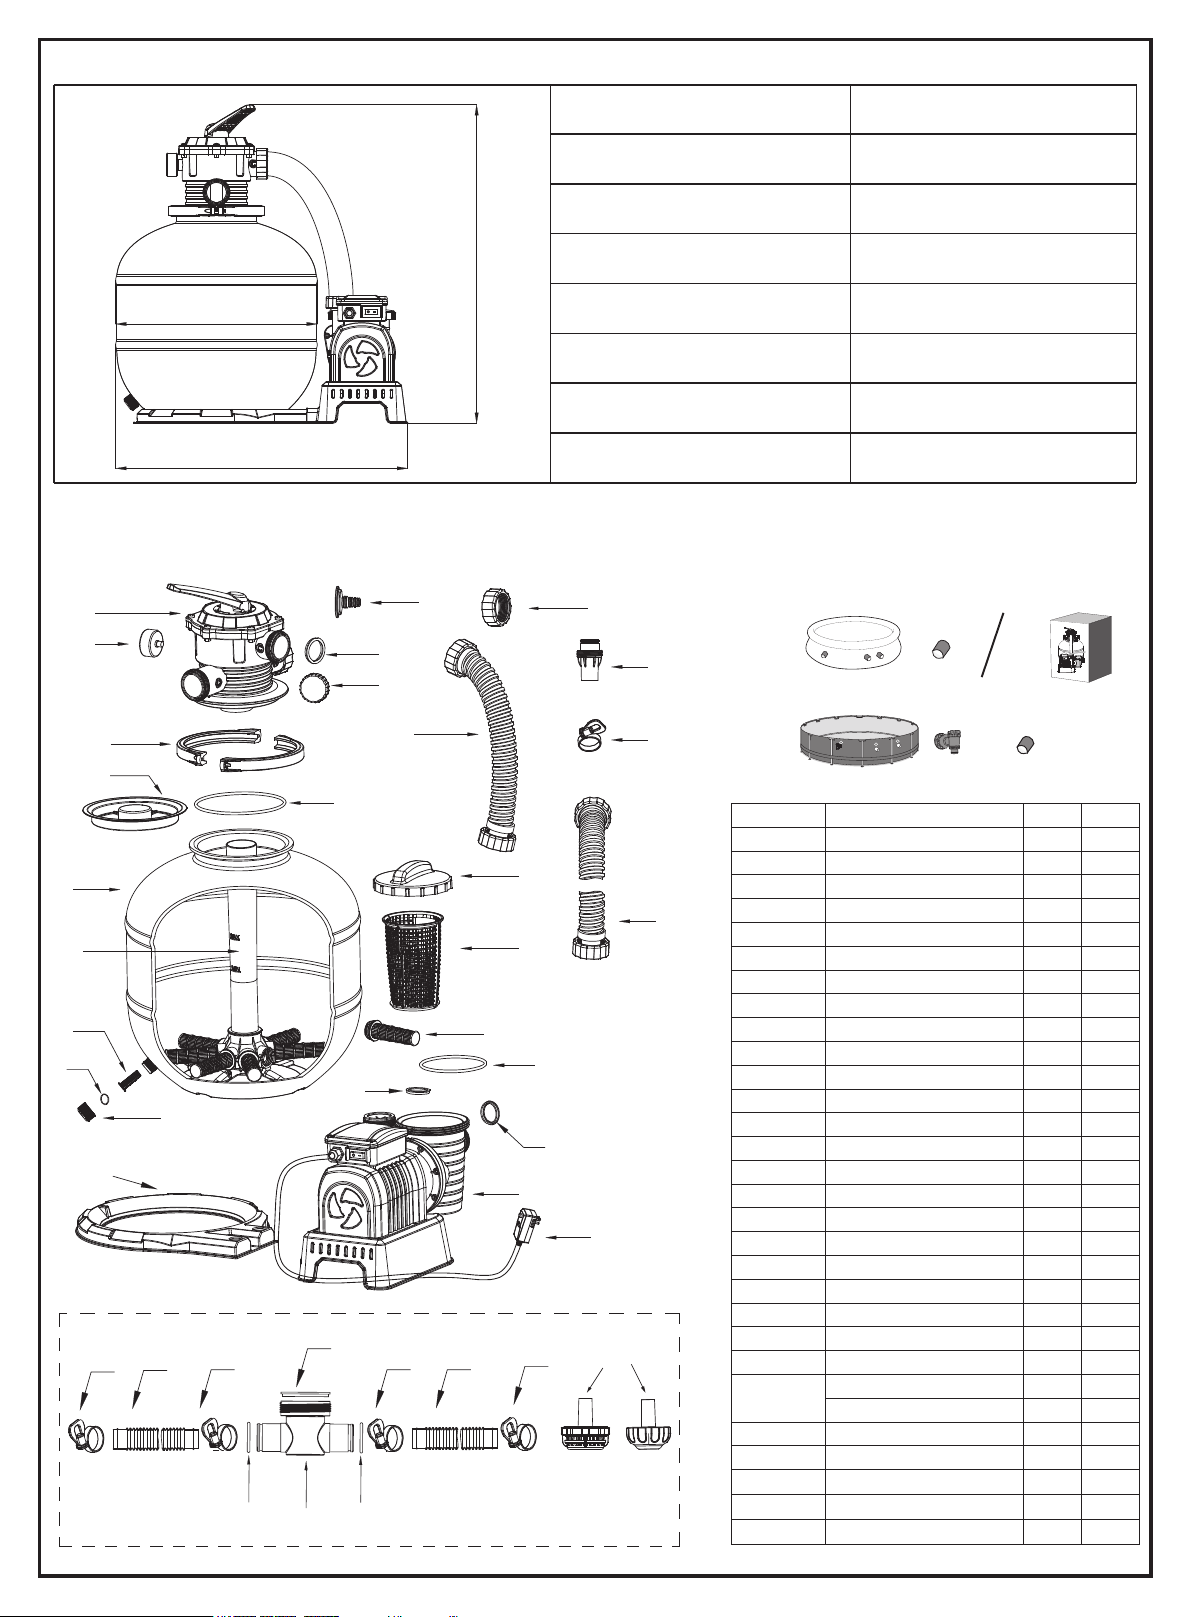
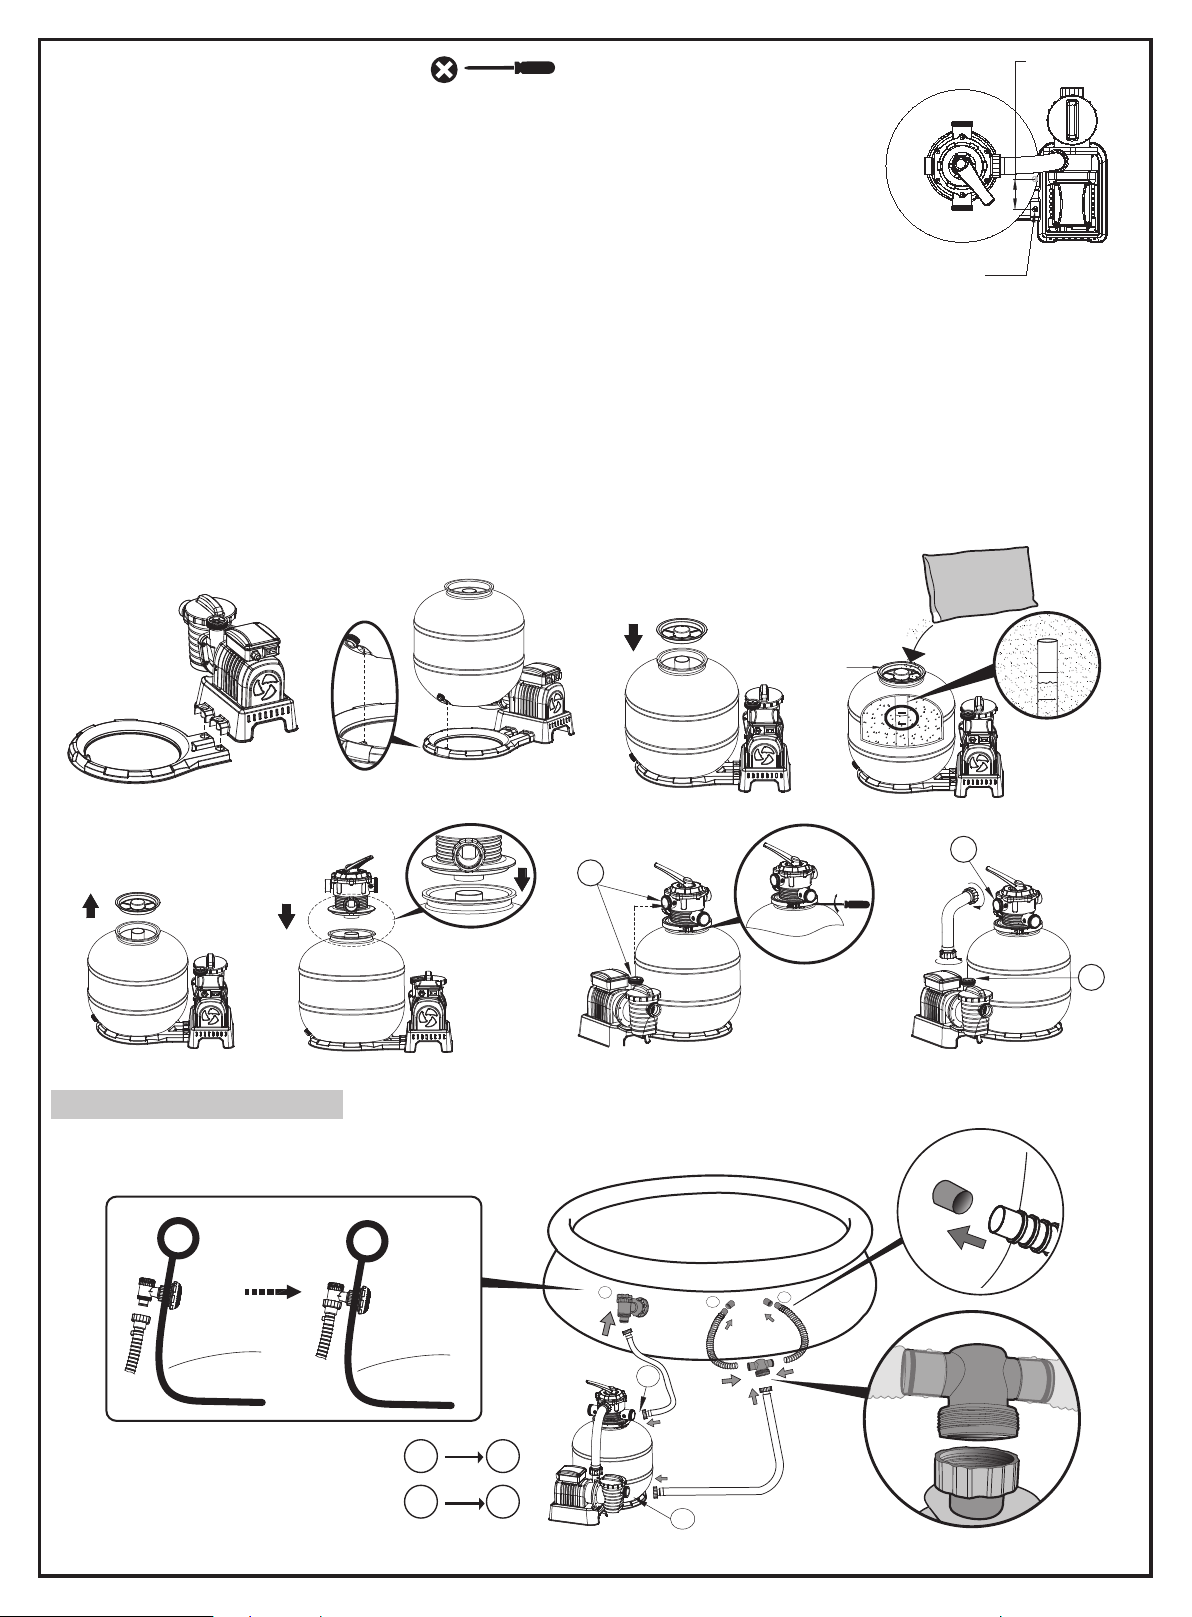
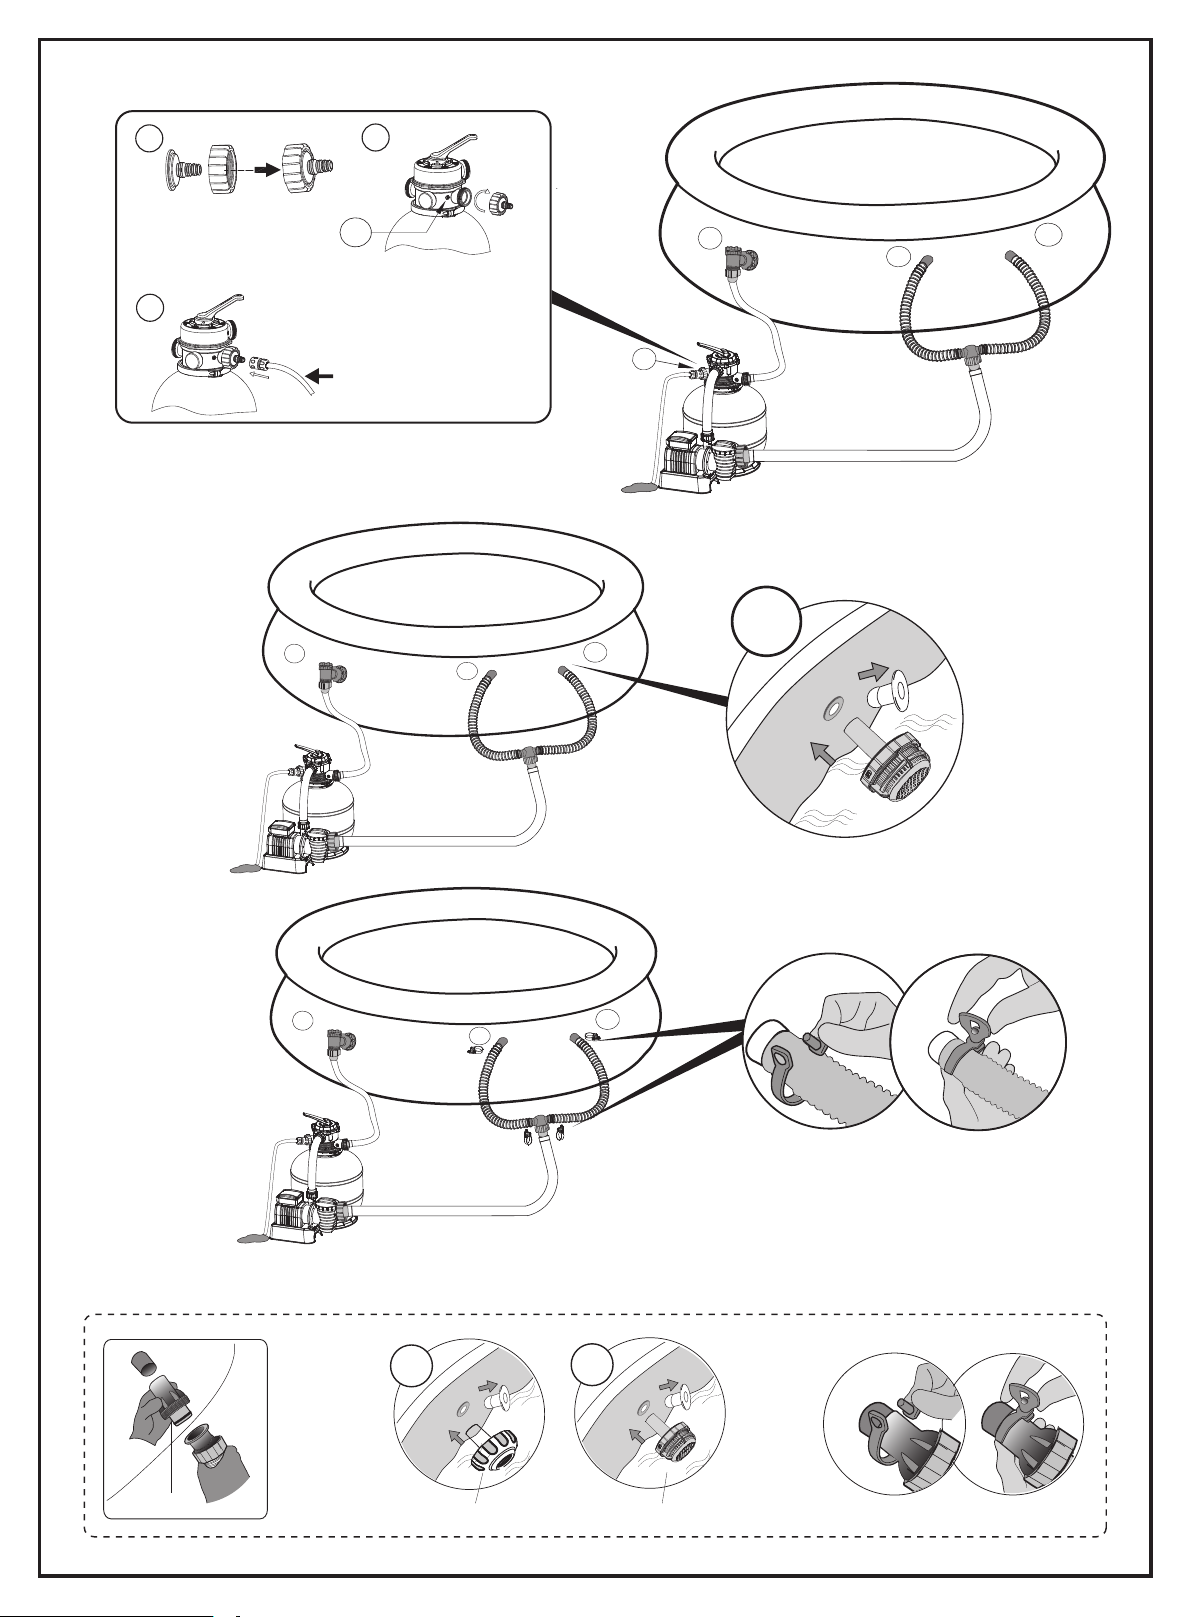
Please examine and verify all sand filter components are present before use. Notify Coleman at the customer service address listed
on this manual for any damaged or missing parts at the time of purchase.
• THERMALLY PROTECTED MOTOR. CSA ENCLOSURE 3
• FOR USE WITH SWIMMING POOLS ONLY.
• CAUTION: TO ENSURE CONTINUED PROTECTION AGAINST SHOCK HAZARD, USE ONLY IDENTICAL
REPLACEMENT PARTS WHEN SERVICING.
• WARNING:RISK OF ELECTRIC SHOCK. CONNECT ONLY TO A GROUNDING TYPE RECEPTACLE.
• CAUTION: THIS PUMP IS FOR USE WITH STORABLE POOLS ONLY - DO NOT USE WITH
PERMANENTLY-INSTALLED POOLS.
• CAUTION:CONNECT ONLY TO GROUNDING TYPE RECEPTACLE PROTECTED BY A CLASS A GROUND
FAULT CIRCUIT INTERRUPTER.
• CAUTION:FOR CONTINUED PROTECTION AGAINST POSSIBLE ELECTRIC SHOCK THIS UNIT IS TO BE
MOUNTED TO THE BASE IN ACCORDANCE WITH THE INSTALLATION INSTRUCTIONS.
• WARNING – RISK OF ELECTROCUTION
1) Connect Only To Properly Grounded Outlet. Do Not Remove Ground Pin
2) Inspect Cord Before Using – Do Not Use If Cord Is Damaged.
3) Keep Ground-Fault Circuit-Interrupter Dry And Off The Ground.
4) Do Not Touch Plug With Wet Hands
5) Double Insulated – When Servicing Use Only Identical Replacement Parts.
6) Read Instruction Manual Before Using.
DO NOT REMOVE THIS TAG.
SAVE THESE INSTRUCTIONS.
S-S-005018
2

Filter Diameter:
Effective Fiter Area:
Max. Operating Pressure:
Working sand filter pressure:
Max. Water Temperature:
Sand:
Sand Size:
Sand Capacity:
437mm
0.150m2(1.61ft2)
1.58Bar(23PSI)
<0.56Bar(8PSI)
35°C
Not included
#20 silica sand, 0.45-0.85mm
Approximately 35 kg
437mm
633mm
690mm
SPECIFICATIONS
PARTS REFERENCE OVERVIEW
Before assembling the sand filter, take a few minutes to become familiar with all the sand filter parts.
16
13
9
8
15
18
5
6
7
1
2
3
4
14
17
19
11
12
20
21
22
12
12
29
10
26
23
22
12
2222 27 27 22
2528 28
P6680
24
P61318
A
X2
X1
B
AB
B
X3
REF.NO SPARE PART NO.
1 P61204
2 P61138
3 P61205
4 P61209
5 P61213
6 P61206
7 P61211
8 P6581
9 P6580
10 P61212
11 P6614
12 P6029
13 P6540
14 P6560
15 P61214
16 P6561
17 P6562
18 P61210
19 P6563
20 P61494
21 P6916
22 P6124
23 P6517
P6680
P61318
25 P61408
26 P6615
27 P6005
28 P6019
29 P6783
A
1
1
2
1
1
1
1
1
1
1
1
6
1
1
1
1
1
8
1
1
2
5
2
2
1
1
1
2
2
1
24
B
1
1
2
1
1
1
1
1
1
1
1
6
1
1
1
1
1
8
1
1
2
4
2
2
0
1
1
2
2
1
S-S-005018
3

Assembly (You will need a screwdriver).
1. Carefully remove all components from the package and check to ensure nothing is damaged. If
equipment is damaged, immediately notify the retailer from where the equipment was purchased.
2. The sand filter should be placed on solid, level ground, preferably a concrete slab. Position the sand
filter so the Ports and Control Valve are accessible for operation, servicing and winterizing.
3. The sand filter to be vertically fixed on ground or a certain pedestal made of wood or concrete before
use to prevent the sand filter from accidentally falling. Fully assembled sand filter will exceed 35kg. The
mounting holes should be 8mm in diameter and spaced 86mm apart. Use two bolts and nuts with a
maximum of 8mm in diameter to fasten the sand filter to the pedestal.
Load pool-grade filter sand.
NOTE: Use only special pool-grade filter sand, free of all limestone or clay: #20 Silica sand 0.45-0.85mm, approximately one
35kg bag should suffice.
If you do not use the recommended size of filter sand, filtering performance will be reduced and the sand filter may damaged, thereby
voiding the warranty.
NOTE: To avoid damaging the Skimmer when adding sand, pour some water into the Bottom Tank to submerse the Skimmer on
the Hub.
NOTE: SAND NOT INCLUDED.
MAX.
MIN .
#20
0.45-0.85mm
C
C
C
4
MAX
MIN
Ф8mm
86mm
Connect to the pool
A
A
BB
B
A
B
A
B
1
S-S-005018
4

D
A
B
B
3
4
2
2
3
1
D
Garden hose (not included)
For Drain, Backwash,
Rinse function
A
B
B
A
B
B
B
For pool with 32mm(1.25in) valve
P61318 P6680
B
A
P6916
S-S-005018
5

GFCI Test
AC
RESET
TEST
RESET
TEST
B
RESET
TEST
D
A. To test the GFCI plug, insert it into a grounding type receptacle.
B. Press the “RESET” button; the indicator turns red.
NOTE: If the indicator light is not on, the test has failed.
C. Press the “TEST” button. The indicator turns off.
NOTE: If the indicator light is not off, the test has failed.
D. Press the “RESET” button, the indicator light turns red, and the sand filter is ready for use.
WARNING: RISK OF ELECTRIC SHOCK. THE GFCI MUST BE TESTED BEFORE EACH USE.
WARNING: DO NOT USE THE PUMP IF THE ABOVE TEST FAILS. Please contact your local Coleman Aftersales Service.
Before switching on, please read the manual carefully.
STOP
CONTROL VALVE OVERVIEW
WARNING: To prevent equipment damage and possible injury, always switch off
sand filter before changing the Control Valve function. Changing valve positions while the pump
is running can damage the Control Valve, which may cause personal injury or property damage.
How to Use the Control Valve:
Press down on the Control Valve handle and rotate to desired function.
OPERATION
Filter: This function is used to filter pool water and
should be positioned here 99% of the time. Water is
pumped through the sand filter, where it is cleaned
and returned to the pool.
B
C
B
A
Closed: This function stops water flowing
between the sand filter and the pool.
C
A
S-S-005018
6

NOTE:
• Be sure all provisions for wastewater disposal meet applicable local, state or national codes. Do not discharge water where it will
cause flooding or damage.
• When the Control Valve is set to the Backwash, Rinse, or Drain position, water will discharge from Port D on the Control Valve.
• Do not switch on or operate the sand filter with the Control Valve set to the Closed function or it will seriously damage the sand filter.
• Do not set the Control Valve between two functions, or it will lead to leaking.
• To avoid water leakage, screw the Port D Cap onto the Control Valve Port D before operating the filter or circulate function.
Air Release
Press down the control valve handle and wait untill the water flow from Port D to release the air.
NOTE: It is important to repeat this operation every time you start the pump after winterizing, maintenance and backwashing the
sand bed.
C
B
A
C
B
D
A
Drain: This function drains water from the pool; another
filter bypass setting, water is pumped and deposited out
of Port D, instead of returning it to the pool.
Circulate: This function circulates pool water
bypassing the sand filter; use this function if the filter
is broken to collect debris in the Debris Screens.
FIRST TIME USE INSTRUCTIONS
Backwash and Rinsing must be performed to prepare the pump for its first use and to wash the
sand.
CAUTION: DO NOT DRY RUN THE SAND FILTER
1. Press down on the Control Valve handle and rotate to the Backwash function.
2. Plug in and run the sand filter for 3-5 minutes, or until the water runs clear.
3. Switch off the sand filter and set the Control Valve to the Rinse function.
4. Switch on the sand filter and run the sand filter for 1 min. This circulates water backwards through the sand filter and drains water out
Port D.
5. Switch off the sand filter. Set the Control Valve to the Closed function.
6. Top up pool water if required.
IMPORTANT: This procedure removes water from the pool, which you’ll need to replace.
Switch off the sand filter immediately if water levels near the pool’s Inlet and Outlet valves.
Backwash Rinsing
C
B
A
C
B
D
A
D
Backwash: This function is used to clean the
sand bed; water is pumped down through the
Collector Hub, upwards through the sand bed, and
deposited out of Port D.
Rinse: This function for initial startup, cleaning, and
sand bed leveling after Backwash; water is pumped
downwards through the sand bed, up through the
Collector Hub and deposited out of the valve Port D.
S-S-005018
7

Sand Filter Maintenance
CAUTION: You must ensure the sand filter is switched off and unplugged before any
maintenance begins or severe risk of injury or death exists. As dirt builds up in the sand filter, the
pressure reading on Pressure Gauge will increase. When the Pressure Gauge is 0.56Bar (8.0PSI) or
higher, or water flow to the pool is too low, it is time to clean the sand. To clean the sand bed, follow all
instructions outlined previously in: Backwash and Rinsing.
NOTE:
1. The Pressure Gauge is just used for measuring the water pressure, not used for precision measurement.
2. We recommend you clean the sand bed once a month or less regularly depending on how often the pool is used. Do not clean the
sand too frequently.
Lowering or Draining Pool Water
1. Switch off the sand filter and set Control Valve to the Drain function.
2. Detach the Hose from the connection valve’s Port A and sand filter Port A and attach to Port D.
3. Switch on the sand filter and press the “RESET” button to run the filter and remove the pool water.
WARNING: DO NOT DRY RUN THE SAND FILTER.
Winterization and long-term storage
In areas that have freezing winter temperatures, pool equipment must be winterized to protect against damage. Allowing water to freeze
will damage the sand filter and void warranty.
1. Backwash the sand filter.
2. Drain the pool according to the pool owner’s manual.
3. Unscrew the drain valve cap at the bottom of the tank and release the remaining water.
4. Disconnect the two Hoses from the pool and the sand filter.
5. Completely spill the sand out of the tank and dry all components.
6. Move away sand filter from pool area, store the sand filter in a dry indoor location out of child’s reach.
Cleaning the Strainer
1. Switch off the sand filter and set the Control Valve to the Closed function.
2. Close the connection valves.
3. Remove the Strainer Cover by unscrewing it.
4. Take out the Strainer, remove any debris.
5. Put the Strainer back into position. Ensure the hole in the strainer is aligned.
6. Ensure the Seal Ring is in place. Secure the Strainer Cover back.
7. Open the connection valves.
NOTE: The Strainer must be emptied and cleaned periodically. A dirty or blocked strainer will
reduce the performance of the sand filter.
1. Now the sand filter is ready for use. Set the Control Valve to the Filter function.
NOTE: To prevent the risk of electrical shock dry any excess water from yourself and the sand filter.
IMPORTANT: Before operation, make sure the tank is placed steadily on its base and
connected correctly to the pump.
2. Switch on the sand filter to run it.
NOTE: The sand filter has now started its filtering cycle. Check that water is returning to the pool and
take note of the filter pressure on Pressure Gauge. Generally, the recommended sand filter pressure is less
than 0.56Bar (8.0PSI) when it is running.
1.6
0
5
10 15
20
1.4
1.2
1
0.8
0.6
0.4
0.2
0
psi
bar
23
1.6
0
5
10 15
20
23
1.4
1.2
1
0.8
0.6
0.4
0.2
0
psi
bar
S-S-005018
8

Problems Probable Causes Solutions
Sand is flowing to
the pool
- Recommend 0.45mm to 0.85mm #20 silica sand
- Stop the sand filter every time set the control valve
- Check if the level of the sand is between the marked “MAX”
and “ MIN” on the collector hub
- Replace the skimmer
Sand Filter does not
operate - GFCI broken - Contact your local Coleman Aftersales Service point to get
instructions
No water flow
Excessive filter
pressure
- Dirty filter
- Calcified sand bed
- Insufficient backwashing
- The pressure gauge is broken
- Backwash
- Inspect sand and change if necessary
- Backwash until water runs clear
- Replace the pressure gauge
Control Valve leaks
from the port D
Connectors leak
- Control Valve is set between two functions
- The gasket is broken
- Set to one function
- Replace the gasket
- Washer of the connectors not in place
- Washer of the connectors broken
- O-ring on the hose connection is broken
- Loose Hoses
- Reposition the washer
- Replace the washer
- Replace the o-ring
- Tighten them
- Stopper plugs are not removed
- Air was not released
- The control valve is set to Closed
- The strainer is blocked
- Sand filter broken
- Remove the stopper plugs and insert the debris screens
- Release the air
- Set to filter function
- Clean the strainer
- Call for service
- Sand is too small
- Move the control valve from the backwash
to the filter function without stopping the
sand filter
- The level of the sand is too high
- The skimmer is broken
TROUBLESHOOTING
S-S-005018
9

S-S-005018
10
BATCH NUMBER:
TO: Bestway®Service Department
Date of purchase:
Date:
Customer Code Number:
Please copy the Batch Number found on the body of the sand filter.
The product you have purchased comes with a limited warranty. Bestway®stands behind our quality guarantee and assures, through a replacement
warranty, your product will be free from manufacturer’s defects.
The limited warranty is valid as follows:
360 days for the motor pumps, 30 days for hoses, fitting and accessory (included in the package), all from the original date of purchase.
To file a warranty claim, this form must be completed and submitted with a copy of your receipt/purchase and emailed to
Please contact your Bestway®After Sales Center at 1-855-838-3888 before sending any documents, and they will provide full instructions of what is
needed for your claim. Bestway®is not responsible for economic loss due to water or chemical costs and will not replace any products deemed to have
been neglected or used outside of the owner’s manual guidelines. Bestway’s warranty covers manufacturing defects discovered while unpacking the
product or during use, as recommended within the user manual. This warranty applies only to products that have not been modified by any 3rd parties. The
product must be stored and handled in accordance with the technical recommendations.
The warranty does not cover damages caused by misuse, abuse, neglect, including but not limited to: collision, fire, excessive heat exposure, improper use
of chemicals, exposure to extreme weather conditions, improper installation, or improper storage.
Replacements and repairs don’t extend the duration of warranty. The warranty start date is the date of sale shown on the original receipt/purchase invoice.
•
L
I
M
I
T
E
D
•
•
W
A
R
R
A
N
T
Y
•
360 DAYS ON PUMP
Please Clearly Write Your Item Code:
Website: www.bestwaycorp.com
Toll-Free:1-855-838-3888
Please provide your address details in full.
Note: Incomplete address details will result in delayed shipments.
Bestway®reserves the right to charge for redelivery of undelivered packages where the recipient is at fault.
REQUIRED INFORMATION - PLEASE WRITE THE SHIPPING ADDRESS
Name:
Zip code: Retailer:
Mobile:
Fax:
Address:
City: Country / State:
Telephone:
E-mail:
Bestway®reserves the right to request photographic evidence of defective parts, or to require sending the item for additional testing. In order to best assist
you, we request all information you provided to be complete.
FOR FAQ, MANUALS, VIDEOS OR SPARE PARTS, PLEASE VISIT OUR WEBSITE: www.bestwaycorp.com
VIDEOS ARE ALSO AVAILABLE ON OUR BESTWAY CHANNEL ON YOUTUBE: www.youtube.com/user/BestwayService
IMPORTANT: ONLY THE DAMAGED PART WILL BE REPLACED, NOT THE COMPLETE SET.
Batch
Number
Batch
Number
Batch
Number
SANDFILTER WITH OZONATOR MODEL
#XXXXXX
Item Code
#XXXXXXSAND FILTER MODEL
YY/MM/DD
Batch
Number

11
S-S-005018

© 2015 The Coleman Company, Inc.
and are registered trademarks of The Coleman Company, Inc., used under license.
Manufactured by
©2015 Bestway (USA) Inc., 3411 E. Harbour Drive, Phoenix, Arizona 85034, United States of America
®™ Trademarks used in some countries of the world under license to
Bestway Inflatables & Material Corp., No.3065 Cao An Road, Shanghai, 201812, China
www.bestwaycorp.com
S-S-005018
Table of contents
Popular Water Filtration System manuals by other brands

Waterdrop
Waterdrop WD-UB system installation instructions

Hydac
Hydac OXiStop OXS-LID/C202 Installation and maintenance instructions

G&G
G&G RPGG 20x50-EX Manual for use

UV Pure Technologies
UV Pure Technologies Hallett instructions

ELGA
ELGA PURELAB flex 1 Service manual

Kohler
Kohler K-6665 installation guide