Comelit IPNVR006A User manual

1
16-25-36 INPUTS H264 STAND-ALONE
NETWORK VIDEO RECORDER
QUICK GUIDE
ART. IPNVR006A
IPNVR025A
IPNVR036A
Please read this manual thoroughly before use and keep it for future reference

2
Technical parameters
Model
IPNVR006A-IPNVR025A-IPNVR036A
Operation
Embedded Linux operation system
Operation system
Graphical user interface (GUI), mouse, front button, remote control
Imagine compression
H.264
Recording mode
Manual, Scheduled, Event
Video Search
Time, Event, Channel, Log
Backup
Network, USB
Video input
RJ45
Video output
VGA, HDMI
Motion Detection
each channel can set the detection area and the multi-level
sensitivity
Image display
1/4/9/16
Video Save
HDD, network
HDD interface
SATA
USB Interface
2 x USB2.0
Power
100-240 VAC / 50-60 Hz

3
HDD Installation
Make sure to install the HDD when You first use it.
.
Front Panel Description
1. HDD led 9. PLAY: Playback key
2. State led, reserved 10. ESC: Exit key
3. 1 ~ 8: CH1 ~ CH8 Single-Screen keys 11. MENU: Menu key
4. ▲▼◄►: Direction key 12. : Confirm key
5. POWER led 13. N.C.
6. IR receiver
7. QUAD key
8. REC: Manual recording key
IPNVR006A front panel

4
1. POWER led 9. ESC: Exit key
2. HDD led 10. MENU: Menu key
3. REC: Manual recording key 11. ▲▼◄►: Direction key, : Confirm key
4. FN key 12. N.C.
5. PLAY: Playback key
6. ON/OFF key
7. Multi-Screen key
8. Single-Screen keys
Rear Panel Description
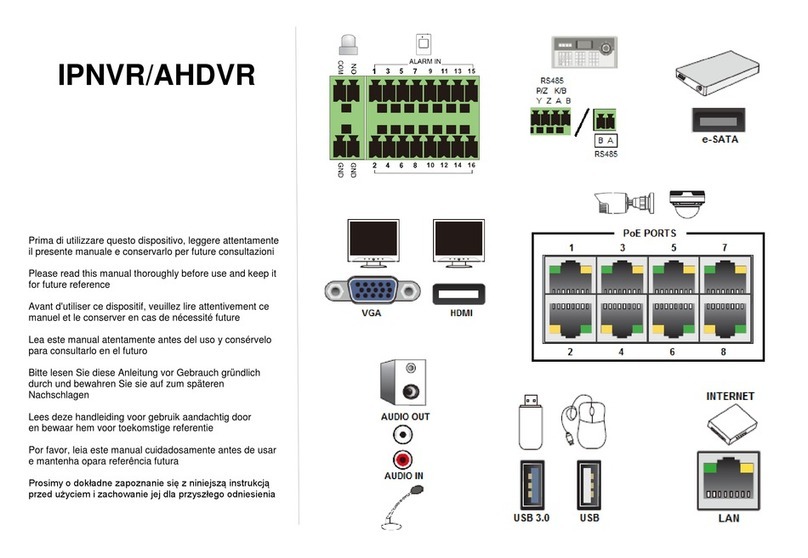
NET: 10/100/1000 Mbit/sec. standard Ethernet port DC12V: 12 VDC power supply connector
VGA: VGA video output connector HDMI video output
USB: 2 x USB connectors Audio IN/Audio out: audio input/output connectors
Operating System Description
Turn ON / OFF
Confirm that AC voltage matches with NVR .Ensure that the NVR power outlet connect with a good
middle ground grounding. After switching power, the device started,【POWER】light is on. Turn into
system, if the panel status light flashing ,it's normal conditions.
Note: default username is admin, default password is empty.
IPNVR025A-IPNVR036A front panel

5
Main Menu Introduction
Press MENU key or right mouse, it will pop-up the main menu. Main menu consists of the following
components:
Split screen: select corresponding preview mode in the menu column.
Shortcut menu: in menu column, there are: Video Manage, System setup, Video playback, Video
backup, Color adjust, PTZ control, Manual record, Volume, Setup Wizard, System
mode, Fast network, Exit system. User could enter the corresponding menu preview
mode.
System mode
In the shortcut menu, click "System Mode", the following screen appears:
IPNVR006A
You can choose between 4different modes:
A - 16 channels 1080p mode (720p, 960p and 1080p cameras).
B –16 channels hybrid mode (10 cameras 720p, 960p, 1080p and 6 cameras 3MP, 4MP, 5MP).
C –6 channels 5MP mode (720p, 960p, 1080p, 3MP, 4MP, 5MP cameras)
D –16 channels 3MP mode (720p, 960p, 1080p and 3MP cameras)

6
IPNVR025A
You can choose between 5different modes:
A - 25 channels 1080p mode (720p, 960p and 1080p cameras).
B - hybrid mode 25 channels-1 (21 cameras 720p, 960p, 1080p and 4 cameras 3MP, 4MP, 5MP).
C - hybrid mode 25 channels-2 (17 cameras 720p, 960p, 1080p and 8 cameras 3MP)
D –16 channels 5MP mode (720p, 960p, 1080p, 3MP, 4MP and 5MP cameras)
E –16 channels 3MP mode (720p, 960p, 1080p and 3MP cameras)
IPNVR036A
You can choose between 6different modes:
A - hybrid mode 36 channels (35 cameras 720p, 960p, 1080p and 1 camera 3MP, 4MP, 5MP).
B - hybrid mode 25 channels-1 (21 cameras 720p, 960p, 1080p and 4 cameras 3MP, 4MP, 5MP).
C - hybrid mode 25 channels-2 (17 cameras 720p, 960p, 1080p and 8 cameras 3MP).
D –16 channels 5MP mode (720p, 960p, 1080p, 3MP, 4MP and 5MP cameras)
E –16 channels 3MP mode (720p, 960p, 1080p and 3MP cameras)
F –36 channels 1080p mode (720p, 960p and 1080p cameras).
The cameras 3MP/4MP/5MP must be registered mandatory on the first channels!

7
General setup
Choose the "General setup" and turn into it's setup interface.
Time Setup:the real time when preview, click ”Refresh” after setting, make sure saving when it
shows ”the recording will stop once you modify the time” and save the setting.
Auto Logout: the present user will be logged off if there is no operation within 10 minutes, and it
needs login again.
Key Buzzer:enabled, there is sound with the controller or pressing key on front panel. Disabled,
without sound.
Language:there is multiple choices according to users, English and so on.
Remote ID:user can use this ID to control the NVR by remote controller. The remote controller
should be correspond with the ID so that it can work.
After setting finished, click "Ok", the information will be saved. Click "Cancel" to exit without saving.
Video manage
Before connecting and set up IPC, please confirm that IPC is already connected to LAN.
Right click on the preview interface, pop-up shortcut interface, click “Video manage".
Add one: add the selected camera
Auto Add: add all cameras detected
Delete: delete the selected connected IPC

8
Delete All: delete all the connected IPC
Manual Edit: modify the IPC parameters of the selected IPC
After finish setup, click “ Ok” button, it will be saved; click: “Cancel” button, it will be not save
Record Setup
Select “Record setup”.
Channel:chose the channels as needed by clicking the inverted triangle
Weekday: chose the day as needed, "ALL" means all days in a week.
Schedule:every time slot can set different recording modes in all 4 time slot. "Time" recording with
red color, "Motion" recording with green color, "Sensor" recording with yellow color; “☑" means
enabled, “□” means disabled. The bottom parts has times status display, whole schedule from time
0~24 hours
Copy to:select the target channel on the right of "copy to "button, click "copy to" and ''Ok" to set
the current channel setup informations to other target video channel. By clicking the button "Cancel",
the setup informations are non-saved.
Network setup

9
Select “network setup”.
DHCP:choose to enable to obtain IP address automatically. "☑" means enabled ,"□" means
disabled
Cloud (P2P):after connecting internet , click“☑Cloud (P2P)” to gain a ID , which can be used in IP
remote monitoring in ESeenet network server
IP address:the IP address must be unique and cannot be in conflict with the host or workstation on
the same network segment
Subnet mask:subnet for the network segment.
Gateway:need to set the gateway address to achieve communication between the different
network segments.
MAC address:showing the device's MAC address
Preferred DNS:DNS IP address
Web port:port number IE browser visit, default port is "80"
PPPOE
Start using:“☑PPPOE” means to start up PPPOE dial-up. “□” means not to start up
Username:input the user name of ISP into edit box
Password:input the password of ISP into edit box
After the page setup is completed, click '"Ok" to save the changes; click "Cancel ", non-save.
DDNS
Automatic analytical function of dynamic domain name, supported Comelit DNS, etc. To use Comelit
DNS see the last page of this manual.
In the "network setup" menu, click " DDNS "
Start using:“☑”means DDNS dynamic domain services start using: “□”means not to start up.
Select the right network server and input user name, password and domain
System logout
In the main menu, click "System logout", popup setting interface
Logout: apply for logging users. After logout, if you want to use the device again, need to login
again
Reboot: it will reboot after "OK".
Shutdown: shutdown the NVR

10
Esee User Manual
1. Connect DVR with network, make sure network working fine
2. For remote view in computer, go to www.dvrskype.com or www.e-seenet.com
Do the following setup before you log in Esee on computer
Note: Internet Explorer setting. If use it for the first time and the software can't load, then
need to make the following setting: Internet options Safety-Internet Custom options
pick Active X and plugin all for opening, click ok.
1. Go to www.dvrskype.com or www.e-seenet.com,input Esee ID, user name and password, this
user name and password is same with DVR user name and password
Note: the default user name is admin, no password
Video monitoring homepage:
Monitoring homepage including: preview window, PTZ control, preview, stream selection, channel
opening, setting, playback, user logout, as below:

11
Open preview:click the target channel with mouse left. Double click the channel can open or close
the correspond preview channel, such as: open; close.
Preview mode: click to choose the mode or double click preview window to switchover
into multi-channel mode
NOTE: to view images of NVRs art. IPNVR006A, IPNVR025A and IPNVR036A from
smartphones (iOS or Android OS) please use the app "Comelit View S" which is freely
downloadable from the relative stores (Apple Store and Google Play). The same app for
smartphones has to be used for tablet devices.
COMELIT DNS SERVICE
For this series of NVR is now available the Comelit DNS service.
To use it proceed as follows:
1 –check the firmware version of the device. If necessary, update the firmware
2 –verify that, on the device, nearby the label showing the model, is present the label with the
univocal code for the DNS service registration. In case it was not present, contact Comelit
Technical support
3 –connect to the site http://www.comelitdns.com, sign up by following the instructions and then
create a host using the activation code above
4 –enter the data (hostname, user and password) in the appropriate NVR menu
5 –to connect to the device registered, enter http://hostname.comelitdns.com:port (if different from
80)

12
NVR H264 STANDALONE
A 16-25-36 INGRESSI
GUIDA RAPIDA
ART. IPNVR006A
IPNVR025A
IPNVR036A
Leggere questo manuale prima dell’uso e conservarlo per consultazioni future

13
Caratteristiche tecniche
Modello
IPNVR006A-IPNVR025A-IPNVR036A
Sistema operativo
Embedded Linux
Operatività
Graphical user interface (GUI), mouse, pulsanti, telecomando
Compressione
H.264
Mod. registrazione
Manuale, Programmata, Evento
Ricerca registrazioni
Orario, Evento, Canale, Log
Backup
Rete, USB
Ingressi video
RJ45
Uscite video
VGA, HDMI
Motion Detection
Impostazione dell'area e della sensibilità per ogni singolo canale
Visualizzazioni
1/4/9/16
Salvataggio dei video
HDD, rete
Interfaccia HDD
SATA
Interfacce USB
2 x USB2.0
Alimentazione
100-240 VAC / 50-60 Hz

14
Installazione del disco rigido
Prima dell'uso, accertarsi di installare l'unità disco rigido (HDD).
1
.
Descrizione dei pannelli frontali
1. Led HDD 9. PLAY: tasto riproduzione
2. Led di stato, riservato 10. ESC: tasto Esci
3. 1 –8: tasti pieno schermo CH1 –CH8 11. MENU: tasto menu
4. ▲▼◄►: tasti direzionali 12. : tasto di conferma
5. PW: led di alimentazione 13. N.C.
6. Ricevitore IR
7. Tasto QUAD
8. REC: tasto registrazione manuale
1. Smontare le viti di fissaggio della
copertura superiore del dispositivo.
2. Collegare il cavo dati del disco
rigido.
3. Collegare il cavo di alimentazione
del disco rigido.
4. Collocare il disco rigido nella posizione
corrispondente all'interno dell'apparecchio.
5. Fissare le viti del disco rigido.
6. Fissare le viti della copertura
superiore.
Pannello frontale IPNVR006A

15
1. PW: led di alimentazione 9. ESC: tasto Esci
2. Led HDD 10. MENU: tasto menu
3. REC: tasto registrazione manuale 11. ▲▼◄►: tasti direzionali, : tasto di conferma
4. Tasto FN 12. N.C.
5. PLAY: tasto riproduzione
6. Tasto ON / OFF
7. Tasto multi-schermo
8. Tasti pieno schermo
Descrizione pannello posteriore
NET: porta Ethernet 10/100 Mbit/sec.10/100/1000 Mbit/sec. DC12V: connettore alimentazione 12 Vcc
VGA: connettore uscita video VGA uscita video HDMI
USB: connettori USB Audio IN/Audio out: connettori ingressi/uscita audio
Descrizione dell'operatività
Accensione/Spegnimento
Verificare che la tensione AC disponibile corrisponda a quella del NVR. Accertarsi inoltre che alla
presa elettrica del NVR sia collegato un cavo di alimentazione provvisto della corretta messa a terra.
Dopo aver acceso l'alimentazione, il dispositivo si avvia e il LED【POWER】si illumina. Se la spia
luminosa di stato sul pannello lampeggia, indica una condizione normale.
Nota: il nome utente di default è: admin, la password di default è vuota.
Pannello frontale IPNVR025A-IPNVR036A

16
Introduzione al menu principale
Premere il tasto MENU o il tasto destro del mouse per visualizzare il menu principale. Il menu
principale è costituito dai seguenti componenti:
Sudd. schermo: è possibile selezionare la corrispondente modalità di anteprima da ciascun
elemento disponibile.
Menu di scelta rapida: include Gest. Video, Configurazione, Riproduzione video, Backup video,
Regol. colore, Controllo PTZ, Reg. manuale, Volume, Procedura guidata, Sistema,
Conf. rapida rete e Uscita sistema. L'utente può accedere alla corrispondente
modalità di anteprima tramite menu.
Sistema
Nel menu di scelta rapida, fare clic su "Sistema", viene visualizzata la schermata seguente:
IPNVR006A
E' possibile scegliere tra 4 differenti modalità:
A –modalità 16 canali 1080p (telecamere 720p, 960p e 1080p).
B –modalità ibrida 16 canali (10 telecamere 720p, 960p, 1080p e 6 telecamere 3MP, 4MP, 5MP).
C –modalità 9 canali 5MP (telecamere 720p, 960p, 1080p, 3MP, 4MP e 5MP).
D –modalità 16 canali 3MP (telecamere 720p, 960p, 1080p e 3MP)

17
IPNVR025A
E' possibile scegliere tra 5 differenti modalità:
A - modalità 25 canali 1080p (telecamere 720p, 960p e 1080p).
B –modalità ibrida 25 canali-1 (21 telecamere 720p, 960p, 1080p e 4 telecamere 3MP, 4MP, 5MP).
C –modalità ibrida 25 canali-2 (17 telecamere 720p, 960p, 1080p e 8 telecamere 3MP).
D –modalità 16 canali 5MP (telecamere 720p, 960p, 1080p, 3MP, 4MP e 5MP)
E –modalità 16 canali 3MP (telecamere 720p, 960p, 1080p e 3MP).
IPNVR036A
E' possibile scegliere tra 6 differenti modalità:
A –modalità ibrida 36 canali (35 telecamere 720p, 960p, 1080p e 4 telecamere 3MP, 4MP, 5MP).
B - modalità ibrida 25 canali-1 (21 telecamere 720p, 960p, 1080p e 4 telecamere 3MP, 4MP, 5MP).
C - modalità ibrida 25 canali-2 (17 telecamere 720p, 960p, 1080p e 8 telecamere 3MP).
D –modalità 16 canali 5MP (telecamere 720p, 960p, 1080p, 3MP, 4MP e 5MP).
E –modalità 16 canali 3MP (telecamere 720p, 960p, 1080p e 3MP)
F –modalità 36 canali 1080p (telecamere 720p, 960p e 1080p).
Le telecamere 3MP/4MP/5MP devono essere obbligatoriamente registrate sui primi canali!

18
Impostazioni generali
Selezionando "Configurazione" è possibile passare alla pagina di interfaccia "Generali".
Imp. orario: orario di visualizzazione del NVR. Dopo aver effettuato l'impostazione fare clic su
"Refresh", verrà visualizzato il messaggio "La registrazione verrà fermata una volta
modificato l'orario".
Logout automaticao: Il NVR effettua automaticamente la disconnessione in assenza di attività entro
10 minuti. Nel caso sarà necessario effettuare nuovamente l'accesso.
Buzzer: Abilita: la pressione di un tasto sul telecomando o sul pannello anteriore genera un riscontro
acustico; Disabilita: non viene emesso alcun suono.
Lingua: consente di selezionare la lingua, per es. Italiano, Inglese, ecc.
ID remoto:è possibile utilizzare questo identificativo numerico per controllare il NVR tramite
telecomando. Per un corretto funzionamento, l'ID del telecomando deve corrispondere
all'ID qui impostato.
Dopo aver completato le impostazioni, fare clic su "Ok" per salvarle. Fare clic su " Annullare" per
uscire senza salvare le impostazioni effettuate.
Gestione video
Prima di impostare la telecamera, verificare che sia connessa alla rete LAN.
Cliccando con il tasto destro del mouse sull'interfaccia di anteprima, compare il menu di scelta
rapida. Cliccare "Gest. video".

19
Agg. singola: connette al NVR la telecamera selezionata
Agg. autom: connette al NVR tutte le telecamere visualizzate.
Elimina canale: cancella la telecamera selezionata.
Elimina tutto: cancella tutti i canali
Mod. manuale: modifica i parametri della telecamera selezionata
Dopo aver completato le impostazioni, fare clic su "Ok" per salvarle. Fare clic su "Annullare"
per uscire senza salvare le impostazioni effettuate.
Impostazioni della registrazione
In Configurazione selezionare "Registrazione".
Canale: è possibile selezionare il canale di destinazione, facendo clic sulla corrispondente casella di
selezione.
Giorno: selezionare il giorno della settimana in base alle proprie esigenze; "TUTTI" indica che la
registrazione è effettuata tutti i giorni.
Programmazione:tramite le apposite caselle disponibili è possibile selezionare diversi orari di
registrazione e le relative modalità di registrazione. La registrazione di tipo "Oraria" è indicata in
colore rosso, la registrazione di tipo "Motion" (rilevamento del movimento) in colore verde e quella di
tipo "Sensore" in colore giallo; indica la selezione del parametro corrispondente e "□" il
caso opposto. Il periodo di programmazione della registrazione è rappresentato graficamente con una
barra corrispondente all'intervallo [0~24] ore
Copia in: cliccare il pulsante e selezionare il canale di destinazione e fare clic sul pulsante ''Ok". Il
sistema procede quindi a copiare le impostazioni del canale corrente sul canale di destinazione.
Fare clic sul pulsante "Annullare" per non salvare le impostazioni effettuate e uscire.

20
Impostazioni di rete
In Configurazione selezionare "Rete".
DHCP: selezionare il protocollo DHCP per ottenere automaticamente l'indirizzo IP. indica
l'attivazione del parametro, "□" indica il caso opposto
ESee (P2P):dopo aver effettuato correttamente il collegamento a Internet , fare clic su Esee
(P2P)" e salvare l'impostazione, si otterrà un ID (identificativo). Con tale ID è possibile effettuare il
controllo remoto tramite il server ESeenet
Indirizzo IP: è necessario che l'indirizzo IP sia unico e non sia in conflitto con host o workstation
nello stesso segmento di rete
Subnet Mask: utilizzata per differenziare il segmento di rete.
Gateway: per stabilire la comunicazione tra i diversi segmenti di rete è
necessario impostare l'indirizzo di gateway.
MAC address: indirizzo MAC del dispositivo
DNS primario: indirizzo IP del server DNS
Porta Web: numero di porta utilizzato per l'accesso da browser (IE); il valore predefinito è "80".
PPPOE
(Avvia): PPPOE" indica l'avvio della connessione dial-up tramite protocollo
PPPOE. "□" indica il relativo arresto.
Nome utente:immettere il nome utente dell'ISP nell'apposita casella di modifica
Password:immettere la password utente dell'ISP nell'apposita casella di modifica
Dopo aver completato le impostazioni, fare clic su '"OK " per salvare le modifiche effettuate e uscire
oppure fare clic su "Annullare" per uscire.
Other manuals for IPNVR006A
1
This manual suits for next models
2
Table of contents
Languages:
Other Comelit Network Hardware manuals

Comelit
Comelit IPNVR016A User manual

Comelit
Comelit 1468 User manual

Comelit
Comelit IPNVR064A08NBSL User manual

Comelit
Comelit IPNVR004BPOE User manual

Comelit
Comelit IPNVR006A User manual

Comelit
Comelit IPNVR916A User manual

Comelit
Comelit IPNVR045A User manual

Comelit
Comelit Nvr 2.0 User manual

Comelit
Comelit IPNVR004CPOE User manual