Comflex Ultimate Series Installation guide

Operating and Care Instruction Manual
Comflex™ Care Recliner Series
CRN, CRS
Manual or Electric Function
Range
ULTIMATE

User Manual Careleda P/L M-03 WI-364rev0 Edited 26.02.2020 2 | P a g e
CAREFULLY READ AND UNDERSTAND INSTRUCTIONS BEFORE USING CHAIR
This manual MUST be read and understood before use of this product.
The use of this system is only part of an overall care plan. The patient must still be repositioned
regularly (subject to specific requirements).
Do not force the operation of any part of the chair. Doing so may cause damage. Refer to the
manual for correct operation of the chair.
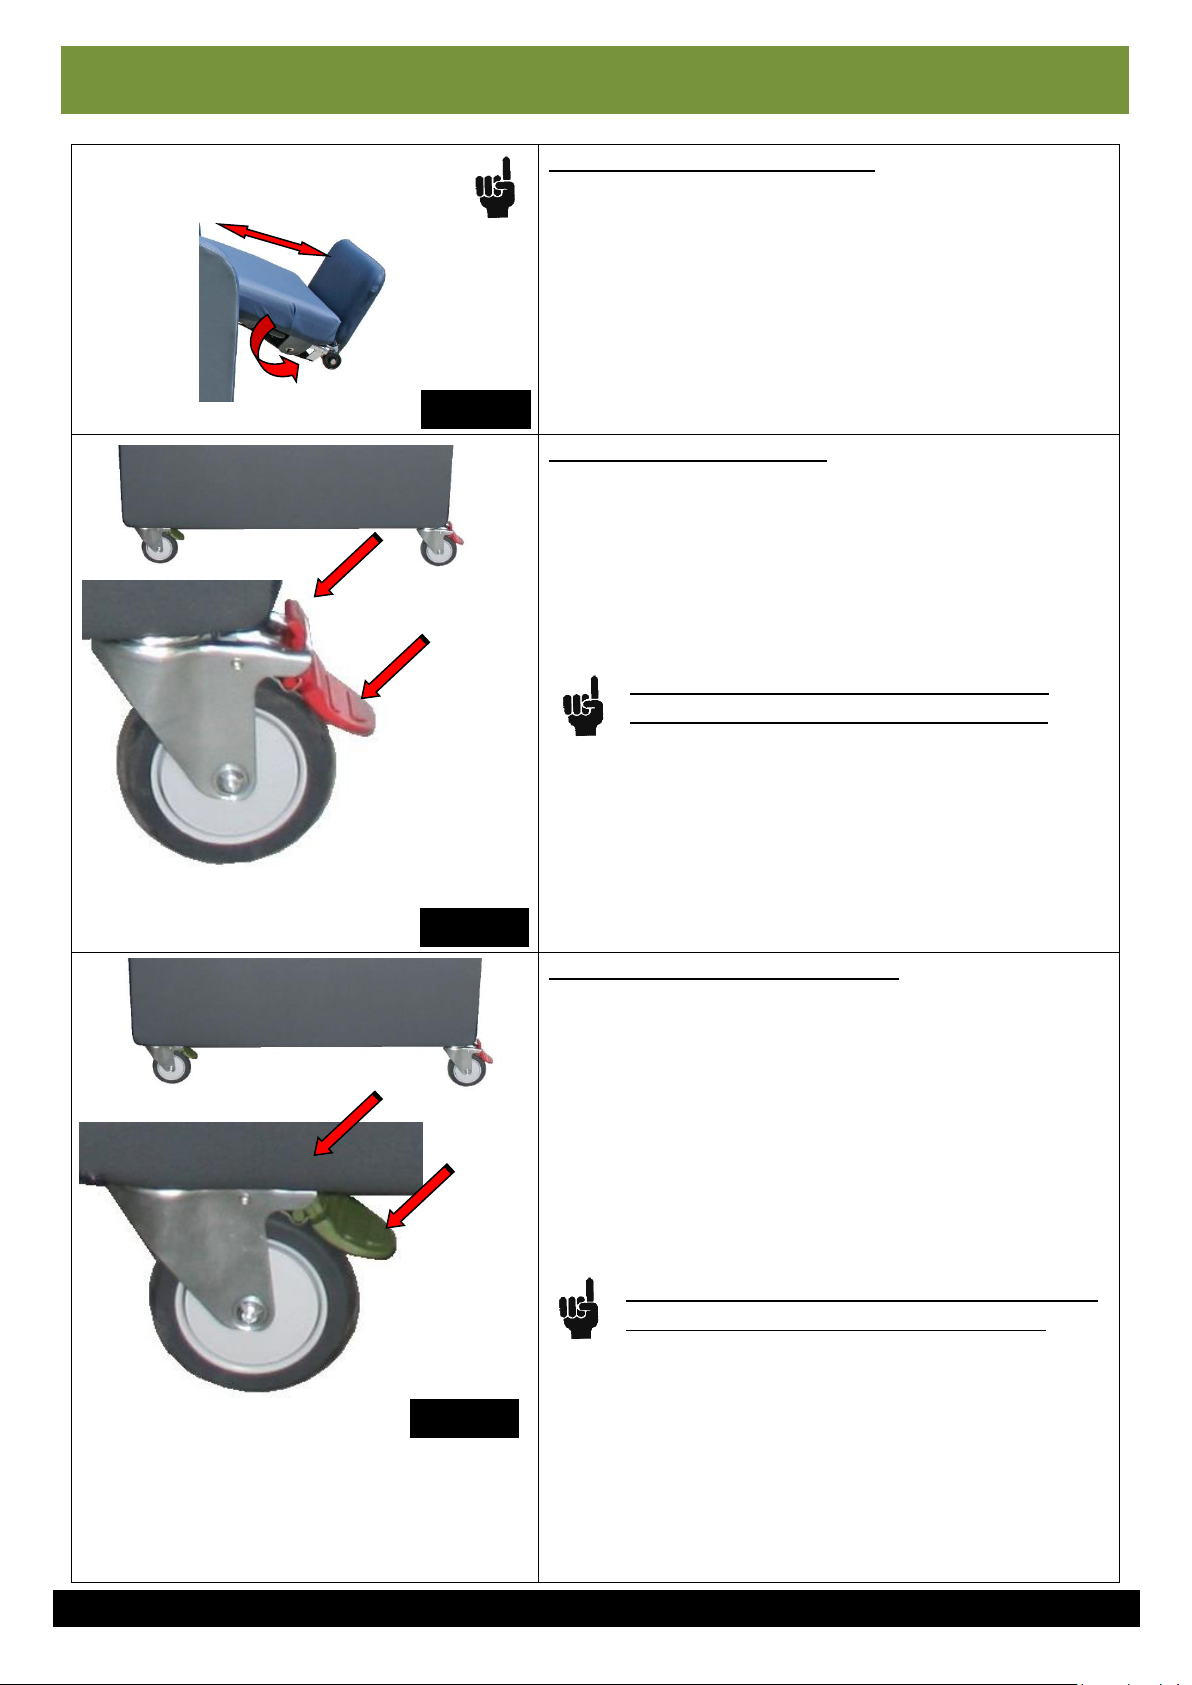
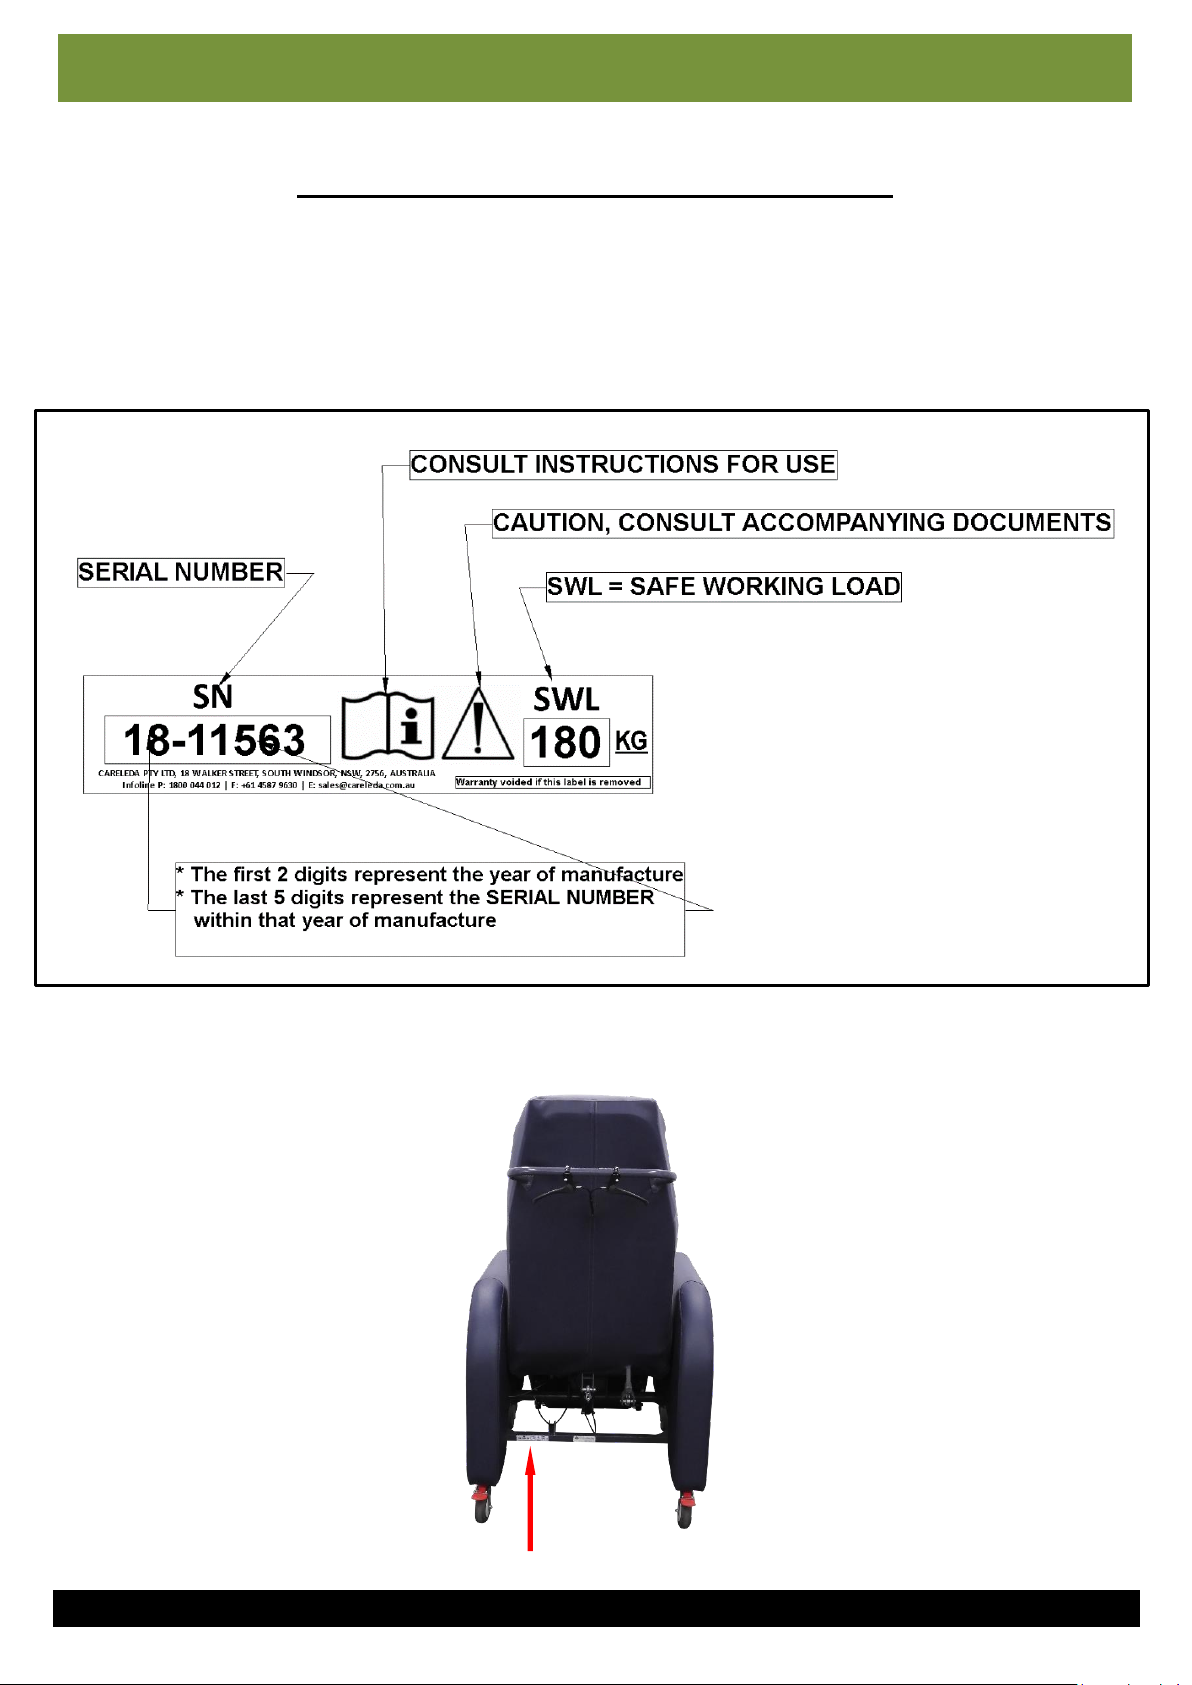
Brakes must be applied when transferring client into or out of chair and when not in use.
Whenever you adjust the chair, assess whether you need to apply the brakes first.
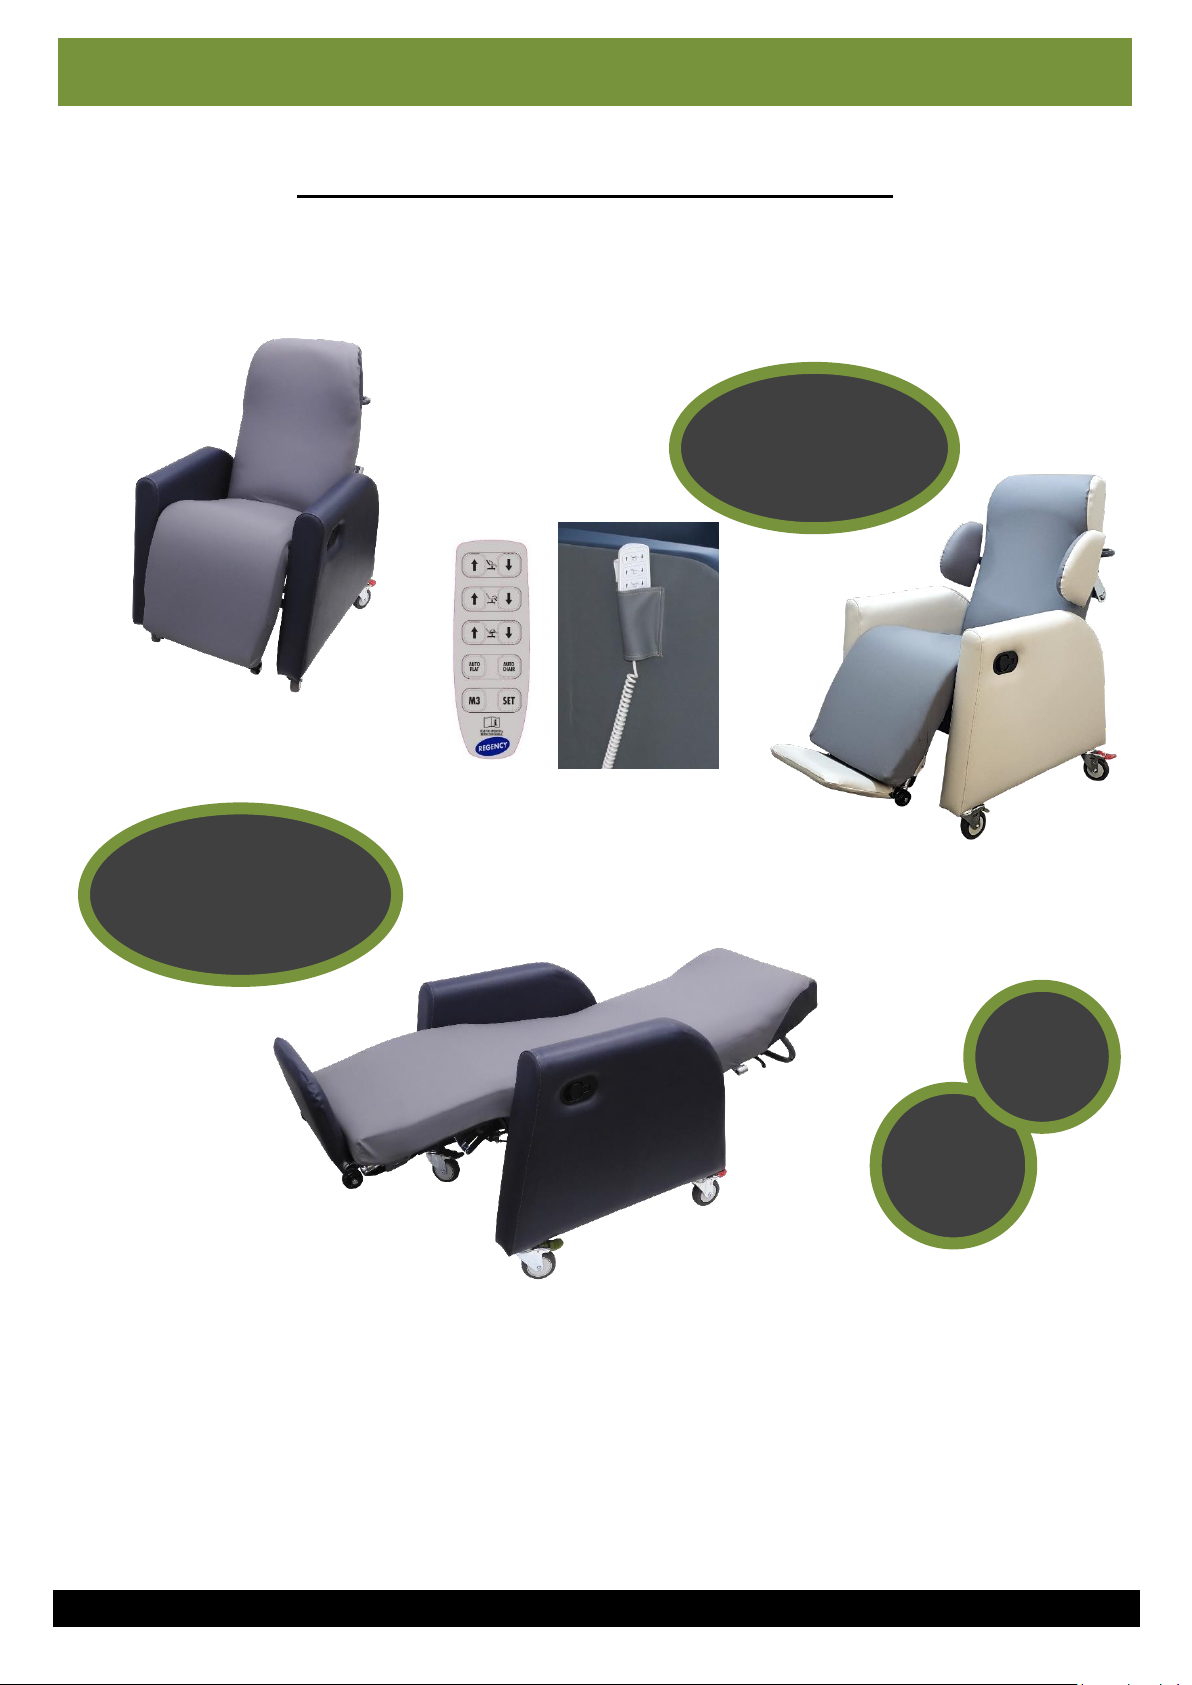
Manual Control - When adjusting back or seat, always ensure that the hand control is re-engaged
securely. Only one lever must be activated at any one time, not both at the same time. This is for
the safety of both the client and the carer.
Chairs are designed to be used on smooth, level paved areas.
This chair must not be used for transport of a client in a taxi vehicle.
The Backrest and/or Leg Rest must not be sat on at any time. Doing so may seriously damage the
chair.
Any damaged, worn, broken or non-functioning parts should be reported and repaired. If client or
carers safety is at risk, the unit should be withdrawn from service until repaired and safe for use.
Electric Function Version
The electrical system of this chair is designed to be used with a 240V power source when supplied
in Australian format. Ensure you have been supplied the correct format.
Do not allow the battery back-up system to fully discharge before connecting to mains supply
where this accessory is fitted.
Do not continue to operate the handset by repeatedly pressing the buttons if any of the functions
will not move.
Do not continually operate the chair functions. Doing this may cause the thermal fuse in the
control box to cut off power.
Do not force the operation of any part of the chair. Doing so may cause damage. Refer to the
manual for correct operation of the chair.
Keep the chair away from any source of open flame.
Do not use the system in the presence of flammable gases (such as anaesthetic agents). We
recommend that this system is used under the guidance of a healthcare professional.
The control unit should only be serviced by authorized personnel. Return to your authorized
distributor for repair.
Switch off the electrical supply to the chair and disconnect from power source before cleaning and
inspection.
Care should be exercised that power cords are not in the way of any mechanism or moving parts.
Communication: Carers must always inform other carers, the client and any other person in the
vicinity, when positioning, transporting or using any of the chairs functions.
Keep the chair away from any source of open flame.
Never operate this chair while under the influence of alcohol or any other substances that could
detract from your alertness or physical and intellectual acuity.
This chair must not be used by more than one occupant at any time or for carrying any other loads.
CHILDREN MUST NOT be allowed to operate chair or controls AT ANY TIME. Any child in the
vicinity of the chair MUST BE SUPERVISED AT ALL TIMES.
Design and specifications are subject to change without notice.
WARNING: - DO NOT LEAVE CLIENT UNATTENDED, ESPECIALLY WHILE SEAT and/or LEGREST IS
RAISED.
NOTICE
This manual does not override the OH&S Policy of any organisation using this
product. Please refer to your organisation’s OH&S Policy before using this product.
SAFETY WARNING
1.

User Manual Careleda P/L M-03 WI-364rev0 Edited 26.02.2020 3 | P a g e
CAREFULLY READ AND UNDERSTAND INSTRUCTIONS BEFORE USING CHAIR
Thank you for choosing another quality Comflex™Product. This manual is your guide to
operating, cleaning and routine maintenance of this Comflex™Care Recliner. It must be kept with
the chair at all times.
Section Contents Page
Safety Warnings 2
1 Introduction 3
2 Product Description 3
3 Operating Instructions 4 - 11
4 Client & Equipment Positioning (OH&S) 12 - 14
5 Technical Data, Including System Information 15 –17
6 Troubleshooting Guide - Electronics 18 - 19
7 Cleaning and Maintenance 19 - 23
The Comflex™Recliner Series range provides comfort, adjustable and assistive pressure care,
and flexibility for those persons who are at risk of developing pressure sores who may spend a
large part of their day sitting or lying down and who require a quality care solution.
The Comflex™ Recliner Series chairs have the following features in common (subject to model
chosen/purchased):
Reclining backrest
Forward and reverse seat tilt
Elevating leg rest - infinite adjustment through-out the range of movement or automatic
adjustment with seat recline (depending on model)
Adjustable Fold Out Footplate - where these options are fitted.
Padded armrests - fixed lounge style
Bahama Style Backrest (no head wings)
Pressure area management foam, gel and air seating system
Low skin shear 2-way stretch fabric on most skin contact surfaces (unless client has
requested otherwise)
Castors, 100mm (Std) –Swivel, Total Braking
Client and Response friendly operation
Fold Back Lateral Supports (on models with this feature)
1.
INTRODUCTION
2. PRODUCT DESCRIPTION
2.

User Manual Careleda P/L M-03 WI-364rev0 Edited 26.02.2020 4 | P a g e
CAREFULLY READ AND UNDERSTAND INSTRUCTIONS BEFORE USING CHAIR
3.1. Seat Tilt Adjustment
Apply brakes before carrying out this function.
Before tilting seat, make sure it is safe to do so. Make
sure the client/patient and carers are safe and the client
is positioned correctly.
3.1.1 Gas Strut Operated Models - Squeeze handle
marked ‘seat’ only, and tilt chair seat to the desired
position, and release handle (see figure 1a).
3.1.2 Electric 3 Function Operated Models –See
Figure 1b, and use the handset buttons on the 3rd
row to either recline or anticline the seat (tilt
chair seat) to the desired position.
3.2 Backrest Adjustment (for models with this feature)
Apply brakes before carrying out this function.
Before adjusting the backrest recline, make sure it is safe
to do so. Make sure the client/patient and carers are
safe and the client is positioned correctly.
3.2.1 Gas Strut Operated Models - Squeeze handle
marked ‘backrest’ only, and adjust the client to the
desired position and release handle (see figure 2a).
3.2.2 Electric 3 Function Operated Models –See
Figure 2b, and use the handset buttons on the 1st
row to either recline or anticline the seat (tilt
chair seat) to the desired position.
FIG 1a
FIG 2a
3. OPERATING INSTRUCTIONS cont’d
3.
FIG 1b
FIG 2b

User Manual Careleda P/L M-03 WI-364rev0 Edited 26.02.2020 5 | P a g e
CAREFULLY READ AND UNDERSTAND INSTRUCTIONS BEFORE USING CHAIR
3.5 Elevating Leg rest
Make sure the client is correctly positioned and all limbs
are clear of legrest path. Apply brakes.
3.5.1 Gas Strut Operated Models –To Raise or Lower:
No Lever Style - Leg rest elevation is linked directly to
the seat tilt function and therefore cannot be
independently adjusted.
Lever Style –Pull lever on side of armrest to raise
legrest, to lower legrest pull lever back in and push on
the legrest to put back in to place.
3.5.2 Electric 3 Function Operated Models –See Figure
5, and use the handset buttons on the 2nd row to either
elevate or lower the leg rest to the desired position.
Leg rest MUST NOT be used for sitting on.
3.6 Adjust Leg Rest for forward transfer and stand-up
lifter access (for models with this feature)
Apply brakes before carrying out this function.
Make sure all limbs are clear of legrest path
3.6.1 Make sure the tracking castors are locked in the
inline/forward position –refer to Point 10.
3.6.2 Ensure footplate is folded up out of the way
Point 8.
3.6.3 Follow directions contained in Section 5, being sure
to tuck the leg rest away as far as possible. Tilt the seat
as far forward as possible - see Point 1.
Take caution if standing client on footplate, the
footplate must be in full contact with ground.
FIG 5
3. OPERATING INSTRUCTIONS
4.
FIG 6

User Manual Careleda P/L M-03 WI-364rev0 Edited 26.02.2020 6 | P a g e
CAREFULLY READ AND UNDERSTAND INSTRUCTIONS BEFORE USING CHAIR
3.7Auto Position Functions (for models with this
feature)
Apply brakes before carrying out these
functions.
Make sure all limbs and Equipment are clear of
legrest and backrest paths
3.7.1 Auto Flat, position function –this Supine/Flat
position has been pre-set for your convenience. To
operate –lay the chair position out flat or supine, press
& hold the button on the handset labelled ‘Auto Flat’
until all actuators/functions have stopped moving or the
desired position has been reached. See Figure 7.1
The seat will level, the backrest lay flat, and the legrest
will raise up/elevate.
3.7.2 Auto Chair, position function –this chair or seated
position has been pre-set for your convenience. To
operate, press & hold the button on the handset labelled
‘Auto Chair’ until all actuators/functions have stopped
moving and the desired chair position has been reached.
See Figure 7.2
The seat will tilt to 2 degrees forward, the backrest
raise up, and the leg rest will lower completely.
3.7.3 Auto M3,position function –this third Auto
memory position can be programmed to suit your needs
for an alternative ‘Auto’ position. To program this
button to a chair position of your choice, please refer
the Section 5 of this Manual.
To operate, press & hold the button on the handset
labelled ‘M3’ until all actuators/functions have stopped
moving and the desired chair position has been reached.
See Figure 7.3
3.8Footplates (for models with this feature)
3.8.2 Fold Away Footplate Type (figure 8) - Make sure
the client is correctly positioned and brakes are on.
Unhook the flaps each side of the legrest cushion. Lift up
only the end of the legrest cushion and fold out the
footplate. Re-attach the flaps to the side of the legrest
frame.
NB: Before any forward transfer, this footplate must be
folded away/stowed under the legrest cushion.
FIG 8
3. OPERATING INSTRUCTIONS cont’d
5.
FIG 7.1
FIG 7.2
FIG 7.3

User Manual Careleda P/L M-03 WI-364rev0 Edited 26.02.2020 7 | P a g e
CAREFULLY READ AND UNDERSTAND INSTRUCTIONS BEFORE USING CHAIR
3.9Adjust Leg/Foot Plate length (for models with this
feature)
Unfasten the ‘hook and loop’ straps from the underside
of the leg rest –shorten or lengthen Leg Rest/Footplate
to desired position and re-fasten straps.
Always make sure the ‘loop and hook’ straps have been
fully re-fastened with sufficient grip. Do not over
lengthen. Always consider suitability for the client.
3.10 Operate Brake Castors
Individual brakes on front and rear castors:
3.10.1 To engage, press down red tab at (a)
3.10.2 To disengage, press top of red tab (b)
Brake (Total Braking) position needs to be
engaged before operating chair functions.
3.11 Operate Tracking (DL) Castors - Front Castor
(Models with this feature)
3.11.1 To engage, Swing castor into the forward position
(trailing). Press down green tab at (a) and click into
position.
3.11.2 To disengage, press top of green tab at (b).
Tracking (Directional Lock) position needs to be
engaged before putting the leg rest down.
FIG 9
A
B
A
B
FIG 10
3. OPERATING INSTRUCTIONS cont’d
6.
FIG 11

User Manual Careleda P/L M-03 WI-364rev0 Edited 26.02.2020 8 | P a g e
CAREFULLY READ AND UNDERSTAND INSTRUCTIONS BEFORE USING CHAIR
Swing Back Lateral Supports (models with this feature)
Pull catch pin –swing lateral back then release catch pin, do
the same to swing lateral back down to position
3. OPERATING INSTRUCTIONS cont’d
7.

User Manual Careleda P/L M-03 WI-364rev0 Edited 26.02.2020 9 | P a g e
CAREFULLY READ AND UNDERSTAND INSTRUCTIONS BEFORE USING CHAIR
Some Key Features Illustrated
Supine
Position
Tilt and
Recline
3. OPERATING INSTRUCTIONS cont’d
8.
2 Function Gas
assisted OR
3 Function
Electric
Swing Back
Lateral Support
Option

User Manual Careleda P/L M-03 WI-364rev0 Edited 26.02.2020 10 | P a g e
CAREFULLY READ AND UNDERSTAND INSTRUCTIONS BEFORE USING CHAIR
Some Key Features Illustrated
3.13 Serial Number & Safe Working Load
The Safe Working Load and Serial Number can be found on the label attached to the back of the
chair frame as shown in the following images. Please note: Removal of this label may result in
voiding of warranty.
The serial number label is usually located on the rear chassis rail of the CRN/CRS series recliner. Refer to
arrow for general direction of label location.
3. OPERATING INSTRUCTIONS cont’d
9.

User Manual Careleda P/L M-03 WI-364rev0 Edited 26.02.2020 11 | P a g e
CAREFULLY READ AND UNDERSTAND INSTRUCTIONS BEFORE USING CHAIR
OH & S and Correct Equipment Use
NOTE: REMEMBER!! In any manoeuvre, the safety of the Client and Response is paramount. This is
only a guide and does not take the place or override your OH&S training or Client handling
techniques. This must be approved by those responsible persons in your organisation before use. E
& OE
3. OPERATING INSTRUCTIONS cont’d
10.

User Manual Careleda P/L M-03 WI-364rev0 Edited 26.02.2020 12 | P a g e
CAREFULLY READ AND UNDERSTAND INSTRUCTIONS BEFORE USING CHAIR
NOTE: REMEMBER!! In any manoeuvre, the safety of the Client and Response is paramount. This is
only a guide and does not take the place or override your OH&S training or Client handling
techniques. This must be approved by those responsible persons in your organisation before use.
E & OE
4. Client & Equipment Positioning
11.

User Manual Careleda P/L M-03 WI-364rev0 Edited 26.02.2020 13 | P a g e
CAREFULLY READ AND UNDERSTAND INSTRUCTIONS BEFORE USING CHAIR
OH & S and Correct Equipment Positioning
To ensure the safe operation of this equipment, please allow the sufficient operating space around
the chair –refer to the diagram below.
Sufficient space is required so that:
The functions of the chair can be used safely and without interference from surrounding
equipment.
Interference of surrounding equipment may cause serious damage to your equipment or safety
issues for the client or carer.
Failure to comply with the space requirements, in the event of an incident involving this equipment, may
void warranty.
NOTE: REMEMBER!! In any manoeuvre, the safety of the Client and Response is paramount. This is only a
guide and does not take the place or override your OH&S training or Client handling techniques. This must
be approved by those responsible persons in your organisation before use. E & OE
Side View Clearance Diagram
4. Client & Equipment Positioning
12.

User Manual Careleda P/L M-03 WI-364rev0 Edited 26.02.2020 14 | P a g e
CAREFULLY READ AND UNDERSTAND INSTRUCTIONS BEFORE USING CHAIR
Plan View Clearance Diagram
4. Client & Equipment Positioning
13.

User Manual Careleda P/L M-03 WI-364rev0 Edited 26.02.2020 15 | P a g e
CAREFULLY READ AND UNDERSTAND INSTRUCTIONS BEFORE USING CHAIR
GENERAL TECHNICAL DATA
DESCRIPTION
MODEL
Please note: that your particular model may have some of
the features listed and not others, depending on the
configuration chosen. The list of technical specifications
below is not exhaustive and if you require any further
information, please contact the company that sold the chair
to you.
CRN
(Narrow)
CRS
(Standard)
Armrest Height - at hips (from seat cushion)
160
160
Backrest - Height (from seat cushion)
700
700
Backrest - Recline Range (SEAT = 0°)
95˚ - 180˚
95˚ - 180˚
Backrest - Width at Shoulders (between Lateral Supports)
500
550
Castors - DL & TB type (individual locking)
100
100
Overall - Height (Backrest upright / seat at approx. 5˚ )
1200
1200
Overall - Length (Supine Position) - Deluxe Leg Rest Type
(Footplate out)
1830
1880
Overall - Length (Supine Position) - Standard Leg Rest Type
1750
1800
Overall - Width
700
750
Seat - Depth
520
570
Seat - Height - @ 0° degrees
550
550
Seat - Height - tilted forward
540
540
Seat - Width (between arms)
500
550
Weight Capacity (SWL) - Maximum
180kg
180kg
ARTG Number
136977
136977
Dimensions are nominal and are measured in mm without covers depressed
Specifications are subject to change without notice
E & OE
5. Technical Data, Incl. System Information

User Manual Careleda P/L M-03 WI-364rev0 Edited 26.02.2020 16 | P a g e
CAREFULLY READ AND UNDERSTAND INSTRUCTIONS BEFORE USING CHAIR
5. Technical Data, Incl. System Information
QUICK GUIDE
Careleda –Wintur PHASE 3 –KIT 1 SW820107_r48018
___________________________________________________________________
No Drawn Rev Date
LAUS183059 (MAU27450) C Andersen Rev C 29/07/2019
1 –BACK REST (LA27)
2 –N/A (PORT PLUG)
B –Battery (KB19)
3 –LEG REST (LA27)
4 –SEAT TILT (LA27)
H1 –HAND CONTROL
SEAT TILT UP
BACK REST
UP
LEG REST UP
AUTO FLAT M1
BACK REST
DOWN
LEG REST DOWN
SEAT TILT DOWN
AUTO CHAIR
M2
MEMORY M3
SET (STORE)
SETUP CONTROL BOX
+
This function must be performed when running a chair for the first time, when replacing a Control Box or when adding to or removing an
actuator from the chair.
The function will automatically detect the actuators connected and run all connected actuators through a cycle of initialisation and stroke
length checking.
Only actuators detected during this process will be able to work.
The Auto Chair and Auto Flat functions will be setup during this process.
If the Control Box has already been setup and you wish to add or remove an actuator, the buttons must be held for approx. 10 seconds before
movement starts.
Please note that if you have started but not completed the setup process, all functions will be disabled.
Simultaneously press and hold the BACK REST UP and SEAT TILT DOWN buttons until all connected actuators have run fully OUT and then fully
IN at least once.
During movements, the control box may buzz POSITION LOST.
To indicate that all movements are complete, the control box will buzz CONFIRM.
INIT ALL
+
To be used after an actuator and/or actuator cable replacement.
Simultaneously press and hold the BACK REST UP and BACK REST DOWN buttons.
The Leg Rest actuator will drive fully DOWN, then drive UP a few mm.
The Back Rest and Seat Tilt actuators will drive fully UP, then drive DOWN a few mm.
During movements, the control box may buzz POSITION LOST.
To indicate that all movements are complete, the control box will buzz CONFIRM.
Examples of models with
this control Box
–R3940DE.S
–R3940DE.L …
–R3940DE.X …
–R3945DE.S …
–R3945DE.L …
–R3945DE.X …
–RR3245D.3E …
–RR3240D.3E …
If in doubt, please contact your
supplier to confirm.

User Manual Careleda P/L M-03 WI-364rev0 Edited 26.02.2020 17 | P a g e
CAREFULLY READ AND UNDERSTAND INSTRUCTIONS BEFORE USING CHAIR
5. Technical Data, Incl. System Information

User Manual Careleda P/L M-03 WI-364rev0 Edited 26.02.2020 18 | P a g e
CAREFULLY READ AND UNDERSTAND INSTRUCTIONS BEFORE USING CHAIR
Problem
Possible Cause
Possible Remedy/Action
1
Power indicator does not light up / No
functions at all
- No power to the system i.e. not
connected to mains
- Check the power cable is plugged
into the mains power socket and that
the power is switched on.
- The fuse has blown
- Replace or send control box for repair
- Defective Power Cable
- Defective power cable - On control
boxes with exchangeable power cable
change the cable.
- On control boxes with fixed cable
send it for repair
- Control box defective
- Send control box for repair
2
Power indicator lights up, but
actuators/functions do not run
- Actuator plug not pushed into
control box properly
- Push actuator plug into control box
properly
- Control box/control panel
defective
- Replace or send control box for repair
3
No functions at all when the power
cable is disconnected from mains
power
- Battery pack is missing
- Replace missing battery pack
- Bad Battery connection
- Check the battery connections
- Batteries are flat
- Plug the power cable into mains
power and charge for a minimum of
24hrs. If problem persists employ an
approved Sertain/Linak qualified
technician to check the
batteries/charging circuit and/or
replace the batteries.
- Batteries are damaged or at the
end of their lifespan
- replace the batteries with Linak
approved batteries
4
Relays in control box are heard clicking
- Actuator defective
- Replace actuator
- Control box defective
- Replace the control box
5
Actuator will drive OUT but not IN
Position Lost on actuator
Try performing the Reset/Initialisation
procedure. If problem persists, replace
the actuator.
6
No relay noise is heard from control
box
Not valid for CB20/CB6S OBF/CB16
OBF
Handset defective
- Send handset for repair
- Replace handset
7
Actuator does not run on battery
power, but relay clicking is heard
- Actuator plug not properly
pushed
- Push actuator plug properly into
control box
- Actuator defective
- Replace actuator or send for repair
- Control box defective
- Replace control box or send for repair
6. Troubleshooting Guide - Electronics

User Manual Careleda P/L M-03 WI-364rev0 Edited 26.02.2020 19 | P a g e
CAREFULLY READ AND UNDERSTAND INSTRUCTIONS BEFORE USING CHAIR
Problem
Possible Cause
Possible Remedy/Action
8
Control Box functions okay apart from
one direction
- Handset defective
- Replace handset or send handset for
repair
- Control box/panel defective
- Send control box for repair or replace
9
Actuator will not drive IN or OUT.
Intermittent beeping from the control
box when button is pressed
- Electronics need resetting
- Perform the Reset/Initialisation
procedure
- Cable to the actuator is either
disconnected or faulty.
- Reconnect or replace the faulty
component
- Actuator is faulty
- Replace actuator or send for repair
10
One or more actuators stop while
operating them
Actuator is overloaded
Reduce or remove load on the chair
and try again
11
HILO columns will not drive IN or OUT
(if applicable)
- Electronics need resetting
- Perform the Reset/Initialisation
procedure
- Cable to column is disconnected
or Faulty.
- Reconnect or replace the faulty
component
- Column is faulty
- Replace column or send for repair
12
POSITION LOST on an actuator is
indicated via an intermittent beep
200msec ON / 200msec OFF.
If problem persists, locate faulty
actuator or cable and replace.
Try the RESET/INITIALISATION
procedure, and then in turn run all
functions.
13
FATAL ERROR is indicated via an
intermittent beep 50msec ON /
500msec OFF.
If problem persists, locate faulty
actuator/cable and replace. This
could also be caused by CB6/CU20
problems, replace as required.
Try the RESET/INITIALISATION
procedure, and then in turn, run all
functions.
DESCRIPTION OF THE VARIOUS SIGNS USED IN THIS MANUAL
Warning!
Failure to comply with these instructions may result in accidents involving serious personal
injury.
Failing to follow these instructions can result in the product being damaged or
destroyed.
GENERAL MAINTENANCE
Daily - A daily visual inspection should be performed by any staff member that is going to use
the chair. This is to make sure that the chair is in a safe operating condition. If there are any
features/items that require attention that may affect the safety of the the client or carer, the
chair should be removed from service until these issues have been rectified.
Weekly –Upholstery cleaning and maintenance must be carried out weekly (minimum) to
ensure longevity and hygienic conditions are maintained. Please refer to section titled General
Cleaning Instructions for recommended cleaning practices.
7. CLEANING & MAINTENANCE
6. Troubleshooting Guide - Electronics

User Manual Careleda P/L M-03 WI-364rev0 Edited 26.02.2020 20 | P a g e
CAREFULLY READ AND UNDERSTAND INSTRUCTIONS BEFORE USING CHAIR
Monthly - The following should be checked and adjusted if required.
All nuts and bolts on pivot points:
If they are loose, tighten without restricting pivot operation.
If they are worn, replace with a Careleda P/L approved fastener.
Mechanism and Gas Strut fasteners must be cared for in like manner to pivot
point fasteners.
All functions of chair –i.e. backrest, seat tilt, leg rest, footrest, wings and arms,
directional lock, braking system –refer to supplier for any repairs required
Cleaning and light oiling of cables and activating heads facilitates better
operation of mechanisms and gas strut.
Grease and oil points as needed, but DO NOT oil or grease gas strut shafts.
Upholstery inspection –any tears, rips, parts missing, etc –refer to supplier of chair for
replacement parts
Castors –please check the following:
The condition and ensure they are freewheeling and bearings are not loose.
The wheels for any distortion or damage
The tyres for any damage –i.e. cuts or chunks out of tyre
The forks are straight
Axle nuts are secure
Wheel bushing and axle for wear and deterioration
Remove any hair and grime build-up on castors
Check that directional lock and brake functions both work correctly
Please note: All pintles must be checked at regular intervals. They must be fully
and firmly fitted in tube and locating device. Retaining screw must be tight
If there is any doubt about the integrity of the castor, please contact your
COMFLEX™ distributor for repair advice
Electrics
All cables and motors to be inspected for damage.
ELECTRICS –MAINTENANCE
Valid for all LINAK products
The LINAK products must be cleaned at regular intervals to remove dust and dirt and inspected for
mechanical damage, wear and breaks.
The LINAK products are closed units and require no internal maintenance.
Only type IP66 are waterproof and type IP66W tolerates being washed in tunnels.
This chair and its LINAK components are not rated IP66 washable.
Valid for all LINAK actuators and Lifting columns
Actuators / lifting columns must be inspected at attachment points, wires, piston rod, cabinet, and
plugs, as well as checking that the actuator / lifting columns function correctly.
To ensure that the pre-greased inner tube remain lubricated the actuator must only be washed
down when the piston rod is fully retracted.
Valid for all LINAK control boxes and handsets
Electronics must be inspected at attachment points, wires, cabinet, and plugs.
7. CLEANING & MAINTENANCE
This manual suits for next models
3
Table of contents
Popular Medical Equipment manuals by other brands

Krug
Krug ASCEND 64526 Operation instructions

Organ recovery systems
Organ recovery systems LifePort Kidney Transporter LKT201 Instructions for use

Siemens
Siemens Sonoline G20 Quick reference guide

IGEA
IGEA Cliniporator EPS02 user manual

AEIOMed
AEIOMed Everest CPAP Quick setup guide

ResMed
ResMed AirFit N30 user guide