comfortel 5200 User manual

comfortel.com.au
facial
steamer
#5200 FACIAL STEAMER
owners manual

GET STARTED
CONTRAINDICATIONS
GENERAL SAFETY
1. Read carefully and keep these instructions in a
safe place.
2. Use this product only for its intended function and
do not use attachments not recommended by the
manufacturer.
3. Do not use outdoors.
ELECTRICAL APPLIANCES
1. All GPO’s must be installed by a qualified Electrician
in accordance with local electrical standards.
2. DO NOT allow children to operate this product.
3. Turn the power o and remove the plug when not in
use or when cleaning.
4. Do not let the power cord get damaged in any way.
5. Keep the power cord away from heat sources.
6. Do not use an extension cord unless the cord
complies with local electrical safety standards.
7. Periodically inspect the power cord for signs of
damage.
8. Do not operate any electrical item with a damaged
power cord.
IMPORTANT PLEASE READ THESE SAFETY INSTRUCTIONS
The facial steamer uses an electric heating element to boil the water in the
reservoir jar in order to produce steam. The steam vapor is passed through to
the nozzle where it can be directed onto the client’s skin. The steamer has an
Ozone function which passes the steam through an Ultraviolet light. This has an
antibacterial action on the skin, which may be beneficial for acne and blemished
skins.
Steaming prepares the skin for further treatment, and has the following benefits:
• Softens, warms and hydrates the skin
• Dilates the follicle openings (opens the pores)
• Softens oily deposits (comedones, milia etc) to allow easier extraction
• Stimulates the sudoriferous (sweat) glands to encourage the elimination of
waste products
• Softens dead skin cells, aiding desquamation
• Stimulates sebaceous activity- beneficial for dry skins
• Increases circulation which improves oxygen and nutrient supply to the skin,
and removes waste products
• Increased hydration, warmth and permeability of the skin may enhance the
penetration of facial treatment products
FACIAL STEAMER
The steamer should not be used where the following conditions are present:
• Recently waxed skin, or skin that has received any kind of heat treatment in the last 48 hours.
• Sunburned skin.
• Rosacea
• Highly vascular skins (skins with a lot of redness or broken capillaries).
• Asthmatic clients may experience breathing diculties while under the steam. vapor. It may be necessary to
elevate their head slightly and position the steam further away.
• Ozone has some reported potential for being a respiratory irritant. Use of the Ozone function should be minimized
or eliminated altogether for clients who have a history of asthma or any respiratory problems.
• Ozone is highly flammable and must not be used around any flame or combustible substances.
Water poses a serious risk even
when device is switched o, do
not leave device connected to
power supply after use.

ASSEMBLY
OPERATION
1. Water fill point
2. Heater element
3. Jar support plate
4. Screw to tighten jar
support plate
5. Middle pillar
6. Base claw
7. Lower pillar
8. Water reservoir jar
9. 4-star base on wheels
10. Bolt for lower pillar
assembly
11. Handle
12. Top pillar
13. Power cord
14. External casing
15. Spray nozzle
16. Control buttons
17. Indicating lights
18. Nut for fixing middle pillar
and height adjustment
19. Flat tube head
(rotate 90 degrees)
20.Support plate arm
1. Bolt the lower pillar (7) onto the 4-star base (9) using the
base claw (6), then insert the middle pillar (5) and fix it into
the lower pillar using the fixing nut (18).
2. Fit the top pillar (12) onto the middle pillar (5).
3. Adjust the height of the steamer as necessary, using the
fixing nut (18).
4. Fit the silicon sealer ring into position on the top rim of
the glass water reservoir jar (8) and fit the reservoir jar into
position. Make sure it is securely fitted into the cradle.
5. Slide the jar support plate (3) into place beneath the jar and
tighten it to fit securely, using the screw on the bottom of
the support plate (4).
1. Plug the electrical point in at the wall socket and turn on.
2. Make sure that the steamer is filled to the highest red indicator line, with distilled water. If the water level drops to the
lower red indicator line, the steamer will automatically cut out. The machine will not function and the lights will not
turn on until the water level has been restored.
3. There is no need to remove the water reservoir jar in order to fill it. Simply refill water from the water fill point and
add distilled water until the water level reaches the highest red indicator line. Do not overfill.
4. It is essential that only distilled water should be used in the steamer. Other water will damage the machine
components and will void the warranty.
5. Press the “Vapor” button into the ON position. A red light will illuminate to indicate that the machine is working. It
will take approximately 8 minutes for the water to boil and steam to begin.
6. Make sure that the steam nozzle is pointed away from the client, in case any malfunction occurs. When the steam
vapor begins, the nozzle may then be directed towards the client.
7. The angle of the spray nozzle may be adjusted by rotating the flat tube head.
8. Protect the client’s eyes and any sensitive or vascular areas with cotton pads.
9. Adjust the steam direction, keeping it at a comfortable distance from the client’s skin. Never apply the steam too
close to the skin as the high temperature may cause a burn.
10. Switch the “Ozone” button to the ON position to start the Ozone function. A green light will indicate that this
function is now in use. Never turn this function on until the steam vapor is visible.
11. To turn o the Ozone or the steam vapor, switch the appropriate button into the OFF position and the illuminated
light will turn o.
12.Never attempt to adjust the height of the steamer while it is in operation.
13.Never attempt to remove the water reservoir jar while it is still hot.
ASSEMBLY
PARTS

The information contained in this document is subject to change without notice and
should not be construed as a commitment by Comfortel Furniture Pty Ltd.
Comfortel Furniture Pty Ltd. assumes no responsibility for any errors that may appear in
this document nor does it make expressed or implied warranty of any kind with regard
to this material, including, but not limited to, the implied warranties of merchantability
and fitness for a particular purpose.
Comfortel Furniture Pty Ltd. shall not be liable for incidental or consequential damages
in connection with or arising out of the use of this document and the program material.
PRODUCT CODE
PURCHASE DATE INVOICE NUMBER
NOTE YOUR PURCHASE DATE & INVOICE NUMBER FOR FUTURE REFERENCE
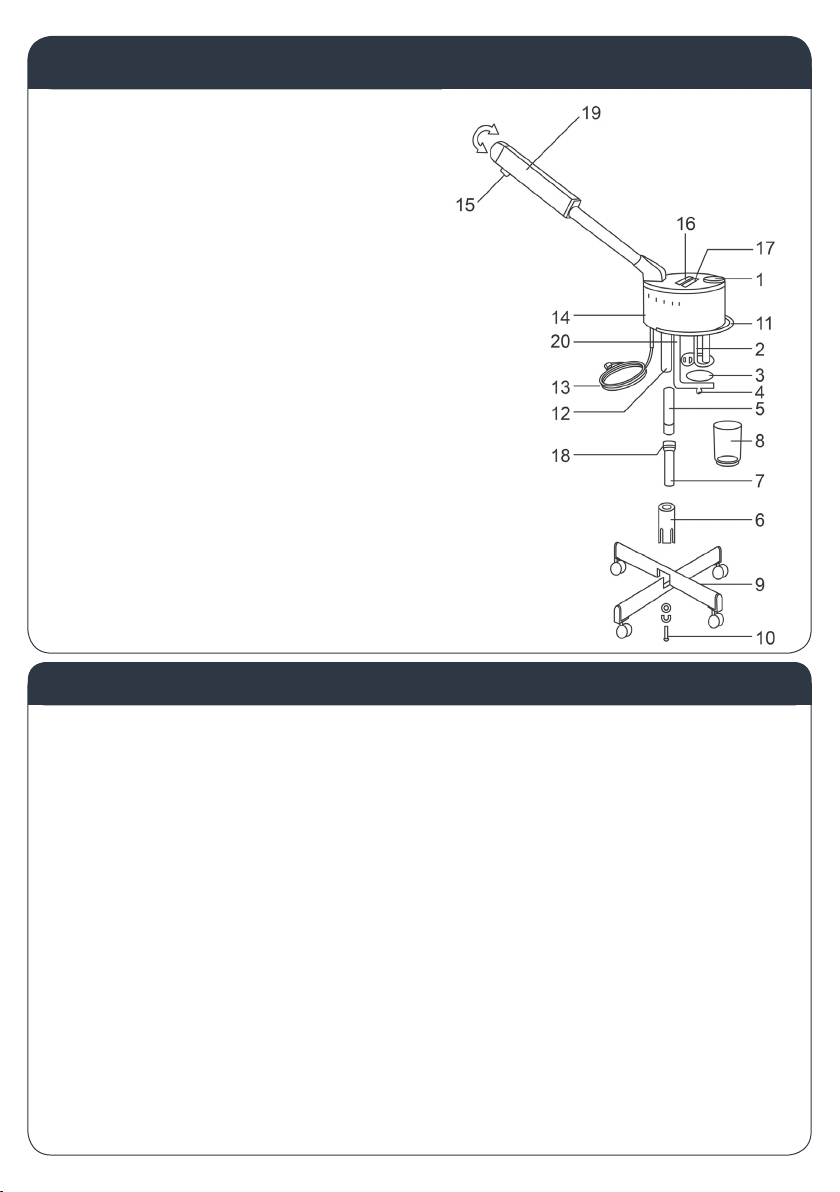
1. The external surfaces of the steamer may be cleaned with a soft cloth and soapy water or a mild non-abrasive
surface cleaning agent.
2. The water reservoir jar should be emptied and thoroughly cleaned with soapy water once a week.
3. If water has discoloured or left a residue inside the jar, the jar should be filled with a white vinegar and water
solution (1 part vinegar to 4 parts water) and left to soak before washing out. It is essential that the vinegar solution must
be completely rinsed out of the jar before the steamer is used. If any residue remains the steamer may spit water when
it is next used, posing an injury risk to the client.
4. If the heating element needs cleaning, the jar filled with vinegar and water may be fitted to its usual position and
left to soak overnight. This will remove any build-up of mineral scale from the element. Please ensure that all vinegar
residue is completely removed from the element and the jar before using the steamer, as stated above.
5. When re-fitting the jar, be sure that the silicon sealer ring is in place, and the jar is fitted firmly to the cradle. Failure
to do so may cause the water to overflow when boiling, or interfere with the steam direction.
6. If the Ozone function does not work, the UV lamp may need to be replaced. The estimated life expectancy of each
lamp is around 2000 hours.
7. Replacement of the lamp must never be attempted by the user. This must be done by a qualified Electrician or
approved Electrical Repairer. The replacement lamp specifications are as follows: Model number T5, 4W
CLEANING & MAINTENANCE
PLEASE RETAIN THIS INFORMATION FOR FUTURE REFERENCE.
For more information about our products and services, contact us at comfortel.com.au
comfortel.com.au
#5200 FACIAL STEAMER
VOLTAGE: 240V.50hz
POWER: 650W
Revision Date: 18.12.2018.V2
©Comfortel Furniture 1997-2019. All rights are reserved.
No part of this document may be photocopied,
reproduced or translated to another language without
written consent of Comfortel Furniture Pty Ltd.
PERIOD AND DESCRIPTION PRODUCTS
12 MONTHS PARTS & LABOR All products
2 YEARS PARTS ONLY All products excluding small electrical appliances
3 YEARS PARTS ONLY All Linak electric actuators
5 YEARS PARTS ONLY Taps cartridge, Ceramic basins
TERMS AND CONDITIONS
For more information about our terms and conditions including warranty, please refer to our website.
WARRANTY PERIOD
Table of contents
Other comfortel Kitchen Appliance manuals
Popular Kitchen Appliance manuals by other brands

Cuckoo
Cuckoo CRP-HW10 Fuzzy Series operating instructions

Dash
Dash Mini Bundt DBCM100 instruction manual

Climadiff
Climadiff VINICAVE use instructions

Brentwood Appliances
Brentwood Appliances HP-3013BK Operating and safety instructions

Orava
Orava SU-102 instruction manual

NUK
NUK Steam Steriliser operating instructions