Commute-Board Travel-X User manual


TABLE OF CONTENTS
INTRODUCTION: THE ELECTRIC COMMUTER SCOOTER AKA COMMUTE-BOARD®
TRAVEL-X
*WELCOME EVERYONE-SAFETY PRECAUTIONS & WARNINGS-ABOUT THE
MANUAL
P. 1 BATTERY CARE
P. 2 LIMITED MANUFACTURER'S FACTORY WARRANTY
P. 3 EQUIPMENT PARTS DRAWING {1}
P. 4 EQUIPMENT PARTS DRAWING {2}
P. 5 OPERATING INSTRUCTIONS
P. 6 INSTRUMENT PANEL
P. 7 OPERATING INSTRUCTIONS <1>
P. 8 OPERATING INSTRUCTIONS <2>
P. 9 OPERATING INSTRUCTIONS <3>
P.10 TECHNICAL PARAMETERS
P.11 LEARNING TO RIDE C-B® FOR THE FIRST TIME
P.12 GETTING STARTED, PART 1
P.13 GETTING STARTED, PART 2
P.14 HOW TO UNFOLD THE C-B® ; SHOWN IS THE DUEL FUNCTIONING
SHOPPING BAG HOOK/CARRY HANDLE HOOK
P.15 HOW TO OPERATE THE ROUND BLACK TIGHTENING SCREW WHEEL ON
LOWER STEERING COLUMN
P.16 HOW TO UNFOLD REAR DECK 2 FROM TOP OF FRONT DECK 1
P.17 HOW TO LOCK THE TWO DECKS
P.18 HOW TO EXTEND THE STEERING COLUMN AND HANDLE BAR HEIGHT
P.19 HOW TO OPERATE THE 'QUICK CLIP' ON STEERING COLUMN
P.20 HOW TO UNFOLD OUT/FOLD BACK IN THE HANDLE BARS
P.21 HOW TO TURN THE POWER ON
P.22 HOW TO SWITCH THE POWER ON & OFF
P.23 HOW TO LOCK & UNLOCK THE TWO DECKS

P.24 IN WHICH DIRECTION DO I TWIST THE ROUND BLACK TIGHTENING SCREW
WHEEL?
P.25 THE CORRECT WAY TO POSITION THE FOLDED C-B® INSIDE THE OPTIONAL
WHEELED CARRY BAG/BACKPACK
P.26 THE OPTIONAL VOLTAGE CONVERTER FOR CHARGING C-B® INSIDE OF A
CAR, RV, BOAT, JET OR TRUCK
P.27 THE OPTIONAL VOLTAGE CONVERTER, DIAGRAM
P.28 HOW TO "TROLLEY" THE C-B® WITHOUT THE OPTIONAL WHEELED CARRY
BAG/BACKPACK
P.29 BLACK ROUND SCREW TIGHTENING WHEEL PHOTO
P.30 MORE PHOTOS ON THE INTERNAL TROLLEY FEATURE
P.31 MORE PHOTOS ON THE INTERNAL TROLLEY FEATURE
P.32 LIMITATION REGARDING THE INTERNAL TROLLEY FEATURE
P.33 HOW TO ASSEMBLE THE OPTIONAL TROLLEY WHEELED CARRY BAG/BACK
PACK
P.34 HOW TO ASSEMBLE THE OPTIONAL TROLLEY WHEELED CARRY BAG/BACK
PACK, CONTINUED
P.35 CARRY BAG/BACKPACK ASSEMBLY PHOTOS
P.36 HOW TO POSITION THE THE FOLDED C-B® INSIDE THE CARRY BAG/BACK
PACK
P.37 HINT: HOW TO PROTECT THE FOLDED KICKSTAND
P.38 SAFE DRIVING
P.39 SAFE DRIVING
P.40 GENERAL MAINTENANCE AND PRECAUTIONS
P.41 SAFE DRIVING
P.42 CONTACT PAGE/CUSTOMER SUPPORT/TECH SUPPORT/PHONE/ON-LINE
C-B® TRAVEL-X PURCHASING
P.43 PURCHASE YOUR NEXT C-B® EXCLUSIVELY FROM HAMMACHER
SCHLEMMER. TO ORDER BY PHONE, CALL 1-800-543-3366, 24 HOURS A DAY,
7 DAYS A WEEK, OR ORDER ON-LINE AT: www.hammacher.com.

WELCOME EVERYONE TO ZERO EMISSION TRANSPORTATION
OUR AMAZING COMMUTE-BOARD® TRAVEL-X is your new “BEST
FRIEND” and your new favorite household “PET” or Personal-Elec-
tric-Transporter.....Its the “WORLD’S MOST ULTRA-PORTABLE
E-SCOOTER”! So get ready to enjoy worry free, non polluting travels
while saving a ridiculous amount of money.....WHY? Because your new
PET transports you 500 miles on just 10¢of electricity. And the fossil
fuel conversion rate is totally insane : Its like paying 1/2¢per gallon of
gas at the pump! And like lling up your car’s fuel tank for just 7.5¢.....
Unheard of a totally disruptive.
HINT: First gear is rarely used. Use second and third gears for best
performance. You may nd rst gear helpful climbing steep grades.
HILLS & GRADES: Use a combination of throttle power and manual
legs kicks to climb most hills & grades.
RELEASE OF ALL LIABILITY
By using or coming in contact with the COMMUTE-BOARD® product,
C-B® owner(s) &/or user(s) hereby all agree to release and hold harm-
less the C-B ® product’s manufactuer, importers, distributors ,dealers
, sales reps, freight forwarders, &/or afliated parties and companies,
including but not limited to the ofcers of the above mentioned compa-
nies, from any and all liability relating to any injury, damage to person(s)
or property, or loss that may occur while owner(s) &/or user(s) oper-
ate &/or come in contact with the COMMUTE-BOARD® product.

EXTREME CAUTION: Go as slow as possible. WHERE FULL PROTEC-
TION: Helmut/knee pads/elbow pads/wrist guards and driving gloves.
Your are NOT riding a bicycle with big wheels. You need to "slow down"
dramatically, to provide yourself with sufcient time to react, in order to
avoid hard to detect hazardous objects on the roadway
that you are not used to watching out for, such as 1/4th"diameter
tree branches, 1/8th"diameter stones or rocks , surface ruts, uneven
pavement, pot holes, water lled pot holes, &/or any object jutting
out from an indoor or outdoor riding surface. Note- such objects in
the roadway can jam/ stop the forward motion of any scooter with
smaller type diameter wheels, C-B ® included, ejecting you off the
stand-on deck to the road surface. When driving your C-B ® , you need
to "constantly monitor" the road surface ahead of you for hazardous
roadway objects and dangerous cracked, rutted, pot holed or uneven
pavement.
WARNING: Please be aware that failure to REDUCE the C-B's ® SPEED
will drastically increase the possibility you will hit road objects that could
and will throw you off C-B's ® deck to the road surface, possibility caus-
ing serious injury to you &/or persons nearby you.

Wearing full protective gear will greatly reduce your chance of being
injured should you be involved in an accident, regardless of who caused
the accident. Watch out for reckless bicycle riders, reckless automobile
drivers, and pedestrians moving suddenly &/or unexpectedly into your
path. Outdoors, only drive your C-B ® in bike lanes with pavement
you have pre check to be smoothly paved and free of hazardous road
objects, on low speed 5 MPH and under surface streets you have pre
checked to be smoothly paved and free of hazardous road objects,
and where allowed, on sidewalks you have pre checked to be smoothly
paved and clear of hazardous objects. Indoors, drive and enjoy your
emission-free C-B ® anywhere and everywhere you are allowed to,
always rst pre checking your intended route, to avoid driving on sur-
faces that are not completely smooth and free of hazardous objects.
CAUTION: Do not drive C-B ® on grass, dirt, gravel, sand, mud, icy
or snowy surfaces , through puddles, in heavy rainy downpours, heavy
winds, or on cold weather surfaces that have not been properly salted.
Though your C-B ® in designed to be driven in all four seasons, avoid
driving C-B ® on days that have excessively hot or excessively cold out-
door temperatures.
WARNING: Do not immerse C-B ® in water . Though your C-B is
equipped with front and rear LED lights, exercise
special caution when driving at night. Hazardous objects on the road-
way at night are much harder to spot.

Thank you for choosing our COMMUTE-BOARD® TRAVEL-X
scooter. This manual is a detailed product introduction.
Reading the manual can help you:
A)Stay safe while driving it
B)Master the basic functions required to unfold, fold and
ride your C-B®
C)Understand the structure and composition of the C-B®
scooter and general maintenance methods
WARNING: Before driving your C-B® for the rst time, you
must charge your battery to 100% on the dash/display;
failure to do so can permanently damage the battery pack
and void the limited 1 year factory warranty.

1
BATTERY CARE: WARNING: BEFORE FIRST USE, CHARGE UP BATTERY
PACK TO 100% ON DASH/DISPLAY.Failure to do so can cause damage
to your battery pack. Try to avoid deep discharging of battery multiple
times to less than 10% charge. Over time,this may damage your bat-
tery pack or cause the need to replace your battery pack more often
than would normally be required. Always re-charge battery to 100% af-
ter riding. Every time you park, stow or allow your COMMUTE-BOARD™
to be stored without using it for extended periods of time,make sure
that you rst turn off the initial power using a 5 second press down on
the dash display button, then,also immediately turn the master power
switch off using the red ON/OFF master power switch,located under
the front deck one,moving the switch to the "OFF” position. Failure to
do so will result in your battery charge depleting on the display. Allowing
this to happen multiple times can permanently damage your battery
pack. STORING FOR EXTENDED PERIODS ON TIME : You can store
your COMMUTE-BOARD™ for extended periods of time,as long as you
recharge the battery pack to a full 100% charge at least EVERY 90
DAYS. Failure to do time may permanently damage your battery pack,
causing it to no longer hold a charge,requiring the battery pack to be
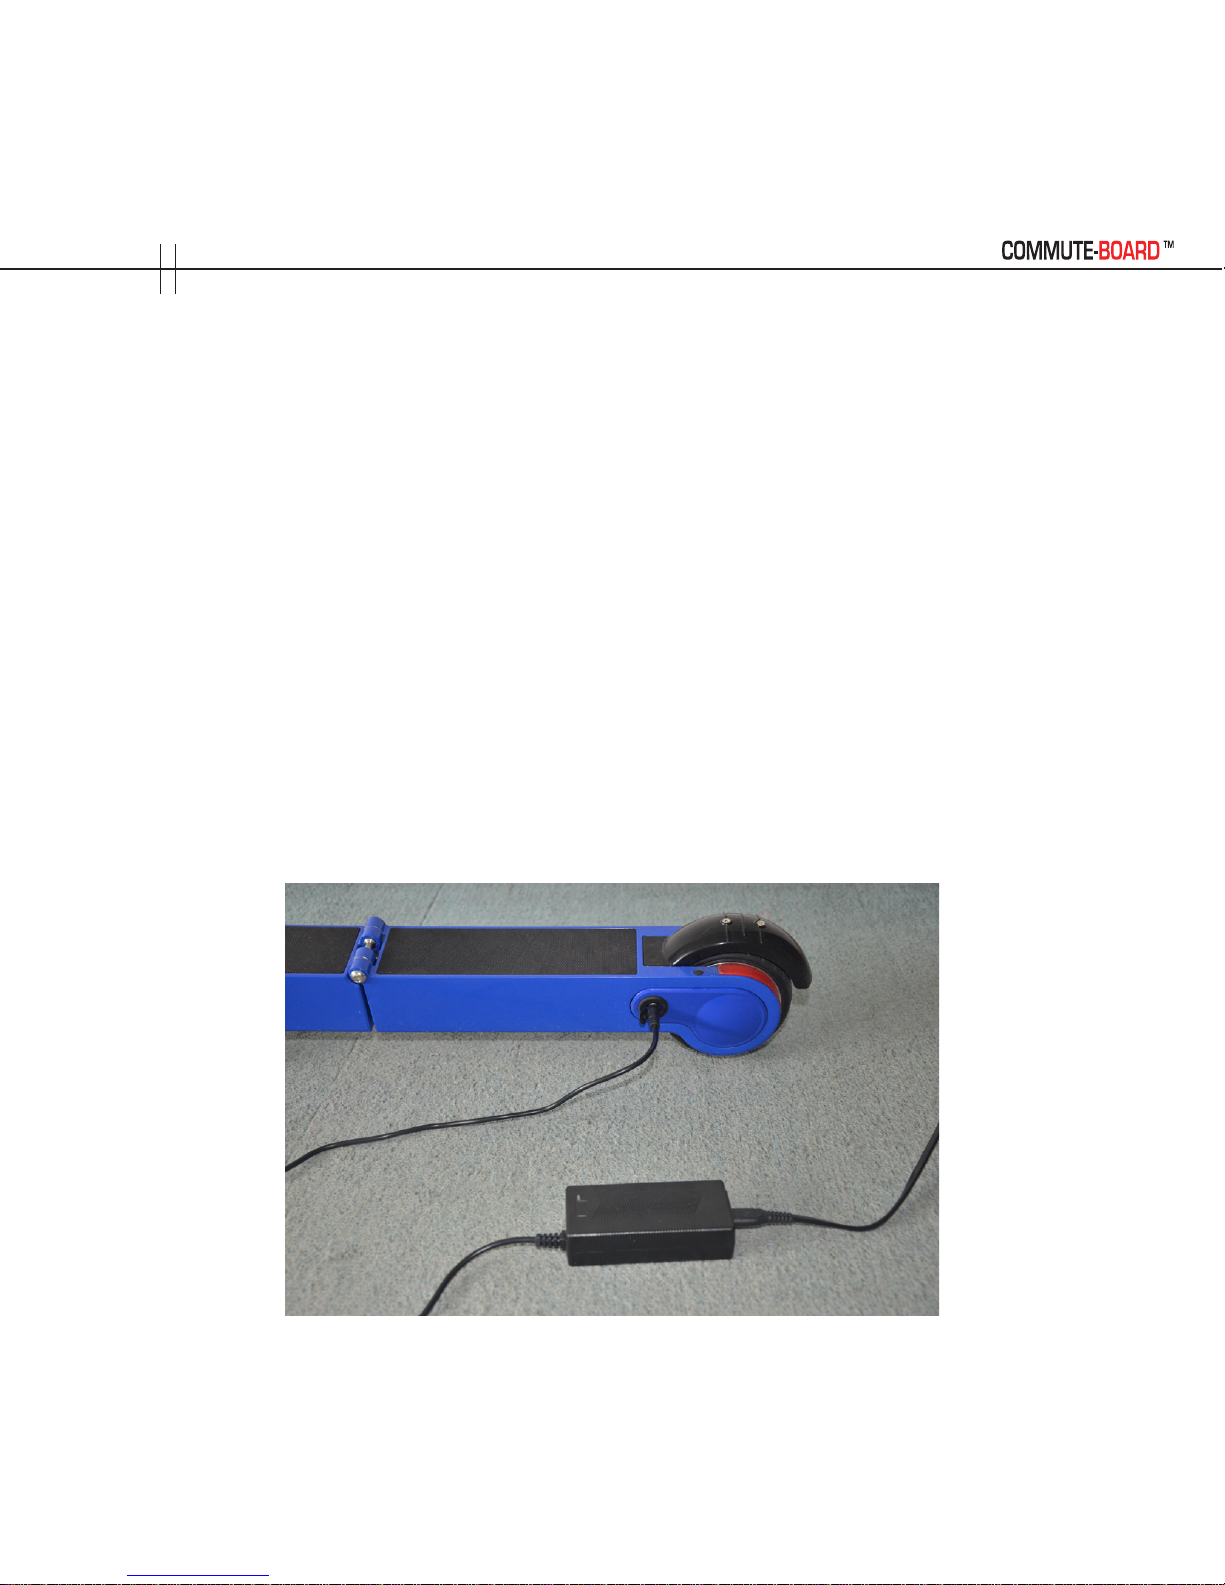
replaced. CHARGING THE BATTERY: Always plug the electrical cable
from the charger unit into the COMMUTE-BOARD’s™ charging port
FIRST; then proceed to plug the cord from the charger into any std.
110 volt wall outlet. Look for a “RED LIGHT”to appear on the char-
ger unit.That indicates your battery is recharging. Recharge time is
around 30 minutes to 4 hours,depending on the % the battery pack
is discharged. Once a full charge to 100% is achieved,a solid “GREEN
LIGHT”will appear on the charger unit Once a solid green light appears
on the charger unit,immediately discontinue charging following this
procedure; rst, unplug the cord from the wall outlet Then, unplug the
cable from the charging port on your COMMUTE-BOARD™.Wrap the
cord and cable around the charger unit Carry the charger with you
inside your rolling trolley carry bag, backpack or in a shirt, pants,jacket
pocket, purse or in a manly satchel with shoulder strap.

2
LIMITED MANUFACTURERS FACTORY WARRANTY: The manufacturer
warrants to the original purchaser that the COMMUTE-BOARD™ prod-
uct is free of all defects in materials, components and workmanship for
a period of 1 year from date of purchase. Not covered by this limited
factory warranty is abuse,neglect,accidents, racing, modications,
alterations and/or repairs made by person’s other than authorized
factory repair personal. For a period of 1 year the manufacturer will,
at its sole decision,either repair or replace any defective components,
free of charge. If shipping of replacement parts or shipping the product
back to the factories’ return center and, after repair/replace,back to
the customer is required,the customer will pay for all such shipping.
The battery pack is included in the limited warranty / unless it shows
signs of gross abuse;neglect or improper use. Failure to follow any of
the instructions in this products manual may void the limited 1 year
factory warranty.

3
Electric Brake
Sliding button that unfolds and
re-folds the handle bars
Accelerator Clip
Hook
Front Lamp
Brake
Screw
Motor
Rear Lamp
Rear Tire
Screen
Power on/off

4
Battery
Pack
Sliding button that unfolds
and re-folds the handle bars
Shopping Hook
Folding metal deck lock

5
Operating instructions
HOW TO TURN ON AND OFF THE C-B® POWER?
“First, after unfolding C-B® to driving mode, reach under ft. deck
one, locate the red on/off master power switch and using one nger,
ip the red on/off master power switch to “ON” position”. HINT: The
single black button located on the dash/display performs all the follow-
ing functions:
1.Press down black button on dash/display 5 seconds
to turn the C-B® power on for driving. Press button down 5 seconds to
turn off power on the dash/display”.
2.Turning on the front & rear lights
Press the button for 2 seconds, headlight and tail lights on.
3.Turning off the front & rear lights
Press the button for 2 seconds , headlight and tail light off
4.Changing gears:
Press the button for 1 second to change the gears: 1/2/3

6

7

8

9

10
TECHNICAL PARAMETERS
THE MOTOR PARAMETERS :
TOP SPEED :
THE CHARGER PARM ETER :
BATTERY PARAMERERS :
CHARGING TIME :
MAXIMUM LOAD :
LARGEST TRAVEL :
OVERALL DIM ENSIONS :
NET WEIGHT :
24V 250W
15 MPH
INPUT 100-240V
50/60Hz 2.2A(MAX)
29.4V /42V 1A
24V 8.8Ah
EST 3H
150KG/330LBS
18MILE
Unfold: 37 *41.73 * 17.12 inch
Folding: 26.06 * 10.71 * 4.96 inch
10.5KG/23LBS

11
LEARNING TO RIDE C-B. FOR THE FIRST TIME AND BEYOND!
CAUTION: Find a fairly empty parking lot to practice your C-B ® driving
skills. Without using the throttle control, try using C-B rst as a manual
'kick scooter'. C-B can free wheel forward like a manual push type kick
scooter. Use manual leg kicks to scoot around a bit to that a better
'feel' for balancing aspects of your new C-B®. Once you feel condent
you are "READY" for a ride using the powered 'thumb push throttle',
slide master red off/off switch, located under front deck one, to the
"ON" position. Press the power on/off button of the dash/display down
5 seconds. The dash will light up. All power is on and you are ready
to take your rst powered ride. BEFORE pressing down on the thumb
throttle, place one foot on the deck and using your other foot and leg,
manually leg kick the scooter forward, hop on with other foot, and only
then press your thumb down on the throttle, located on right side of
the handle bars. Now the front hub power drive motor wheel is propel-
ling your forward. The press down thumb electronic brake is located on
the left side of the handlebars. IMPORTANT WARNING; When rst us-
ing the thumb press down brake, lightly "feather" the brake, bend your
knees , crouch down, and position yourself so you are leaning slightly
back on the deck. CAUTION: The electronic brake is powerful; if you
press on it too abruptly while you are still learning how to ride your C-B
®, and if you fail to bend your knees, crouch down and lean back slight-
ly while getting a "FEEL FOR" the brake, you could suddenly feel yourself
'lurch forward' toward the steering column, experiencing a feeling of
'loss of control'. Again, lightly feathering the brake, and applying light
thumb pressure to the brake while you are in the learning stage will
avoid a 'lurching forward' feeling toward the steering column.

12
GETTING STARTED:
Refer to the photos in this manual. Carefully open carton with a pock-
et knife, box cutter, key etc. Remove the shrink wrap. Gently remove
the folded C-B® from the carton and place it onto the top of any small
stable table covered with a tablecloth or towel. Lean the folded C-B®
onto it's right side. Locate the 'manual Instructions booklet' and the
white small box with the charger/charger cable inside. Set the char-
ger/charger cable box aside but keep the manual handy. CAUTION: Be
careful when removing the folded C-B from the white foam packing and
carton, because the "carry handle" hook/latch and catch slot may not
yet be secured. {The kickstand was set in its folded up position at the
factory}. Hint: Make sure kickstand is in the folded up position, before
removing C-B from the carton.. After the folded C-B® has been placed
on a table top, onto its right side, study the underside of lower front
deck.
1. Find the “red master power, on/off switch”, located near the rear
underside of front deck one. {The red master power switch is set in the
“off” position at the factory}.

13
Next, nd the big, black metal spring loaded movable “deck lock”,
located about 1” to the right/rear of the red master power on/off
switch. Using ONLY your rst or index nger of either hand press “UP”
on the “at section” of the black metal deck lock, closest to the red
master power on/off switch. Press up on that exact at section of the
deck lock and then quickly release nger pressure a few times, as this
is good practice for later; see the manual for: {how to lock the two
decks}; {how to unlock the two decks}. IMPORTANT: If the “black metal
spring loaded carry handle hook”, located at the bottom rear section
of the folded steering column has NOT yet been securely connected
into the “catch slot” located in the top rear section of top folded, rear
deck 2, make the hook/slot connection now, by using the rst, or index
nger of either hand to “pull out” the black metal hook and then insert
the edge of the hook securely into the catch slot. Now, you can “lift”
the folded C-B® using its hooked, secured “carry handle”, by using one
hand to grasp the folded steering column carry handle by its underside,
positioning your 4 ngers under the forward most section of the “folded
steering column carry handle”. {This is the carry handle’s best point-of-
balance}. Using the now secured, hooked carry handle, lift the folded
C-B off the table and place the folded C-B® onto the oor of your house
or garage. Immediately fold down the kickstand.
Table of contents
Popular Scooter manuals by other brands

Denver
Denver SEL-90100F Original manual

Clearwell Mobility
Clearwell Mobility Admiral Mk3 user manual

Electric Mobility
Electric Mobility EM 140F owner's manual

Lambretta
Lambretta V50 Special Assembly manual

Pride Mobility
Pride Mobility Go-Go Elite traveller owner's manual

Civibikes
Civibikes CHEETAH user manual