Competition Dynasty 3D Edison User manual

User's Manual

Package Content
▓One unit of 3D Edison system included
▓3D Active Shutter Glasses included (How many glasses base on
your purchase
▓ One unit of Remote Control included
▓ One unit of Power Adapter included
▓ One unit of HDMI Cable (1M included
Overview
This 3D Edison converter will allow you to connect 2D/3D HDMI device
to any 2DTV,Monitor and LCD Projector through HDMI. It can also
generation frame rate convert1080P@24 up to 1080P@60.
User environment
P
lease turn off the light to avoid light and keep Lumen<3 pollution and
adjust/reduce the backlight and brightness of the TV moderately to reduce
flickering to achieve better visual results.
□Download Lumen meter tool

■IOS
■IOS、Android:
1. Into Appstore/
Google play Store
2. Search Luxmeter.
3. I
nstall Luxmeter app.
To use your
3D
Plug all cables to the appropriate locations on the
Connector a HDMI input cable to the HDMI input.
Connector a HDMI output cable to the HDMI output.
Connector USB cable to 3D glasses(optional .
Connector the
■Android
Google play Store
.
nstall Luxmeter app.
3D
Edison:
Plug all cables to the appropriate locations on the
3D
Edison box
Connector a HDMI input cable to the HDMI input.
Connector a HDMI output cable to the HDMI output.
Connector USB cable to 3D glasses(optional .
Connector the
3D Edison power supply.
Edison box
Connector a HDMI output cable to the HDMI output.

The status o the red power led
The
power LED will glow red when in use. When the power cable
input the power LED will quickly turn on, then BLINKING and waiting
receives HDMI signal
the 3D
Edison handshake has been completed.
The status o the red power led
power LED will glow red when in use. When the power cable
input the power LED will quickly turn on, then BLINKING and waiting
transit
, and then on permanently to indicate that
Edison handshake has been completed.
power LED will glow red when in use. When the power cable
input the power LED will quickly turn on, then BLINKING and waiting
, and then on permanently to indicate that

The status of
LEDin red
LED OFF: Insufficient power. Use the
LED BLINKING: The
accept an HDMI
signal. (The
LED ON: The 3D
Edison
HDMI signal.
Buttons on Remote and unctional
【Power Button
】
Try to go nearly as possible to
within good range and in line of sight. Once you press the power
button, the LED
light behind
【3D Button】
Press it once and it should turn your screen blurry meaning you are in
3D mode. It is
converting a 2D image to 3D with a press of this button.
These are the directional buttons. You'l
through different settings and hitting "Ok" to set the setting etc.
【
OSD Button (on
Here's where you'll access pretty much all the settings for
except for the settings for the glasses.
【OSD
Exit Button
L
et's you go to your previous step or exit out of the OSD.
【
Glasses Button
This open
up a setting that's not available in the OSD menu. You get a
menu with 2 panel
settings: LV and SL. You can adjust both
and SL from 1-
9. This is basically where you try to get rid of any
ghosting issues.
LEDin red
may be used for troubleshooting:
LED OFF: Insufficient power. Use the
3D
Edison power supply.
LED BLINKING: The
3D
Edison is receiving power and is
signal. (The
3D
Edison into save power mode
Edison
is powered and receiving and decoding the
Buttons on Remote and unctional
】
Try to go nearly as possible to
3D
Edison to power it on. IR must be
within good range and in line of sight. Once you press the power
light behind
3D Edison goes red.
Press it once and it should turn your screen blurry meaning you are in
converting a 2D image to 3D with a press of this button.
【Directional Buttons】
These are the directional buttons. You'l
l be using this for cycling
through different settings and hitting "Ok" to set the setting etc.
OSD Button (on
-screen display aka menu .
Here's where you'll access pretty much all the settings for
except for the settings for the glasses.
Exit Button
】(aka return/back button
et's you go to your previous step or exit out of the OSD.
Glasses Button
】
up a setting that's not available in the OSD menu. You get a
settings: LV and SL. You can adjust both
9. This is basically where you try to get rid of any
may be used for troubleshooting:
Edison power supply.
Edison is receiving power and is
ready to
Edison into save power mode
is powered and receiving and decoding the
Edison to power it on. IR must be
within good range and in line of sight. Once you press the power
Press it once and it should turn your screen blurry meaning you are in
converting a 2D image to 3D with a press of this button.
l be using this for cycling
through different settings and hitting "Ok" to set the setting etc.
Here's where you'll access pretty much all the settings for
3D Edison
et's you go to your previous step or exit out of the OSD.
up a setting that's not available in the OSD menu. You get a
settings: LV and SL. You can adjust both
panel LV
9. This is basically where you try to get rid of any

【HD Button】
TV be compatible with
【FHD Button
E
njoy content in Full HD if your TV has Full HD capability.
【TV Button】
To change
things back to normal.
【VR Button】
This is for people with Virtual Reality headsets. So, if you want to
experience what guessing is limited VR this is for you.
【
3D Depth Buttons
L
eft (purely white arrow and right (black arrow with outer white line
arrows. The left arrow when pressed for the first time is adjusting for
the inward setting. The left arrow when pressed during the inward or
outward setting just cycles through their settings (but doesn't change
to inward or outward. The right arrow when
is adjusting the outward setting. The right arrow when pressed during
the inward or outward setting just cycles through their settings (but
doesn't change to inward or outward. There are three settings to
cycle through: weak, me
【Mute Button】
Pressing it makes no difference.
Quick Start
Guide
1.
Plug all cables to the appropriate locations on the
Connector a HDMI input cable to the HDMI input.
Connector a HDMI output cable to the HDMI output.
Connector USB cable to 3D glasses(optional .
Connector the
TV be compatible with
3D
Edison if it's not compatible with FHD.
njoy content in Full HD if your TV has Full HD capability.
things back to normal.
This is for people with Virtual Reality headsets. So, if you want to
experience what guessing is limited VR this is for you.
3D Depth Buttons
】
eft (purely white arrow and right (black arrow with outer white line
arrows. The left arrow when pressed for the first time is adjusting for
the inward setting. The left arrow when pressed during the inward or
outward setting just cycles through their settings (but doesn't change
to inward or outward. The right arrow when
pressed for the first time
is adjusting the outward setting. The right arrow when pressed during
the inward or outward setting just cycles through their settings (but
doesn't change to inward or outward. There are three settings to
cycle through: weak, me
dium, and strong.
Pressing it makes no difference.
Guide
Plug all cables to the appropriate locations on the
3D
Edison box
Connector a HDMI input cable to the HDMI input.
Connector a HDMI output cable to the HDMI output.
Connector USB cable to 3D glasses(optional .
Connector the
3D Edison power supply.
Edison if it's not compatible with FHD.
njoy content in Full HD if your TV has Full HD capability.
This is for people with Virtual Reality headsets. So, if you want to
eft (purely white arrow and right (black arrow with outer white line
arrows. The left arrow when pressed for the first time is adjusting for
the inward setting. The left arrow when pressed during the inward or
outward setting just cycles through their settings (but doesn't change
pressed for the first time
is adjusting the outward setting. The right arrow when pressed during
the inward or outward setting just cycles through their settings (but
doesn't change to inward or outward. There are three settings to
Edison box
Connector a HDMI input cable to the HDMI input.
Connector a HDMI output cable to the HDMI output.

2.
Grab the remote that was included in the pac
make sure the batteries are alive.
3. Press
【
Power Button
】
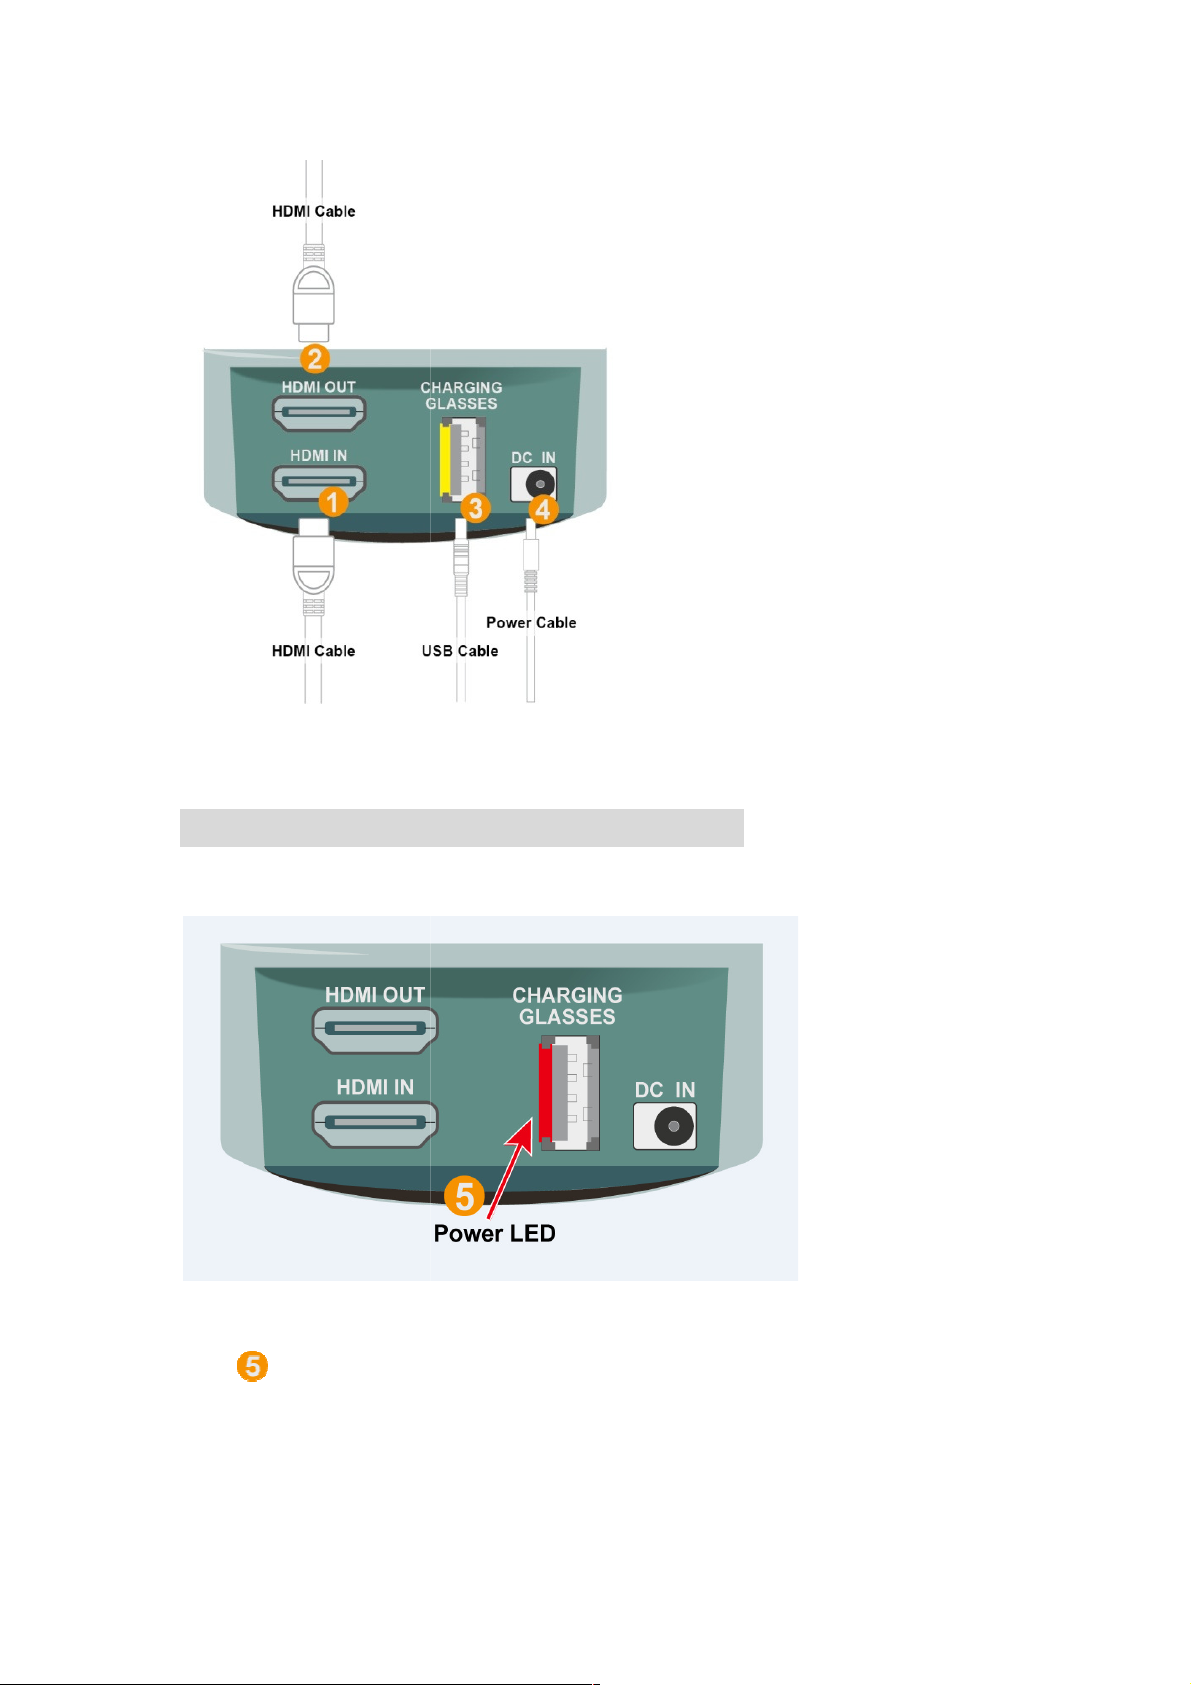
check power led states.
4.
Press
【
3D Button
】
on the remote towards
blurry. What you are doing here is converting a 2D image so that it can be seen in
a 3D format.
5.
There are two buttons
【
3D Depth Left Arrow
】
and
Left Arrow
】
and
Keep In world and Week
propose to using for LDC project
6.
Make sure you are in the right scene mode. You can see what scene you
are in by going to the OSD menu.
have our choices:
【
【【
【
Movie
a movie, choose movie. If you are playing a video
※
Note: Only stay on
【
【【
【
2D
The others options
for SBS
【
【【
【
OSD
】
】】
】
>
【
【【
【
3D
】
】】
】
>
【
【【
【
3D(SBS)
【
【【
【
OSD
】
】】
】
>
【
【【
【
3D
】
】】
】
>
【
【【
【
3D(
【
【【
【
OSD
】
】】
】
>
【
【【
【
3D
】
】】
】
>
【
【【
【
2D
】
】】
】
7.
Grab your 3D glasses. Hit the
button in the middle . You'll see the glasses turn darker. If the glasses stay that way
the whole time, it's a success. If the glasses go dark for
are unsuccessful. Reason could be you are not in 3D mode. You must be in 3D mode
to have the glasses stay on.
use. (b After full charge, the LED will turn
working once the system left the 3D mode
working after 5 seconds.
Grab the remote that was included in the pac
kaging. Place the batteries and a
make sure the batteries are alive.
】
on the remote towards 3D
Edison to turn on system and
on the remote towards
3D Edison
. This will make the screen
blurry. What you are doing here is converting a 2D image so that it can be seen in
There are two buttons
with arrows at the very bottom of remote. They are
and
【
3D Depth Right Arrow
】
.Press once
Keep In world and Week
for TV/Monitor
(Medium/Strong setting are
propose to using for LDC project
.
Make sure you are in the right scene mode. You can see what scene you
are in by going to the OSD menu.
【
【【
【
OSD
】
】】
】
>
【
【【
【
3D
】
】】
】
>
【
【【
【
2D-3D
】
】】
】
Scene and you
Movie
】【
】【】【
】【
Games
】【
】【】【
】【
Picture
】【
】【】【
】【
Text
】
】】
】
.
If you are watching
a movie, choose movie. If you are playing a video
game, choose Games.
2D
-3D
】
】】
】
mode that you can make this choice
for SBS
、
T/B
、
2D mode:
3D(SBS)
】
】】
】
Support input SBS ormat
3D(
T/B)
】
】】
】
Support input Top/Bottom ormat
】
】】
】
Back to input 2D ormat
Grab your 3D glasses. Hit the
【
power buttonon glasses
】
(small polygon shape
button in the middle . You'll see the glasses turn darker. If the glasses stay that way
the whole time, it's a success. If the glasses go dark for
4 sec or 6
and stay off, you
are unsuccessful. Reason could be you are not in 3D mode. You must be in 3D mode
to have the glasses stay on.
※
(a The glasses needs to charge
before you fist
use. (b After full charge, the LED will turn
-off automatic.(c
Glasses will
working once the system left the 3D mode
(d T
he glasses will automatically stop
kaging. Place the batteries and a
lso,
Edison to turn on system and
. This will make the screen
blurry. What you are doing here is converting a 2D image so that it can be seen in
with arrows at the very bottom of remote. They are
.Press once
【
Depth
(Medium/Strong setting are
Make sure you are in the right scene mode. You can see what scene you
Scene and you
If you are watching
game, choose Games.
mode that you can make this choice
.
Support input Top/Bottom ormat
(small polygon shape
button in the middle . You'll see the glasses turn darker. If the glasses stay that way
and stay off, you
are unsuccessful. Reason could be you are not in 3D mode. You must be in 3D mode
before you fist
Glasses will
stop
he glasses will automatically stop

8.
Make sure your room is dark
constant flickering. Closing the blinds/shades should do a good
9.
Play and pause around a movie (recommend animation or movies that include
animation such as Avatar, Cars, Frozen, Toy Story etc. . If you are seeing constant
flickering on the screen, try adjusting the
disabling motion enhancers
10. Press the
【
Glasses B
you adjust the 3D image so the 3D image is as clear as possible.
right picture as Left
eye see left picture.
11.
Notice in the previous step (9. , there are 2 settings you have to adjust: LV and
SL. You can adjust both from 1
possible.
※
3D Mode recommend LV2 SL3 ,2D to 3D mode
SL3/LV9 SL3
with Movie scene as the selection and a Weak
Speci ications
Make sure your room is dark
(Keep LUX <3
as possible to avoid the annoying
constant flickering. Closing the blinds/shades should do a good
enough job.
Play and pause around a movie (recommend animation or movies that include
animation such as Avatar, Cars, Frozen, Toy Story etc. . If you are seeing constant
flickering on the screen, try adjusting the
Backlight/ Brightness
of your TV. Also,
disabling motion enhancers
and some of the TV settings.
Glasses B
utton
】
on the remote towards 3D
Edison. This is where
you adjust the 3D image so the 3D image is as clear as possible.
※
eye see left picture.
Notice in the previous step (9. , there are 2 settings you have to adjust: LV and
SL. You can adjust both from 1
-
9. Adjust until you see as minimal ghosting as
3D Mode recommend LV2 SL3 ,2D to 3D mode
recommend
with Movie scene as the selection and a Weak
In
ward setting.
Speci ications
as possible to avoid the annoying
enough job.
Play and pause around a movie (recommend animation or movies that include
animation such as Avatar, Cars, Frozen, Toy Story etc. . If you are seeing constant
of your TV. Also,
Edison. This is where
※
Right eye see
Notice in the previous step (9. , there are 2 settings you have to adjust: LV and
9. Adjust until you see as minimal ghosting as
recommend
LV1 SL3 / LV7
ward setting.

□
To support all glasses in the operative distance
IR receiver
location
■
No need a 3D TV or 3D
■
Support HD/FHD/4K
■
Support 4K 2D TV / 4K Active 3D TV @FHD Mode.
■
With chargeable shuttle RF2.4G 3D glasses, simply focus to have
clear 3D image.
■
Depth of field adjust available.
■
Leverages NVDIA ‘s award winning 3D Vision technology .
■
HDMI inputs resolution :
■
HDMI outputs resolution :
■
3D Input Format : Side by Side (Half /Top and Bottom/Frame
Packing
■
3D Output Format : 3D Frame Packing/Side by side supported
■
2D to 3D conversion.
■ 2D Bypass,3D B
ypass
■
HDCP1.2/HDMI 1.4a
■ 2D to 3D Image:
To support all glasses in the operative distance
.
location
No need a 3D TV or 3D
Projector, still enjoy 3D vision.
Support HD/FHD/4K
2D TV.
Support 4K 2D TV / 4K Active 3D TV @FHD Mode.
With chargeable shuttle RF2.4G 3D glasses, simply focus to have
Depth of field adjust available.
Leverages NVDIA ‘s award winning 3D Vision technology .
HDMI inputs resolution :
FHD/HD/480P (24Hz/60Hz
HDMI outputs resolution :
FHD/HD (60Hz Supported
3D Input Format : Side by Side (Half /Top and Bottom/Frame
3D Output Format : 3D Frame Packing/Side by side supported
2D to 3D conversion.
ypass
HDCP1.2/HDMI 1.4a
Projector, still enjoy 3D vision.
With chargeable shuttle RF2.4G 3D glasses, simply focus to have
Leverages NVDIA ‘s award winning 3D Vision technology .
Supported
3D Input Format : Side by Side (Half /Top and Bottom/Frame
3D Output Format : 3D Frame Packing/Side by side supported

(a 6 stage adjustment for Depth of Field
(b In world 3 levels
(c Out world 3 levels
(d user mode support
[Movie][Game][Picture][Text]
■ Power Supply:
(a AC100V-240V , 12VDAC/0.5A
(b CEC&DOE
(c LEVEL VI Compliant
■ System Size: 3.5(Ø x 10(H cm
■ System Weight: 300(g
Trouble shutting
For more new information, please visit our website.
www.xu-yun.com
Table of contents
Other Competition Dynasty 3D Glasses manuals