Concept2 BikeERG User manual

PRODUCT MANUAL
concept2.com
2
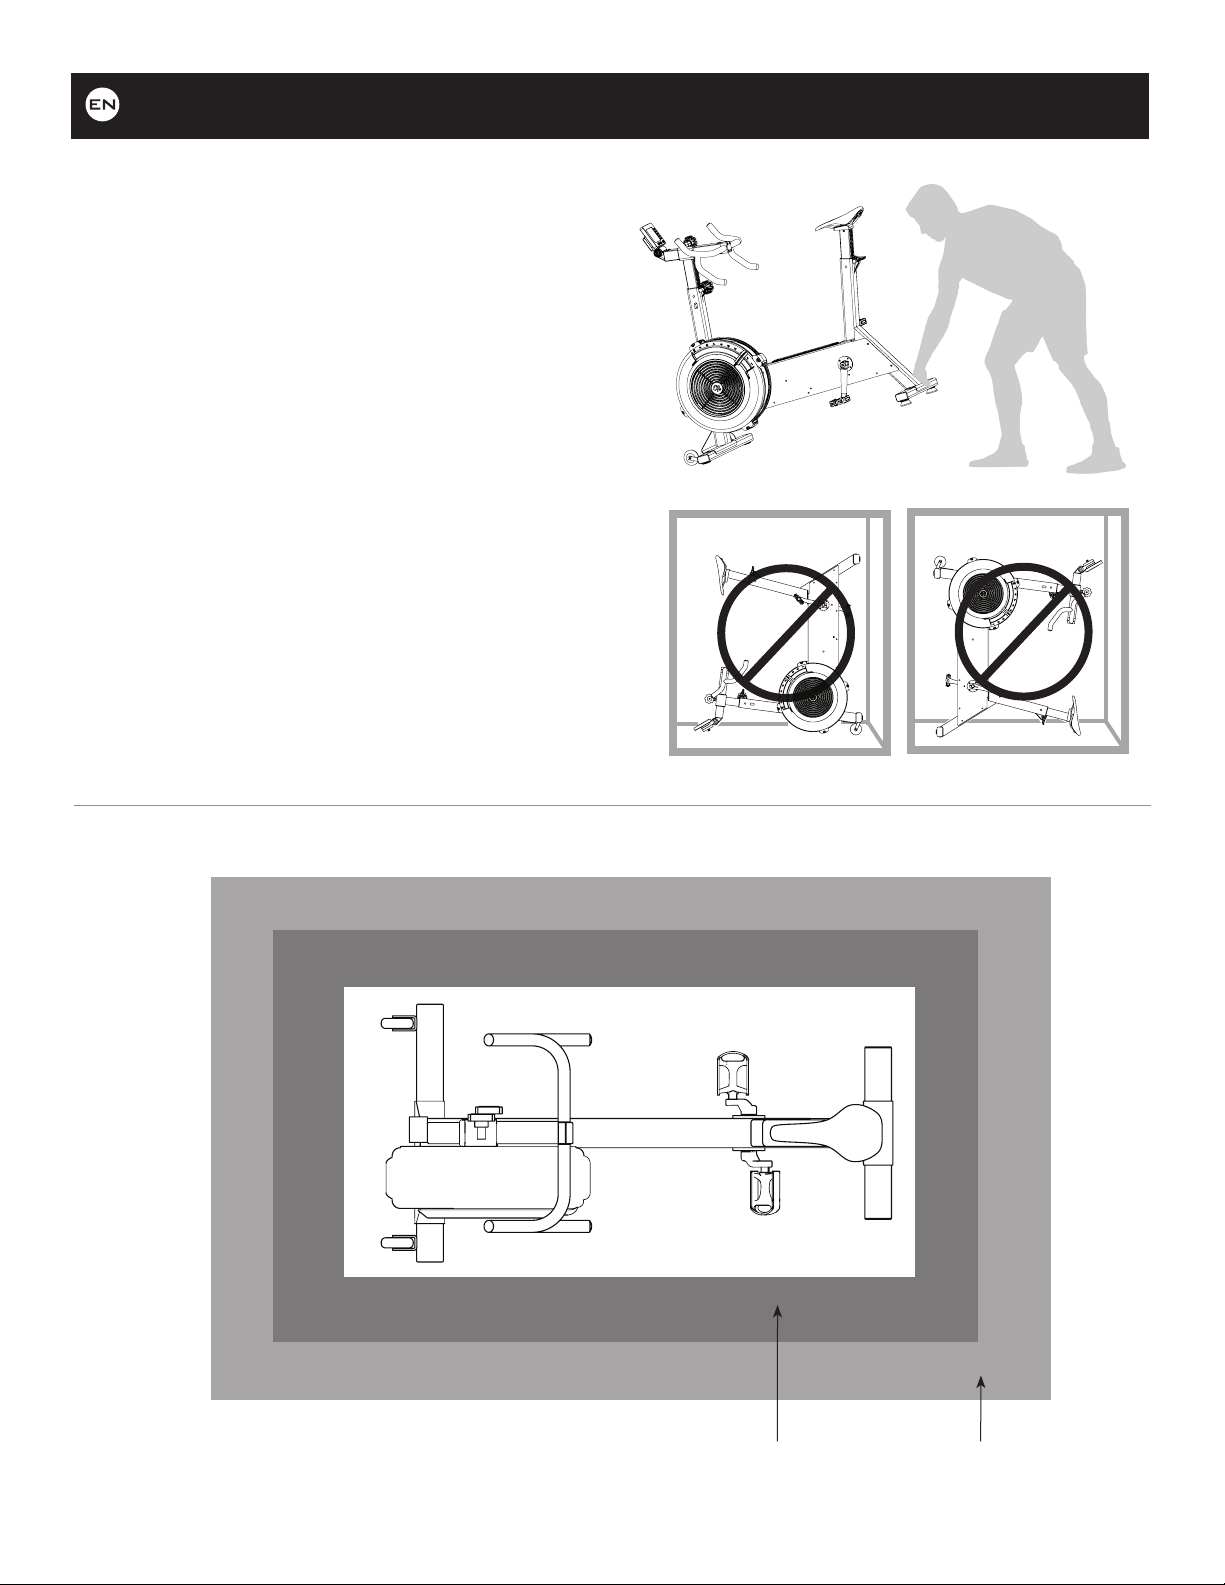
FREE AREA
72 in x 84 in
183 cm x 213 cm
TRAINING AREA
48 in x 60 in
122 cm x 152 cm
MACHINE DIMENSIONS
24 in x 48 in
61 cm x 122 cm
WEIGHT CAPACITY
300 lb
136 kg
Important Use and Safety Notes
• The machine should be used on a stable, level surface.
The rear foot has leveling pads that can be adjusted as
needed.
• To move the BikeErg, grasp the rear foot and lift until
the caster wheels start to roll (1).
• The BikeErg is intended for indoor use.
• Check fasteners for tightness according to the
Maintenance section on page 5.
• Use of this machine with a worn or weakened part
may result in injury to the user.
• When in doubt about the condition of any part,
Concept2 strongly advises that you replace the part
immediately with genuine Concept2 replacement
parts. Use of other replacement parts may result in
injury or poor performance of the machine.
• Keep children, pets and fingers away from pedals.
Pedals can cause injury.
• Do not stand the BikeErg up on end as the BikeErg
may tip over (2).
• Perform proper maintenance as described in the
Maintenance section on page 5.
PRODUCT DIMENSIONS
ENGLISH
1
2
3
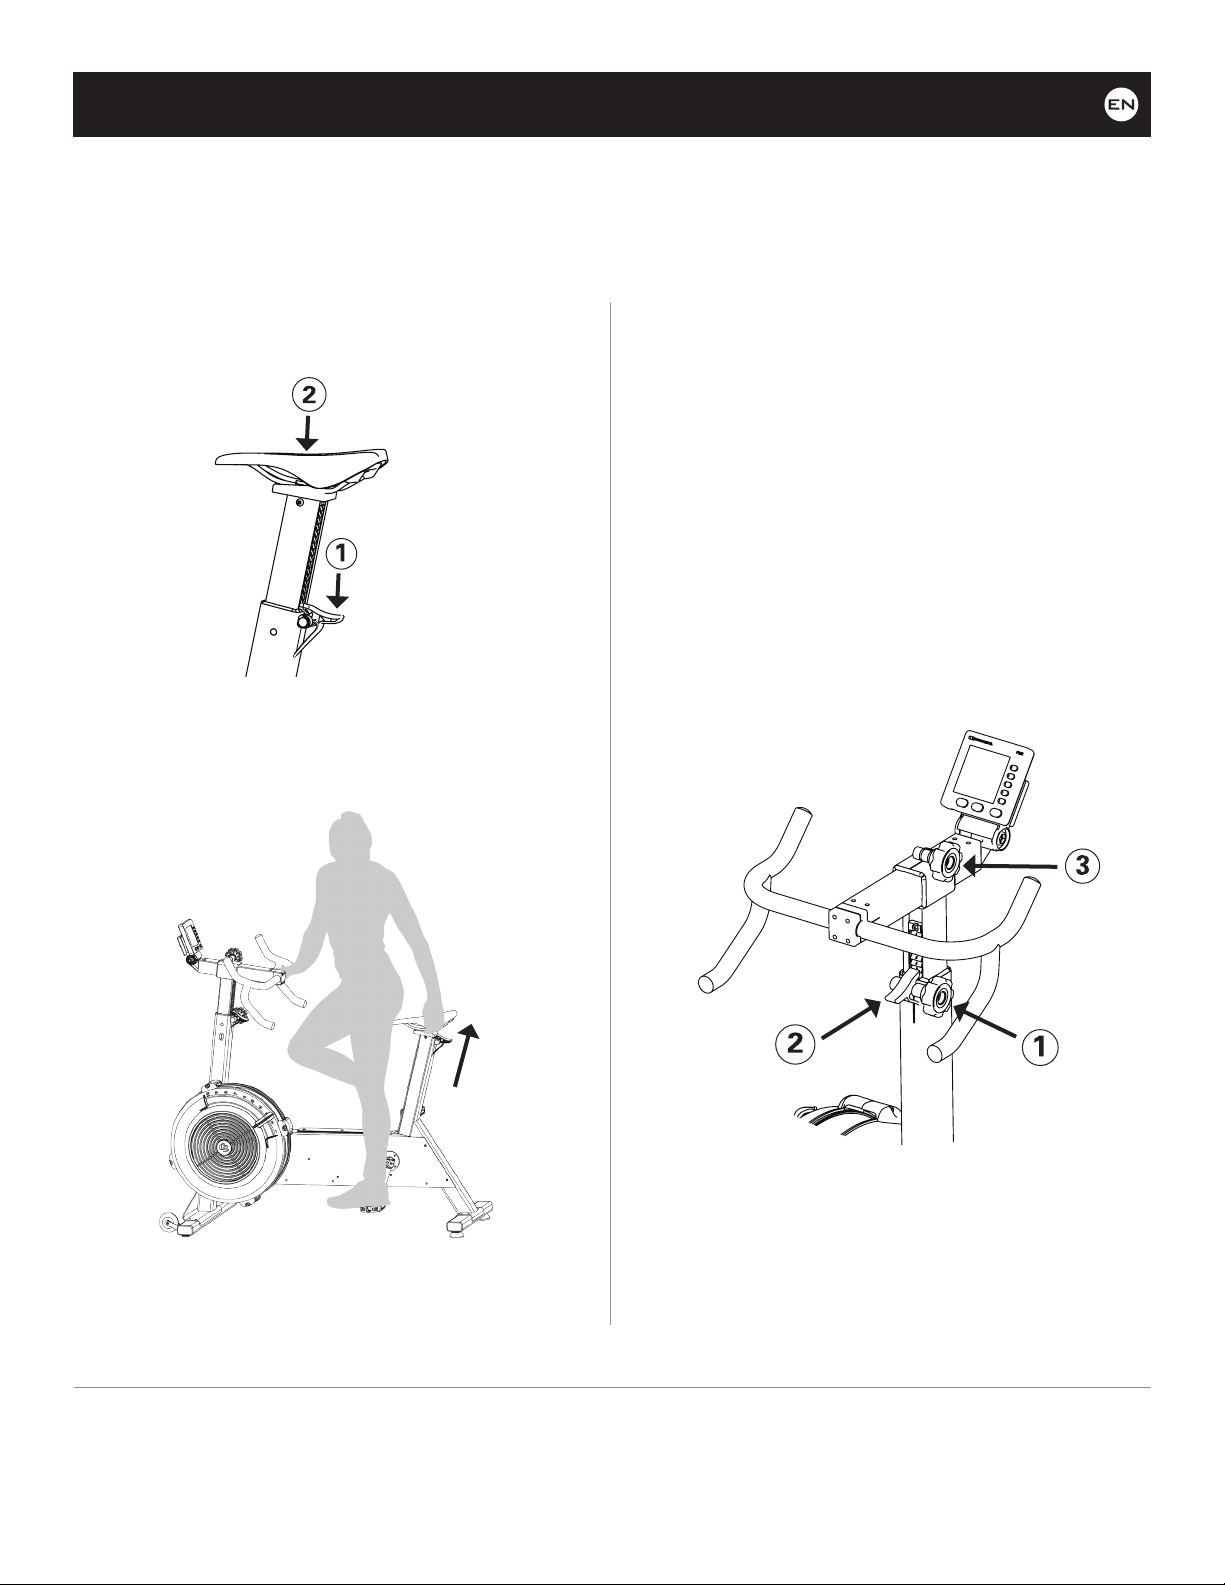
HOW TO ADJUST THE SADDLE
1. Release lever (1) and lower the saddle (2).
2. Step onto the BikeErg.
3. With your heel on the down pedal and your leg
straight, pull the saddle up to your body.
4. You should have a slight bend in your leg as you ride
with the ball of your foot on the pedal.
C
ENGLISH
HOW TO ADJUST THE HANDLEBARS
To adjust handlebar height:
1. Loosen the adjustment knob (1).
• To lower: release ratchet by pressing lever (2)
then press handlebars down.
• To raise: simply pull up to desired height.
2. Tighten adjustment knob (1).
To adjust reach position:
1. Loosen adjustment knob (3)
• Slide handlebars forward or back as desired.
2. Tighten adjustment knob (3).
Setting Up the BikeErg
The BikeErg provides a range of settings for the saddle and handlebars so that you can find the position that
is most comfortable and effective for you.
For information on using the BikeErg, including training tips, workouts, the free Online Logbook
and more, visit concept2.com/start.

4
Getting Started
1. Keep your workouts short and easy at first, to let your body adjust to the new exercise.
2. Gradually increase your cycling time and intensity over the first two weeks. Like any physical activity, if you increase the
volume and intensity too quickly, fail to warm up properly, or use poor technique, you will increase the risk of injury.
WORKOUT INTENSITY
User-Controlled Resistance
• The BikeErg offers you two ways of managing the resistance you feel and the resulting intensity of your workout: the
damper setting and your pedaling cadence. An increase in either one will raise the resistance that you feel, and if you
increase both, the resistance will go up even more quickly.
• You can cycle as hard or as easily as you wish. The BikeErg will not force you to work at any set intensity level. As you put
more effort into your cycling, you will go faster, produce more watts, and burn more calories. All of these outputs will be
measured and displayed by the PM5.
Damper Settings on the Flywheel
The BikeErg features a damper with settings from 1 to 10.
Higher numbers feel more like pedaling in a heavier gear.
Lower numbers feel like pedaling in a lighter gear.
For general fitness and a good aerobic workout, use a
damper setting where you can maintain a cadence in the
range of 60 to 80 rpm.
Drag Factor
The 1–10 damper setting scale is a quick reference for setting
the “gearing.” A more precise way to tune the “gearing”
is by viewing the drag factor, which is a measure of the
air resistance within the flywheel enclosure. To view drag
factor on the PM go to Main Menu > More Options > Display
Drag Factor. The BikeErg offers a drag factor range of
approximately 40 to 210.
Calibration
The BikeErg will prompt you periodically to verify the calibration, including whenever you program a distance that is part
of our Online World Ranking. The verification process (and recalibration, if required) is simple and the PM5 will guide you
through it. To start a verification or calibration at any other time, press More Options >Utilities > Calibration.
After moving the BikeErg to a different location, verify the calibration to assure accurate results.
ENGLISH
BEFORE YOUR FIRST WORKOUT
WARNING! Over-exercising may result in serious injury or death. If you feel faint, stop exercising immediately.
Consult your physician. Be sure that it is not dangerous for you to undertake a strenuous exercise program.
For information on using the BikeErg, including training tips, workouts, the free Online Logbook
and more, visit concept2.com/start.

5
Maintenance
RECOMMENDED MAINTENANCE
SCHEDULE
After first five Hours of Use
• Check all fasteners for tightness.
Daily
• Clean saddle, handlebars,
step pad and flywheel cover
with a cloth and cleaner
after use.
• Do not use bleach or coarse
abrasives.
Every 250 Hours of Use
• Check that the crank arms are tight on the crank
axle. Tighten the clamp screws if needed using the
L-key supplied with the BikeErg. See illustration.
• Check all fasteners for tightness.
• Check for dust inside flywheel with a flashlight.
Vacuum if needed. See illustrations at right.
Verify calibration after cleaning. On the PM go to
Main Menu > More Options > Utilities > Calibration.
As Needed
Check the fit of the seat post.
The seat post should move
up and down with only light
pressure applied. The seat post
fit can be adjusted using a ½”
wrench (not included) where
shown. Do not overtighten.
WARNING!The safety level of the machine can be maintained
only if it is examined regularly for damage and wear. Replace
defective or worn components immediately to ensure safety and
performance or keep machine out of use until repair.
2.
3.
1.
5.
6.
4.
7.
FLYWHEEL OPENING AND CLEANING
Loosen screws.
WARRANTY INFORMATION
Concept2 BikeErgs are backed by a limited 2 year and
5 year warranty. For complete warranty information in
the US and Canada, visit concept2.com/warranty.
For warranty information outside the US and Canada,
contact the authorized Concept2 dealer in your
territory. A list of authorized Concept2 dealers can be
found at concept2.com/international. If you do not find
a local dealer in your territory visit concept2.com or
email [email protected].
ENGLISH
B
DETAIL B
SCALE 1 : 4

07/19
PM5 Compliance Information
FCC ID: J2MPM5
WARNING: Changes or modifications to this unit not expressly approved by the party responsible for compliance could void the user’s authority to operate the
equipment.
NOTE: This equipment has been tested and found to comply with the limits for a Class B digital device, pursuant to Part 15 of the FCC Rules. These limits are designed
to provide reasonable protection against harmful interference in a residential installation. This equipment generates, uses, and can radiate radio frequency energy and, if
not installed and used in accordance with the instructions, may cause harmful interference to radio communications. However, there is no guarantee that interference
will not occur in a particular installation. If this equipment does cause harmful interference to radio or television reception, which can be determined by turning the
equipment off and on, the user is encouraged to try to correct the interference by one or more of the following measures:
• Reorient or relocate the receiving antenna.
• Increase the separation between the equipment and receiver.
• Consult the dealer or an experienced radio/TV technician for help.
This device complies with Part 15 of the FCC. Operation is subject to the following two conditions: (1) This device may not cause harmful interference, and (2) this
device must accept any interference received, including interference that may cause undesired operation.
IC: 6620A-PM5
Industry Canada (IC) Compliance Statement
This device complies with Industry Canada licence-exempt RSS standard(s). Operation is subject to the following two conditions:
(1) this device may not cause interference, and (2) this device must accept any interference, including interference that may cause undesired operation of the device.
Industrie Canada (IC) Déclaration de conformité
Le présent appareil est conforme aux CNR d’Industrie Canada applicables aux appareils radio exempts de licence. L’exploitation est autorisée aux deux conditions
suivantes : (1) l’appareil ne doit pas produire de brouillage, et (2) l’utilisateur de l’appareil doit accepter tout brouillage radioélectrique subi, même si le brouillage est
susceptible d’en compromettre le fonctionnement.
Patent application U.S. serial number 11/169712 and its corresponding applications in other countries are owned by Suunto Oy (Finland)
Note: As shown above, this device contains small amounts of lead. This lead is only present in glass
or ceramic (other than dielectric ceramic in capacitors, e.g. piezoelectronic devices), or in a glass or
ceramic matrix compound, per EU directive 2011/65/EU (RoHS II) Annex III exemption 7(c)-I.
PM5
PM5 Assembly/
The Concept2 PM5 is compliant with all applicable European Union CE Marking Directives, including:
• 2004/108/EC—Electromagnetic Compatibility (EMC)
• 1999/5/EC—Radio Equipment & Telecommunications Terminal Equipment (RTTE)
• 2011/65/EU—Restriction of Hazardous Substances in Electrical & Electronic Equipment (RoHS II)
•
O
Other manuals for BikeERG
6
Table of contents
Other Concept2 Exercise Bike manuals


Popular Exercise Bike manuals by other brands

Livestrong
Livestrong 2010 EB LS Instruction booklet

Kettler
Kettler racer s manual

Christopeit Sport
Christopeit Sport AL 2 Assembly and exercise instructions

Tunturi
Tunturi Cardio Fit Bike 35 user manual

BH FITNESS
BH FITNESS H9162RF Instructions for assembly and use

Weslo
Weslo Pursuit S 85 Bike Manuel de l'utilisateur


