Concordia 1500s User manual

User Guide
Concordia
Model
1500s/i
Espresso
Machine


Table of Contents
Important Safety Information.............................................1
Machine Operation............................................. 1
Hot Surfaces and Liquids ..................................... 1
Electrical......................................................... 1
Espresso Grinders.............................................. 1
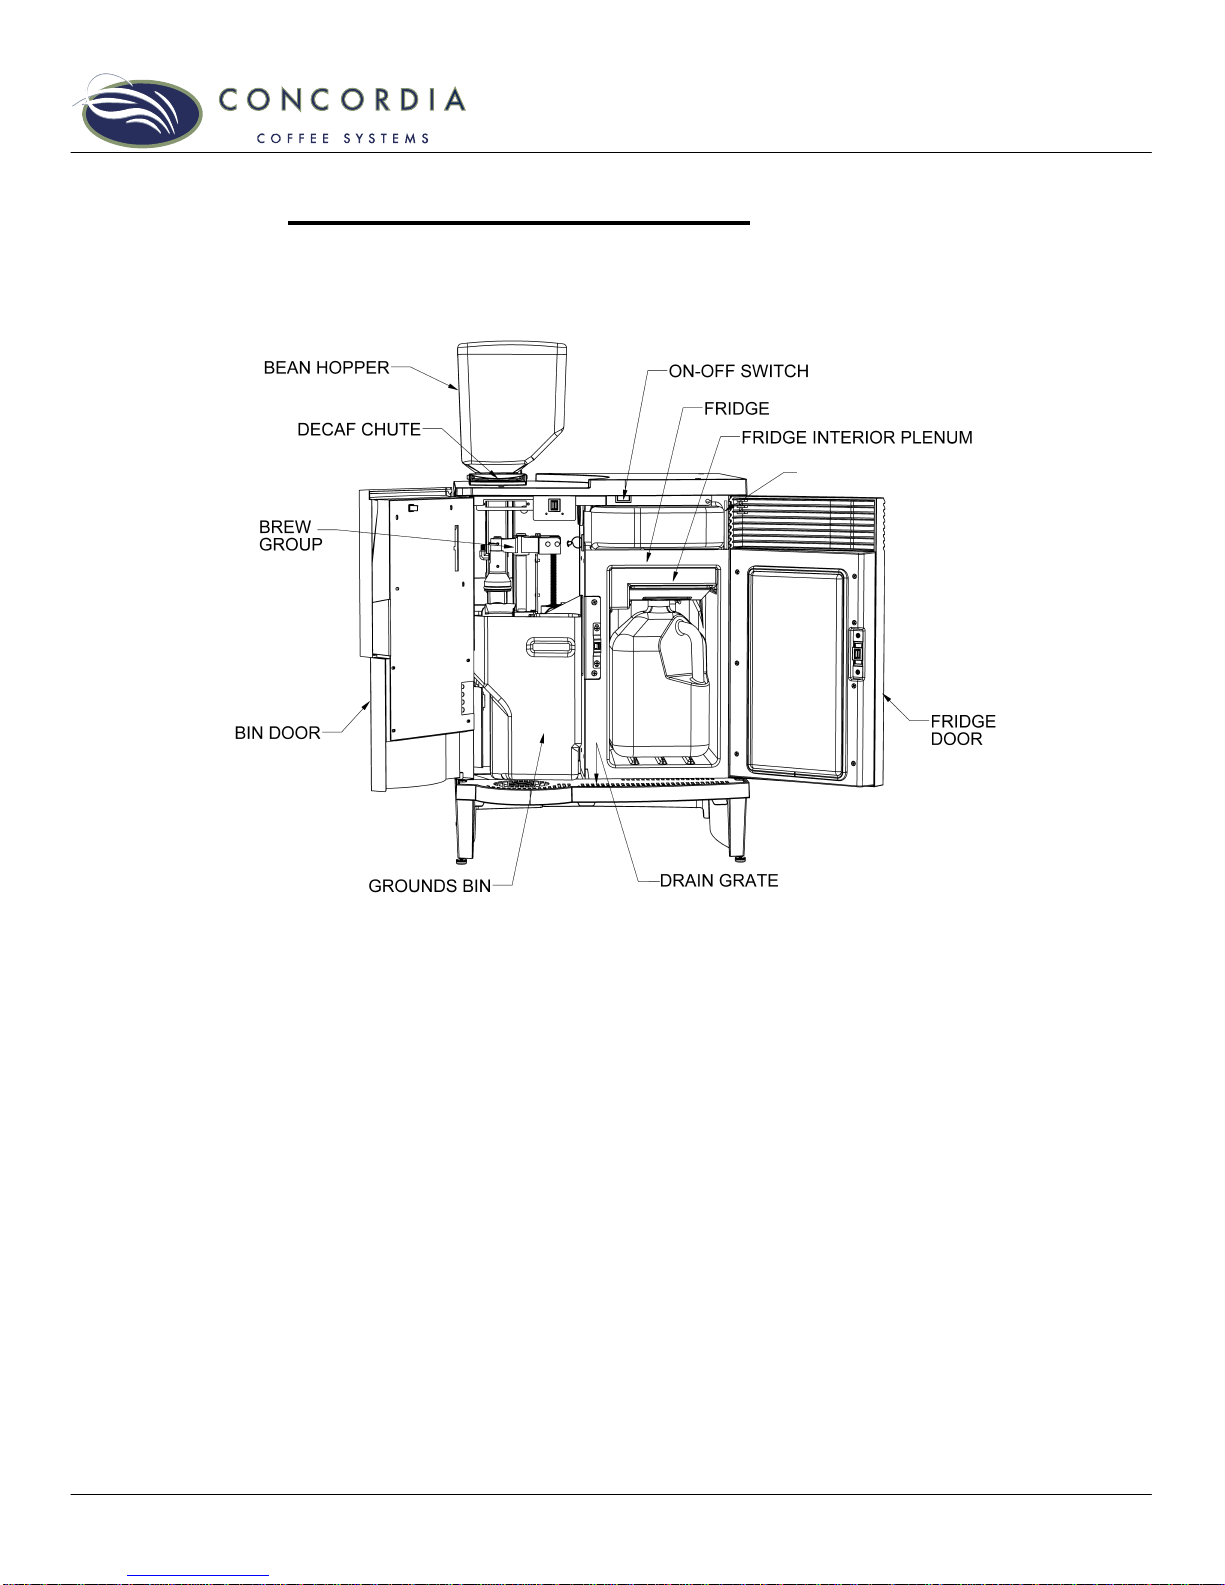
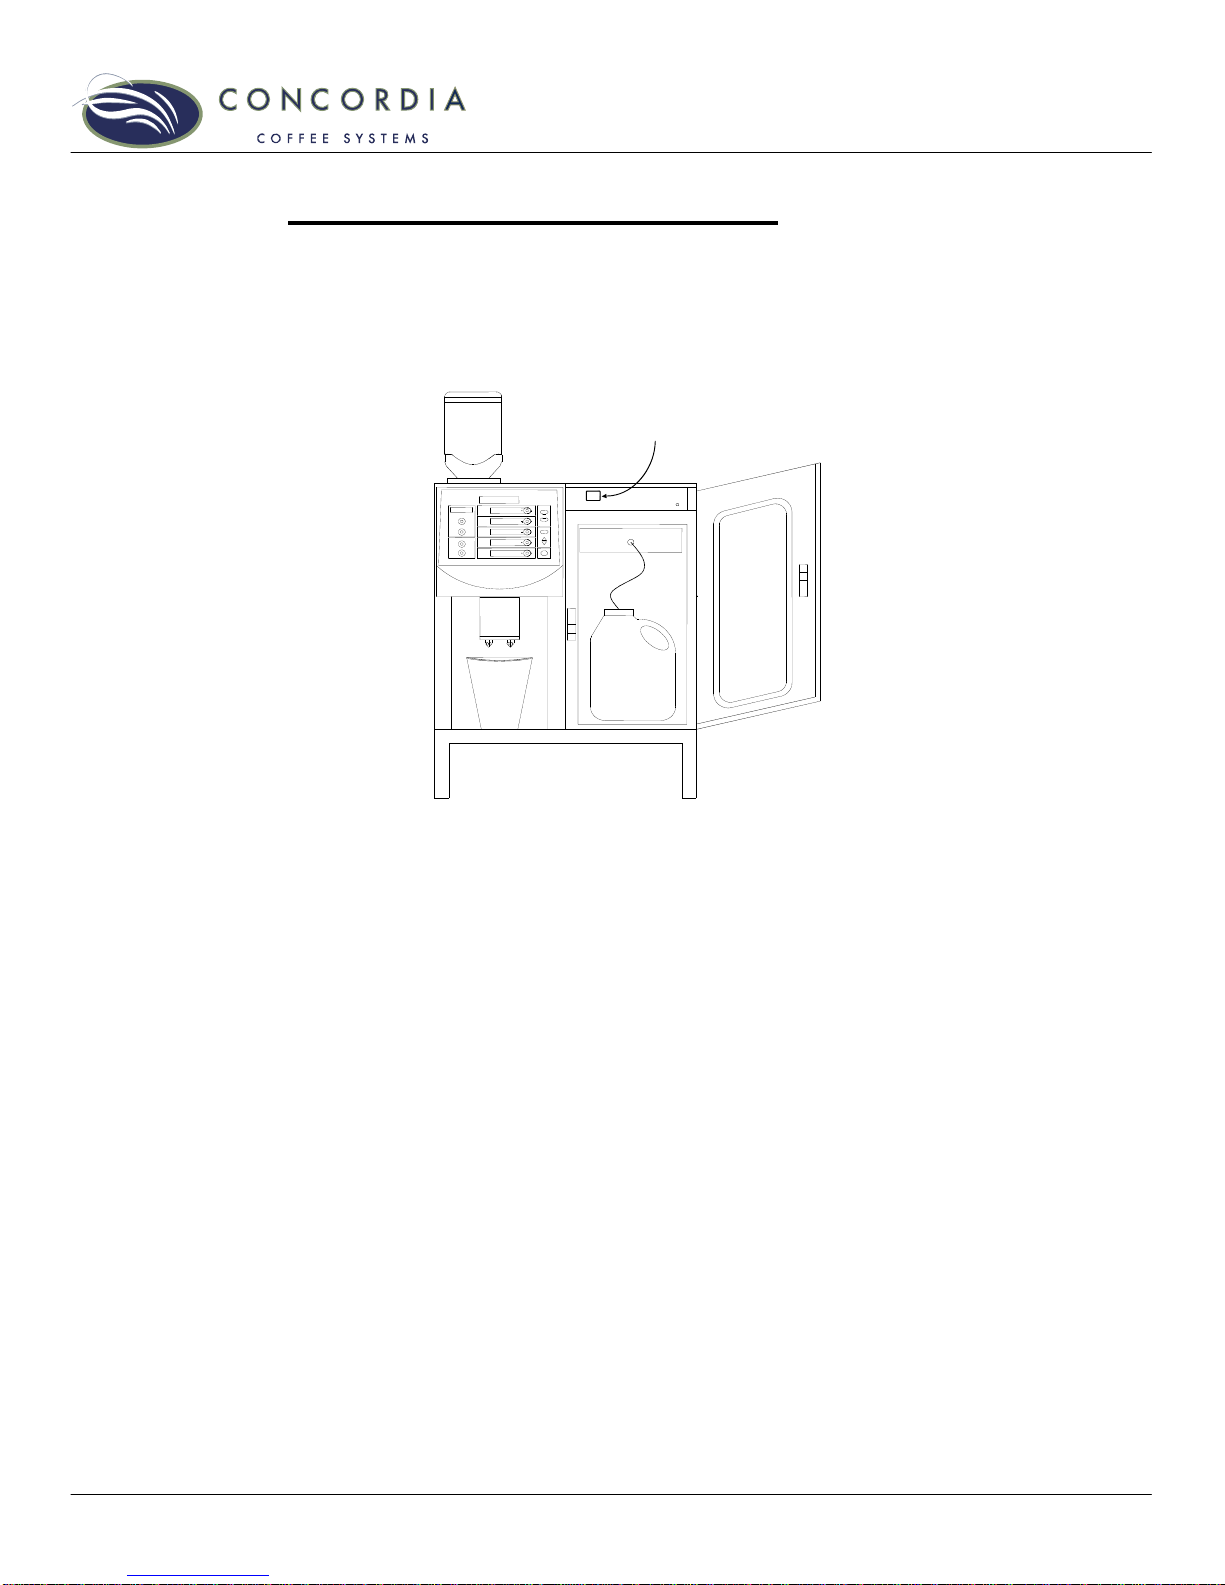
The Model 1500s/i Machine................................................2
The Model 1500s/i Components............................. 3
Using the Espresso Machine.............................................4
Starting the Machine .......................................... 4
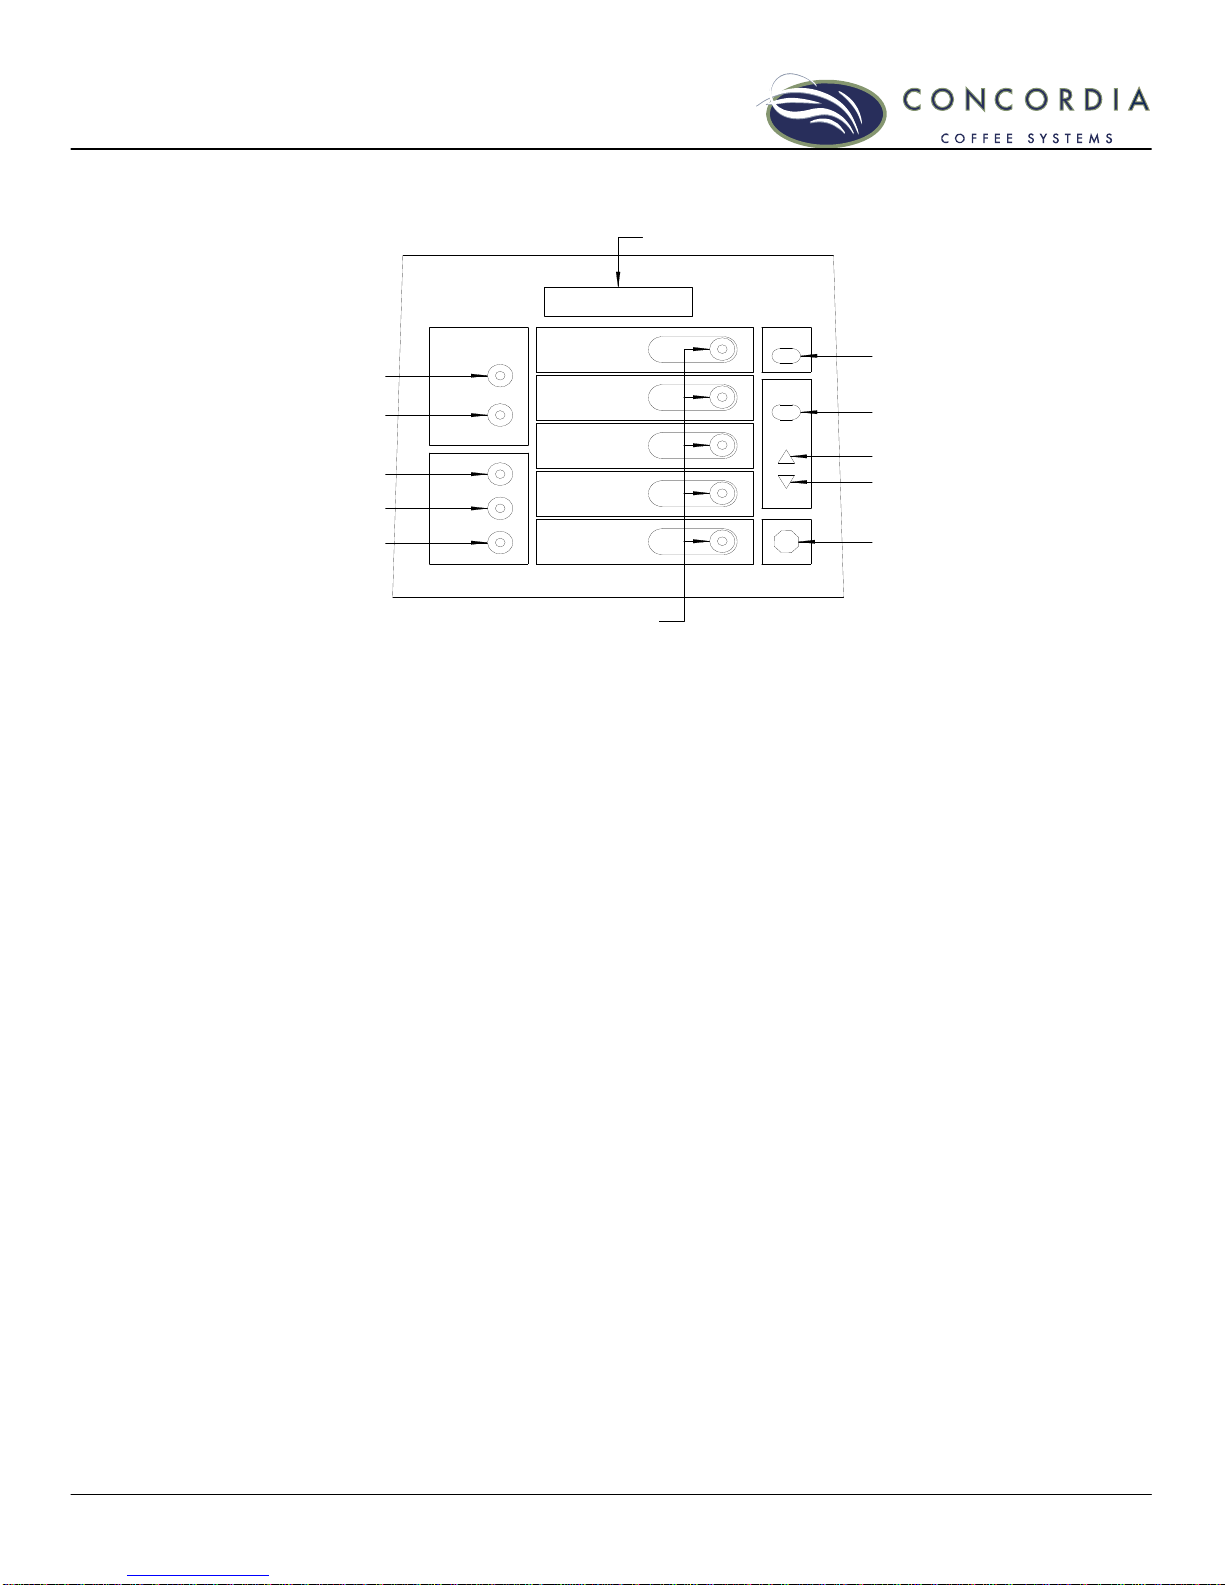
1500s Elite Touch Pad ........................................ 5
1500i Elite Touch Pad......................................... 7
Pouring Drinks .................................................. 9
Pre-Programmed Drinks .....................................10
Making a Decaffeinated Drink ..............................12
Machine Software Overview ............................................13
Software Programming Menu ...............................13
Display Messages ..............................................14
Plumbing ...........................................................................15
Soft-Plumbed or Hard-Plumbed Configuration..........15
Beans and the Bean Hopper............................................16
Storing Espresso Beans.......................................16
Bean Hopper ...................................................16
Milk and the Milk System .................................................18
Espresso Overview...........................................................19
What is espresso? .............................................19
Cleaning and Maintenance...............................................20
Importance of Daily Cleaning...............................20
Cleaning Timer ................................................20
Daily Maintenance ............................................21
Monthly Maintenance ........................................23
Preventative Maintenance ..................................23
Upper Piston O-Ring Replacement Procedure ..........24
Priming the Water Delivery System .......................25
MSDS .............................................................25
Ordering Cleaning Products.................................25
Troubleshooting Guide ....................................................26
FAQ....................................................................................28
Machine Warranty.............................................................30
Limited Warranty Statement and Disclaimers ..........30
Additional Limited Warranty Exclusions .................30


Customer Service (800) 778-0990 1
Important Safety Information
Your safety is important to us. The Concordia Model 1500s/i dispenses
hot liquids and steam, and incorporates grinding operations. Please
follow all safety precautions to reduce the risk of electric shock, burns,
and/or injury to persons or property.
Machine Operation
Do not use the machine for anything other than its specific
intended use.
Close supervision is required anytime the machine is used near
children.
Machine must be installed in a safe and stable location and in
accordance with Concordia’s installation requirements.
Do not operate the machine with unauthorized parts or
attachments. Improper use may cause fire, electrical shock,
hazard, or injury.
WARNING: Using unauthorized parts or attachments will
nullify the machine warranty.
Do not attempt to override safety interlocks.
Hot Surfaces and Liquids
Care must be taken around the machine, as hot liquids and
steam are produced and dispensed. Serious burns can occur.
Do not touch hot surfaces or parts.
Electrical
To protect against electrical hazards, do not immerse the
power cord, plugs or machine in water or any other liquid.
Turn the power switch to OFF when the machine is not being
used for an extended period.
Unplug machine when performing any type of maintenance or
repairs.
Do not operate the machine with an improper or damaged
power cord or plug, or after the machine has been damaged in
any manner.
A short power cord is provided to reduce the risk of tripping
and entanglement. The cord should be arranged so that it does
not drape over a table or countertop, or otherwise allow
accidental tripping or entanglement.
Espresso Grinders
Do not operate machine without bean hoppers in place.
The grinding mechanisms and burr blades are powerful; avoid
contact with all moving parts.
Never feed coffee beans into the grinder by hand.
Never place a foreign object, finger or hand into the grinding
mechanism.

2 Customer Service (800) 778-0990
The Model 1500s/i Machine
AIR FILTER

Customer Service (800) 778-0990 3
The Model 1500s/i Components
Bean Hopper
The bean hopper holds espresso beans, and feeds them to the grinder.
Decaf Bypass Chute
Decaffeinated espresso is added through the decaf bypass chute.
Brew Group
The brew group assembly precisely brews espresso and automatically
discards the used coffee into the grounds bin.
Grounds Bin Door
The grounds bin is located behind the left-hand door at the front of the
machine.
Grounds Bin
The grounds bin catches the used espresso grounds for easy disposal.
Drain Grate
The drain grate covers the drain tray and directs spillage to the drain
and is removable for easy cleaning.
Refrigerator Door
The refrigeration unit is located behind the right-hand door at the front
of the machine.
Air Filter
The air filter prevents dust and debris from entering the circulation
fan.
Refrigerator Interior Plenum
The refrigerator interior plenum directs cold air into the refrigeration
unit.
Refrigerator
Located behind the right-hand door is a built-in refrigeration system
capable of accommodating a 1-gallon milk container.
On/Off Switch
Located behind the right-hand door, the power switch must be in the
“ON” position for machine operation.
Drain Water Bin
NOT PICTURED IN GRAPHIC. The drain water bin collects waste liquid
for locations using a soft-plumbed water system.
Fresh Water Bin
NOT PICTURED IN GRAPHIC. The fresh water bin is a reservoir providing
fresh water for locations using a soft-plumbed water system.

4 Customer Service (800) 778-0990
Using the Espresso Machine
Starting the Machine
The power switch is located above the refrigerator compartment
behind the refrigerator door.
Turn the power switch to the ON position to start the machine.
Machine warm-up takes approximately 10-15 minutes. During warm-up,
the machine is heating the water and generating steam, while cooling
the refrigeration compartment.
DO NOT Quickly flip the power switch OFF and ON.
DO Wait at least 5 seconds between turning the machine
off and back on again. Quickly flipping the switch can
blow a fuse within the machine.
If a FILL WATER/EMPTY DRAIN or CHECK WATER FLOW error message
is displayed, reset the unit by turning the unit OFF then ON at the
power switch, then press the HOT WATER button for a few seconds to
cause water to completely fill the water delivery system. It may be
necessary to repeat this step.
Starting the Machine if Display reads: MACHINE OFF
If the display reads MACHINE OFF, press the ON/OFF button located on
the front panel.
The display will read PLEASE WAIT. If the door is open, machine will
not warm up.
D
T
H
HS
P
M
C
C
C
C
A
E
I
F
O
S
ON / OFF switch

Customer Service (800) 778-0990 5
1500s Elite Touch Pad
1. LCD DISPLAY
DISPLAYS DRINK SELECTION AND MACHINE STATUS MESSAGES.
2-6. OPTIONS
DRINK OPTIONS ARE PRESSED BEFORE PRESSING THE DRINK START
BUTTON.
DOUBLE
An extra shot of espresso is added to the selected drink.
TALL
Extra milk will be used when pouring the selected drink.
HOT WATER
Hot water is poured.
HOT MILK
Hot milk is poured.
COLD MILK
Cold milk is poured.
7-11. DRINKS
THESE BUTTONS DETERMINE WHICH TYPE OF DRINK WILL BE POURED.
FOR COFFEE DRINKS, ONE SHOT OF ESPRESSO WILL BE USED.
CAFFE LATTE
Caffe latte is poured.
CAPPUCCINO
Cappuccino is poured.
AMERICANO
Americano is poured.
ESPRESSO
A single shot of espresso is poured.
ICED LATTE
A single shot of espresso and cold milk are poured.
DOUBLE
TALL
HOT WATER
HOT MILK
STOP
PROGRAM
CLEAN
CAFFE LATTE
CAPPUCCINO
AMERICANO
ESPRESSO
ICED LATTE
FIRST FILL CUP WITH ICE
ON / OFF
SELECT DRINK
OPTIONS
if desired press first
39°
1
2
3
4
5
7, 8, 9, 10, 11
16
15
14
13
12
1500sElite
ACORTO
COLD MILK
6

6 Customer Service (800) 778-0990
12. CLEAN BUTTON
AFTER PRESSING THE CLEAN BUTTON, THE CLEANING CYCLES WILL
BEGIN (FIRST THE MILK SYSTEM CLEAN, AND THEN THE SHUTDOWN
CLEAN). ONCE THE CLEANING CYCLE IS STARTED, IT CANNOT BE
STOPPED. SEE THE CLEANING CARD INCLUDED WITH THE MACHINE FOR
FULL CLEANING PROCEDURES.
CLEAN BUTTON
Press to begin the daily milk clean and shutdown clean cycles.
13-15. PROGRAMMING AND MENU NAVIGATION
FOR COMPLETE PROGRAMMING DIRECTIONS, SEE PAGE 13
PROGRAM BUTTON
Press 1 time for Cumulative Drink Statistics
Press 3 times to access main programming menu
UP ARROW
Scroll up in menu and submenu categories
DOWN ARROW
Scroll down in menu and submenu categories
16. STOP BUTTON
STOP BUTTON
Will clear drink selections or stop the pouring of a drink.

Customer Service (800) 778-0990 7
1500i Elite Touch Pad
1. CLEAN BUTTON
AFTER PRESSING THE CLEAN BUTTON, THE CLEANING CYCLES WILL
BEGIN (FIRST THE MILK SYSTEM CLEAN, AND THEN THE SHUTDOWN
CLEAN). ONCE THE CLEANING CYCLE IS STARTED, IT CANNOT BE
STOPPED. SEE THE CLEANING CARD INCLUDED WITH THE MACHINE FOR
FULL CLEANING PROCEDURES.
CLEAN BUTTON
Press to begin the daily milk clean and shutdown clean cycles.
2. PROGRAMMING AND MENU NAVIGATION
FOR COMPLETE PROGRAMMING DIRECTIONS, SEE PAGE 13
PROGRAM BUTTON
Press 1 time for Cumulative Drink Statistics
Press 3 times to access main programming menu
UP ARROW
Scroll up in menu and submenu categories
DOWN ARROW
Scroll down in menu and submenu categories
3. OPTIONS
DRINK OPTIONS ARE PRESSED BEFORE PRESSING THE DRINK START
BUTTON.
EXTRA SHOT
An extra shot of espresso is added to the selected drink.
LARGE CUP
CAFFE LATTE CAPPUCCINO AMERICANO ESPRESSO ICED LATTE
1
2
CONCORDIA
COFFEE SYSTEMS
OPTIONS
SELECT DRINK
EXTRA SHOT LARGE CUP
ON/OFF
PROGRAMCLEAN
HOT WATER HOT MILK COLD MILK
STOP
SELECT DRINK
39°
Elite
1500i
3
4
5 6

8 Customer Service (800) 778-0990
Extra milk will be used when pouring the selected drink.
4. DRINKS
THESE BUTTONS DETERMINE WHICH TYPE OF DRINK WILL BE POURED.
FOR COFFEE DRINKS, ONE SHOT OF ESPRESSO WILL BE USED.
CAFFE LATTE
Caffe latte is poured.
CAPPUCCINO
Cappuccino is poured.
AMERICANO
Americano is poured.
ESPRESSO
A single shot of espresso is poured.
ICED LATTE
A single shot of espresso and cold milk are poured.
5. MORE OPTIONS
DRINK OPTIONS ARE PRESSED BEFORE PRESSING THE DRINK START
BUTTON.
HOT WATER
Hot water is poured.
HOT MILK
Hot milk is poured.
COLD MILK
Cold milk is poured.
6. STOP BUTTON
STOP BUTTON
Will clear drink selections or stop the pouring of a drink.

Customer Service (800) 778-0990 9
Pouring Drinks
Pouring a Drink
1. Place cup on drain grate below product nozzle
2. Press desired DRINK OPTION button(s)
3. Press START button for the desired drink
Brewing cycle starts and stops automatically once the drink START
button is selected.
Pouring Milk Only
Press the HOT MILK button to dispense hot milk
Pouring Cold Milk
Press the COLD MILK button to dispense cold milk
Pouring Hot Water
Press the HOT WATER button to dispense hot water
Stopping Drink Pour
Press the STOP button to interrupt the dispensing of the beverage
NOTE: Hot water cannot be poured simultaneously with coffee and/or
milk drinks. When coffee or milk is poured, hot water dispensing is
inhibited.

10 Customer Service (800) 778-0990
Pre-Programmed Drinks
Please note that specific pre-programmed drinks will depend on the
model and touch pad of your machine.
ESPRESSO
An aromatic shot of intensely rich coffee.
TO POUR: Press the ESPRESSO button
CAFFE LATTE
Steamed milk mixed with espresso.
TO POUR: Press the CAFFÉ LATTE button
CAPPUCCINO
Espresso topped with rich layers of steamed and foamed milk.
TO POUR: Press the CAPPUCCINO button
AMERICANO
Espresso mixed with water
TO POUR: Press the AMERICANO button
ICED LATTE
Cold milk mixed with espresso.
TO POUR: Fill cup with ice
Press the ICED LATTE button
Drink Variations
MAKE IT A DOUBLE SHOT
The beverage will be made with two shots of espresso.
TO POUR: Press the EXTRA SHOT button
Press the desired drink button
MAKE IT A TALL
The beverage will be made with more milk, in a larger cup.
TO POUR: Press the TALL button
Press desired drink option button(s)
Press the desired drink button
MAKE IT DOUBLE TALL
The beverage will be made with two shots of espresso, in a larger cup.
TO POUR: Press the TALL button
Press the EXTRA SHOT button
Press the desired drink button
MAKE IT FLAVORED
TO POUR: Pour 1-2 ounces of flavor in cup

Customer Service (800) 778-0990 11
MOCHA
Latte flavored with chocolate sauce.
TO POUR: Pour 1-2 ounces of chocolate syrup in cup
Place cup under drink dispensing nozzle
Press the CAFFEE LATTE button
STEAMER
Steamed milk flavored with syrup.
TO POUR: Pour 1-2 ounces of flavor in cup
Press the HOT MILK to fill cup

12 Customer Service (800) 778-0990
Making a Decaffeinated Drink
1. Open the bypass chute door
2. Using the supplied scoop, insert pre-ground decaffeinated
espresso
Measure 1 level scoop for a single shot espresso
Measure 2 level scoops for a double shot espresso
3. Close the bypass chute door
4. Select desired drink options (if needed)
5. Press the desired drink start button
NOTE: If no drink is selected within 45 seconds of opening the bypass
chute, the brew group will reset itself and dispose of any ground coffee
in the bypass chute.
WARNING: Using more than two level scoops will place too much
coffee in the brew chamber causing the machine to display GROUP
ERROR. To correct this error, press the ON/OFF button on the front
panel to turn the unit off and then back on. Doing this resets the brew
group mechanism, which will empty the brewing chamber of all coffee
grounds and reset the machine.
Bypass Chute

Customer Service (800) 778-0990 13
Machine Software Overview
Software Programming Menu
PRESS THE PROGRAM BUTTON RESULT
ONE TIME CUMULATIVE TOTAL
TWO TIMES DAILY TOTAL
THREE TIMES O-RING COUNTER
FOUR TIMES EXIT THE MENU SYSTEM
Check Cumulative Total Drink Statistics
• Press and hold the PROGRAM button until top line of the LCD
reads CUMULATIVE TOTAL.
• The cumulative total will appear in the lower line of LCD.
NOTE:The cumulative drink total can only be reset by replacement of
the software.
Detailed Cumulative Drink Statistics
• Press and hold PROGRAM button until top line of the LCD
reads: CUMULATIVE TOTAL
• Press the PROGRAM button a second time, to advance to DAILY
TOTAL screen.
• Press UP or DOWN arrow buttons to scroll through the totals
for the individual drink types.
NOTE:The daily drink counters are reset to “0” when a daily clean
cycle is performed.
O-Ring Counter
• Press and hold the PROGRAM button until the top line of the
LCD reads: CUMULATIVE TOTAL
• Press the PROGRAM button a second time, to advance to the
DAILY TOTAL screen.
• Press the PROGRAM button a third time, to advance to the O-
RING COUNTER screen.
• Press the UP arrow button to access the o-ring counter
information screen.
• The top line of the LCD will display the number of cycles on the
o-ring, and the bottom line will display the message O-RING
REPLACED?
• To reset the o-ring counter, press the UP arrow button.
Exiting Menu System
Press the PROGRAM button repeatedly to cycle through the menu
system until the message SELECT DRINK or PLEASE WAIT is displayed.

14 Customer Service (800) 778-0990
Display Messages
The following table lists the various messages, which can be displayed
on the Model 1500s/i, and their definition.
NOTE: Actual messaging may vary according to a particular version of
software.
MESSAGE DEFINITION / ACTION
CHECK WATER FLOW No water flow detected by flowmeter.
CLEANING Cleaning cycle is running.
DAILY CLEAN DUE Perform milk system & brew group system cleaning cycles.
DAILY TOTALS Total number of individual drinks served.
DECAFFEINATED Grounds chute bypass door has been opened.
DRAIN BIN IS OUT Drain bin is not properly positioned in unit.
EMPTY GROUNDS BIN Empty the grounds bin (must be out for at least 6 seconds).
FILL WATER / EMPTY DRAIN Fill fresh water bin and empty the drain bin (if applicable).
FRONT PANEL OPEN Left door is not properly closed.
GROUNDS BIN OUT Re-install/position the grounds bin in unit.
GROUP ERROR Reset unit (turn unit off, then on, at power switch).
GROUP HEAT ERROR Reset unit (turn unit off, then on, at power switch).
HOT WATER HOT WATER button has been selected.
INSERT CLEANING TABLET Place cleaner tablet into grounds chute bypass door.
MACHINE IS OFF Unit is off (refrigeration unit is still operating).
MILK CLEAN Milk clean cycle is running.
PLEASE WAIT Unit is performing an operation (heating, resetting, etc…).
REPLACE O-RING Replace upper piston o-ring, (see O-ring replacement procedure).
RUN DAILY CLEAN Daily clean procedure must be run.
SELECT DRINK Unit is ready to make a drink.
SHUTDOWN CLEAN Unit is in shutdown clean mode.
START DAILY CLEANING Perform milk system & shutdown cleaning cycles.
STATISTICS Unit is ready to display drink counts.
SWEEP BREWER Brush away coffee from top of brew group surface.
WAIT WARM-UP TIMED OUT Operating temperature not present within 30 minutes.

Customer Service (800) 778-0990 15
Plumbing
Soft-Plumbed or Hard-Plumbed Configuration
The Model 1500s/i can be plumbed directly to a building’s water supply
(hard-plumbed) and/or drain system or configured as a self-contained
unit using the on-board fresh water and drain water bins (soft-
plumbed). It’s also possible to use a combination of these
configurations.
For locations using the soft-plumbed option, located below the
machine there are two water bins that must be used. The drain water
bin is used to collect waste liquid, and the fresh water bin supplies the
machine with water for preparing drinks. The drain water bin has a 1-
gallon capacity and is located on the left side, and the fresh water bin
has a 1.5-gallon capacity and is located on the right side.
NOTE: Filtered water must be used in the fresh water bin.

16 Customer Service (800) 778-0990
Beans and the Bean Hopper
Storing Espresso Beans
Espresso beans are typically sealed in an airtight container by the
roaster. Once the vacuum-sealed bag is opened, the beans should be
stored in an airtight container in a cool, dry location. The opened bag
of beans should be used within 10-15 days. Once the bag has been
opened, the freshness of the beans will rapidly decrease.
Typically roasters do not recommend storing beans in the freezer. If
you do need to store beans in the freezer, be sure to thaw the beans
prior to placing them in the hopper.
Bean Hopper
The bean hopper holds approximately 2lbs of fresh whole espresso
beans. The espresso beans are gravity fed into the grinder as each
drink is poured.
Directions for Filling Bean Hopper
1. Place bean hopper on machine
2. Remove bean hopper lid
3. Pour fresh, whole espresso beans into the bean hopper
4. Replace bean hopper lid
5. If present, remove hopper stopper
3
2
1
HOPPER STOPPER
HOPPER
HOPPER LID
This manual suits for next models
1
Table of contents
Other Concordia Coffee Maker manuals

Concordia
Concordia Integra User manual

Concordia
Concordia Integra 1 User manual

Concordia
Concordia 2500s User manual

Concordia
Concordia 2500i User manual

Concordia
Concordia XpressTouch User manual

Concordia
Concordia INTEGRA 4 User manual

Concordia
Concordia Xpress series User manual

Concordia
Concordia Integra User manual