manuals.online logo
Brands
  1. Home
  2. •
  3. Brands
  4. •
  5. Concrete Tool Importers
  6. •
  7. Power Tools
  8. •
  9. Concrete Tool Importers surspider ZKZ-25A User manual

Concrete Tool Importers surspider ZKZ-25A User manual

Concrete Tool Importers
Owners Manual
www.concretetools.co.nz
Concrete Tool Importers Ltd 0800 727 333
Making all rebar tying easier, stronger and faster
[email protected]
Intelligent Rebar Tier
Introduction Introduction 2
Attention Attention 3
Warning Warning 4
Instructions for use Specications 5
Charger Description 6
Battery use 7
Installation of wire roll 10
Changing Jaws 11
Adjusting Coil Size 13
Adjusting Wire Length 14
Tying Operation 15
Maintenance Maintenance 17
Trouble Shooting Problem solving 18
Parts List Standard components 19
Optional items 20
Thank you for choosing to purchase a Surspider Intelligent Rebar Tier
from Concrete Tool Importers. We have created this User Manual to help
you understand and get the best results from your new tool. Please read
this manual carefully before using it so you can use the tool correctly.
Please make sure that you understand all the warnings, operational
processes and maintenance points.
You will notice the differences immediately with your Surspider Rebar
Tier when you compare it to competing brands, at nearly 1.4 kilograms
lighter than other brands you will be able to work longer and complete
more ties with far less effort. The smaller physical size of the gun means
that you don’t have to battle with the gun to t around mesh or tight steel
work and above anything else it ts comfortably in your hand meaning a
better days work.
The cost savings of using a Surspider Wire Tie Gun over traditional hand
tying are huge, one gun can tie more ties per day than four workers hand
tying and when compared to other brands of the same product you will
still nd the cost savings are huge through both the intial purchase of the
gun and also the ongoing consumable costs.
We are condent that you will nd using your wire tie gun simple and
easy with only one dial for making adjustments to your guns
performance. A simplied design, with 25 exclusive patents on its’
innovative design technology makes it less likely to have problems, easy
to service and maintain, meaning that you have less down time on the
job. Independent testing shows that the Surspider Rebar Tier has a
99.2% success rate for tying standard ties.
Through continual ongoing random and rigorous testing these tools have
been proven time and again to easily function for over a million ties
without fault even when used continuously. They have been used
successfully on everything from small construction sites through to large
precast operations so we are condent that you will be happy with your
new Rebar Tier.
Thank you again for making a great decision to purchase a Surspider
Rebar Tier, we expect that you will enjoy the savings you have made.
1. Concrete Tool Importers Ltd 0800 727 333 Concrete Tool Importers Ltd 0800 727 333 2
Contents Introduction
1. Only authorised technicians can work on your Surspider Rebar Tier,
do not attempt to dismantle or repair the gun yourself.
2. Do not charge the batteries while the cable is coiled, wound up,
squeezed or damaged.
3. Do not abuse the cord. Never use the cord for carrying, pulling or
unplugging the charger. Keep cord away from heat, oil, sharp edges
and moving parts.
4. Keep your gun clean and dry to avoid damaging it. Do not expose
your Surspider Gun or charger to rain or wet conditions
5. Do not attempt to clean the internal parts of your gun.
6. Only use the original battery charger for charging batteries.
7. Immediately turn the gun off if an alarm activates, do not use again
until the problem is remedied.
8. Only use the Surspider wire and batteries to avoid damaging your
gun and injury to yourself.
9. Please follow your Surspider Owners Manual to ensure safe and
effective use of your machine and to extend its life.
10. Keep your work area clean and well lit.
11. Do not operate power tools in explosive atmospheres, such as in the
presence of ammable liquids, gases or dust.
12. Keep children and bystanders away while operating a power tool.
13. Stay alert, watch what you are doing and use common sense when
operating your Surspider Rebar Tier. Do not use the power tool while
you are tired or under the inuence of drugs, alcohol or medication.
14. Use personal protective equipment. Always wear eye protection.
15. Have your Surspider Rebar Tier serviced by a qualied repair person
using identical replacement parts
▪ Don’t touch the power wire with wet hands to avoid accidental
electric shock.
▪ Pull the plug to disconnect the charger NOT the wire
▪ Don’t share the charging block with other equipment
▪ Store your Surspider Rebar Tier and charger is a safe place to
avoid damage
▪ Keep your hands clear of the tying area, spool and wire to avoid
serious injury.
▪ Keep all body parts clear of the power head to avoid injury.
▪ Store your Rebar Tie Gun in a clean and dry environment away
from corrosive products.
▪ Keep out of reach of children to avoid serious injuries.
▪ Avoid impact damage to your Rebar Tie Gun
Attention Warning
3. Concrete Tool Importers Ltd 0800 727 333 Concrete Tool Importers Ltd 0800 727 333 4
Clutch Button
Unlocking Lever
Locking Button
Handle
On/off Switch Power Light
TriggerCurl guide
Locking Button
Clutch Cover
Right Cutter
Head
Left Cutter
Tier Lip
Tightening Claw Clutch Button Cover (closed) Wire Coil
Tying area
ZKZ Rebar Tier
Model No. ZKZ-25A ZKZ-40A
Size 300x225x68 315x225x68
Weight (kg) 1.45 1.45
Voltage (V) 14.4 14.4
Tying range (mm) 12-24 26-40
Tying speed (s) 0.8 0.8
Tying wraps 2 3
Ties per full standard
battery
2000 1100
Ties per full advanced
battery
6200 3500
Battery ZKZ-25A ZKZ-40A
Standard Battery Advanced Battery
Voltage 14.4 14.4
Battery Charge 16.8V DC 0.7A 16.8V DC 2.2A
Battery Capacity (Ah) 2.0 6.0
Charging time (h) 2.8 2.7
Warranty (Months) 6 6
Standard Battery
Advanced Battery
Battery Adaptor
Low battery
50% battery
75% Battery
Full battery
No Light
Green Light
Red Light
The battery indicator light is
located at the base of the
handle. The quantity of charge
remaining in the battery can
be determine using the table
below.
5. Concrete Tool Importers Ltd 0800 727 333 Concrete Tool Importers Ltd 0800 727 333 6
Rotary Dial
Tying Head
• ONLY USE THE AUTHORISED BATTERY PACK, if the tool is
connected to a power supply other than the authorised pack, such
as a rechargeable battery, dry cell, or a storage battery for use in
cars, the tool may be damaged, breakdown, overheat, or even catch
on re. Do not connect this tool to any power supply except the
Surspider battery pack.
• TO ENSURE MAXIMUM PERFORMANCE, FULLY CHARGE THE
BATTERY BEFORE USE. A new battery pack or one not used for
extended periods may have self-discharged and thus may need
recharging to restore it to a fully charged condition. Before operating
the tool, make sure to charge the battery pack with the Surspider
battery charger.
• BATTERY CHARGING PRECAUTION. Only use the Surspider
battery charger as failure to do so may cause the battery to overheat
or catch re leading to serious injury. Only charge the battery from a
230/240V 50Hz power supply to avoid overheating or inadequate
charging possibly causing serious injury.
• Do not cover the battery charger while the battery pack is being
charged. This will cause overheating and damage from burning or
the charger may catch on re.
• Never use a transformer
• Never connect the battery charger to a DC Generator power
supply
• Avoid charging the battery pack in the rain, in a damp place, or
where water is present. Charging a damp or wet battery pack will
cause an electric shock or a short circuit that may lead to damage
from burning and even the tool catching re.
• Do not touch the power cord or plug with wet hands or gloves.
This may cause injury from electric shock
• Charge the battery pack in a temperature range of 5 - 40ºC
• Keep the battery pack and charger away from heat and ames
• Do not charge the battery pack near ammable materials
• Charge the battery pack in a well ventilated place. Avoid
charging the battery pack where it will be in direct sunlight.
• Avoid continual use of the battery charger. Rest the charger for
15 minutes between charges to avoid functionality problems with the
unit.
• Any objects that block the ventilation holes or battery pack
receptacle may cause electric shock or problems functioning.
Make sure that the charger is clean of dust and other foreign
materials.
• Handle the power cord carefully. Do not carry the battery charger
by its power cord. Do not use the power cord to disconnect it from
the wall socket; this will damage the cord and break the wires or
cause a short circuit. Do not let the power cord contact sharp edged
tools, hot materials, oil, or grease. A damaged cord must be repaired
or replaced.
• Do not charge non rechargeable batteries with this charger
• This charger is not intended for use by children. Children should
be supervised to ensure they do not play with the charger
• Do not let the terminal (metal components) of the battery pack
short circuit. A short circuit in the terminal will generate a large
current, causing the battery to overheat and be damaged.
• Do not leave or store the tool in a vehicle or in direct sunlight
during summer. Leaving the tool in high temperature conditions
may cause the battery pack to deteriorate.
• Do not store a fully discharged battery pack. If a fully
discharged battery pack is removed from the system and left for
a long period of time, it may become damaged. Recharge the
battery immediately when it has been discharged.
7. Concrete Tool Importers Ltd 0800 727 333 Concrete Tool Importers Ltd 0800 727 333 8
Wire Coil
Diameter (mm) 0.8
Length (m) 100
Net Weight (g) 390
Ties per roll ZKZ-25A 283
Ties per roll ZKZ-40A 147
Wire Roll
Unlocking Button
Cover
Locking Button
Wire feed receiver
Open Cover
Push & hold
Wire
Tapered Sleeve
Clutch release
Wire Roll InstallationBattery Charger
1. Press “Unlock Button”
2. Put wire roll into the gun
3. Press the “”Clutch Release” and insert the wire into the
wire feed receiver
4. Close both of the covers and press the locking button
Battery charging indicator lights
230/240V 50Hz Power Plug Socket
Charging stations
To adjust the power levels
5
4
3
2
1
0
L
M
To adjust the tension on the tie you can adjust the power level with the
rotary dial.
1. Turn the rotary dial to the power level that you require, normally level 3
should be correct.
If the knot is not tight enough you may need to increase the power.
If the wire breaks you may need to reduce the power
9. Concrete Tool Importers Ltd 0800 727 333 Concrete Tool Importers Ltd 0800 727 333 10
Model
ZKZ-20A
ZKZ-25A
ZKZ-35A
ZKZ-40A
To adjust the Model for different jaw sizes
5
4
3
2
1
0
L
M
1. With the gun turned “OFF”, turn the rotary dial to “M”and hold the
trigger and turn the gun on holding the trigger in until it beeps.
Release the trigger after the beep.
No Light
Green Light
Red Light
Each set of different jaw sizes requires your Surspider Wire Tier to be
re-calibrated to the correct size to perform to its best
2.To change between modes depress the trigger quickly and the lights will
change to indicate the change of mode as pictured in the table below
You will need to know which jaws you are setting your Rebar Tier to, in
New Zealand we use the ZKZ-25A (25mm) or ZKZ-40A (40mm)
3. Return the rotary dial to the power setting that you require and test
Changing the Jaw Size
1. Remove the three allen
head bolts using the screw
driver provided. The centre
bolt is the short one.
4. Ease the head unit out by
gently working the unit up
2. Lift off the plastic cover to
expose tying head
3. Lift mechanisim to release
the head
5. Replace with the new tying
head and follow the removal
process in reverse.
11. Concrete Tool Importers Ltd 0800 727 333 Concrete Tool Importers Ltd 0800 727 333 12
5
4
3
2
1
O
L
M
To adjust the wire coil diameter
1. Turn the rotary dial to “O”
2. Depress the trigger, quickly and release. The gun will feed out a
wire coil. Cut the wire with the cutters provided. Measure the diameter
3. Loosen the Pivot Screw and Set Screw. Lift the trailing end to make
wire diameter smaller or drop the trailing end to make the wire diameter
larger.
Model ZKZ-25A ZKZ-40A
Correct Diameter 36-38mm 54-58mm
Move up to make the
wire diameter smaller
Move down to make the
wire diameter larger
Wire sender mouth
Set Screw
Pivot Screw
5. When you are happy with the wire diameter tighten both Set Screw
and Pivot Screws.
4. Test the diameter by repeating step 2
6. Return the rotary dial to your preferred power setting 1-5
To adjust the wire length
5
4
3
2
1
0
L
M
1. Turn the rotary dial to “L”
Length one
Length two
Length three
Length four
Length ve
No Light
Green Light
Red Light
2. Depress the trigger quickly while watching the indicator lights as
as pictured in the table below. Length one is the shortest while length
ve is the longest. The larger the coil is, the longer the wire length that
you will require
The length of the wire required changes with the number of wraps and
coil size
3. Return the rotary dial to the power setting that you require when you
are happy with the wire length
Ideal length with end of
wire in this quadrant
If the end of the
wire ends here
it is too long
If the end of the
wire ends here
it is too short
13. Concrete Tool Importers Ltd 0800 727 333 Concrete Tool Importers Ltd 0800 727 333 14
Tying Operation
• Check that your Rebar Tier is in good condition and free of damage
• Press the “Power Button” to turn your Rebar Tier on
• The battery indicators will turn from red to green
• Diagonally place the jaws of the Rebar Tier over the rebar or mesh
that you wish to tie at 45º while holding the tier vertical.
• Press the trigger and your gun will nish tying automatically
• Move to your next tie
• The power indicator light will change to red when the battery is low
and the gun will stop tying.
• You can keep an eye on the remaining wire quantity through the cover
• The gun will not work correctly if the are between the tier tip and guide
chin are obstructed
• If the wire gets caught in the cutter, take it out before continuing to use
• If your rst tie is unsuccessful, try a ghost tie without anything in the
jaws by depressing the trigger , then return to tying your job.
• Never put any body parts in the working area of the tool
• Hold the gun still and do not remove it until the tie is complete
15. Concrete Tool Importers Ltd 0800 727 333 Concrete Tool Importers Ltd 0800 727 333 16
17. Concrete Tool Importers Ltd 0800 727 333 Concrete Tool Importers Ltd 0800 727 333 18
Problem Possible Cause Solution
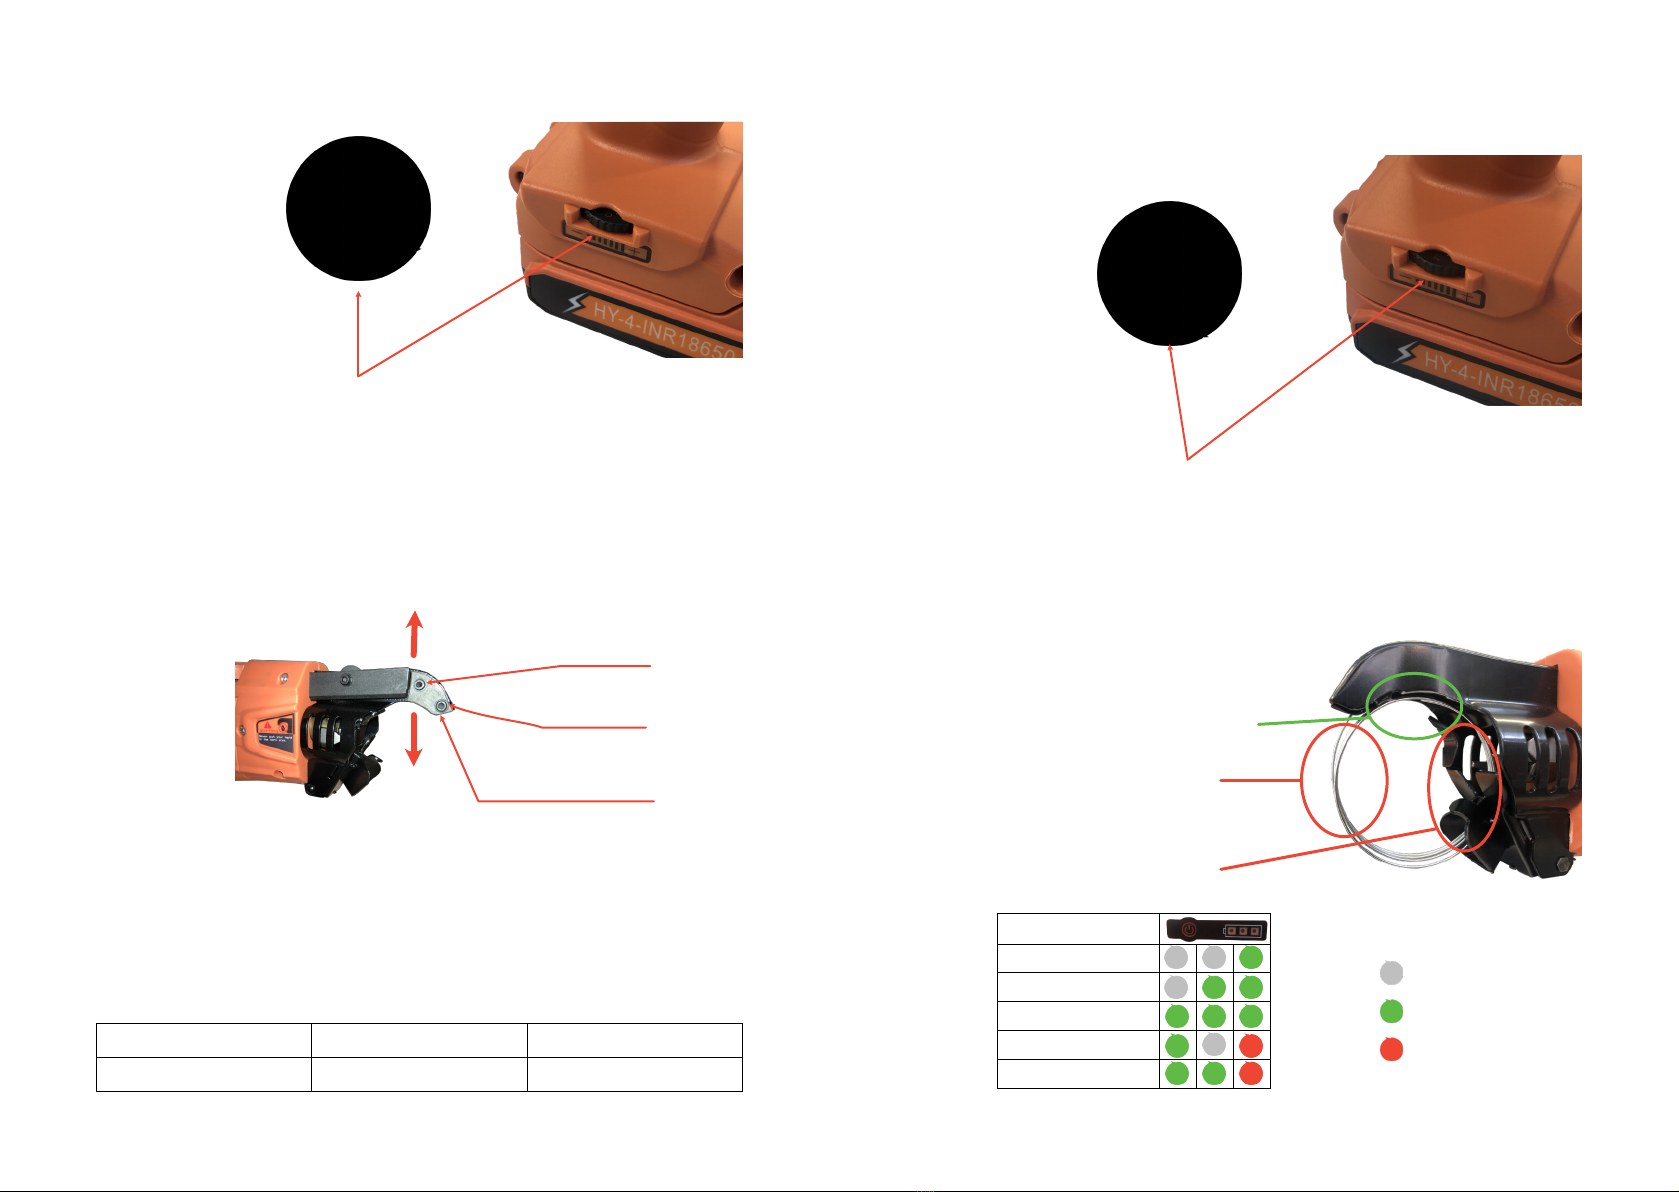
Rebar tier not
working
Power indicator light red, battery is at Replace and charge battery
Power indicator light is green, something else
has happened
Stop use, contact Concrete
Tool Importers 0800727333
Power indicator lights
are not ashing
Battery is not
connected correctly
Reinsert or replace battery
Circuit fault Stop use, contact Concrete
Tool Importers 0800727333
Rebar tier is
working but
no wire is
coming out
No or low wire in gun Install new roll of wire
Incorrect wire Use the specied Surspider
wire only
The locking button isn’t press in Lock the wire roll by pressing
the lock button
The wire is blocked in the wire feed receiver
or tapered sleeve
Remove the wire and
reinstall the wire correctly
Damaged wire Remove wire, cut back to
good wire and reinstall.
The right cutter has not reset and has blocked
tie lip
Stop use, contact Concrete
Tool Importers 0800727333
The wire outlet of the tying head is blocked Clean the wire outlet
Wire is not
tying tight
enough
Battery level is low Replace the battery
Incorrect wire Use the specied Surspider
wire only
Wire length is too long Adjust the wire length
Not enough tying power Adjust the power
Another reason Stop use, contact Concrete
Tool Importers 0800727333
Wire knots
break
Incorrect wire Use only the specied
Surspider wire
The wire length is to short, one less wrap than
needed
Adjust the wire length. Press
down on the lock button to
lock the wire roll.
Tying power is too low Adjust the power
Another reason Stop using, send it to
Concrete Tool Importers
0800727333
Buzzer
sounds
One short beep when gun is turned on Boot up, this is normal
One long beep, power indicator light is red Battery is at, replace battery
Three long beeps Motor has a problem,
Contact Concrete Tool
Importers
Five long Beeps Sleep mode, this is normal
Trouble shootingMaintenance
Always conduct a routine inspection of your Surspider Rebar Tier
before and after using it:
• Check for any cracks in the the casing
• Check power switch is working correctly
• Check all working functions of the tool, including making a wire ring,
wire length, wire cutting etc.
Clean the exterior of the tool using a mild detergent and water on a wet
rag after use.
Avoid storing or transporting the battery with metal objects to avoid short
circuiting.
If your gun gets damaged, please return it to your nearest branch of
Concrete Tool Importers for repair.
The warranty will be void if any repairs are carried out without
authorisation from Concrete Tool Importers in writing.
Your tool contains magnets which attract iron lings over time and need
checking and cleaning regularly.
Over time the head may get damaged through everyday wear and tear
to the point it is out of shape. If this happens the gun will not perform
correctly and may cause problems with not tying knots or wire breaking.
Check the diameter of the circles at the start of each job and adjust
accordingly.
If you have any problems with your Surspider Wire Tie Gun, check the
Trouble Shooting page in the rst instance. If the problem remains
unresolved please contact Concrete Tool Importers on 0800 727 333
Your Surspider Wire Tie gun comes with a six month warranty for the
original purchaser from the date of purchase and covers manufacturing
Faults and the battery but not breakages or wear and tear.
19. Concrete Tool Importers Ltd 0800 727 333 Concrete Tool Importers Ltd 0800 727 333 20
ZKZ-A Model Optional Parts
Advanced Battery
(Included adaptor)
Pry Hook
Tool Belt
Jaws 25mm
Jaws 40mm
ZKZ-A Model Standard Kit
Name Picture Quantity
Intelligent Rebar
Tier
1 pcs
Double Charger 1 pcs
Standard Battery 2 pcs
Wire Coil 1 pcs
Cutters 1pcs
Double ended Allen
Key Screwdriver
1 pcs
Tool box 1 pcs
User Manual 1 pcs
[email protected]
www.concretetools.co.nz
76a Oxford St
Richmond
Nelson
Unit 1, 66 Paraone Koikoi Drive
The Lakes
Tauranga
Unit 2, 11 Blackburn Road
East Tamaki
Auckland
Concrete Tool Importers Ltd
22a Tyne St
Tower Junction
Christchurch
0800 727 333

This manual suits for next models

1

Popular Power Tools manuals by other brands

Paslode CS150 Operating manual and schematic

Paslode

Paslode CS150 Operating manual and schematic

Power Adhesives 820-12 operating instructions

Power Adhesives

Power Adhesives 820-12 operating instructions

DeWalt DCF922 Original instructions

DeWalt

DeWalt DCF922 Original instructions

Max 45505 instruction manual

Max

Max 45505 instruction manual

Cleco 47BAB15AM3 instruction manual

Cleco

Cleco 47BAB15AM3 instruction manual

Max HN90 Operating and maintenance manual

Max

Max HN90 Operating and maintenance manual

Festool Carvex PSC 400 EB instruction manual

Festool

Festool Carvex PSC 400 EB instruction manual

Jet J-1230R Operating instructions and parts manual

Jet

Jet J-1230R Operating instructions and parts manual

Metalnox PT 150 instruction manual

Metalnox

Metalnox PT 150 instruction manual

CONWIN Duplicator 2 instruction sheet

CONWIN

CONWIN Duplicator 2 instruction sheet

Makita SG1251 instruction manual

Makita

Makita SG1251 instruction manual

Sealey Siegen Tools S01047 manual

Sealey

Sealey Siegen Tools S01047 manual

BEHABELT HP01 instruction manual

BEHABELT

BEHABELT HP01 instruction manual

Ryobi PCL28 user manual

Ryobi

Ryobi PCL28 user manual

Graphite 59G402 instruction manual

Graphite

Graphite 59G402 instruction manual

WOLFF Leister Triac-Set operating manual

WOLFF

WOLFF Leister Triac-Set operating manual

tormek SVD-185 manual

tormek

tormek SVD-185 manual

Sioux Tools IW100AI-8H Instructions and parts list

Sioux Tools

Sioux Tools IW100AI-8H Instructions and parts list

manuals.online logo
manuals.online logoBrands
  • About & Mission
  • Contact us
  • Privacy Policy
  • Terms and Conditions

Copyright 2025 Manuals.Online. All Rights Reserved.