Consort HE6351SL Use and maintenance manual

Installation & Control Guide for
SL Twinzone Radiant Heaters for SL Wireless Controllers
All electrical appliances produced for the Company are guaranteed for one year
against faulty material or workmanship. This applies only if the appliance has been
used for purposes in accordance with the instructions provided and has not been
connected to an unsuitable electricity supply, or subject to misuse, neglect,
damage or modified or repaired by any person not authorised by us. This guarantee
is offered to you as an extra benefit and does not affect your legal rights.
The correct electricity supply voltage is shown on the rating label attached to the
appliance.
Reasonable care has been taken to ensure that this guide is accurate at the time
of printing. In the interest of progress the Company reserve the right to vary
specifications from time to time without notice.
QUALITY SPACE HEATERS
Models
HE6351SL 1.5kW, HE6343SL 3kW
40000061 Iss 01

40000061 Iss 01
Important—please read
The silica sheath of the heating elements should not
be touched by hand, otherwise permanent marks
(devitrification) will occur during heating. WHEN
ASSEMBLING HOLD THE ELEMENTS BY THE CERAMIC
BUSHES AND OBSERVE THE CLEANING INSTRUCTIONS
AFTERWARDS.
Overview
Please read this guide carefully and retain for future
use and maintenance.
This appliance has been designed and
manufactured to the highest international
standards, however, care must be taken for optimal
results and safety. This appliance also meets the
requirements of EU Directive 2004/106/EC for EMC
and 2009/125/EC Directive.
Safety & Care
The appliance is not intended for use by persons
(including children) with reduced physical, sensory
or mental capabilities or lack of experience and
knowledge unless they have been given supervision
or instruction concerning use of the appliance by a
person responsible for their safety.
Warning
Do NOT site the appliance into a corner.
Do NOT use the appliance in workshops or rooms
where excessive dust is generated or present.
Do NOT touch outlet grille when the appliance is
in use.
Do NOT cover or restrict any aperture of the
appliance when in use.
Do NOT use the appliance if damaged.
Do NOT leave the appliance unattended.
Cleaning
Always disconnect the heater from the mains before
cleaning. The heater should not require any
maintenance, but it is strongly advised that it is kept
clean. An occasional wipe over with a soft cloth is
all that should be necessary.
Do NOT use metal or furniture polish on any part
of the heater.
Do NOT touch the heater with wet hands or in
any way bring water into contact with it.
If the supply cord is damaged, it must be replaced
by the manufacturer or its service agent or a similarly
qualified person in order to avoid a hazard.
2
If Your Heater Does Not Work
Check that power is available to the heater. The LED
light on the SL receiver should be illuminated
Check that the fuse in the spur unit has not blown. This
can be done by replacing the fuse with another
suitable fuse.
Check if the heater is paired with the SL controller
Should none of the above remedies work, then telephone
the helpline number shown in these instructions (UK ONLY).
Do not attempt to repair the heater.
Connection to the Main Supply
Electrical installation should be carried out by a
competent installer, preferably registered with NICEIC in
accordance with the 17 edition of the IEE Wiring
Regulations, (BS.7671), and any relevant Local Authority
Bye-Laws. This heater is fitted with a 3-core mains supply
cable and should be permanently connected to the
electricity supply via a double pole switch having 3mm
gap on each pole. A switched Fused Connection unit to
BS.1363. Part 4 is a recommended mains supply
connection accessory to ensure compliance with safety
requirements applicable to fixed-wiring installation.
Note: When switched on for the first time the appliance
may emit a slight smell.
WARNING: This appliance must be earthed.
When refitting the lid care must be taken to align the light
pipe on the lid with the indicator light.
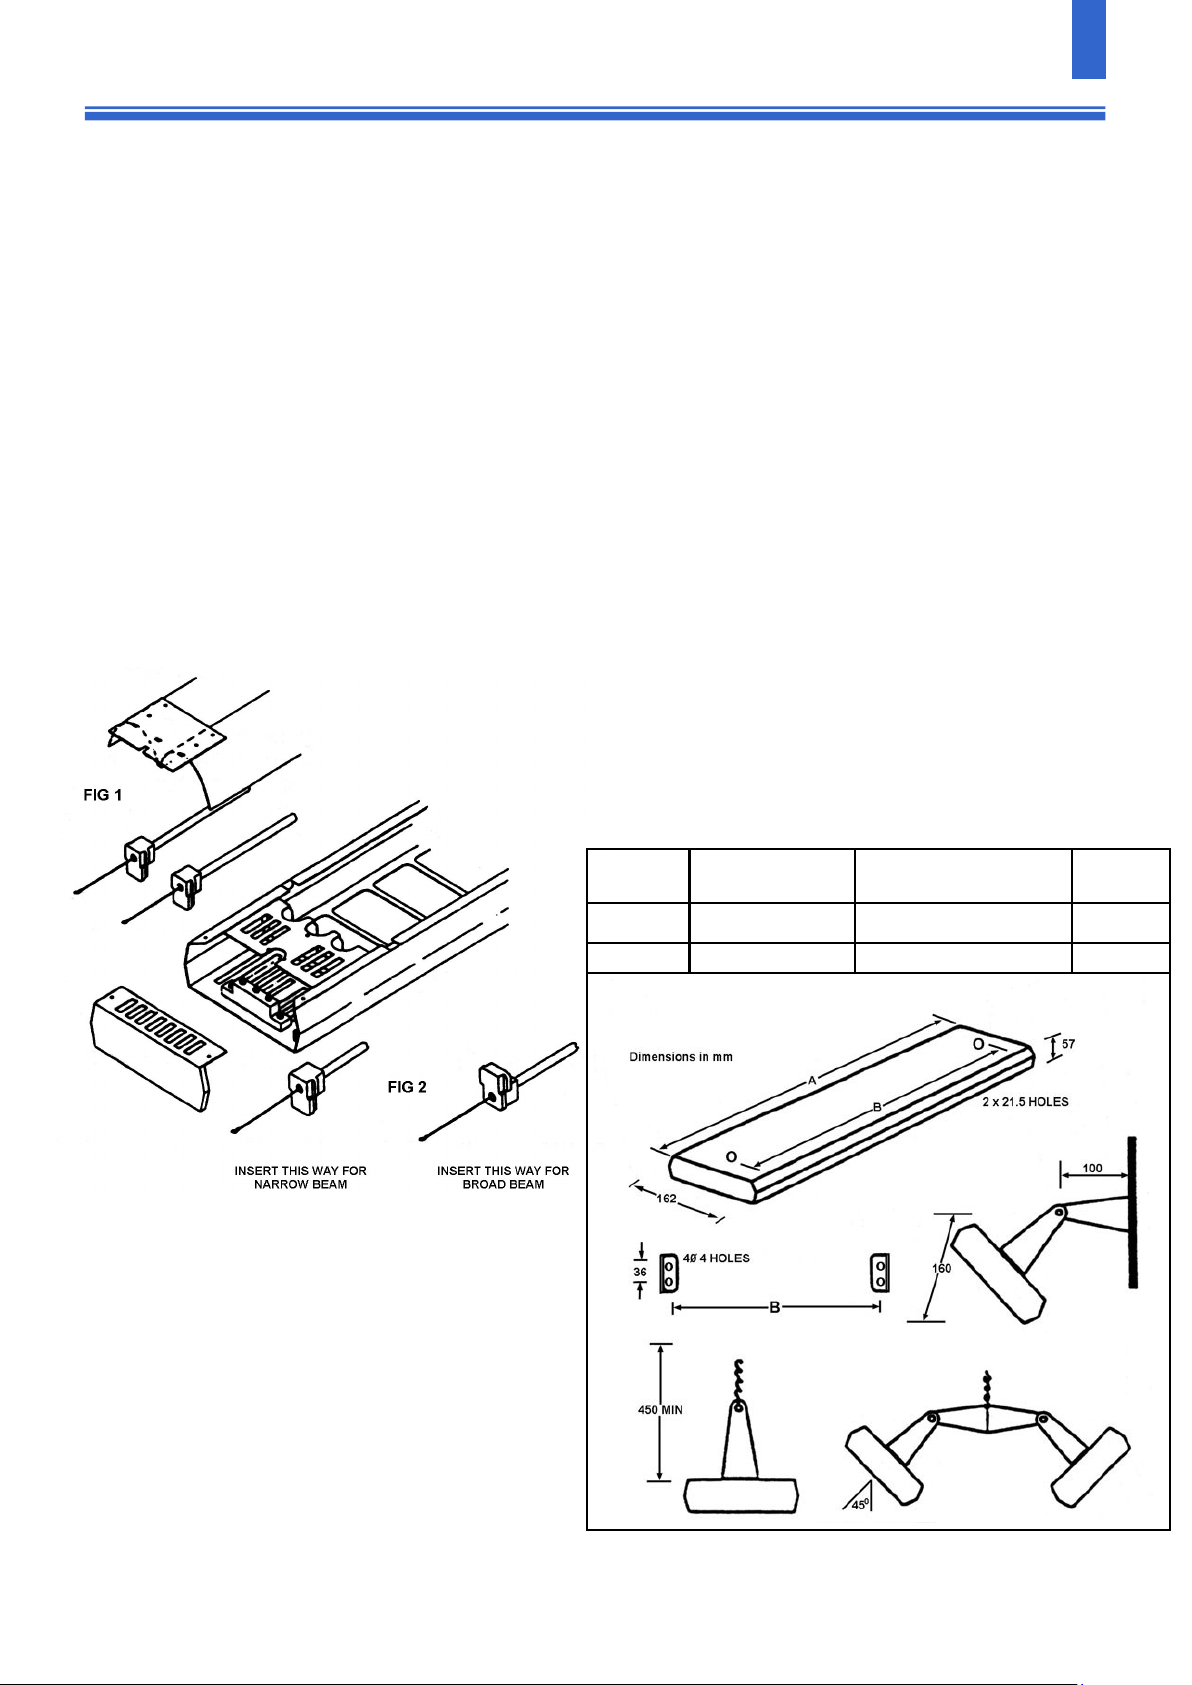
Assembly
The Twin-Zone heater is designed to provide widespread
warmth (broad beam) or a more concentrated beam of
heat over a localised area (narrow beam), and the
selection of either is made by adjusting the position of the
element. This is determined by ensuring that the ceramic
blocks supporting the silica tubing are mounted into the
heater body in the correct position. Long end of ceramic
blocks downwards will give narrow beam and short end
downwards will give broad beam. (See Fig 2).
N
E
L
INDICATOR
LIGHT

40000061 Iss 01
3
Assembly
The heater is supplied with the elements fitted in the
broad beam position and connected ready for
installation.
To change the beam width to the narrow setting
Remove the terminal box covers.
Remove the reflector from the body of the heater.
Disconnect the element tails from the terminal blocks.
Holding the elements by the ceramic bushes, lift
the element out of the retaining slots in the body.
Rotate the ceramic blocks into the narrow beam
position (long end downward, as Fig. 2) and replace.
The heater can now be reassembled in the
reverse order.
ENSURE THAT THE CERAMIC BLOCKS ARE ALL INSERTED
INTO THE BODY IN THE SAME OFFSET POSITION.
LONG END DOWNWARDS FOR NARROW BEAM.
Suspension
Mounting brackets for suspension purposes are
supplied with each heater. See diagrams for
alternative methods. Provision is made for mounting
by 20 mm conduit. Where the mounting brackets are
joined at the swivel point, the M6 shakeproof washer,
supplied in the mounting pack, should be used.
Angled
The diagram below illustrates a pair of heaters, which
should be adjusted to the narrow beam position,
suspended from the ceiling. Two heaters can be
mounted at 450to the vertical, thus giving wider
radiation from a single point and saving extra wiring.
Wall Mounting
The heater can be wall mounted, using the brackets
shown.
A safety guard, catalogue number HE6350, is
available if required for particular applications.
Element Replacement
A complete set of replacement elements (element
spiral assembled in silica tube) is available for all
heaters. When installing replacement elements the
cleaning instructions given previously should be
observed.
Spare element for HE6343SL
Cat No: HE6371 1.5 kW Silica sheathed element.
Spare element for HE6351SL
Cat No: HE6375 2 x 0.75 kW Silica sheathed
elements.
CAT No Overall Length mm
A
FIXING CENTRES mm
B
Weight
kg
HE6343SL 1170 1070 3
HE6351SL 660 570 1.8

Consort Equipment Products Limited
Thornton Industrial Estate, Milford Haven, Pembrokeshire, SA73 2RT
Tel: 01646 692172 Fax: 01646 695195
Operation hours: Mon to Thu 8.30am to 4.30pm | Fri 8.30am to 3.30pm
BS EN ISO 9001 Registered Company No FM12671
40000061 Iss 01
Operation
This heater can only be used when connected to a SL
Wireless Controller. Each SL controller can control any
number of heaters providing they are in the RF range.
The heater has an indicator light positioned on the
fascia panel. The light may be:
Green -when no heat is needed
Red -when the heater is on full power
SL Receiver Installation
The heater is supplied with SL wireless receiver pre
wired. The cable length is approximately 0.9m. The
controller should be screwed to the wall with 2x
number 4 or 5 screws and suitable wall plugs. Care
should be taken when installing the receiver. It must
not be positioned above, behind or below the
heater. Ideal position is on the side, minimum 250mm
from the heater. When the heater is suspended from
the ceiling, the SL receiver should be installed on the
ceiling as far as possible from the heater to avoid
damaging the electronic components when
connecting mains cable to the receiver. If the cable
between the heater and the SL receiver needs
replacing or extending, the same 2.5mm high
temperature flexible cable must be use.
SLPB SLTI
SLVT
Please refer to the SL user and operating instructions for
full operational details.
SL wireless controllers
CUSTOMER HELPLINE
Should you need any advice on the use of your new Consort product, please contact
our Helpline:
4
SLVTB
This manual suits for next models
1
Popular Electric Heater manuals by other brands

Centrometal
Centrometal HPe2/4CM Guidebook for installation, handling and maintenance

Somogyi
Somogyi home FK 21 instruction manual

HygroMatik
HygroMatik DemiLine Series manual

Heater Craft
Heater Craft G200X Installation and owner's manual

NuTone
NuTone H-910W installation instructions

Vortice
Vortice THERMOLOGIKA Instruction booklet