Cook's essentials 803849 User manual

1
DIGITAL AIR FRYER & COOKER
Model No: 803849
220-240V, 50/60HZ
1200-1400W
PLEASE READ AND RETAIN THESE INSTRUCTIONS FOR
FUTURE REFERENCE

2
DIGITAL AIR FRYER & COOKER
INSTRUCTION MANUAL
Product Overview
Congratulations on the purchase of this high quality product. This versatile
Digital Air Fryer & Cooker uses hot air in combination with high-speed air
circulation (rapid hot air) and a top grill to prepare a variety of tasty dishes in a
healthier, fast and easy way. Your ingredients are heated from all sides at once
and there is no need to add oil to most of the foods that you cook.
Used and cared for in line with the guidance provided within this Instruction
Manual it should provide you with many years of trouble free service.

3
General description
Health and Safety
The use of any electrical appliance requires the application of the following
common sense safety rules.
Failure to observe these safety rules exposes the user to the risk of personal
injury or the product itself to the risk of damage. These two categories are
denoted by the following conventions:
WARNING: Danger to the person!
IMPORTANT: Damage to the appliance!
Please therefore note the following safety advice.
Location
This appliance is intended for domestic use only. It should NOT be used
for commercial purposes. Such use may damage the product and will
invalidate your warranty.
Always locate your appliance away from the edge of a worktop.
Ensure that the appliance is used on a firm, flat, heat resistant surface.
Do not use the appliance outdoors, or near water.
1. Concealed Handle and Air Inlet
2. LED Display
3. Touch Sensitive User Controls
4. Basket / Tray Release Button Cover
5. Basket / Tray Release Button
5. Handle
6. Power Inlet
7. LED Display
8. Air Outlet
9. Cooking Basket
10. Cooking Tray
11. Pan
12. Power Cord (Not Shown)

4
Mains Cable
The mains cable should reach from the socket to the base unit without
straining the connections.
Do not let the mains cable hang over the edge of a worktop where a
child could reach it.
Do not let the cable run across an open space e.g. between a low
socket and table.
Do not let the cable run across a cooker or toaster or other hot area
which may damage the cable.
If the supply cable is damaged, DO NOT USE THE APPLIANCE. The
cable must be replaced by a suitably qualified person with a special
cable assembly available from the manufacturer or its service agent.
Personal Safety
WARNING: To protect against fire, electric shock and personal injury, do
not immerse the cord, plug and or appliance in water or any other liquid.
The use of accessory attachments not recommended by the
manufacturer may cause damage to the unit and a risk of personal
Injury. It will also invalidate your warranty.
WARNING. This appliance contains no user-serviceable parts. All
repairs must only be carried out by a qualified engineer. Improper
repairs may place the user at risk of harm.
WARNING. Do not use the appliance after a malfunction or if it has
been dropped or damaged in any way.
WARNING. Do not use the appliance for any purpose other than its
intended use.
WARNING. Extreme caution must be observed when moving an
appliance with hot contents.
WARNING. Do not use the product with wet or moist hands.
Only clean your Product after it has been disconnected from the Mains
Supply and allowed to fully cool down.
This appliance is not intended for use by persons (including children)
with reduced physical, sensory or mental capabilities, or lack of
experience and knowledge, unless they have been given supervision or
instruction concerning the use of the appliance by a person responsible
for their safety.
Children
Never allow a child to operate this appliance.
Children are vulnerable in the kitchen, particularly when unsupervised
and if appliances are being used or cooking is being carried out.

5
Teach children to be aware of dangers in the kitchen, warn them of the
dangers of reaching up to areas where the child cannot see properly or
should not be reaching.
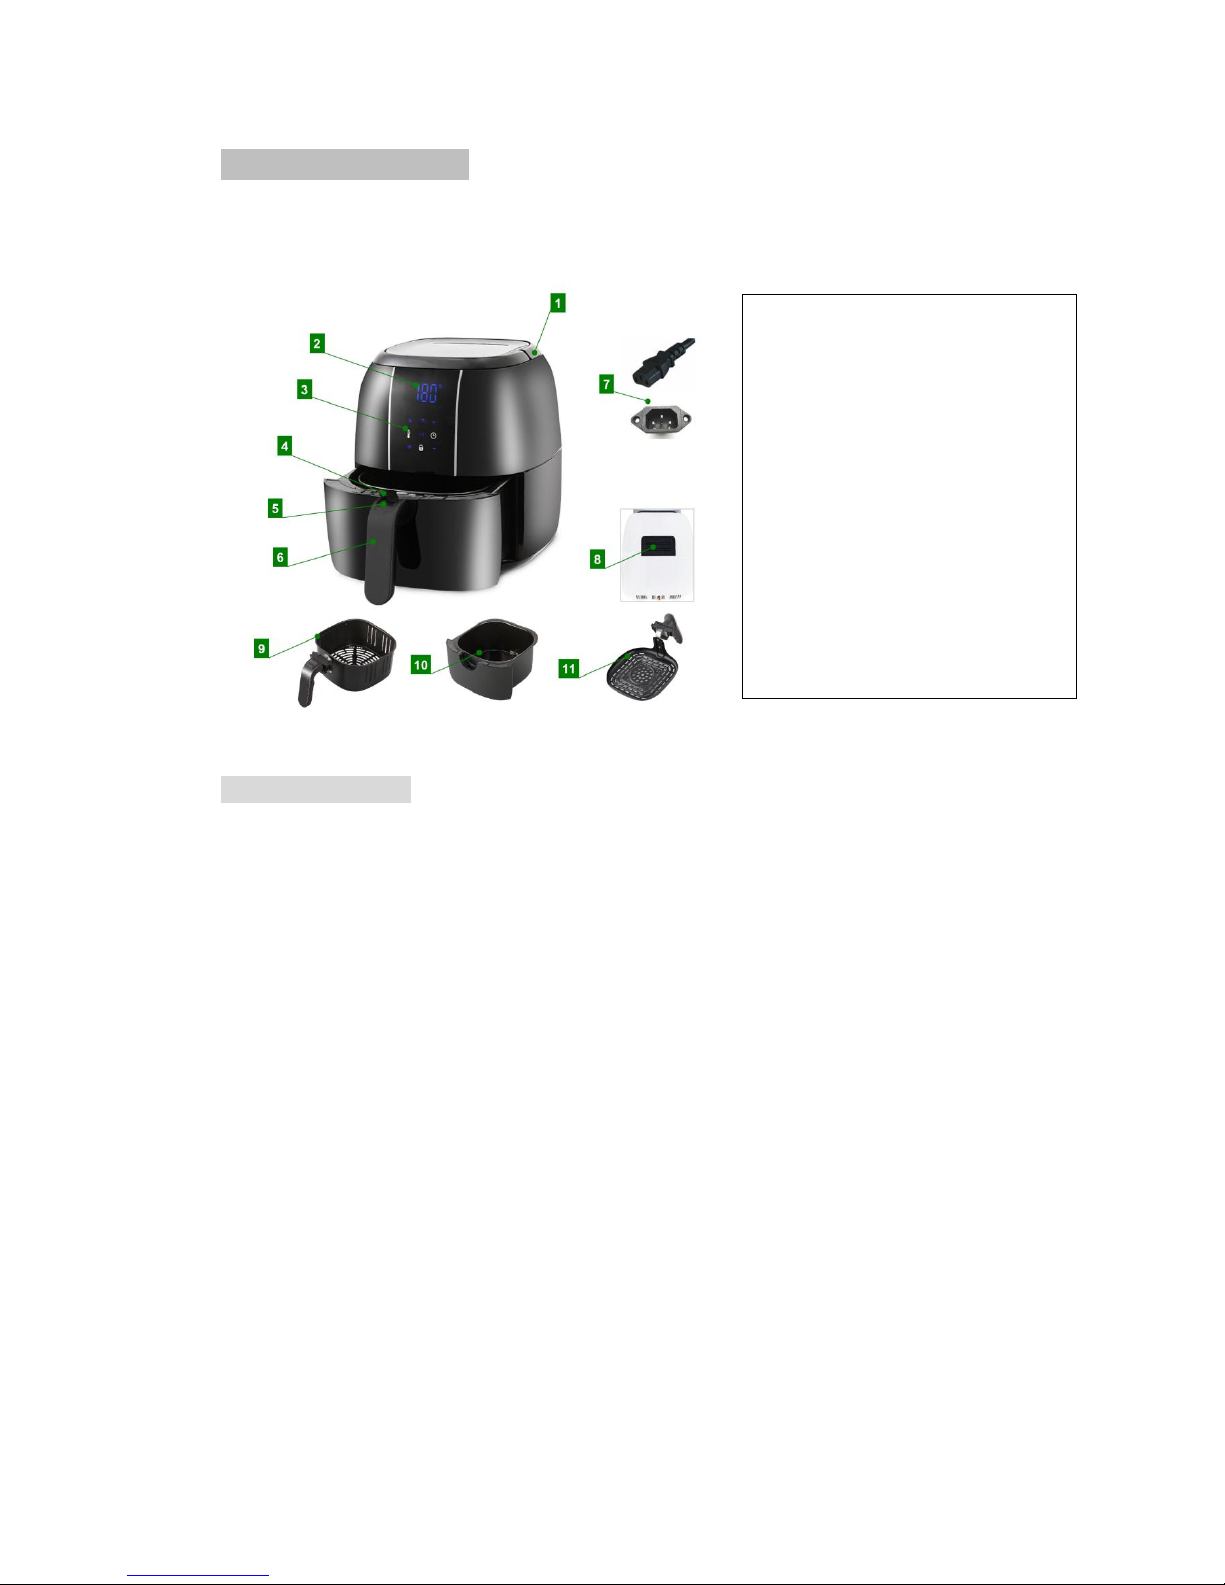
Safety Considerations Specifically for this Product
IMPORTANT. This appliance is fitted with a removable Power Cord. Please
make sure you only use the cord supplied with your product as this is fused
appropriately to provide correct protection.
IMPORTANT. When operating this Air Fryer & Cooker, keep at least four
inches (ten centimetres) of free space on all sides of the oven to allow for
adequate air circulation.
WARNING. DO NOT place your Air Fryer under cupboards, blinds or
curtains. Risk of overheating / fire.
To disconnect, turn off at the wall socket before removing the plug from the
mains outlet.
Unplug from the outlet when not in use and before cleaning. Always hold
and pull the plug, never pull the cord.
Allow the appliance to cool before putting on or taking off parts, and before
cleaning
WARNING. Do not cover any part of the Fryer with a cloth or similar, it will
cause overheating. Risk of fire.
Never leave the appliance unattended when operating.
WARNING. This is an AIR FRYER & COOKER. It requires very little oil to
cook. Do not fill the pan with oil or fat.
Do not use any accessories other than manufacturer recommended
accessories in this Fryer
Always wear protective, insulated oven gloves when inserting or removing
items from the hot Air Fryer & Cooker.
The appliance must be used on a stable heat-resistant surface.
The temperature on the surface of this appliance is relatively high during
cooking and for some time after it has been in use. Do not touch with bare
hands.
WARNING. Do not use this appliance in conjunction with an external timer
or remote control.
WARNING. DO NOT carry or lift the appliance using the Handle on the
Tray. Use ONLY the folding handle on the top of the unit for this purpose.
The first time you use your Air Fryer & Cooker there may be a slight odour
or a small amount of smoke given off. This is normal and is just the
manufacturing residues burning off.
Always place the ingredients to be cooked / fried in the basket to prevent it
from coming into contact with the heating elements.
WARNING. Do NOT fill the pan with oil as this may cause a Fire hazard

6
WARNING. This is a CLASS I Product and as such needs to be connected
to an EARTHED supply.
Electrical Requirements
When using electrical appliances basic safety precautions should always be
followed.
Check that the voltage indicated on the rating plate corresponds with that of
your local network before connecting the appliance to the mains power supply.
If your appliance is supplied with a non-rewirable plug fitted to the mains lead
and should the fuse need replacing, you must use an ASTA or BS approved
type conforming to BS1362 and of the same rating. If in doubt consult a
qualified electrician for advice or assistance. If you need to remove the plug -
DISCONNECT IT FROM THE MAINS and cut it off the mains lead. You must
then dispose of it IMMEDIATELY and SAFELY. Never attempt to re-use the
plug or insert it into a socket outlet as there is a danger of an electric
shock

7
How to use your Digital Air Fryer & Cooker
To begin using your Digital Air Fryer & Cooker, first, carefully unpack it and
check that it has not sustained any damage during transportation. Also check
that all the items shown in the PRODUCT OVERVIEW are present. We
recommend that you retain your packaging so that, in the unlikely event of a
fault developing, you are able to return the product in the correct packaging for
best protection.
Before first use
1. Remove all packaging material.
2. Remove any stickers or labels from the appliance other than the
Product Rating Plate.
3. Your Air Cooker and Fryer is supplied with both a Cooking Basket and a
Cooking Tray. The former is for when you are cooking larger items or
foods such as chips where a container is needed. The Cooking tray is
ideal for Steak, Bacon etc or where you need to use a Baking Tin or
other container as when making Muffins or Cakes. For transportation
purposes they are supplied with the handles detached, please see
below for details on how to assemble them.
Assembling the Handle/s onto the Cooking Basket and Cooking Tray.
ITEM
DESCRIPTION
a
Main Body (Cooking Tray or Cooking Basket
b
Screw (X4)
c
Domed Nut (X4)
d
Toothed Washer (X4)
e
Handle Assembly
f
Screwdriver (X1), Spanner (X1) [Not Shown]

8
A. Offer up the Handle Assembly (e) to the Cooking Tray / Basket.
B. Align the fixing holes.
C. One at a time, insert a Screw (b).
D. Place a Toothed Washer (d) over the Handle side of the Screw
thread.
E. Place on a Domed nut (c) and tighten by hand.
F. Repeat 2-5 for the second fixing.
G. Fully tighten using the Screwdriver and Spanner (f)
3. Thoroughly wash the Cooking Basket (9), Cooking Tray (10) and Pan
(11) in hot soapy water using a non-abrasive sponge. Rinse and dry.
4. Note: You can also use a dishwasher to wash these items.
5. Wipe the inside and outside of the appliance with a moist cloth.
6. Dry thoroughly with a soft cloth.
IMPORTANT: This is an Air Fryer & Cooker that works on hot air. Do
not fill the pan with oil or frying fat
Preparing for use
1. Place the appliance on a stable, level and heat resistant surface.
IMPORTANT. Do not place the appliance on non-heat-resistant
surfaces.
2. Place the Cooking Basket (9) or Cooking Tray (10) in the Pan (11)
correctly.
IMPORTANT. This appliance is fitted with a SAFETY INTERLOCK. If
the Pan is not properly located into the Air Fryer then the appliance will
not operate. When correctly located the Pan will be flush with the body
of the Fryer on both sides.
3. Connect the supplied Power Cord (12) [Not Shown] socket to the Plug
on the rear of the Appliance. Then connect the Power Cord Plug into
an earthed wall outlet socket.
4. Your Air Fryer and Cooker is now ready for use.
WARNING. Check that the voltage of your local mains supply matches
that shown on the Rating Plate of your appliance before switching on.
DO NOT fill the Pan with oil or any other liquid.
DO NOT put anything on top of the appliance.
DO NOT block the Air Outlet (8) at the rear of the unit. This disrupts the
airflow and affects the hot air cooking result.

9
User Controls
User Controls (3) Layout LCD Display (7)
USER CONTROLS
LCD DISPLAY SYMBOLS
SYMBOL
FUNCTION
SYMBOL
FUNCTION
Temperature Setting,
adjusted by UP/DOWN
keys.
This symbol will illuminate
when the unit is heating.
Press to increase the
temperature. 50C for each
press. Range 60-2000C.
This symbol will illuminate
when mains power is on.
Press to decrease the
temperature. 50C for each
press. Range 60-2000C.
This symbol rotates when
the fan is operating.
Preset Programmes.
Press sequentially to
select 01-06. See table
below.
OC
The 3 Digit display will
show the temperature
setting in OC.
Range 60-2000C
Start / Pause function.
The 3 Digit display will
show the time in minutes.
Range 1-60 minutes.
Child Lock. Lock or Unlock
the User Controls. Press
and hold for 3s to unlock.
Press once to lock.
Time Setting. Adjusted by
+- keys.
Press to increase the
cooking time. 1 minute for
each press. Max. 60 mins.
Press to decrease the
cooking time. 1 minute for
each press. Min 1 min.

10
Preset Cooking Programmes
The Preset Programmes shown below are useful when you are cooking simple
dishes. As with all temperature settings and cooking times these are
approximate only. Both time and temperature will vary depending on food
varieties and quantities as well as your own personal preferences.
Although these Programmes are preset, you can, if you wish, adjust both
temperature and time both prior to and during the cooking process.
PROGRAMME No. & TYPE
APPROX WEIGHT
(g / oz)
TEMPERATURE
(0C)
TIME
(min)
01 - Frozen Fries
350 / 12
200
16
02 - Home Made Fries
350 / 12
180
16
03 - Steak
300 / 11
180
15
04 - Chicken Drumstick
300 / 11
180
20
05 - Fish
300 / 11
180
12
06 -Cupcake
5 (Units)
200
18
Using the Appliance
This versatile Digital Air Fryer & Cooker can prepare a large range of foods.
Please refer to the separate RECIPE BOOKLET for many ideas on the foods
you can prepare.
Explanation of Operation (Roasting and Frying)
The following instructions show you how to operate your Air Fryer and
Cooker. The basic sequence of operations remains the same no matter what
you are cooking (all numbers shown refer to the diagram on PAGE 3):
1. Connect your Air Fryer to a convenient wall socket and switch on.
2. The LCD Display will briefly fully illuminate and then show three
horizontal bars and the (Power On) symbol. You will also hear a
single "Beep".
3. Remove the Pan (11) by pulling carefully on the Handle (5). Place the
Pan on a flat, heat resistant surface.
4. Remove the Cooking Basket (9) if required as follows. Slide the
Button Cover (4) on the Basket /Tray Release Button (5) forwards to
expose the Button. Press the Button and the Basket can then be lifted
out.
5. Add the food you wish to cook to the Basket (taking care not to overfill),
return the Basket to the Pan (simply clicks into place) and then the Pan
to the Air Fryer.
NOTE: We recommend you leave approximately a 2.0cm gap between
your food and the top of the tray.
6. Press and hold the (Child Lock) button for 3 seconds. The Air
Fryer and Cooker will switch on into "Fast Cooking Mode" and the
display will illuminate showing 1800C, the default temperature and
lighting up the touch sensitive controls. The time is also preset to a

11
default of 10 minutes. These default settings allow you to immediately
begin cooking and then adjust time and temperature if needed
afterwards.
7. To start cooking in the "Fast Cooking Mode" simply press the
(Start / Pause) button.
8. If you do not wish to use the default "Fast Cooking Mode" then
proceed as follows to adjust the time and temperature to your
requirements:
a. TEMPERATURE: To change the temperature press the or
buttons to increase or decrease the time in 50C increments.
Each single press will change the temperature by 50C. Pressing
and holding the or buttons will step the temperature
through sequentially, again in 50C increments.
b. TIME: To change the time press the or buttons to increase
or decrease the time in 1 minute increments. Each single press
will change the time by one minute. Pressing and holding the
or buttons will step the time through sequentially.
NOTE: If you do not press the button within 1 minute of completing
your settings the Air Fyer and Cooker will switch into standby and your
settings will be lost.
NOTE: Exactly the same procedure as shown in 8a/b is used to adjust
time and temperature regardless of whether you start the "Fast
Cooking Mode" or not.
9. Press the button to start the cooking process. The time that you
entered starts counting down. The display will switch alternately
between the temperature and the remaining time. The (Fan) and the
(Heat On) symbols in the display will illuminate.
10.If you need to add ingredients, shake or turn food or check on progress
during cooking you can remove the Tray by grasping the Handle and
pulling it carefully out. The cooking process pause and then resume
when the Tray is replaced. To avoid too much loss of heat we do not
recommend leaving the tray out for longer than around 30 seconds.
NOTE: To Pause the cooking process you can press the button.
Press the button to resume.
To STOP the cooking process press . The cooking will stop and all
settings will be lost.
11.When the cooking time you have set has elapsed the Air Fryer will
"Beep" four times and switch to standby and the (Power On) symbol
will extinguish. The fan will however continue to run for around three

12
minutes (to help cool the appliance down), a rotating (Fan)symbol
will show in the display.
12.When the fan stops running the unit will "Beep" once and shutdown.
The display will show just three horizontal bars.
NOTE: You can adjust the time or the temperature at any time during
the cooking process.
NOTE: The Air Fryer indicates when it has reached the set
temperature by turning the (Heat On) symbol off. You will notice that
this happens repeatedly during the cooking process as your desired
temperature is maintained.
WARNING: Do not touch the Pan during cooking and for some time after
use, as it gets very hot. Only hold the Pan by the Handle.
NOTE: Add 3 minutes to the cooking time if the appliance is cold.
Tips:
If you want, you can also let the appliance preheat without any
ingredients inside the Basket. In that case, set the time to 3 or 4
minutes as described in 8b. Press the button. When the Air
Fryer has reached your set temperature the (Heat On) symbol
will turn off. You can then remove the Pan and fill the Basket,
return the Pan to the Air Fryer and set the temperature and timer
to the required cooking settings. Press to start.
Some ingredients (for example chips) require shaking halfway
through the cooking time. To shake the ingredients, pull the pan
out of the appliance by the handle (the Air Fryer will switch off)
and shake it. Then slide the pan back into the Air Fryer & Cooker
and continue to cook.
WARNING: Do not press the Basket / Tray Release Button (5) during
the shaking process. The Basket is equipped with a
mechanical interlock (Release Button Cover) to prevent you
pressing the button accidentally.
To reduce the weight, you can remove the Basket from the Pan
and shake the basket only. To do so, pull the Pan out of the
appliance, place it on a heat-resistant surface and sliding the
Release Button Cover forwards press the Basket Release Button
on the handle to release the basket.
If you set the time to half the cooking time, you will hear the

13
audible alarm "beep" four times to alert you that you have to
shake the ingredients. However, this means that you have to set
the timer again for the remaining cooking time and press ON
again after shaking.
If you set the time to the full cooking time, there is no audible
alarm during cooking just at the end of the cooking cycle.
However you can pull out the pan at any time to check on
progress, the power will shut down automatically and resume
automatically after you slide the pan back into the appliance.
NOTE: Cooking will resume automatically when you return the Pan to
the Air Fryer. You do not need to press again unless the cooker has
completed the set time and you need to cook for a few more minutes.
9. When you hear the timer beep 4 times, the set cooking time has elapsed.
Pull the pan out of the appliance and place it on to a heat-resistant surface.
NOTE: The MAXIMUM settable cooking time is 1 hour. If you need to cook
for longer than this then simply wait until the hour has elapsed and then set
the time for your desired additional cooking time.
10. Check if the ingredients are ready.
If the ingredients are not ready yet, simply slide the pan back into the
appliance and set the timer for a few extra minutes and press the button
again to resume.
11. To remove small ingredients (e.g. fries), press the basket release button
and lift the basket out of the pan.
WARNING. Do not turn the Basket upside down with the Pan still
attached to it, as any excess oil that has collected on the bottom of
the Pan will leak onto the cooked food. After hot air frying, the pan
and the ingredients are hot. Depending on the type of food in the Air
Fryer & Cooker, steam may also escape from the Pan.
12. Empty the contents of the basket into a bowl or onto a plate
Explanation of Operation (Baking)
1. Your Air Fryer and Cooker is also very useful for preparing delicious cakes,
quiches and snacks.
To cook these you will need a suitably sized Baking Tin. Any type can be used
as long as it sits inside the Cooking Tray, this is recommended when you are
undertaking Baking as it provides improved access.
In every other respect the method of use and the setting up of the Air Fryer &
Cooker is identical to Frying and Roasting.
TIP: We recommend that when baking cakes it is advisable to preheat the Air

14
Fryer before adding your cake mixture to the Baking Tin and placing it in the
Basket of the Air Fryer. Proceed as follows;
2. Follow the instructions in the previous section to set the temperature then
set the time to 4 minutes. Press . When the Air Fryer has reached your set
temperature the (Heat On) symbol will turn off. You can then remove the
Pan and fill the Basket, return the Pan to the Air Fryer and set the temperature
and timer to the required cooking settings. Press to start.
NOTE:Add 3 minutes to the cooking time when you start cooking while the Air
Fryer & Cooker is still cold.
NOTE: Please be aware that whilst the Air Fryer and Cooker can cook foods
with a high fat content these will tend to produce a significant amount of smoke
particularly when using a high temperature setting. This will not harm the Air
Fryer or affect the final result of the food
Tips
To remove large or fragile ingredients, use a pair of tongs to lift the
ingredients out of the basket.
Smaller ingredients usually require a slightly shorter cooking time
than larger ingredients.
A larger amount of ingredients only requires a slightly longer
cooking time, a smaller amount of ingredients only requires a
slightly shorter cooking time. This is a benefit of this type of
cooking.
Shaking smaller ingredients halfway through the cooking time
optimises the end result and can help prevent unevenly cooked
ingredients.
Add some oil to fresh potatoes for a crispy result. Fry your
ingredients in the Air Fryer & Cooker within a few minutes of
adding the oil. (See the "Recommended Setting" for guidance.
Snacks that can be prepared in an oven can also be prepared in
the Air Fryer & Cooker.
The optimal amount for preparing crispy fries is around 500
grams.
Use pre-made dough to prepare filled snacks quickly and easily.
Pre-made dough also requires a shorter cooking time than
home-made dough.
Place a Baking Tin or Oven Dish in the Cooking Tray if you want to
bake a cake or quiche or if you want to fry fragile ingredients or
filled ingredients.
You can also use the Air Fryer & Cooker to reheat ingredients. To
reheat ingredients, set the temperature to 150
℃
for up to 10
minutes.
DO NOT use the reheat 1500C setting to defrost ingredients as it
may not fully defrost them.

15
Cleaning and Storage
Cleaning
We recommend that the Cooking Basket, Cooking Tray and Pan are
cleaned as soon as they have cooled down after use to prevent the build up of
any residues. Proceed as follows:
1. Disconnect the appliance from the Mains Supply and allow to cool down
completely.
2. Remove the Pan from the Air Fryer and Cooker by pulling gently on the
handle.
3. Remove the Basket from the Pan as follows. Slide the Button Cover
over the Basket / Tray Release Button (2) forwards to expose the
Button. Press the Button and the Basket / Tray can then be lifted out.
4. Thoroughly wash the Basket Tray and Pan in hot soapy water using a
non-abrasive sponge. Rinse and dry.
NOTE: You can also use a dishwasher to wash these items.
5. Wipe the inside and outside of the appliance with a moist cloth. Dry with
a soft cloth.
IMPORTANT. DO NOT use any abrasive or caustic cleaning agents or
scouring pads as these may damage the surface of your appliance.
Storage
Once the appliance has been thoroughly cleaned and dried it can be stored in
a dry location out of the reach of children.
To ensure it is dust free and ready for use the next time you need it we
recommend you keep it in its original packaging.

16
Troubleshooting
In the unlikely event that you experience a problem with your Air Fryer and
Cooker please take a couple of minutes to check these possible causes
before you contact the Help Line.
PROBLEM
POSSIBLE CAUSES
SOLUTIONS
The LED Display is not
illuminated
No Power
Make sure the appliance is
plugged in.
Check your wall socket is
switched on or try another
socket.
The Unit will not operate
The Pan is not correctly
located in the Air Fryer body.
Interlock switch not operated.
Ensure the Pan is located so
that it is flush with the main
housing.
My settings were lost
More than 1 minute elapsed
before starting the cooking
process
Start the cooking process
within 1 minute of completing
the settings
There is a lot of smoke
The food being cooked
contains high levels of fat.
This will not cause any harm to
the cooker or impair the taste
of the finished food.
Although I followed the
cooking times the food
still needed longer
You did not preheat the Air
Fryer or add 3-4 minutes to the
cooking time
Add extra time or preheat
before starting to cook
Specification
Model / Model Number
AIR FRYER & COOKER / 803849
Operating Voltage
220-240V 50/60Hz
Power Consumption
1200-1400W
Fuse Type / Value
BS1362 13A
Protection Class
I (This Product must be earthed)
Recycling
At the end of its useful life or at any time in the future you need to dispose of this product
please note that waste electrical products should not be disposed of with household waste.
Please recycle where facilities exist. Check with your Local Authority or retailer for
recycling advice
Approval
This product complies with European Low Voltage and Electromagnetic Compatibility
Directives when installed and used in accordance with this instruction manual.
Imported by QVC, W4 5XU

17
This page is intentionally blank.
Table of contents
Other Cook's essentials Fryer manuals