CookMax VOLANO 350 User guide

cookmax, cookmax+ und start! sind Marken der PENTAGAST eG
Ruhrstrauch 4, D-36100 Petersberg
Tel: +49 (0) 66 1 / 93 48 3 –0 / Fax: +49 (0) 66 1 / 93 48 3 - 25
www.pentagast.de
Vorbereitung
Aufschnittmaschine
Artikel-Nr.
90415008 (Volano350FLORATO)
Handbuch

VOLANO 350 –370
Affettatrice a volano –Uso e manutenzione
Flyweel slicer –Use and maintenance
Trancheuse à volant –Emploi et maintenance
Schneidemaschine Mit Handrad –Gebrauch und Wartung

I
Caratteristiche tecniche
VOLANO 350
VOLANO 370
Diametro lama mm
350
370
Spessore di taglio mm
0÷2,5
0÷2,5
Taglio utile
Larghezza mm
270
270
Altezza mm
240
250
Corsa piatto mm
320
320
Dimensioni d’ingombro massime
(valori in mm)
Dimensioni d’ingombro e peso
VOLANO 350
VOLANO 370
A
600
600
B
510
510
C
870
870
D
710
710
E
650
650
Peso Kg
81,0
81,0
2
E
A
C
B
D

10
7
6
3
4
5
1
12
11
16
8
9
2
13
8
10
7
15
14
4
2
1
3
5
12
9
6
1. Volano
2. Impugnatura
3. Carrello
4. Manopola numerata spessore fetta
5. Pomolo avanzamento rapido piatto
6. Piatto portamerce
7. Pressamerce
8. Affilatoio
9. Lama
10. Paralama
11. Parafetta
12. Piatto di raccolta
13. Vaschetta raccogli scarto
14. Avanzamento lento piatto
15. Pomolo bloccaggio piatto
16. Pomello bloccaggio affilatoio
3

Uso della macchina
Ruotare il volano 1avvicinando il carrello 3 (verso l’operatore); sollevare il pressamerce 7; ruotare in senso
orario la manopola 5e contemporaneamente spostare verso destra il piatto portamerce 6; appoggiare sul
piatto 6il prodotto da affettare;
abbassare il pressamerce 7 bloccando il prodotto; ruotare in senso orario la manopola 5e
contemporaneamente spostare verso sinistra il piatto 6per avvicinare il prodotto alla lama 9; l'avvicinamento
e l'allontamento del prodotto possono essere effettuati con più precisione usando la manopola 14;
azionando la manopola numerata 4(0÷2,4 mm) predisporre lo spessore della fetta richiesto.
4
7
3
1
5
6
6
9
7
5
1
4
14
6

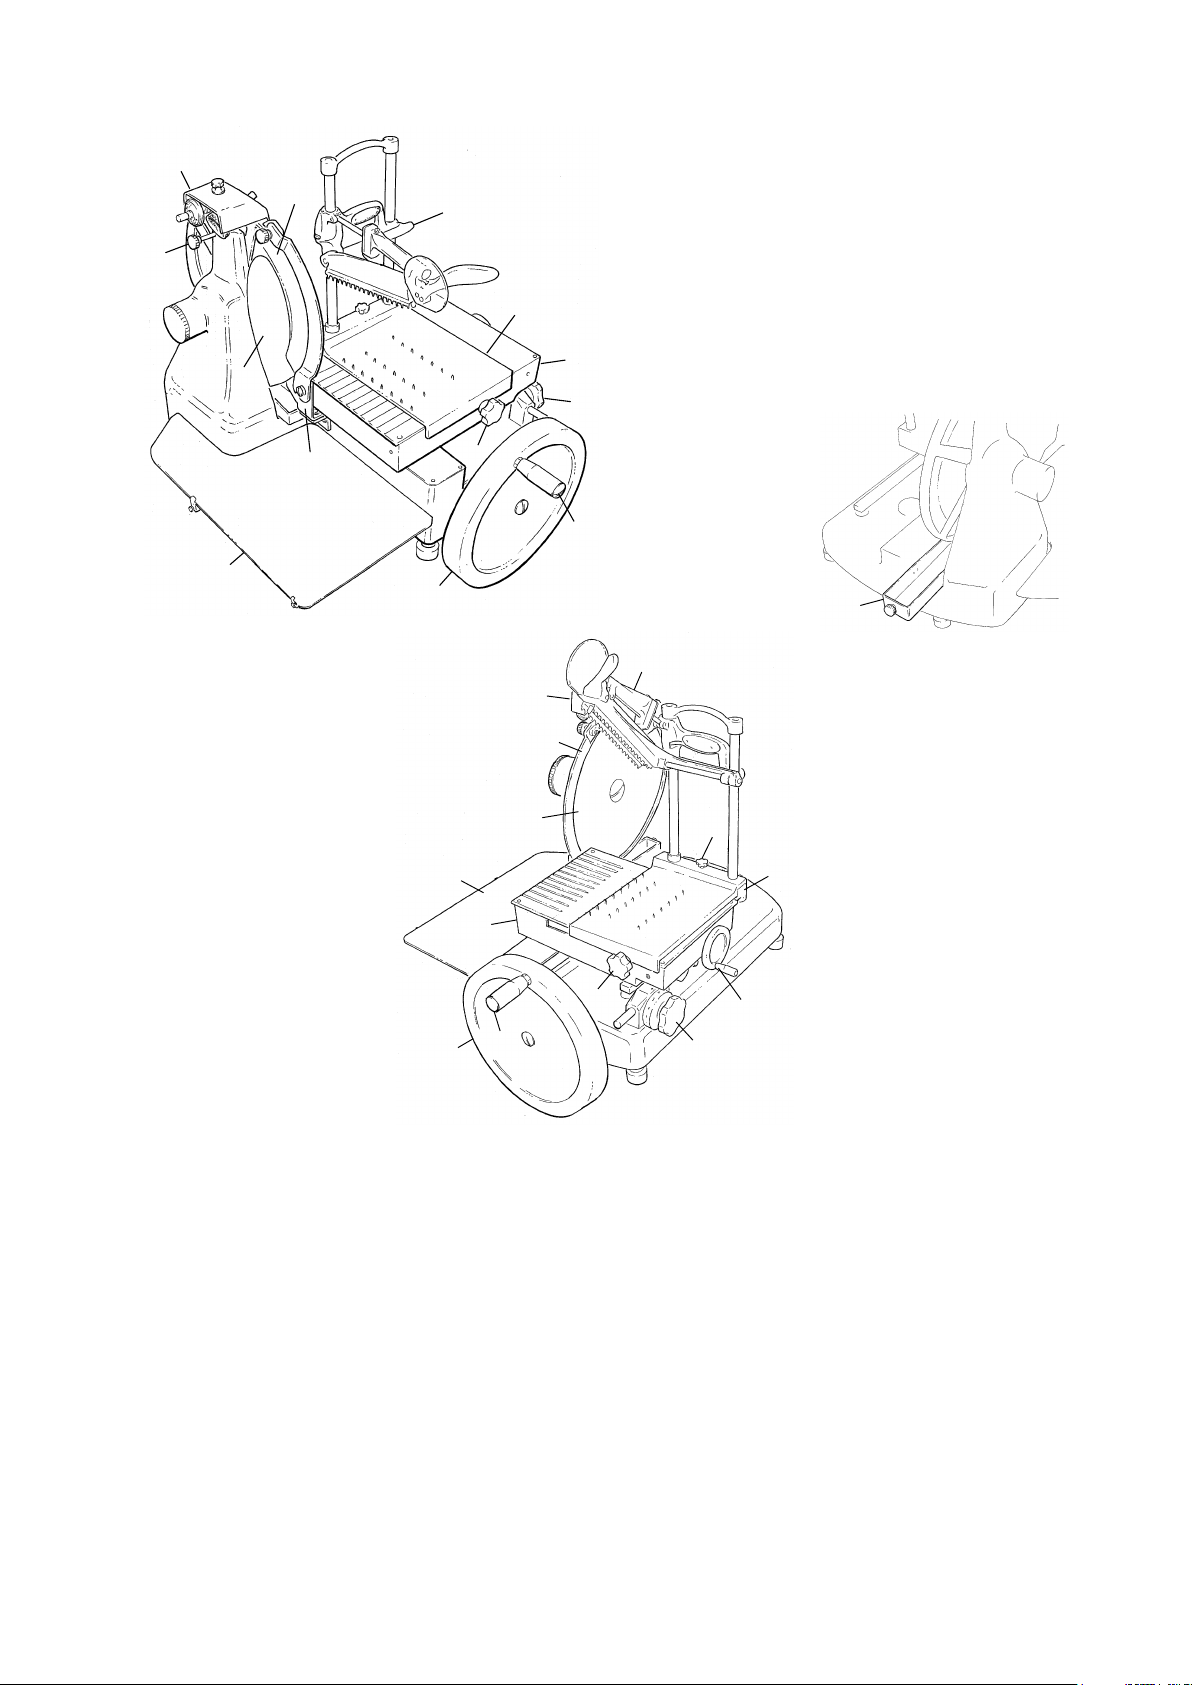
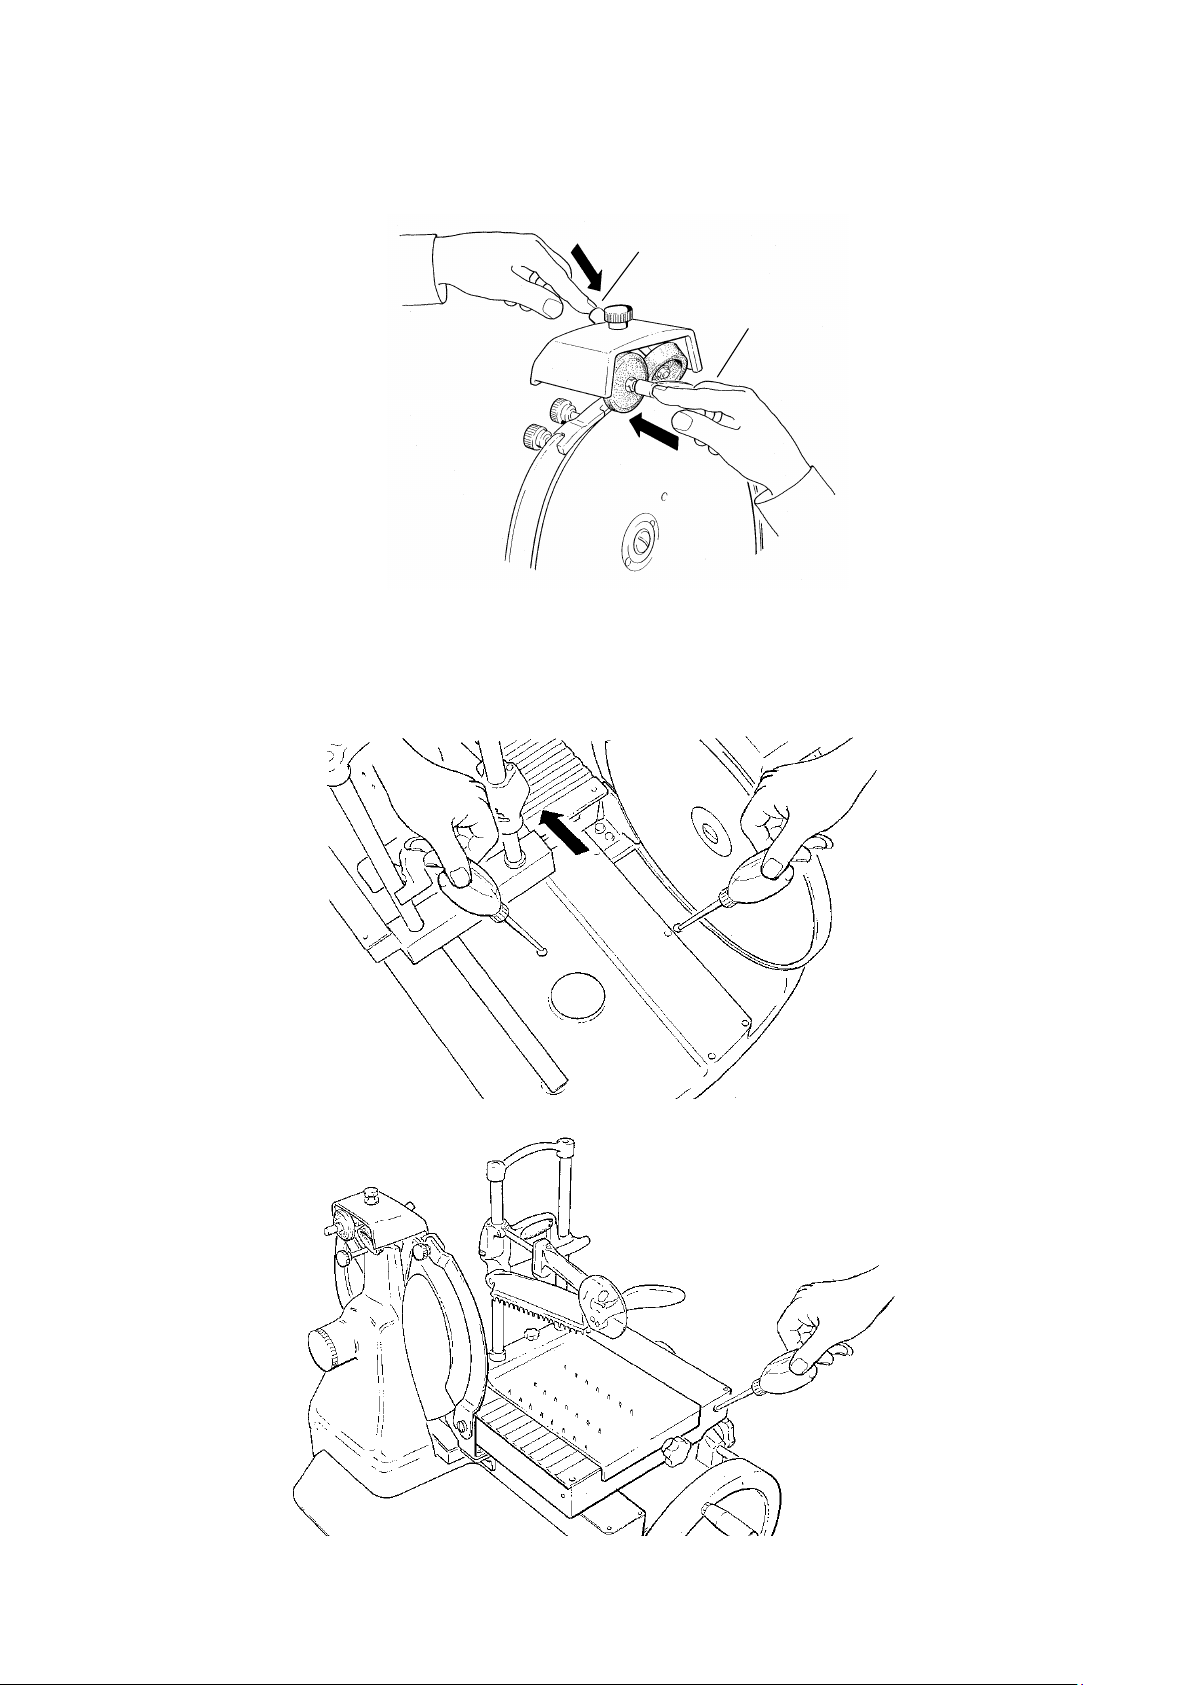
Prima di iniziare il taglio del prodotto rimuovere il paralama 10 allentando il pomolo 10.1 e spostarlo dalla
posizione di riposo (A) alla posizione di lavoro (B) scoprendo il tal modo il filo della lama stessa; bloccare il
paralama 10 nella nuova posizione riavvitando il pomolo 10.1.
ATTENZIONE
Utilizzare sempre guanti di protezione antitaglio ed antiscivolo operando con grande attenzione, senza
distrarsi.
PERICOLO DI TAGLIO!
Ruotare il volano 1avviando l’operazione di taglio con deposizione delle fette sul piatto 12; riportare il
paralama 10 in posizione di riposo (A) ad operazioni di taglio terminate.
MAI LASCIARE LA MACCHINA INUTILIZZATA CON IL FILO DELLA LAMA SCOPERTO!
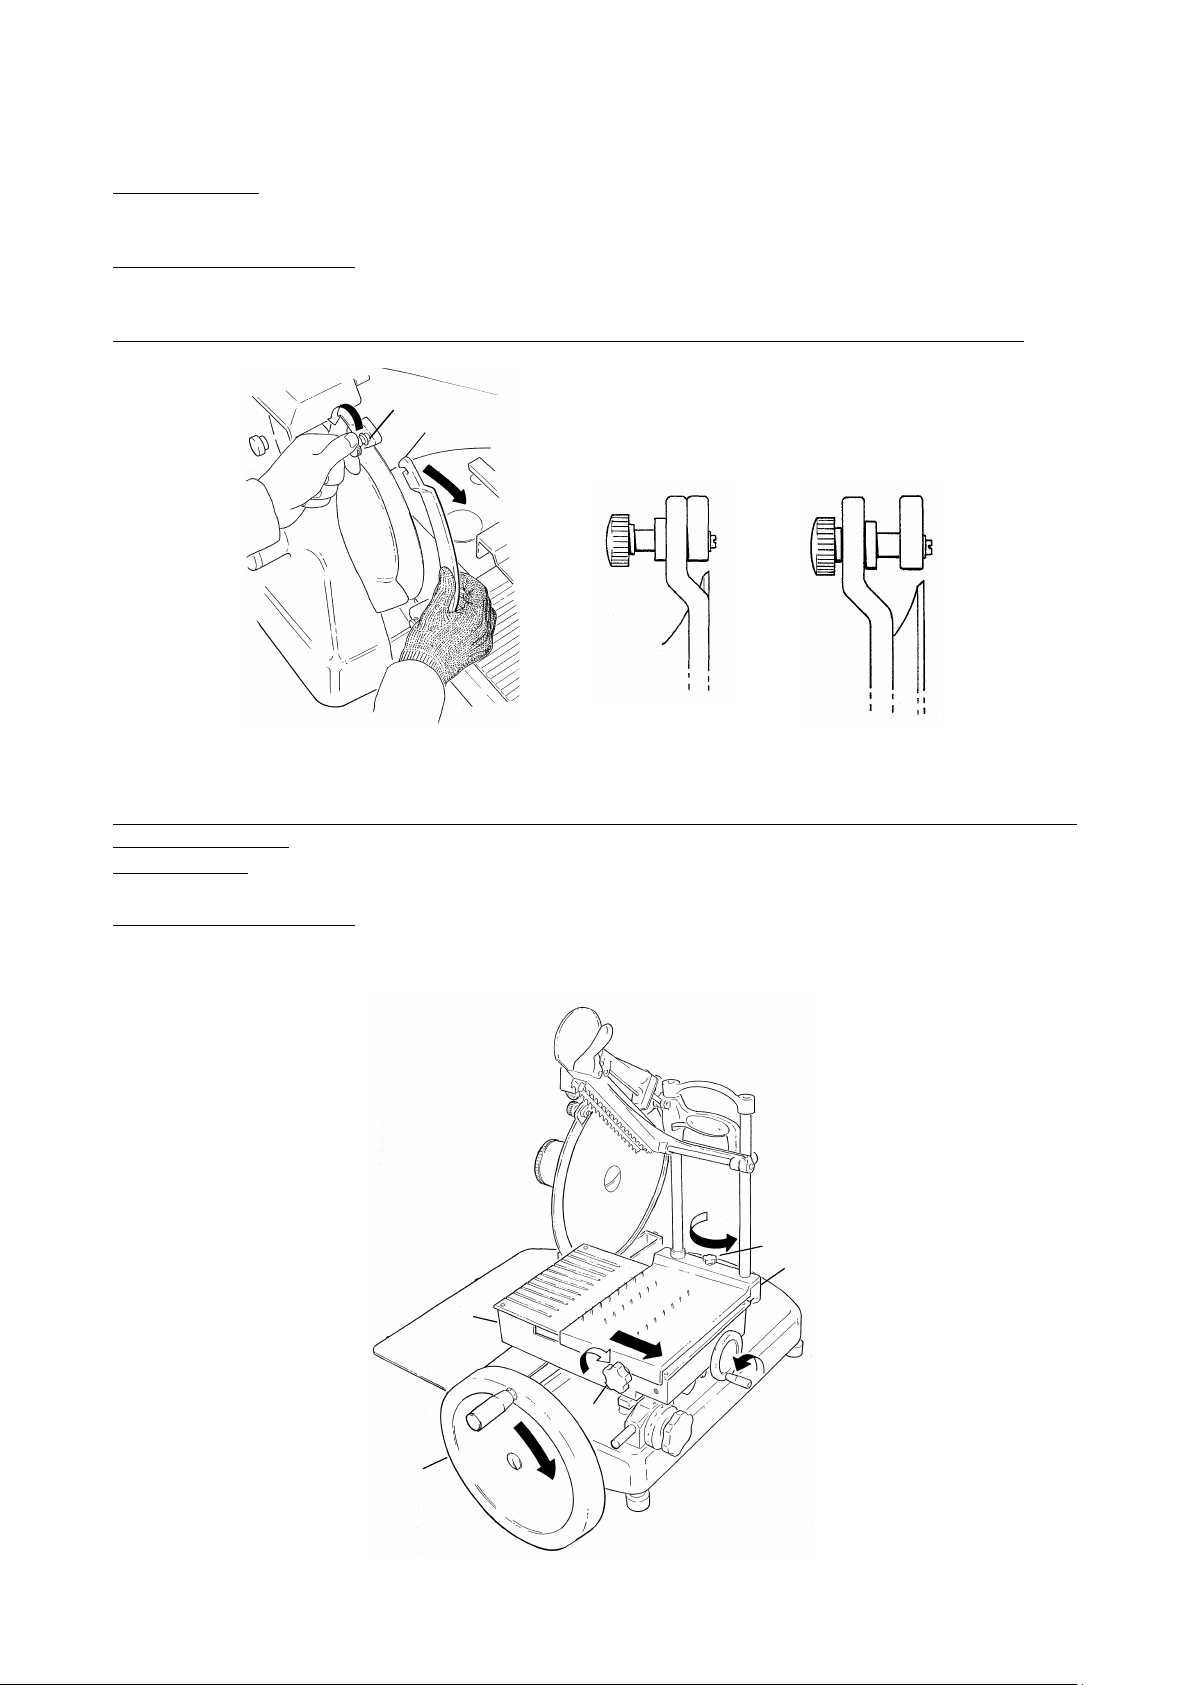
Pulizia della macchina
Per le operazioni di pulizia utilizzare esclusivamente un panno inumidito con acqua e normale detersivo
liquido per stoviglie.
Attenzione: utilizzare sempre guanti di protezione antitaglio ed antiscivolo eseguendo le operazioni di
seguito descritte con grande attenzione, senza distrarsi.
PERICOLO DI TAGLIO!
Ruotare il volano 1avvicinando il carrello 3(verso l’operatore); ruotare in senso orario la manopola 5e
contemporaneamente spostare verso destra il piatto portamerce 6; togliere il prodotto dal piatto 6; svitare il
pomolo 15 di bloccaggio come in figura;
5
10
10.1
A
B
1
3
5
6
15

sollevare il piatto portamerce 6; pulire con cura la parte inferiore del piatto ed il piano del carrello 3; pulire la
lama 9come in figura, con grande attenzione, partendo dal centro verso l’esterno;
15
6
3
9
aprire il parafetta 11 e pulirne con cura l’interno; rimuovere il paralama 10 previo allentamento del relativo
pomolo di bloccaggio 10.1.
ATTENZIONE: pericolo di taglio!
Rimontare il paralama prontamente ad operazioni di pulizia terminate.
11
10
10.1
6

Estrarre la vaschetta raccogli scarti 13; lavarla, aciugarla e rimetterla in sede; rimuovere il piatto 12 previo
allentamento delle due viti di fissaggio.
Per le operazioni di pulizia utilizzare esclusivamente un panno inumidito con acqua e normale detersivo
liquido per stoviglie.
Affilatura lama
Allentare il pomello di bloccaggio 16 dell’affilatoio 8; sollevare l’affilatoio e ruotarlo di 180°; riabbassare con
attenzione l’affilatoio 8, la lama si centrerà automaticamente tra le due mole; ribloccare il pomello16.
7
13
12
8
16
8
16

Mettere in rotazione il volano e premere contemporaneamente, per circa 30-40 secondi, solo il pulsante 8.1;
interrompere la rotazione e controllare con una matita che sul filo della lama si sia formata una leggera bava;
mettere nuovamente in rotazione il volano e premere contemporaneamente solo il pulsante 8.2 per 2-3
secondi; riportare l’affilatoio nella posizione originaria.
8.1
8.2
Lubrificazione
Una-due gocce d’olio nei punti indicati; usare esclusivamente l’olio in dotazione; pulire con cura dopo la
lubrificazione rimuovendo l’eventuale olio in eccesso.
8

EN
Technical features
VOLANO 350
VOLANO 370
Blade diameter mm
350
370
Cut thickness mm
0÷2,5
0÷2,5
Actual cut
Width mm
270
270
Height mm
240
250
Tray run mm
320
320
Maximum dimensions
(values in mm)
Dimensions and weight
VOLANO 350
VOLANO 370
A
600
600
B
510
510
C
870
870
D
710
710
E
650
650
Weight Kg
81,0
81,0
9
E
A
C
B
D

10
7
6
3
4
5
1
12
11
16
8
9
2
13
8
10
7
15
14
4
2
1
3
5
12
9
6
1. Hand wheel
2. Handle
3. Trolley
4. Slice thickness, graduated knob
5. Plate, quick forward
6. Goods-holder tray
7. Presser
8. Sharpener
9. Blade
10. Blade protector
11. Slice protector
12. Collection plate
13. Waste collection tray
14. Plate slow forward
15. Plate locking knob
16. Sharpener locking knob
10

Use
Rotate the 1hand wheel, and bring the 3trolley closer o the operator; lift the 7goods-presser; rotate the 5
knob clockwise and simultaneously move the 6goods-holder tray to the right; set the goods to slice on the 6
tray;
7
3
1
5
6
6
lower the 7goods-presser to hold the product in place; rotate the 5 knob clockwise and simultaneously move
the 6tray to the left, thus bringing the product close to the 9blade; the goods can be more precisely brought
close or away from the blade using the 14 knob; set the required slice thickness on the 4graduated (0÷2,4
mm) knob.
9
7
5
1
4
14
6
11

Before proceeding with slicing the product, remove the 10 blade protector by loosening the 10.1 knob and
move it from idle position (A) to work position (B), thus uncovering the blade cutting edge; lock the 10 blade
protection in the new setting by screwing the 10.1 knob again.
WARNING
Always use protective, cut-resistant, gripping gloves and proceed with the utmost care and attention.
CUTTING HAZARD!
Rotate the 1hand wheel and start the slicing operation; the slices will fall onto the 12 plate; once completed
slicing, return the 10 blade protection to idle position (A).
WHEN THE MACHINE IS NOT IN USE, ALWAYS COVER THE BLADE!
Cleaning the machine
For all cleaning operations, always and exclusively use a water-moist cloth and a standard, dishwashing
detergent.
Warning: always wear cut-resistant, gripping gloves and carry out the operations described with the utmost
care and attention.
CUTTING HAZARD!
Rotate the 1hand wheel and bring the 3trolley towards the operator; rotate the 5knob clockwise and
simultaneously move the 6goods-holder plate to the right; remove the goods from the 6tray; unscrew the 15
locking knob as in the illustration;
1
3
5
6
15
12
10
10.1
A
B

lift the 6goods-holder tray; carefully clean its underside and the 3trolley surface; very carefully clean the 9
blade as illustrated, starting from the centre and towards the outside;
15
6
3
9
open the 11 slice-protection and carefully clean the inside; loosen the locking 10.1 knob to remove the 10
blade-protector.
WARNING: Cutting hazard!
Once completed cleaning, reassemble the blade-protector.
11
10
10.1
13

Slide the 13 waste tray out, wash it, dry it and slide it in again; loosen the two fastening screws and remove
the 12 tray.
To clean only use a cloth dampened with water and normal dishwashing liquid soap.
Blade sharpening
Loosen the 16 locking knob on the 8sharpener; lift the sharpener and rotate it at 180°; carefully, lower the 8
sharpener again; the blade will automatically centre between the two sharpening grinders; lock the 16 knob
again.
14
13
12
8
16
8
16

Set the hand wheel in motion and simultaneously press the 8.1 knob, only for 30-40 seconds; stop rotation
and use a pencil to check that the blade cutting edge has made a slight burr; set the hand wheel in rotation
again and simultaneously press the 8.2 knob only for 2-3 seconds; return the blade sharpener to its original
position.
.
8.1
8.2
Lubrication
One or two oil drops in the points highlighted in the illustration; use only the oil supplied; after lubrication,
thoroughly remove any possible excess oil.
15

F
Caractéristiques techniques
VOLANO 350
VOLANO 370
Diamètre lame mm
350
370
Épaisseur de coupe mm
0÷2,5
0÷2,5
Coupe utile
Largeur mm
270
270
Hauteur mm
240
250
Course chariot mm
320
320
Dimensions d'encombrement maximum
(valeurs en mm)
Dimensions et poids
VOLANO 350
VOLANO 370
A
600
600
B
510
510
C
870
870
D
710
710
E
650
650
Poids Kg
81,0
81,0
16

10
7
6
3
4
5
1
12
11
16
8
9
2
13
8
10
7
15
14
4
2
1
3
5
12
9
6
1. Volant
2. Poignée
3. Chariot
4. Poignée numérotée épaisseur tranche
5. Levier d'avancement rapide plateau
6. Plateau porte produit
7. Presse produit
8. Affûteur
9. Lame
10. Protection lame
11. Guide tranche
12. Plateau de recueil
13. Cuvette déchets
14. Avancement lent plateau
15. Pommeau de blocage plateau
16. Pommeau de blocage affûteur
17

Utilisation de la trancheuse
Tournez le volant 1en approchant le chariot 3(vers l'opérateur); soulevez le bras-presseur 7; tournez dans
le sens des aiguilles d’une montre le bouton tournant 5et simultanément déplacez vers la desiree ;
déposez sur le plateau 6le produit à débiter; baissez le bras presseur 7en bloquant le produit; tournez le
bouton 5dans le sens des aiguilles d’une montre et simultanément déplacez vers la gauche le plateau 6
pour rapprocher le produit du couteau 9; le rapprochement et l’éloignement du produit peuvent être effectués
avec plus de précision en utilisant le bouton 14; l’utilisation du bouton numéroté 4(0÷2,4 mm) permet de
fixer l’épaisseur de coupe.
18
7
3
1
5
6
6
9
7
5
1
4
14
6

Avant de commencer la coupe du produit retirez le protège-lame du couteau 10 en desserrant le bouton 10.1
et faites-le passer de la position repos (A) à la position travail (B) mettant ainsi à nu le fil du couteau; bloquez
la protection du couteau 10 dans sa nouvelle position en revissant le bouton 10.1.
ATTENTION
Utilisez toujours des gants de protection et de sécurité, travaillez toujours avec vigilance sans inattention.
RISQUE DE SE COUPER !
Tournez le volant 1pour commencer l’opération de coupe avec dépôt des tranches sur le plateau 12;
remettez le protège-lame du couteau en position repos (A) lorsque l’opération de coupe est terminée.
QUAND VOUS N’UTILISEZ PAS LE TRANCHEUR NE LAISSEZ JAMAIS LE COUTEAU
AVEC LE FIL A NU!
Nettoyage de la machine
Pour les opérations de nettoyage utilisez exclusivement un chiffon humide avec de l’eau et un produit liquide
lave-vaisselle.
Attention: utilisez toujours des gants de protection et de sécurité et effectuez les opérations décrites ci-
dessus avec grande vigilance, sans inattention.
RISQUE DE SE COUPER !
Tournez le volant 1en approchant le chariot 3(vers l'opérateur); tournez le bouton 5dans le sens des
aiguilles d’une montre et simultanément déplacez vers la droite le plateau porte-produit 6; prélevez le produit
du plateau 6; dévissez la poignée de levier de sécurité 15 d’après le dessin;
19
10
10.1
A
B
1
3
5
6
15
This manual suits for next models
2
Table of contents
Languages:
Other CookMax Kitchen Appliance manuals

CookMax
CookMax SA40 Service manual

CookMax
CookMax SG220 Service manual

CookMax
CookMax 146007 Programming manual

CookMax
CookMax 146003 User manual

CookMax
CookMax 513015 User manual

CookMax
CookMax 146006 User manual

CookMax
CookMax FP 36 User manual

CookMax
CookMax Volano 300 User guide

CookMax
CookMax HP-38A User manual