Cookworks DF7003T-CB Manual

Issue 1 23/4/2020 1
Health Fryer
Model No. DF7003T-CB
Care & Instruction Manual
For household and indoor use only
Please read these instructions before use and retain for
future reference

Issue 1 23/4/2020 2
ELECTRICAL SAFETY
You should only plug the appliance into a 220V‐240V AC,
50Hz supply. Connecting it to other power sources may
damage the appliance and will invalidate the guarantee.
Switch off and unplug when not in use and before cleaning
the appliance.
Keep the appliance and its cord out of reach of children
less than 8 years.
Do not allow children to use the appliance without
supervision.
This appliance can be used by children aged from 8 years
and above and persons with reduced physical, sensory or
mental capabilities or lack of experience and knowledge if
they have been given supervision or instruction concerning
use of the appliance in a safe way and understand the
hazards involved. Children shall not play with the appliance.
Cleaning and user maintenance shall not be made by
children unless they are older than 8 and supervised.
Keep fryer housing, cable, and plug dry and away from
areas where it is likely to get splashed. Never immerse in
water.
Do not pull on the cable to disconnect from the mains
supply.
Do not operate the appliance if damaged or after it
malfunctions. In the event the supply cord is damaged, in
order to avoid a hazard it must only be replaced by a
qualified service engineer, with a suitably approved part.
This appliance must be positioned so that the plug is
accessible and the plug socket is within easy reach of the
power cord.
This appliance must be plugged into an earthed socket
outlet.

Issue 1 23/4/2020 3
WARNING!
This appliance is intended exclusively for use in domestic
households. It is not suitable for commercial use.
Place the appliance on a flat, stable surface with adequate
ventilation and away from other sources of heat. Minimum
distances around the appliance for adequate ventilation is
10cm. Do not cover or restrict ventilation openings.
Place all foodstuffs to be cooked into the frying basket (not
the bowl). Do not fill the bowl with oil.
Never leave the fryer unattended during use or move the
fryer when hot.
The surfaces of the fryer will become hot during use. Do
not touch; wear oven gloves when handling the appliance
during and immediately after use. Note the heating
element is subject to residual heat after use.
The surfaces of the fryer are liable to become hot during
and immediately after use; wear oven gloves when
handling the appliance. Note the heating element is
subject to residual heat after use.
Do not use the fryer on, near or under surfaces that are
heat sensitive or those that may be damaged by steam.
Do not over fill the frying basket.
To help prevent burns; stand back when removing food
from the fryer and allow the steam to escape. Do not reach
over the appliance while it is in operation.
Only use with the parts provided and as described in this
manual. This appliance can cause personal injury if
misused.
Do not operate the fryer using a timer or separate remote
control.
Do not cover and allow the fryer to cool completely before
storing.
In the unlikely event that dark smoke is emitted from the
fryer, immediately unplug the fryer, ventilate the room and
wait for the smoke to stop before removing the frying
basket.

Issue 1 23/4/2020 4
FOOD SAFETY
Thoroughly defrost frozen meat, poultry, fish and seafood
in the refrigerator before cooking unless cooking from
frozen advice is provided by the food packaging.
Keep raw meat and poultry separate from cooked foods.
Always wash hands after handling raw meat and poultry,
before handling any ready to eat foods.
Wipe and disinfect surfaces that have been in contact with
raw meat and poultry.
Use separate utensils for handling raw meat/poultry and
cooked food or wash them thoroughly between use.
To check whether meat, particularly poultry, is cooked,
pierce the flesh with a skewer or fork; the juices should run
clear. Ensure the product is piping hot throughout.
Fish is cooked when it appears opaque and can be flaked
easily.

Issue 1 23/4/2020 5
PARTS
1. Fryer housing
2. Display
3. Touch panel control
4. Bowl (removable)
5. Frying basket
(removable)
6. Basket release button
and cover
7. Frying basket handle
8. Ventilation grill
9. Power cable

Issue 1 23/4/2020 6
REMOVING AND FITTING THE FRYING BOWL
The frying bowl and the frying
basket share a handle when the
bowl is fitted in the fryer.
To remove the bowl assembly
from the fryer, pull the handle
outward.
To refit the bowl assembly
from the fryer, push the
handle towards the fryer.
Fig.1
SEPARATING THE FRYING BOWL FROM THE FRYING BASKET
To prevent accidental release the
basket release button is fitted with
a clear plastic cover. To release
the basket from the bowl
assembly.
1. Lift plastic cover.
2. Press the release button and
lift out the basket.
3. To refit the basket, align the
handle with the slot in the
bowl and lower into position.
A click will be heard when the
basket engages.
BEFORE FIRST USE
1. Lift out the basket and remove the protective cardboard
underneath the bowl and between the bowl and the basket.
Dispose of all packaging safely.
2. Clean in accordance with the cleaning section of these
instructions.
3. Become familiar with -
The parts of the fryer –See page 5
How to fit and remove the frying bowl –See fig. 1
How remove and fit the frying basket –See fig. 2
Fig.2

Issue 1 23/4/2020 7
CONTROL PANEL
TO USE
1. Place the fully assembled fryer on a stable, flat, heat
resistant surface and away from flammable materials and
surfaces that may be damaged by steam. Check that the
plug will reach a socket and that it can be accessed without
reaching over the fryer.
2. Pull out and fully unwind the cable, plug in and switch on
the display will activate briefly, a bleep will be heard and
the power indicator will illuminate (red). For your safety do
not allow the cable to dangle over the edge of units
3. Preheat the fryer for 5 minutes before use. Press the
POWER pad and the display will activate.
4. Press the MODE pad and the temperature will flash in the
display. Using the adjustment (+/-) pads, set the
temperature to the desired cooking temperature.
Temperature
Start / Pause pad
Mode pad
Adjustment
pad (up)
Power pad
Adjustment
pad (down)
Power indicator
Cooking time
Time icon
Temperature icon
Fan indicator
Heating indicator

Issue 1 23/4/2020 8
5. Press the MODE pad again and the operation time will flash
in the display. Using the adjustment (+/-) pads, set the
cooking time to 5 minutes (5:00).
6. Press the START / PAUSE pad. The heating & fan
indicators will illuminate, the operation time will start to
count down and the fryer will start to operate.
7. When timer reaches 0:00, five bleeps will be heard and the
fryer will switch off.
8. Remove the frying bowl from the body of the fryer and
place on a heat resistance surface.
9. Place the food to be cooked into the frying basket taking
care not to overfill and allowing sufficient space between
the items for the hot air to circulate during cooking. Do not
fill beyond 2/3full for most foods and a maximum of 500g
of chips.
10. Refit the frying bowl and basket into the fryer.
11. Set the temperature and desired cooking time and press
the START / PAUSE pad.
12. When the fryer has reached the required cooking
temperature the heating indicator will extinguish and
illuminate again when it next heats.
13. Halfway through the cooking time, remove the bowl, shake
or turn the food over. The fryer will automatically switch
off as the frying bowl / basket is removed and switch on
again when the bowl is refitted.
14. When the cooking time has been completed, remove the
frying bowl and basket and check that the food is cooked.
15. If the food requires further cooking, refit the bowl and
basket and set the timer for the extra cooking time
required.
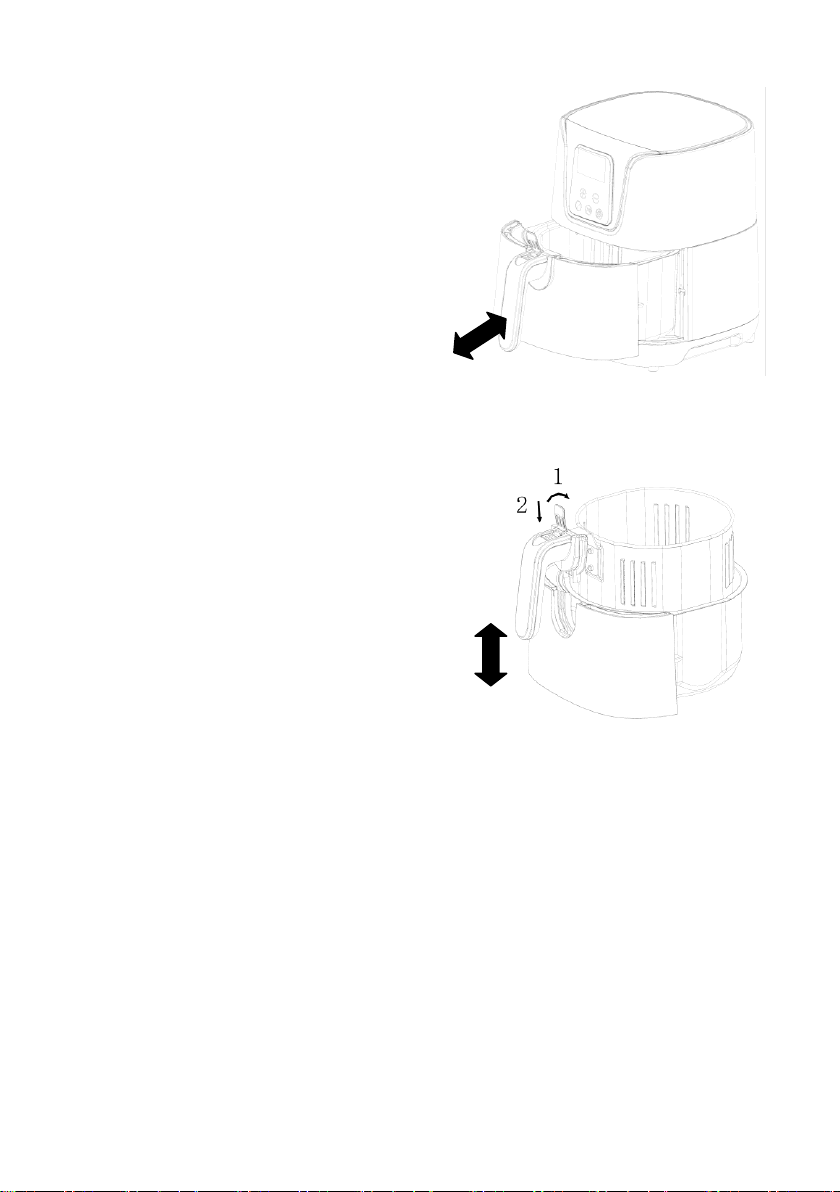
16. When frying is complete, remove the basket from the bowl
(fig. 2) and empty contents onto a plate or serving bowl.
17. When cooking has been completed, switch off at the mains
supply and allow to cool fully (at least 3 hours) before
cleaning the fryer.

Issue 1 23/4/2020 9
GENERAL COOKING ADVICE FOR USING YOUR HEALTH
FRYER.
This health fryer is great for when you want to eat fried food
but with a lower fat content. It can also bake or roast and many
snacks that can be prepared in an electric fan oven can be
cooked in this health fryer. For air fryer recipes, techniques
and specific cooking times consult a specialist recipe book.
Some general advice follows.
If making homemade fries / potato wedges, wash and dry
the potatoes and toss in spoonful of cooking oil to coat the
fries before placing into the frying basket.
For crispier fries cut chips into smaller sticks or coat with
more oil.
Do not overfill the frying basket and separate food where
possible. Take care not to fill the basket beyond 2/3full for
most foods and a maximum of 500g of chips.
Rinse raw starchy foods (e.g. potatoes) with water and pat
dry to help prevent them from sticking together.
After frying do not leave the food in the frying basket for too
long as the steam will soften any coatings.
Raw foods usually require frying at a lower temperature
than cooked or partially cooked foods.
The cooking time will vary according to the shape, thickness
and composition of the food.
Smaller pieces will cook quicker than larger pieces. For
best results, ensure pieces of food are similar in size.
Arrange the food with spaces between the pieces to hot air
to pass though.
Cook foods with a lighter flavour before those with stronger
flavours to help prevent flavour taint.
The health fryer can also be used to reheat small quantities
of food. Set timer for 10 minutes and the temperature to
150°C. Always check food is piping hot before eating.

Issue 1 23/4/2020 10
FRYING CHART
All the times stated in the table are a guide only - always
check that the centre of the food is piping hot.
The times will vary according to personal choice, size or
thickness of food being cooked (e.g. one large piece will
take longer to cook than several smaller pieces of an
equivalent weight) and the starting temperature of the food
(fridge or room temperature).
Always check food packaging for any recommended cooking
times and temperatures stated.
Food
Temp
(℃)
Air fry
time
(minutes)
Max food
weight
Action at
half way
Cake
(cup cakes)
180
10-15
500g
-
French Fries
(from frozen)
200
15-20
500g
Shake
Fish
(fillets &
steaks)
200
15-22
500g
Turn
Chicken
(wings &
drumsticks)
200
15-22
500g
Turn
Meat
(chops &
steaks)
200
10-20
500g
Turn
Shrimp
180
10-18
500g
Shake

Issue 1 23/4/2020 11
CLEANING
Clean after each use.
1. Switch off and unplug the fryer and allow it to cool
completely.
2. Wipe the inside and outside of the fryer housing with a soft
damp cloth soaked in soapy water. Rinse and dry surfaces
with a soft dry cloth. Do not use detergent or abrasives as
these may scratch the surface. Never immerse the fryer
housing in water.
3. The heating element maybe brushed with a soft cleaning
brush to remove any food debris.
4. Wash the frying bowl and basket in hot water with a little
washing up liquid. Rinse and dry thoroughly. Do not use
detergent or abrasives as these may scratch the surface.
Not suitable for the dishwasher.
5. After cleaning, reassemble the fryer for storage.
TROUBLESHOOTING
Observation
Possible cause
Appliance does not
work
Not plugged in.
Timer not set.
Uneven cooking
Food not turned or shaken at halfway
point.
Food not cooked fully
Basket too full.
Cooking temperature too low.
Cooking time too short.
Bowl does not close
fully
Basket not fully engaged into bowl.
Too much food in basket.
White smoke emitted
Food being cooked is greasy.
Bowl not cleaned properly from
previous use.

Issue 1 23/4/2020 12
TECHNICAL SPECIFICATION
Cookworks Health Fryer
Model
DF7003T-CB
Cat No
7698329
Rated Voltage & Frequency
220 - 240V AC
50- 60Hz
Rated Power Input
1300W
Bowl capacity
4 litre
Basket capacity
3 litre
Temperature range
80 –200C
Timer
0 –60min
Class rating
I (earthed)
BS 1362 fuse
10A
Product dimensions (external)
385 x 280 x 316
mm
Product weight (net)
4.9 kg approx.
RECYCLING ELECTRICAL PRODUCTS
You should now recycle your waste electrical goods and
in doing so help the environment.
This symbol means an electrical product should not be
disposed of with normal household waste. Please
ensure it is taken to a suitable facility for disposal when
finished with.
Visit www.recycle-more.co.uk, click on “bank locator”
and enter your postcode to find your nearest recycling
site.

Issue 1 23/4/2020 13
PLUG / WIRING ADVICE
The wires in this mains lead are coloured in accordance with
the following UK electrical code: BLUE = NEUTRAL
BROWN = LIVE
GREEN + YELLOW = EARTH
Non-rewireable plug
This appliance may be fitted with a “non‐rewireable” plug. If
you need to change the fuse in a “non‐rewireable” plug, the
fuse cover must be refitted. If the fuse cover is lost or
damaged, the appliance must not be used.
Rewireable plug
The colours of the wires in the mains lead of this appliance
may not correspond with the coloured markings identifying the
terminals in a rewireable plug. Rewireable plugs should only
be replaced by a suitably competent person. If in doubt,
consult a qualified electrician.
The BLUE wire must be connected to the
terminal marked with the letter N
The BROWN wire must be connected to
the terminal marked with the letter L
The GREEN & YELLOW wire must be
connecting to the terminal marked with
the letter E or the earth symbol .
Produced in China for and
imported by
Argos Limited,
489-499 Avebury Boulevard,
Milton Keynes, MK9 2NW
www.argos.co.uk/cookworks
Tel: 0345 640 3030

Issue 1 23/4/2020 14
Table of contents
Other Cookworks Fryer manuals

Cookworks
Cookworks 423/7350 User manual

Cookworks
Cookworks XJ-10302 Manual

Cookworks
Cookworks AF-06 Manual

Cookworks
Cookworks XJ-14301 User manual

Cookworks
Cookworks KDF-596D Manual

Cookworks
Cookworks DF5318-GS Manual

Cookworks
Cookworks XJ-10301 Manual

Cookworks
Cookworks DF5318 Manual

Cookworks
Cookworks KDF-5577DTW Manual

Cookworks
Cookworks XJ-10301 User manual
Popular Fryer manuals by other brands

Cook's Companion
Cook's Companion CC801847C manual

Philips
Philips HD9230/50 Service manual

ButterBall
ButterBall 23014314 Operation manual & safety instructions

Frymaster
Frymaster MJ45 Installation, operation and maintenance manual

Tower Hobbies
Tower Hobbies T17007 Safety and instruction manual

BKI
BKI BLF-FC Service manual