manuals.online logo
Brands
  1. Home
  2. •
  3. Brands
  4. •
  5. Cookworks
  6. •
  7. Fryer
  8. •
  9. Cookworks XJ-10302 Manual

Cookworks XJ-10302 Manual

Other Cookworks Fryer manuals

Cookworks XJ-10301 User manual

Cookworks

Cookworks XJ-10301 User manual

Cookworks AF-06 Manual

Cookworks

Cookworks AF-06 Manual

Cookworks XJ-14301 User manual

Cookworks

Cookworks XJ-14301 User manual

Cookworks DF5318-GS Manual

Cookworks

Cookworks DF5318-GS Manual

Cookworks 423/7350 User manual

Cookworks

Cookworks 423/7350 User manual

Cookworks XJ-10301 Manual

Cookworks

Cookworks XJ-10301 Manual

Cookworks DF5318 Manual

Cookworks

Cookworks DF5318 Manual

Cookworks KDF-596D Manual

Cookworks

Cookworks KDF-596D Manual

Cookworks DF7003T-CB Manual

Cookworks

Cookworks DF7003T-CB Manual

Cookworks KDF-5577DTW Manual

Cookworks

Cookworks KDF-5577DTW Manual

Popular Fryer manuals by other brands

GILES EOF-BIB/FFLT/24/24 manual

GILES

GILES EOF-BIB/FFLT/24/24 manual

GE 168997 manual

GE

GE 168997 manual

Falcon G350/11 Installation and servicing instructions

Falcon

Falcon G350/11 Installation and servicing instructions

GoWISE USA GW22612 instruction manual

GoWISE USA

GoWISE USA GW22612 instruction manual

Wolf IF15/S Specification sheet

Wolf

Wolf IF15/S Specification sheet

Electrolux Thermetic 9CHG583284 Operating and safety instructions

Electrolux

Electrolux Thermetic 9CHG583284 Operating and safety instructions

DeLonghi D677UX Instructions for use

DeLonghi

DeLonghi D677UX Instructions for use

SEVERIN DEEP FRYER - Dimensions

SEVERIN

SEVERIN DEEP FRYER - Dimensions

Toastmaster TMFG18-NAT Installation and operation instructions

Toastmaster

Toastmaster TMFG18-NAT Installation and operation instructions

Domo DO465FR Instruction booklet

Domo

Domo DO465FR Instruction booklet

Russell Hobbs RDF300 Instructions and warranty

Russell Hobbs

Russell Hobbs RDF300 Instructions and warranty

Henny Penny PFG-691 Technical manual

Henny Penny

Henny Penny PFG-691 Technical manual

Farberware FBW FT 43721 B manual

Farberware

Farberware FBW FT 43721 B manual

GERMANICA GEAF5L3LD instruction manual

GERMANICA

GERMANICA GEAF5L3LD instruction manual

Wells F-85 Features and specifications

Wells

Wells F-85 Features and specifications

Philips HD9211 user manual

Philips

Philips HD9211 user manual

Lakeland 31796 Instruction booklet

Lakeland

Lakeland 31796 Instruction booklet

Dash Tasti-Crisp DFAF755 user manual

Dash

Dash Tasti-Crisp DFAF755 user manual

manuals.online logo
manuals.online logoBrands
  • About & Mission
  • Contact us
  • Privacy Policy
  • Terms and Conditions

Copyright 2025 Manuals.Online. All Rights Reserved.

ISSUE 1b 04/12/2018
1
SEMI PROFESSIONAL FRYER
Model No. XJ-10302(2000W)
Care & Instruction Manual
Please read and retain these instructions for
future reference
ISSUE 1b 04/12/2018
2
Electrical safety
You should only plug the appliance into a 220V‐240V AC, 50Hz
supply. Connecting it to other power sources may damage the
appliance and will invalidate the guarantee.
This deep fat fryer is designed for domestic use. Don’t use it
in wet or damp locations.
Switch off and unplug when not in use and before cleaning
the appliance.
Keep the appliance and its cord out of reach of children less
than 8 years.
This appliance shall not be used by children from year 0 to 8
years. This appliance can be used by children aged from 8
years if they are continuously supervised. The appliance can
be used by people with reduced physical, sensory or mental
capabilities or lack of experience and knowledge if they have
been given supervision or instruction concerning use of the
appliance in a safe way and understand the hazards involved.
Cleaning and user maintenance shall not be made by children.
Keep control housing, cable, and plug dry and away from
areas where it is likely to get splashed. Never immerse in
water.
Do not pull on the cable to disconnect from the mains supply.
Do not operate the appliance if damaged or after it
malfunctions. In the event the supply cord is damaged, in
order to avoid a hazard it must only be replaced by a qualified
service engineer, with a suitably approved part.
This appliance must be positioned so that the plug is
accessible and the plug socket is within easy reach of the
power cord.
This appliance must be plugged in to an earthed socket outlet.
ISSUE 1b 04/12/2018
3
Warning!
This appliance is intended exclusively for use in domestic
households. It is not suitable for commercial use.
Do not operate this appliance with the storage lid fitted.
Cooking appliances should be positioned in a stable
situation with handles positioned to avoid spillage of hot
liquids.
Never leave the fryer unattended during use or move the fryer
when the oil is hot.
The surfaces of the fryer will become hot during
use. Do not touch; wear oven gloves when handling
the appliance during and immediately after use
and use long handled utensils when checking the
food. Note the fryer and heating element is
subject to residual heat after use.
Do not use the fryer on, near or under surfaces that are heat
sensitive or those that may be damaged by steam or by hot
oil.
Do not fill the oil tank above maximum level marked or below
the minimum level. Check the oil level before each use.
Do not over fill the frying basket. Take care not to fill beyond
2/3full for most foods and a maximum of 600g of chips.
Do not reach over the appliance while it is in operation.
Only use with the parts provided and to heat cooking oil.
This appliance can cause personal injury if misused.
Do not operate the fryer using a timer or separate remote
control.
Do not mix different types of oil and never use solid fats.
Do not cover and allow the fryer to cool completely before
storing.
In the unlikely event that a fat fire occurs, fit the lid. Unplug
the fryer and smother the flames with a damp cloth.
ISSUE 1b 04/12/2018
4
Food Safety
Thoroughly defrost frozen meat, poultry, fish and seafood in
the refrigerator before cooking unless cooking from frozen
advice is provided by the food packaging.
Keep raw meat and poultry separate from cooked foods.
Always wash hands after handling raw meat and poultry,
before handling any ready to eat foods.
Wipe and disinfect surfaces that have been in contact with
raw meat and poultry.
Use separate utensils for handling raw meat/poultry and
cooked food or wash them thoroughly between use.
To check whether meat, particularly poultry, is cooked,
pierce the flesh with a skewer or fork; the juices should run
clear. Ensure the product is piping hot throughout.
Fish is cooked when it appears opaque and can be flaked
easily
ISSUE 1b 04/12/2018
5
Parts
1. Storage lid (see fig. 7)
2. Control housing
3. Oil tank
4. Outer casing
5. Frying basket handle
6. Frying basket
7. Heating element
8. Maximum & Minimum
marks
9. Power indicator
10.Heating (working)
indicator
11.Reset point
12.Temperature control knob
13.Micro switch
4
3
2
5
1
6
8
7
11
13
9
10
12
ISSUE 1b 04/12/2018
6
Assembly
1. Place the fryer on a stable, flat, heat resistant surface, away from
flammable materials and surfaces that may be damaged by steam
or hot oil.
2. Check that the plug will reach a socket and that it can be accessed
without reaching over the fryer.
3. Fit the oil tank into the outer casing (fig. 1 & 2).
4. Fit the heating element into the oil tank (fig. 2) ensuring that the
control panel is correctly engaged into the brackets at the rear of
the casing so that the micro switch is activated. If the control
panel is not correctly fitted, the micro switch will prevent the fryer
from working.
Fig. 1 Fig. 2
Fig.3 Fig. 4 Fig. 5
Ensure micro switch is
activated
ISSUE 1b 04/12/2018
7
5. Unfold the handle (fig 3) until it clicks in to position with the wire
handle sitting either side of the wire bracket (fig 4 & 5).
6. Fit the basket into the oil tank (fig.6).
7. For storage fit the lid, the smaller pair of grooves should be
towards the front and when correctly fitted the lid will be flush with
the edge of the oil tank (fig.7 & 8).
Fig. 6 Fig. 7
Fig. 8
Storage lid
ISSUE 1b 04/12/2018
8
Before first use
1. Clean all detachable parts in accordance with the cleaning section
of these instructions.
2. Become familiar with -
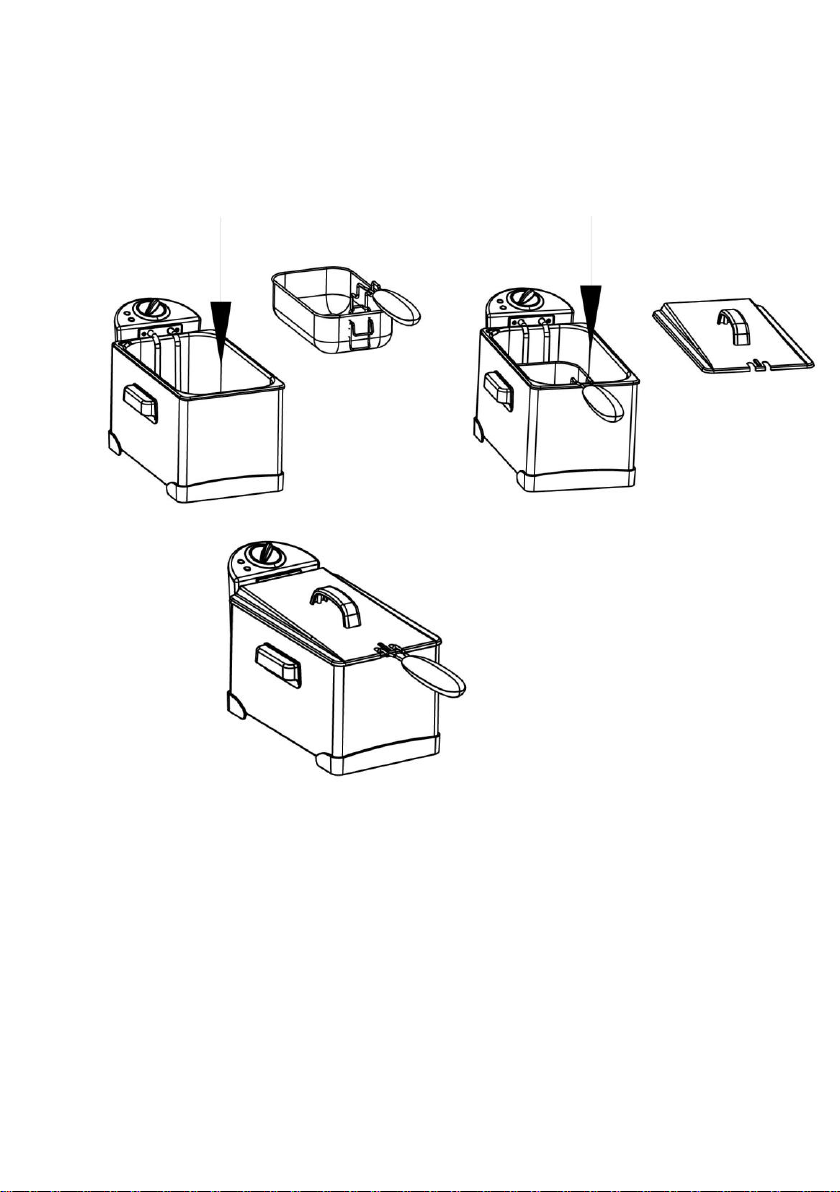
The parts of the fryer –See page 4
How to open frying basket handle –See figs. 3,4 & 5
The drainage position for the frying basket - See fig. 9
How to fit the lid –See fig. 7 & 8
How to fit and remove the oil tank –fig. 1.
How to fit the control housing to the outer casing –fig 2 & 3.
To Use
1. Clean thoroughly before use.
2. Place the assembled fryer on a stable, flat, heat resistant surface,
away from flammable materials and surfaces that may be
damaged by steam or hot oil. Depending on what is being cooked,
oil droplets may spit from the fryer whilst in use so choose a
surface that can easily be cleaned afterwards.
3. Check that the plug will reach a socket and that it can be accessed
without reaching over the fryer.
4. Fill the tank with cooking oil to the required level marked inside
the oil tank. Do not fill past the maximum (3 litre) or below the
minimum (2.5 litre) level.
5. Do not fit the lid. The lid is for storage purposes only and should
be put to one side whilst the fryer is in use.
6. Check that the temperature control is at the ‘MIN’ position. Fully
unwind the cable, plug in and switch on, the power indicator will
illuminate. For your safety do not allow the cable to dangle over
the edge of units.
7. Rotate the temperature control knob and set to the required
cooking temperature and the heating indicator will now illuminate.
8. Allow the oil to preheat (8-12 minutes approx.). When the oil has
reached the required cooking temperature, the heating indicator
will extinguish.
9. Place the food to be cooked into the frying basket taking care not
to fill beyond 2/3full for most foods and a maximum of 600g of
chips.
10. Place the basket slowly into the fryer. Do not fit the lid. Depending
on what is being cooked, oil droplets may spit from the fryer so
stand away from the immediate vicinity of the tank whilst cooking.
ISSUE 1b 04/12/2018
9
11. When frying is complete, lift the frying basket and hook onto the
end of the oil tank to permit the oil to drain back into the oil tank
for a short while (fig. 10).
12. If the food requires further
cooking, place the basket and
food back into the oil.
13. When cooking has been
completed, move the
temperature control knob
back to the ‘MIN’ position, the
power light will extinguish and
switch the fryer off at the
mains. The lid may now be
fitted
14. Allow the oil to cool fully (at
least 3 hours) before
emptying and cleaning the
fryer.
Tips for successful frying
Choose oil that can withstand high temperatures. Do not use solid
fats.
Do not mix different types of oils.
Change the oil regularly (8-12 uses) or when it discolours. Some
cooking oils (e.g. sunflower oils) need to be changed more
frequently.
Dry food thoroughly before frying and remove any ice from frozen
foods to prevent oil overflowing and to extend the life of the oil.
Rinse raw starchy foods (e.g. potatoes) with water and pat dry to
help prevent them from sticking together.
Do not over fill the frying basket and separate food where possible.
Take care not to fill the basket beyond 2/3full for most foods and
a maximum of 600g of fresh chips per basket.
After frying do not leave the food draining in the frying basket for
too long as the steam will soften any coatings.
Raw foods usually require frying at a lower temperature than
cooked or partially cooked foods.
Smaller quantities of food will cook faster than larger quantities.
The cooking time will vary according to the shape, thickness and
composition of the food.
Fig. 9
ISSUE 1b 04/12/2018
10
Tips for successful frying (continued)
Smaller pieces will cook quicker than larger pieces. For best
results, ensure pieces of food are similar in size.
Arrange the food with spaces between the pieces to allow even
frying.
Cook foods with a lighter flavour before those with stronger
flavours to help prevent flavour taint.
Frying Chart
All the times stated in the table are a guide only - always check
that the centre of the food is piping hot.
The times will vary according to personal choice, the type of oil
used size or thickness of food being cooked (e.g. one large piece
will take longer to cook than several smaller pieces of an equivalent
weight).
Always check food packaging for suitability for frying and use any
recommended cooking times and temperatures stated on the
packaging.