Coopers 10025 User manual

Water Cooler with Filter10025 Instructions
v 001: 12/01/15
Please read this instruction manual thoroughly before starting and ensure you
are familiar with the operation of your new WATER COOLER WITH FILTER.
Please note:
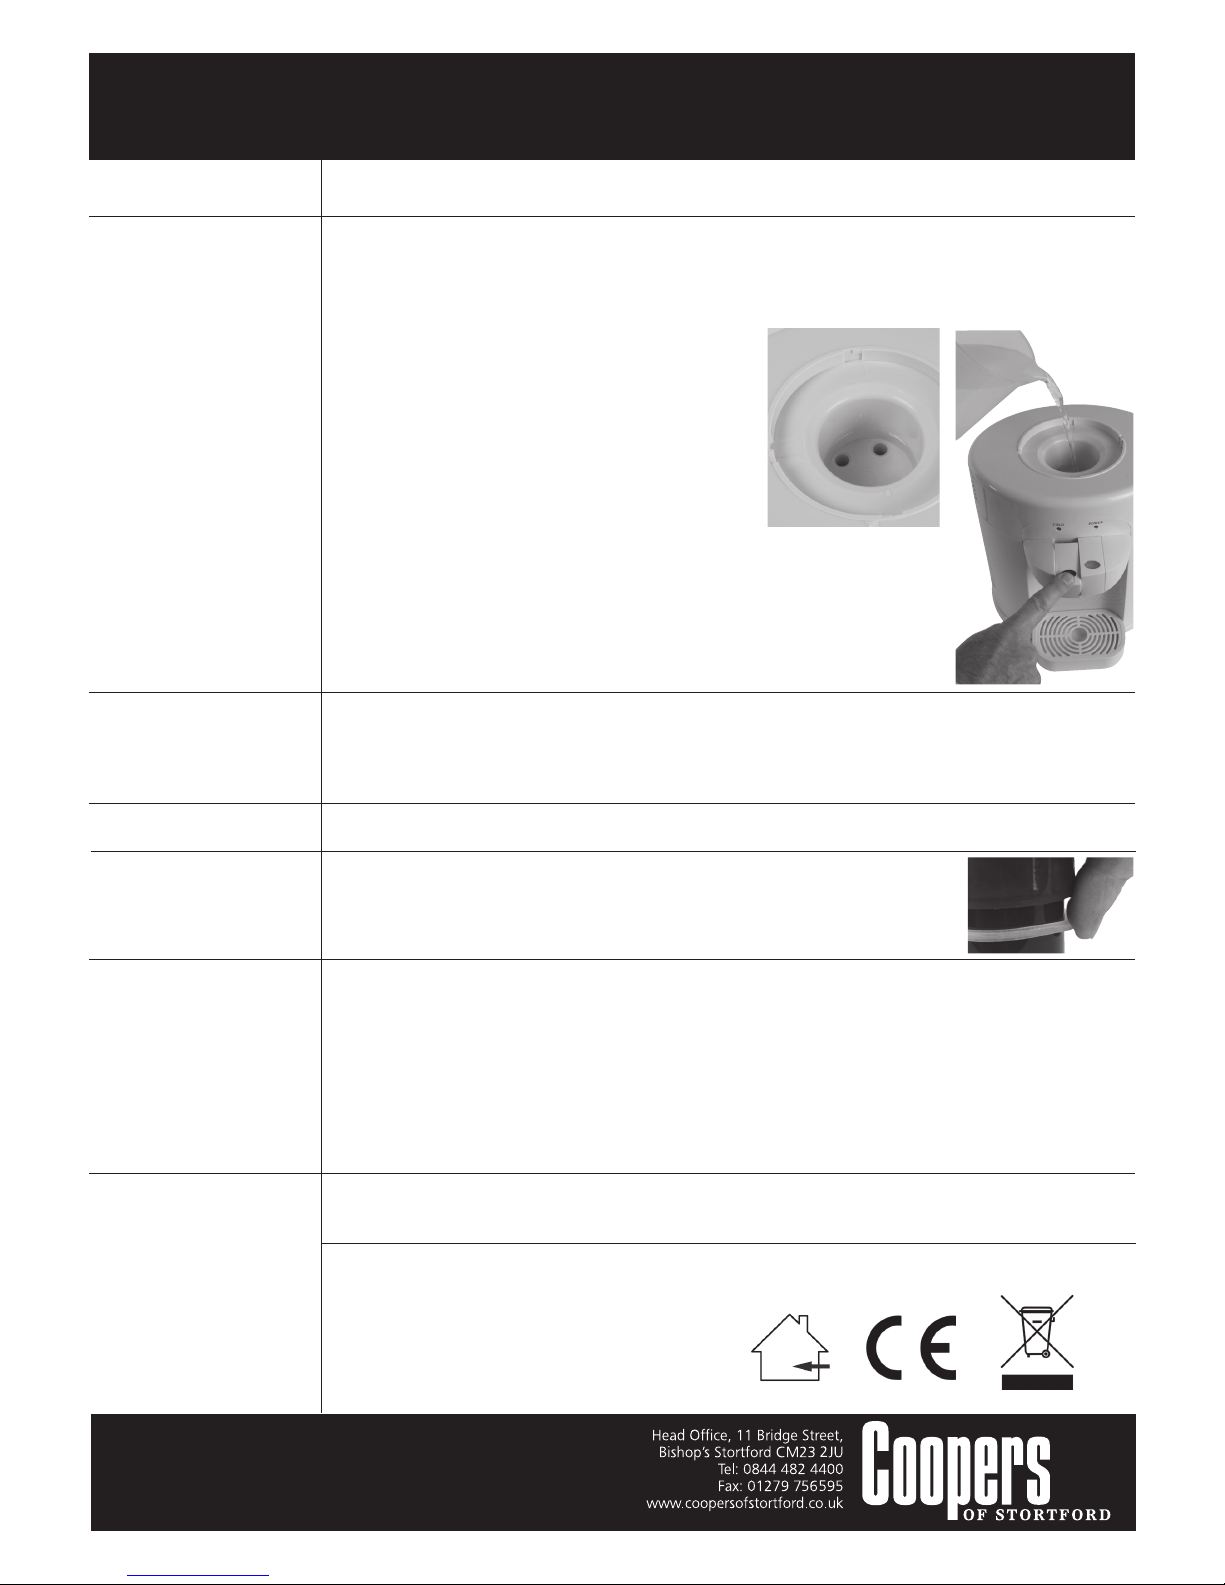
• The Water Cooler Tank has a capacity of approx. 600ml and does not supply a
continuous stream of chilled water.
• The unit needs time to chill the replacement water as it enters the chiller tank. The blue
Indicator Light will be on whilst the water is chilling.
Important:
• Remove the filter from its packaging, lay it on its side in a container and fully cover and
soak in cold clean water for 30 minutes to expel all the air inside fully.
• Failure to do this may cause the filter to float and not stay in its correct position. It may
also cause poor flow through the filter.
When using electrical appliances, basic safety precautions should always be followed:
• To protect against electric shock, do not immerse cord, plug or unit in water or any
other liquid. Do not use near sinks, baths or showers.
• Unplug from outlet when not in use and before moving or cleaning.
• Do not use unit with wet hands.
• Do not operate any appliance with a damaged cord or plug or after the appliance
malfunctions, or has been damaged in any manner.
• Do not misuse the cord. Never carry the unit by the cord or pull to disconnect it from
the outlet. Instead, grasp the plug and pull to disconnect.
• Before each use, check thoroughly for any defects and DO NOT use if defects are
found. Take care not to drop the appliance as heavy impacts may cause internal
damage.
• Do not use accessories not recommended by Coopers of Stortford, these may cause the
unit to malfunction.
• NEVER cover the item in any way when in use.
• DO NOT place under or near flammable materials such as curtains, shelves etc.
• Ensure there is sufficient distance between the unit and other items on the work
surface or work station, or the confines of the area in which it is situated. We
recommend a minimum clearance around all faces of at least 10cm.
• Do not install the unit on other appliances, on uneven surfaces or where it could be
subject to heat sources (e.g. radiators or stoves), direct sunlight, excessive dust or
mechanical vibrations. Do not place any other appliance on top of the Water Cooler.
• The unit should not be used outdoors, placed near a hot gas or electrical burner or
placed in a heated oven.
• Unplug the unit during lightning storms or when unused for long periods of time.
• Keep unit out of reach of young children. Children should be supervised to ensure that
they do not play with the unit.
• Always operate the unit from a power source of the same voltage, frequency and rating
as indicated on the product identification plate.
• The unit is intended for household use only and not for commercial or industrial use.
• Do not block off vents.
• There are no user serviceable parts in this unit.
• This cooler is designed to chill water only. Do not add any other liquids or additives.
• Do not fill with hot water.
• Please ensure that the unit is plugged directly into the electrical outlet, it is not
recommended to use this unit with an extension cord, double adaptor or power board.
• Do not plug into the power socket before set up is completed.
• Do not switch the unit on if it appears to be faulty in any way.
• Do not place the unit in direct sunlight as this may discolour the unit and may reduce
the cooling performance.
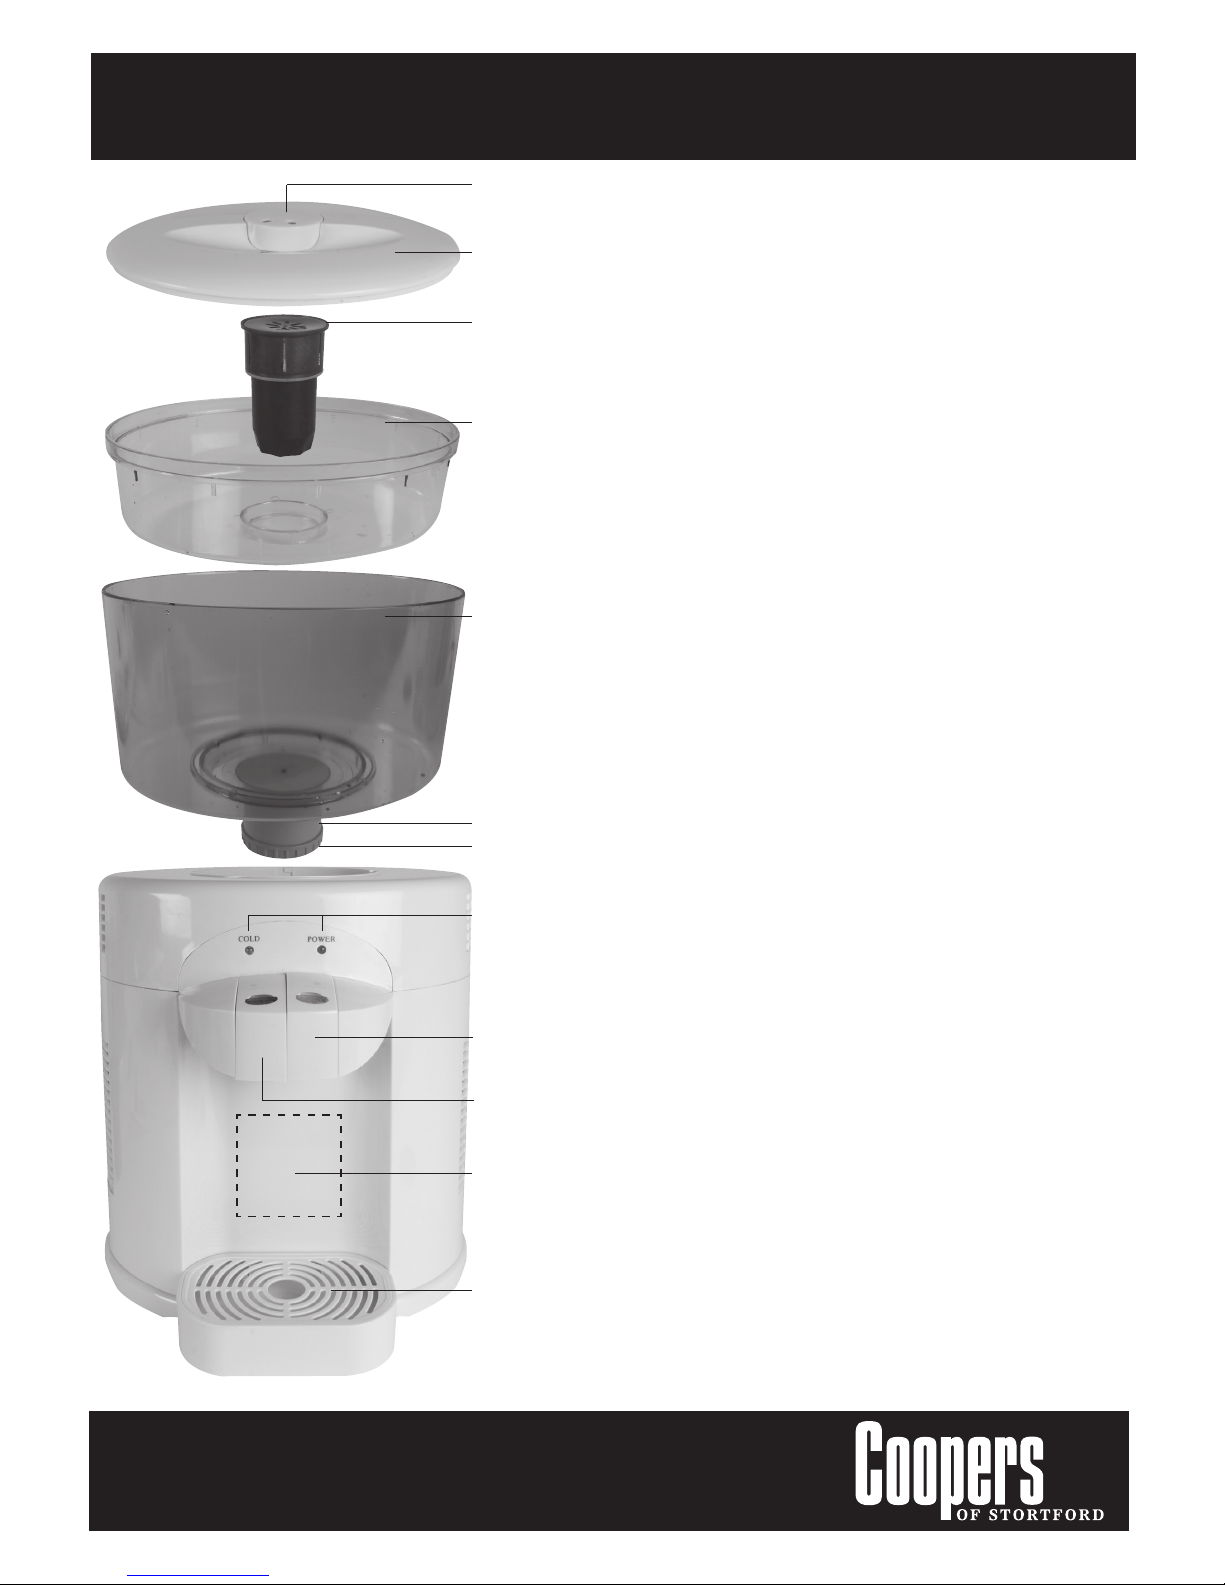
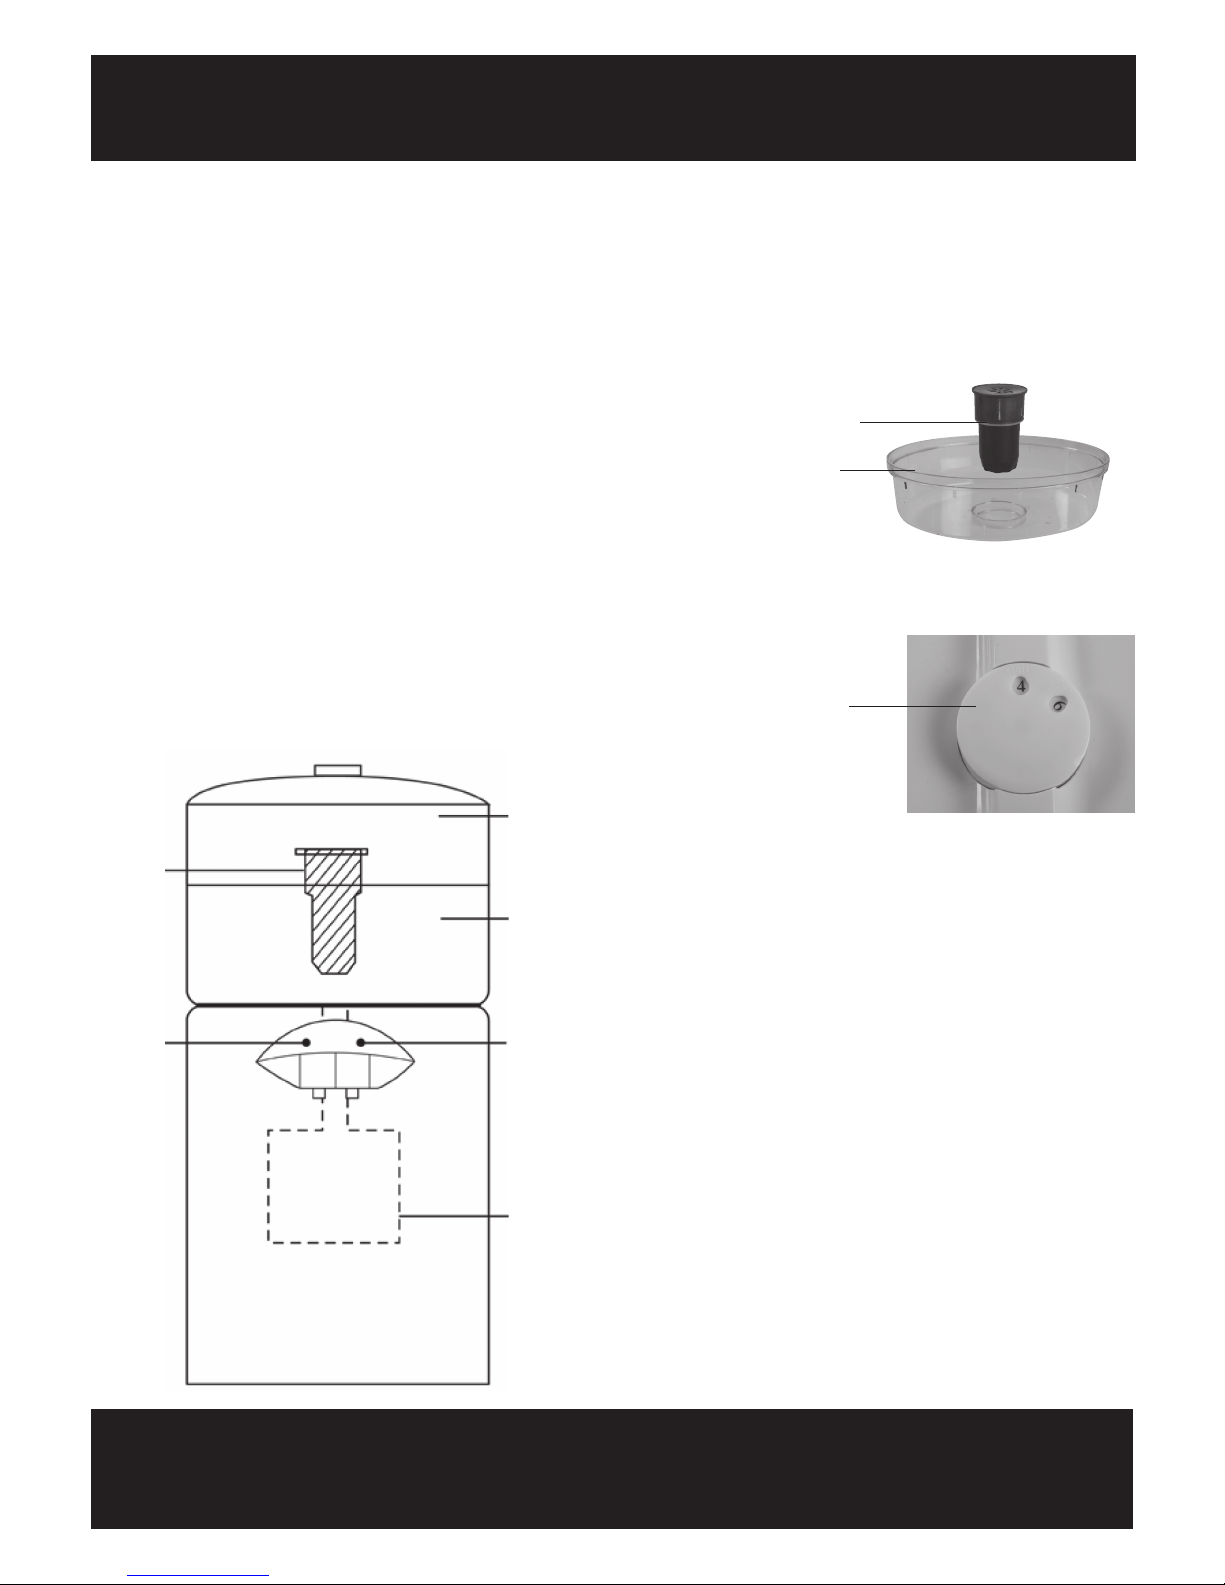
Date Indicator for
filter replacement
Lid
Filter – Replaceable
Upper Water Tank –
unfiltered water
approx. 1.8L
Lower Water Tank –
filtered water approx.
2.6L
Float Housing –
Float inside
Ring Nut
Indicator Lights –
Blue ON = water cooling
Blue OFF = water cooled
Yellow ON = power
available
Water Cooler Tank
inside approx. 600ml
Cup Rest with
Removable Spill Guard
Room Temperature
Water Tap
Cold Water Tap
1
Please read carefully before use and retain for future reference.

INSTRUCTIONS FOR USE
• Insert the plug into a power socket and switch on.
• Switch the Water Cooler to “ON” at the back of the unit.
• Both the blue “cold” and yellow “power” indicator lights
will illuminate indicating there is power supplied to the
unit, and that the water cooler is chilling the water.
• For best performance, and depending on the water temperature, allow approximately
30 – 40 minutes for the water to chill before use.
• When the water has reached the required temperature, the “cold” indicator light will
turn off indicating the water in the 600ml cooler tank has fully chilled.
Note: The Water Cooler Tank has a capacity of 600ml and does not supply a continuous
stream of chilled water.
The unit needs time to chill the replacement water as it enters the cooler tank as will be
indicated by the blue Indicator Light illuminating.
Water Float
The Float is an important part of the Water Cooler. It is used to gauge the water levels
and to prevent overflow.
To ensure the Float is fitted correctly:
Float Housing Float with Rubber Stopper
• Unscrew the Ring Nut on the bottom of the Float Housing to remove the Float.
• The Float has a rubber stopper on the tip. This rubber tip must be pointing upwards
towards the base of the water tank as shown.
• Ensure the rubber tip is seated correctly in the top of the Float and ensure it is clean
before replacing.
• Screw the Ring Nut back on to the housing. Ensure it is secure but do not over tighten.
CLEANING INSTRUCTIONS:
• Always switch off and unplug before cleaning.
• DO NOT immerse in water. Risk of electric shock.
• Allow to dry thoroughly before further use.
• When changing the filter it is also recommended to wash the Water Tanks and the Float
components.
• Use warm water with mild detergent to clean the Water Tanks, Float components and
lid then rinse and dry.
• To clean the Cooler unit, wipe over with a soft damp cloth and mild detergent then wipe
dry.
• Never spray the unit with liquids or submerge in water or any other liquid.
• Do not use flammable liquids, chemicals, abrasive creams, steel wool or scouring pads
for cleaning.
• Do not place parts in a dishwasher.
• The Filter will require changing every 2 - 3 months depending on use.
SPARE PARTS:
Spare Water Filters can be purchased from Coopers of Stortford.
Please quote Product Code: 10026 for Pack 3 Filters.
Please read carefully before use and retain for future reference.
3
Filter

• If the Upper and Lower Water Tanks are full of water and the Cold Water Tap is not dispensing any water when pressed down, there is
probably an air bubble preventing the water flowing down. This can be easily rectified by following the steps below:
• Remove the Upper and Lower Water Tanks from the top of the unit. (Take care as water will drain out the bottom of the water tanks). There
will be a small amount of water in the round receptacle on top of the main unit.
• Place a cup under the Cold Water Tap.
• Press down on the Cold Water Tap and continue to hold it down.
The remaining water in the receptacle should then drain down into the
cooler tank.
• Fill a jug or large glass of water (at least 600ml) and while holding the
Cold Water Tap down, slowly pour the water directly into the top of the
unit.
• The water will slowly drain into the main unit and fill the chiller tank inside.
• Continue pouring water into the top until water starts to come out of the spout under the Cold Water Tap.
This will indicate the tank inside is full.
• Release the Cold Water Tap and replace the Lower and Upper Water Tanks onto the top of the unit.
• Refill as described previously.
• The unit should now work properly.
• Water has not been given enough time to chill. - While the blue “cold” light is illuminated, the water is chilling. When the blue “cold” light
turns off, the water is chilled.Allow time for the blue “cold” light to turn off.
• Unit is not turned on. Plug in and switch on. Ensure the switch on the back of the unit is also switched on.
• Do not place the unit in direct sunlight as it will prevent the water from chilling properly.
• Filter is blocked. Replace Filter. Soak new Filter in clean cold water for 30 minutes prior to using.
• Lay the Filter on its side in a container and fully cover and soak in cold clean water for 30 minutes to expel
all the air inside fully.
• Should the Filter continue to float, it could be that the rubber seal has twisted. To fix, roll the seal over one
quarter turn, push up under the lip and try the fitment again.
• You may notice a fine black dust come out of the Filter when soaking and when using for the first time.
• This will happen on all new Filters and when water is filtered through it the first couple of uses.
• This is no cause for alarm. It is just the dust from the activated carbon inside the Filter.
• Although it looks unsightly, it will not harm you.
• It is recommended that after the Filter has finished soaking, been rinsed and then fitted to the Cooler Unit, fill the Cooler Tank and operate
the taps to allow all the water to flush through and to remove any remaining black dust.
• Repeat a second time.
• The discarded water can be used to water your plants without harm.
Rating information:
230-240V AC.; 50 Hz; 75W.
PLEASE SAVE THESE INSTRUCTIONS FOR FUTURE REFERENCE.
Disposal of Packaging:
Dispose of the packaging at your local recycling centre.
Dispose of paper and carton separately from plastic bags at your local recycling centre.
Dispose of the item at the end of its lifespan at your local authorised household waste recycling centre.
Water will not flow through tap/s
TROUBLESHOOTING
Water is not cold
Water does not flow through Filter
Filter keeps floating
Black dust washing out of Filter
4
Popular Water Filtration System manuals by other brands

Delta
Delta Airmaster F Series instruction manual

USFilter
USFilter M SERIES - 2000 Operation and maintenance manual

Pure Water
Pure Water PW90 Programming guide

Aqua One
Aqua One Moray 320 manual

Waterco
Waterco MultiCyclone12 Plus Installation and operation manual

Aqua Medic
Aqua Medic NR 400 Operation manual

Aquapure
Aquapure AP902 Installation and operating instructions

Range Master
Range Master Aquaclassic TSA4 instructions

ThePondguy
ThePondguy PowerUV 9 installation manual

Aquapure
Aquapure MCA SERIES Installation and operating instructions

Pure-Pro
Pure-Pro RS-106R user manual

Clear Water
Clear Water Ozone Systems PRO400 Installation & maintenance manual