PLATINUM SERIES KEYPAD INSTRUCTIONS -PAGE 2
Keypad Connections
BENCH TESTING THE KEYPAD
This bench test assumes the keypad is unprogrammed. If it
has been programm ed, follow the Factory Reset Function found in
the Programming section.)
Step 1. Enter default master code [1-2-3-4], followed by the
pound sign [#]. The Green LED will light up and the door
relay will energize for 5 seconds.
Step 2. Enter default user code [5-6-7-8-9-0], followed by the
pound sign [#]. The Green LED will light up and the door
relay will energize for 5 seconds.
Step 3. Go to the next section, Installing & Wiring the Keypad.
If the mast er code o r user code is i ncorr ectly entered, the Red
LED will li ght up for 3 s econds. Re-enter the m aster or user code.
If the master code or user code still does not work, reset the
keypad to fac tory defaul t using the Factory Reset Function found
in the Programming section.
INSTALLING AND WIRING THE KEYPAD
Step 1. After choosing the mounting location for the keypad, drill
the mounting holes using the enclosed template or mount
to an electrical back box or low voltage wiring device if
appropriate. DO NOT insert the Security Plugs into
the screw holes at this time. THE SECURITY PLUGS
ARE DESIGNED TO BE TAMPER RESISTANT AND
MUST BE DRILLED OUT TO BE REMOVED.
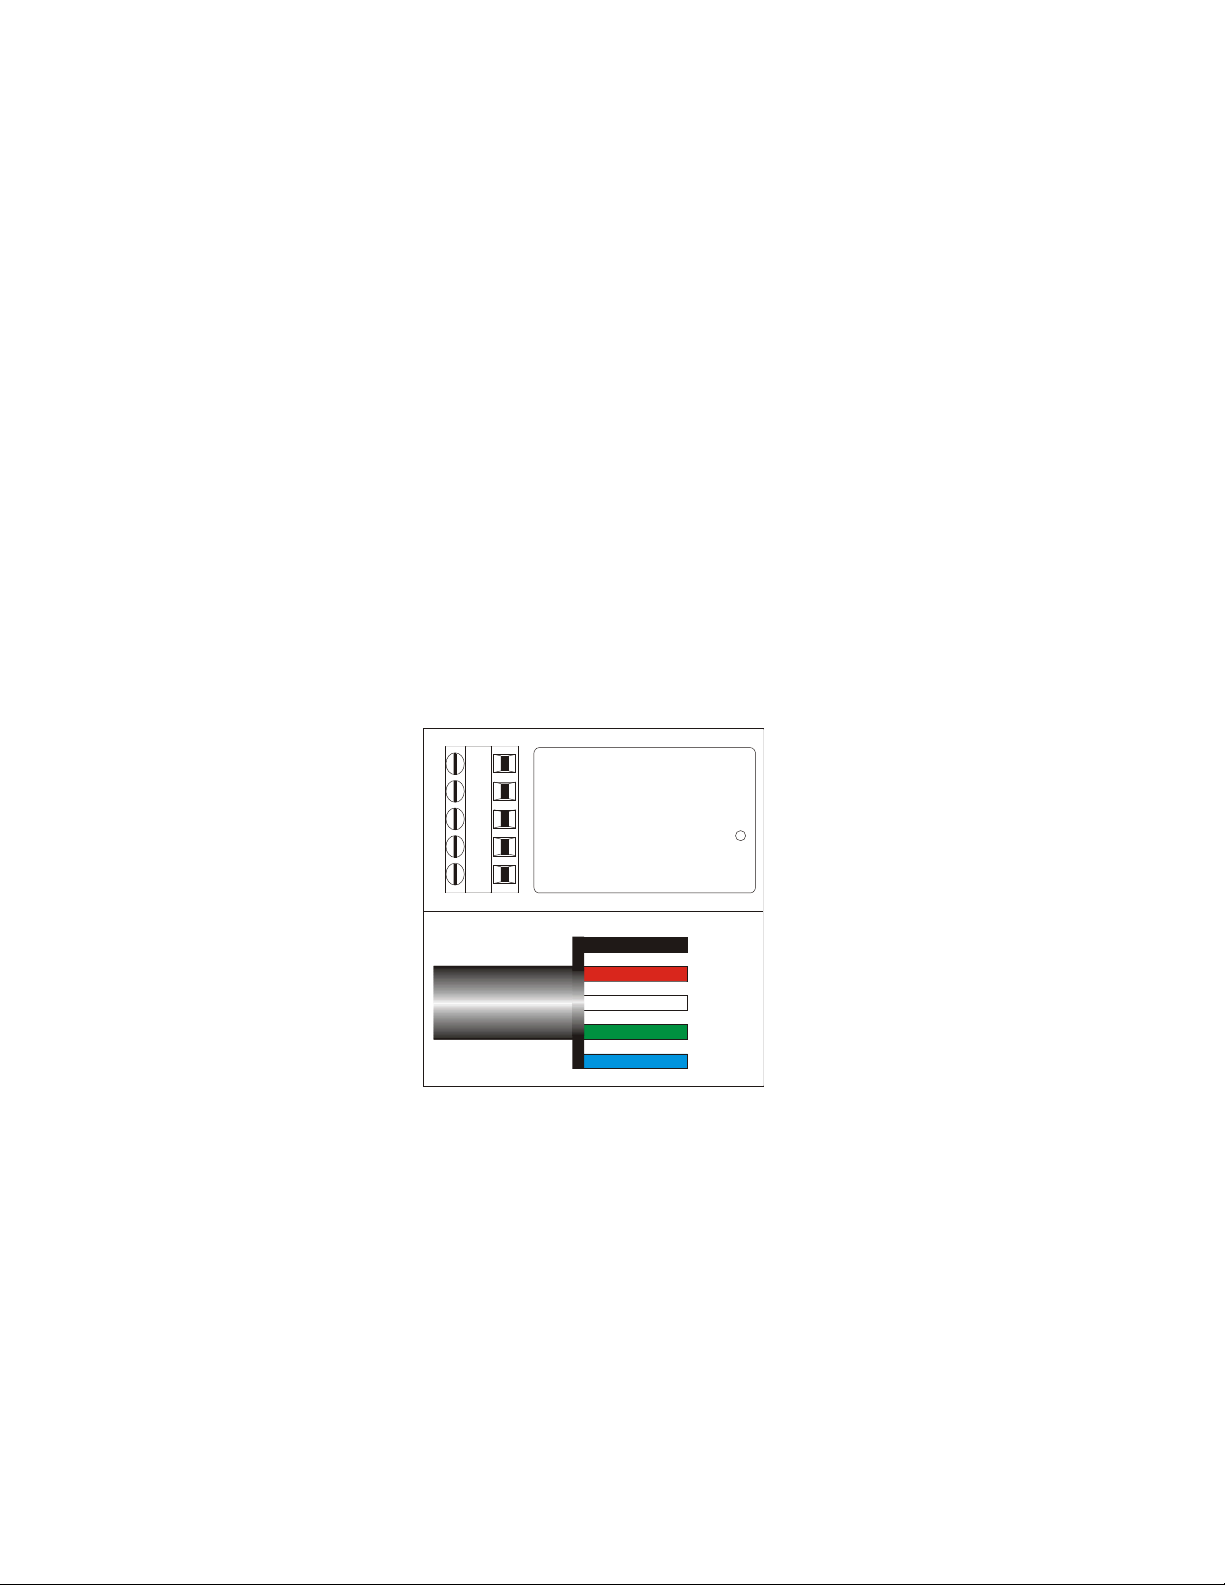
Step 2. Using the diagram at right, connect
the power and door relay wires to the
keypad. See Application Examples
Section for ideas on how to connect
the keypad in your application. If
you use this product to operate a
DC door strike, magnetic lock,
relay or any device that has a coil
(inductive load) that is powered
from a DC source, you MUST
install a varistor in parallel across
the coil terminals. The varistor
provi ded with this keypad is des igned
to be used with a 12 VDC door lock.
If you are using a 24 VDC lock, do
not use the varistor that came with
your keypad. The varistor should
prevent the high voltage spike that
occurs when the lock coil is de-
energized. If you do not use a varistor, you will have
erratic operations and eventually damage the keypad
and any other electronic device in the system.
Step 3. Turn on the power supply. The following will happen:
i) The keypad s buzzer will beep briefly.
ii) The keypad s Red LED will illuminate briefly.
iii) The keypad is r eady for use. Go to the next section,
Programming the Keypad.
PROGRAMMING THE KEYPAD
All programming is performed using the Keypad. Here are
some tips to help you program your keypad:
%¸ WHEN PROGRAMMING, YOU MUST WAIT W HILE THE
RED LED IS ON SOLID. CONTINUE ENTERING DATA
WHEN THE RED LED BEGINS FLASHING.
%¸ IMPOR TANT! CHANGE THE FACTORY-SET MASTER
CODE (1234) USING FUNCTION 2 AFTER PROGRAMMING
THE KEYPAD. It may be easier to do all the necessary
programming before you change the master code. Be sureto
keep a copy of the new master code in a secure and
accessible location.
%¸ IMPOR TANT! BEFORE YOU INSTALL THE KEYPAD, MAKE
SURE YOU ERASE THE FACTORY-SET USER CODE
(567890) USING FUNCTION 4.
Entering Program Mode
To enter program mode, enter the asterisk twice (**), then the
Master Code, and then the asterisk twice(**) again.
Example: ** 1 2 3 4 **
The Red LED will turn on solid for three seconds, and then will
flash slow, indicating that you are in program mode. You must
wait until the Red LED flashes to continue, as the keypad is
processing information and will not accept new input. Once the
Red LED is flashing, you may enter any of the four program
options, or you may enter the pound sign (#) to exit program
mode. If you do not enter a program option within 15 seconds, the
keypad will automatically exit program mode.
If this happens, you will need to re-enter the
Master Code to continue programming.
Program the Relay for Momentary Time
Enter 1 and the Red LED will light for
three seconds and then flash fast. Then ent er
the elapsed time, in seconds, for the door to
be unlocked. You must use two digits, i.e.,
enter a number between 01 and 99. Enter the
pound sign ( #) to confirm this ent ry. The Red
LED will light for three seconds (to
acknowledge the entry), then the Red LED will
begin to flash slow. You are now back at the
main program menu.
Examples:
To set relay to 15 seconds, enter: 1 15 #
Program the Relay for Latching
Enter 1 and the Red LED will li ght for three seconds and then
flash fast. Then enter two zeros (00) to set the relay to latching
mode. Enter the pound sig n (#) t o confirm this entry. The Red
LED will li ght for three seconds (to ackn owledge the entr y) then
the Red LED will begin to flash slow. You are now back at the
main program menu.
Examples:
To set relay to latching, enter: 1 00 #
Change the Master Code
Enter 2 and the Red LED will light for three seconds and then
flash fast . Enter the Master Cod e slot number (00), and then enter
the pound sign (#). The Red LED will light for three seconds (to
allow time to acknowledge the entry) and then it will resume
flashing. Enter your new Master Code, followed by the pound sign
(#). The Master Code must be between 4 and 8 digits, and must
be numbers only (* and # ar e not valid code num bers). The Red