TO THE INSTALER: Recommnended Pressure - 20 psi
CARE AND MAINTENANCE INSTRUCTIONS
Your new water closet provide you with years of service.
Cleaning should be done on a regular basis. Use of scouring cleansers may remove the glaze
on the bowl and are not recommended.
Wipe all outside surfaces with a soapy water solution and clean bowl area with a non - abrasive
type cleaner.
Use of tank and bowl cleaners containing chlorine will cause damage and are not recommended.
Replacement parts for ballcocks and flush valves must be obtained from ColCerámica S.A.
Contact our customer service department for information on ordering replacement parts.
When contacting customer service, please have the model number or your toilet and type of
ballcock or flush valve installed in the toilet tank. This information can be obtained by opening
your tank lid and finding the manufacturer ´s name on the ballcock cap and on the flush valve
flapper.
In cases where parts are substituted, ColCerámica S.A will not be responsible for damage
caused by parts not supplied by us.
NOTE:
To instal your toilet with gray cement and rock sand follow the next instructions: only use gray
cement and rock sand in a mixture of a part of gray cement by four parts of rock sand. Never
use pure cement (gray or white) nor extend the mixtute in all base bowl area.
Toilet
Installation Instructions
Observe Local Plumbing and Bulding Codes
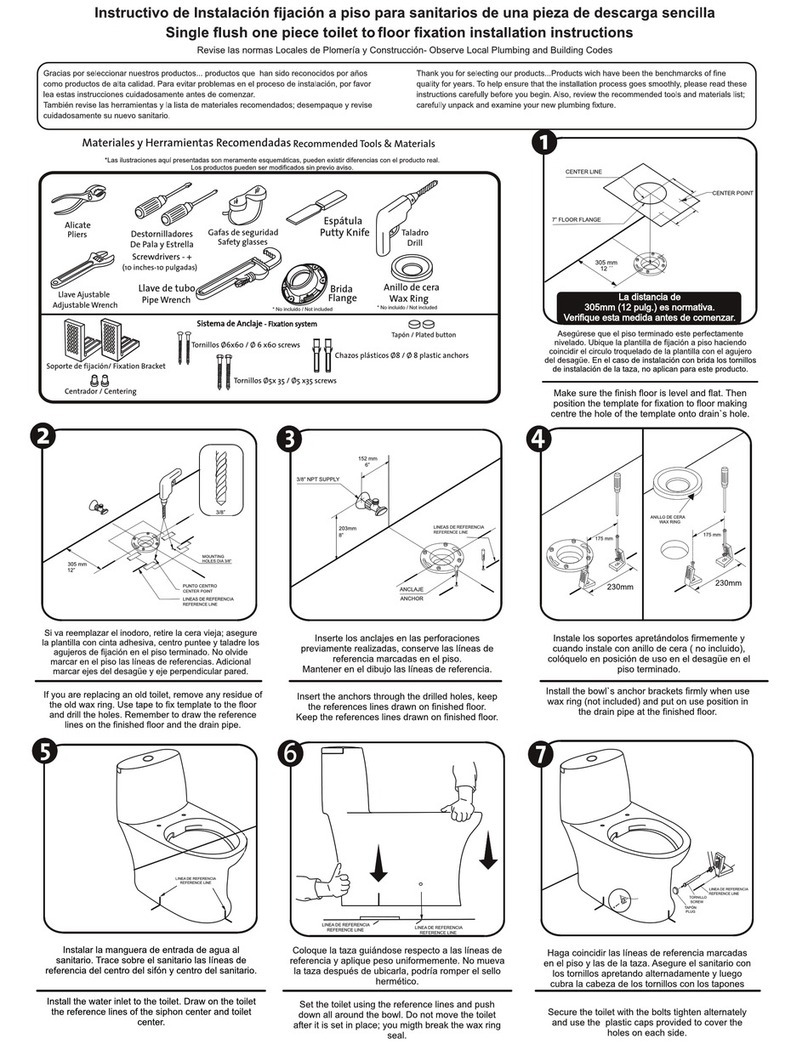
Introduction: Thank you for selecting our products...products which have been the
benchmarks of fine quality for years..To help insure that the installation process will proceed
smoothly, please read these instructions carefully before you begin. Also, review the
recommended tools and materials list; carefully unpack and examine your new plumbing
fixture.
Recommended Tools & Materials
1Center of the floor drain and floor flange
should be 12” from the rear wall Insert
flange bolts into slots and rotate them
into the flange.
NOTE:
If replacing an existing toilet be certain
to shut off water supply before removing
old toilet.
10”
Regular Screwdriver
2-1/2” Lg. Flange
Bolts & Nuts
Shut-Off Valve and
Felxible supply Tube
Adjustable Wrench
Hacksaw
Level
Tape
Measure
Wax Ring
Instrucciones
para Instalación de Sanitarios
Introducción: Gracias por seleccionar nuestro productos...productos que han sido reconocidos por
años como productos de alta calidad. Para evitar problemas en el proceso de instalación, por favor lea
estas instrucciones cuidadosamente antes de comenzar. También revise las herramientas y la lista de
materiales recomendados; desempaque y revise cuidadosamente su nuevo sanitario.
Materiales y Herramientas Recomendadas
Nivel
Sierra para Metales
Llave Ajustable
Destornillador de Pala
Tornillos y Tuercas
de 2-1/2” Lg.
Válvula de Cierre y
Tubo Flexible de Suministro
Anillo de Cera
Cinta
Métrica
El centro del desagüe del piso y de la brida
debe ser de 12” (30.5 cm) desde la parte
posterior de la pared. Inserte los tornillos
dentro de las ranuras de la brida y haga que
giren dentro de esta.
NOTA:
Si va a reemplazar un sanitario viejo, antes
asegúrese de cerrar el suministro de agua.
12”12”
30,5 cm30,5 cm
PARA EL INSTALADOR: Presión Recomendada - 20 psi
INSTRUCCIONES DE CUIDADO Y MANTENIMIENTO
Su nuevo sanitario le proporcionará años de servicio.
Se debe limpiar sobre una superficie regular. La utilización de limpiadores abrasivos puede dañar el
esmalte de la taza y no es recomendable.
Limpie las superficies externas con una solución de agua jabonosa y limpie el área del tazón con un
limpiador no abrasivo.
Usar limpiadores que contengan cloro pueden causar daños al tanque y a la taza y no es recomendable.
Las partes de sustitución para las válvulas de entrada y las válvulas de salida deben ser obtenidas a
través de Sanitarios & Lavamanos Corona. Contacte nuestro Departamento de Servicio al Cliente, para
información sobre como solicitar las partes de repuesto.
Cuando contacte nuestro Departamento de Servicio al Cliente por favor tenga el número del modelo de
su sanitario y el tipo de válvulas de entrada y de salida instaladas en el tanque. Esta información la
puede obtener levantando la tapa del tanque donde encontrará el nombre del fabricante de la válvula
de entrada y de la válvula de salida.
En casos donde las partes de repuesto no son originales, Sanitarios & Lavamanos Corona no se hace
responsable de los daños causados por estas partes no suministradas por nosotros.
NOTA
Para instalar su sanitario con cemento gris y arena, tenga en cuenta las siguientes recomendaciones:
Usar solamente cemento gris y arena de peña en una mezcla de una parte de cemento por cuatro
partes de arena. Nunca utilice cemento puro (gris o blanco) ni extienda la mezcla en toda el área de la
base de la taza.
www.colceramica.com
Dirección: Carrera 68D # 80-70
Teléfono: (57-1) 404 88 84
Línea de Servicio al Cliente: 018000512030
Bogotá-Colombia
BPC´S 251618


