manuals.online logo
Brands
  1. Home
  2. •
  3. Brands
  4. •
  5. CORONA
  6. •
  7. Toilet
  8. •
  9. CORONA Manantial Pro 300941001 User manual

CORONA Manantial Pro 300941001 User manual

1
Instructivo de Instalación
Installation Instructions
Introducción:
¡Gracias por preferir productos CORONA! Reconocidos por su alta calidad durante años.
Con el fin de facilitar el proceso de instalación lea cuidadosamente las siguientes instrucciones antes de comenzar. Además observe las
herramientas recomendadas y los componentes requeridos. Cuidadosamente desempaque y examine su producto, verificando que se
encuentre en buen estado.
Introducción:
¡Thank you for choosing CORONA products! Recognized for their high quality for years.
To help ensuring that the installation process will proceed smoothly, please read these instructions carefully before you begin.
Also, review the recommended tools and required components; carefully unpack and check all parts are in good condition.
Sanitario Dos Piezas
Two Piece Toilet
RANGO DE PRESIÓN MÍNIMO: 20 PSI / MINIMUM PRESSURE RANGE: 20 PSI (1.38 Bar)
RANGO DE PRESÍON MÁXIMO 80 PSI / MAXIMUM PRESSURE RANGE: 80 PS (5.52 Bar)
Herramientas recomendadas / Recommended tools:
Taladro
Drill
Llave ajustable
Adjustable
wrench
Gafas seg.
Googles
Nivel
Level
Destornillador
Screwdriver
Guantes de seg.
Safety gloves
Llave de tubo
Pipe wrench
Flexómetro
Tape measure
Sierra
Hacksaw Pistola de
silicona
Caulk gun
1. Cierre el suministro de agua antes de iniciar el proceso de instalación
del sanitario.
Turn o the water supply before starting the toilet installation
process.
Proceso de instalación TAZA / BOWL installation process:
Suministro de agua
Water supply
R
E
Q
U
I
R
E
D
R
E
Q
U
E
R
I
D
O
2. Entre centro del desagüe del piso y la brida sanitaria (NO
INCLUIDA) deben estar a 305 mm. (12”) desde la parte
posterior de la pared.
Between the center of the floor drain pipe and closet
flange (NOT INCLUDED) should be 305 mm. (12”) from
the rear wall.
Suministro de agua
Water supply
Desagüe
Drainage
Brida
Flange
305mm. (12”)
ADVERTENCIA: EN CASO DE TENER ALGUNA ANOMALÍA, RETIRE LA TAPA DEL TANQUE Y REALICE LOS AJUSTES DE LAS POSIBLES FALLAS:
WARNING: IN CASE OF MALFUNCTION, REMOVE THE TANK’S LID AND MAKE ADJUSTMENTS TO POSSIBLE FAILURES:
2 3
Arandelas plásticas + tornillos x2
Plastic washers + bolts x2
Tuercas x2 / Nuts x2
Manguera de suministro
Supply hose
4. MANEJE LA TAZA CON CUIDADO; sosténgala
entre las piernas, haciéndo que los tornillos de
fijación pasen a través de los agujeros ubicados
en la base de la taza.
LOWER BOWL VERY CAREFULLY; hold it
between yourlegs and into position with fastening
bolts passing through holes in bowl base.
3.
Instale las arandelas plásticas ymetálicas (NO INCLUIDAS) como se indica
en el gráfico, coloque las tuercas y apriete. Finalmente fije los casquetes
sobre los tornillos de fijación con silicona anti-hongos.
(Los casquetes pueden venir dentro del asiento sanitario según su fabricante).
Assemble the plastic and metal washer (NOT INCLUDED) as shown in the
figure, with the washer in the ‘’up’’ position as marked. Finally install the
caps over the each fastening bolt with anti-fungi caulk.
(These caps can come inside the toilet seat package by manufacturer).
Arandela plástica
Plastic washer
Arandela metálica
Metal washer
Tuerca / Nut
Casquete
Cap
5.
Suministro de agua
Water supply
Suministro de agua
Water supply
Empaque de selle
Sealing gasket
Tornillos de fijación x2
Fastening bolts x2
Brida sanitaria
Closet flange
- Inserte los tornillos de fijación
dentro de las ranuras de la brida y
haga que giren dentro de ésta.
- Posicione el empaque de selle
sobre la cavidad interna de la
brida sanitaria.
- Insert the fastening bolts into slots
and rotate into the closet flange.
- Set the sealing gasket over the
closet flange cavity.
N.P.T / F.F.L
Proceso de instalación TANQUE / TANK installation process:
- Verifique que el empaque esponjoso de la válvula de descarga esté
previamente instalado en la parte inferior del tanque.
- Inserte las arandelas plásticas pequeñas en los tornillos (INCLUIDOS).
- Posicione el tanque sobre la taza e inserte los tornillos a tráves de los
agujeros coincidentes en la taza. (Ver gráfico).
- Introduzca las arandelas y las tuercas para anclar el tanque.
- Apriete las tuercas alternando la IZQUIERDA y la DERECHA.
(Utilice una llave ajustable o un juego de ratchet).
- Check in the bottom of the tank that the sealing gasket is previously
installed on the flushing valve.
- Insert the small plastic washers into the bolts (INCLUDED).
- Locate the tank over the bowl and insert the bolts through the matching
holes in the bowl. (See graphic).
- Insert the washers and nuts to anchor the tank.
- Tighten the nuts alternating LEFT and RIGHT.
(use an adjustable wrench or socket wrench).
Arandelas plásticas x2
Plastic washers x2
NO APRIETE EN EXCESO / DO NOT OVERTIGHTEN
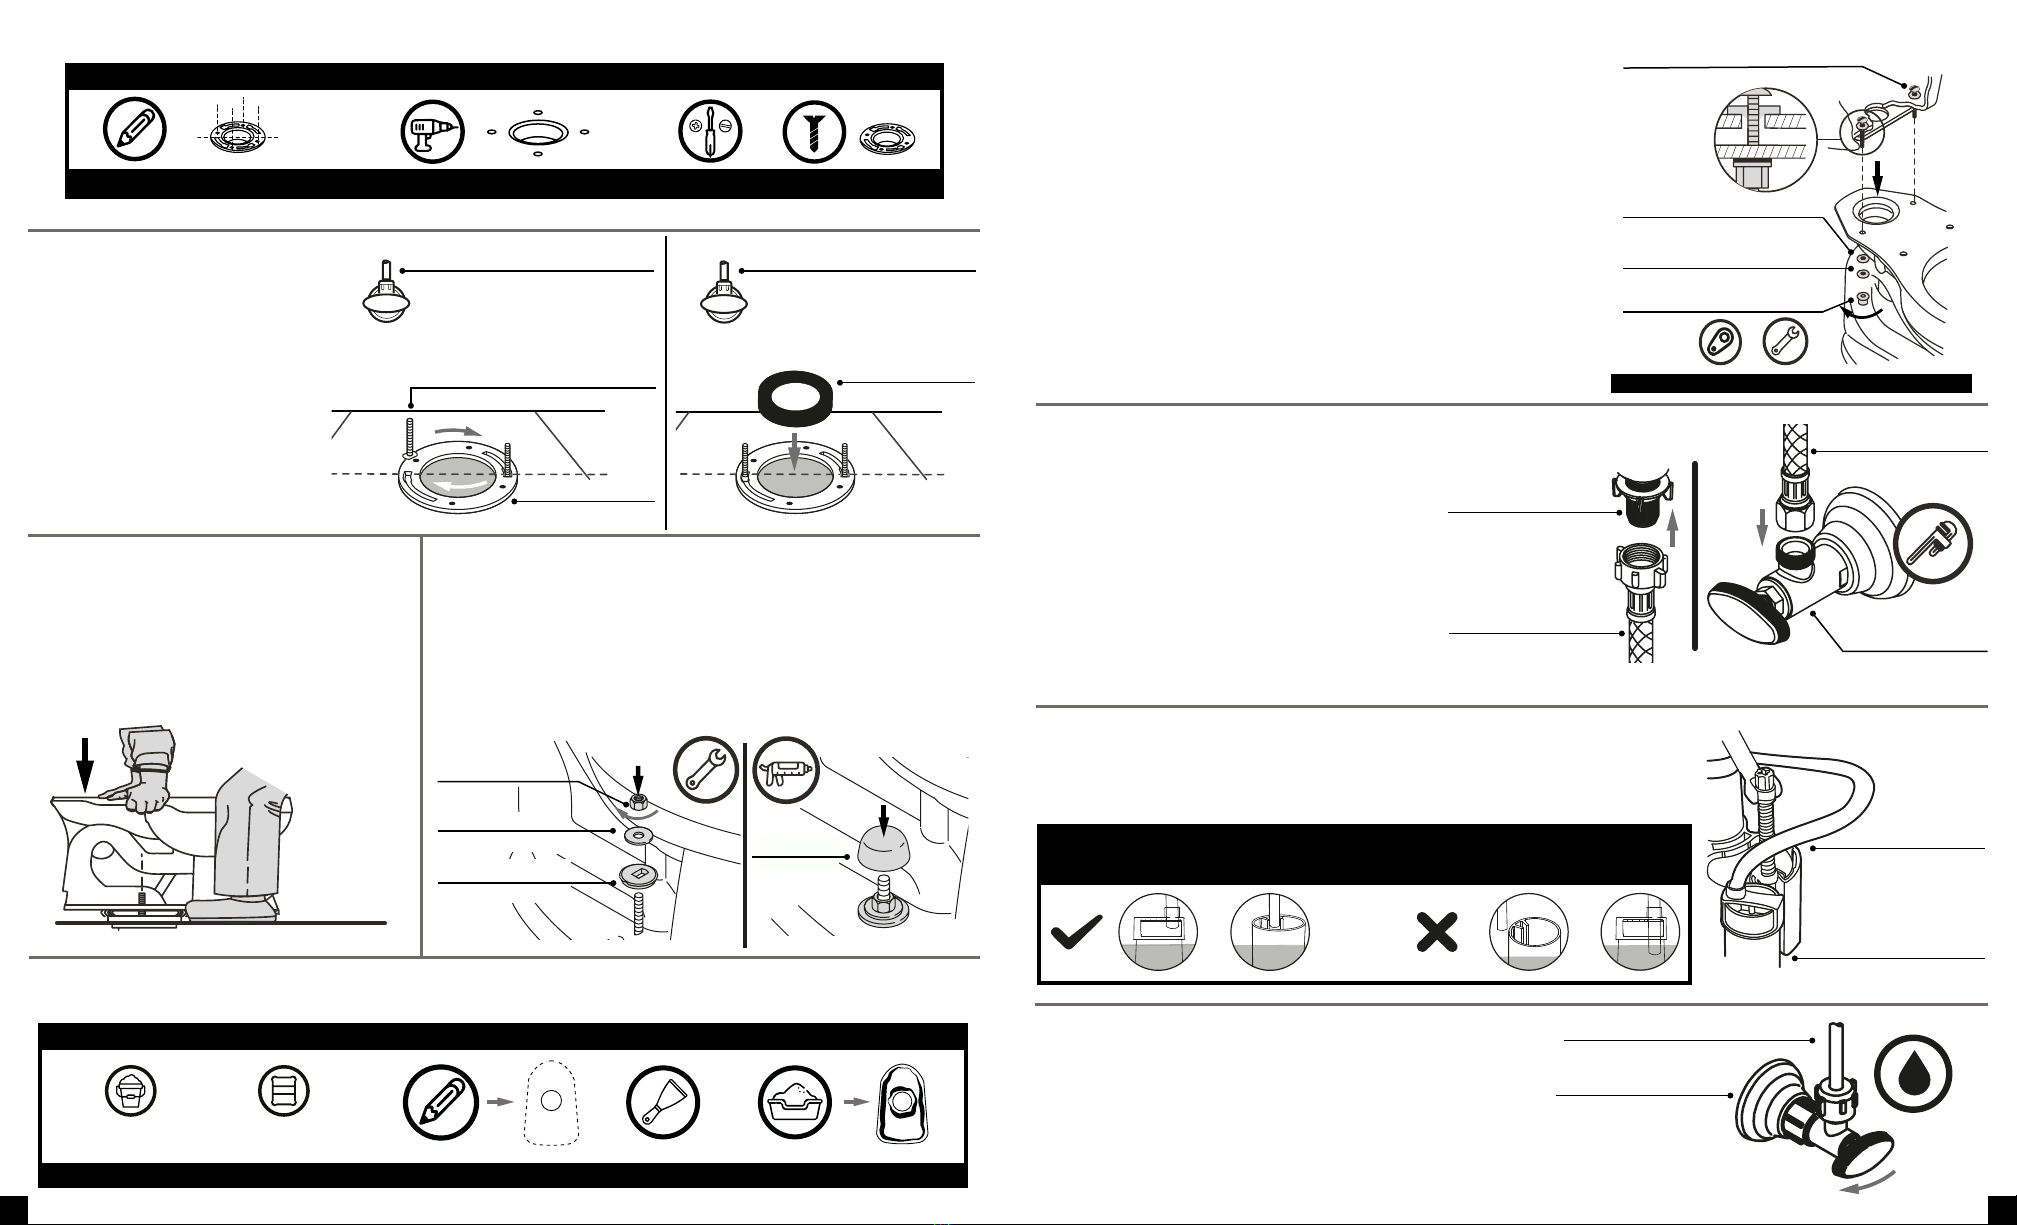
Funcionamiento y Operación / Operation and Performance:
Conecte la manguera de suministro a la válvula
de llenado de agua del tanque. Luego doble
cuidadosamente la manguera y conéctela al suministro
de agua.
NOTA: Apriete las conexiones adecuadamente para
evitar fugas de agua, de ser necesario, use una llave
de tubo.
Connect the supply hose to the water fill valve of the
tank. Then carefully bend the hose and connect it to
the water supply.
NOTE: Tighten connections properly to avoid water
leakage, if you need it use a pipe wrench.
Manguera de suministro
Supply hose Suministro de agua
Water supply
Válvula de llenado
Fill valve
6.
7.
8. Antes de abrir el suministro de agua, en el interior del tanque inserte la manguera de refill
en el tubo de rebose de la válvula de descarga utilizando las ranuras o el soporte de sujeción.
Before opening the water supply, inside the tank, insert the refill hose into the overflow
tube using the retainer clip or support.
Manguera de refill
Refill hose
Tubo de rebose
Overflow tube
ASEGURE QUE LA MANGUERA REFILL QUEDE DENTRO DEL TUBO DE REBOSE DE LA VÁLVULA DE
DESCARGA.
MAKE SURE THE REFILL HOSE INSIDE THE OUTLET VALVE’S OVERFLOW TUBE.
9. Abra el suministro de agua lentamente y chequee las
conexiones de la manguera de suministro.
Turn on water supply slowly and check the water supply
hose connections.
Manguera de suministro
Supply hose
Suministro de agua
Water supply
Nunca utilice cemento puro (gris o blanco) ni extienda la mezcla en toda el área de la base de la taza (borde del desagüe y silueta de la base).
Never use pure cement (gray or white) or spread the mixture over the entire area of the bowl base (drainage edge and base silhouette).
INSTALACIÓN CON CEMENTO GRIS / GRAY CEMENT INSTALLATION
MARCAR BASE / DRAW FOOT PROFILE APLICAR MEZCLA / APPLY MIXTURE
+
+
3/4 parte de cemento gris
3/4 portion gray cement
1 parte Arena de peña
1 portion Rock Sand
PREPARAR MEZCLA / PREPARE MIXTURE
Arandelas metálicas x2
Metal washers x2
For installation with CLOSET FLANGE, perform the following procedure or follow the manufacturer’s instructions:
INSTALACIÓN DE BRIDA SANITARIA / CLOSET FLANGE INSTALLATION
UBICAR Y MARCAR / POSITION AND DRAW PERFORAR / DRILL FIJAR / FIX
x4
+ +
4
Posibles fallas y soluciones / Troubleshooting:
LÍNEAS DE ATENCIÓN AL CLIENTE / CUSTOMER SERVICE
Se debe limpiar sobre una superficie regular.
No utilizar limpiadores abrasivos ni limpiadores que contengan cloro ya que puede causar daños al tanque y taza.
Limpie las superficies externas con una solución de agua jabonosa y desinfecte el área del pozo con un limpiador NO ABRASIVO.
Para solicitar partes de repuesto solo se hace con la compañía, póngase en contacto a nuestra línea de atención; tenga a la mano el número de modelo del
sanitario, tipo de válvula de entrada y salida instaladas en el tanque (se obtiene levantando la tapa del tanque).
En casos donde las partes de respuesto NO son originales, la Compañía NO se hace responsable por los daños ocurridos.
Bogotá: 404 88 84
Colombia: 01 8000 51 20 30
México:
Directo: (81) 8125 2000
LADA sin costo: 01 800 705 1020
Centro América:
Guatemala: (502) 1-800-6240-109
Costa Rica: (506) 4001-4966
Nicaragua: (505) 2249-5521
Honduras-Tegucigalpa: (504) 9767-0821
Honduras-San Pedro Sula: (504) 9482-6710
Panamá: (507) 8000-202
El Salvador: (503) 2274-4620
Norte América:
USA: 866 821 2811
Instrucciones de cuidado y mantenimiento
-
-
-
-
-
Cleaning should be done on a regular basis.
Do not use abrasive cleaners or cleaners containing chlorine, as this may cause damage to the tank and bowl.
Clean the external surfaces with a soapy water solution and clean the well area with a NON-ABRASIVE cleaner.
To request spare parts, please contact our customer service; please make sure to have the model number of the toilet, type of inlet and outlet valve installed
in the tank (obtained by lifting the tank’s lid).
In cases where the replacement parts are NOT original, the Company is NOT responsible for the damages occurred.
Care and mantenaice instructions
SAP: 22000009977
Problema / Trouble Causa / Cause Solución / Solution
Válvula de llenado no llena
Fill valve is not filling
El suministro de agua no está abierto
The water supply is not turned on
Abra el suministro de agua
Turn on water supply
Fugas de agua al exterior
del sanitario
Water leakages outside toilet
La manguera de suministro
está desajustada
Supply hose is out of adjusment
Ajuste la manguera de suministro
(ver paso 7)
Adjust the supply hose (see step 7)
10. Realice pruebas de descarga para verificar correctamente su funcionamiento. Proceda a instalar el asiento sanitario según las
instrucciones del fabricante.
Perform flushing tests to verify proper operation. Proceed to install seat according to the manufacturer’s instructions.
BAJO NINGUNA CIRCUNSTANCIA AJUSTE LA GRIFERÍA DEL TANQUE SIN LA DEBIDA COLABORACIÓN DE UN ESPECIALISTA.
DO NOT ADJUST UNDER ANY CIRCUMSTANCES THE TANK FITTINGS WITHOUT THE DUE COLLABORATION AN PROFESSIONAL.
SI EXISTE ALGUNA FUGA O GOTEO AL INTERIOR DEL POZO
IF THERE IS ANY LEAKAGE OR DRIPPING INSIDE THE WELL
Tornillo
Screw
Contraiga el tornillo en sentido a las manecillas del reloj.
Tighten the screw clockwise.
Botón accionador
Actuator button
Tuerca
Nut
SI LA VÁLVULA NO DESCARGA CORRECTAMENTE DESPUÉS DE SER ACCIONADA
IF THE VALVE DOESN’T DISCHARGE PROPERLY AFTER BEING ACTUATED
Extraiga el tornillo en sentido contrario a las manecillas del reloj.
(medida recomendada 22mm)
Pull out the screw counterclockwise. (Recommended size: 22mm)
-
-
-
-
-
NOTA: Luego de contraer o extender el tornillo, ajustar con la tuerca para que el tornillo quede en su lugar.
NOTE: After contracting or extending the screw, adjust with the nut so that the screw is in place.
Tornillo
Screw
Botón accionador
Actuator button
Tuerca
Nut

Other CORONA Toilet manuals

CORONA 251618 User manual

CORONA

CORONA 251618 User manual

CORONA Ecoclean Single O26011001 User manual

CORONA

CORONA Ecoclean Single O26011001 User manual

CORONA Nyren 12161 User manual

CORONA

CORONA Nyren 12161 User manual

Popular Toilet manuals by other brands

Kogan KATOPOTPNKA user guide

Kogan

Kogan KATOPOTPNKA user guide

Laufen Pro A quick guide

Laufen

Laufen Pro A quick guide

Toto NEOREST TCF996RWG/RWSW instruction manual

Toto

Toto NEOREST TCF996RWG/RWSW instruction manual

THE BOLD LOOK OF KOHLER K-3977 Installation and care guide

THE BOLD LOOK OF KOHLER

THE BOLD LOOK OF KOHLER K-3977 Installation and care guide

Laufen ILBAGNOALESSI One manual

Laufen

Laufen ILBAGNOALESSI One manual

Laufen Cleanet RIVA H894690 manual

Laufen

Laufen Cleanet RIVA H894690 manual

Raritan FRESH HEAD Installation and maintenance instructions

Raritan

Raritan FRESH HEAD Installation and maintenance instructions

Drive DeVilbiss Healthcare TSE 150 Instructions for use

Drive DeVilbiss Healthcare

Drive DeVilbiss Healthcare TSE 150 Instructions for use

Toto NEOREST 500H instruction manual

Toto

Toto NEOREST 500H instruction manual

Avenue Cumberland TL-4250-WL manual

Avenue

Avenue Cumberland TL-4250-WL manual

Dometic 970 SERIES instruction manual

Dometic

Dometic 970 SERIES instruction manual

Thetford Wilcox Crittenden Headmate 1460 manual

Thetford

Thetford Wilcox Crittenden Headmate 1460 manual

Inax RS Series Installation and use manual

Inax

Inax RS Series Installation and use manual

brondell FreshSpa Warm  FSW 20 owner's manual

brondell

brondell FreshSpa Warm FSW 20 owner's manual

VITRA V-Care user manual

VITRA

VITRA V-Care user manual

Olympia CLEAR 15CL Installation and Maintenance

Olympia

Olympia CLEAR 15CL Installation and Maintenance

Kohler JULY S-TRAP K-28866T-S quick start guide

Kohler

Kohler JULY S-TRAP K-28866T-S quick start guide

Geberit Monolith Plus installation manual

Geberit

Geberit Monolith Plus installation manual

manuals.online logo
manuals.online logoBrands
  • About & Mission
  • Contact us
  • Privacy Policy
  • Terms and Conditions

Copyright 2025 Manuals.Online. All Rights Reserved.