manuals.online logo
Brands
  1. Home
  2. •
  3. Brands
  4. •
  5. Corsa
  6. •
  7. Other
  8. •
  9. Corsa 14929 User manual

Corsa 14929 User manual

Exhaust System Installation
Axle Back Exhaust System
Dual Rear Exit w/ Twin 4” Pro-Series Tips
BMW F06, F12, F13 M6
PN 14929 & 14929BLK
Please take time to read and understand these installation instructions.
CORSA recommends that the installation of this system be performed by a qualified service center or professional
muffler installer who has the necessary equipment, tools and experienced personnel. However, if you decide to
perform this install, the use of a hoist and an additional person will be required.
CAUTION: Never work on a hot exhaust system. Allow time for the vehicle to cool. Always wear eye protection when
working under a vehicle.
Recommended Tools:
3/8” drive ratchet
3/8” drive 13mm deep socket
3/8” drive 15mm deep socket
3/8” drive 1/2” deep socket
3/8” drive 3” extension
3/8” drive 6” extension
1/4" drive ratchet
1/4" drive 7mm socket
Safety glasses
T30 torx bit socket or screwdriver
Chain-style pipe cutter
Grommet pullers
Soap and water solution
Permanent Marker
Tape measure
Torque Wrench
Penetrating lubricant spray
Please confirm that all parts are present before beginning the factory exhaust system removal and CORSA exhaust
system installation.
Bill of Materials
1. 13MV2056 –Rear Muffler Assembly –Passenger
2. 13MV2059 –Rear Muffler Assembly –Driver
3. 13MV3007 –Tip Assembly –Driver
4. 13MV3008 –Tip Assembly –Passenger
5. 13MV7055 –Hardware Kit
Exhaust System Installation
Axle Back Exhaust System
Dual Rear Exit w/ Twin 4” Pro-Series Tips
BMW F06, F12, F13 M6
PN 14929 & 14929BLK
Factory Exhaust System Removal:
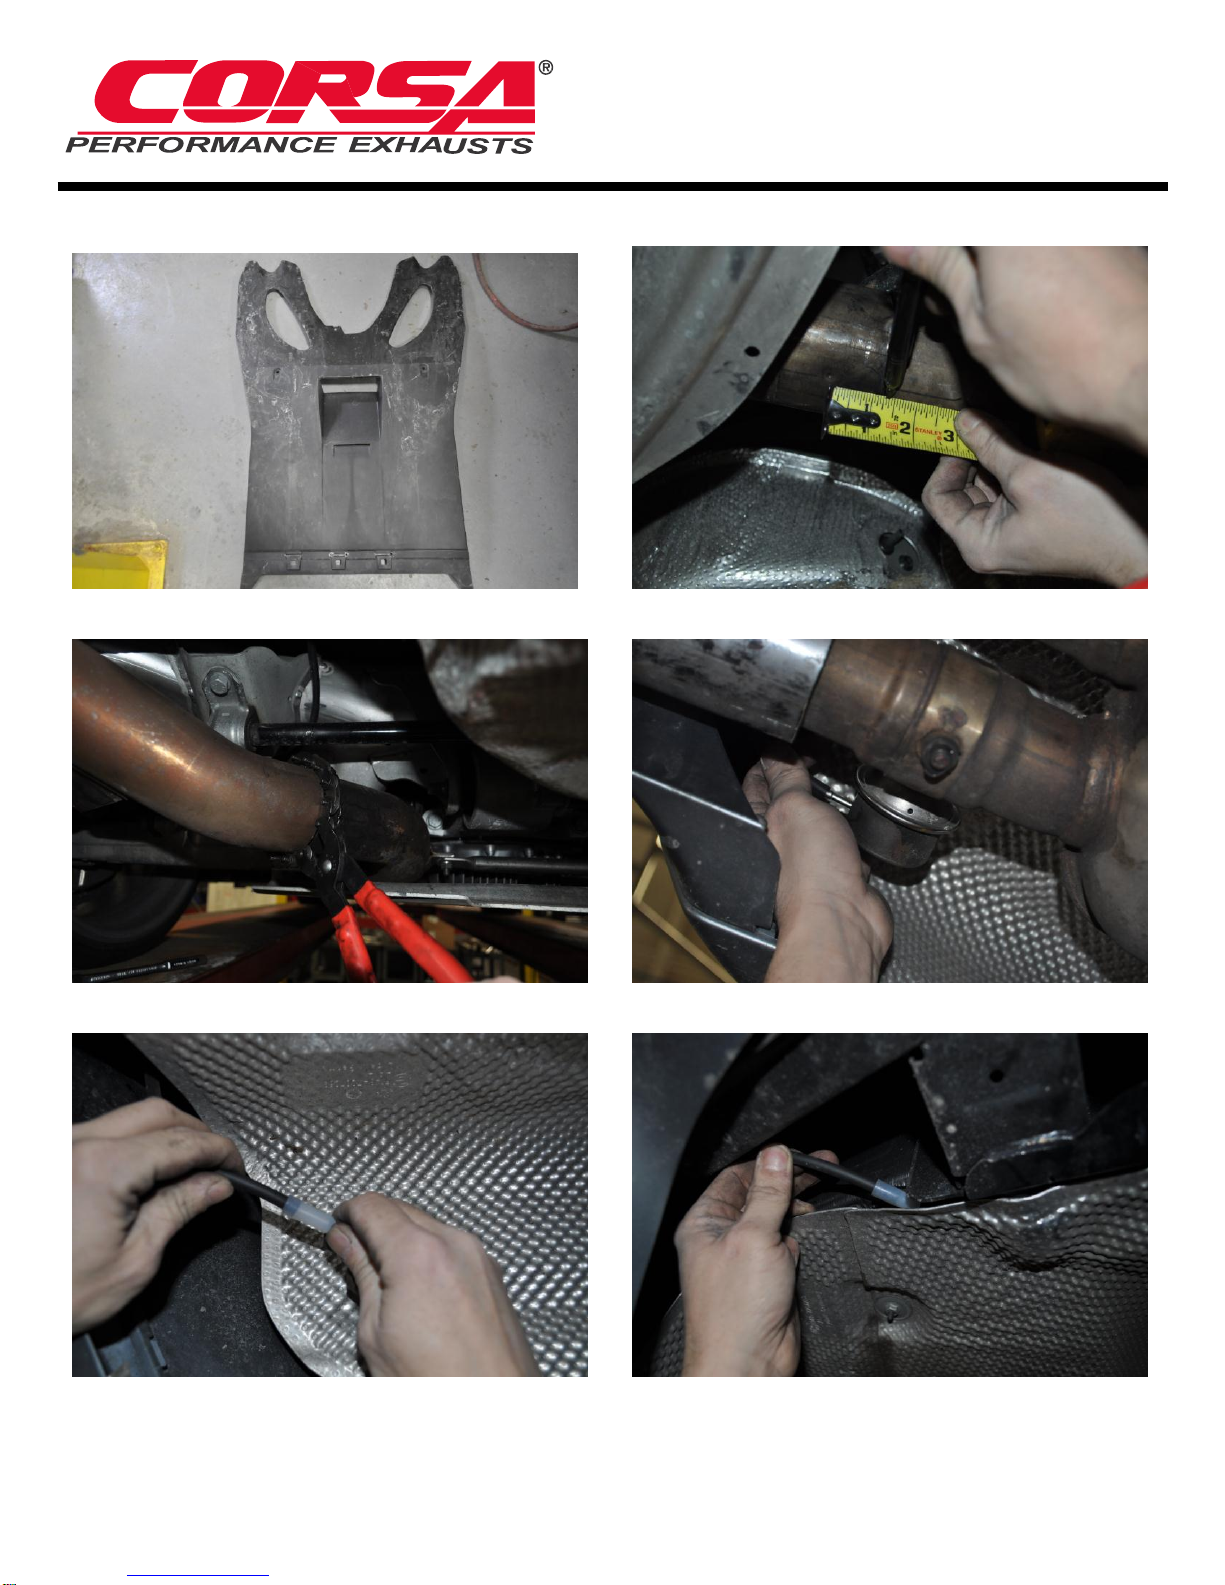
1. Remove plastic splash guard from the rear of the vehicle using the T30 Torx driver, 7mm socket and 1/4” ratchet. The
T30 Torx fasteners are along the back side near the bumper while the 7mm hex head fasteners are placed around the
edges and sides of the shield. (Fig. A)
2. Locate the small dent in the driver’s side exhaust piping near the aluminum and plastic splash guards covering the
rear differential. The dent is located on the bottom of the pipe close to the rear edge of the splash guard. Measure
1.25” from this dent towards the rear of the car and mark the pipe. (Fig. B) Repeat this step on the passenger’s side of
the vehicle.
3. Using the chain-style pipe cutter or other appropriate device, cut the pipe at the mark. (Fig. C) Repeat this step on the
passenger’s side of the vehicle.
4. Locate the vacuum line and vacuum actuator on the outer tip on the driver’s side rear muffler. Remove the vacuum
line from the actuator (Fig. D) and cap with one of the supplied vacuum caps. (Fig. E) Tuck the capped vacuum line
between the heat shield and frame of the vehicle. (Fig. F) Repeat this step on the passenger’s side of the vehicle.
5. Using the ratchet and the 13mm deep socket, remove the nut securing the ground strap to the rear stud of the front
hanger. Remove only the rear-most nut at this time. (Fig. G) Repeat this step on the passenger’s side of the vehicle.
Keep the nuts for use during the Corsa system installation.
6. Using the ratchet, 6” extension and the 13mm deep socket, remove the nut securing the rear hanger to the vehicle.
(Fig. H) Repeat this step on the passenger’s side of the vehicle. Keep the nuts for use during the Corsa system
installation.
7. NOTE: The only thing supporting the muffler at this time is the hanger at the front of the muffler. Take care as to not
let the muffler swing and damage the car and to prevent personal injury.
8. Remove the remaining nut securing the front hanger. Repeat this step on the passenger’s side of the vehicle. Keep the
nuts for use during the Corsa system installation.
9. Remove the factory mufflers from the vehicle.
10. Using the ratchet and 13mm deep socket, remove the nut securing the ground strap to the rear muffler’s hanger. (Fig.
J) Repeat this step for both mufflers. Keep the ground straps for use during the Corsa exhaust system install. The nuts
are not used during the later installation of the Corsa system.
11. Using grommet pullers or a similar device, remove the front hanger and hanger grommet from the muffler. NOTE:
The use of a soapy water solution may aid in the removal of hanger grommets. (Fig. K) Keep the hangers and hanger
grommets for use during the Corsa system installation.
12. Using grommet pullers or a similar device, remove the rear hanger and hanger grommet from the muffler. NOTE: The
use of a soapy water solution may aid in the removal of hanger grommets. (Fig. L) Keep the hangers and hanger
grommets for use during the Corsa system installation.
Exhaust System Installation
Axle Back Exhaust System
Dual Rear Exit w/ Twin 4” Pro-Series Tips
BMW F06, F12, F13 M6
PN 14929 & 14929BLK
Factory Exhaust System Removal Pictures:
Fig. A Fig. B
Fig. C Fig. D
Fig. E Fig. F
Exhaust System Installation
Axle Back Exhaust System
Dual Rear Exit w/ Twin 4” Pro-Series Tips
BMW F06, F12, F13 M6
PN 14929 & 14929BLK
Factory Exhaust System Removal Pictures:
Fig. G Fig. H
Fig. J Fig. K
Fig. L
Exhaust System Installation
Axle Back Exhaust System
Dual Rear Exit w/ Twin 4” Pro-Series Tips
BMW F06, F12, F13 M6
PN 14929 & 14929BLK
Installation of CORSA Exhaust System:
NOTE: Apply the anti-seize lubricant (supplied) to the threads ONLY of all the clamps and flange bolts. Failure to
follow this procedure can cause nuts to seize on clamps and potentially destroy threads. After applying anti-seize
lubricant, be sure to thoroughly clean your hands, as lubricant will tarnish stainless steel. All clamps should be
tightened using a properly calibrated Torque Wrench. Using an air impact gun will
damage the clamp and reduce its ability to effectively seal the joint. It may also
cause the joint to separate, thereby causing damage to your exhaust system and
to your vehicle.
NOTE: Align all clamps so that the center of the clamp bolt is 90 degrees from the
notch in the pipe. (See Fig. CLAMP)
1. Remove all exhaust system components from the shipping box, including clamps and hardware.
2. Locate the driver’s side muffler assembly and the front hanger removed during Step #10 of the removal
process. (Fig M) Slide the rubber grommet onto the front hanger of the muffler assembly. (Fig. N and P)
Note: The use of a soap and water solution may make it easier to install hangers.
3. Repeat Step #2 on the passenger’s side muffler.
4. Locate the rear hanger removed during Step #11 of the removal process. Slide the rubber grommet onto the
rear hanger of the muffler assembly. (Fig. Q and R)
Note: The use of a soap and water solution may make it easier to install hangers.
5. Repeat Step #4 on the passenger’s side muffler.
6. Locate one of the 80mm clamps. Slide it over the end of the expanded muffler inlet, noting the location of the
clamp’s bolt and the notches on the expansion. Be sure to have the bolt towards the inside of the car. (Fig. S)
Slide the expanded end of the muffler assembly over the cut end of the factory exhaust. (Fig. T) Do not tighten
the clamp at this time.
7. Locate one the nuts removed during Step #7 of the removal process. Using the 13mm deep socket, 6”
extension and ratchet, tighten the nut onto the front stud to secure the front hanger supporting the driver’s
side muffler. (Fig. U)
8. Repeat Step #7 on the passenger’s side muffler.
Exhaust System Installation
Axle Back Exhaust System
Dual Rear Exit w/ Twin 4” Pro-Series Tips
BMW F06, F12, F13 M6
PN 14929 & 14929BLK
9. Locate one of the nuts and one of the ground straps removed during Steps #4 and #9. Using the 13mm deep
socket, 3” extension and ratchet, secure the ground strap to the rear stud of the front hanger. Orient the strap
so that the eyelet is end is pointing towards the inside of the vehicle. (Fig. V)
10. Repeat Step #9 on the passenger’s side of the vehicle.
11. Using the ratchet and 1/2” deep socket, secure the ground strap to the stud on the muffler hanger using one of
the nuts supplied with the Corsa kit. (Fig. W)
12. Repeat Step #11 on the passenger’s side of the vehicle.
13. Locate one of the nuts removed during Step #5 of the removal process. Using the 13mm deep socket, 6”
extension, and ratchet, secure the rear hanger on the driver’s side muffler. (Fig. X and Y)
14. Repeat Step #13 on the passenger’s side of the vehicle.
15. Locate the driver’s side tip assembly and one of the 3” clamps. Install the clamp onto the tip assembly such that
the bolt is vertical with the nut towards the ground and the bolt is towards the outside of the car. Tighten the
clamp using the ratchet and 15mm deep socket until the tip assembly is snug on the muffler’s outlet pipe. (Fig.
Z and AA)
16. Using the 15mm deep socket and ratchet, snug the clamp on the inlet of the muffler. (Fig. BB)
17. Repeat Step #16 on the passenger’s side of the vehicle.
18. Adjust the system accordingly so that the tips are centered in the bumper valence. At this time, tighten all
clamps to 45ft-lbs using the torque wrench and 15mm socket. Take note when adjusting the system to
maintain a finger tip’s gap between the hanger and hanger bracket on the front hanger. (Fig. CC)
19. Reinstall the plastic splash guard using the fasteners retained from Step #1 of the removal process. The Torx
fasteners are used along the edge of the bumper while the hex head fasteners secure the guard along the
edges with two in the middle. (Fig. DD)
NOTE: During cold weather start-ups, you may experience an exhaust sound that is deeper and louder in
tone than usual. This is temporary and will diminish to normal levels once your engine has reached its
normal operating temperature.
NOTE: Immediately following the installation of your exhaust system, you may experience a trace of
smoke after initial start-up. DO NOT be alarmed. The smoke is caused by the burning of a small amount of
forming oil residue used in the manufacturing process.
Exhaust System Installation
Axle Back Exhaust System
Dual Rear Exit w/ Twin 4” Pro-Series Tips
BMW F06, F12, F13 M6
PN 14929 & 14929BLK
CORSA Installation Pictures
Fig. M Fig. N
Fig. P Fig. Q
Fig. R Fig. S
Exhaust System Installation
Axle Back Exhaust System
Dual Rear Exit w/ Twin 4” Pro-Series Tips
BMW F06, F12, F13 M6
PN 14929 & 14929BLK
CORSA Installation Pictures
Fig. T Fig. U
Fig. V Fig. W
Fig. X Fig. Y
Exhaust System Installation
Axle Back Exhaust System
Dual Rear Exit w/ Twin 4” Pro-Series Tips
BMW F06, F12, F13 M6
PN 14929 & 14929BLK
CORSA Installation Pictures
Fig. Z Fig. AA
Fig. BB Fig. CC
Fig. DD

This manual suits for next models

1

Popular Other manuals by other brands

Paradyne 9161 Single T1 user guide

Paradyne

Paradyne 9161 Single T1 user guide

Agrident AWR300 quick start guide

Agrident

Agrident AWR300 quick start guide

Konig & Meyer 14760 manual

Konig & Meyer

Konig & Meyer 14760 manual

IBM HS21 BLADECENTER - FOR SPECJBB2005 specification

IBM

IBM HS21 BLADECENTER - FOR SPECJBB2005 specification

Blue Ox BX3763 installation instructions

Blue Ox

Blue Ox BX3763 installation instructions

Spectracom VelaSync 1232 user manual

Spectracom

Spectracom VelaSync 1232 user manual

SEA Praha GSM-R4-DIN manual

SEA Praha

SEA Praha GSM-R4-DIN manual

Land Pride WC1503 Operator's manual

Land Pride

Land Pride WC1503 Operator's manual

Ahlborn ALMEMO 500 Supplementary instructions manual

Ahlborn

Ahlborn ALMEMO 500 Supplementary instructions manual

LG KG375 user guide

LG

LG KG375 user guide

Go Rhino 55185 installation instructions

Go Rhino

Go Rhino 55185 installation instructions

ReelCraft 4000 Series operating instructions

ReelCraft

ReelCraft 4000 Series operating instructions

Hubbell S1R6 Series installation instructions

Hubbell

Hubbell S1R6 Series installation instructions

Bosch TR2000 Series Installation and operating instructions

Bosch

Bosch TR2000 Series Installation and operating instructions

Drester Boxer Quattro Combo DB44C Operation manual

Drester

Drester Boxer Quattro Combo DB44C Operation manual

Windowmate WM1000-CT Series manual

Windowmate

Windowmate WM1000-CT Series manual

Sole Digital Liftlog XL Installation and user manual

Sole Digital

Sole Digital Liftlog XL Installation and user manual

SMART Board 3000i operating instructions

SMART Board

SMART Board 3000i operating instructions

manuals.online logo
manuals.online logoBrands
  • About & Mission
  • Contact us
  • Privacy Policy
  • Terms and Conditions

Copyright 2025 Manuals.Online. All Rights Reserved.