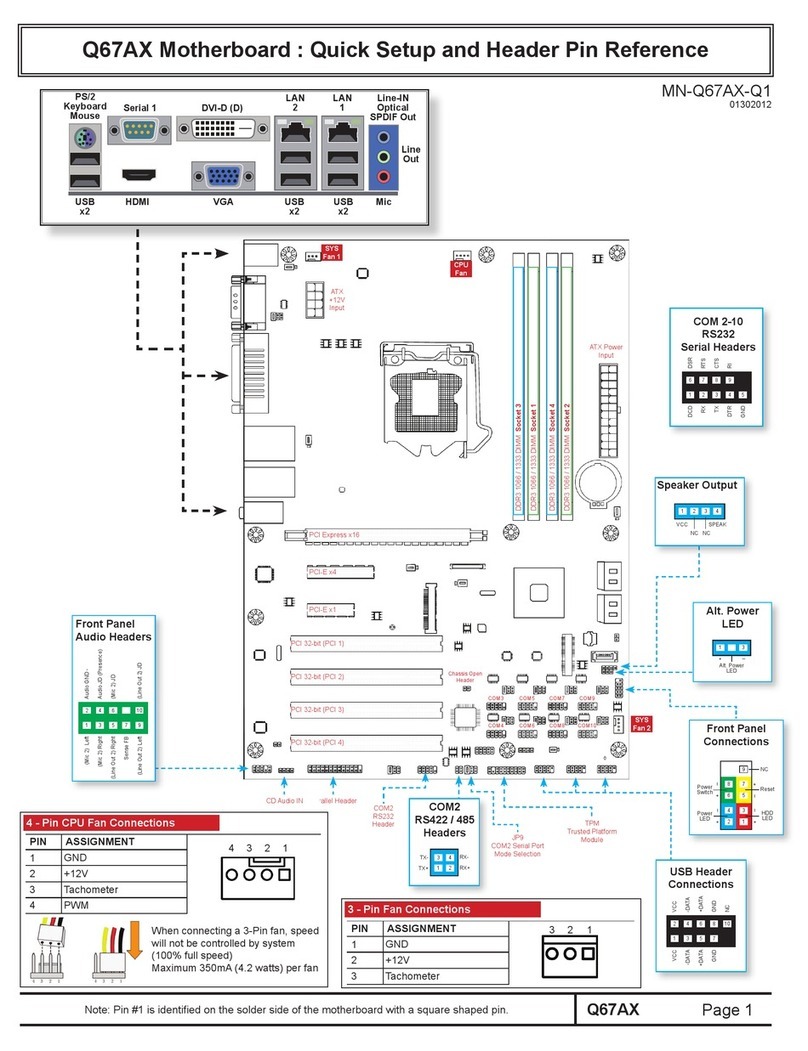
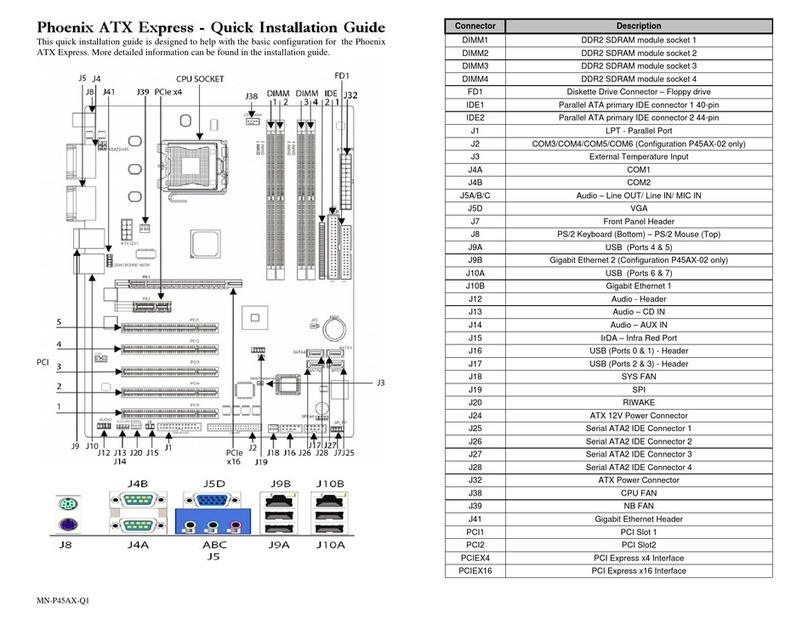
Corvalent C23AX User manual

+
C236AX USER MANUAL
Part Number: C23AX

2
Table of Contents
REVISION HISTORY ................................................................................................................. 4
PREFACE 5
SAFETY PRECAUTIONS WARNING!....................................................................................... 6
Static Electricity Warning! ..................................................................................................................... 6
FCC Notice ........................................................................................................................................... 6
CE Notice ............................................................................................................................................. 6
Conventions Used in this Manual ......................................................................................................... 6
CHAPTER 1 TECHNICAL SPECIFICATIONS ..................................................................... 7
Embedded Processor (1151 LGA package) ........................................................................................ 7
Non-Embedded Processors ................................................................................................................. 7
Chipset ................................................................................................................................................. 7
Peripheral Chips ................................................................................................................................... 8
System Memory .................................................................................................................................... 8
BIOS ..................................................................................................................................................... 8
Embedded I/0 ....................................................................................................................................... 8
Miscellaneous ....................................................................................................................................... 9
Power connectors ................................................................................................................................. 9
Fan Headers ......................................................................................................................................... 9
Form Factor and Dimensions ............................................................................................................... 9
Environmental Requirements ............................................................................................................. 10
CHAPTER 2 HARDWARE CONFIGURATION ...................................................................11
Handling Precautions ......................................................................................................................... 11
Jumper Locations ............................................................................................................................... 12
Header Locations ............................................................................................................................... 13
Connector Locations........................................................................................................................... 14
Setting the Jumpers............................................................................................................................ 17
Jumpers .............................................................................................................................................. 18
Headers .............................................................................................................................................. 20
Connectors ......................................................................................................................................... 33
Installing Memory ............................................................................................................................... 39
Installing CPU ..................................................................................................................................... 40
Installing HEAT SINK/FAN ................................................................................................................. 41
Installing FAN(s) ................................................................................................................................. 41
Installing Power Cables ...................................................................................................................... 41
Back Panel Connections .................................................................................................................... 42
CHAPTER 3 AMIBIOS SETUP ...........................................................................................43
BIOS Boot Sequence ......................................................................................................................... 43
Starting BIOS Setup ........................................................................................................................... 43
BIOS Setup Main Menu ...................................................................................................................... 44
Main Setup ......................................................................................................................................... 47
Advanced BIOS Setup ....................................................................................................................... 48
Chipset Setup ..................................................................................................................................... 56
Security Setup .................................................................................................................................... 60
Boot Setup .......................................................................................................................................... 61
Save & Exit Menu ............................................................................................................................... 63
3
APPENDIX A TECHNICAL SUMMARY ...............................................................................64
System Memory Map.......................................................................................................................... 64
Interrupt Map ...................................................................................................................................... 65
Graphics Features .............................................................................................................................. 66
APPENDIX B FLASH BIOS PROGRAMMING .....................................................................67
How to Reflash the BIOS ................................................................................................................... 67
APPENDIX C EFI BIOS AND POST CODES .......................................................................68
Checkpoint Ranges ............................................................................................................................ 68
Standard Checkpoints ........................................................................................................................ 69
APPENDIX D SATA INTERFACES .....................................................................................77
RAID 0 ................................................................................................................................................ 77
RAID 1 ................................................................................................................................................ 77
RAID 10 .............................................................................................................................................. 78
RAID 5 ................................................................................................................................................ 78
Loading the Intel Rapid Storage Technology RAID Driver ................................................................. 79
APPENDIX E TERMINOLOGY ............................................................................................80

4
Revision History
Revision Revision History Date
01 First Release 09/27/16
Notice
The company reserves the right to revise this publication or to change its contents without notice.
Information contained herein is for reference only and does not constitute a commitment on the part
of the manufacturer or any subsequent vendor. They are in no way responsible for any loss or
damage resulting from the use (or misuse) of this publication.
This publication and any accompanying software may not, in whole or in part, be copied,
photocopied, translated or reduced to any machine readable form without prior consent from the
vendor, manufacturer or creators of this publication, except for copies kept by the user for backup
purposes.
Brand and product names mentioned in this publication may or may not be copyrights and/or
registered trademarks of their respective companies. They are mentioned for identification purposes
only and are not intended as an endorsement of that product or its manufacturer.
August 2016

5
Preface
Thank you for your purchase of the C23AX industrial embedded motherboard. This design was
based on the Intel® C236 (Skylake) chipset and the v5 generation Intel XEON single processor
family providing the ideal platform to industrial applications that require low power and high
performance. With proper installation and maintenance, your board will provide years of high
performance and trouble free operation.
This manual provides a detailed explanation into the installation and use of the C23AX industrial
embedded motherboard. It is written for the novice PC user/installer. However, as with any major
computer component installation, previous experience is helpful and should you not have prior
experience, it would be prudent to have someone assist you in the installation.

6
Safety Precautions Warning!
Static Electricity Warning!
The C23AX motherboard has been designed as rugged as possible but can still be damaged if jarred
sharply or struck. Handle the motherboard with care.
It contains delicate electronic circuits that can be damaged or weakened by static electricity. Before
removing the board from its protective packaging, it is strongly recommended that you use a
grounding wrist strap. The grounding strap will safely discharge any static electricity build up in your
body and will avoid damaging the motherboard. Do not walk across a carpet or linoleum floor with
the bare board in hand.
FCC Notice
This equipment has been designed to comply with the limits for a Class B digital device, pursuant to
part 15 of the FCC Rules. These limits are designed to provide reasonable protection against
harmful interference when the equipment is operated in a commercial environment. This equipment
generates, uses, and can radiate radio frequency energy and, if not installed and used in accordance
with the instruction manual, may cause harmful interference to radio communications. Operation of
this equipment in a residential area is likely to cause harmful interference in which case the user will
be required to correct the interference.
You are cautioned that any change or modifications to the equipment not expressly approved by the
party responsible for compliance could void your authority to operate such equipment.
CE Notice
This equipment has been designed to comply with CE. In a domestic environment this product may
cause radio interference in which case the user may be required to take adequate measures.
Conventions Used in this Manual
Notes - Such as a brief discussion of memory types.
Important Information - such as static warnings, or
very important instructions.
When instructed to enter keyboard keystrokes, the
text will be noted by this graphic.

7
Chapter 1 Technical Specifications
The C23A is a long-life industrial motherboard with multi-core processor technology and PCI Express
2.0 and 3.0 support. Powered by the Intel® C236 chipset (Skylake), the C23AX motherboard was
designed specifically for embedded applications such as Medical, Security, Imaging, Industrial
Automation, and Manufacturing that require a smaller, compact footprint with ECC memory support.
Embedded Processor (1151 LGA package)
Intel® Xeon™ E3-1275 v5 3.60GHz, 4 core/ 8 threads, 8M cache, 80W
Intel® Xeon™ E3-1225 v5 3.30GHz, 4 core/ 4 threads, 8M cache, 80W
Non-Embedded Processors
For additional supported processors, please contact your Sales Representative.
Chipset
GL82C236 PCH
Four DDR4 2133MHz DIMM sockets
Up to 64GB of ECC memory
Intel® Integrated Graphics.
One HDMI port at 3840x2160@30Hz
One DisplayPort v1.2 at 4096x2304@60Hz
One VGA Port at 2560x1600@60Hz
Six SATAIII 6Gb/s ports with Intel® Rapid Storage
Technology RAID support (0, 1, 5 and 10)
Intel® AMT 11.0 support
Multi-monitor support

8
Peripheral Chips
Nuvoton NCT6106D SIO chip Six full handshake COM ports, COM2 configurable
to RS-232C, RS-422 or RS-485
PS/2 keyboard and mouse connector and header
Hardware voltage monitor /CPU temp. monitor
Watchdog timer
PWM fan control outputs / tachometer inputs
CPU thermal diode monitoring
ITE IT8892E PCI-Express to PCI bridge
System Memory
Four DIMM sockets, supporting up to 64GB of unbuffered ECC DDR4 memory.
BIOS
AMI UEFI BIOS 128Mb SPI
Embedded I/0
Serial Ports (6) 6 full handshake RS232 serial ports
COM2 configurable to RS-232C, RS-422 and
RS485
USB Interfaces (12) 4 USB3.0 ports on back I/O (blue)
2 USB3.0 ports on 2x10 20-pin header
2 USB2.0 ports on back I/O (black)
2 USB2.0 ports on 2x5 10-pin headers
1 USB2.0 port on 1x5 pin header
1 USB2.0 port connector
Keyboard/Mouse Header Combined PS/2 Keyboard and mouse
Video Support DisplayPort connector on back I/O
HDMI connector on back I/O
VGA connector on back I/O
Audio ALC892 with 6W amplifier 6 channel HD Audio codec
Line-in, Line-out, MIC stacked connector and front
panel audio header

9
Intel i211AT Gigabit Ethernet PCI-E Gigabit Ethernet controller
10/100/1000 Mbps full and half duplex operation
Intel i219-LM Gigabit Ethernet PCH Integrated Gigabit Ethernet controller
10/100/1000 Mbps full and half duplex operation
SLB9665
TPM2.0
Miscellaneous
CMOS/Battery RTC integrated in PCH
CR2032 lithium battery or equivalent
Watchdog Timer Reset: 1~65535 sec./min and 1 min./step
Expansion 1x PCI Express x16 Slot
1x PCI Express x4 Slot
1x PCI Express x1 Slot
4x PCI 32bit Slots
1x mSATA connector
1x SIM card slot
1x M.2 2230 slot
Power connectors
24 pin ATX power connector (compatible with 20 pin connector)
8 pin 12V power connector
Fan Headers
CPUFAN – 4 pin header (PWM)
SYSFAN1 – 4 pin header (compatible with 3-pin)
SYSFAN2 – 4 pin header (compatible with 3-pin)
Form Factor and Dimensions
12.0" x 9.6" (305mm x 244mm)

10
Environmental Requirements
RoHS compliant assembly
CATEGORY OPERATING NON-OPERATING
TEMPERATURE 0C to 60C -40C to 70C
HUMIDITY 0 to 90% non-condensing 5 to 95% @ 40C non-
condensing

11
Special Warranty Note:
Products returned for warranty repair will be inspected for damage caused by
improper installation and misuse as described in the previous section and the static
warning below. Should the board show signs of abuse, the warranty will become void
and the customer will be billed for all repairs and shipping and handling costs.
Chapter 2 Hardware Configuration
This chapter provides all the necessary information for getting the C23AX ready to use. Topics
discussed include installing the DRAM and jumper settings.
Handling Precautions
The C23AX has been designed to be as rugged as possible but it can be damaged if dropped, jarred
sharply or struck. Damage may also occur by using excessive force in performing certain installation
procedures such as forcing the system board into the chassis or placing too much torque on a
mounting screw.
Take special care when installing or removing the system memory DIMMs. Never force a memory
into a socket. Screwdrivers slipping off a screw and scraping the board can break a trace or
component leads, rendering the board unusable. Always handle the C23AX with care.
Static Warning
The C23AX contains delicate electronic semiconductors that are highly sensitive to static electricity.
These components, if subjected to a static electricity discharge, can be weakened thereby reducing
the serviceable life of the system board. BEFORE THE BOARD IS REMOVED FROM ITS
PROTECTIVE ANTISTATIC PACKAGING, TAKE PROPER PRECAUTIONS! Work on a conductive
surface that is connected to the ground. Before touching any electronic device, ground yourself by
touching an unpainted metal object or, and highly recommended, use a grounding strap.

12
Jumper Locations
JRI1
JCMOS1
JRI2
JATATX1

13
Header Locations
JKBMS1
JCOM5
JAUXP1
SYSFAN1
JCOM6
CPUFAN1
JCOM4
JAUDIO1
JCOM3
JCOM2A
JBAT1
JCOM2B
JFP1
JGSPIO1
JSMB1
JSPDIF1
JSPI1
JSPK1
JUSB1
JUSB2
JUSB4
JLPC1
LPT1
SYSFAN2
JGPIO1

14
Connector Locations
ATX12V1
JSIM1
JUSB3
ATXPWR1
PCI1
PCIE3
PCIE2
PCIE1
PCI2
PCI3
PCI4
AUDIO1
LAN1
LAN2
VGA1/DP1
COM1/HDMI
PSUSB1
NGFF1
MPCIE1
CPU1
DIMMs
SATA2/1
SATA4/3
SATA6/5

15
Jumpers, Connectors and Headers Quick Reference Table
Jumpers Name Description
JATATX1 AT/ATX Power Mode Selection 3x1 header, pitch 2.00mm
JCMOS1 CMOS Reset 3x1 header, pitch 2.54mm
JRI1 COM1 RI Function Selection 3x2 header, pitch 2.00mm
JRI2 COM2 RI Function Selection 3x1 header, pitch 2.00mm
Header Name Description
CPUFAN1 Processor Fan header (PWM) 4x1 header, pitch 2.54mm
JAUDIO1 Front Panel AUDIO header 5x2 header, pitch 2.54mm
JAUXP1 Auxiliary Panel connector 10x2 header, pitch 2.54mm
JBAT1 External Battery 2x1 wafer, pitch 1.25mm
JCOM2A Serial Port 2 header 5x2 header, pitch 2.54mm
JCOM2B Serial Port 2 RS-422/RS-485 header 3x2 header, pitch 2.00mm
JCOM3/COM4/COM5/COM6 Serial Port headers 5x2 header, pitch 2.54mm
JDIO1 GPIO header 5x2 header, pitch 2.54mm
JFP1 Front Panel header 5x2 header, pitch 2.54mm
JKBMS1 PS/2 Keyboard/Mouse header 6x1 wafer, pitch 2.54mm
JSGPIO! SGPIO header 3x2 header, pitch 2.00mm
JSMB1 SMBUS header 5x1 header, pitch 2.54mm
JSPDIF1 S/PDIF header 4x1 header, pitch 2.54mm
JSPI1 SPI header 4x2 header, pitch 2.00mm
JSPK1 Speaker header 4x1 header, pitch 2.00mm
JUSB1 USB3.0 header 10x2 header, pitch 2.00mm
JUSB2 USB2.0 header 5x1 header, pitch 2.54mm
JUSB4 USB2.0 header 5x2 header, pitch 2.54mm
JLPC1 LPC header 5x2 header, pitch 2.00mm
LPT1 Parallel Port header 13x2 header, pitch 2.54mm
SYS_FAN1 System Fan header 4x1 header, pitch 2.54mm
SYS_FAN2 System Fan header 3x1 header, pitch 2.54mm

16
Connector Name Description Type
ATXPWR1 ATX Power Connector 12x2 connector
ATX12V1 ATX 12V Connector 4x2 connector
AUDIO1 Line-out/Line-in/Microphone 3 phone Jack
COM1 Serial Port connector DB-9M
CPU1 Processor Socket 1151 pin LGA socket
DIMM DDR4 DIMM memory sockets 288 pin
DP1 DisplayPort
HDMI1 HDMI connector
JUSB3 USB2.0 Single USB-A
JSIM1 SIM card slot
LAN1 NIC1 stacked with dual USB3.0 Stacked RJ-45
LAN2 NIC2 stacked with dual USB3.0 Stacked RJ-45
MPCIE1 Full/Half size miniPCIe connector
NGFF1 M.2 module slot M.2 2230
PCIE1 PCI Express x16
PCIE2 PCI Express x1
PCIE3 PCI Express x4
PCI1 32bit PCI slots
PCI2 32bit PCI slots
PCI3 32bit PCI slots
PCI4 32bit PCI slots
PSUSB1 PS/2 Keyboard/Mouse with USB2.0
SATA1~6 Shrouded Serial ATAIII Connectors
VGA1 Analog VGA connector DB-15

17
Setting the Jumpers
Jumper Types
Jumpers or headers are small pins attached to the system board. Covering two pins with a shunt
closes the connection between them. The C23AX examines these jumpers to determine specific
configuration information. There are two different categories of jumpers on the C23AX.
A. Two pin jumpers are used for binary selections such as enable, disable. Instructions for this type
of jumper are open, for no shunt over the pins or closed, when the shunt covers the pins.
B. Three or four pin jumpers are used for multiple selections. Instructions for these jumpers will
indicate which two pins to cover. For example: for JP1 2-3 the shunt will be covering pins 2 and 3
leaving pin 1 exposed.
How to identify pin number 1 on Figure: Looking to the solder side (The board side with fewer
components) of the PCB (Printed Circuit Board), pin number 1 will have a squared pad. Other pins
will have a circular pad. They are numbered sequentially.
Double row jumpers are numbered alternately, i.e. pin number 2 is in the other row, but in the same
column of pin number 1. Pin number 3 is in the same row of pin 1, but in the next column and so
forth.

18
2-3: Clear CMOS
1-2: Normal
1
3
1
3
2-3: ATX
1-2: AT
1
3
1
3
Jumpers
Use the diagram below and the tables on the following pages to locate and set the on-board
configuration jumpers.
JATATX1: AT/ATX Power Mode Selection
JCMOS1: Clear CMOS

19
JRI1: COM1 RI Function Selection
3-4 closed : +5V
1
1-2 closed: RI
1
1
5-6 closed : +12
V
JRI2: COM2 RI Function Selection
3-4 closed : +5V
1-2 closed: RI
5-6 closed : +12
V

20
Headers
Use the diagram below and the tables on the following pages to locate the headers.
CPUFAN1: Processor Fan header (PWM)
PIN ASSIGNMENT
4 1
4 PWM
3 Tachometer
2 12V
1 GND
JAUDIO1: Front Panel AUDIO header
PIN ASSIGNMENT PIN ASSIGNMENT
9 1
10 2
1 MIC-L 2 GND
3 MIC-R 4 ACZ_DET#
5 LINE-OUT-R 6 MIC_Sense
7 NC 8 Key
9 LINE-OUT-L 10 LINE_Sense
This manual suits for next models
2
Table of contents
Other Corvalent Motherboard manuals

Corvalent
Corvalent Phoenix ATX Express User manual

Corvalent
Corvalent Q35SBC User manual

Corvalent
Corvalent C246AX User manual

Corvalent
Corvalent Q67AX Specification sheet

Corvalent
Corvalent ATX User manual

Corvalent
Corvalent Gator 550-G User manual

Corvalent
Corvalent H61SB User manual

Corvalent
Corvalent Q77AX User manual

Corvalent
Corvalent Gator Mini-ITX User manual