Thank you for purchasing our product. In order to ensure safety and
better performance, please carefully read this manual before use.
User Manual
Specification
1
2
3
4
5
6
4
1
8
2
3
5
7
6
Nail drill handpiece x 1
Drill bit x 11
Sanding band x 25
Cleaning brush x1
Charging cable x 1
Storage pouch x 1
Model
Rated input
Rated working power
Battery capacity
Charging time
Working time
BK-A08
5V2A (MAX)
10W (MAX)
3.7V/400mAh
1.5 hours
2-4 hours
Package List
Drill Bit Instructions Preparation Before Use
Drill Bit Installation
Cleaning and Maintenance
FAQ
Warning
Instructions
Long Cone Bit Safety Bit Needle Bit
To polish nail
sidewalls and cuticles
For removing bulge
parts on nail surfaces
and nail polishing
For nail carving and
nail corner filing
Large Barrel Bit Mandrel with
Sanding Band
Short Cone Bit
For polishing hard and
rough nails
For buffing nail
surfaces, removing nail
polish & acrylic nails
For removing
calluses around the
nail edges
Small Barrel Bit Barrel Bit Umbrella Top Bit
For polishing nail
surfaces and remove
calluses
For buffing nail
surfaces and removing
nail polish & acrylic
nails
Felted Wool Bit Coarse Disc Bit
For polishing and
exfoliating the edges
after cutting nails
For polishing and
cleaning debris on nail
surfaces
For polishing the nail
surface for a
smoother feeling
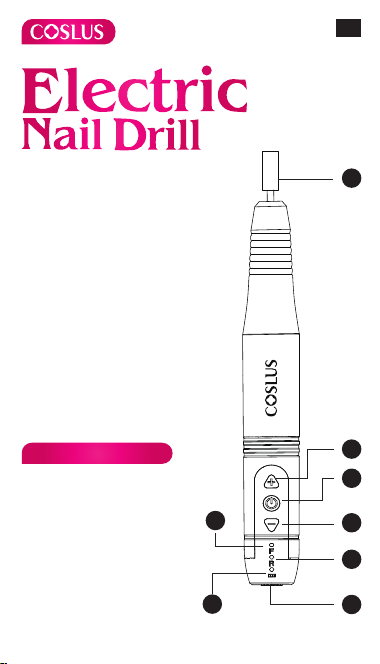
Product Overview
1. “+” button (speed up)
2. Switch button
3. “-” button (speed down)
4. Forward indicator (clockwise)
5. Reverse indicator
(counterclockwise)
6. Battery indicator
7. Charging port
8. Drill bit
1. Device charging: connect type-C cable to the device and
adapter(not included in the package). During charging, battery
indicator flashes red when battery power is low, and flashes green
when it’s charged to more than 30%. When fully charged, battery
indicator keeps steady green.
2. When battery power is too low, battery indicator will flash red,
and automatically shut down after flashing for 10s.
3. It takes about 1.5 hours for the device to be fully charged, and it
can work continuously for about 2-4 hours after fully charged.
1. Hold the handpiece in one hand and the drill bit in the other hand.
2. Insert into or pull out the drill bit firmly.
1. Choose different drill bits according to different needs, and
install the drill bits to connecting shaft at the tip of handpiece until
it is fixed in place.
2. Power on: press and hold switch button for 2s, the device is
turned on, green battery indicator lights up, the motor starts
rotating, orange reverse or forward indicator lights up.
3. Switch rotation direction: under power-on state, press switch
button twice quickly to change the rotation direction, orange
forward indicator means it is rotating forward, orange reverse
indicator means it is rotating reversely.
4. Speed up: short press “+” button, the motor will be accelerated
after pressing this button.
5. Speed down: short press “-” button, the motor will be
decelerated after pressing this button.
6. Pause: short press switch button when the device is turned on,
the device suspends work, reverse/forward indicator goes out.
And if there is no operation within 120s, the device will be turned
off automatically.
7. Power off: long press switch button to turn off the device, or
press switch button to pause, the device will automatically be
turned off after 120s.
8. Operate while charging: the device can be turned on and
operated during charging, or fully charge it before use.
9. Locked rotor control: when the dill bit is in contact with relatively
hard surfaces, if the load is not released in time, the device will
automatically shut down after 10s.
Q: The product does not work.
A: 1. Check if the product needs to be charged and if the product
is in suspended state.
2. Check whether the product is damaged. Falling may cause
deformation of drill hole, or even cause parts inside the handpiece
breaking. Please try to prevent falling to avoid damage.
3. Accumulation of excessive nail dust in power hole and the
device, or accumulation of nail polish at the switch button will
affect the normal operation.
4. Washing with water will cause internal parts to rust and not
work properly. Recommended to clean the device with cleaning
brush after each use.
Q: The product cannot use replacement drill bit.
A: Ensure whether the diameter of dill bit is too large to fit in.
Q: The product has power, but it shuts down automatically.
A: Surfaces that the drill bit touches are too hard. It is
recommended to increase rotating speed or operate on suitable
surfaces.
1. Before starting cleaning the device, make sure it is powered off.
2. Do not immerse the device in water, accessories that can be
disassembled shall be cleaned separately.
3. Use a clean cloth or a wrung-out wet cloth to clean the device
surfaces.
4. Do not use any lubricants, cleaners, polishes, or air fresheners on
this device.
1. Do not store this product for a long time in humid or
high-temperature environment. If it is not used for a long time, please
store the product after it is fully charged.
2. Do not throw this product together with household waste, it should
be handed over to designated recycling center according to local law
and regulation.
3. The following people are not suitable to use this product: children,
diabetic, those who have skin inflammation on fingers or toes,
allergies, physical sensory or mental disabilities.
4. Please stop using immediately and consult the doctor in time if you
feel comfortable.
5. The product is only for nail drilling, do not use for any other
purposes.
6. Do not disassemble, repair or transform this product by yourself.
Insert Pull
-01- -02- -03- -04- -05- -06-
EN
3
4 5
6
1
2
Whatsapp
Note: If there is any technical improvement in the product, we will
make a new version of the manual without notice. The product
appearance and color may vary according to different version,
please refer to the actual product received.