Covaris E220-plus Manual

E220 & LE220 (-plus, R-plus, Rsc)
Setup & Instrucon Manual
Instrument and Soware Developed for High-performance
Sample Preparaon using Adapve Focused Acousc® (AFA®) Energy
For Research Only
Model Numbers: E220-plus, E220R-plus, LE220-plus, LE220R-plus, and LE220Rsc | Soware: SonoLab®10.2
Covaris
E220 & LE220 (-plus, R-plus, Rsc) Setup & Instrucon Manual Part Number: 010521 Rev B | May 2021

2
Covaris
E220 & LE220 (-plus, R-plus, Rsc) Setup & Instrucon Manual Part Number: 010521 Rev B | May 2021
UNIVERSAL PRECAUTIONS
Universal Precauons should be followed on all specimen samples, regardless of whether a sample is known to contain
an infecous agent. Laboratories handling specimen samples are advised to comply with applicable parts of the following
government and clinical standards, or their equivalent in the country of use:
• Centers for Disease Control (CDC), Universal Precauons for Prevenon of Transmission of HIV and Other Bloodborne
Infecons, published 1987, updated 1996
• Clinical and Laboratory Standards Instute (CLSI), GP17-A3 Clinical Laboratory Safety; Approved Guideline - Third
Edion, published 2012, ISBN 1-56238-797-9 (Print), ISBN 1-56238-798-7 (Electronic)
• Clinical and Laboratory Standards Instute (CLSI), M29-A4 Protecon of Laboratory Workers from Occupaonally
Acquired Infecons; Approved Guideline, Fourth Edion, published 2014, ISBN 1-56238-961-0 (Print), OSBN
1-56238-962-9 (Electronic)
• Occupaonal Safety and Health Administraon (OSHA), 29 CFR 1910.1030 Bloodborne Pathogens
• Internaonal Standards Organizaon (ISO) 15190:2003, Medical Laboratories – Requirements for Safety
Trademarks
Patented or patent pending and registered or registraon-pending trademarks of Covaris are protected.
Registered names and trademarks used in this document, even when not specically marked as such, are not to be considered
unprotected by law.
WCS and AFA are either registered trademarks or trademarks of Covaris, Inc. in the United States and/or other countries.
Teon is a registered trademark of The DuPont Company.
Informaon subject to change without noce
For Research Use Only (RUO)
Not for use in Diagnosc Procedures
Product covered by Patent No. US6, 719,449, US6, 948,843, and other pending applicaons
2021© Covaris Inc., All Rights Reserved
Covaris, Inc.
14 Gill St, Unit H
Woburn, Massachuses
01801-1721 USA

3
Covaris
E220 & LE220 (-plus, R-plus, Rsc) Setup & Instrucon Manual Part Number: 010521 Rev B | May 2021
Warnings
For the Safety of Operang Personnel:
• Make sure that the equipment is properly grounded. DO NOT operate if it’s not properly grounded.
• The unit is equipped with a power plug appropriate for the desnaon country. DO NOT, under any circumstances, remove the
grounding prong from the power cord.
• DO NOT run an acousc treatment with the enclosure door OPEN or without a water bath - the acousc system will not work.
• If there is any indicaon that the Safety System is not funconing properly, DO NOT operate the equipment. Contact Covaris
Technial Support immediately if this occurs.
• If the equipment is used in a manner not specied by the manufacturer, the protecon provided by the equipment may be
impaired.
To Prevent Damage to the Equipment:
• The instruments are designed to operate in ambient laboratory condions e.g., 19 to 25 °C (66 to 77 °F). DO NOT operate the
instrument in a cold room environment. The system is designed to operate with a water bath and recirculang heater/chiller
apparatus to control sample temperature.
• NEVER run a method without water in the bath since this could cause damage to the transducer. The instrument is equipped
with a water level sensor to protect the transducer and degassing pump. The system will not allow the degassing pump to
operate or the acousc treatment to start unless an adequate volume of water is detected.
• Dislled or deionized water should be used to ll the water bath.
• Unless a Water Condioning System 2.0 (WCS) is acvely employed, empty the water bath and wipe it dry EVERY DAY with a
lint-free cloth. DO NOT leave water in the bath for an extended me since there is no water ltraon or water cleaning system
within the apparatus (unless WCS is employed).
• DO NOT employ isopropyl alcohol, ammonia-based or abrasive cleaners in the system, since these chemical soluons will
damage the acrylic surfaces.
• Establish a standard of operaon and test the equipment periodically, as described in the maintenance secon of this manual.
CAUTION: All AutoFill components have pressure rangs above Covaris’ specied maximum operang pressure which have
been extensively tested. However, if plant DI water is connected to the instrument, a catastrophic failure may result in
substanal plant water spillage. It is the end user’s responsibility to specify and implement appropriate containment/alarm
schema for their facility.

4
Covaris
E220 & LE220 (-plus, R-plus, Rsc) Setup & Instrucon Manual Part Number: 010521 Rev B | May 2021
Warranty
When used in accordance with wrien instrucon and under normal operang condions, the Covaris instruments are guaranteed
to be free of defects in MATERIAL and WORKMANSHIP for one (1) year from the date of original delivery by an authorized
representave. Any component proven defecve during the stated period will be repaired free of charge or replaced at the sole
discreon of Covaris, F.O.B., Woburn, Massachuses, U.S.A. provided that the defecve component is returned properly packaged with
all transportaon charges prepaid. The customer is expected to perform basic diagnoscs and component replacement via telephone
support from Covaris personnel. If Covaris personnel are required to perform on-site repair, all travel related costs are paid by the
customer. A limited warranty as specied may apply to certain components of the equipment.
Warranty Excepons
This warranty is void if failure of the soware or hardware has resulted from accidents, abuse, improper maintenance or repair, or by
misapplicaon from the customer. It is also void if damage is caused by any unauthorized aachments or if modicaons are made to
the equipment. Removing or tampering with the Safety Enclosure will void the warranty, and the customer will assume all liabilies.
This warranty is limited to the original purchaser and is not transferable.
The soware will perform according to the accompanying wrien materials and the medium on which the soware is delivered is
free of defects in materials under normal use and service. The warranty is void if damage has resulted from third party soware not
intended for use with the system.
The high-power focused transducer is designed to give maximal mechanical energy output in water. Permanent damage to the
transducer and electronic circuits could result if the transducer is operated without water. Operaon of the system without water in
the water bath voids the warranty.
Contact Covaris, Inc. if you have quesons or concerns pertaining to the use of our quipment.
Warranty Services
The purchased equipment is covered by a twelve (12) month warranty which includes all the necessary services and support necessary
so end users can successfully operate their equipment. Extended warranes are available at the end of the original 12 month warranty
period.
Services included with the original purchase of the system are:
Technical Support – Ongoing assistance with the operaon or applicaon of the equipment and/or troubleshoong is provided via:
• Telephone
- United States: Tel: +1 781.932.3959 during the hours of 9:00 a.m. to 5:00 p.m., Monday through Friday,
Eastern Standard Time/EST (UTC−05:00)
- Europe: Tel: 44 (0) 845 872 0100, during the hours of 9:00 a.m. to 5:00 p.m., Monday through Friday,
Greenwich Mean Time/GMT
Parts Replacement – Replacement of parts (excluding consumables) from normal operaon of equipment are provided on a priority
basis. All labor and shipping charges are included. Failure due to accident, abuse, or improper operaon is not covered.
This manual includes maintenance guidelines and troubleshoong ps.

5
Covaris
E220 & LE220 (-plus, R-plus, Rsc) Setup & Instrucon Manual Part Number: 010521 Rev B | May 2021
Table of Contents
1. Introducon................................................................................................................................................................................................................ 6
1.1 Overview of the User Manual ......................................................................................................................................................................... 6
1.2 E220-plus Focused-ultrasonicator ................................................................................................................................................................. 6
1.3 E220R-plus Focused-ultrasonicator............................................................................................................................................................... 6
1.4 LE220Rsc Focused-ultrasonicator.................................................................................................................................................................. 6
2. Installaon and Setup ............................................................................................................................................................................................... 7
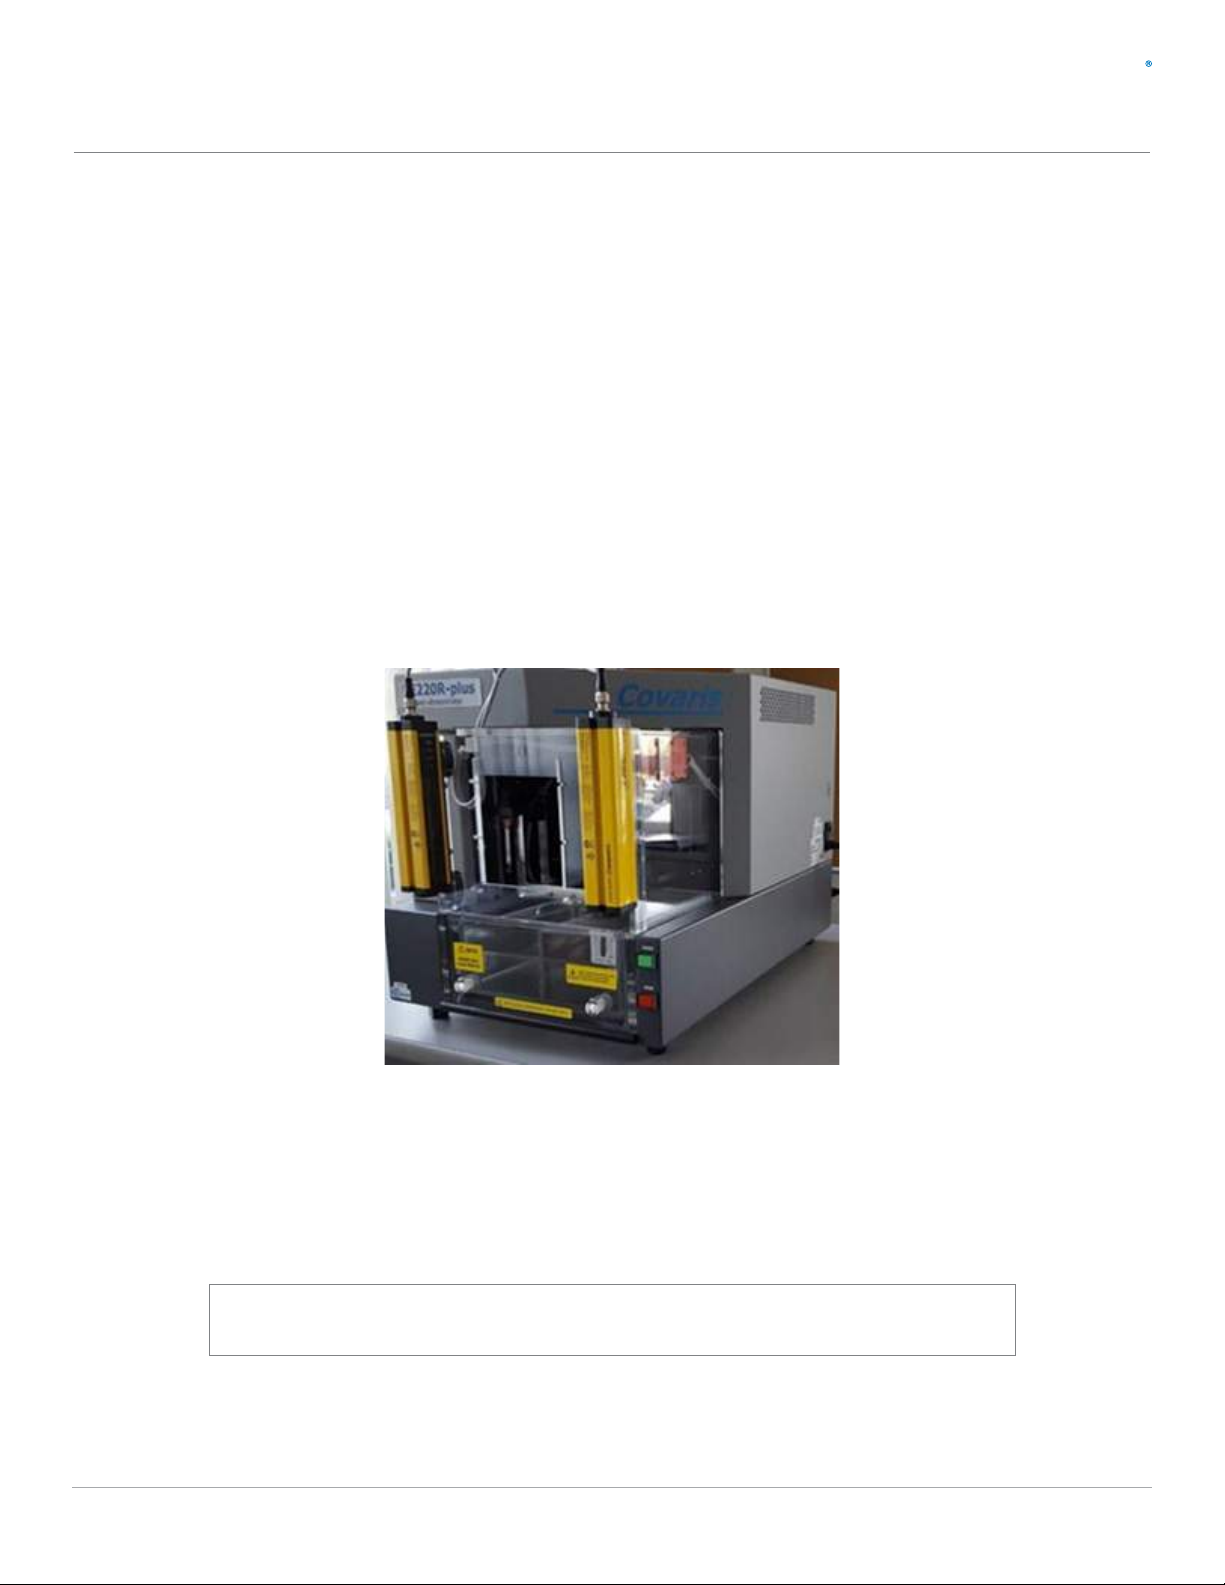
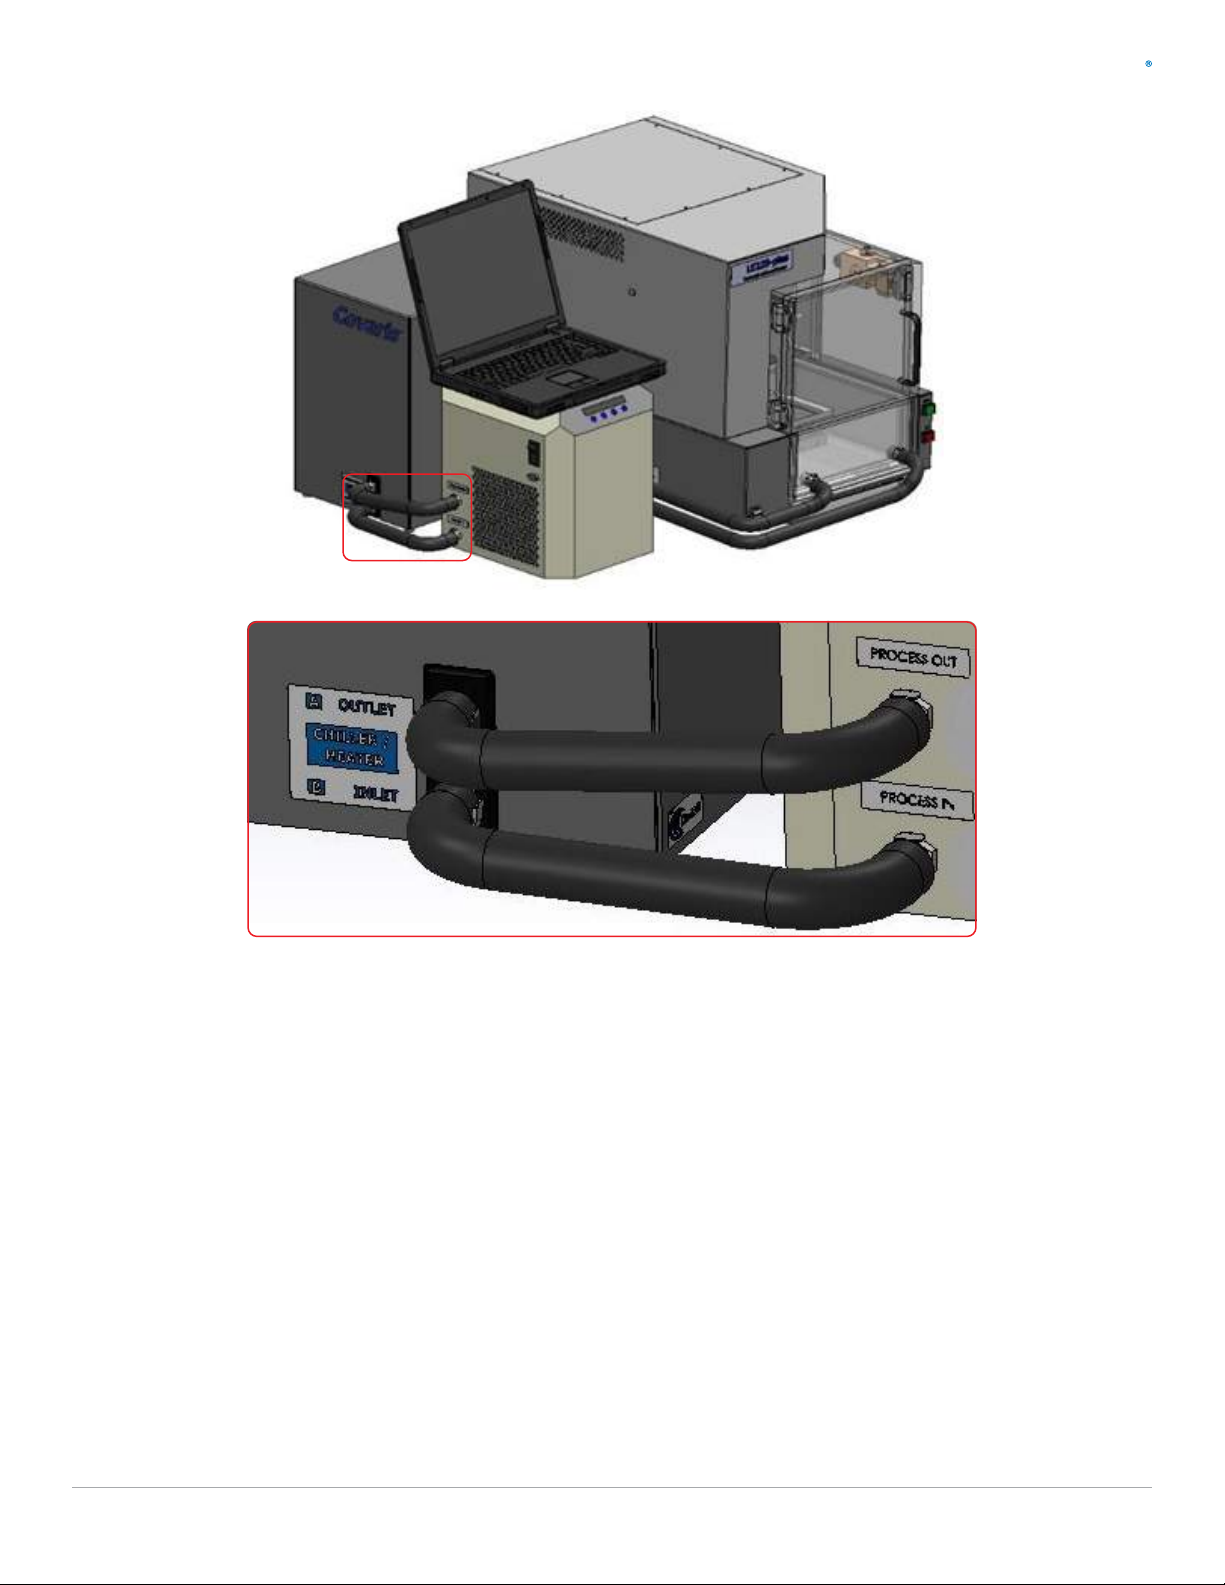
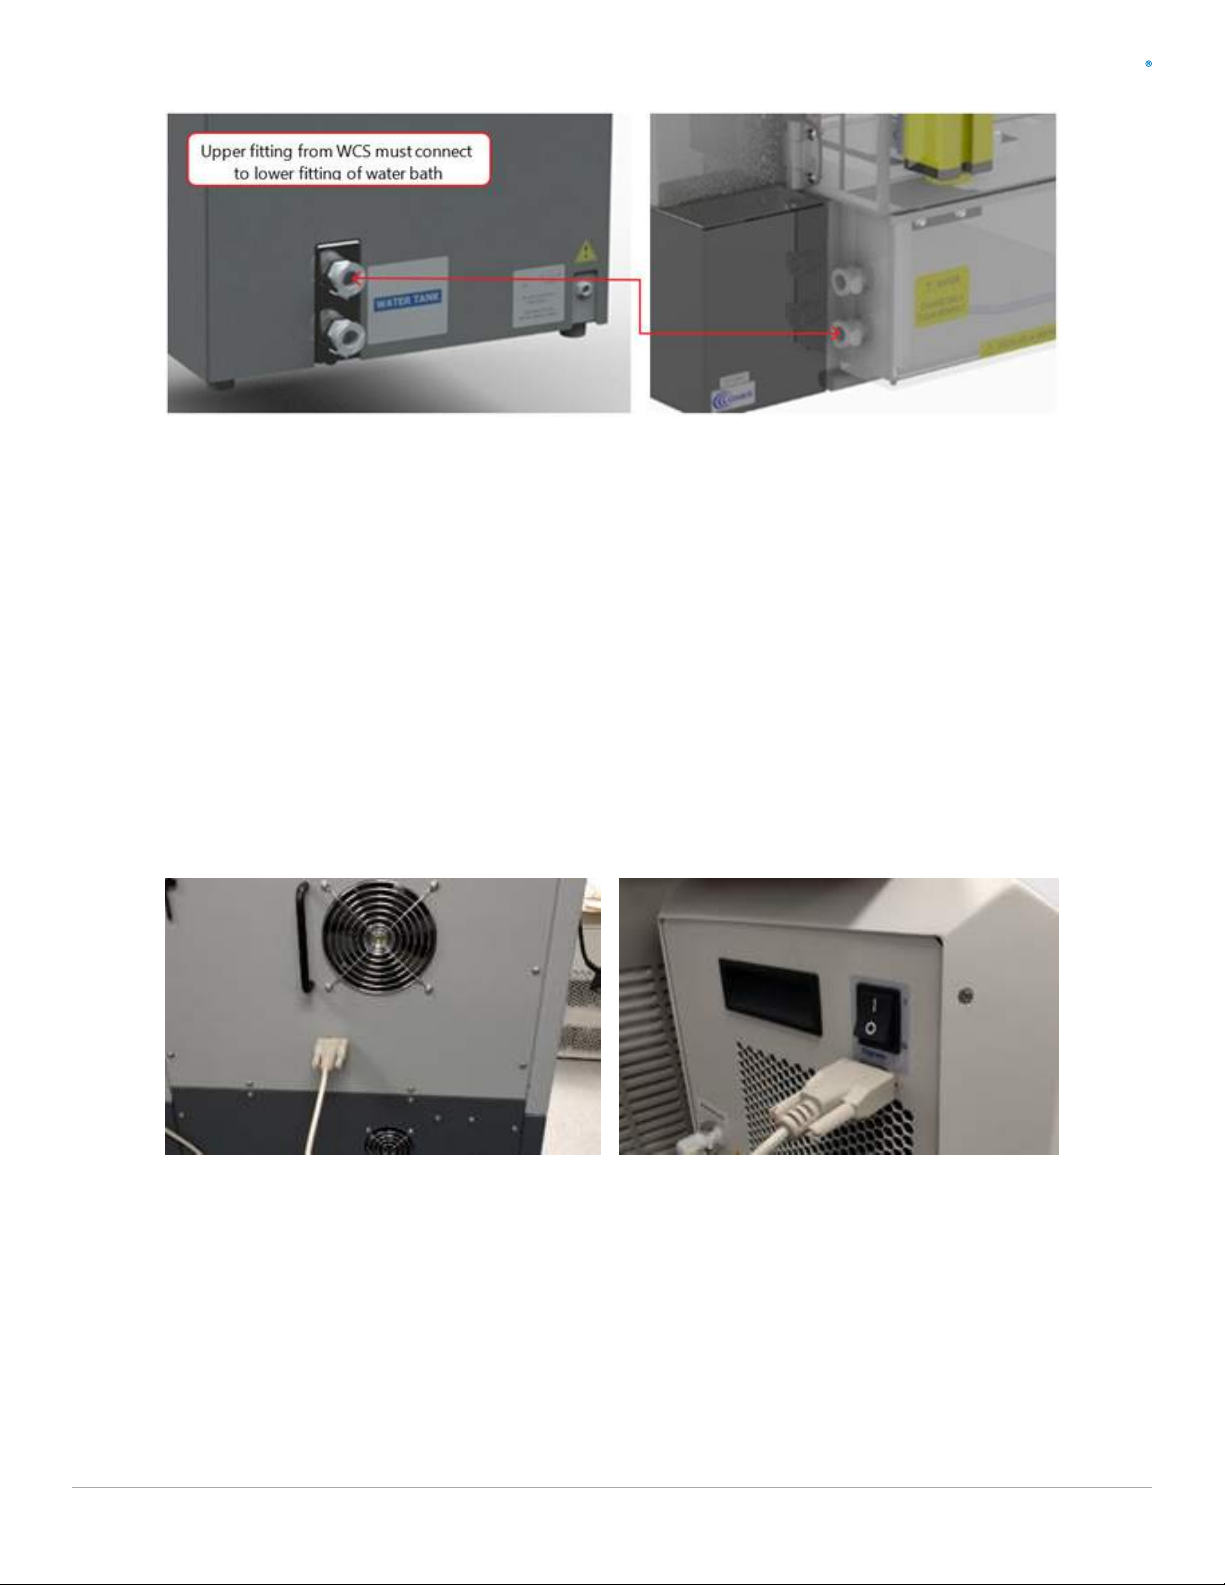
2.1 Assembly............................................................................................................................................................................................................. 7
3. Geng Started........................................................................................................................................................................................................... 11
3.1 Fill the Water Bath ............................................................................................................................................................................................ 11
3.2 Start the System ................................................................................................................................................................................................ 11
3.3 Preparing your System for Use........................................................................................................................................................................ 13
3.4 System Shutdown.............................................................................................................................................................................................. 16
4. AFA Operaon............................................................................................................................................................................................................ 17
5. SonoLab Soware...................................................................................................................................................................................................... 18
5.1 The Method Screen........................................................................................................................................................................................... 18
5.2 The Schedule Screen......................................................................................................................................................................................... 22
5.3 The History Screen............................................................................................................................................................................................ 24
5.4 The About Screen.............................................................................................................................................................................................. 25
5.5 The Admin Screen ............................................................................................................................................................................................. 26
6. Create and Edit Methods ......................................................................................................................................................................................... 30
6.1 Create a New Method ...................................................................................................................................................................................... 30
6.2 Using the Repeat Funcon .............................................................................................................................................................................. 36
6.3 Scanning Treatments (LE220Rsc Only) .......................................................................................................................................................... 39
6.4 Using Drag and Drop with Treatment Steps ................................................................................................................................................. 42
6.5 Modify Exisng Methods ................................................................................................................................................................................. 43
7. System Specicaons................................................................................................................................................................................................ 44
8. Maintenance............................................................................................................................................................................................................... 45
8.1 Cooling Air Intake .............................................................................................................................................................................................. 45
8.2 Water Bath.......................................................................................................................................................................................................... 45
8.3 Transducer........................................................................................................................................................................................................... 45
8.4 Safety System..................................................................................................................................................................................................... 46
8.5 Degassing System.............................................................................................................................................................................................. 46
8.6 Cleaning the System ......................................................................................................................................................................................... 46
8.7 Water Bath.......................................................................................................................................................................................................... 46
9. Troubleshoong ......................................................................................................................................................................................................... 48
10. Appendix................................................................................................................................................................................................................... 50
Appendix A: Using SonoLab Consumable-based Method Selecon................................................................................................................ 50
Appendix B: Using SonoLab Posion Restricons .............................................................................................................................................. 51
Appendix C: SonoLab 8.x Data Converter ........................................................................................................................................................... 53
Appendix D: E220 (-plus and R-plus) Series Site or Transport Preparaon ................................................................................................... 54
Appendix E: Installing SonoLab 10 Soware....................................................................................................................................................... 55
Appendix F: Humidity and Water Management for the Covaris E220-plus................................................................................................... 58
Appendix G: Connecng AutoFill to Plant Water ............................................................................................................................................... 59

6
Covaris
E220 & LE220 (-plus, R-plus, Rsc) Setup & Instrucon Manual Part Number: 010521 Rev B | May 2021
1.1 Overview of the User Manual
This manual contains the operaon and maintenance instrucons for the Covaris E220-plus, E220R-plus, LE220-plus, LE220R-plus,
and LE220Rsc Focused-ultrasonicators. This document contains informaon that is essenal to the proper use and care of your
equipment. Should any unforeseen problems occur with the normal operaon of the equipment, immediately contact your Covaris
Technical Support representave.
The following denions apply in this manual:
1.2 The E220- and LE220-plus Focused-ultrasonicator
The E220- and LE220-plus Focused-ultrasonicators are based on the Covaris Adapve Focused Acouscs (AFA) technology. These
instruments are designed to provide researchers with an integrated stand-alone tool to be used in a laboratory environment and are
ideal for those who work with ssue homogenizaon, cell lysis, DNA or chroman shearing, and other sample preparaon steps. The
E220-plus treats samples sequenally, one sample at a me. The LE220-plus treats a column of samples simultaneously.
This system is comprised of the:
• Treatment System which delivers the acousc energy to the sample
• Safety System which protects users from inadvertently contacng the high intensity acousc energy
• Computer and Applicaon Soware which provides an interface to control the device via the API
• Water Management System which consists of a cooler/heater and a UV treatment chamber with parculate lter to maintain
water quality in the instrument bath
1.3 The E220R- and LE220R-plus Focused-ultrasonicator
In addion to the features of the E220- and LE220-plus described above, the E220R- and LE220R-plus are designed to be integrated
with a sample handling robot in an automated work cell. The front door of the safety enclosure contains a cutout providing the robot
arm access to the inside of the instrument cabinet. The instrument presents the sample tray at the opening, and the robot arm loads
or unloads the sample through the opening. The instrument is controlled by custom soware built using the SonoLab 10 API Toolkit.
A light curtain has been added as an addional safety interlock. The light curtain is wired into a safety rated relay controller, the output
of which is connected to the Covaris controller board. If an operator reaches through the robot access opening while the system is
running, the motor power and acouscs are immediately disabled.
The light curtain consists of invisible, infrared light and an infrared detector. Beams of light on 14 mm spacing are transmied between
the source and detector. Blocking one or more beams of light will trigger the safety interlock system. Acouscs and moon will remain
paused unl the beams are unobstructed.
1.4 The LE220Rsc Focused-ultrasonicator
The LE220Rsc is an enhanced version of the LE220R-plus. In addion to the features of the LE220-plus and LE220R-plus, the LE220Rsc
contains an extended travel X axis moon stage. This longer travel stage allows treatment of 96 and 384 posion well plates using the
Covaris scanning treatment method. The scanning treatment method allows for connual AFA-treatment as the plate passes over the
transducer, without pausing between columns. The scanning speed and number of iteraons determines the total acousc dose.
1. Introducon
CAUTION: Equipment damage may occur.WARNING: Personal injury may occur.NOTE: Inconvenience if disregarded.

7
Covaris
E220 & LE220 (-plus, R-plus, Rsc) Setup & Instrucon Manual Part Number: 010521 Rev B | May 2021
2.1 Assembly
The following items should be found in the crate containing the instrument:
• Main unit
• Notebook computer with AC adapter
• Cables
- USB cable
- Instrument power cord
- Computer AC adapter power cord
• Accessories
- AFA ultraCUBE, consisng of:
○ Water Condioning System 2.0 (WCS)
○ CH05 Chiller
- Chiller hose kit
- Sample tubes & racks (varies by applicaon)
- Water bath (installed in main unit)
- AutoFill accessory kit
Unpack the instrument, the Water Condioning System 2.0 (WCS), and the CH05 chiller. Refer to the WCS User Manual to install
the UV lamp into the WCS. The lamp is shipped separately to prevent breakage during shipment. Arrange the instrument, WCS, and
chiller on a bench as shown. The chiller and WCS may be installed on either side of the system. The CH05 and WCS may also be
placed on the oor or such that the hoses may reach the front of the water bath of the water bath.
2. Installaon and Setup
E220R-plus Focused-ultrasonicator
CAUTION: When posioning the system, please keep the fan and rear panel vents free of obstrucons which can block the
ow of air.

8
Covaris
E220 & LE220 (-plus, R-plus, Rsc) Setup & Instrucon Manual Part Number: 010521 Rev B | May 2021
• Connect the hoses between the WCS and the CH05 as shown above.
• For the E220-, E220R-, LE220-, and LE220R-plus, connect the remaining two hoses between the two ports on your instrument
water bath and the remaining two ports on the opposite side of the WCS. Connect the lower hose to the ng on the le side
of the water bath.
For the LE220Rsc, the upper hose from the WCS 2.0 must connect to the lower ng of the water bath. The temperature
sensor for the water bath is adjacent to the two hose connecons. The lower hose ng contains a long tube to bring the
cooled (heated) water from the chiller away from the temperature sensor to prevent an erroneous temperature reading.

9
Covaris
E220 & LE220 (-plus, R-plus, Rsc) Setup & Instrucon Manual Part Number: 010521 Rev B | May 2021
The WCS contains a parculate lter and UV lamp to prevent biological growth. This allows the water bath to be changed only
once per month. Refer to the User Maintenance Secon of this manual for addional details.
• The AutoFill opon allows plant deionized water to be plumbed directly to the instrument to allow automac lling of the water
bath without any operator intervenon. If the AutoFill opon is going to be used, refer to the instrucons included with the
AutoFill accessory kit or Appendix D of this manual to assemble the components of the AutoFill Accessory Kit, and connect the
plant water to the system.
• Plug the instrument into a power source using the enclosed line cord. The instrument is a “universal input” device and
automacally employs any worldwide line voltage or frequency (100 to 240 volts AC, 50 or 60 Hz). Leave the instrument power
and notebook power switched OFF during this me.
• Plug one end of the USB cable into the instrument USB Port and the other end into any USB port on your notebook computer.
Connect the temperature control cable between the D-connector at the rear of the instrument and the D-connector on the
CH05 chiller.
• Connect the CH05 to a power source. The CH05 is a universal input device. Do not turn on the CH05 at this me.
• Locate the WCS power supply and line cord. Connect the WCS power supply to the port provided on the WCS and connect the
line cord to a power source. The power supply is a universal input device. Leave the WCS turned o at this me.
• Connect the computer to a power source. Connect the mouse or other accessories to the computer.

10
Covaris
E220 & LE220 (-plus, R-plus, Rsc) Setup & Instrucon Manual Part Number: 010521 Rev B | May 2021
• Refer to the rear of the instrument’s right-side panel to idenfy the following features:
• Refer to the gure below to idenfy the following items:
• Power on the instrument. The power switch is located at the right rear, near the power entry module.
• Press and hold the green ‘Door’ buon while pulling the door handle to open the safety enclosure front door. Slide out the
water bath and remove it from its plasc shipping bag. Remove and discard the desiccant pack.
The instrument is now ready to be started.
The Rear Right Panel of the System
USB Port
AC Line (Mains) Input
and Power Switch
Product Safety Label
Serial Tag, Regulatory, and Line
Power Label
E220R-plus LE220-plus LE220Rsc
Enclosure Door
Safety Lock
Door Lock
Release Buon
Stop
Buon
Safety
Enclosure
Water
Bath
LE220Rsc with extended bath
and ngs on the le side of bath

11
Covaris
E220 & LE220 (-plus, R-plus, Rsc) Setup & Instrucon Manual Part Number: 010521 Rev B | May 2021
3.1 Fill the Water Bath
The instrument’s transducer must be immersed in a water bath to transmit high-frequency,
focused acousc energy to the sample tube. For best performance, employ only clean, dislled
or deionized water in the bath.
Open the front door, remove the bath and the rst me your system is operated, ll the bath
inially about half full. The rst me the WCS and chiller are operated, a substanal amount of
air is forced from the WCS into the bath, which may cause the full bath to overow. This only
occurs the rst me an empty WCS is used.
Once the WCS is lled with water, the bath should be lled to a level of 15. If the transducer
is in a raised posion, and is out of the bath, ll to 15 on the “Fill” side of the gauge. If the
transducer is submerged, ll to 15 on the “Run” side of the gauge.
If Periodic Fill is enabled, aer the inial lling of the bath, Periodic Fill will maintain a sucient water level in the bath automacally.
See Secon 5.2 for addional informaon on Periodic Fill.
3.2 Start the System
Turn the instrument power ON using the power switch located on the rear, right side of the instrument
at the power entry module. When power is ON, the green door-lock release switch will illuminate and
the venlaon fans in the rear panels will run.
Power on the WCS and CH05 Chiller. SonoLab soware will perform its temperature control; it is not
necessary to adjust the temperature set points from the CH05 control panel.
A large volume of air is purged from the chiller and WCS when they are rst operated. This is normal, and only occurs the rst me the
chiller/WCS assembly are operated.
Start the system computer. The computer employs a Windows 10 (or later) Operang System. SonoLab is an applicaon used to
control a Covaris Focused-ultrasonicator for processing a biological or chemical sample. It is designed to create, edit, and run a
processing program called a method. It has provisions to run, pause or stop a method and view execuon histories which contain
a record of key instrument parameter values during a run. It also contains editors for customizing system sengs and performing
maintenance funcons.
SonoLab is installed on the computer delivered with the instrument. No further installaon or conguraon is required.
Find the SonoLab icon on the desktop:
If the icon is not visible, or if SonoLab is not installed, please refer to Appendix B or contact the Covaris Technical Support Department
for installaon instrucons.
3. Geng Started

12
Covaris
E220 & LE220 (-plus, R-plus, Rsc) Setup & Instrucon Manual Part Number: 010521 Rev B | May 2021
Double-click on the SonoLab icon to start SonoLab. The splash screen will appear:
Following the splash screen, the moon system homing dialog appears:
Click ‘Yes’, then ‘OK’ when prompted to empty the sample tray. The transducer and sample holder mechanical assemblies will move into
posion and the SonoLab METHOD Screen will display.

13
Covaris
E220 & LE220 (-plus, R-plus, Rsc) Setup & Instrucon Manual Part Number: 010521 Rev B | May 2021
If SonoLab does not connect to the instrument, the following screen appears allowing SonoLab to be run in emulaon mode without
an instrument.
Click “Use Emulaon Mode”, and the normal SonoLab ‘Method’ screen will appear, allowing the user to operate SonoLab as if an
instrument is present. This is useful for training purposes or for creang methods o-line.
3.3 Preparing your System for Use
To run an acousc treatment, a number of condions must be met, including:
a. The moon system must be inialized.
b. There must be an acousc method selected in the Method box.
c. Water temperature must be within acceptable Min and Max limits.
d. The bath water must be degassed.
e. Water should be approximately at level 15.
f. The safety enclosure door must be closed.
The “Run” buon will remain gray and inacve unl a method is selected, and all necessary condions, except the temperature and
degassing states are met. Your system automacally sets the temperature when a method is selected. Aer a specic user’s inial log
in, SonoLab will automacally select the last method run by this user the next me they log in. The bath water temperature will then
be set according to this method. Once the method is started, SonoLab will pause if water must be added to the bath and unl the bath
is suciently degassed.
To achieve an acceptable status on the other condions:
a. Your system’s moon system normally inializes when SonoLab starts unless the
user purposely skips this step. In this case, the moon system can be homed from
the Moon Control pane. Click on the Moon Control buon to display the
Moon Control pane.
Click on “Home” to inialize the moon system. See addional informaon for the
Moon Control pane in ‘The Method Screen’, Secon 5.1, of this manual.
NOTE: The proper plate and consumables must be in place on your system’s sample tray.

14
Covaris
E220 & LE220 (-plus, R-plus, Rsc) Setup & Instrucon Manual Part Number: 010521 Rev B | May 2021
b. To select and load an acousc method, click on the panel displaying the current loaded method, as shown below. A list of
exisng method names will be displayed in a drop-down list. Navigate through the list with the vercal scroll bar and select a
method. If Consumable-based Method Selecon is enabled, the “Method” bar is disabled. See Consumable-based Method
Selecon in Appendix A of this document for operang and conguring SonoLab for Consumable-based Method Selecon.
c. An important principal of the Covaris Focused-ultrasonicator is isothermal temperature control. Your system automacally
adjusts the water temperature, as necessary, to match the method temperature set point once a method is selected. Water
Temperature status will turn green when temperature is within the Min and Max limits (by default 3 degrees above or below the
set point). The default set point (in the absence of a selected method) is 20 ºC.
The bath cool down from room temperature to below 10 degrees takes about 30 minutes. Once a method starts, if the bath
temperature rises beyond the user specied limit, your system nishes the current posion being treated, pauses treatment, and
automacally resumes when the temperature is back within limits, with no operator intervenon required.
d. Properly degassed water is important for the ecient transfer of acousc energy from the instrument’s transducer to the
sample being treated. If water is detected in the bath, the degassing pump is automacally turned on when SonoLab is started.
The degassing me is approximately 45 seconds per millimeter of water level in the bath (about 45 minutes for a full bath).
The degas pump can be manually turned on and o from the Water Works pane. See addional informaon below in secon
Other Controls on the Home Screen.
e. When the “Run” buon is clicked to start the method, SonoLab checks that there is sucient bath water for the consumables
employed in the method. If the water level is incorrect, the method is paused and a message to add water is presented.
The amount of water specied will vary depending on the current
water level in the instrument water bath. Aer the bath is lled,
SonoLab will pause execuon of the method to degas the bath, based
on amount added. Degassing me for 1 liter added is about 10
minutes, for 2.5 liters about 30 minutes.
Currently loaded
method
Drop-down List of
Available Methods

15
Covaris
E220 & LE220 (-plus, R-plus, Rsc) Setup & Instrucon Manual Part Number: 010521 Rev B | May 2021
The remaining condions, along with their related status, are displayed in the Instrument Status panel. Click the “System Status” buon
to display the Instrument Status panel. An acceptable condion is indicated by a green check mark in the Status box. If a condion is
not acceptable, the status will show X.
If any of the items other than “Temperature within Limits” in the Status list display X, a red X will also be displayed in the System Status
buon, as shown below. Water temperature will be adjusted as necessary once a specic method is started.
Switches are provided in the ‘Method Opons’ pane to override the degas mer and temperature limits to allow your system to run a
method without waing for these condions to be met. With the temperature and degas overridden, the ‘System Status’ display adds
‘Overridden’ indicators as shown.
A yellow triangle indicates that degassing me or temperature targets have not yet been met.
Once a method has been loaded and all condions are acceptable, the ‘Run’ buon will turn green and the selected acousc Method
can be started.
NOTE: If the AutoFill opon connecng plant water to the E220-plus is implemented, bath water level is maintained
automacally. See Appendix D for details of the AutoFill opon.
A red X is System Status
results in a red X in the right
hand column.

16
Covaris
E220 & LE220 (-plus, R-plus, Rsc) Setup & Instrucon Manual Part Number: 010521 Rev B | May 2021
Using Posion Restricons When Running Methods
It is somemes convenient to run a method on a plate that is only parally populated with samples. For example, consider a method
that treats all 12 columns in a 96-well plate. But now you have a plate that has samples only in columns 4 to 6. Using Posion
Restricons allows treang a subset of a method’s specied posions. See instrucons in Appendix B of this document, Using Posion
Restricons.
To modify an exisng method, refer to Secon 5: Create and Edit Methods.
3.4 System Shutdown
If the instrument will be idle for an extended period of me (e.g. longer than two weeks), refer to the system shutdown procedure in
the User Maintenance secon of this manual.
When your system is nished being used for the day, leave the transducer submerged in the bath if automac scheduling is acve.
At the end of the scheduled period, the scheduler will turn o the degas pump and disable cooling in the chiller, then automacally
restart both as scheduled for the next day. SonoLab soware must be le running and the system and CH05 chiller powered on for
the scheduled events to occur.
If scheduling is not in use, click on the ‘Water Control’ buon and then the ‘Click for Standby’ buon. The transducer will rise out
of the bath and the CH05 chiller’s heater/cooler will turn o, but the chiller’s pump will connue to operate, circulang bath water
through the Water Condioning System (WCS).
NOTE: No scheduled events will occur when the instrument is in “Standby” mode, regardless of whether or not SonoLab is
in scheduled mode.
CAUTION: Do not turn o the WCS or CH05 chiller. These must remain powered on to treat the bath water against bio-
growth. Leaving water in the water bath for an extended me without the WCS operang may promote algal growth in the
bath and lines. This growth can interfere with the water quality and sample processing.

17
Covaris
E220 & LE220 (-plus, R-plus, Rsc) Setup & Instrucon Manual Part Number: 010521 Rev B | May 2021
AFA uses four parameters to ne tune specic acousc treatments. These parameters are programmed into Methods as provided by
Covaris. Methods can be executed manually or by the automaon soware, including specifying the treatment to be performed and
whether a full or only part of a plate is to be treated. A brief explanaon of the treatment parameters is provided below.
Peak Incident Power (PIP)
This parameter measures the peak electrical power used to drive the ultrasound transducer. In the E220- and LE220-plus instruments,
the range of Peak Incident Power is between 1.5 to 500 Was. Plate denions selected for a treatment may further restrict maximum
PIP.
Duty Factor
This parameter denes the rao between the transducer on-me and total operaon me. Duty Factor is expressed as a percentage.
For a given Peak Incident Power, a larger Duty Factor results in more acousc energy generated from the transducer. Users can dene
the Duty Factor from 1 to 50%.
The product of the Peak Power and Duty Factor gives the approximate Average Incident Power (AIP) generated from the transducer.
For example, if Peak Incident Power is set to 10 Was and Duty Factor is set to 15%, the Average Incident Power will be approximately
1.5 Was. However, the real Average Incident Power from the transducer may vary due to factors such as sample tube type, water
level, and water temperature.
Cycles per Burst
This parameter indicates the number of electrical signals used in each acousc “burst” of the transducer. Cycles per Burst (cycles/
burst) range from 50 to 1000 in the E220- and LE220-plus instruments for dierent applicaons.
Duraon
This parameter denes the amount of me for which the sample is under treatment while in indexed operaon (i.e. treang one row
at a me). Duraon is 1 to 3600 seconds. Treatments longer than 3600 seconds (60 minutes) can be implemented using the Repeat
funcon described in Secon 6.2.
Treatment Records
The history of a treatment consists of three les: Measurements, Summary, and Treatments les. Refer to Secon 5.3 for details.
Measurements, a .csv le which can be opened as a spreadsheet, contains informaon about the methods run, including mes,
posions treated, acousc power, bath water temperature, and bath water level.
The Treatments le is also a .csv le which contains treatment parameters, start and end mes for the method, along with water level,
and temperature data. The Treatment le contains the data sent to the LIMS.
The Summary is a .xml le containing textual informaon which is shown along with the graphics in the History display.
4. AFA Operaons

18
Covaris
E220 & LE220 (-plus, R-plus, Rsc) Setup & Instrucon Manual Part Number: 010521 Rev B | May 2021
5.1 The Method Screen
When SonoLab is launched, the Method screen is displayed with the last successfully run treatment method.
• Method displays the current selected treatment method and its status.
- Plate: the name of the sample plate specied by the current selected method.
- Temperature: the actual temperature of the water in the instrument bath.
- Setpoint: the water bath temperature specied by the current selected method.
- State: possible states, depending on what the system is doing, includes:
○ At inial startup, Idle.
○ During a treatment method, the possible states include:
• Waing for Water Temperature: the system waits for the water temperature to be within the range specied by the
selected method.
• Waing for Water Degas: the system waits for sucient me for eecve degassing to occur.
• Waing for Water to be Added to the Bath: this occurs when the water level is low and AutoFill is not enabled.
• Running: the system is currently performing the selected treatment method steps.
• Paused: the method is paused by the user or the API.
○ Following a treatment:
• Completed: the treatment terminated normally.
• Aborted: the treatment was halted by a command from a user or the API.
• Failed: the method run was unsuccessfully completed with the displayed reason.
• Cancelled: in Consumable Based Method Selecon (see Appendix A), method selecon was cancelled.
- Run Time: the remaining me for acousc on, me required for moon, any delay steps or other overhead for the current
method.
- Methods saved on the system are selected from the drop-down list.
5. SonoLab Soware

19
Covaris
E220 & LE220 (-plus, R-plus, Rsc) Setup & Instrucon Manual Part Number: 010521 Rev B | May 2021
• Posion Restricons
It is somemes convenient to run a method on a plate that is only
parally populated with samples. For example, consider a method that
treats all 12 columns in a 96-well plate. But now you have a plate that
has samples only in columns 4 to 6. Using Posion Restricons allows
treang a subset of a method’s specied posions. Refer to Appendix B
of this document, Using SonoLab Posion Restricons.
• Addional system control funcons are accessed via buons at the right side of the screen.
• System Status displays the System Status panel, which shows whether the instrument condions required to run a treatment
method are or are not met. A red X indicates a parameter has not been met, a green check indicates it has.
- Acouscs Connected: a green check indicates the electronics have successfully connected to the soware.
- Moon Connected: a green check indicates the moon controller board is detected.
- Chiller Connected: a green check indicates that the chiller is communicang with the instrument.
- Homed: a green check indicates that the instrument’s moon system has been inialized.
- Door Closed: a green check indicates the safety door is closed.
- Water Degassed: a green check indicates the water has been degassing for a sucient length of me. A yellow triangle
indicates that the water has not degassed for a sucient me but may be overridden in Method Opons.
- Temperature within limits: a green check indicates the water is within the temperature range specied by the currently
selected method. A yellow triangle indicates that the temperature has not reached the method’s specied temperature
range but may be overridden in Method Opons.
- Light Curtain: a green check indicates that the light curtain is not violated.
- Water Bath Present: a green check indicates the acrylic water bath’s presence is detected.
- Method Valid: a green check indicates the selected method includes a valid plate denion le and treatment parameters.
A red X indicates the method is not valid and cannot be run. Use the Method Editor to correct the problems.
- API Connected: “No” is the default condion, indicang that the E220-plus is not under external automaon control. “Yes”
indicates that the instrument is under external control, but most of the funconality connues to be available, unless the
external control is execung a treatment method. In this case, a method may not be started, and Moon and Water controls
are locked out. A user can sll pause or abort the method.

20
Covaris
E220 & LE220 (-plus, R-plus, Rsc) Setup & Instrucon Manual Part Number: 010521 Rev B | May 2021
• Moon Control displays the Moon Control panel, which contains buons for moving the sample tray to predened posions.
- Home: inializes the moon system and moves the sample tray to its inialized posion.
- Load: moves the sample tray to the front of the safety enclosure to facilitate loading samples.
- Start: moves the sample tray to the rst treatment posion as specied by the current selected method.
- RFID: moves the sample tray to the posion in which a plate’s RFID tag is read by the RFID reader.
- Service: raises the sample tray and transducer assembly allowing the water bath to be removed from the instrument.
- Stop: stops all current moon.
• Water Control displays the Water Control panel, which contains both water system status indicators and user control funcons.
- Water System Indicators
o Level
• Current: indicates the current bath water level.
• Minimum: indicates the minimum level which will allow the currently selected method to run.
o Temperature
• Current: the current temperature of the water bath.
• Setpoint: the water bath temperature specied in the currently selected method. A treatment begins when the water
temperature is within the range specied by the method.
• Range: the temperature range over which the currently selected method will run, once treatment has begun. If the
bath goes outside this range while a method is running, the method is paused unl the bath is again within the range.
o Degas Time: the remaining degassing me before a method can be run (unless the degas mer is overridden).
o Flow State
• Circulang: the bath water is circulang between the bath, chiller, and WCS for temperature control and cleaning.
• Filling: the bath is being lled automacally (AutoFill is enabled).
Water Control Pane without AutoFill Enabled Water Control Pane with AutoFill Enabled
This manual suits for next models
4
Table of contents
Other Covaris Industrial Equipment manuals