CoverCraft Carver OTC User manual

Thank you for purchasing a Carver Over-the-Tower Cover (OTC). We look forward to making you another happy Carver
customer. Our OTC’s for Tournament Ski Boats and Tournament Ski Boats w/ Wide or Pickle Fork Bows are designed to go
over the entire boat including your ski tower and bolt-on swim platform. Our OTC’s for V-Hull Runabouts/Modified V-Hull
Boats and Deck Boats are designed to go over the entire boat including the ski tower and integrated swim platform.
Below you will find instructions on how to install your new cover. If you have any questions while installing your boat cover,
feel free to call us at (888) 48-COVER and we can walk you through the process. When you call us here at Carver, you will
get a live person, not a recording because our goal as the leading boat cover manufacturer in the US, is to impress you with
our exceptional customer service.
It may be necessary to spin your wakeboard racks in and to fold and store your bimini top in order to install your new
Carver Cover.
1. Add any padding needed to the windshield, wakeboard racks or any sharp areas that could damage the boat cover.
2. Place the bow end of the rolled cover (the end with the tag) on the bow of your boat and unroll towards the stern or back,
positioning it down the center of your boat as you roll.
3. Slip the front of the cover over the bow and pull the cover open to the sides and over the tower as you work towards
the stern of the boat.
4. Adjust cover fit by pulling cover tight to eliminate sagging areas. These areas may collect standing water or snow and
shorten the life of your cover.
5. Using the reinforced tie-down loops, secure the cover to your trailer with the included tie-down kit (see instructions on
Installing a Carver Tie-Down Kit on the next page). NOTE: The Carver Over-the-Tower Cover is not recommended for
travel.
To remove the boat cover, fold it to the center from each side and roll it from back to front. This will make it easier to repeat
steps 1-5 when covering boat again. IMPORTANT: Allow cover to dry thoroughly before folding into storage.
Warranty: The materials and workmanship are guaranteed to be free of defects at the time of manufacture. Warranty
coverage commences on the original date of purchase. The warranty does not cover normal wear, weather soiling and stains
from environmental pollution and/or standing water, cuts from sharp objects, neglect, accident or misuse. The boat cover
must be properly installed, utilized and maintained. The length of warranty is determined by the type of material ordered.
Please visit www.carvercovers.com for detailed warranty information.
Installing Your Carver
Over-the-Tower Boat Cover
More Information at CarverCovers.com
or call (888) 48-COVER. The Best Covers Under the Sun™
Carver by Covercraft Industries, LLC 212 N. Lyles Ave., Landrum, SC 29356

More Information at CarverCovers.com
or call (888) 48-COVER. The Best Covers Under the Sun™
Carver by Covercraft Industries, LLC 212 N. Lyles Ave., Landrum, SC 29356
Installing a Carver Tie-Down Kit
Tie-Down Kit is sold separately unless noted otherwise at time of cover purchase.
Installing A Carver Tie-Down Kit
Tie-down kit is sold separately unless noted otherwise at time of cover purchase.
Based upon the size of your boat cover, it may not be necessary to use all of the
tie down straps.
Step 1: Thread the buckle-end of the strap through the tie down loop from back to
front. Pull through approximately 12 inches and tie-o with a simple overhand knot
so that the strap is secure.
Step 2: Guide the opposite end of the strap around the trailer from back to front.
Step 3: Thread the strap through the top slot in the quick release buckle from back to front,
pulling the end of the strap toward you.
Step 4: Continue threading the strap over the center bar of the buckle and into the bottom
slot of the buckle. The strap is now fully adjustable by pulling down on the loose end of
webbing. Install all the straps on the cover before tightening.
Step 5: Be sure the cover is centered on the boat, then tighten all straps securely so that
the cover is taut.
Step 6: Trim the straps. Leave approximately 12”of webbing for adjustability and trim o any excess using a pair of scissors.
Lightly singe the cut edge of the webbing using a cigarette lighter to fuse the yarns and prevent the webbing from
unraveling. DO NOT SET ON FIRE AND BE SURE TO EXTINGUISH ANY FLAMES. To remove the boat cover, simply disconnect
the quick release buckles by squeezing the sides. For quick and easy re-installation of the cover, leave the straps attached to
the tie-down loops. After rst use, check straps for tautness. If they require adjustment, untie knot and refer to step 1.
Rope Ratchet Instructions
Rope ratchet is sold separately unless noted otherwise at time of cover purchase.
If you purchased a boat cover with draw rope encased in the hem, a Rope Ratchet is a convenient
and ecient way to tighten and secure the rope so that the boat cover stays in place.
The 1/4” rope in the hem of your cover is tied o on each end to prevent the rope from slipping
back into the hem.
Untie one end of the rope. The ratchet casing is marked with an arrow showing the direction to thread the rope.
Feed the rope into the bottom of the ratchet casing, around the gear and back out
through the bottom.
Insert the hook into the knotted (opposite) end of the rope and pull the loose
end through the ratchet until the rope is taut and the cover is tight.
Note! Take care not to trim too much excess from the loose end of the rope
as it will be needed to loosen the cover!
To release the rope, press the thumb lever under the hook of the ratchet and
pull rope in the opposite direction.
1
2
3
4
We offer a wide selection of products and accessories to protect your investment.
Most are available from your local marine dealer. If you are unable to obtain
our products from a marine dealer, you can call us toll-free at:
1-888-48-COVER
to locate a dealer near you.
Other Products available from
Carver
t #JNJOJ5PQT t #JNJOJ5PQAccessories t 18$$PWFST
Based upon the size of your boat cover, it may not be necessary to use all of the tie-down straps.
Step 5
Be sure the cover is centered on the boat, then tighten all straps securely so that the cover is taut.
Step 6
Trim the straps. Leave approximately 12” of webbing for adjustability and trim o any excess using a pair of
scissors. Lightly singe the cut edge of the webbing using a cigarette lighter to fuse the yarns and prevent the
webbing from unraveling. DO NOT SET ON FIRE AND BE SURE TO EXTINGUISH ANY FLAMES. To remove the
boat cover, simply disconnect the quick release buckles by squeezing the sides. For quick and easy re-installation
of the cover, leave the straps attached to the tie-down loops. After first use, check straps for tautness. If they
require adjustment, untie knot and refer to step 1.
Step 1
Thread the buckle-end of the strap through the tie-down loop from
back to front. Pull through approximately 12 inches and tie-o with a
simple overhand knot so that the strap is secure.
Step 2
Guide the opposite end of the strap around the trailer from back to
front.
Step 3
Thread the strap through the top slot in the quick release buckle
from back to front, pulling the end of the strap toward you.
Step 4
Continue threading the strap over the center bar of the buckle and
into the bottom slot of the buckle. The strap is now fully adjustable
by pulling down on the loose end of the webbing. Install all the straps
on the cover before tightening.

More Information at CarverCovers.com
or call (888) 48-COVER. The Best Covers Under the Sun™
Carver by Covercraft Industries, LLC 212 N. Lyles Ave., Landrum, SC 29356
How to Prolong the Life of
Your Boat Cover
• Avoid letting water or snow stand on the boat cover - use support poles, straps, or bows.
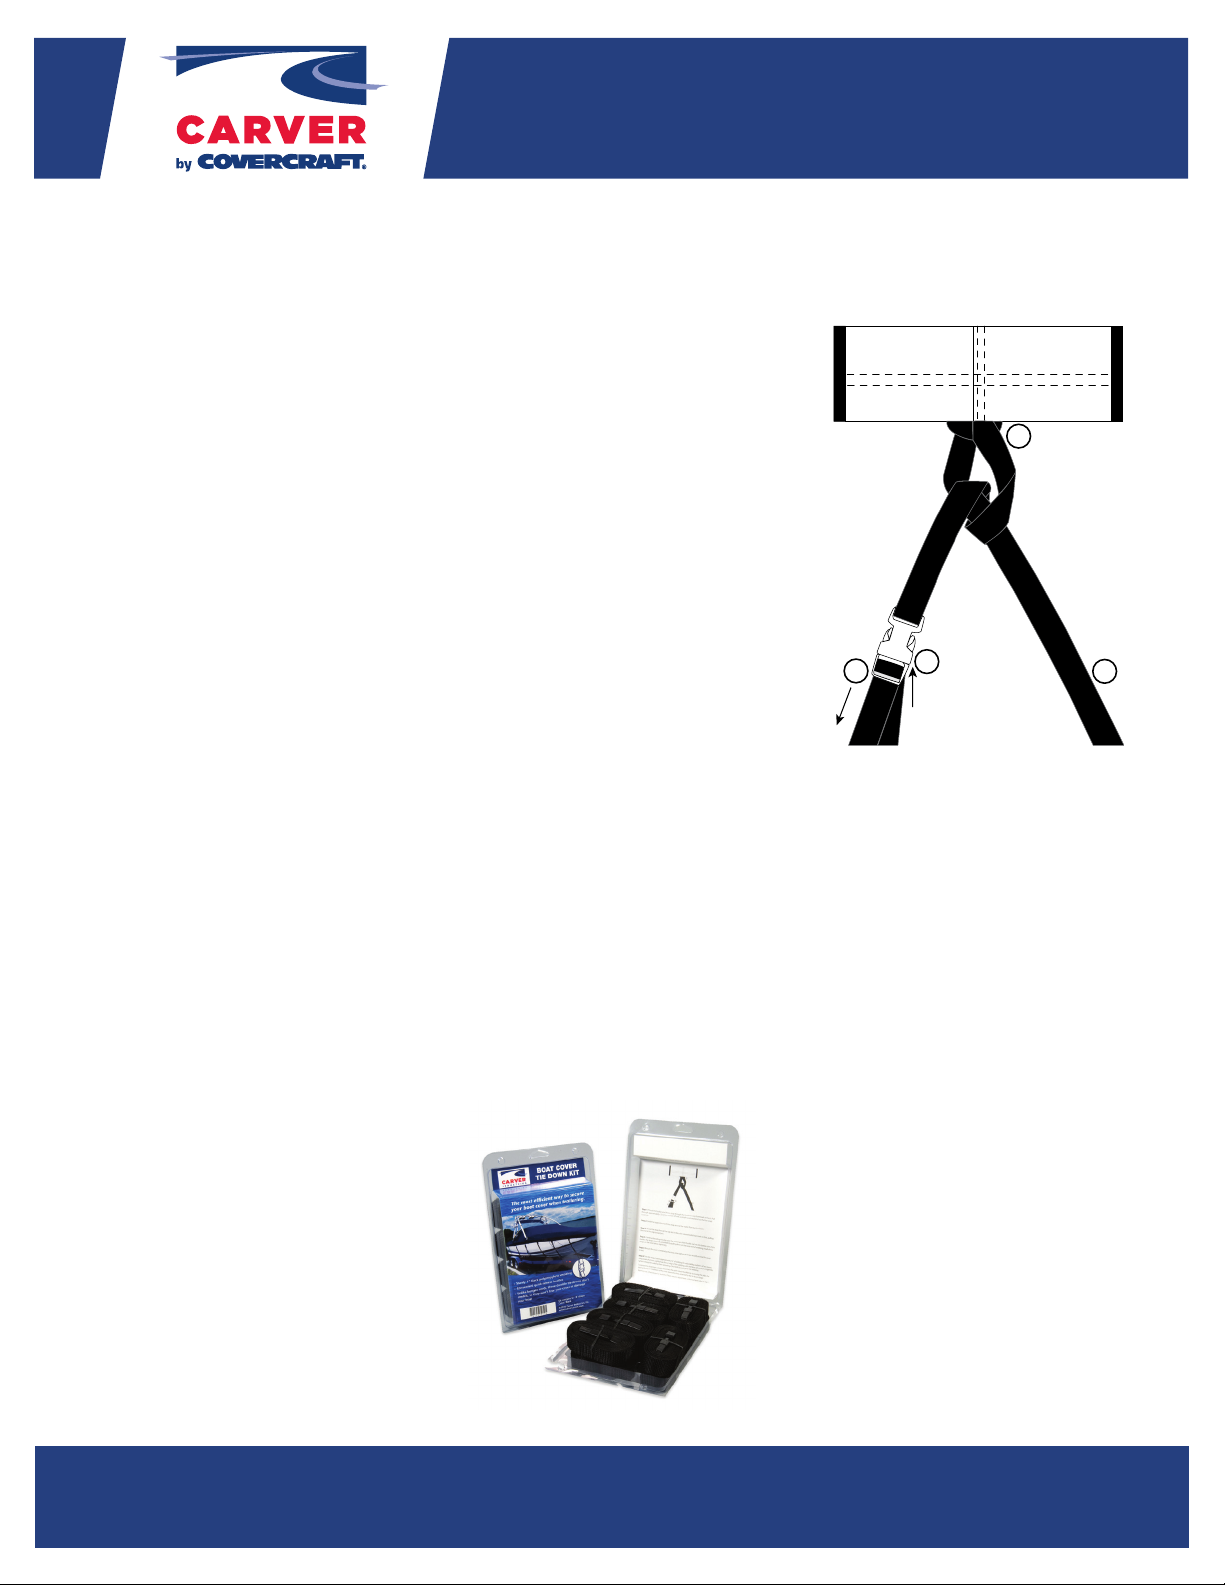
• Always tie boat cover down securely.
• Take the precaution of padding the windshield, the wakeboard racks, and any sharp areas before installing
the cover.
• Clean the boat cover regularly to remove salt, pollen, and environmental pollutants that could support the
growth of mildew. Brush o any loose dirt or soil, then spray the cover with a solution of mild, non-detergent
soap (such as Lux, Dreft, Ivory, or Woolite) and cool/warm water. A soft brush may be used on heavily soiled
areas. Rinse thoroughly. If cleaning diminishes the water repellency of the cover, we recommend treating with
303 High Tech Fabric Guard™ Water Repellent.
• Allow the boat cover to dry thoroughly before folding for storage.
No matter how carefully maintained, every boat is a target for a case of mildew. Mildew is a form of fungus present
everywhere in the world. It takes dark, damp conditions to encourage their growth. Those conditions are found
on a boat.
An essential boat-keeping chore should be regular cleaning of the interior, especially prior to boat cover
installation. Any form of dirt (food crumbs, suntan lotion, pollen, etc.) can become a foothold for mildew. Utilize
boat cover accessories such as vents, which are invaluable in improving air circulation and allowing moisture from
condensation to escape.
Mildew cannot survive in light and heat, so take wet gear out of your boat and spread it in the sun before stowing.
Expose all sides to the sunlight and turn items like life jackets inside-out for full eect. Allow your boat to dry in
the sun before installing your cover.
Silica gel and activated alumna are porous granules that absorb up to half their weight in moisture from the
atmosphere and can be purchased inexpensively at hardware stores. Use a double thickness of nylon stocking
as a container, and hang suspended in the boat, under the cover. These products can be reused after drying for
about an hour in a 300 degree vented oven. Most remedies rely on sodium hypochlorite (household bleach) to
remove mildew. A good, strong, all-around solution is 1/2 cup household bleach per gallon of water. Do not use
liquid detergents in combination with bleaches. Scrub the aected surfaces with a soft brush, using rubber gloves
and eye protection. Rinse thoroughly.
For cleaning our boat covers and bimini top canvas, we highly recommend 303 Fabric & Vinyl Cleaner which is
safe and eective. Be aware that repeated cleanings can diminish the water repellency of certain marine canvas.
To restore water repellency to factory-new levels, we highly recommend 303 Fabric Guard. For more information,
please visit our website, www.carvercovers.com or www.goldeagle.com/brands/303-products/.
Remember that anything used to kill or remove mildew will wash or wear away over time, so be prepared for
repeated treatments as part of your maintenance routine.
Table of contents
Other CoverCraft Boating Equipment manuals
Popular Boating Equipment manuals by other brands

Aerial
Aerial FREERIDE BIMINI installation guide

JOBE
JOBE ADDICT 1.6 installation guide

bamar
bamar BOXTRON E14S Use and maintenance instruction manual

Columbia Boat Alarms
Columbia Boat Alarms 411 installation manual

Jackson kayak
Jackson kayak Flex Drive 3D owner's manual

Livorsi
Livorsi TTK1150EL Installation

Floe
Floe X-SHALLOW 510-17100-00 Assembly instructions and owner's manual

Sleipner
Sleipner Side-Power ESPE 600 Installation and user manual

DockCraft
DockCraft DockSider Assembly, Installation, Setup, and Operating Instruction

Marine PC
Marine PC MPC-PPC12 user manual

Harken
Harken Vang-Master VM-1 installation manual

Mente Marine
Mente Marine ACS iC user manual