manuals.online logo
Brands
  1. Home
  2. •
  3. Brands
  4. •
  5. COVERKING
  6. •
  7. Automobile Accessories
  8. •
  9. COVERKING DG1214 User manual

COVERKING DG1214 User manual

Owner’s Manual
Model #DG1214, DG1215, DG1216, DG1217, DG1218, DG1219
Dodge Challenger
About Your Coverking® Product
Congratulations on your purchasing decision. Coverking® designed this Front End Cover to be the very best available. With proper care,
your Coverking® Front End Cover will provide years of stylish looks and maximum protection.
Installation of the Front End Cover is a simple process that should take about 30 minutes. Removal and reinstallation (as for car washing)
takes just a few minutes.
If you encounter any problems during the installation of your Coverking® Front End Cover, please contact our Consumer Response
Department, Monday - Friday, 7AM - 5PM (PST) at 1-800-400-1120.
Note:
Please read this manual thoroughly before beginning the installation. After completing installation, keep this manual for further
reference.
Tips for Easier Installation and Care
[] Before Installation, wash and wax your vehicle. Use a paste wax—not a spray—on the hood and fenders in order to maintain the finish
underneath the Coverking® Front End Cover.
[] Install the Front End Cover in temperatures of 70˚F (21˚C) or higher. The warmth will make the fabric more pliable and will allow it to
stretch slightly for a tighter and smoother fit.
[] Do not use vinyl cleaners or protectants on your Coverking® Front End Cover. These cleaners reduce the breathability of the vinyl and
will void the Coverking® Warranty.
[] Do not install the Coverking® Front End Cover on any vehicle that does not still have its original factory paint. Coverking® will not be
held liable for any warranty claims of paint damage to repainted vehicles.
[] Remember that the Front End Cover also protects paint from fading due to sunlight while the rest of the car is exposed.
Coverking® will not be held liable for any warranty claims on sun-faded paint.
[] Caution
:
There may be elastic straps described in some sections of this manual that can snap back if not properly hooked. To
avoid injuries, exercise caution and use safety glasses when installing.
[]
DO NOT PULL UP ON THE CLIPS OR THE FABRIC TO REMOVE THE COVER.
When removing the cover, it will be easiest to
reverse the installation steps.
Defining Custom Accessories
TT1285 - TT1296 2 DG1214 - DG1219 3
Contents
2.gPtsiLstraP
Installation Instructions
Hood Cover Pg. 2
Front End Cover Pg. 2
Unpacking: What You Have
Remove all parts from the shipping container. Check each part
included against the following Parts List and look for any possible
damage from shipping.
Parts List
Item Description Qty
1dooh,revoC1
2 Cover, front end 1
3 Warranty Card 1
The right side of the fabric is indicated as:
The Hood Cover
One of the features that makes your Coverking® Front End
Cover the very best available is the separate Hood Cover.
This means that you can access the engine compartment
without removing or adjusting the cover. Install the Hood
Cover first, by following these steps:
Step One
Open the hood and slip the Hood Cover over the front
edge of the hood. Make sure that the corners of the hood
fit snugly into the corners of the Hood Cover. When the
Hood Cover fits snugly, stretch the fabric at the straps
to remove major wrinkles.
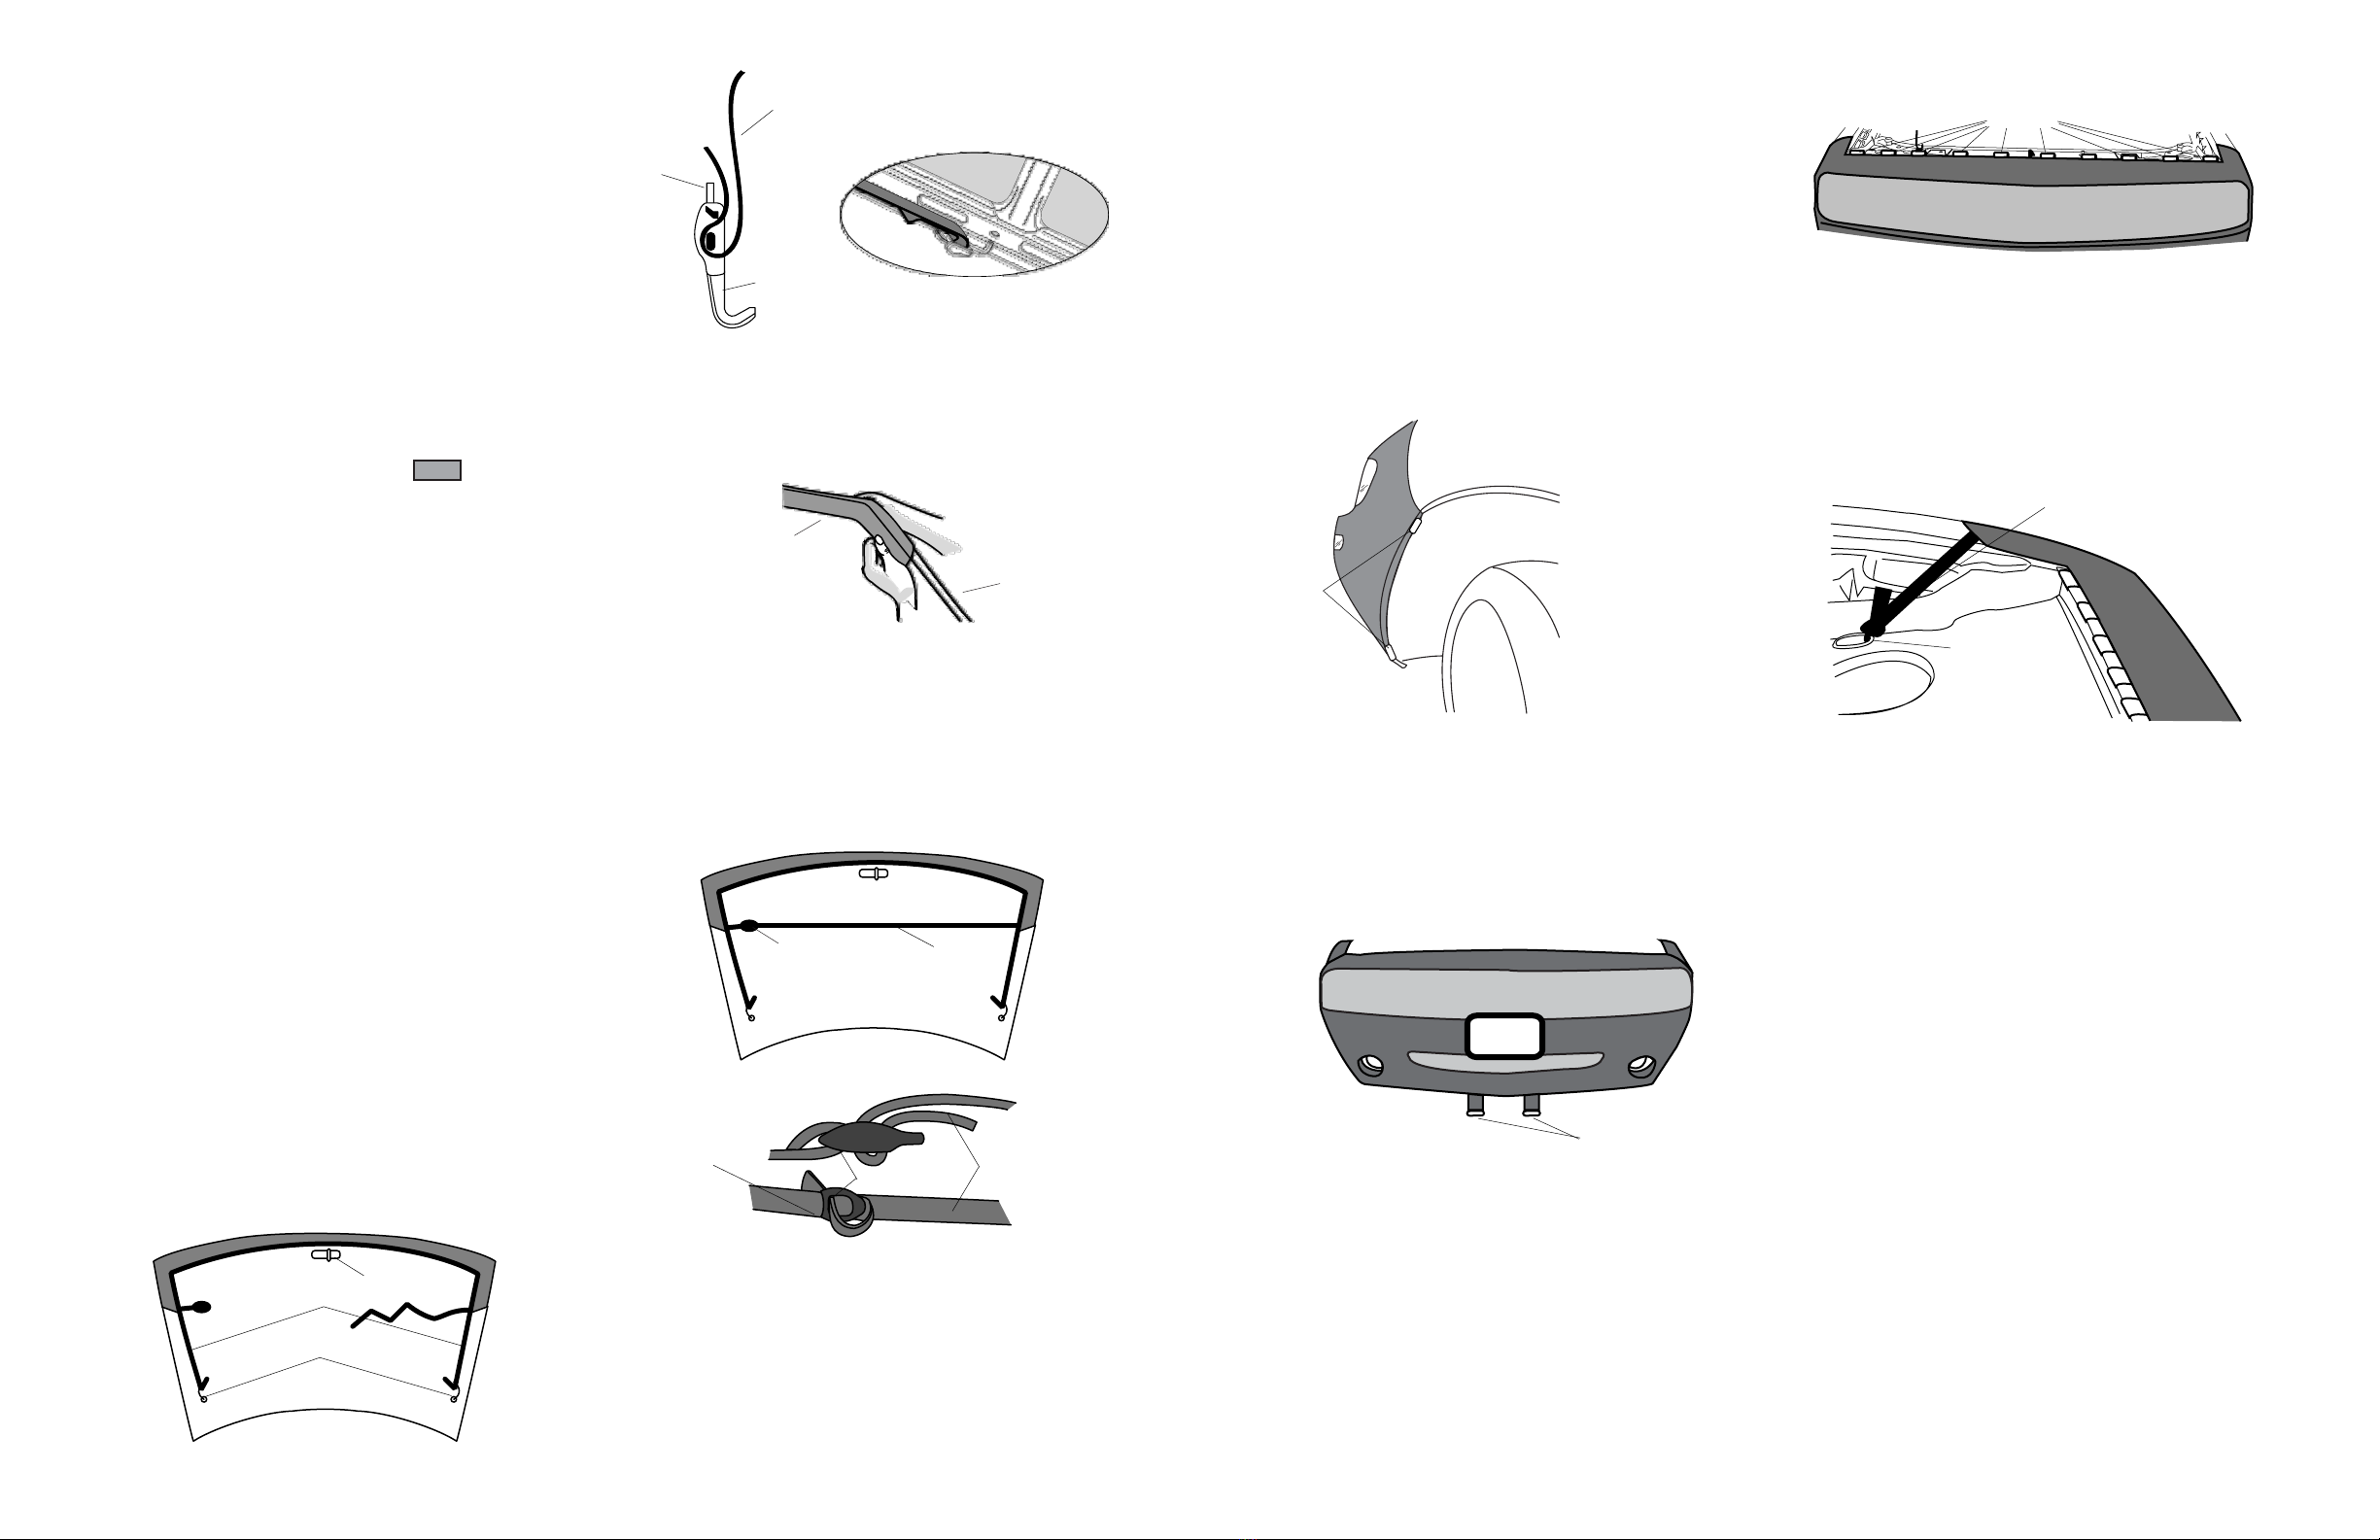
Step Two
Pull one of the straps sewn to the Hood Cover to the hole in
the hood's underside, as shown in Figure 1. Adjust the Buckle
Hook so that it is about 1/2" away from the hole. Now pull the
strap down and slip the Buckle Hook into the hole. To release
the tension on the webbing for adjustment of the strap, simply
pull out on the tab on the Buckle Hook (see Figure 2).
The Strap should be quite taut (as taut as possible without
tearing). Relocate the Buckle Hook if necessary to tighten. Tie
off excess strap to keep free of the engine compartment. Now
repeat this process with the strap on the other side.
Note: Check all straps periodically to insure tension. Adjust
tightness if necessary.
Note: Check all straps periodically to insure tension. Adjust
tightness if necessary.
Figure 1
Straps
Buckle Hooks
Hood Latch
Step Three
With the Hood Cover in place, pull the fabric on the sides of the
hood around to the underside of the hood on both sides. This
will insure maximum tightness of the Hood Cover (see Figure 3).
Figure 2
Strap
Tab
Buckle Hook
Figure 3
Hood
Cover
Step Four
The remaining strap provides better tension and stability for the
cover. Stretch the strap across the underside of the hood and
thread it through the buckle on the opposite side (see Figure
4). Do not twist the strap. Pull the strap as tight as possible.
Loop the excess strap back through the buckle to keep it out of
the engine compartment (see Figure 4b). Again, make sure
that the strap is taut.
Figure 4
Buckle Strap
Underside of Hood
Figure 4a
Buckle Strap
Thread excess
strap back
through buckle.
Figure 4b
The Front End Cover
This section explains how to install the front cover portion of
your Coverking® Front End Cover.
Underside of Hood
Step One
Orient the cover on the vehicle. The bottom of the cover will be
marked on the inside. If necessary, slip the opening in the
cover around the license plate.
Note: Turn the wheels for easier access to the wheel wells.
Step Two
Pull the cover back to one of the wheel wells and locate the
two plastic clips sewn to the cover (see Figure 5). Hook the
clips to the edge of the wheel well. Attach the cover to the
other wheel well.
Figure 5
Wheel Well
Plastic Clips
Step Three
Locate the two straps with plastic clips sewn to the cover along
the bottom of the fender, in front of the wheel well (see Figure 6).
Hook them to the bottom of the fender.
Figure 6
Pull up on the Grille Screen and locate the ten plastic clips sewn
to the top of the cover along the edge of the engine compartment
(see Figure 7). Hook them the to the edge of the engine
compartment.
Figure 7
Step Five
Pull up on the sides of the cover and locate the strap with
the buckle hook sewn to the cover on each side of the engine
compartment (see Figure 8). Pull the strap down and slip
the buckle hook into the hole.
Figure 8
Engine
Compartment
Plastic Clips
Note: DO NOT PULL UP ON THE CLIPS OR THE FABRIC
TO REMOVE THE COVER. When removing the cover, it will
be easiest to reverse the installation steps.
Engine
Compartment
Strap
Slip hook into hole
and adjust strap
to tighten.
08/09
Plastic
Clips
Step Four
Hood
DG1214 - DG1219
ScreenGrille

This manual suits for next models

5

Other COVERKING Automobile Accessories manuals

COVERKING CH1131 User manual

COVERKING

COVERKING CH1131 User manual

COVERKING Custom Seat Cover User manual

COVERKING

COVERKING Custom Seat Cover User manual

Popular Automobile Accessories manuals by other brands

MMD 427866 installation manual

MMD

MMD 427866 installation manual

BrandMotion AVMS-3690 installation instructions

BrandMotion

BrandMotion AVMS-3690 installation instructions

PFX ProFormX A-ARM LIFT KIT manual

PFX

PFX ProFormX A-ARM LIFT KIT manual

Strut King SK06-HPDL-RMT01 installation instructions

Strut King

Strut King SK06-HPDL-RMT01 installation instructions

Star SM-S/T user manual

Star

Star SM-S/T user manual

Bahama Golf Parts ACC-RR04 installation instructions

Bahama Golf Parts

Bahama Golf Parts ACC-RR04 installation instructions

Modula RE-CARGO KIT 2 PORTABICI Assembly instructions

Modula

Modula RE-CARGO KIT 2 PORTABICI Assembly instructions

Dakota Digital HDX-47C-PU Instrument Installation

Dakota Digital

Dakota Digital HDX-47C-PU Instrument Installation

Ranger design 1506-TC Cargo Plus installation guide

Ranger design

Ranger design 1506-TC Cargo Plus installation guide

Audiovox Pursuit Series owner's manual

Audiovox

Audiovox Pursuit Series owner's manual

Black Horse Off Road MBT-MR1512 Installation instructions & user guide

Black Horse Off Road

Black Horse Off Road MBT-MR1512 Installation instructions & user guide

Toyota Bluetooth SWC owner's manual

Toyota

Toyota Bluetooth SWC owner's manual

Husky 33001 Assembly, Installation, Operation and Maintenance Instructions

Husky

Husky 33001 Assembly, Installation, Operation and Maintenance Instructions

TrailFX 968 quick start guide

TrailFX

TrailFX 968 quick start guide

HAUL MASTER 90018 Assembly and operation instructions

HAUL MASTER

HAUL MASTER 90018 Assembly and operation instructions

Front Runner SLIMLINE II manual

Front Runner

Front Runner SLIMLINE II manual

AMP Research BedStep 75306-01A instructions

AMP Research

AMP Research BedStep 75306-01A instructions

SuperATV Half Windshield installation instructions

SuperATV

SuperATV Half Windshield installation instructions

manuals.online logo
manuals.online logoBrands
  • About & Mission
  • Contact us
  • Privacy Policy
  • Terms and Conditions

Copyright 2025 Manuals.Online. All Rights Reserved.