Coway APM-1010DH User manual

Coway Air Purier
APM-1010DH
• This product is for domestic use only. It cannot be used in an overseas country where the power
voltage is dierent.
• Warranty card is included in this user’s manual.
• Read and save these instructions.
•
English / Français / Español / Deutsch / Italiano / Nederlands /

FEATURES
An innovative ANTI-FLU HEPA™ lter system
Coway’s innovative ANTI-FLU HEPA™ captures micro particles and inactivates viruses up to
99.9 %. The lter system has been optimized to quickly remove pollutants from the air.
- This appliance is not a medical device.
Air purication & humidication combo system
This product provides hybrid functions where the air purication function removes ne dust,
viruses, and harmful gases, and the natural humidication function uses a humidication
lter.
Optimized humidication system
Both a humidication lter and a humidity sensor have been adopted to control the amount
of moisture supplied on the basis of the room temperature and the humidity condition.
Powerful & hygienic humidication performance
A vaporization-type humidication system has been adopted that supplies 450 ㎖ or more
moisture per hour.
Auto-o timer
You can select the timer(1hr, 4hr, and 8hr) so it automatically turns o when the desired time
has elapsed.
Selectable custom lters
A customized lter system has been adopted so that customers can select one of 3 types of
option lters: dust, new-house or old-house lters.
3-step automatic operation using the particle sensor
The pollution level of the air is represented in real-time through the particle sensor and the air
ow speed is automatically controlled on the basis of the surrounding pollution level when
the automatic operation is selected to minimize power consumption.
Air quality indicator
It shows the indoor air pollution level measured by the particle sensor. The color of air quality
indicator changes in real-time according to the indoor air pollution level.
3-step hygiene humidication system
It consists of humidication, anti-scale and anti-bacterial lters and protects the water in the
water tank and the tray from being contaminated.
A
n
t
i
F
l
u
H
E
P
A
F
il
t
e
r

FOR INFORMATION
MAINTENANCE
HOW TO USE
OTHERS
| 03 |
SAFETY INFORMATION
Danger
Warning
Caution
| 07 |
PARTS NAME
| 09 |
AIR PURIFICATION PROCESS
| 10 |
AIR HUMIDIFICATION
PROCESS
| 10 |
PREPARATIONS
| 12 |
HOW TO USE
| 14 |
ADJUST PARTICLE SENSOR
| 15 |
FILLING UP THE WATER TANK
| 16 |
CLEANING METHOD
| 21 |
FILTER REPLACEMENT
| 23 |
NATURAL VAPORIZATION
HUMIDIFICATION
| 24 |
TROUBLESHOOTING
| 25 |
SPECIFICATION
CONTENTS
DEAR CUSTOMERS
Thank you for using the Coway air purier.
Please read the user’s manual to use and maintain the product correctly.
If you encounter a problem while using the product, you may easily solve the problem by
referring to the user’s manual. As this manual contains the product warranty card,
please keep it in a safe place.
2
1
FEATURES / CONTENTS
Coway
- Please keep the User’s Manual where it can be readily reached or found. -

SAFETY INFORMATION
The following information is for user
safety that should be observed.
It is to ensure user safety and prevent property damage.
Please read the precautions carefully and use the
product correctly.
for 220 V - 240 V use only for 120 V use only
Danger : Failing to follow the precautions below may result
in serious injury or even death.
• Do not use a damaged power plug or loose electric outlet.
• Please connect the power plug to a dedicated grounded electrical
outlet for 220 V - 240 V~ 50 Hz / 60 Hz.
• Do not move the product by pulling only the power cord.
• Do not handle the power plug with wet hands.
• Do not forcefully bend the power cord or place it under a heavy object
to prevent it from being damaged or deformed.
• Do not repeatedly connect and disconnect the power plug.
• If the electric outlet is wet, carefully unplug the product and let the
electric outlet dry completely before subsequent use.
• Make sure to unplug the product before repairing, inspecting or
replacing a part.
• Remove any dust or water from the power plug.
• Do not plug the product into an electrical outlet or power strip that
is being used by several other appliances. Use an electrical outlet
dedicated to the product.
• Unplug the system if it is not used for a long time.
• Do not attempt to repair or modify the power cord yourself.
• If the power cord is damaged, do not replace the cord yourself. Call a
service center to have it replaced.
• Do not install the product near a heating device.
• Do not install the product in locations exposed to moisture or water
(rainwater).

4
3
• Do not use the product in areas where ammable gases or combustible
materials are used or stored.
• Do not insert sharp objects such as a gimlet into the pollution sensor.
• If the product produces a strange noise, burning smell or smoke, unplug
it from the electrical outlet immediately and call our service center.
• Never place the product in water.
• Do not spray any ammable materials such as insecticides or air
fragrances near or into the air inlet.
• Do not disassemble, repair, or modify the product at your own
discretion.
• Do not place any containers with water, medicine, food, metallic objects
or ammable material on top of the product.
• Unplug the system before cleaning it.
• Clean by spraying water directly and do not clean the product using
benzene or thinner.
• Do not use the air purier in a factory or industrial setting where
machine oil may be present in the air.
• Do not eat the antibiotics in the water tray.
• Avoid external impacts to the water tank. A strong impact may damage
the water tank.
• Empty the water tray and the water tank before moving the product.
SAFETY INFORMATION | Danger
For Information

Warning : Failing to follow the precautions below may
result in considerable physical injury or property
damage.
• Do not insert ngers or foreign objects into the air inlet or outlet.
• Do not let children hang on to the product or climb on it.
• When removing the front cover, exercise caution that a part of
your body or any kind of object does not become stuck in the
top part of the product.
• This appliance is not intended for use by persons (including
children) with reduced physical, sensory or mental capabilities,
or lack of experience and knowledge, unless they have been
given supervision or instruction concerning use of the appliance
by a person responsible for their safety.
• Children should be supervised to ensure that they do not play
with the appliance.
• This appliance can be used by children aged from 8 years and
above.
SAFETY INFORMATION

6
5
Caution : Failing to follow the precautions below may result
in slight physical injury or property damage.
• Do not install the product on a sloped surface.
• Do not apply force or impact to the product.
• When the product is in use, maintain a distance of at least 20 cm
from the walls or adjacent objects and 30 to 60 cm above the
product.
• Install the product so that no obstacles block the circulation of
air around the product.
• Install the air purier away from strong articial lighting or direct
sunlight.
• Install the air purier at least 2 m away from electronic appliances
such as a TV.
• Do not install the air purier in a location exposed to direct
sunlight.
• Replace the lters according to the lter replacement cycles.
• Clean the Pre-lter with water regularly and dry it completely
before use.
For Information SAFETY INFORMATION | Warning | Caution

Front / Top View
PARTS NAME
Air quality
indicator
Front cover
Air outlet
Front
humidication
lter
Handle
Particle sensor
Water tank
Rear
humidication
lter
Water tray
Indicators /
buttons

8
7
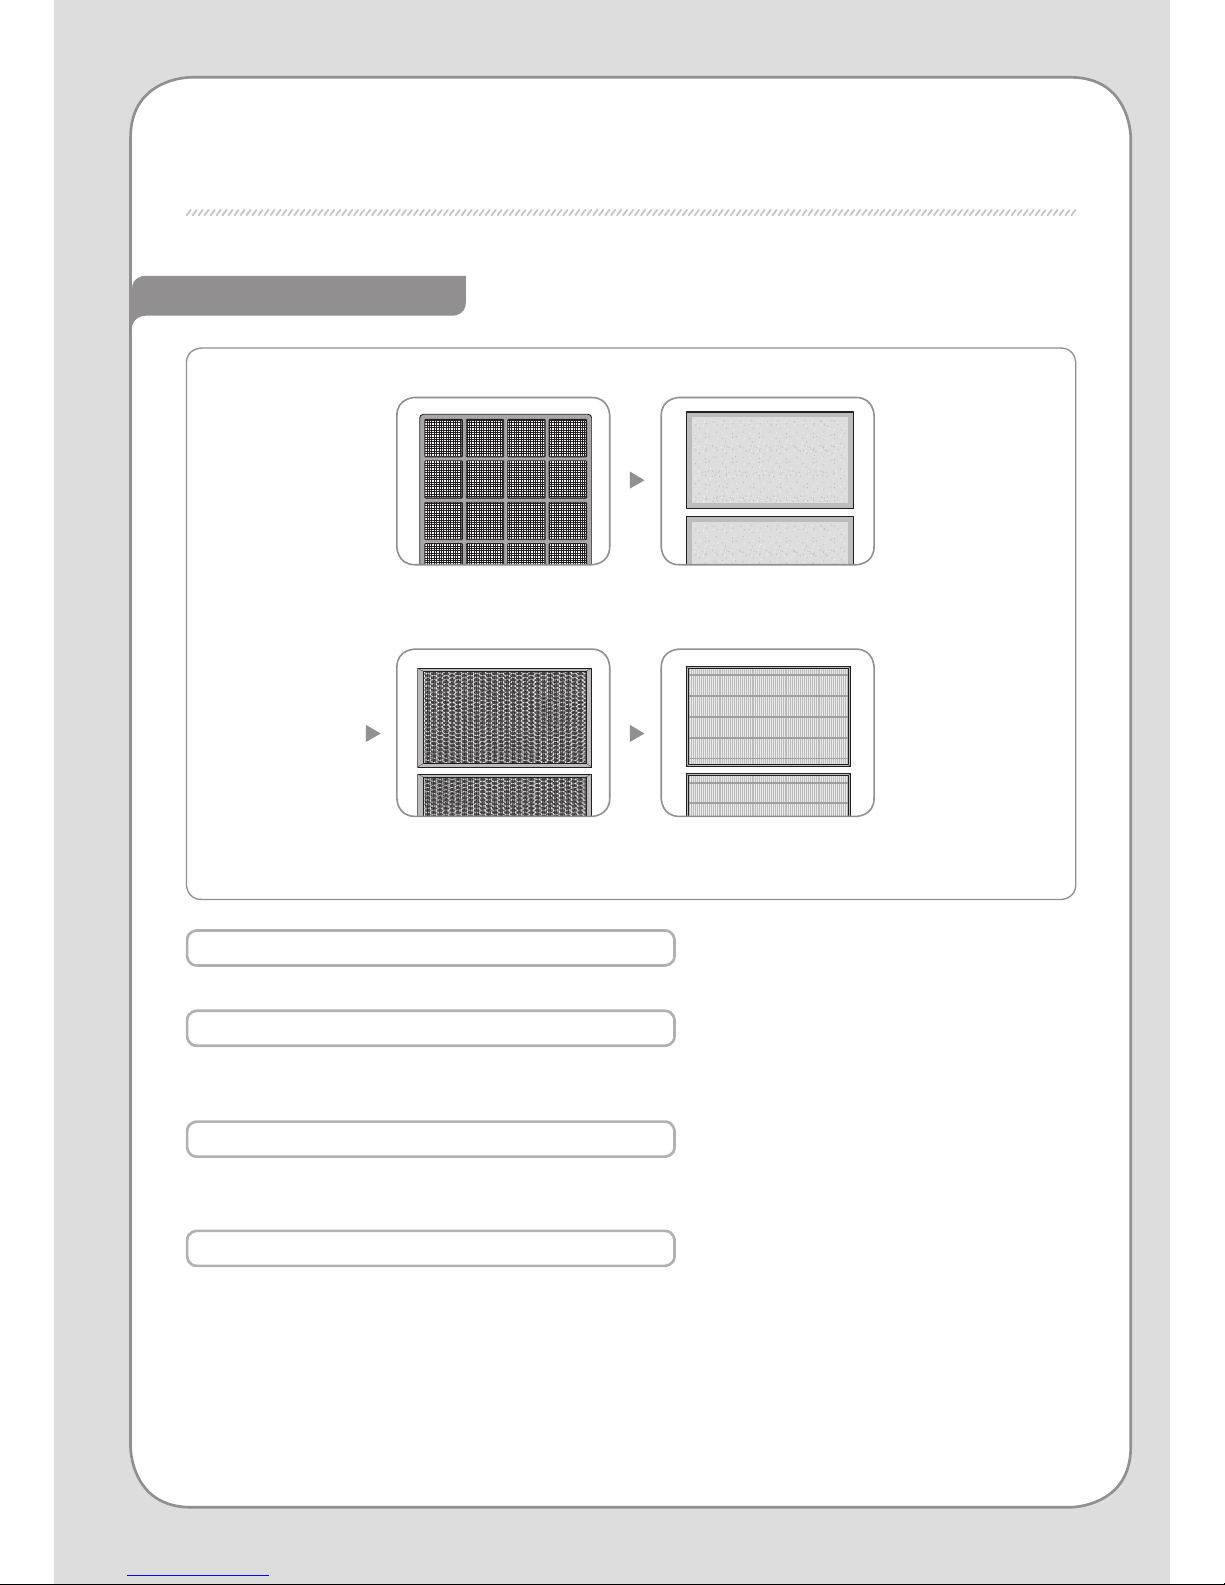
For Information PARTS NAME
1 Air purication, humidication indicators
- When only the air purication indicator is
on : Since the water tank is empty, only the air
purication function is performed.
- When both the air purication and
humidication indicators are on : The
water tank is lled with water and both the
humidication and air purication functions
are performed.
* If the water tank is not installed or not properly
installed, the operation mode indicator blinks.
1 Mode button
Using the mode button, you can select the
operating mode in 3 steps in the following
order: Auto → Silent → Dust.
2 Airow speed button
Using the airow speed button, you can set the
airow speed in 4 steps in the following order:
Step 1 → Step 2 → Step 3 → Turbo (If you press
the airow speed button during an operating
mode, it switches to manual mode immediately).
3 Humidity button
Using the Humidity button, you can set the
humidity level in the following order: 40% →
50% → 60% → Continuous operation (The
congured humidity is only applied in Auto
mode).
4 O-timer button
Pressing the O-timer button changes the
indicator in the following order: “1hr → 4hr →
8hr”. If the o-timer is cancelled, all the indicator
lamps are turned o.
5 Air quality indicator
Represents the pollution level by
the color of the indicator.
Indication Part Operation Part
Clean: Blue
Low pollution level: Bright violet
High pollution level: Red
Medium pollution level: Dark violet
Indication part / Operation part
Power Button
1Air purication,
humidication indicators
Mode indicator Airow indicator
Mode button
1Airow speed button
2
Current/Selected humidity indicator O-timer indicator
Humidity button
3O-timer button
4Light sensor

AIR PURIFICATION PROCESS
Air purication system
3. Deodorization lter 4. ANTI-FLU HEPA™ lter
1. Pre-lter 2. Custom lter
Pre-lter
It removes relatively large dust and mold, human hair, pet hair, and so on.
Custom lter
Customers can select one of 3 types of custom lters according to their requirements:
dust, new-house or old-house lters.
Deodorization lter
The activated carbon particles of the Deodorization lter eectively eliminate food odors and unpleasant
household smells.
ANTI-FLU HEPA™ lter
Coway’s innovative ANTI-FLU HEPA™ captures micro particles and inactivates viruses up to 99.9 %. Natural
substances from Ginkgo and Japanese sumac trees destroy the protein on the surface of viruses.
It also eectively removes ne dust and cigarette smoke while the antibacterial and anti-mold functions of
the organic antibacterial materials eliminate germs and mold.

PREPARATIONS
10
9
AIR PURIFICATION PROCESS / AIR HUMIDIFICATION PROCESS / PREPARATIONS
How to Use
AIR HUMIDIFICATION PROCESS
1 Water tank
- Contains 3 L of water, provides an anti-bacterial eect and promotes the ion-exchange of water.
2 Water tray
- Supplies the appropriate amount of water from the water tank to the humidication lter and provides
an anti-bacterial eect.
3 Humidication lter
- The humidication lter absorbs water. As the puried air from the air outlet passes through the
humidication lter, naturally humidied air is generated.
1 Open the front cover.
Open the front cover by pulling it at the bottom.
- Take care when you do this because excessively pulling the top
or middle part of the front cover may damage the product.
2 Take the lter out and remove the plastic packaging.
Remove the plastic packaging from the lters except for the pre-lter and then install the lters
according to the order of the lters.
How to Install Filter
Tips
- Make sure to remove each lter’s plastic packaging before installing the lters.
- This product is for home use only. Use the product indoors only.
- When the unit is not in use, disconnect the power plug from the electric outlet.
- Check the front part of the lter when installing it.
* The lter order: Pre-lter → Custom lter → Deodorization lter→
ANTI-FLU HEPA™ lter
Humidifying air purication process
FRONT/전면/前
FRONT
前 面

PREPARATIONS
1 Separate the water tank.
2 Separate the water tray as shown by the gure.
3 Install the humidication lter for which the plastic packaging has
been removed.
- Install the lter so that the thin lter faces the front and the thick
lter faces the back.
- Although the humidication lter has a front and a back, it does
not have a top and a bottom.
4 Install the water tray and the water tank in this order.
- The amount of moisture supplied by the humidication lter may decrease as it is contaminated by
scale. Clean the lter at least once a week (see p.17).
- If you do not want to use the humidication function, remove the humidication lter, dry it
completely in the shade and store it in a separate location.
- If the water tank or the water tray is not properly installed, the product will not work.
Front
Rear
Humidication lter

HOW TO USE
Turn the product on by pressing the Power button and select an airow
speed by pressing the Airow speed button.
Step 1 → Step 2 → Step 3 → Turbo
Turn the product on by pressing the Power button and select a mode by
pressing the Mode button.
Auto → Silent → Dust
▶
Auto mode
Automatically controls the airow speed (Step 1, 2, 3 and 4) according to the air pollution level
detected by the particle sensor in order to purify the air more eectively. This operating mode is
appropriate for general users.
Pollution level 1 Pollution level 2 Pollution level 3 or higher
Airow speed Step 1 Step 2 Step 3
▶
Silent mode
Minimizes the airow for the air purication or humidifying air purication operation to ensure a
quiet, pleasant environment. This mode is a low-noise and low power consumption mode.
- In Silent mode, the Airow speed indicator is turned o.
▶
Dust mode
This mode eectively removes any house dust in the room.
This mode maximizes the airow to remove the house dust from the air in the room.
The airow speed continually alternates between steps 3 and 1 regardless of the pollution level.
Airow speed step 3 continues for 10 minutes and then step 1 continues for 30 minutes. Airow
speed step 3 blows the house dust into the air and step 1 puries the air.
▶
Sleep mode (only when Auto mode is selected)
If the surrounding illumination is dark for more than 3 minutes, the unit automatically switches to
sleep mode, lowers the airow speed, noise and power consumption.
If the surrounding illumination is bright again for 5 minutes or longer, the unit resumes normal
operations.
In sleep mode, all displays except for the power indicator are turned o.
- Connect the power plug to the electrical outlet before operating the product.
- When the air purier is turned on, it automatically operates in Auto mode.
Tips
12
11
PREPARATIONS / HOW TO USE
How to Use
To Operate the Manual Mode
To Select the Auto Mode

HOW TO USE
Insert the water tank into the product until it clicks into place.
If the water tank is not completely installed, it may result in a water leakage or malfunction of the product.
2 Set a humidity level by pressing the humidity button.
- You can select Auto mode and adjust the airow speed even
during the humidifying air purication operation.
- The congured humidity is only applied in Auto mode.
1 To use the humidifying air purication function, ll the water tank
with water.
- If you ll the water tank with water, it is automatically detected
by water level sensor and the humidifying air purication
function starts. If the sensor detects that the water tank is
empty, the humidication indicator is turned o and the unit
automatically switches to the air purication operation.
Using the o timer function, you can select 1, 4 or 8 hours before the
unit is turned o.
- To cancel an o timer, press the o-timer button until the o-timer
indicator is turned o.
(1hr → 4hr → 8hr → cancel)
Precautions for installing the water tank
O timer ON/OFF
To use the humidifying air purication function

14
13
HOW TO USE / ADJUST PARTICLE SENSOR
ADJUST PARTICLE SENSOR
1 While the air purier is in operation, press and hold the Airow
speed and Mode buttons at the same time for 3 seconds or more.
2 The Airow speed indicator blinks at an interval of approximately
0.5 seconds.
3 Adjust the sensor sensitivity by pressing the Airow speed button.
The sensitivity of the sensor is represented by the blinking airow
speed indicator.
Step 1 Step 2 Step 3
Sensitive Normal Insensitive
4 When the Airow speed and Mode buttons are pressed and held
simultaneously for 2 seconds or more, the system returns to normal
operation, saving the sensitivity setting.
- If no button is pressed for 10 seconds, the current sensitivity is
automatically saved.
When the product is shipped, the pollution sensor is set to normal sensitivity. If the pollution level stays at
the highest level after 2 hours of operating or stays at the lowest level for more than 1 hour when the air
does not appear clean, users can adjust the sensitivity of the sensor.
3 seconds
2 seconds
How to Use

To ll the water tank with water
1 Separate the water tank from the side of the product by pulling the
separation catch.
2 Separate the water tank cap by turning it counterclockwise.
3 Fill the water tank with water and turn the water tank cap clockwise
until you hear a popping sound.
FILLING UP THE WATER TANK
Do not touch the anti-scale lter of the water tank cap as this may result in a problem with the
product performance.

16
15
FILLING UP THE WATER TANK / CLEANING METHOD
Separate the front cover from the unit and remove any dust attached
to the surface with a soft cloth or brush. Use a damp cloth if the
contamination is serious. (However, do not use abrasives.)
Use a dry, soft cloth to clean the product body. Use a damp cloth if the
contamination is serious. (However, do not use abrasives.)
2 Use a slightly damp cotton swab and lightly clean the lens, dust inlet
and outlet. Then use a dry cotton swab to remove any remaining
moisture.
- Without regular cleaning, the performance of the particle sensor
will deteriorate.
- The cleaning cycle diers depending on the operating
environment. When using the product in a dusty environment,
you will need to clean the sensor more often.
1 Open the particle sensor cover
on the right-hand side of the
product. First, clean the air inlet
and outlet vents and then the
particle sensor using a soft brush
or vacuum cleaner.
Clean the air inlet and outlet with a soft brush.
- Take care that no dust enters the air purier when cleaning it.
CLEANING METHOD
- Always unplug the unit before cleaning it.
- Do not use detergents that contain organic solvents (solvent, thinner, etc), bleach,
chlorine, or abrasives.
- Do not place the unit into water or spray water onto it.
Tips
Cleaning Air Inlet and Outlet (every 2 months)
Cleaning Particle Sensor (every 2 months)
Cleaning front cover
Cleaning the Unit (every 2~4 weeks)
Maintenance
Air outlet
Dust outlet
Dust inlet

1 Separate the water tank from the side of the product and open the water tank cap at the bottom of the
water tank by turning it counterclockwise. If there is any residual water in the water tank, empty the water
tank before cleaning it.
2 Separate the anti-scale lter from the water tank cap.
Add water and a small amount of neutral detergent into the water tank until approximately 1/3 of the
water tank is lled and close the cap by turning it clockwise. Shake the water tank holding it with both
hands as shown by the gure, so that all sides of the water tank can be washed.
- Since the water tank is large, you can clean it by putting your hand into the water tank.
- Do not add a neutral detergent into the water tank when the anti-scale lter is installed. This will
degrade the product performance.
3 Open the water tank cap by turning it counterclockwise and clean it
under owing water.
Wash the anti-scale lter under owing water and install it into the
water tank cap.
-Avoid external impacts to the water tank. A strong impact may
damage the water tank. This may result in water leakage.
-When closing the cap, fasten it rmly in the direction of CLOSE
(clockwise) until you hear a popping sound.
-If the cap is not completely fastened, it may result in a water leakage.
Cleaning the water tank (daily)
CLEANING METHOD
▶
+
Neutral
detergent

18
17
CLEANING METHOD
1 Separate the water tank from the product and separate the water tray from the side of the product by
pulling it.
-When you remove the water
tray as shown by the gure,
take care because there may
be residual water in the hole of
the catch.
2 Carefully separate the humidication lter from the water tray.
-When you separate the humidication lter, some water
absorbed by the lter can be extracted. Please take care of the
water.
Soak the humidication lter in warm water (40 ℃ or lower) for at
least 20 minutes and softly wash it with a cleaning brush under
owing water.
-The period and intensity of the scale accumulation at the front of
the humidication lter may dier depending on the TDS of the
water. If the lter is whitened by the accumulated scale, wash it
under owing water.
4 Dry the water tank completely in a shady location to remove all
moisture before installing it.
-To operate in humidifying air purication mode: Remove any
moisture from outside the water tank, ll up the water tank
with water and install the water tank.
-To operate in air purication mode: Remove any moisture
from outside and inside the water tank and install the water
tank.
Cleaning the water tank (daily)
Cleaning the water tray (daily)
Maintenance

CLEANING METHOD
3 Separate the humidication lter, the blocking lm and the water tray cover from the water tray in this
sequence, and then wash the water tray with a damp, soft cloth or cleaning brush using a neutral detergent
under owing water. Wipe away the moisture from the water tray with a soft, dry cloth and dry it in the
shade.
4 Remove the anti-bacterial case from the water tray and clean it with a cleaning brush.
-Insert the anti-bacterial case into the water tray so that the arrow indicates the inside of the
humidication lter.
-Assemble the water tray cover and assemble the
blocking lm aligning it to the rail.
Table of contents
Languages:
Other Coway Air Cleaner manuals

Coway
Coway AP-1019C User manual

Coway
Coway airmega 400S User manual

Coway
Coway AP-1018F User manual

Coway
Coway AIRMEGA 230(W) User manual

Coway
Coway AP-1717A User manual

Coway
Coway airmega AP-1515G User manual

Coway
Coway Airmega AP-1512HHS User manual

Coway
Coway APMS-0815C User manual

Coway
Coway AP-1008BH User manual

Coway
Coway Airmega AP-1220B User manual

Coway
Coway AIRMEGA AP-2015E User manual

Coway
Coway Airmega 240 User manual

Coway
Coway AIRMEGA AIM User manual

Coway
Coway AP-0512NH User manual

Coway
Coway AP-0805EH User manual

Coway
Coway AP-1018F User manual

Coway
Coway Airmega 250 User manual

Coway
Coway AP-1005AH User manual

Coway
Coway AP-0510IH User manual

Coway
Coway AP-1516D User manual