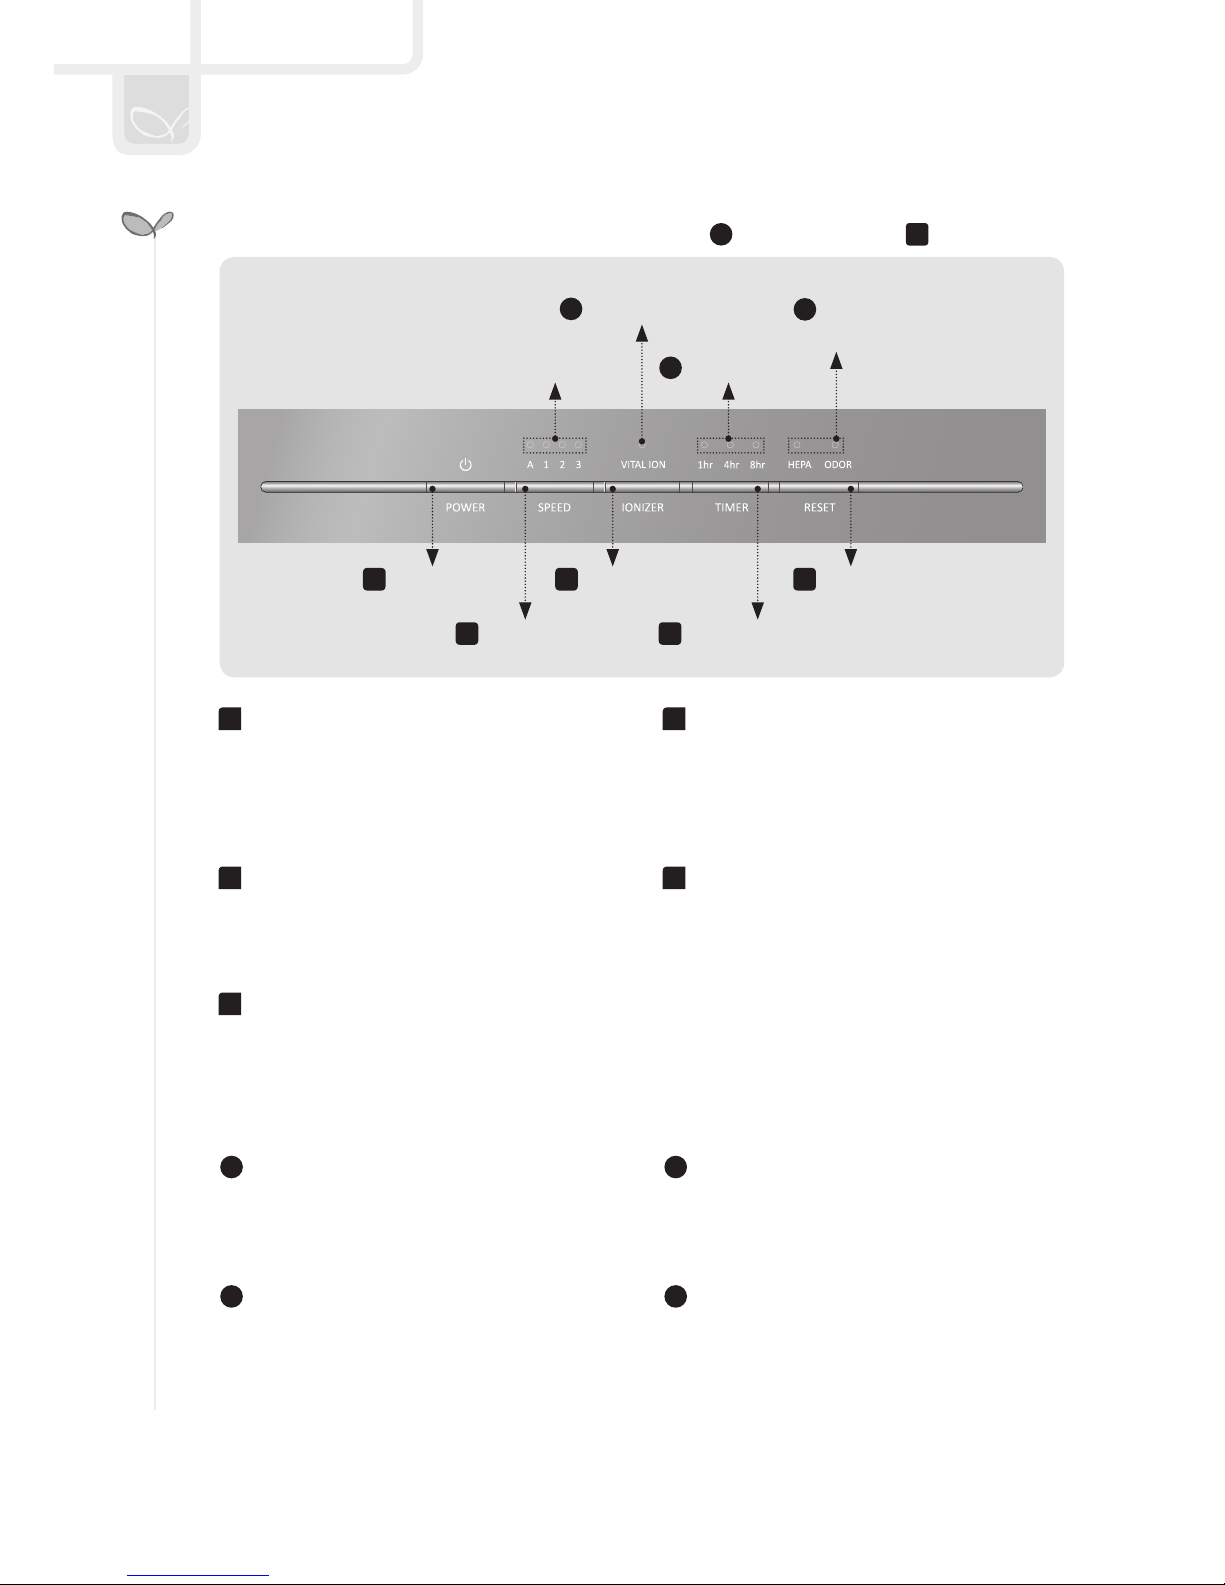
Coway AP-1012GH User manual

AP-1012GH
AIR PURIFIER
Before operating the unit, please read this manual thoroughly,
and retain it for future reference.
Owner’s
Instructions
- English
- Français
- Español

FEATURES
The True HEPA lter is capable of trapping airborne allergens and contaminants
down to 0.3 microns. It reduces airborne bacteria, mold spores and particles
that carry viruses. The unit’s lter system has been optimized to remove indoor
pollutants fast and effectively.
It shows the indoor air pollution level measured by the dust sensor.
The color of air quality indicator changes according to the indoor air pollution level
in real time. (Blue → Dark Purple → Red)
The product checks the lter replacement cycle and turns on the relevant indicator,
improving customer convenience with regard to lter replacement.
The Timer feature allows you to control how long you want the air purier to run
before automatically powering off.
CONTENTS
FEATURES .......................................01
CONTENTS ......................................01
SAFETY INFORMATION ..................02
PARTS NAME ...................................04
- Front / Rear ...............................04
- Operation / Indication Part ........05
AIR PURIFICATION PROCESS .......06
PREPARATIONS ..............................07
- How to Install Filter ....................07
HOW TO USE ...................................08
ADJUST AIR QUALITY SENSOR ....09
CLEANING METHOD .......................10
FILTER REPLACEMENT ..................12
- Filter Cleaning and Replacement
Cycles ........................................12
- Resetting the lter replacement
indicator .....................................12
- Forcible Reset Mode .................12
TROUBLE SHOOTING ....................13
SPECIFICATIONS ............................14
WARRANTY CARD ..........................18
1

DANgER :
• Do not use a damaged power plug or loose electric outlet.
• Please connect the power plug to a dedicated grounded electrical outlet for 120 V, 60 Hz.
• Do not move the product by pulling only the power cord.
• Do not handle the power plug with wet hands.
• Do not forcefully bend the power cord or place it under a heavy object to prevent it from being
damaged or deformed.
• Do not repeatedly connect and disconnect the power plug.
• If the electrical outlet is wet, carefully unplug the product and let the electric outlet dry
completely before subsequent use.
• Make sure to unplug the product before repairing, inspecting or replacing a part.
• Remove any dust or water from the power plug.
• Do not plug the product into an electrical outlet or power strip that is being used by several other
appliances. Use an electrical outlet dedicated to the product.
• Unplug the system if it is not used for a long time.
• Do not attempt to repair or modify the power cord yourself.
• If the power cord is damaged, do not replace the cord yourself. Call a service center to have it
replaced.
• Do not install the product near a heating device.
• Do not install the product in locations exposed to moisture or water (rainwater).
• Do not use the product in areas where ammable gases or combustible materials are used or
stored.
• Do not insert sharp objects such as a gimlet into the pollution sensor.
• If the product produces a strange noise, burning smell or smoke, unplug it from the electrical
outlet immediately and call our service center.
• Never place the product in water.
• Do not spray any ammable materials such as insecticides or air fragrances near or into the air
inlet.
• Do not disassemble, repair, or modify the product at your own discretion.
• Do not place any containers with water, medicine, food, metallic objects or ammable material
on top of the product.
• Unplug the system before cleaning it.
• Do not Clean by spraying water directly and do not clean the product using benzene or thinner.
• Use the product for home or business use according to the model.
• Do not use the air purier in a factory or industrial setting where machine oil may be present in
the air.
2

3
• The appliance is not to be used by children or persons with reduced physical, sensory or mental
capabilities, or lack of experience and knowledge, unless they have been given supervision or
instruction.
• Do not insert ngers or foreign objects into the air inlet or outlet.
• Do not let children hang on to the product or climb on it.
• When removing the front cover, exercise caution that a part of your body or any kind of object
does not become stuck in the top part of the product.
• This appliance has a polarized plug (one blade is wider than the other). To reduce the risk of
electric shock, this plug is intended to t in a polarized outlet only one way. If the plug does not
t fully in the outlet, reverse the plug. If it still does not t, contact a qualied electrician. Do not
attempt to defeat this safety feature.
• Do not operate any fan with a damaged cord or plug. Discard fan or return to an authorized
service facility for examination and/or repair.
• Do not run cord under carpeting. Do not cover cord with throw rugs, runners, or similar
coverings. Arrange cord away from trafc area and where it will not be tripped over.
• Do not install the product on a sloped surface.
• Do not apply force or impact to the product.
• When the product is in use, maintain a distance of at least 20 cm from the walls or adjacent
objects and 30 to 60 cm above the product.
• Install the product so that no obstacles block the circulation of air around the product.
• Install the air purier away from strong articial lighting or direct sunlight.
• Install the air purier at least 2 m away from electronic appliances such as a TV.
• Do not install the air purier in a location exposed to direct sunlight.
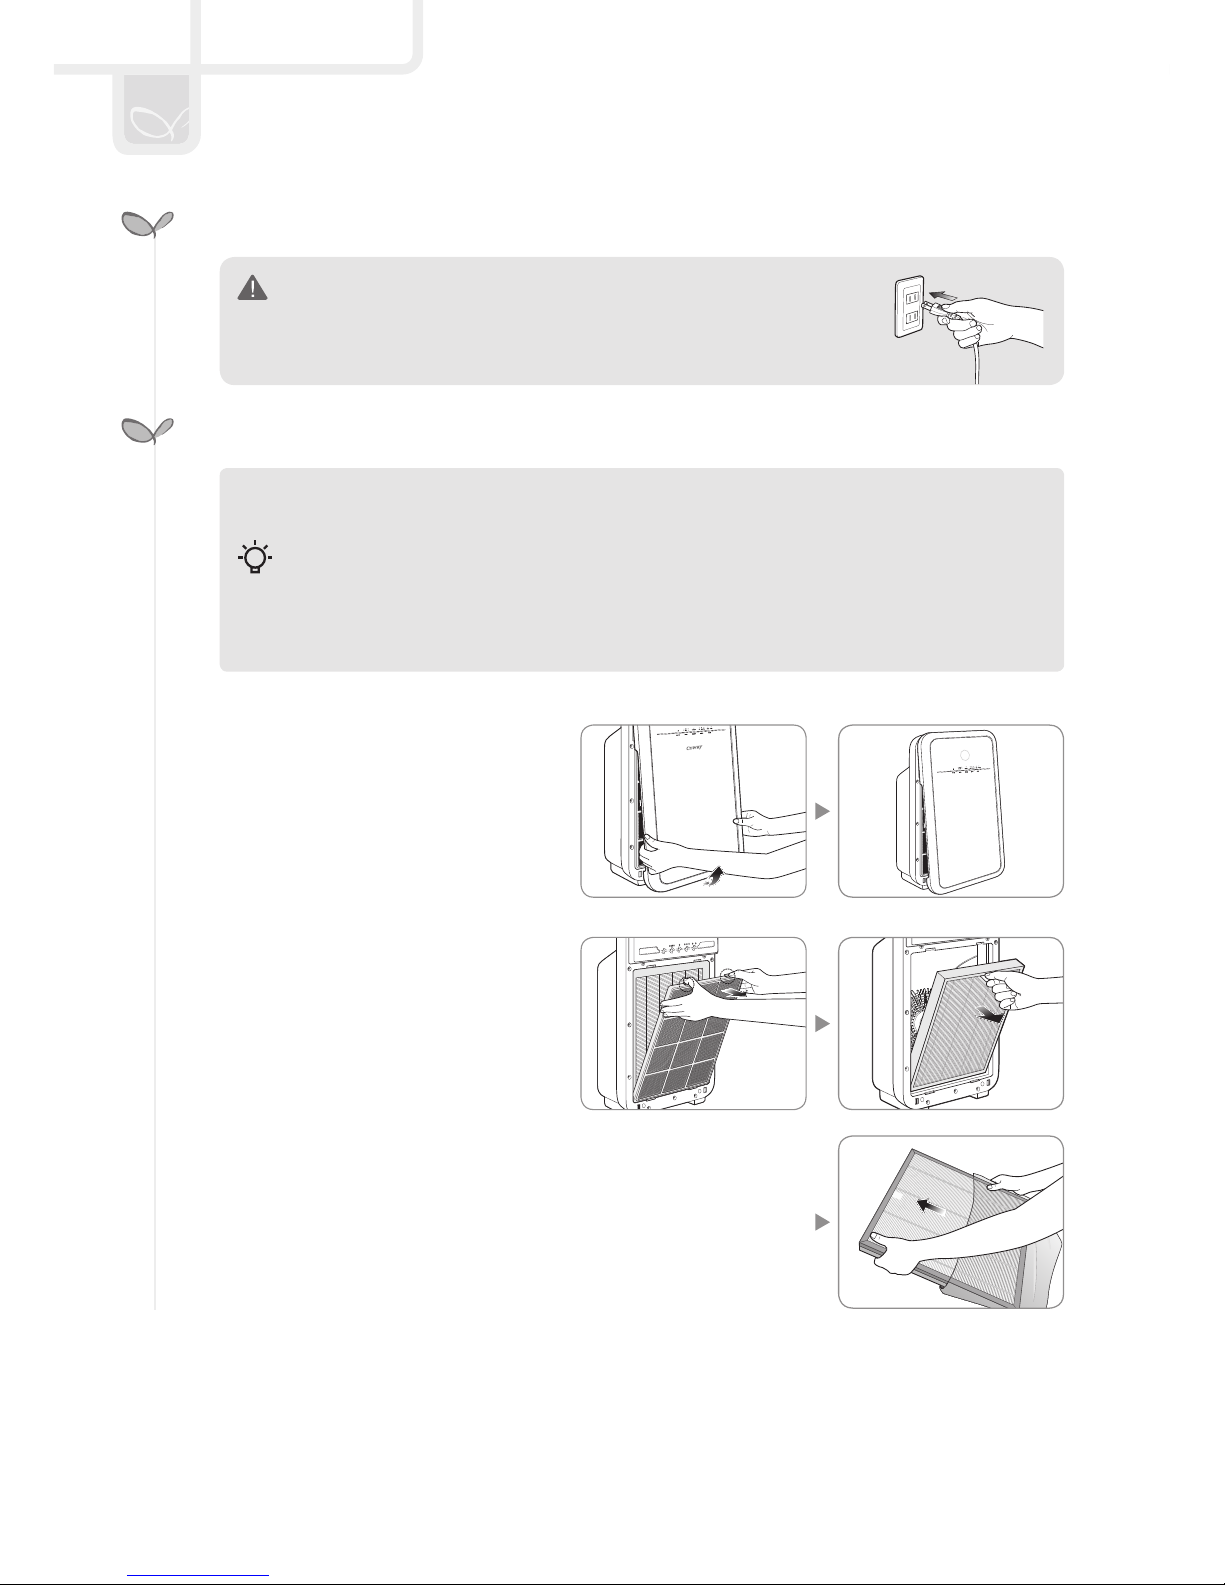
• Replace the lters according to the lter replacement cycles.
• Clean the Pre-lter with water regularly and dry it completely before use.
• Suitable for use with solid-state speed controls.
• Cleaning and user-maintenance, such as lubrication, may result in re, electric shock, or injury
to persons.
• Unplug or disconnect the appliance from the power supply before servicing.

It displays the current pollution level of the room.
4
1
1
2
3
2Display part/
operation
part
3Air quality
sensor
4Front cover
1Air Quality
indicator
Handle
2Air outlet
3Power cord
Clean:Blue Polluted:
Dark purple
Highly
polluted: Red
- The quality level of the indoor air can be determined by
the color of the round lamp located at the front of the air
purier.
1
2
3
4

5
Indication Part Operation Part
3Timer indicator
1Power Button
4Timer Button
4Filter Replacement
indicator
5Filter Reset
Button
2Speed Button
3Ionizer Button
2Ionizer indicator
1
Use this button to turn the air purier on
or off.
- To power off, press and hold the
power button for one second.
2
Use this button to adjust the fan speed.
Available settings for the fan speed are
1 → 2 → 3 → Auto.
3
Use this button to turn the Ionizer on
or off.
4
Use this button to turn off the air purier
after a predetermined period of time.
Available timer settings are 1H, 4H, and 8H.
5
When the lter replacement indicator Is
turned on, replace the concerned lter
and press the RESET button.
1
It shows the current fan speed. Each
indicator is turned on as per its airow
speed.
2
It shows whether the ionizer is turned on
or off.
3
It shows the current time setting for air
purication. Each indicator is turned on as
per its set timer.
4
Replace the lter when this indicator is
on. Refer to lter replacement cycle for
each lter.

6
It removes relatively large dust and mold, human hair, pet hair, and so on.
Features a granular active carbon, which is particularly effective at trapping odors and harmful
gases to keep your home smelling fresh.
True HEPA Filter
The high-performance composite True HEPA lter effectively removes ne dust and cigarette
smoke up to 99.97%. It reduces airborne bacteria, mold spores and particles that carry viruses.

7
- Open the front cover by pulling
the lower part of it.
- Remove the plastic packing of
the lters and install the lters by
proper order.
- Make sure to remove each lter’s plastic packing before installing lters.
- The product is for household use. Use the product indoors only.
- When the product is not in use, remove the power plug from the electric outlet.
- When installing lters, make sure that lter direction is correct (Front/Back).
► Order of lters : Pre-lter → Deodorization Filter → True HEPA Filter
Tips
Make sure to connect the power plug to a grounded electric outlet
(120 V~, 60 Hz) dedicated to the product.

8
HOW TO USE
Press the power button and then select
the speed of the fan by pressing the speed
button.
1 → 2 → 3 → Auto
The Timer feature instructs the air purier to automatically power off
after 1, 4, or 8 hours.
- To deactivate the timer, press and hold the Timer button until the
indicator is no longer lit.
- 1H → 4H → 8H → Timer Off
- Before operating the product, connect the power plug to the electric outlet.
- When the air purier is turned on, it automatically operates in Auto mode.
Tips
►
Automatically optimizes the speed setting 1 through 4 based on the level of Indoor air
quality detected by dust sensor.
This mode is recommended for general users.

9
1. While the air purier is powered on, press the Speed buttons
for two seconds.
2. The Speed indicator will ash at 0.5 second intervals.
3. Adjust the sensitivity by pressing the speed button. The
sensitivity of the sensor is displayed by a blinking airow
speed indicator.
Speed step 1 Speed step 2 Speed step 3
Sensitive Standard Insensitive
- High Sensitivity: If the air purier indicates a pollution level of 1 for longer than one hour
when the actual pollution level is higher.
- Low Sensitivity: If the air purier continues to indicate the highest pollution level even after
running the air purier for more than two hours.
4. Press the Speed button for 2 seconds to apply the new sensor
sensitivity setting. The air purier will then resume normal
operations.
- The new setting will also be applied if no other button is
pressed for 10 seconds.
When the product is shipped out, the air quality sensor is set to standard sensitivity. If the
pollution level stays at the highest level after 2 hours of operation or stays at the lowest level
for more than 1 hour when the air does not seem clean, users can adjust the sensitivity of the
air quality sensor as follows.
2 seconds
2 seconds

1. Open the air quality sensor cover on
the right-hand side of the product.
Clean the air inlet and outlet vent
and then the air quality sensor with a
soft brush or vacuum cleaner.
2. Wet a cotton swab lightly and clean
the lens, dust inlet, and dust outlet. Clean them with a dry cotton
swab to remove remaining moisture.
- Without regular cleaning, the performance of the pollution
sensor deteriorates.
- The cleaning cycle differs depending on the operation
environment. When using the product in a dusty environment,
clean the sensor more often.
Clean the air inlet and outlet with a soft brush.
- Exercise caution not to have dust fall inside the air purier.
- If covered in dust, run the air purier in manual mode for 10 minutes
to blow the dust off the vent. You may then continue with normal
use.
Separate the front cover from the product and remove the dust
attached to the surface with a soft dry brush or cloth.
- Use lightly wet cloth if the contamination is serious but do not use
abrasives.
Use dry, soft cloth to clean the product.
- Use lightly wet cloth if the contamination is serious but do not use
abrasives.
- Always unplug the air purier before cleaning the product.
- Do not use detergents that contain organic solvents (solvent, thinner, etc), bleach,
chlorine, or abrasives.
- Do not put the air purier in water or spray water directly on it.
Tips
Air
outlet
Air
inlet
Dust outlet
Dust inlet

11
1. Open the front cover by pulling the
lower part of it.
2. Press down on the top clip of the pre-lter and pull it out.
- To prevent dust from falling off, remove the lter carefully
without exerting a shock.
3. Clean the Pre-ler with a vacuum cleaner or with water
depending on the level of contamination.
4. Install the Pre-lter after removing the moisture completely. Fit the
front cover back to the product.
- When retting the Pre-lter to the product, t it in the hook
correctly.
- Always unplug the product before cleaning the lter.
- The pre-lter is reusable by removing dust or cleaning it with water.
- If the pre-lter is not cleaned for a long time, the product performance may deteriorate.
- Deodorization lter and True HEPA lter cannot be cleaned and reused. Never clean
them with water.
Tips

12
Filter
Pre-Filter Every 2~4 weeks Cleaning
Deodorization Filter Every 1 year Replacement
True HEPA Filter Every 3 years Replacement
- Each service life is based on 8-hour use in maximum air speed.
- The recommended lter replacement cycles may differ depending on the operating
environment.
1. Reset indicator blinks when the lter needs to be replaced.
2. Odor LED : Deodorization Filter
HEPA LED : True HEPA Filter
3. The pollution level indicator will not turn on if the lter
replacement indicator is activated.
4. After replacing lter, push the Reset button for 2 seconds.
When you have replaced a lter before the lter replacement cycle is
reached, you can forcibly reset the lter replacement cycle back to the factory default setting.
1. When the reset function is not activated, press and hold the reset button for 2 seconds.
2. Press the reset button to select the desired lter to forcibly reset.
Press once : Odor LED (Deodorization Filter)
Press twice : HEPA LED (True HEPA Filter)
3. After you select the lter to reset, press and hold the reset button for 2 seconds. And then,the
accumulated time in electronic time counter is erased.
- If there is no input for 10 seconds in forcible reset mode, the reset mode is cancelled.
- Check that the ‘front’ sides of lters are in the correct direction.
- To maintain optimal performance of the product, use original Coway lters.
- Always unplug the air purier before replacing lters.
Tips
2 seconds

Symptom Check Measures to take
No air is blowing.
•Is the power cord connected? Connect the power cord to an electric
outlet for 120 V~, 60 Hz.
•Is the display part all turned off? Press the power button and then select
the desired function.
• Isn’t the power gone out? Use the air purier after the power comes
back on.
• Is the front cover closed? Close the front cover properly.
The airow speed does
not change. • Isn’t it in manual? Set the desired operating mode.
The airow speed is
signicantly weaker
than before.
• Isn’t the lter cleaning or
replacement time passed?
Check the lter cleaning and replacement
cycles and then clean/replace the lter(s)
if necessary.
A bad smell comes out
of the air outlet.
• Isn’t the lter cleaning or
replacement time passed?
Check the lter cleaning and replacement
cycles and then clean/replace the lter(s)
if necessary.
The color of the
pollution level indicator
always stays the same.
• Isn’t there dust on the pollution
sensor’s lens? Clean the lens of the pollution sensor.
• Does the pollution level keep
indicating a high level?
Adjust the sensitivity of the pollution
sensor to Insensitive or standard.
• Does the pollution level keep
indicating a low level?
Adjust the sensitivity of the pollution
sensor to sensitive or standard.
When other functional
problems are detected. • Check the symptoms, unplug the product, and ask service center.
The air purier may operate abnormally not because of the product malfunction but because
of minor causes or the fact that the user is not familiar with the product use. In such a case,
problems can be solved easily even without the help from the service center just by checking
the following. If the problem still persists after you check the following, contact the service
center.
13

Product specication
Model AP-1012GH
Rated voltage 120 V~, 60 Hz
Phase Single Phase
Power consumption 90 W
Product insulation grade Grade 2 device
Dust collection method Mechanical dust collection method (True HEPA lter)
Safety feature Fan Motor is shut down when front cover is open.
Installation place Indoor use
Maximum volume of air 197.76 ft3/min
Size 13.77 inch(W) X 8.62 inch(D) X 24.72inch(H)
Weight 16.75 Lbs
► Specications are subject to change without notice.
14

FEATURES
The True HEPA lter is capable of trapping airborne allergens and contaminants
down to 0.3 microns. It reduces airborne bacteria, mold spores and particles
that carry viruses. The unit’s lter system has been optimized to remove indoor
pollutants fast and effectively.
It shows the indoor air pollution level measured by the dust sensor.
The color of air quality indicator changes according to the indoor air pollution level
in real time. (Blue → Dark Purple → Red)
The product checks the lter replacement cycle and turns on the relevant indicator,
improving customer convenience with regard to lter replacement.
The Timer feature allows you to control how long you want the air purier to run
before automatically powering off.
1
Le ltre True HEPA peut capturer jusqu’à 0,3 micron de particules allergènes et de
contaminants. Il réduit les bactéries en suspension, les spores de moisissure et
les particules véhiculant des virus. Le système de ltre de l’appareil a été optimisé
pour retirer les polluants intérieurs rapidement et efcacement.
Indique le niveau de pollution de l’air intérieur mesuré par le capteur de poussière.
La couleur du voyant de la qualité de l’air varie en temps réel en fonction du
niveau de pollution de l’air intérieur.
(Bleu → Mauve foncé → Rouge)
Le produit vérie la fréquence de remplacement du ltre et active le voyant
approprié, facilitant ainsi le remplacement du ltre par le client.
La fonction de minuterie permet de contrôler la durée de fonctionnement du
puricateur d’air avant son arrêt automatique.
FONCTIONNALITÉS ........................01
SOMMAIRE ......................................01
CONSIGNES DE SÉCURITÉ ...........02
NOM DES PIÈCES ...........................04
- Vues avant et arrière .................04
- Commande/Voyant ....................05
PROCESSUS DE PURIFICATION DE
L’AIR .................................................06
AVANT UTILISATION .......................07
- Installation du ltre ....................07
UTILISATION DE L’APPAREIL .........08
RÉGLAGE DU CAPTEUR DE
QUALITÉ DE L’AIR ...........................09
NETTOYAGE DE L’APPAREIL .........10
REMPLACEMENT DU FILTRE ........12
- Cycles de nettoyage et
remplacement de ltre ...............12
- Réinitialisation de l’indicateur de
remplacement du ltre ...............12
- Mode de réinitialisation forcée .. 12
DÉPANNAGE ...................................13
CARACTÉRISTIQUES TECHNIQUES
. . 14
CARTE DE GARANTIE ....................18

2
DANgER :
• N’utilisez jamais une che ou une prise électrique endommagée ou défectueuse.
• Branchez la che d’alimentation dans une prise murale (que vous réserverez exclusivement à
cet appareil) reliée à la terre de 120 V, 60 Hz.
• Ne déplacez pas le produit en tirant seulement sur le cordon électrique.
• Ne manipulez pas la che électrique avec les mains mouillées.
• Ne pliez pas avec force le cordon d’alimentation ou ne le placez pas sous un objet lourd an
d’éviter qu’il ne soit endommagé ou déformé.
• Évitez de brancher et de débrancher le cordon d’alimentation de façon répétée.
• Si la prise murale est humide, débranchez l’appareil avec précaution et laissez la prise sécher
complètement avant de le rebrancher.
• Veillez à débrancher l’appareil avant toute opération de réparation, maintenance ou
remplacement de pièces.
• Retirez toute trace de poussière ou d’eau de la prise murale.
• Ne branchez jamais l’appareil sur une prise ou multiprise utilisée par plusieurs autres appareils.
Utilisez une prise réservée exclusivement à cet appareil.
• Débranchez le système s’il n’est pas utilisé pendant une durée prolongée.
• Ne tentez pas de réparer ou de modier vous-même le cordon d’alimentation.
• Si le cordon d’alimentation est endommagé, ne tentez pas de le remplacer vous-même. Appelez
un centre de réparation pour le faire remplacer.
• N’installez pas l’appareil à proximité d’une source de chaleur.
• N’installez pas l’appareil dans un endroit exposé à l’humidité ou à l’eau (ex. : eau de pluie).
• N’installez pas l’appareil à proximité de gaz inammables ou de matières combustibles.
• N’insérez pas d’objets pointus comme une vrille dans le capteur de pollution.
• Si l’appareil émet des bruits étranges, une odeur de brûlé ou de la fumée, débranchez-le
immédiatement de la prise murale et appelez notre centre de réparation.
• N’immergez jamais l’appareil dans l’eau.
• Ne vaporisez pas de matériaux inammables (ex. : insecticides ou parfums) à proximité de ou
dans l’entrée d’air.
• Ne tentez jamais de démonter, réparer ou modier l’appareil vous-même.
• Ne posez pas de récipients remplis d’eau, de médicaments, de nourriture, d’objets métalliques
ou de matériaux inammables sur le dessus de l’appareil.
• Débranchez l’appareil avant de le nettoyer.
• Ne nettoyez pas l’appareil en pulvérisant directement de l’eau et n’utilisez ni benzène ni diluant.
• Utilisez l’appareil dans un cadre domestique ou professionnel selon le modèle.
• N’utilisez pas le puricateur d’air dans une usine ou une entreprise où l’huile des machines peut
être présente dans l’air.

3
• Cet appareil n’est pas conçu pour être utilisé par des personnes (y compris les enfants)
inexpérimentées ou dont les capacités physiques, sensorielles ou mentales sont réduites, sauf
si celles-ci sont sous la surveillance ou ont reçu les instructions d’utilisation appropriées de la
personne responsable de leur sécurité.
• N’insérez pas le doigt ou tout corps étranger dans les entrées et sorties d’air.
• Ne laissez pas les enfants se suspendre au produit ou grimper dessus.
• Lorsque vous retirez le capot avant, faites attention à ce qu’aucune partie de votre corps ni
aucun objet ne se coince dans la partie supérieure de l’appareil.
• Cet appareil est muni d’une che polarisée (une lame plus large que l’autre). An de réduire
les risques d’électrocution, cette che a été conçue de manière à ne pouvoir être insérée que
d’une seule façon dans une prise murale polarisée. Si la che n’entre pas parfaitement dans la
prise, retournez-la. Si la che ne paraît toujours pas adaptée à la prise, contactez un électricien
qualié. Ne tentez pas de contourner cette mesure de sécurité.
• Ne faites jamais fonctionner un ventilateur quel qu’il soit si le cordon d’alimentation ou la prise
murale est endommagé(e). Ne l’utilisez plus ou remettez-le à un centre de réparation agréé
pour examen et/ou réparation.
• Ne faites pas passer le cordon sous un tapis ou une moquette. Ne le recouvrez pas non plus
d’un revêtement de ce type. Faites cheminer le cordon à l’écart des zones de passage an
d’éviter tout accident.
• N’installez pas l’appareil sur une surface inclinée.
• Évitez de soumettre l’appareil à un choc brutal.
• Pendant l’utilisation, placez l’appareil à au moins 20 cm des murs ou des objets situés à
proximité et assurez un espace libre de 30 cm à 60 cm au-dessus de celui-ci.
• Installez l’appareil de façon à ce que rien ne puisse entraver la circulation de l’air.
• Installez le puricateur d’air à l’écart des éclairages puissants ou des rayons directs du soleil.
• Installez le puricateur d’air à au moins 2 m des appareils électroniques tels qu’un téléviseur.
• N’installez pas le puricateur d’air dans un lieu exposé aux rayons directs du soleil.
• Remplacez les ltres en fonction de leur cycle de remplacement.
• Nettoyez le pré-ltre régulièrement à l’eau et séchez-le complètement avant de l’utiliser.
• Adapté à une utilisation avec des commandes de vitesse à semi-conducteurs.
• Le nettoyage et l’entretien effectués par l’utilisateur, tels que la lubrication, peuvent provoquer
des incendies, des électrocutions ou des blessures.
• Débranchez ou déconnectez l’appareil de son alimentation avant toute réparation ou entretien.

4
Afche le niveau de pollution actuel de la pièce.
1
1Voyant de la
qualité de l’air
3Capteur de
qualité de l’air
4Capot avant
2Composants
d’afchage/
Composants
de commande
Poignée
2Sortie d’air
3Cordon
d’alimentation
Excellente :
bleu
Mauvaise :
violet
Très mauvaise :
rouge
- Le niveau de la qualité de l’air intérieur peut être déterminé grâce
à la couleur du voyant situé à l’avant du puricateur d’air.
1
2
3
4
1
2
3

5
Indication Part Operation Part
3Voyant de
minuterie
1Bouton de mise
en marche
4Bouton de minuterie
4Indicateur de
remplacement du ltre
5Bouton de réinitialisation
des ltres
2Bouton de réglage
du débit
3Ionizer Button
1Voyant de débit
2Voyant de l’ionisateur
1
Ce bouton permet d’allumer ou d’éteindre
le puricateur d’air.
- Pour éteindre l’appareil, appuyez sur
le bouton pendant 1 seconde.
2
Ce bouton permet de régler la vitesse du
ventilateur. Les réglages disponibles pour
la vitesse du ventilateur sont 1→ 2→ 3
→ Auto.
3
Utilisez ce bouton pour activer ou
désactiver l’ionisateur.
4
Ce bouton permet d’éteindre le
puricateur d’air après une période
prédéterminée. Les réglages disponibles
pour la minuterie sont 1h, 4h et 8h.
5
Lorsque le voyant de remplacement
du ltre s’allume, remplacez le ltre
concerné et appuyez sur le bouton
RÉINITIALISATION.
1
Permet d’indiquer la vitesse du ventilateur
actuelle. Chaque voyant s’allume selon la
vitesse du débit d’air.
2
Il indique si l’ionisateur est allumé ou
éteint.
3
Permet d’afcher le réglage de l’heure
actuelle pour la purication de l’air.
Chaque voyant s’allume selon le réglage
de la minuterie.
4
Remplacez le ltre lorsque le voyant est
allumé. Reportez-vous à la fréquence de
remplacement des ltres pour chaque
ltre.
Table of contents
Languages:
Other Coway Air Cleaner manuals

Coway
Coway AP-3008FH User manual

Coway
Coway AP-1019C User manual

Coway
Coway airmega AP-1515G User manual

Coway
Coway AP-1018F User manual

Coway
Coway AIRMEGA AIM User manual

Coway
Coway AP-1512HH User manual

Coway
Coway AIRMEGA Icon User manual

Coway
Coway Airmega AP-1220B User manual

Coway
Coway AP-1005AH User manual

Coway
Coway AP-1512HH User manual

Coway
Coway Airmega 160 User manual

Coway
Coway AP-1008CH User manual

Coway
Coway AP-1018F User manual

Coway
Coway AP-1018F User manual

Coway
Coway AP-1717A User manual

Coway
Coway Airmega 200M User manual

Coway
Coway Air Purifier AP-1008DH User manual

Coway
Coway AP-2505CH User manual

Coway
Coway AP-1008BH User manual

Coway
Coway AIRMEGA 230(W) User manual