Coxo C-SMART-I+ User manual

C-SMART-I+
ENDODONTIC TREATMENT INSTRUMENT
Ver1.1 Revision Date:2015-06-24
AUTO1
介绍
Safety caution
CAUTION:
Please read the following information completely
before use this product.
1.This unit must be used as the user's guide mentions, not for other
purpose. Please refer to the usage instruction strictly. We won't take
the responsibility for the damage caused by improper use.
2.Before using the main power, make sure the power voltage is according
to adaptor voltage range. Improper input voltage will damage the unit
and cause danger to operator or patient.
3.Please use the original accessories, such as: contra angle, adaptor, and
battery. We won't take the responsibility to any problem or damage
caused by using other parts which are not supplied by us.
4.To avoid electric shock, don't insert any other parts into the unit; it may
cause electric shock or damage.
5.Avoid the detergent go into the unit, in case that causes the short circuit
or problem.
6.Please turn off the instrument at once when something wrong with it.
It's not allowed to modify the unit at any condition. Any disassembling
or modification will cause the invalidation of the guarantee.
7.Please use the intact standard file. Or it would cause damage to the
patient while working.
8.Protect the instrument from ambient electromagnetic interference.
When there is a patient who is using the cardiac pacemaker, or there is
an electronic operation, please don't put the machine around.
9.Unstable voltage and being under electromagnetic environment will
interfere with the normal operation.
10.When discard the accessories, please abide with the local regulation,
if necessary, contact our service centre to recover it.
11.This unit is just for the professional user.
介绍
Intended use
The unit is the supplementary root-canal treatment device, which can
assist the dentists to operate more standard root-canal in the process of
root-canal treatment, The unit is suitble for NiTi rotary files.
This product provides only to the dentists who have already been trained
and use only in clinic and laboratory.
1
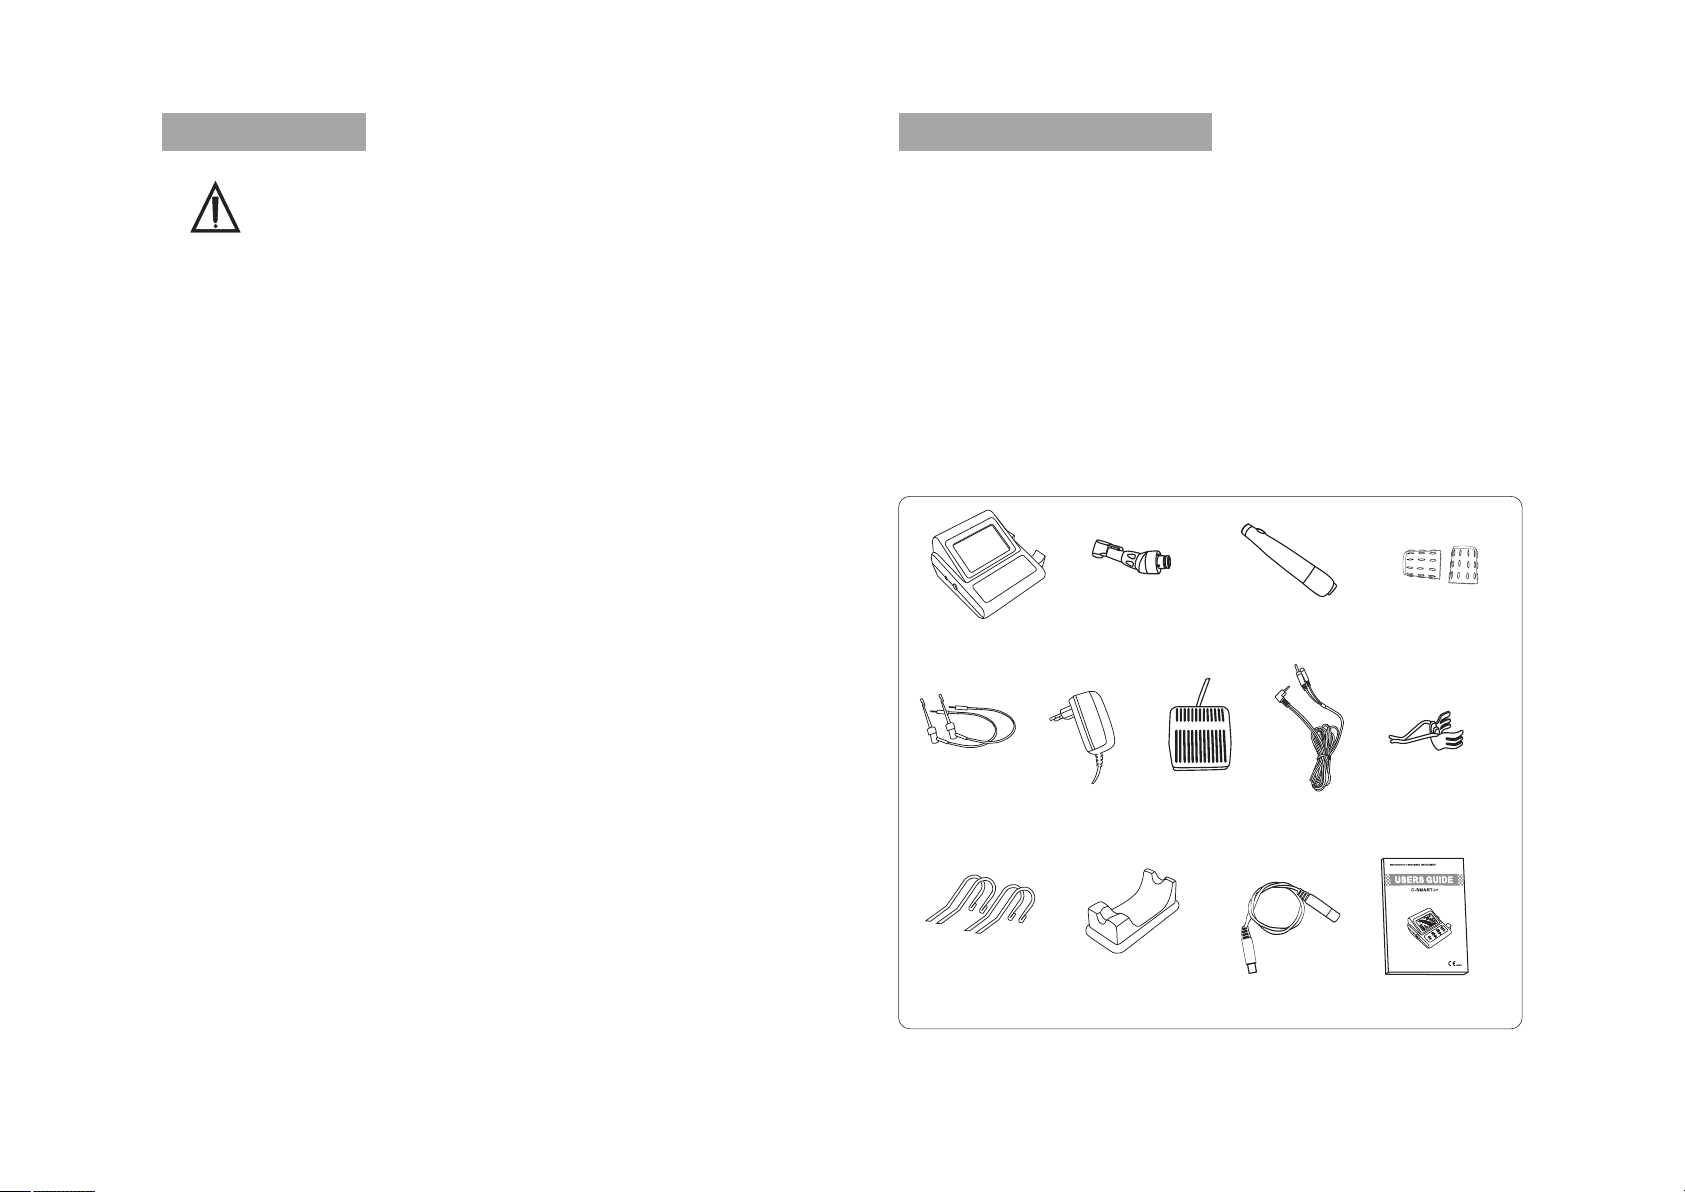
介绍
Standard configuration
Main unit
Contra angle
Motor handle
Silicon coat
File holder
Adaptor
Foot switch
Test wire
Contra angle holder
Lip hook
Handle base
Lip hook line
Usage manual
Torque card
2
Main unit Contra angle Motor handle
File holder Adaptor Foot switch Test wire
Contra angle
holder
Lip hook Handle base Lip hook line Usage manual
Silicon coat
1
1
1
2
2
1
1
1
1
4
1
1
1
1
4
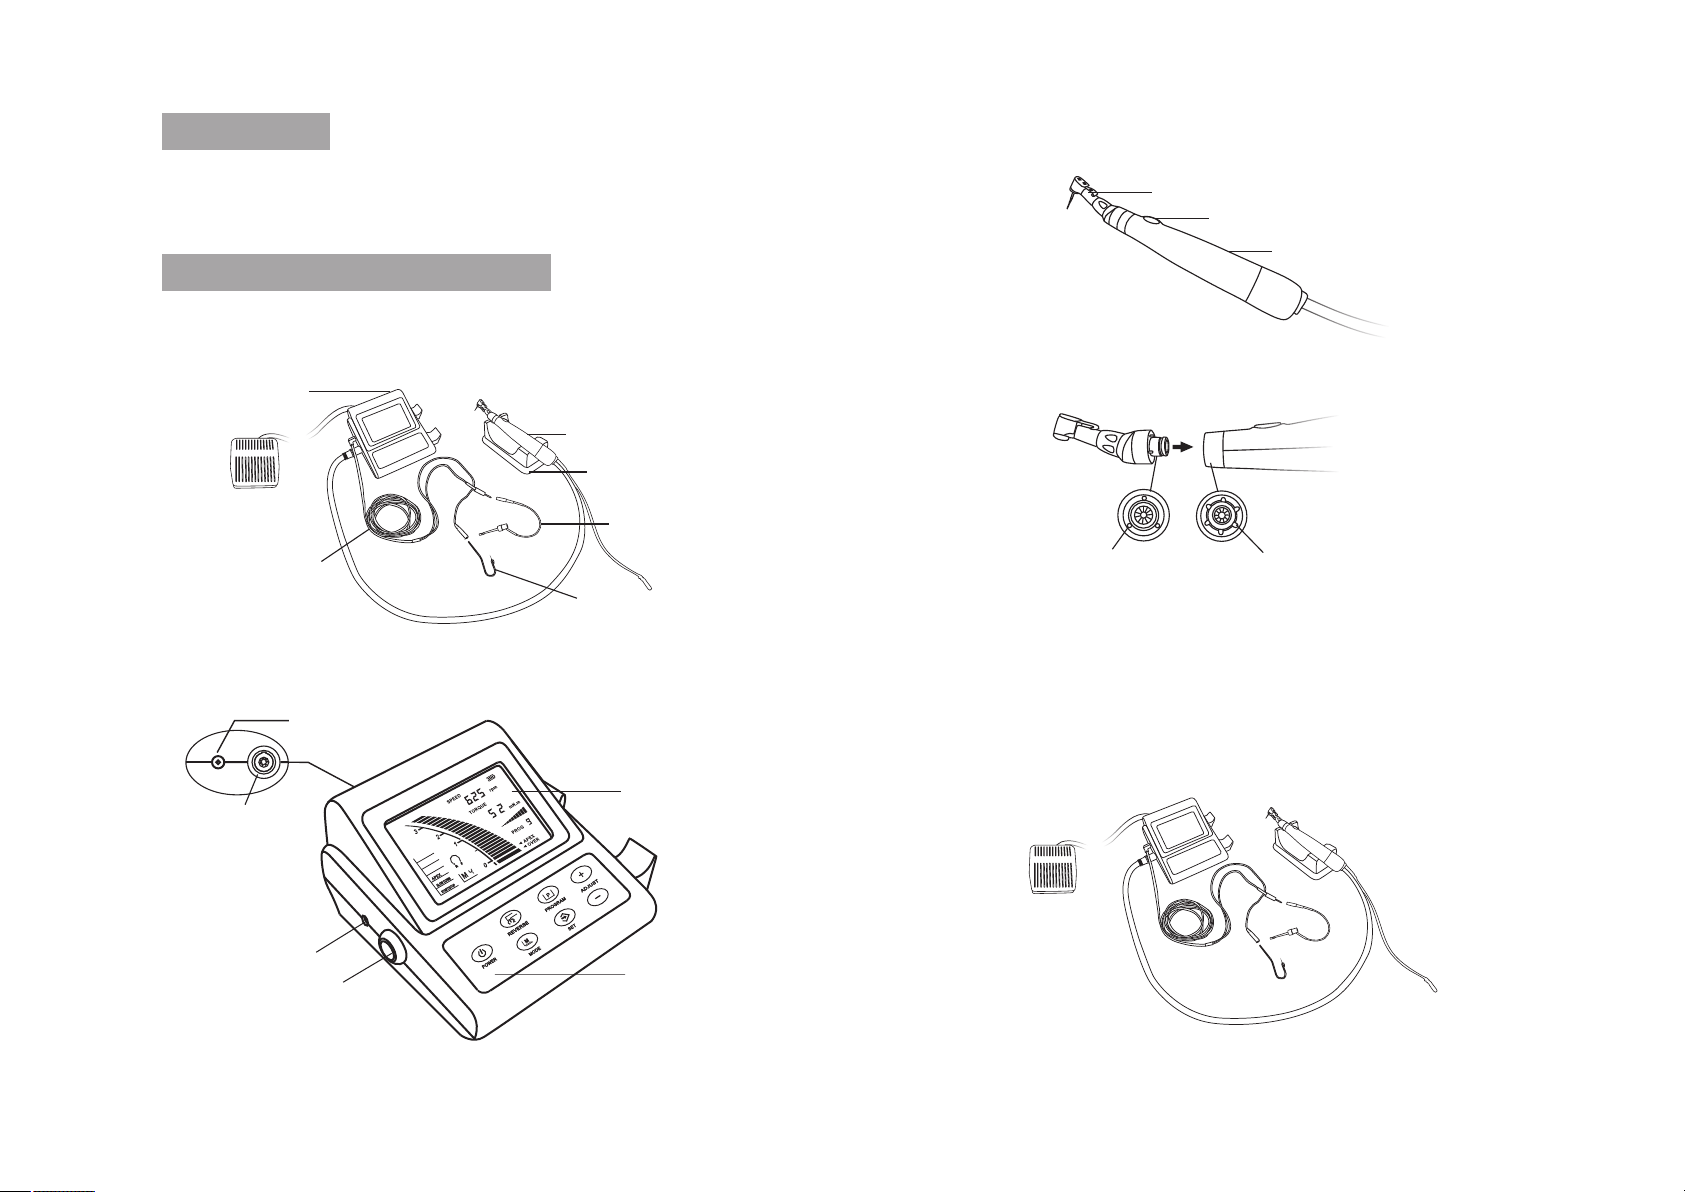
Install the contra angle
Install the main unit
1. Please clean all the parts that have contacted to patient before using.
2. Aim the anchor points on the connector of the contra angle to
the slot inside the unit to connect both parts, there is click after
the correct installation.
3. Six directions of contra angle are available, between each
direction is 60°.
locating points locating slot
Contra angle’s
interface
Handle’s
interface
Structure and theory — main unit
Adaptor jack
Foot switch jack
Test wire jack
Endo motor jack Operation panel
LCD
3
Construction and installation
Main unit
Foot switch
Contra angle
Handle
Handle base
AUT O1
The unit is the supplementary root-canal treatment device, which
can assist the dentists to operate more standard root-canal in the
process of root-canal treatment.
Intended use Structure and theory — motor handle
Motor handle
Start button
Test wire
This product is consist of main unit, foot switch, test wire, handle,
file holder, lip hook, handle base and so on.
File holder
Lip hook
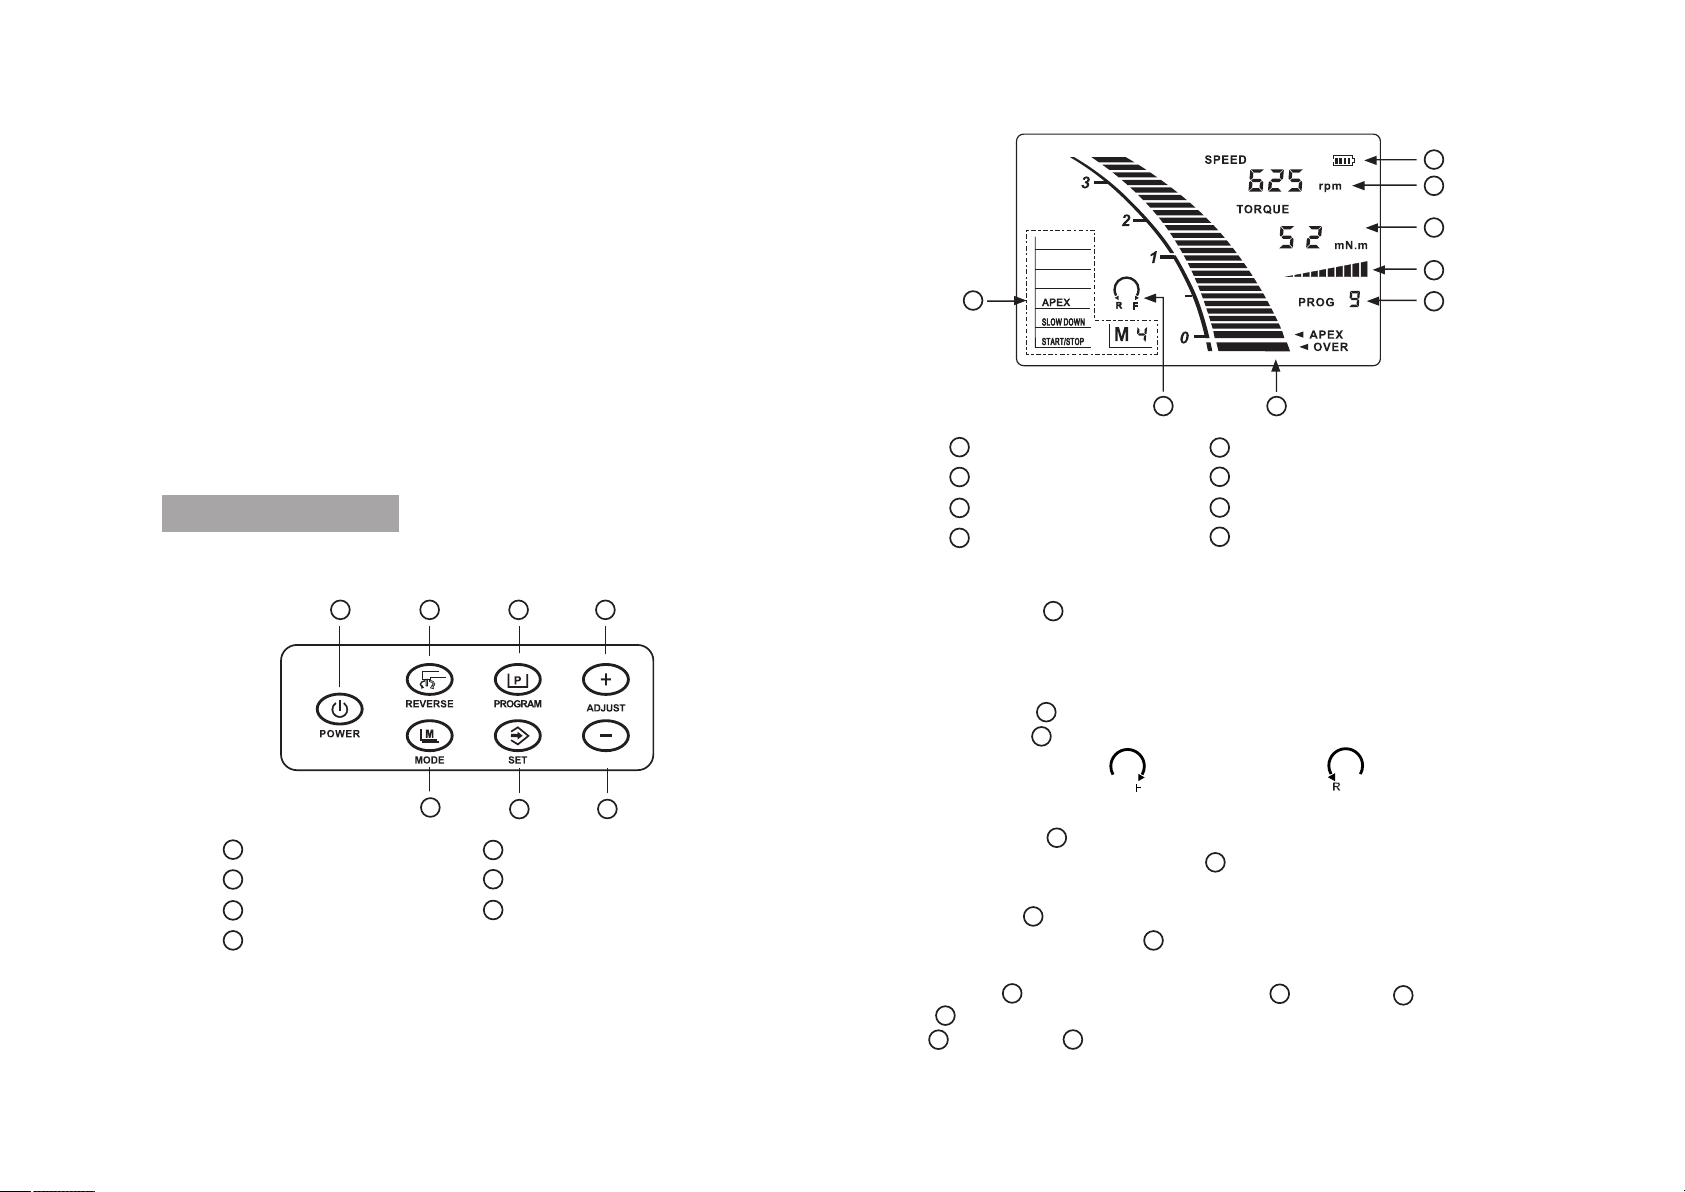
The file speed in the apical constriction
Mode area
Direction area
Apex locator area
Speed area
Torque area
Current torque indicator
Program area
Battery level area
rpm
Ncm
a
3
1
5
4
2
b
c
e
d
/
F/R/MODE
1On/off button
2Speed adjust button
3Torque adjust button
4Direction/mode button
5Start/stop button
aMode area
bDirection area
cSpeed area
eBattery level area
dTorque area
5 6
AUTO1
1. Power
Press power key to turn on the unit, information will be displayed on
LCD; press it again to turn off unit, information which on the LCD will
disappears.
2. Direction switch
Press reverse key to set the working direction of the file, icon will be displayed
on direction area .
Direction display:
3.Program switch
Press program key can switch the program, there are 9 programs can be saved;
and which displayed on program area .
4.Mode switch
Press mode key can switch the mode, there are 4 modes can be select; and
which displayed on mode area .
5.Setting and adjust
Press set key can switch between speed area , torque area and program
area , the value of the area which being selected will blink, and press the up
key and down key to adjust the value.
2.Speed adjust
Press speed adjust button to adjust the speed, speed value will be
displayed on speed area , the default adjustment value as follows:
125 250 375 425 500
2
0.6 0.9 1.2 1.5 1.8 2.1
3.9 3.6 3.3 3.0 2.7 2.4
3.Torque adjust
Press torque adjust button to adjust the torque, torque value will be
displayed on torque area , the default adjustment value as follows:
c
d
NOTE: Speed and torque can’t be adjusted while file is working .
Forward. Reverse.
3
rpm
Ncm
5. Mode switch
Hold direction/mode button (>1s) can change the working
mode, there are 3 motor modes: Auto reverse 、Continuous and
Reciprocating .The icon will be displayed on mode area .
4
a
625300
1
1 2 3 6
457
a
bc
d
e
f
g
h
a
b
c
d
e
f
g
h
POWER key
REVERSE key
PROGRAM key
MODE key
SET key
UP key
DOWN key
1
2
3
4
5
6
7
Function definition
2
b
3
g
4
a
5de
g
67
Key and display
Notice: Please wear rubber gloves when operation.
1. Put the instrument on a solid place.
2. Connect the plug of the motor wire to the main unit, make sure that
they are in the right position.
3. Connect the contra angle to the motor.
4. Put the well connected main unit on the handle holder reposefully.
5. Insert the foot switch plug into the jack on the main unit in M2 and M3.
6. In M1,Insert the test wire to the hole on the main unit, and connect the
file holder to test wire.
7. In M4 ,connect the lip hook line to the end of the handle socket.

7 8
M1: In this mode, only apex locator
functions, methods of operation are
as follows:
NOTICE:
It can not get an exact value of the apex
length when the treatment is in an unstable
condition. So, please insert the file into
the root-canal and take an X-ray photo to
make sure the veracity.
1. The plug of the testing wire should be
completely plugged into hole on the
main unit.
When you need to pull out the test
wire, please don’t pull the wire but
hold its pin and pull it out.
2. Clip the metal part of the file
with the holder and hang the
Lip hook up at any side of the
patient’s mouth.
In M1 Mode, you can assemble the unit as follow:
3. Insert the file into the root-canal, and
circumrotate the file toward the apex of the
root-canal. And then the instance between
the tip of the file and apex of the root-canal
will be displayed on the LCD screen. When
the figure on the LCD screen shows 0.5mm,
please fasten the file with the rubber vernier
caliper on the reference point of the tooth
crest rather than keep up probing into the
root-canal. Then measure the distance from
the bottom of rubber vernier caliper to the tip of the file.
Root-canal length is the file distance when the LCD displays 0.5.
Mode definition
Working mode table
The unit has 4 modes and consists of 6 function options.
Automatic1
NORMAL: Manual functions, file rotates in the setting speed.
AUTO MATIC 1:When the file arrives the set torque or after arrives the
setting position of root tip, the file begin to reverse, and after it leaves
root canal or the torque decreases, it recovers to forward.
AUTO MATIC 2: The file first clockwise rotates 2 laps, and then
counterclockwise rotates 1 lap, and will continue this cycle.
APEX: Apex locator.
SLOW DOWN: When the file is approaching to apical foramen, the
motor automatically slows down for safer treatment.
START/STOP: The file starts rotating automatically when inserted into
the canal and it stops automatically upon with drawal.
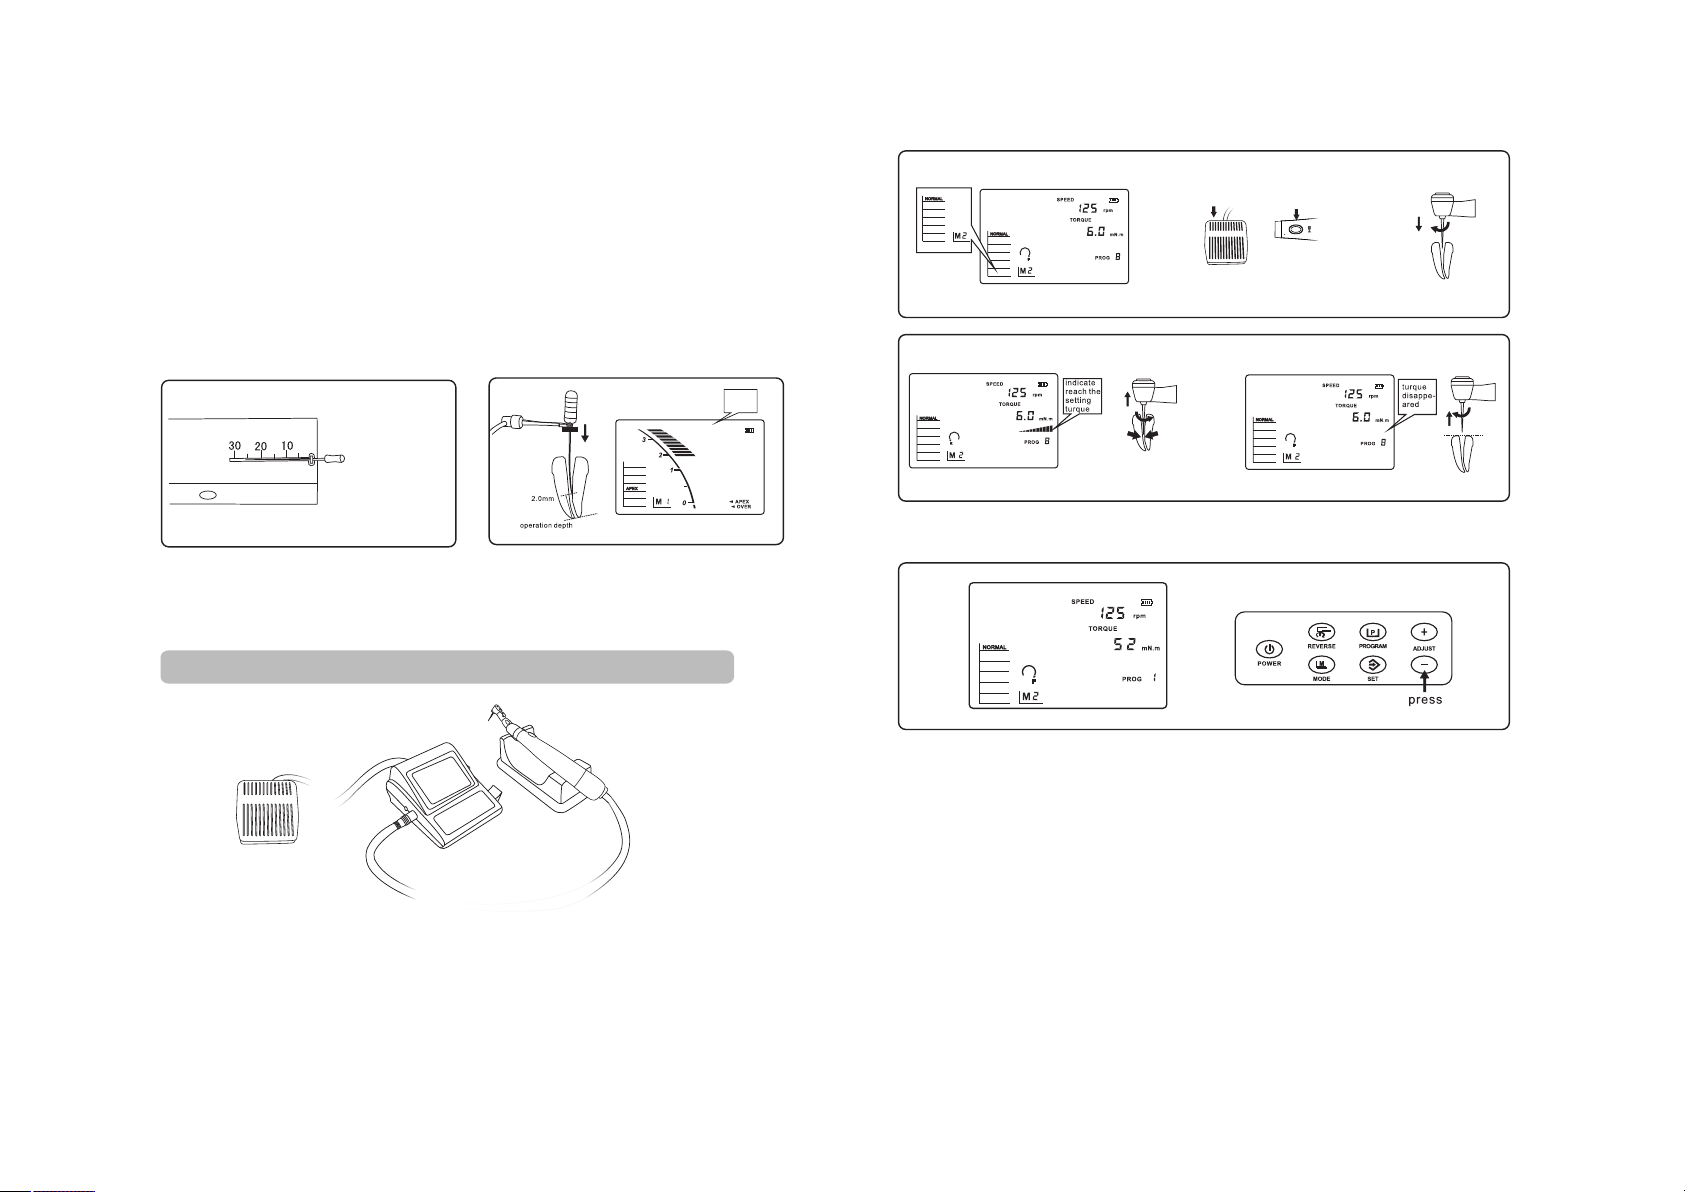
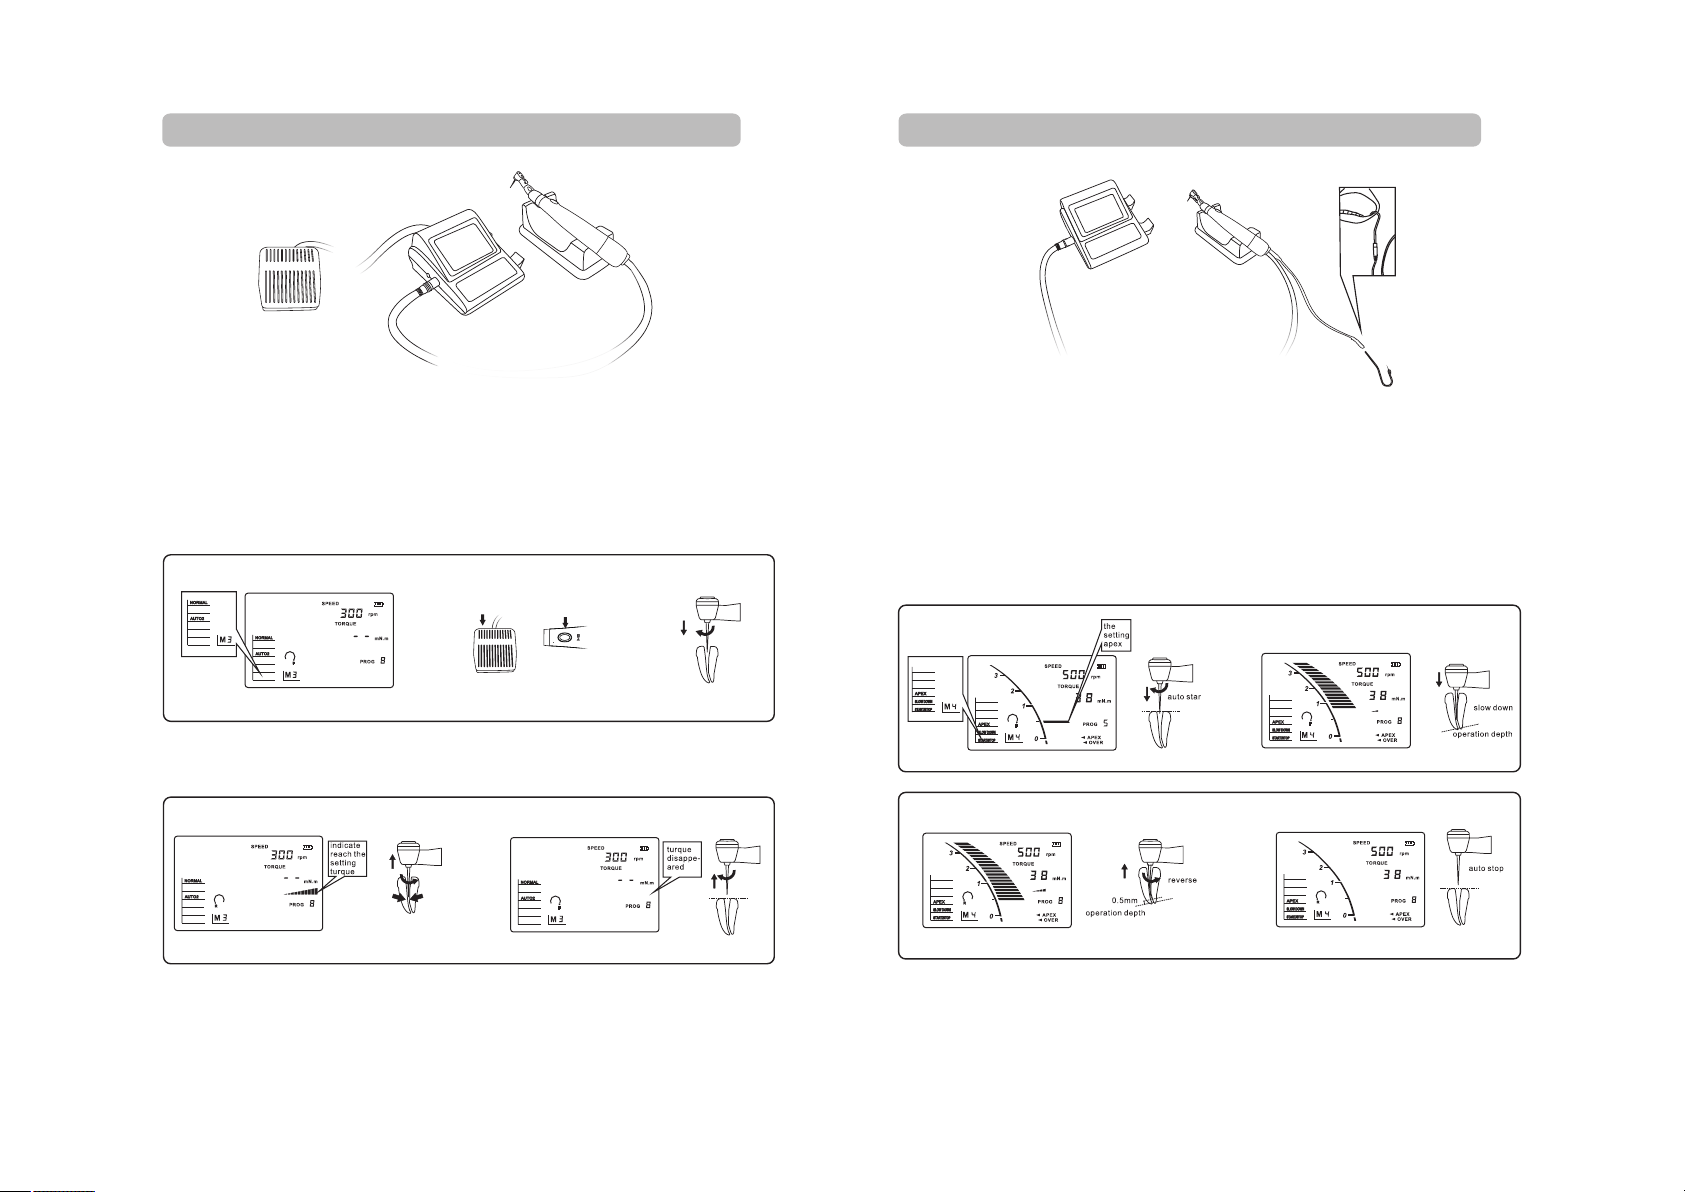
M2:
AUT O1
AUT O1
AUT O1 A UTO 1
Single root canal expanded function, hold down the foot switch or
press the handle button, the file will rotate; when the file arrived at
the setting torque, the file will automatically reverse. When the
torque reduces, the file will recover forward. Loosen the foot switch
or press the handle button, the file stops rotating.
/
踩 按
The calibration function:
AUTO1
Under the mode of M2, the program is set to 1, and then set the rate of
125, torsion as 52, and then press "-" key about 3 seconds long, hear
ringing sound for four, namely into the calibration mode. In calibration
mode, the motor rotating, buzzer will ring a sound every 16 seconds, the
entire process for a minute and a half. After that, the unit continuous ring
4 times.
Notice:
This function is only applicable to replacing contra angle or motor , uses
for calibration parameters to support new equipment. Before entering the
calibration model, it should connect the motor and contra angle , plug in
the file, and place the motor. In the process of calibration, don't touch
the contra angle and the file, to avoid causing the calibration error. After
calibration is completed, the user must be shutdown, restart again.
9 10
In M2 Mode, you can assemble the unit as follow:
5. When the file reaches the position to 2.0mm away from the apex of the
root-canal, there will be a continuous alarm.
4. Deciding the working length of root canal when the figure on the LCD
screen shows 0.5mm, then measure the distance from the bottom of
rubber vernier caliper to the tip of the file. Take note of this figure.
So subtract 0.5-1.0mm from the above data is the working length of
root-canal.
When the file drills through the root-canal,please make the final value
in terms of the one measured in 0.5mm.
The working length of root-canal varies from each other for the reason
of different shapes of teeth and root-canal.
嘟
AUT O1
AUT O1
AUT O1 A UTO 1
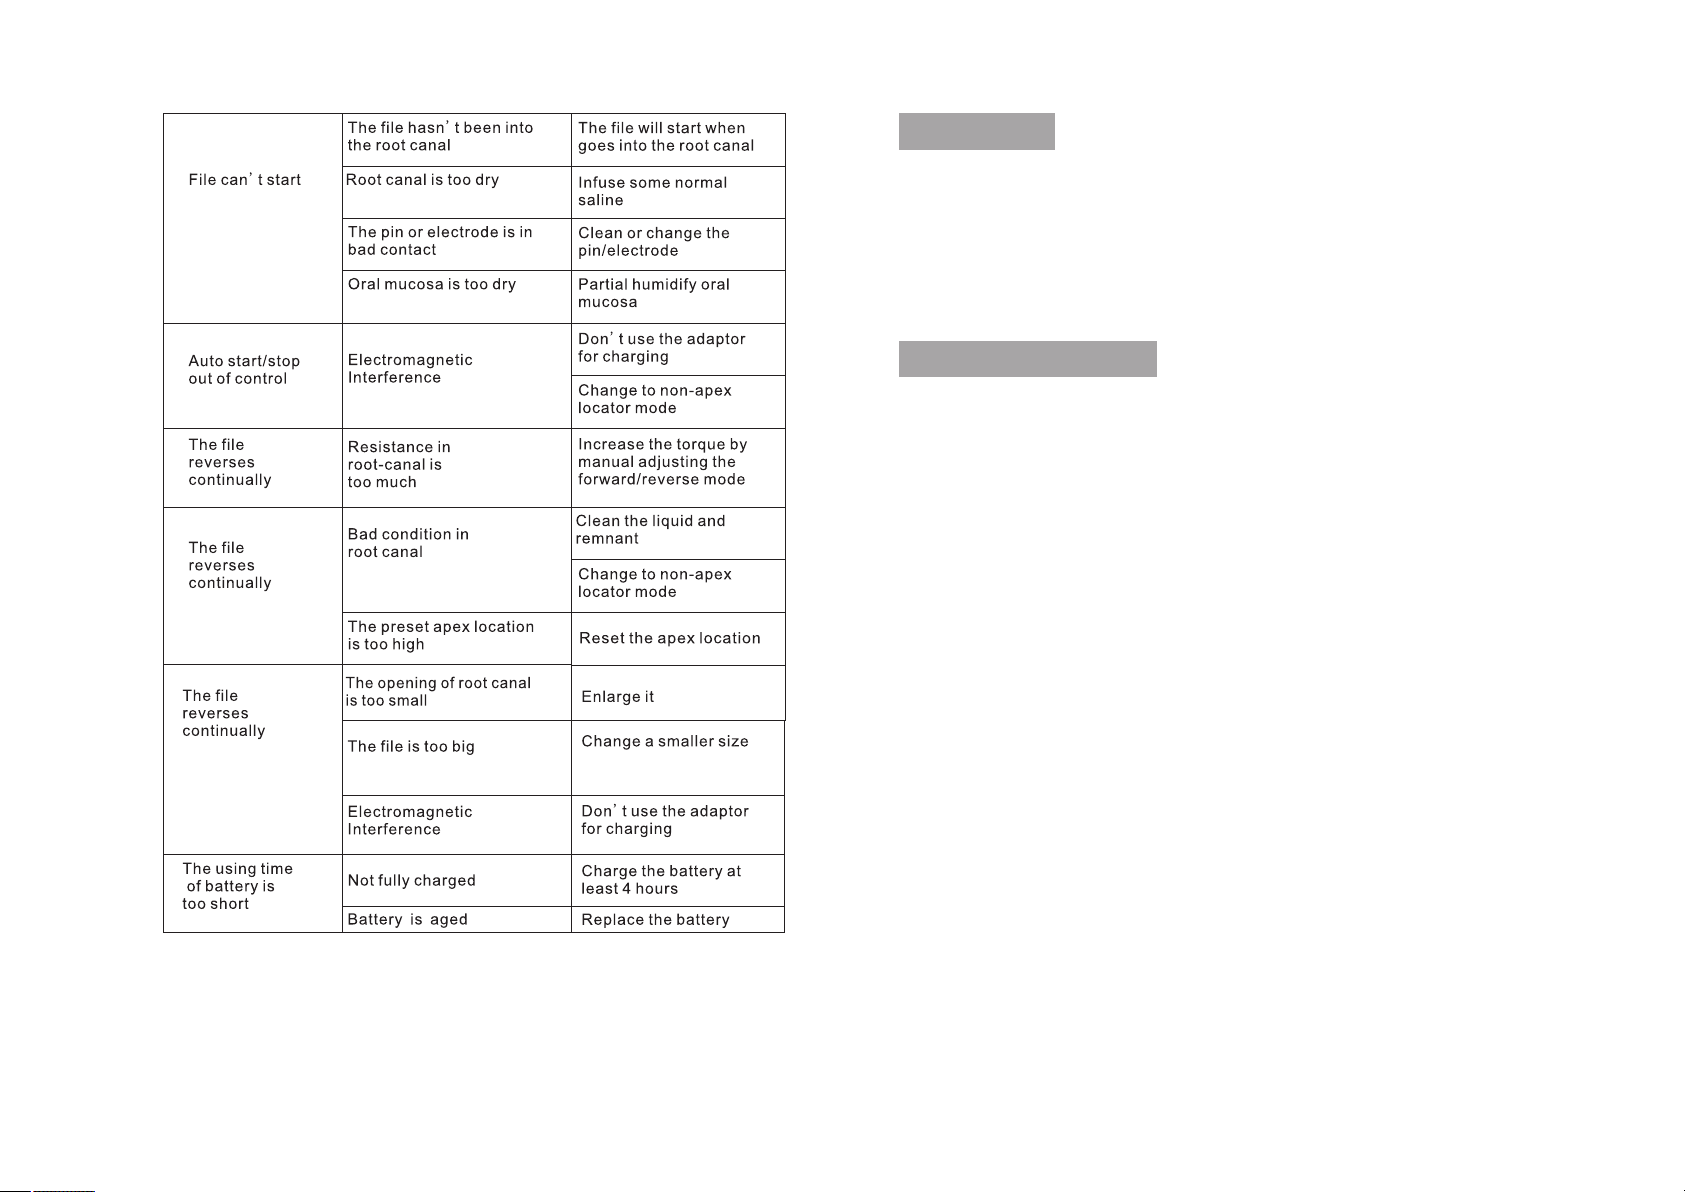
M4: With the function of root canal measuring root canal expanded, after
the root canal file into the root canal, the file started forward. After
the file arrives the district of root canal stenosis, it begins to rotate
slowly, and then automatically reverse when arrived at the apices of
the setting position. It restores the original speed operation after
leave narrow area, and automatically stop after leave the root canal.
M3: Reciprocating rotation function, hold down the foot switch or press
the handle, the file starts to reciprocating rotation, rotating situation
for the reverse 150°, forward 30°, the speed of about 300 RPM.
Loosen the foot switch or press the handle button, the file will stop
running.
In M3 Mode, you can assemble the unit as follow: In M4 Mode, you can assemble the unit as follow:
/
stamp press
11 12
AUT O1

13 14
Charge
LCD displays the current battery power, the number of lattice shows
more, and the power is fuller. If there is no electricity, the lattice will
flicker, which means the battery power is about to run out, at this status
the beeper will ring per 3S, and the unit will shut down after 60S.
To fully charge the battery, you should connect the unit to adaptor at least
for 4 hours or more (The new battery requires at least 8 hours or more),
the sign will be running during the battery charging.
Notice: when the instrument is connected to the adaptor, the unit will
power off automatically, and the beeper will beep for three times,
showing the connection is correct.
Automatic power off
The instrument will shut down automatically when it continues working
for 3minutes. In that case, all display and function will stop.
Notice: When power off, the LCD will show recharging sign when
charging.
Maintenance and sterilization
1. If not use the unit for long time, please open the battery cover and
remove the battery, keep the instrument clean and store it somewhere
dry and clean.
2. Parts like contra angle and stainless electrode, which have direct
contact with the patient, should be disinfected by autoclave each time
after using. The contra angle holder and the electrode wire can be
autoclavable at 135°C.
3.The crust of the instrument and the wire should be disinfected by the
ethanol.
Troubleshooting
If the equipment is not normal work, before call our after-sales center,
please check the table below.
15 16
Our company is responsible for product-and-technology service. Our
experienced technician will offer you technical support when technical
problem occurs.
The main unit are guaranteed for 24 months from the date of purchase.
The accessories (contra angle, motor handle, file holder, adaptor,
foot switch, test wire and lip hook line )are guaranteed for 6 months.
The guarantee is valid for normal usage conditions. Any modification or
accidental damage will render the guarantee void.
Guarantee
Technical services
1. Power adaptor: Input:100-240 Vac 50/60Hz
Output:DC 10V/1.5A
2. Battery Voltage:DC 7.4V
Capacity:1000 mAh
3. Rotation speed: 125-625rpm
4. Torque 0.3-5.2N.cm (3-52N.m)
5. Temperatures Operating: +10˚~+40˚C
Storage: -10˚ ~+55˚C
6.Humidity Operating: 30~75%RH
Storage: 20~85%RH
7. Atmospheric pressure Operating: 80~106kPa
Storage: 50~106kPa
8. Protection against electrical shock: Type B
主机 1
弯机 1
马达 手柄 1
硅胶 套 2
夹持 器 2
适配 器 1
脚踏 1
测试 线 1
弯机 卡夹 1
不锈钢唇钩 4
手柄 支架 1
唇钩 线 1
使用 手册 1
转速 卡 1
Main unit
Contra angle
Motor handle
Silicon coat
File holder
Adaptor
Foot switch
Test wire
Contra angle holder
Lip hook
Handle base
Lip hook line
Usage manual
Torque card

17
Please refer to the instructions
Symbols and definition
This way up
Fragile,handle with care
Keep away from rain
Table of contents
Other Coxo Medical Equipment manuals


Popular Medical Equipment manuals by other brands

Tandem
Tandem AutoSoft 30 Instructions for use

Nouvag
Nouvag Vacuson 60 LP Operation manual

Open Bionics
Open Bionics Hero Arm user manual

E-Pill
E-Pill MedTime Station Plus instruction manual

Hitachi
Hitachi EUP-C516 instruction manual

PamMobility
PamMobility SYNAGO 727T0045 Instructions for installation and use


