Cozzia EC-618B User manual

INSTRUCTION MANUAL EC-618B

Table of Contents
Thank you for purchasing the EC-618B Massage chair.
Before using your massage chair, please read the contents of this instruction
manual and refer to it when needed.
Luxury Features ………………………........................…… 1
Safety Precautions ………………………......................…. 2-6
Chair Components ……………………….....................….. 7-8
Chair Installation & Moving ……………….....................… 9-14
Chair Remote Controller …………………...................….. 15
Operation Guide …………………………....................….. 16-21
Grounding Instructions …………………......................….. 22
Chair Specifications …………....................………………. 23
Troubleshooting ………………………......................…….. 24
Product Care and Storage …………...................………… 25
Warranty Information ……………….......................………. 26-28
Warranty Card (Attachment)

1
01 Luxury Features
● COZZIA massage Chair is controlled by a microcomputer that performs various
intelligent massage type and combinations such as Kneading, Swedish, Tapping, Shiatsu,
Clapping, Rolling, Scrapping, Foot Roller, Vibration and Air Massage. All these types
performing massage with accurate on the acupressure points, to effectively alleviate
fatigue, promote metabolism and improve blood circulation.
● Innovated 3D robot controlled by a microcomputer brings fire-new precise and thorough
massage enjoyment, especially focusing on the acupressure points of the back.
● S-track backrest well accordant with the curve of human back make massage much
effective and comfortable.
● 8 set of Auto massage programs and various type of manual massage function are able
to meet various requirement in publics.
● Full body air squeezing massage located in neck, shoulder, arm, back, seat and leg.
● Luxurious and shining head cover with functions of speakers for surrounding music and
various LED light to creat most relaxing and comfortable massage environment.
● Unique and effective roller massage at soles.
● Additional lumbar heating and vibration function in the center of seat.
● Auto scanning and manual fine adjustment to customize the height of back massage.
● The angel of backrest and legrest can be adjusted simultaneously and separately,
backrest from 115 degree to 160 degree, while the Footrest from 0 degree to 90 degree,
and zero-gravity position available by one-touch.
● The Timer is adjustable according to your desired duration of the massage programmer.
● Liquid Crystal Display for a user friendly operation even in the dark.
● Designed with power surge protector as well as automatic thermal sensor and auto
shutdown for safety.
● The operation is controlled by intelligent microprocessor for excellent performance and
consistent quality.
● Ergonomically designed to enhance massage experience.

2
Safety Precautions
02
IMPORTANT SAFETY INSTRUCTIONS
When using the massage chair, basic precautions should always be followed,
including the following:
Read all instructions before using this massage chair.
DANGER-To reduce the risk of electric shock:
● Always unplug this massage chair from the electrical outlet immediately after
using and before cleaning.
● Never use pins or other metallic fasteners with this appliance.
● Carefully examine the covering before each use. Call for service if the covering
shows any sign of deterioration, such as blistering, peeling or cracking.
● Keep dry-Do not operate in a wet or moist condition.
WARNING- To reduce the risk of burns, fire, electric shock or injury to persons:
● Read all instructions before using.
● A massage chair should never be left unattended when plugged in. Unplug from
the outlet when it is not in use and before putting on or taking off parts.
● Close supervision is necessary when this massage chair is used by or near
children or disabled persons. Keep children away from reclining backrest and
extended leg rest.
● Use this massager chair only for its intent use as described in this manual.
● Never operate this massage if it has a damaged cord or plug, if it is not working
properly, if it has been dropped or damaged, or dropped into water. Contact
Customer Department.
● Keep the cord away from heated surfaces.
● Never operate the massage chair with the air openings blocked. Keep the air
openings free of lint, hair, and the like.
● Never drop or insert any object into any opening.
● Do not use outdoors.
● Do not operate where aerosol (spray) products are being used or where oxygen
is being administered.

3
● To disconnect, turn all controls to the off position, then remove the plug from the
outlet.
● Do not stand on or in the massage chair. Use only while seated.
● The product is not intended for use by children or persons with reduced physical,
sensory or mental capabilities, or lack of experience and knowledge, unless they
have been given supervision or instruction concerning use of the product by a
person responsible for their safety.
Safety
● Children should be supervised to ensure that they do not play with the product.
● Temperatures sufficiently high to cause burns may occur regardless of the control
setting. Do not use on an infant or invalid or on a sleeping or unconscious person.
Check the skin in contact with the heated area of the appliance frequently to reduce
the risk of blistering.
● Burns may result from improper use
● Do not crush-avoid sharp folds.
● Keep children away from extended foot support (or other similar parts).
● DO NOT WET-DO NOT USE PINS.
● NEVER REMOVE COVER.
● Connect this appliance to a properly grounded outlet only. See Grounding
Instructions.
SAVE THESE INSTRUCTIONS
This massage chair is intended for household use only.
1. Usage Environment
● Do not use the massage chair in an excessively humid or dusty environment as
this may result in malfunction or electric shock.
● Do not use the massage chair in a room with a temperature of 104°F or higher.
● Do not expose the massage chair to heaters, stoves or direct sunlight.
● Place and use the massage chair on an even, non-slip floor.
● The massage chair is designed for home use and not for commercial purposes.

4
2. Safety Precautions
● To ensure safe and correct use of the massage chair, do not operate it without
reading this operation manual carefully.
● Do not use the massage chair when the upholstery or seat is removed. This may
cause injury or malfunction.
● Do not use the massage in combination with other therapeutic equipment or
electric blanket, etc, as this may result in ineffectiveness or injury.
● Do not use the massage chair an hour before or after eating as this may have
adverse effects on the user.
● Do not allow children or pets to play around the massage chair, e.g. behind the
backrest, under the seat or leg rest of the massage chair. This may result in injury.
● Do not use the massage chair when your body is wet.
● Do not operate the massage chair with wet hands.
● It is not recommended to use the massage for more than 15 minutes.
● Do not perform continuous massage on the same sport of your body for more than
5 minutes at a time as this may result in excessive stimulation and may have adverse
effects.
● Do not insert your hand or foot along the paths of the massage rollers during use
as this may cause injury.
● Stop operation immediately if you experience any discomfort.
● This product is not intended for self-treatment of conditions that should be
managed by a qualified health care provider.
● People on medication or with medical conditions, please consult your doctor before
use. Please do not use the product if you are not felling well.
Caution
● This massage chair is to be used indoors only.
● If you use the massage chair in a cold room, do not increase the room
temperature abruptly. It is recommended that you increase the temperature
gradually to a normal level.
● If the massage chair is stored in a cold place and is being brought into a
warm environment, it is advisable to wait one hour before use. This is
because its performance may not be at optimum level, as there may be water
droplets on the mechanical parts due to condensation. Using the massage
chair under such conditions may result in malfunction.
5
3. People with Medical Conditions
Consult your doctor before use if you:
● are under medical rest as ordered by a doctor.
● have spinal disorders, an abnormal spinal condition or have suffered a spinal
injury.
● have back problems.
● have diabetes, osteoporosis or sensory impairment.
● have joint dysfunction such as rheumatism, hammertoe or gout.
● have a pacemaker or other electronic medical devices.
● may be pregnant.
● have phlebitis or thrombosis.
● have an increased risk for blood clots.
● had recent surgery.
● have surgical pins, screws, or anything mechanical in the legs, ankles or feet.
Caution
● This massage chair is not intended for use by children or persons with
reduced physical, sensory or mental capabilities, or lack of experience and
knowledge, unless they have been given supervision or instruction or
instruction concerning use of the massage chair by a person responsible for
their safety.
● Children should be supervised to ensure that they do not play with the
massage chair.
● Avoid using the massage chair under the influence of alcohol.
● Do not apply massage rollers directly on the head, elbow or knee joints,
torso or abdomen.
● If your legs or feet slip off the leg rest during massage, do not force them
back in as this may result in injury.
● Remove the power plug from the electrical outlet immediately should
liquid be accidentally spilled onto the massage chair. Do not use wet hands
to connect or disconnect the power plug from the electrical outlet.
● Do not tamper with the power cord or use the massage with a damaged
cord as this may result in malfunction and electric shock.

6
4. Instances When the Massage Chair Should Not Be Used
In the following events, please switch off the main power switch immediately and
disconnect the power cord from the electrical outlet:
● If water is accidentally spilled onto the massage chair. This may result in electric
shock or malfunction.
● If the fabric of the backrest is torn and the internal components are exposed.
● If pain or discomfort is felt during massage, stop operation immediately and
consult your doctor.
● If you detect any malfunction or any other abnormal condition during operation.
● If there is a power failure. Injury may occur when power is restored unexpectedly.
● If there is lightning.
5. Assembly and Repair of the Massage Chair
● Do not disassemble the backrest cover of the massage chair. Touching the
internal components may result in malfunction or electrical shock.
● This massage chair must only be professionally serviced or repaired. Do not
attempt to disassemble or repair the massage chair yourself.
6. Things to Note About the Power Plug and Cord
● Check that the Alternating Current (AC) voltage corresponds with the
specifications indicated for the massage chair.
● Do not connect or disconnect the power plug from the electrical outlet with wet
hands. This may result in malfunction or electric shock..
● When disconnecting the power plug, pull it by holding the plug, not the cord.
● Although operation will be stopped automatically by the Auto-Timer function,
always remember to switch off the main power switch after use.
● Do not place the power cord under the massage chair or any other heavy objects.
● Do not wind the power cord around the massage chair as this may damage the
cord and result in a fire or electric shock.
● Do not operate the massage with a damaged cord or extension cord.
● Do not use the massage if the electrical outlet is loose.
● If the power cord is damaged, it should be replaced by a qualified technician.

7
03 Chair Components
Castor
LED + Speaker
Shoulder panel
Handrest
Seat Pad
Calvesrest
Footrest
Pillow
Backrest
Side panel

8
Massaging Position
RollerHeaterAir Bag
34 Air Bags
1 Vibration
2 Heater
30 Air Bags
2 Roller
Vibration
Back Massage
Mode

9
04 Chair Installation & Moving
A
A
B
B
Note: Ensure sufficient spaces around the chair. When backrest reclining and footrest
raising, the minimum 80cm space must be ensured both at the front and the back of chair.
Bottom of the chair may damage the tatami mattress or floor. It is recommended to spread
a piece of mattress under the chair.
Step 1:
● Use the diagonal pliers to cut off the cable tie which binds the stopper of the backrest,
and unwrap the packaging material of the backrest actuator (a) underneath the seat pad
and both seat anchor (b).
● Put the backrest pad onto the seat pad which was used to avoid the backrest pad from
oil pollution from seat anchor on both side.
● Lift the backrest, and insert part A into part B as shown in picture.
Note: Put remote controller wire out of the side panel which could avoid of wire damage
when install the backrest.
at lease 80cm
at lease 80cm
(a) (b)
10
Green+2 Grey+2+Red
Grey+2Green+3
A
B
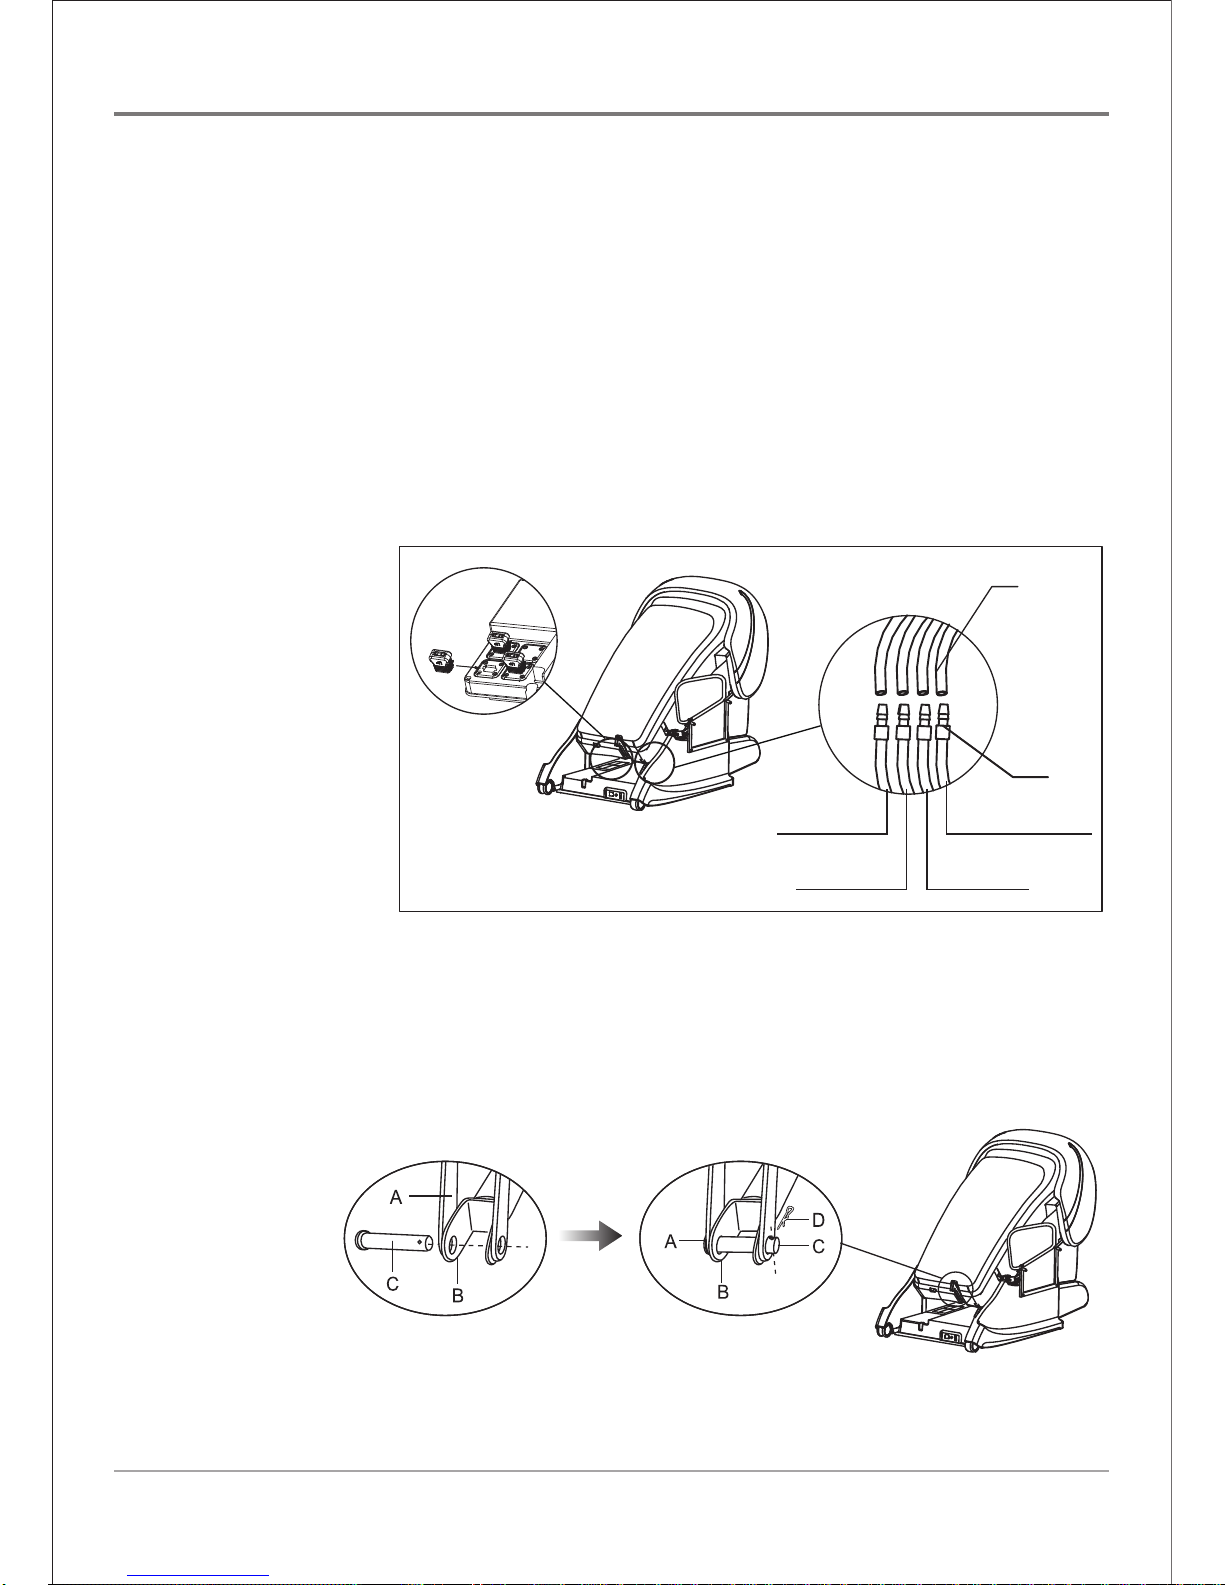
Step 2:
● Turn the backrest to front, it will help expose all the air tubes out from backrest, named
group A as picture showing, and remove the spare white plastic stoppers on each air tube.
● Connect well air tubes "A" with corresponding air tube "B"(out from PCB box) as shown
in picture. Then stuff all air hoses well connected inside to avoid pressing air tubes whiling
chair moving.
● Connect data plug out from backrest into the corresponding socket in the electric
control box.
● Raise the backrest.
Note: Please make sure above connection is well done before turning on the chair.
Step 3:
● Take off the bin (flat head rivet) and bolt (split pin) from backrest actuator (a), and put
them on the ground.
● Attach the backrest connection rod (A) and the fork (B) with the flat head rivet (C). Lock
the rivet with split pin (D) as showed in PIC 1 and PIC 2.
● Turn the backrest to back until a “click” sound is heard.
A: Connecting rod
B: Fork
C: Flat head rivet
D: Split pin
PIC 1 PIC 2

11
Backrest Pad
Velcro
Zipper
Backrest
Step 4:
● Attach backrest pad onto
backrest with the zipper.
● Align and engage Velcro
onto backrest.
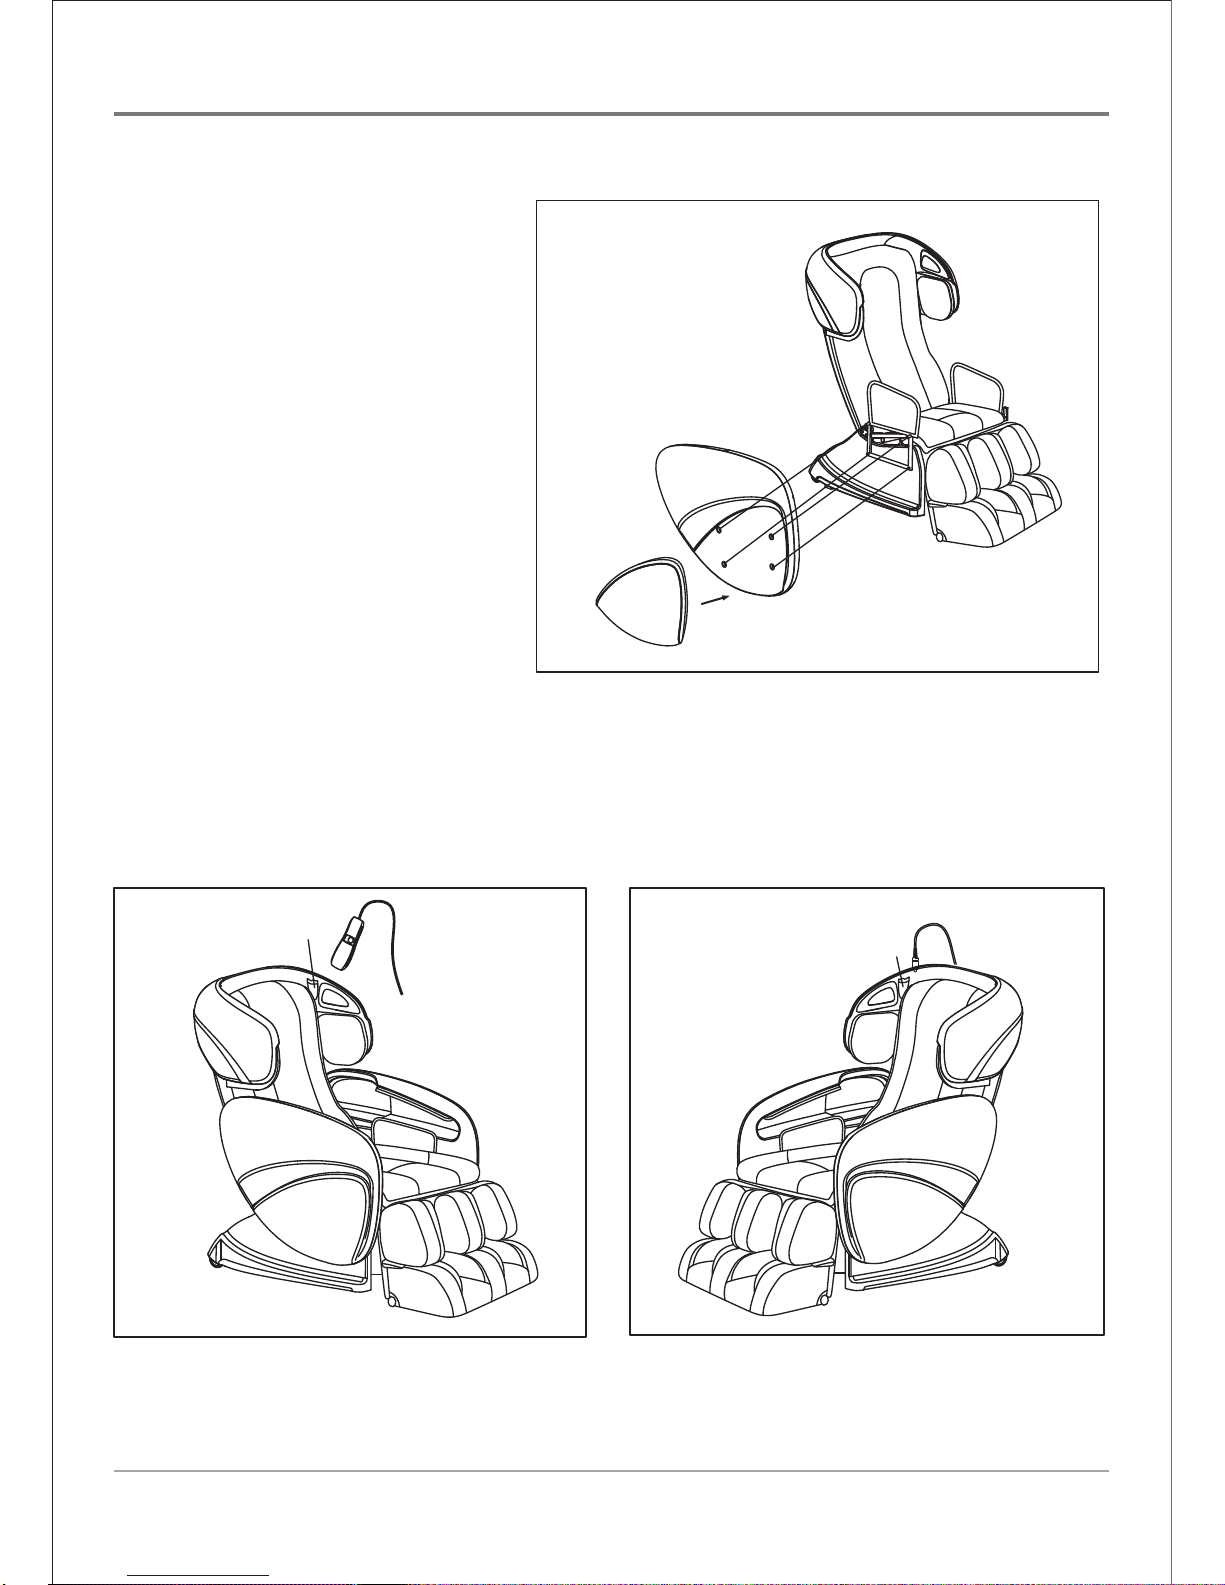
Step 5: Install Side Panel
1) Remove side panel cover E by slightly pulling the cloth strip (which could be threw
away after use) from inner side panel.
2) Connect air tube(H) out from side panel and the air tube(G) out from underneath of
seat, and the air tube(H) must cross the seat frame as picture showing before connecting
with air tube(G) to avoid pressing whiling chair playing.
E
H
E
G
H
cloth strip
12
E
Step 6:
Place controller into pocket.
MP3 could be connected to this wire to get music, and it could be place into the right
pocket.
3) Attach side panel to the seat by
aiming the 4 screw holes, then fix
by the 4 bolts (M6*30).
4) Target the white plastic holes on
inner side of side panel to attach
side panel cover (E).
Repeat above 1) ~ 4) to assemble
the other side.
pocket
pocket

13
Step 8:
The back massage strength-control
pad has been inserted into the
backseat cover. If strong massage is
desired, remove the back massage
strength-control pad from the cover;
this strengthens the massage. If
mildermassage are desired, insert
the back massage strength-control
pad into the cover; this lessens the
strength of the massage.
Step 7:
Connect the Power Cord.
Back massage
strength-control pad

14
Moving the chair
1. Restore the footrest to its original position.
2. Recline the chair to tilt approximately 45 degrees. Move the chair using the wheels as
the fulcrum.
Note:
● Always return the footrest to its original length and restore it to its original position
before moving the chair, otherwise injury during movement may result.
● Do not move the chair while a person is seated on it.
● Place a mat on the floor and gently roll the chair over it to avoid damaging the floor.
Step 1
Step 2
15
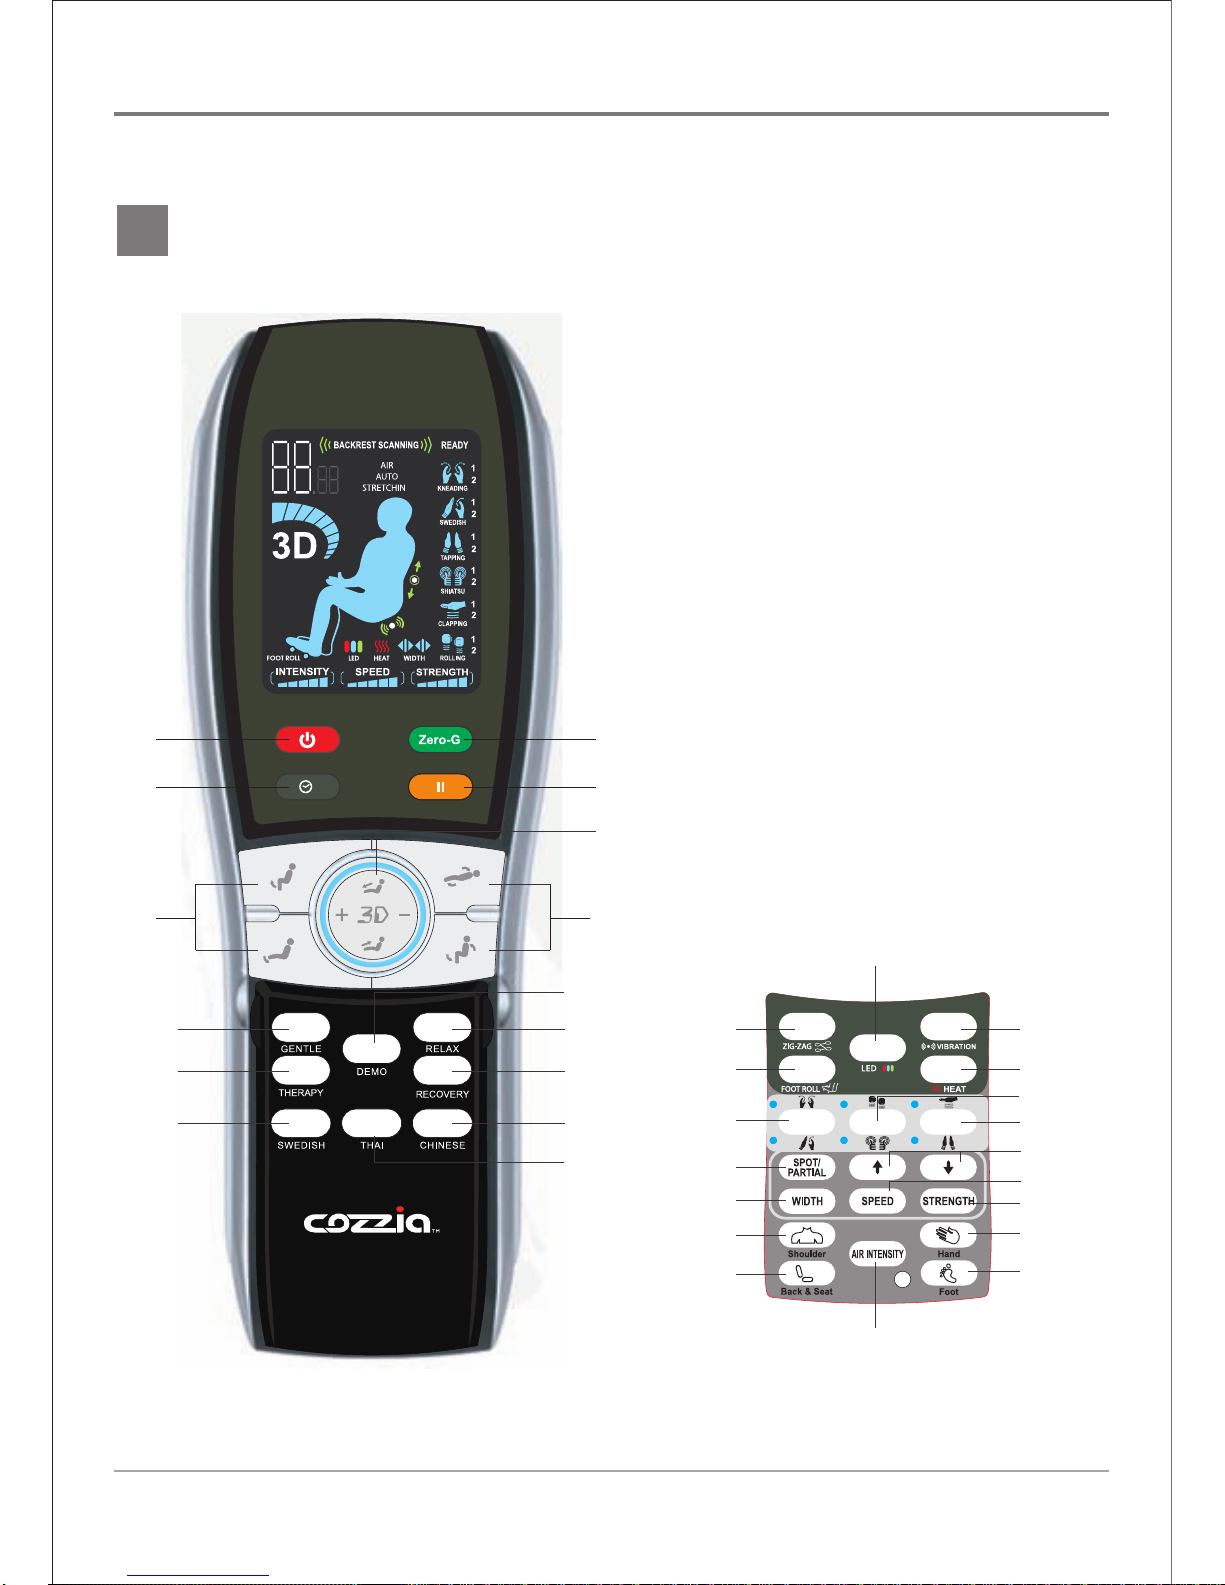
05 Chair Remote Controller
1
2
5
7
9
12
8
11 17
18
21
24
27
30
31
19
20
23
22
25/26
29
28
32
33
34
15
16
10
14
13
6
4
3

16
06 Operation Guide
Connect to the power supply, and turn the switch to “I” position, chair is now in idle mode.
During its idle mode, ON/OFF button will blink, which means the electric is well connected.
During its idle mode, only ON/OFF, Pause, Legrest Recline/Restore, Chair
Recline/Restore buttons can be operatable.
Control Buttons for the Massage Chair
1. ON/OFF
The Start/Stop Control Button
Press this button to light ON the LCD screen. Press any massage function button to start
massage. This will initiate the timer function. Press this button again to stop all massage
functions, massage chair will return to its original position.
2. TIMER
Time interval Control Button
When a massage function is activated, the timer is preset at 15 minutes. Every single
press on this button will change the timer interval in the sequence of
“20>25>30>5>10>15>20” minutes.
Note: Slumber auto massage program is fixed 20 minutes.
3. PAUSE
Press this button once to halt running massage function and countdown timer. During
pause mode, the pause button will be blinking.
Press this button again to cease the “Pause” function and resume previous massage
function as well as countdown timer.
4. ZERO-G
Press this button to active the Zero-G function in default,press again to return to idle
position.
Note: ZERO-G button is NOT controllable during auto programs of Swedish and Thai.
5. LEGREST RECLINE AND RESTORE
Angle Adjustment Button for Legrest
Keep pressing the either button and release until the legrest reach your ideal position.

17
6. CHAIR RECLINE AND RESTORE
Keep pressing to reach lying flat comfortably, while pressing to restore the chair
to its original positon.
Full body Auto massage program
7. GENTLE(2D)
8. RELAX (2D)
9. THERAPHY (2D)
10. VIGOROUS (2D)
11. DEMO (2D)
12. SWEDISH (3D)
13. THAI (3D,with stretching function)
14. CHINESE (3D)
15. Legrest Length Adjustment Button
Keep pressing the either button and release until the length of chair legrest fit your leg
well.
Note: When Zero-G program is activated 1st time after chair is turn on, the chair will scan
and adjust the length of legrest automatically, and memory the customized length for you
to save repeated scanning before you end this time enjoyment.
16. LED LIGHTING
LED Lighting Founction Start/Stop Control Button
Press this button to activate LED lighting function at both sides’s shoulder. Every single
press on this button will change the colors of LED lighting in the sequence of Red > Blue
> Green > auto circle of “Red>Blue>Green”>Close.

18
Note: The Auto Program of Gentle, Relax, Therapy and Vigorous, are preset one LED
background color, and you can also adjust the LED color by pressing the LED button.
17. ZIG - ZAG
ZIG - ZAG function Start/Stop Control Button
Press this button to activate updated full body twisting massage by air squeezing located
in back and seat. Press this button again to stop the ZIG – ZAG function.
18. FOOT ROLLING
Foot roll function Start/Stop Control Button
Press this button once to activate rhythmic rolling massage at soles, press this button
again to stop rolling massage at soles.
Note: During Auto Program mode, pressing this button can also disable/enable the Foot
Rolling function.
19. VIBRATION
Seat Vibration function Start/Stop Control Button
Press this button once to activate rhythmic seat vibration function, press this button again
to stop the Vibration function.
Note: During Auto Program mode, pressing this button can also disable/enable the
Vibration function.
20. HEAT
Lumbar Heat function Start/Stop Control Button
Press this button to activate lumbar heat function, press this button again to stop the Heat
function.
Note: During Auto Program mode, pressing this button can also disable/enable the Heat
function.
Manual Massage Program
21. KNEADING
Kneading function Start/Stop Control Button – 5 levels of strength to be adjusted
Table of contents
Other Cozzia Massager manuals

Cozzia
Cozzia CZ-388 User manual

Cozzia
Cozzia Espree User manual

Cozzia
Cozzia CZ-710 Manual

Cozzia
Cozzia CZ-357 User manual

Cozzia
Cozzia CZ-730/Qi User manual

Cozzia
Cozzia ergotec AG-6100 User manual

Cozzia
Cozzia CZ-710V User manual

Cozzia
Cozzia EC-360D Manual

Cozzia
Cozzia ZEN CZ-641 User manual

Cozzia
Cozzia CZ-629 User manual


