CPA EL 10 cl Installation manual

MANUALE D’USO
Ver.00 –10-04-2015
C.P.A. s.r.l.
POMPE / PUMPS/POMPES / BOMBAS
EL 10 cl
MANUALE DI PROGRAMMAZIONE
IT
PROGRAMMING INSTRUCTIONS
UK
MANUEL DE RÉGLAGE
F
MANUAL DE REGULATÌON
E

Rev 3.0 Cod. 00.008.255
2
ITALIANO
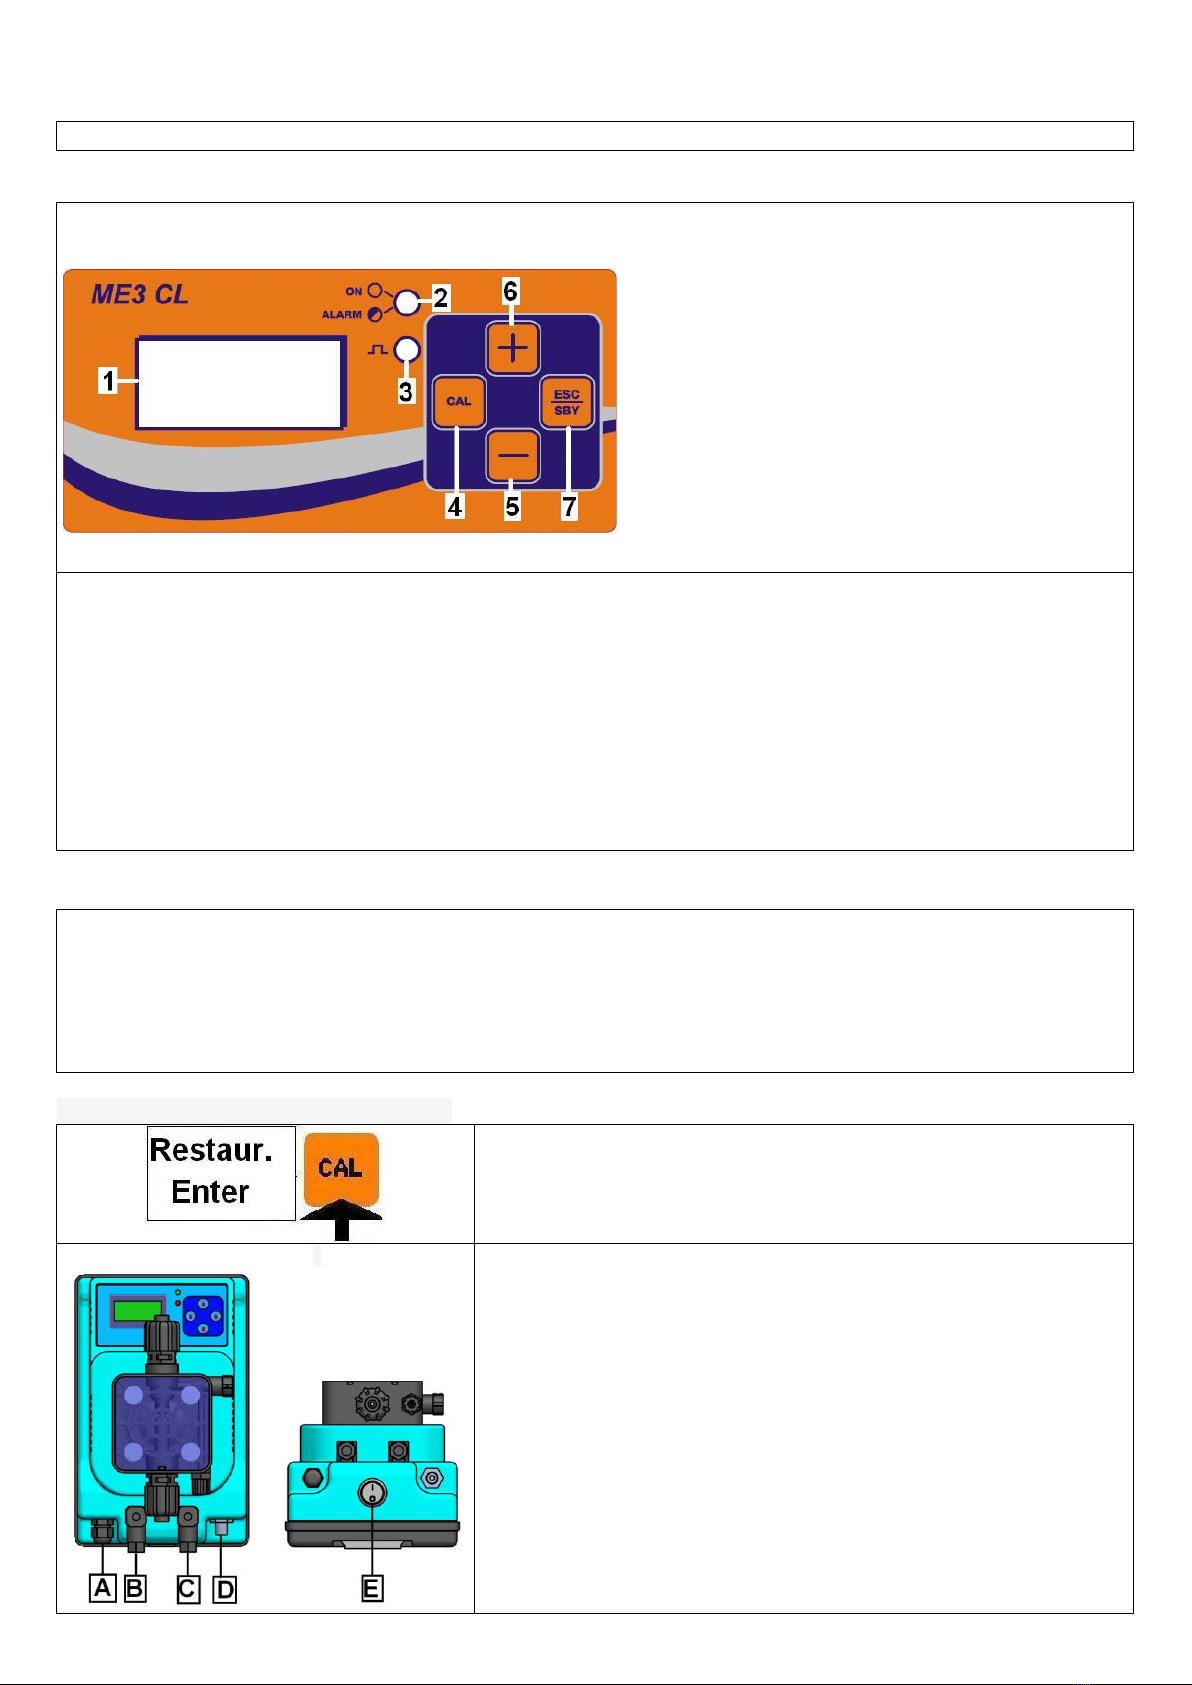
DESCRIZIONE PANNELLO FRONTALE
1. Display LCD 8 x 2 retroilluminato
2. Led verde:▪ fisso =POMPA ACCESA
▪lampeggiante = POMPA IN ALLARME
3. Led rosso: segnala le iniezioni
4. Tasto CAL: ▪ fa entrare in programmazione
▪Salva le modifiche
5/6.Tasto –e +: ▪ Fa navigare all’interno del menu
▪ Modifica il valore dei parametri
7. Tasto ESC/SBY: ▪ mette la pompa in stand_by
▪ fa uscire dal menu
FUNZIONI GENERALI DELLA POMPA:
- MENU IN 4 LINGUE: ITALIANO, INGLESE, FRANCESE, SPAGNOLO
- 3 POSSIBILI TIPI DI FUNZIONAMENTO: COSTANTE, ON/OFF, PROPORZIONALE
- ALLARME TEMPORALE DI SOVRADOSAGGIO
- RITARDO DI ACCENSIONE
- RIPRISTINO DEI PARAMETRI DI DEFAULT
- CONTROLLO DI FLUSSO D’ACQUA
- CONTROLLO DI LIVELLO
- STOP DEL DOSAGGIO ( STAND_BY )
- SEGNALAZIONE DELLA PORTATA % ISTANTE PER ISTANTE
REGOLAZIONI DELLA CASA
FUNZIONAMENTO: ON-OFF
SETPOINT: 1.20 ppM
VERSO DI DOSAGGIO: clorazione
FREQUENZA DI INIEZIONE: 100% (150 imp/min)
TEMPO DI ALLARME : 0unit (disabilitato)
RITARDO DI ACCENSIONE: 0 minutes
RIPRISTINO DELLE REGOLAZIONI DELLA CASA
Premere e rilasciare rapidamente il tasto CAL per entrare in
programmazione e poi con i tasti +e - visualizzare “Riprist. Enter”.
Premere CAL per confermare. Automaticamente la pompa torna in
misura con in memoria
i valori di programmazione e calibrazione di fabbrica.
CONNESSIONI DELLA POMPA
A -è il cavo di alimentazione elettrica , 230 V- 50Hz (a richiesta 115 ~).
B - è il connettore della sonda di livello (contatti 3 e 4). OPTIONAL
C -è il connettore del sensore di flusso (contatti 3 e 4). OPTIONAL
D - è il connettore BNC della sonda cloro
E- è l’interruttore ON_OFF. OPTIONAL

Rev 3.0 Cod. 00.008.255
3
STAND BY (STOP)
La pressione prolungata del tasto ESC/SBY per 2 secondi durante il funzionamento pone la pompa in
stato di stand by:
1) CESSA IL DOSAGGIO
2) LED verde di on lampeggiante.
3) Nel funzionamento PROPORZIONALE il display visualizza: “Stop 0%” sulla prima riga e la misura
attuale sulla seconda riga (vedi figura a lato)
3) Nel funzionamento Manuale e ON-OFF il display visualizza: “Stop” e la % di frequenza
programmata sulla prima riga e la misura attuale sulla seconda riga (vedi figura a lato).
La nuova pressione per 2 secondi del tasto ESC/SBY fa tornare la pompa nello stato di
funzionamento.
STRUTTURA DEL MENU
Premendo e rilasciando
rapidamente il tasto CAL si entra in
programmazione.
Si naviga dentro il menu con i tasti +
e -.
Si entra nei sottomenu premendo il
tasto CAL.
SCELTA DELLA LINGUA
Premere e rilasciare rapidamente il tasto CAL e scorrere il menu con i tasti +e -finchè sul display
appare la scritta della scelta della lingua. Premer il tasto CAL e poi con i tasti +e - scegliere :
Lingua Italiano
Premere CAL per confermare ed ESC per tornare in misura
RITARDO DI ACCENSIONE
CHE COSA E’? Il ritardo di accensione è il tempo in minuti (da 0-999min)
che la pompa attende dopo la sua accensione per dosare il prodotto
chimico. Durante questo tempo viene visualizzato il messaggio “Ritardo”
sulla prima riga del display e la misura sulla seconda riga del display (vedi
figura a lato). Durante questo tempo la pompa è disabilitata al dosaggio ma
è possibile accedere al menu per modificare parametri e calibrazioni.
MODIFICA DEL RITARDO DI ACCENSIONE
Premere e rilasciare rapidamente il tasto CAL e scorrere il menu con i tasti +
e -finchè sul display appare la scritta “Ritardo Accens.”. Premere CAL per
entrare e con i tasti +e –scegliere i secondi di ritardo di accensione da 0 a
999. Premere CAL per confermare ed ESC per tornare in misura.
Rev 3.0 Cod. 00.008.255
4
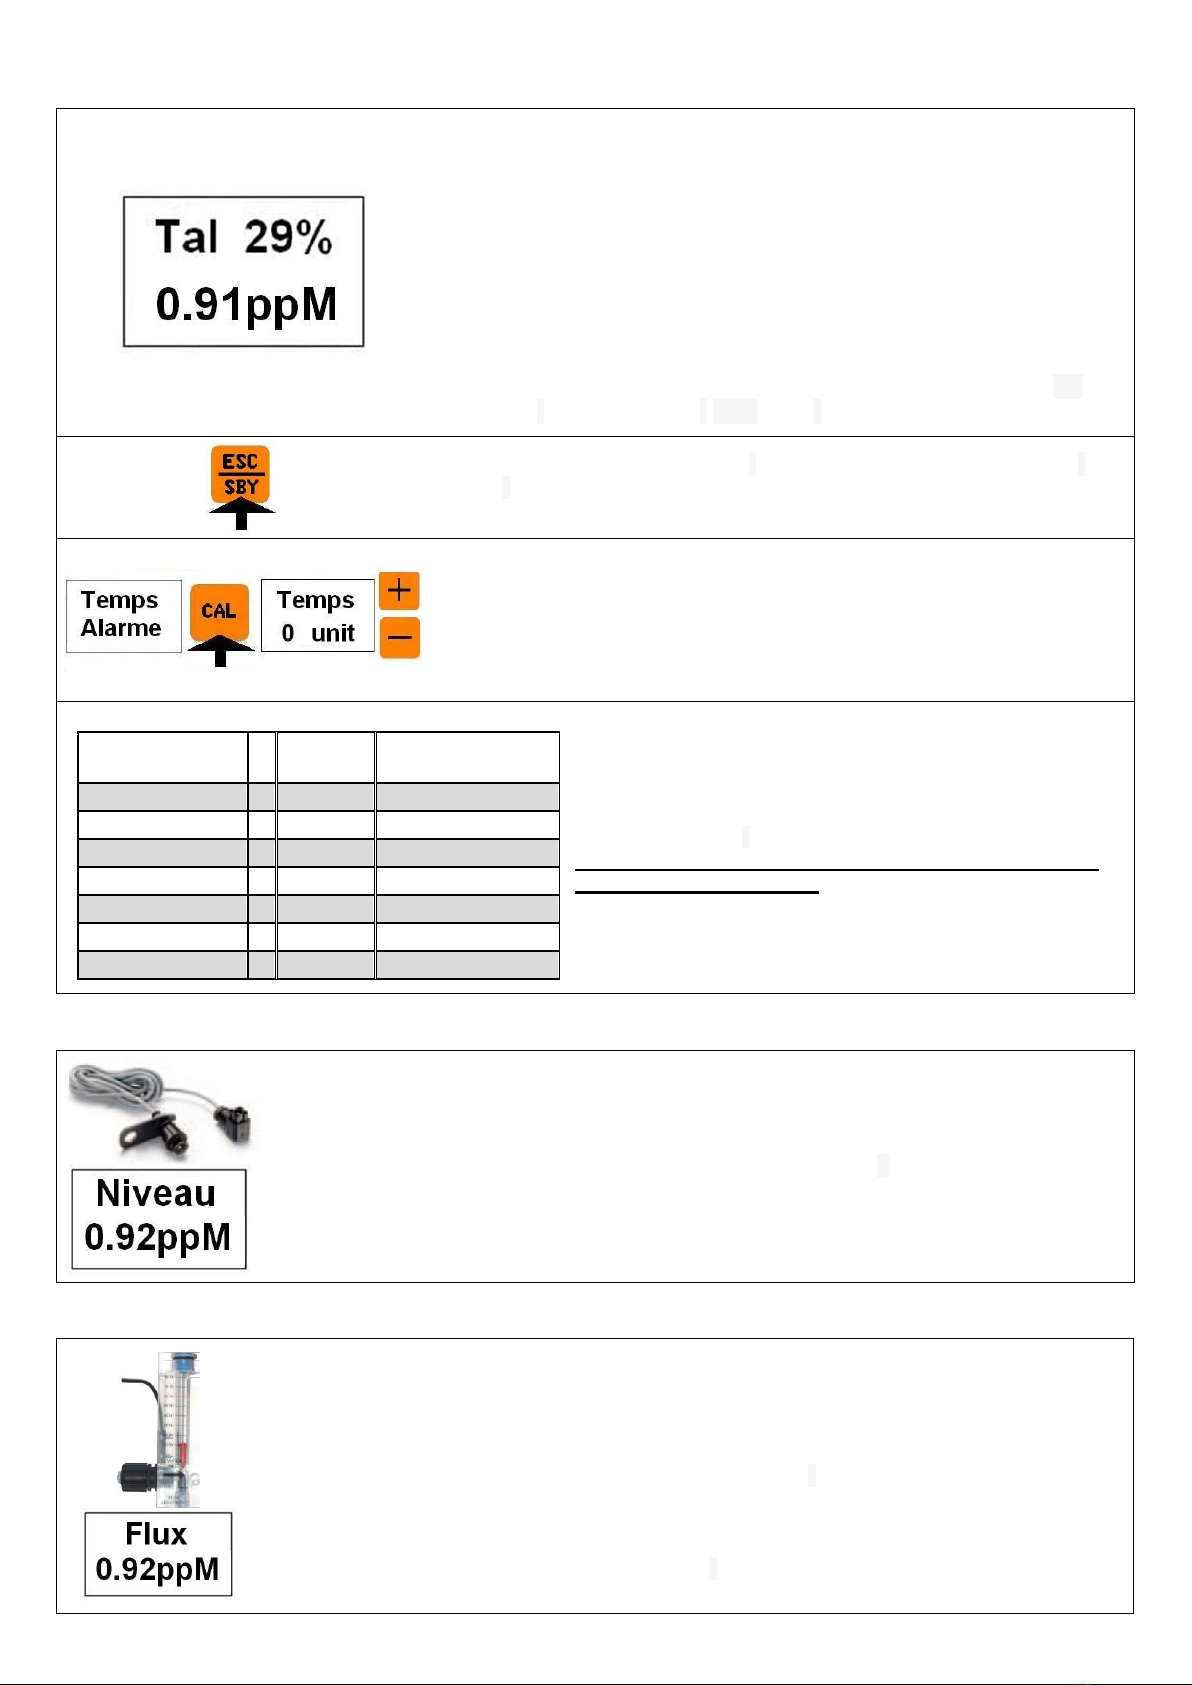
ALLARME TEMPORALE
CHE COSA E’? L’allarme temporale è espresso in unit (unità) di dosaggio. Una
unità di dosaggio equivale a 150 iniezioni di prodotto chimico. Il conteggio delle
iniezioni parte da 0 nell’istante in cui la pompa inizia il dosaggio dopo l’accensione,
si incrementa durante il dosaggio, si sospende durante l’allarme di livello e durante
lo stand_by, si resetta se manca l’alimentazione elettrica, se la misura raggiunge il
setpoint e durante l’allarme di flusso. Quando il conteggio raggiunge il valore del
parametro memorizzato nel Tempo di Allarme, la pompa va in allarme:
1) CESSA IL DOSAGGIO (nessuna tensione al magnete)
2) LED verde di on lampeggia
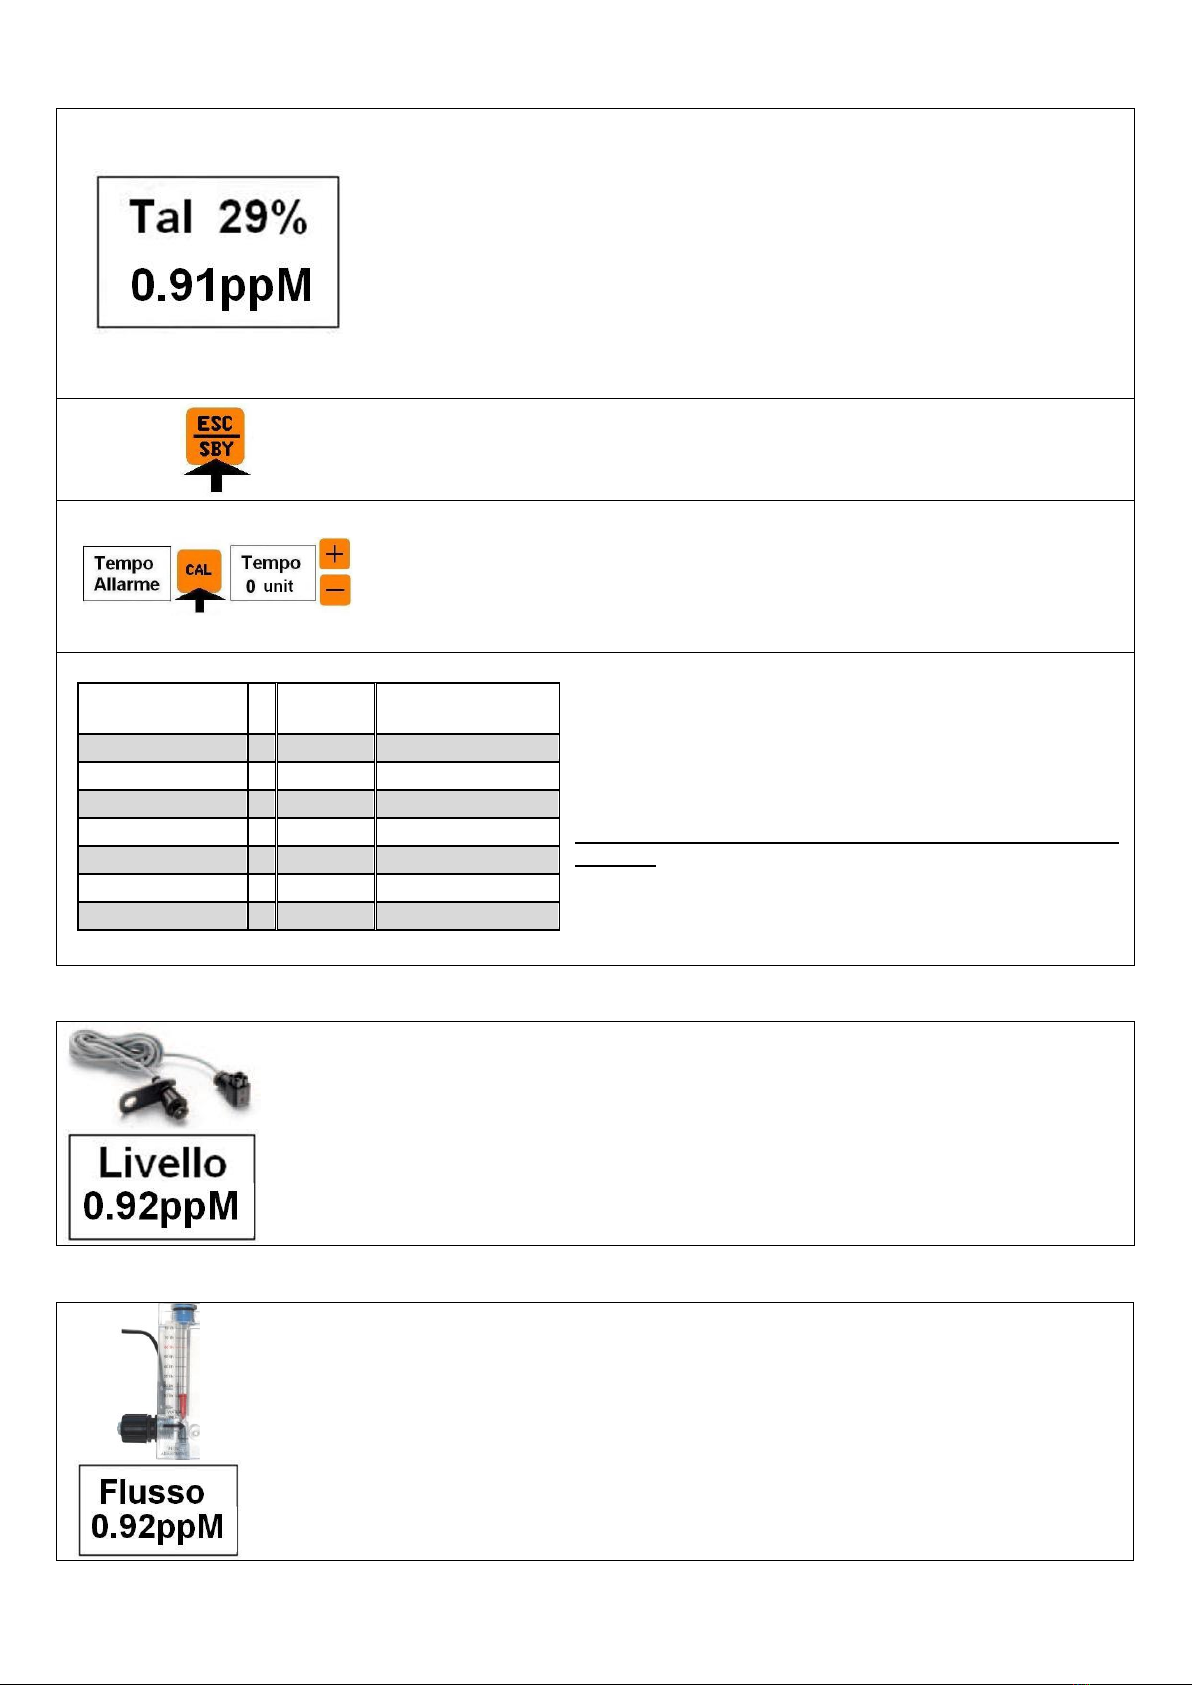
3) IL DISPLAY visualizza: sulla prima riga “Tal “ e la portata percentuale, sulla
seconda riga invece visualizza la misura.
La pressione prolungata del tasto di ESC per 2 secondi fa tornare la pompa nello
stato di FUNZIONAMENTO ed azzera il conteggio che riparte immediatamente
quando la pompa ricomincia a dosare.
MODIFICA DELL’ALLARME TEMPORALE
Premere e rilasciare rapidamente il tasto CAL e scorrere il menu con i tasti +e -
finchè sul display appare la scritta “Tempo Allarme”. Premere CAL per entrare e
con i tasti +e –scegliere le unità di allarme temporale da 0 a 120 unit.
Premere CAL per confermare ed ESC per tornare in misura
Esempio di calcolo del Tempo di Allarme se si vogliono
iniettare 2 litri (=2000cc) di prodotto massimo alla
contropressione di targa della pompa.
NB:L’allarme temporale non ha effetto sul funzionamento
manuale
MOD
l/h
1 unit
Tempo Allarme=
2000cc :(cc_unit)
ME3-ppM 04/12
4
66.6cc
30 unit
ME3-ppM 04/18
4
66.6cc
30 unit
ME3-ppM 05/10
5
83.3cc
24 unit
ME3-ppM 06/15
6
100cc
20 unit
ME3-ppM 10/2
10
166.6cc
12 unit
ME3-ppM 26/2
26
433.3cc
5 unit
ME3-ppM 30/1
30
500cc
4 unit
CONTROLLO DI LIVELLO (OPTIONAL)
La chiusura del contatto di livello, libero da tensione, durante il funzionamento della pompa, in
qualsiasi modalità essa si trovi, provoca:
1) la cessazione dell’attività di dosaggio
2) l’accensione lampeggiante del led verde on
3) Il display visualizza alternativamente sulla prima riga la scritta “Livello” mentre sulla
seconda riga permane la misura attuale
La riapertura del contatto di livello fa tornare la pompa , nello stato di FUNZIONAMENTO
congruente con gli ingressi attuali della pompa.
NB: l’allarme di livello sospende (ma non resetta ) il conteggio dell’ allarme temporale.
CONTROLLO DI FLUSSO (OPTIONAL)
La chiusura del contatto di flusso, libero da tensione, durante il funzionamento della pompa, in
qualsiasi modalità essa si trovi, provoca:
1) la cessazione dell’attività di dosaggio
2) l’accensione lampeggiante del led verde on
3) Il display visualizza alternativamente sulla prima riga la scritta “Flusso” mentre
sulla seconda riga permane la misura attuale
La riapertura del contatto di flusso fa tornare la pompa , nello stato di FUNZIONAMENTO
congruente con gli ingressi attuali della pompa.
NB: l’allarme di flusso resetta il conteggio dell’allarme temporale.

Rev 3.0 Cod. 00.008.255
5
POSSIBILI FUNZIONAMENTI
Ci sono 3 possibili funzionamenti:
Tipo manuale: dosaggio costante ad un numero di impulsi al minuto definito
in programmazione come nel prossimo paragrafo.
Tipo Proporzionale: dosaggio proporzionale alla distanza della misura dal
setpoint desiderato. Range di proporzionalità : 1ppM
Tipo On-Off : dosaggio di tipo costante che si attiva nel momento in cui la
misura si allontana dal setpoint. Hysteresi totale centrata sul Setpoint:
0.1ppM
PROGRAMMAZIONE DEL FUNZIONAMENTO MANUALE (COSTANTE) E VISUALIZZAZIONE
Premere e rilasciare rapidamente il tasto CAL e poi i tasti +e -per fare
apparire “Tipo Funzion.” Premere CAL e quindi con i tasti +e –scegliere
“Tipo Manual” e confermare con CAL. Appare “Freq.” con la percentuale
precedentemente scelta. Modificare con +e –tale valore e confermare la
scelta con CAL. Premere ESC per tornare in misura con il funzionamento di
dosaggio Manuale appena programmato.
Il numero di iniezioni che la pompa fa al minuto è pari alla percentuale scelta
della frequenza massima. Esempio : 80% significa 120 impulsi al minuto cioè
150imp/min x 0.8 = 120 imp/min
Nel funzionamento Manuale il display scrive sulla prima riga “Man.” e la
percentuale di frequenza di iniezione programmata.
Sulla seconda riga è visualizzata la misura.
PROGRAMMAZIONE DEI FUNZIONAMENTI
PROGRAMMAZIONE DEL FUNZIONAMENTO ON-OFF ppM E VISUALIZZAZIONE
Premere e rilasciare rapidamente il tasto CAL e poi i tasti +e –fino a visualizzare
“Tipo Funzion.” Premere CAL e quindi con i tasti +e –fare apparire “Tipo On-
Off”. Quindi confermare con CAL.
Appare il valore del Setpoint precedentemente memorizzato. Premere +e –per
modificarlo e il tasto CAL per confermare la modifica.
Appare il verso del dosaggio Chlor oppure DeChlor precedentemente
memorizzato. Con +e –scegliere il verso e confermare con CAL.
Scegliere Chlor se si vuole dosare per valori di ppM inferiori al Setpoint.
Scegliere DeChlor se si vuole dosare per valori dei ppM superiori al Setpoint.
Appare il valore della percentuale della frequenza massima di iniezioni (150
imp/min) precedentemente memorizzato. Modificarlo con +e –e confermare con
CAL. Premere ESC per tornare in misura con il nuovo funzionamento di dosaggio
On-Off appena programmato
Nel funzionamento On-Off se la pompa dosa il display scrive sulla prima riga
“On” e la percentuale di iniezioni programmata, se la pompa non dosa il display
scrive sulla prima riga “Off”e la suddetta percentuale.
Sulla seconda riga è visualizzata la misura.
Rev 3.0 Cod. 00.008.255
6
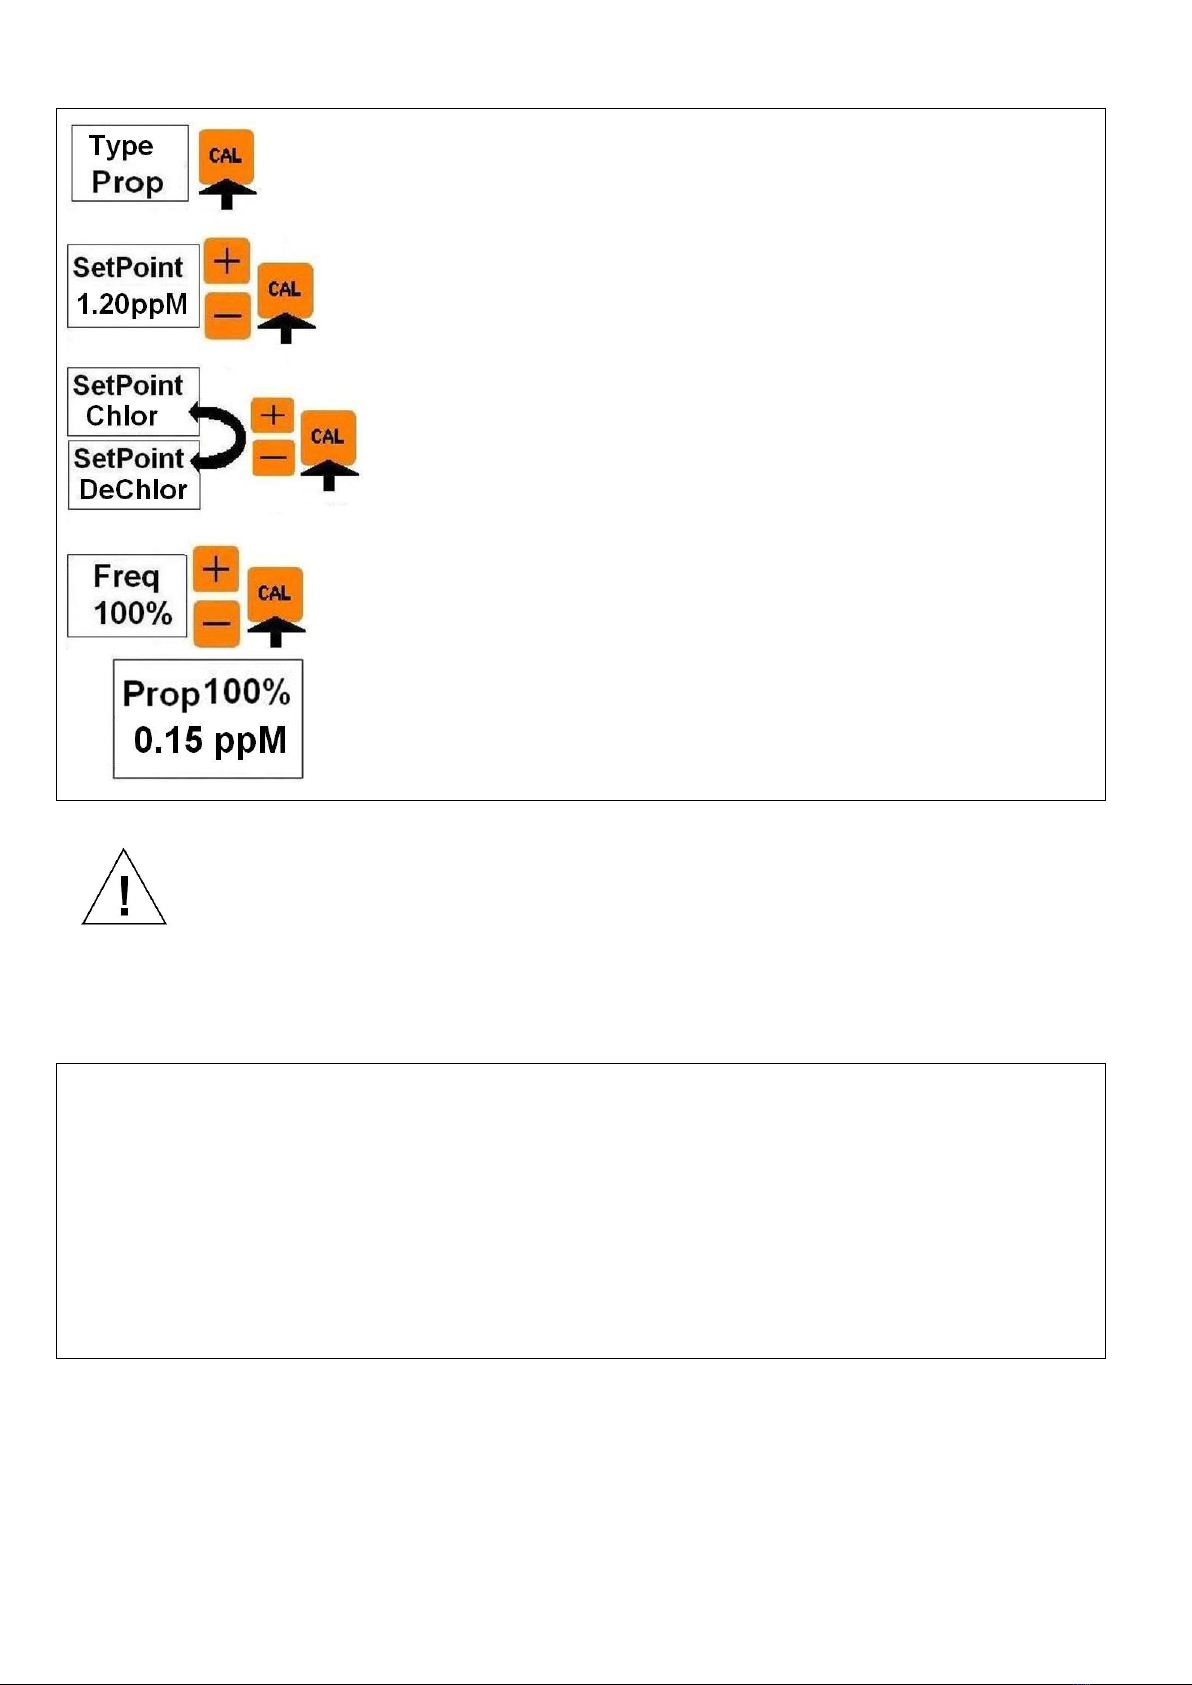
PROGRAMMAZIONE DEL FUNZIONAMENTO PROPORZIONALE AI ppM E VISUALIZZAZIONE
Range di proporzionalità = 1ppM
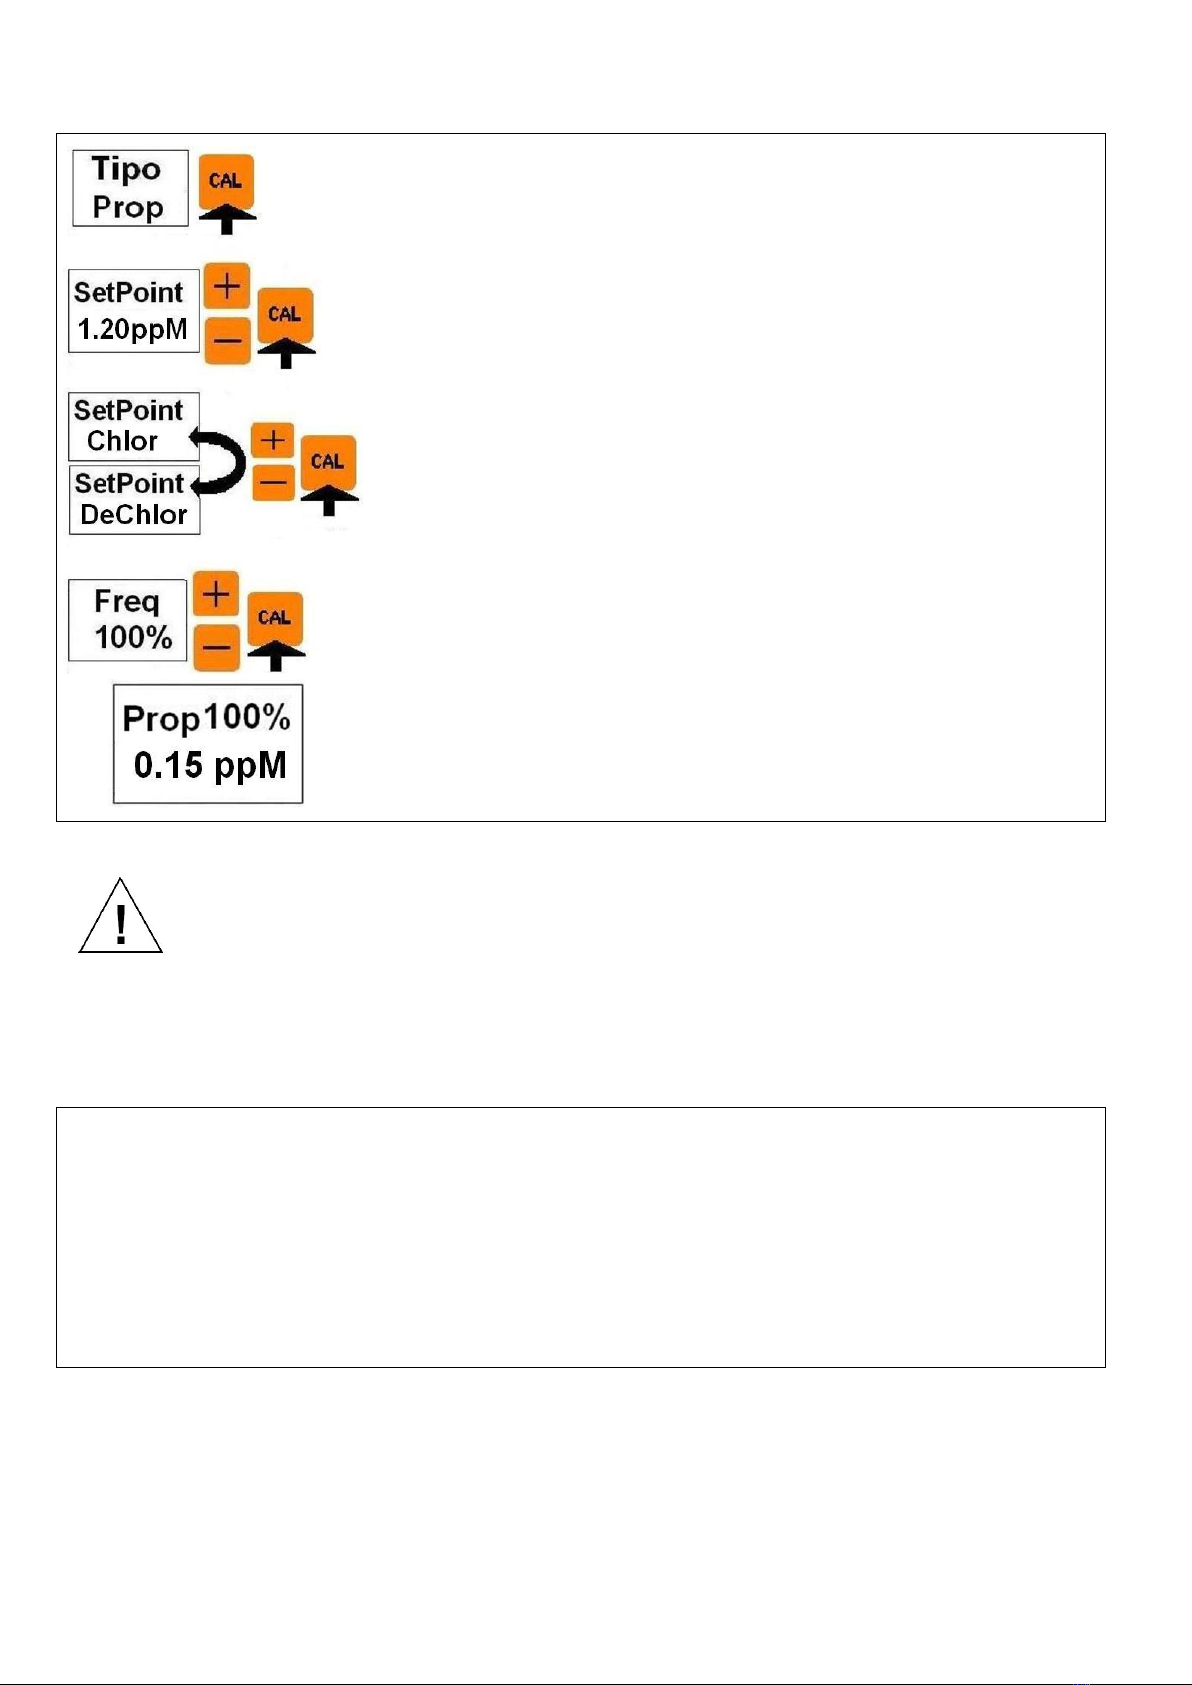
Premere e rilasciare rapidamente il tasto CAL e poi i tasti +e -fino a visulaizzare
“Tipo Funzion.” Premere CAL e quindi con i tasti +e –visualizzare “Tipo Prop” e
confermare con CAL.
Appare il valore del Setpoint precedentemente memorizzato. Premere +e –per
modificarlo e il tasto CAL per confermare la modifica.
Appare il verso del dosaggio Chlor oppure DeChlor precedentemente
memorizzato. Con +e –si passa dall’uno alltro e confermare con CAL.
Scegliere Chlor se si vuole dosare per valori di ppM inferiori al Setpoint.
Scegliere DeChlor se si vuole dosare per valori dei ppM superiori al Setpoint.
Appare il valore della percentuale della frequenza massima di iniezioni (150
imp/min) precedentemente memorizzato. Modificarlo con +e –e confermare con
CAL. Premere ESC per tornare in misura con il nuovo funzionamento di dosaggio
Proporzionale appena programmato.
Nel funzionamento Proporzionale il display scrive sulla prima riga “Prop” e la
percentuale di iniezioni che il magnete sta facendo rispetto alla frequenza di
iniezioni programmata.
Sulla seconda riga è visualizzata la misura.
In qualsiasi punto di programmazione se non viene premuto alcun tasto (+,-, CAL) durante 60 secondi, la
pompa esce dalla programmazione con i parametri nuovi fino a quel momento memorizzati.
CALIBRAZIONE DELLA SONDA DI CLORO
Attenzione,
è necessario fare un test comparativo per il controllo del cloro libero (tipo DP1 test).
La taratura dello ZERO é fatta di fabbrica e quindi passare direttamente alla taratura del gain.
Se proprio si vuole effettuare la calibrazione dello zero considerare che la pompa è stata studiata in maniera tale che
lo zero elettrico risulti praticamente coincidente con lo zero elettrochimico
Quindi se è proprio necessario fare la taratura dello zero procedere come segue:
staccare l’ingresso sonda di cloro :
1) Attendere che il display raggiunga un'indicazione stabile (a qualsiasi valore).
Premere e rilasciare rapidamente il tasto CAL e poi i tasti + e -fino a visualizzare “Taratura elettro”. Premere CAL e
quindi il tasto –per effettuare la taratura dell’offset della sonda. Regolare (se necessario) il valore di lettura a
0.00ppM e poi confermare con CAL. Se compare il messaggio “Taratura impossi” la taratura non è stata effettuata.
Provare a ripeterla. Se non appare alcun messaggio la taratura è stata effettuata.
Rev 3.0 Cod. 00.008.255
7
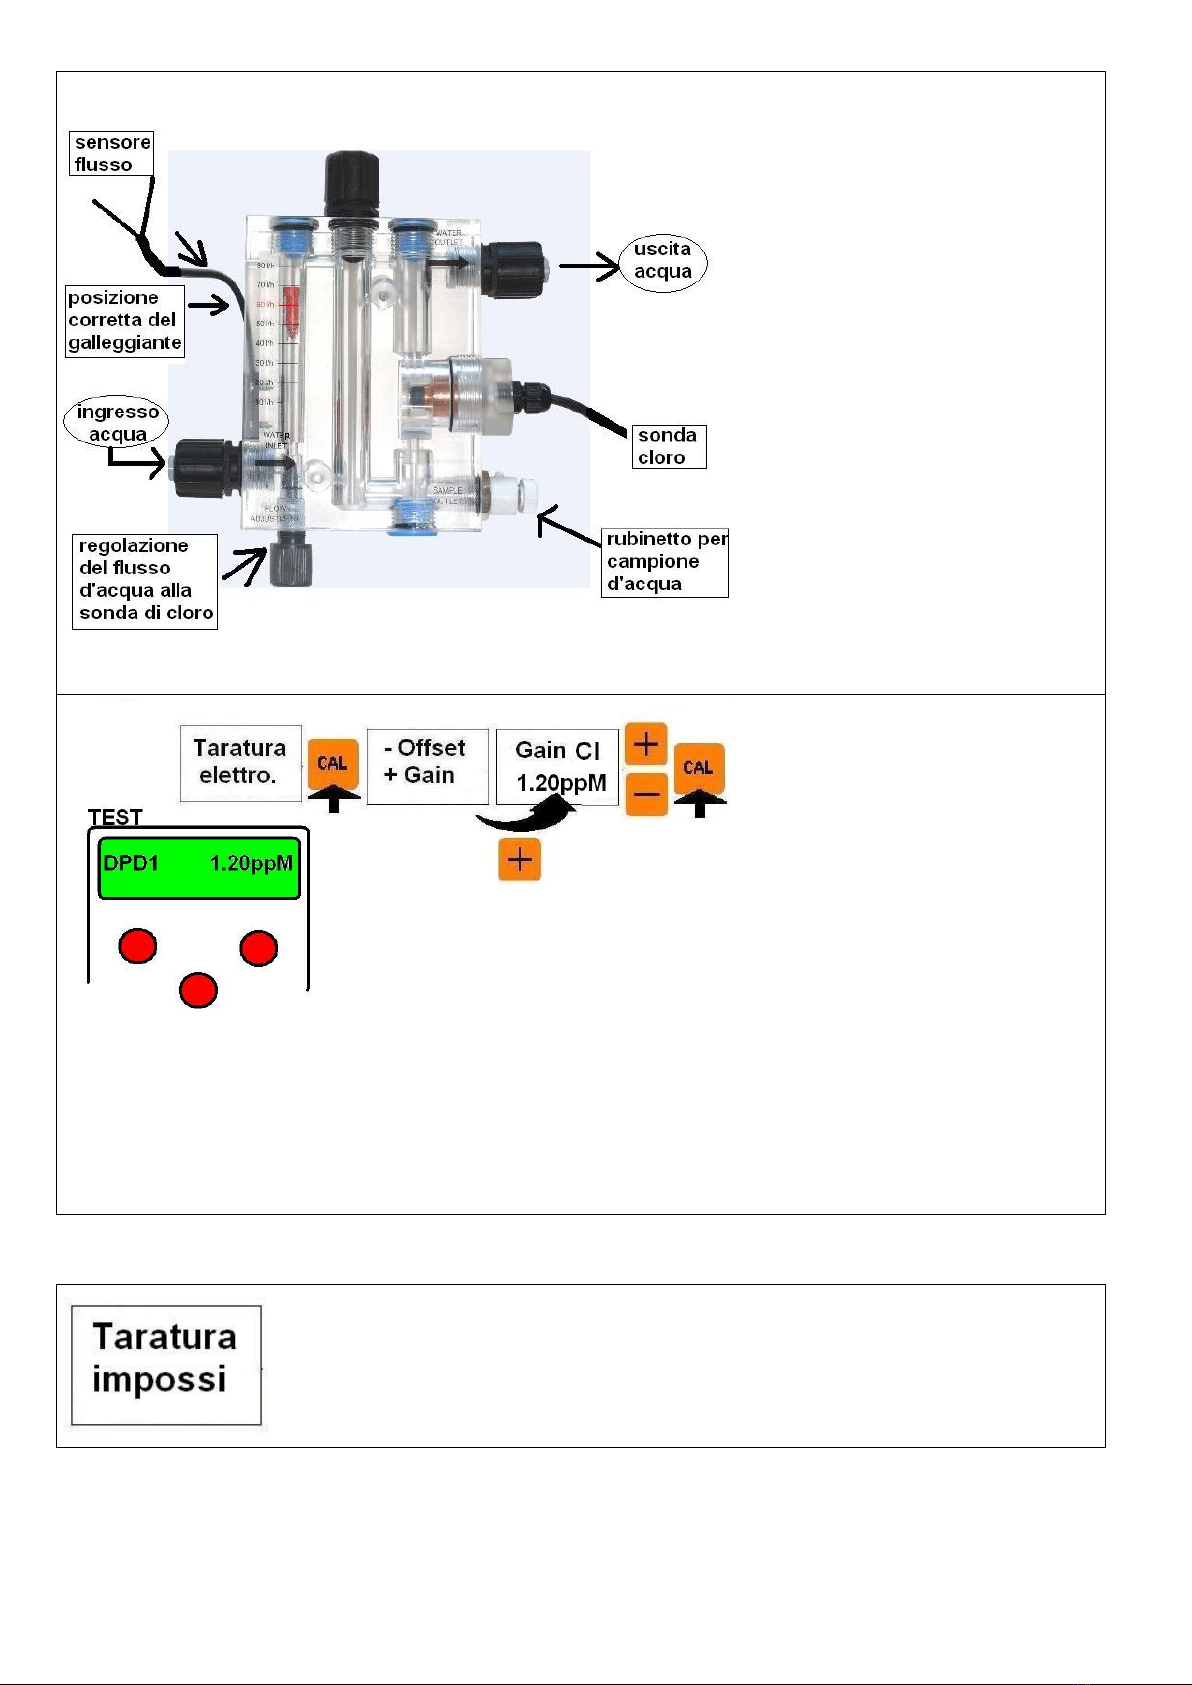
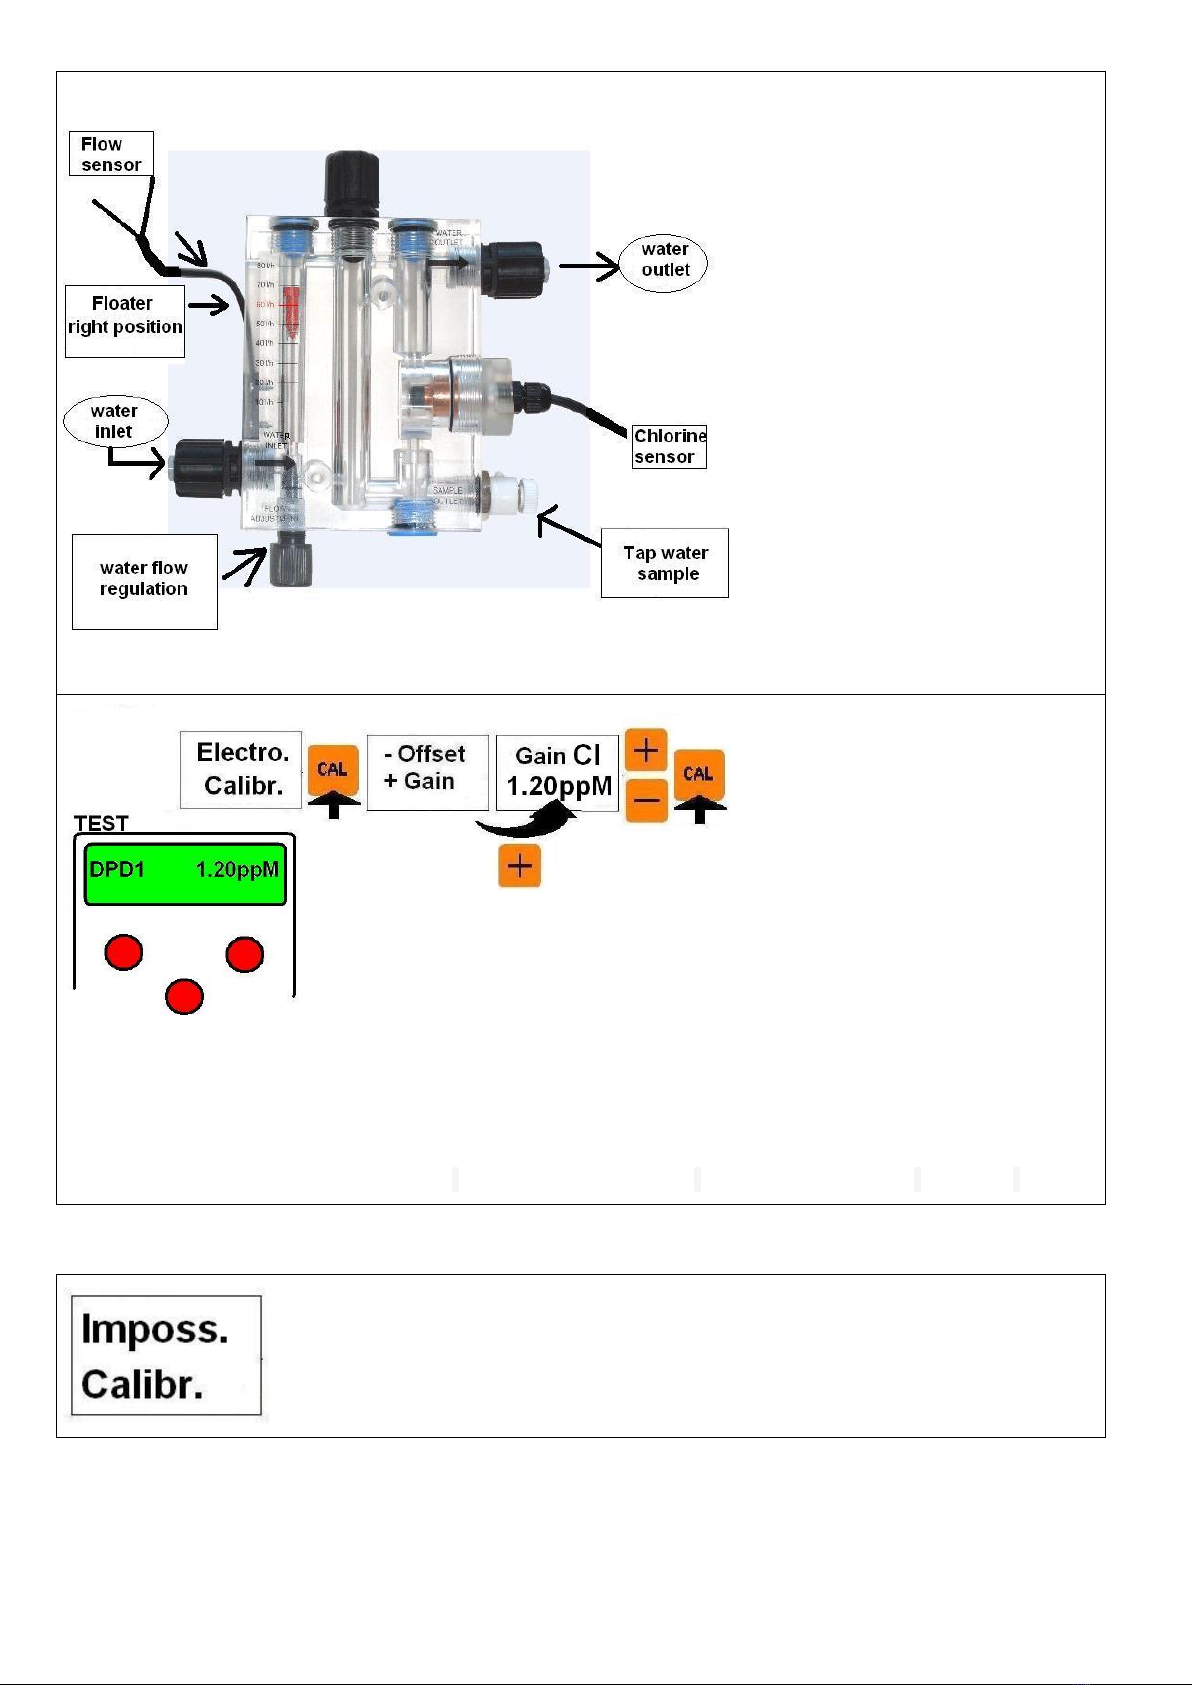
RACCOMANDAZIONI: Prima di
procedere alla taratura del gain FARE
ATTENZIONE A SEGUIRE LE
SEGUENTI ISTRUZIONI:
1) Si raccomanda di stabilizzare il
flusso d’acqua nel porta sonda fino a
portare il galleggiante nella posizione in
alto (60l/h). Questo permetterà alle
sfere di vetro di pulire adeguatamente
la superficie di rame.
2) Stabilizzare il pH al valore di lavoro
prima di fare la calibrazione del Gain. (
Si consiglia di scegliere un valore tra
7.0 e 7.3pH )
3) La calibrazione del gain va effettuata
a valori di cloro il più possibile vicini al
valore di setpoint desiderato. Se ad
esempio si vuole una concentrazione di
cloro di 1.20ppM è consigliabile
eseguire la taratura del Gain con acqua
intorno a tali condizioni. Usare un test
fotometrico DPD1 sul campione
d’acqua prelevato dal rubinetto del
portasonda ( figura accanto) per
controllare i ppM di cloro presenti in
vasca.
TARATURA DEL GAIN
Si consiglia di effettuare la
calibrazione di gain dopo almeno 2,3
ore di lavoro alle condizioni ottimali,
oppure si può anche effettuare una
prima calibrazione dopo
l’installazione della sonda e della
pompa e poi tornare ad affinare la
calibrazione dopo 24 ore.
Una volta stabilizzati flusso e pH e
controllato che il cloro sia nelle
condizioni di concentrazione ottimali,
procedere alla calibrazione del GAIN.
Attendere la stabilizzazione della lettura
sul display.
Effettuare un test DPD1 su un campione di acqua prelevata dal rubinetto del portasonda di cloro.
Premere e rilasciare rapidamente il tasto CAL e poi i tasti +e -fino a visualizzare “Taratura elettro”. Premere CAL e
quindi il tasto +per effettuare la taratura del gain della sonda.
Regolare (se necessario) il valore letto fino a portarlo al valore di lettura DPD1 con i tasti +e -e poi confermare con
CAL.Se compare il messaggio “Taratura impossi” la taratura non è stata effettuata. Leggere il paragrafo che segue :
MESSAGGI DELLA POMPA. Se non appare alcun messaggio la taratura è stata effettuata.
MESSAGGI DELLA POMPA
INDICA CHE LA TARATURA DELL’ELETTRODO E’ IMPOSSIBILE. E’ NECESSARIO
RIPETERLA.
Se dopo aver ripetuto la calibrazione appare nuovamente il messaggio, procedere come
segue:
a) Controllare che le condizioni di flusso e pH siano esatte.
b) Controllare le corrette connessioni della pompa con la sonda
c) Ripetere il test DPD1 e quindi ripetere la calibrazione del gain della pompa

Rev 3.0 Cod. 00.008.255
8
ENGLISH
FRONTAL PANEL DESCRIPTION
1.Display LCD 8 x 2 backlight
2.Green Led: ▪ fix =PUMP ON
▪ blinking = PUMP IN ALARM
3.Red Led: indicates the injections
4.CAL button : ▪ allows to enter in programming
▪saves the changes
5/6. –and + buttons : ▪ allows to navigate through the menu
▪ Modify the parameters values
7. ESC/SBY button: ▪ puts the pump in stand_by mode
▪ allows to exit the menu
GENERAL FUNCTIONS OF THE PUMP :
- 4 LANGUAGES MENU: ITALIAN, ENGLISH, FRENCH, SPANISH
- 3 POSSIBLE TYPES OF FUNCTIONING: MANUAL, ON/OFF, PROPORTIONAL
- ALARM TIME OF OVERDOSAGE
- START UP DELAY
- DEFAULT PARAMETER RESTORING
- WATER FLOW CONTROL
- LEVEL CONTROL
- STOP DOSING ( STAND_BY )
- REAL TIME FLOW RATE %
DEFAULT SETTINGS
FUNCTIONING: ON-OFF
SETPOINT: 1.20 ppM
DIRECTION DOSING: Chlorination
INJECTION FREQUENCY:100%(150 imp/min)
ALARM TIME: 0unit (disabled)
START UP DELAY: 0 minutes
DEFAULT SETTINGS RESTORE
Push and quickly release CAL button and then pressing +and –buttons
select “Restore Enter”
Push CAL to confirm the choice. The pump goes back in measure
restoring in memory
the default settings and calibrations parameters.
PUMP’S CONNECTION
A -è il cavo di alimentazione elettrica , 230 V- 50Hz (a richiesta 115 ~).
B - è il connettore della sonda di livello (contatti 3 e 4). OPTIONAL
C -è il connettore del sensore di flusso (contatti 3 e 4). OPTIONAL
D - è il connettore BNC della sonda cloro
E- è l’interruttore ON_OFF. OPTIONAL

Rev 3.0 Cod. 00.008.255
9
STAND BY (STOP)
Push and hold the ESC/SBY button for 2 seconds during the functioning to put the pump in stand by
mode:
1) It stops dosing
2) Green on led blinks.
3) If the functioning is PROPORTIONAL the display shows: “Stop 0%” on the first row and the current
measure on the second row (see figure on the left side)
3) If the functioning is Manual or ON-OFF the display shows: “Stop” and the % programmed
frequency on the first row and the current measure on the second row (see figure on the left side)
Push again the ESC/SBY button for 2 seconds to return the pump to the programmed functioning
MENU TREE
Push and quickly release CAL
button during the functioning to
enter into the programming menu.
Push +or - button to navigate
through the menu.
Push the CAL button to enter the
submenus
LANGUAGE SELECTION
Push and quickly release CAL button and then pressing +and –buttons select the language
choice. Push CAL to enter the language submenu and select “Language English” by pressing +
or - .
Push CAL to confirm the choice and ESC to go back in measuring
DELAY START
WHAT IS IT? The delay start is the time in minutes (0-999min) after the
power on that the pump waits before dosing the chemical product. During
this period of time the display shows the message “Delay” on the first row
and the measure on the second row (see figure on the left side). During the
delay start the pump can’t dose but it is possible to enter the menu and
modify the parameters and calibrations.
DELAY START EDITING
Push and quickly release CAL button and scroll the menu using +and –
buttons till the display shows “Delay Start”. Push CAL to enter the submenu
and then by pressing +and –button choice the value in seconds (0-999).
Push CAL to confirm and ESC to go back in measuring.

Rev 3.0 Cod. 00.008.255
10
TIME ALARM
WHAT IS IT? The Time alarm is expressed in units (0-120unit) of dosage.
One unit is equivalent to 150 injections of chemical. The injections counting
starts from 0 when the pump starts dosing after the power on, increases
during dosing, stops during level alarm and stand_by state, and is resetted
when the power is off, when the measure reaches the setpoint and during the
flow alarm. When the counting reaches the value memorized in Time alarm
the pump goes in Time Alarm state:
1) The dosing stops (no tension to the electromagnet)
2) Green led On blinks
3) the display shows:“Tal” and the % flowrate on the first row and the
measure on the second row.
Push and hold ESC button for 2 seconds to esc the Time Alarm state and to
go back to functioning. The time alarm counting restart from 0 when the pump
starts dosing again
TIME ALARM EDITING
Push and quickly release CAL button and scroll the menu using +and –
buttons till the display shows “Alarm Time”. Push CAL to enter the submenu
and then by pressing +and –button choice the value in units (0-120).
Push CAL to confirm and ESC to go back in measuring.
Example for the calculation of Alarm Time to dose 2 liters
(=2000cc) of chemical at backpressure of the pump
nameplate.
NOTE: The time alarm has no effect on Manual mode
operation
MOD
l/h
1 unit
Allarm Time=
2000cc :(cc_unit)
ME3-ppM 04/12
4
66.6cc
30 unit
ME3-ppM 04/18
4
66.6cc
30 unit
ME3-ppM 05/10
5
83.3cc
24 unit
ME3-ppM 06/15
6
100cc
20 unit
ME3-ppM 10/2
10
166.6cc
12 unit
ME3-ppM 26/2
26
433.3cc
5 unit
ME3-ppM 30/1
30
500cc
4 unit
LEVEL CONTROL
The closing of the level input contact, free of tension, while the pump is working, will cause:
1) the dosing stops
2) the green ON led blinks
3) the display shows “Level” alternatively on the first row and the actual measure on the second
row.
When the level contact gets opened again, the pump returns to working mode compatible with
the actual inputs. NOTE: The level alarm suspends (but not reset) the counting of the Alarm
Time
FLOW CONTROL
The closing of the flow input contact, free of tension, will cause:
1) the dosing stops
2) the green ON led blinks
3) The display shows “Flow” alternatively on the first row and the actual measure on the second
row.
When the flow contact gets opened again, the pump returns to working mode compatible with the
actual inputs. NOTE: The flow alarm resets the counting of the Alarm Time.

Rev 3.0 Cod. 00.008.255
11
POSSIBLE FUNCTIONING
There are 3 possible functioning:
Function Manual: constant dosing with a number of impulses per minute
programmed as follows in the next paragraph.
Function Prop: dosing proportional to the distance of the measure from the
setpoint. Range of proportionality : 1ppM
Function On-Off: constant dosing that starts when the measure moves
away from the setpoint. Total Hysteresis centered on the setpoint:
0.1ppM
PROGRAMMAZIONE DEL FUNZIONAMENTO MANUALE (COSTANTE) E VISUALIZZAZIONE
Push and quickly release CAL button and scroll the menu using +and –
buttons till the display shows “Function Type”. Push CAL to enter the
submenu and then by pressing +and –button choice “ Function Manual” and
confirm pressing CAL. The display will show “Freq.” and the % stored in the
last programming. Modify it by pressing +and –button and confirm the choice
pressing CAL. Push ESC button to esc the menu and go back in measure
with the Manual functioning just programmed.
The number of injections of the pump per minute depends on the %
programmed. For example: 80% means 120 injections per minute i.e. 150
pulses/min x 0.8 = 120 pulses/min.
In Manual functioning the display shows on the first row “Man.” and the %
frequency programmed.
The second row shows the measure.
PROGRAMMING OF THE FUNCTIONING
PROGRAMMING AND VISUALIZATION OF ON-OFF ppM FUNCTIONING
Push and quickly release CAL button and scroll the menu using +and –buttons
till the display shows “Function Type”. Push CAL to enter the submenu and
then, by pressing +and –button, choice “Function On-Off” and confirm pressing
CAL.
The display will show the value of setpoint stored in the last programming. Modify
it by pressing +and –button and confirm the choice pressing CAL.
The display will show the direction of dosing Chorination or Dechlorination
stored in the last programming. Choice the direction by +or –button and confirm
pressing CAL.
Select Dechlor if you want the pump to inject for ppM values greater than
Setpoint.
Select Chlor if you want the pump to inject for values of ppM lower than Setpoint.
The display will show the % of maximum frequency (150pulses/minute) stored in
the last programming. Modify it by pressing +and –button and confirm the choice
pressing CAL. Push ESC button to esc the menu and go back in measure with
the On-Off functioning just programmed.
In the On-Off functioning if the pump is dosing the display shows “On” and the %
frequency programmed on the first row, if the pump doesn’t dose the display
shows “Off” and the %frequency programmed.
On the second row the display writes the measure.
Rev 3.0 Cod. 00.008.255
12
PROGRAMMING AND VISUALIZATION OF PROPORTIONAL ppM FUNCTIONING
Range of proportionality = 1ppM
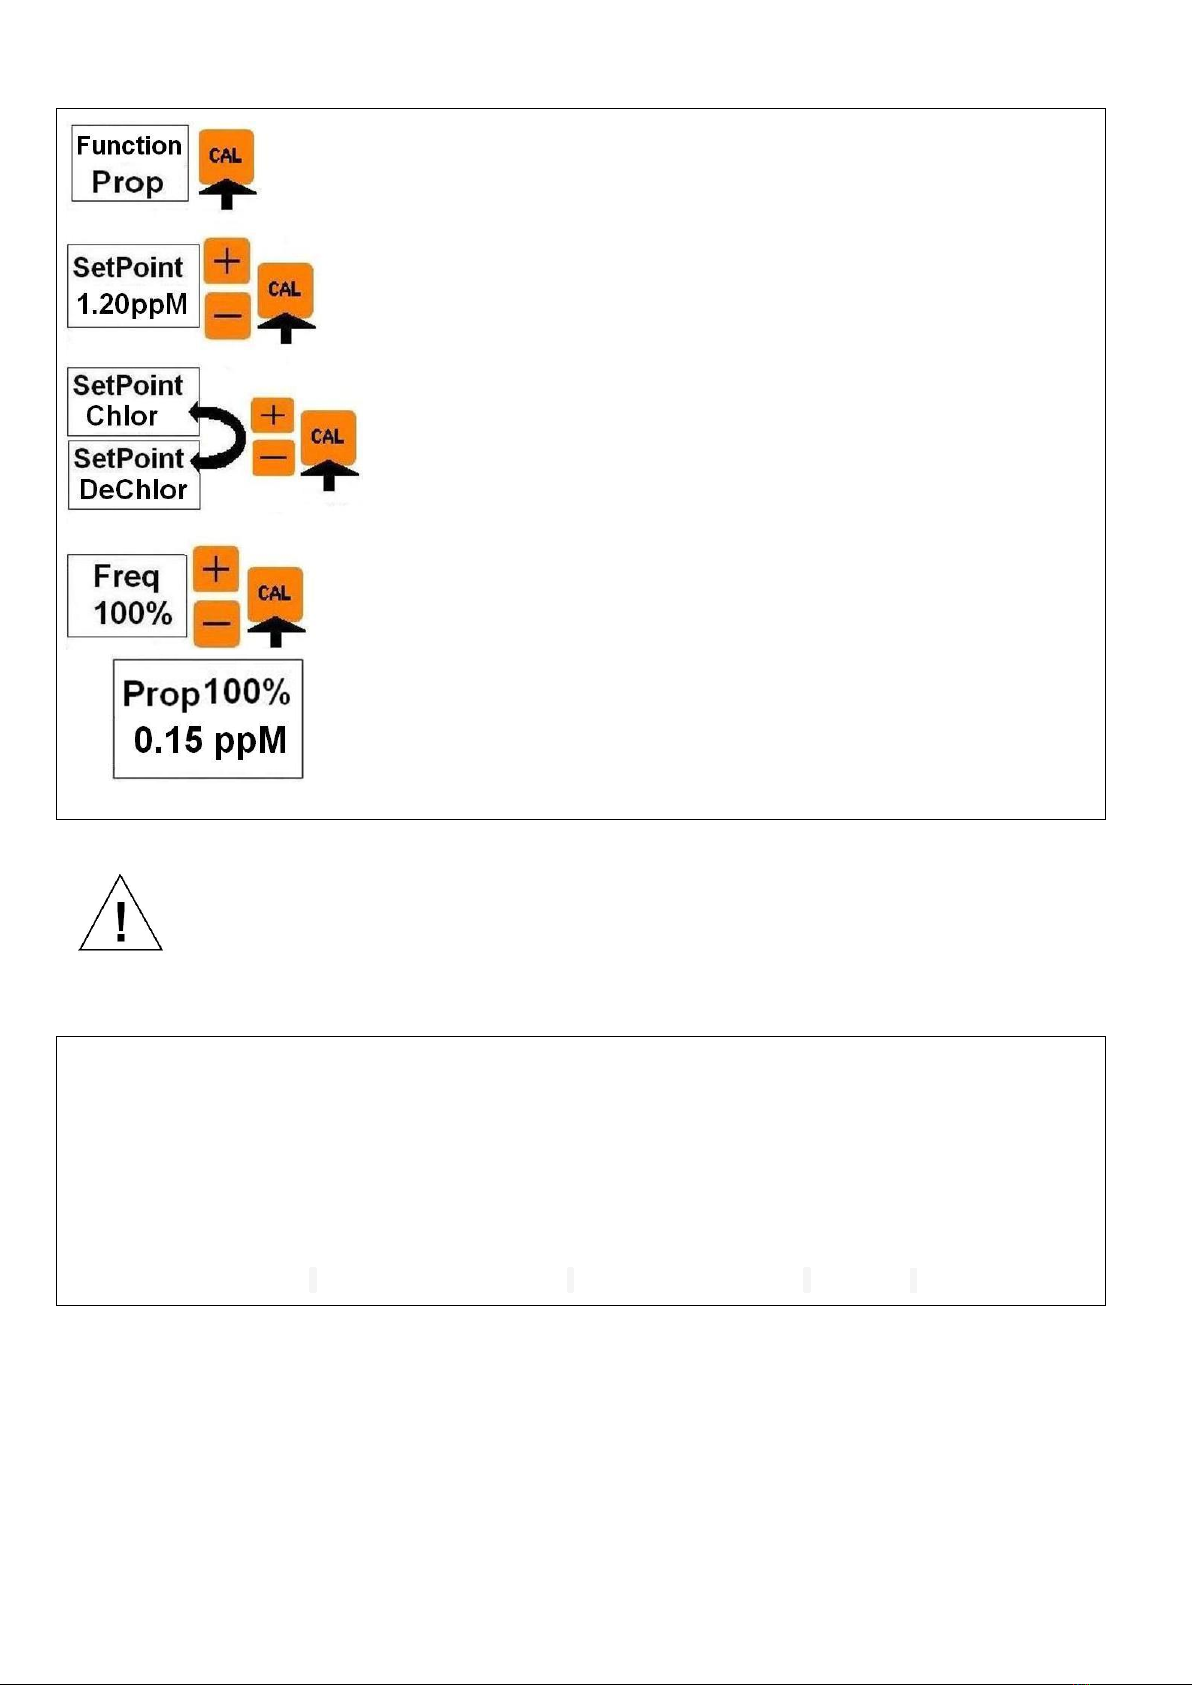
Push and quickly release CAL button and scroll the menu using +and –buttons
till the display shows “Function Type”. Push CAL to enter the submenu and
then, by pressing +and –button, choice “Function Prop” and confirm pressing
CAL.
The display will show the value of setpoint stored in the last programming. Modify
it by pressing +and –button and confirm the choice pressing CAL.
The display will show the direction of dosing Chlorination or Dechlorination
stored in the last programming. Choice the direction by +or –button and confirm
pressing CAL.
Select Dechlor if you want the pump to inject for ppM values greater than
Setpoint.
Select Chlor if you want the pump to inject for values of ppM lower than Setpoint.
The display will show the % of maximum frequency (150pulses/minute) stored in
the last programming. Modify it by pressing +and –button and confirm the choice
pressing CAL. Push ESC button to esc the menu and go back in measure with
the Proportional functioning just programmed.
In the Proportional functioning the display shows on the first row “Prop” and the
actual %frequency of dosing that the pump is doing respect to the % frequency
programmed.
On the second row the display writes the measure.
During the programming if you do not push any button (+,-, CAL) for more than 60 seconds, the pump will
get out of programming keeping the data stored until that moment.
CHLORINE PROBE CALIBRATION
Attention,
It will be necessary to do a comparative free chlorine test (for example a DPD1 photometric test)
Zero Calibration is executed at factory and then go directly to RECOMMENDATIONS paragraph.
The pump is been projected so that the electrical zero probe calibration is equal to electrochemical zero calibration.
So if it’s really necessary to calibrate the zero of the probe read the following instructions:
-disconnect the chlorine probe input from the pump
1)wait until the display reaches a stable reading(any value)
Push and quickly release CAL button and then scroll the menu by + and –buttons till the display shows
“Electro. Calibr.” Push CAL to enter the submenu and then the button –to do the OFFSET calibration of the
probe. If it is necessary you can modify the value shown in the second row of the display by buttons +or –
till 0.00ppM reading. Push CAL to confirm. If the display shows the message “Imposs. Calibr.” the probe
calibration is not saved. If no error message appears the calibration has been performed.
Rev 3.0 Cod. 00.008.255
13
RECOMMENDATIONS: before doing
GAIN calibration, PAY ATTENTION TO
THE FOLLOWING INSTRUCTIONS:
1) it is necessary to stabilize the water
flow by turning the knob regulation till
the floater stays in the upper position
(60l/h). This is important because the
right water flow rate allows the glass
spheres to clean adequately the cupper
surface.
2) Before calibrating the GAIN of the
chlorine probe, stabilize the pH at the
working conditions.(We recommend to
choose a value from 7.0 to 7.3pH) .
3) It is necessary to do the Chlorine
gain calibration at concentration values
nearest possible to the desired setpoint.
For example if the chlorine
concentration desired is 1.20ppM it is
strictly recommended to do the gain
calibration with water in those
conditions. Use a DPD1 photometric
test to check the chlorine
concentration in the water sample
taken from the Tap (see the figure on
the left)
GAIN CALIBRATION
It is recommended to do the gain
calibration after at least 2 or 3 hours
of optimal working conditions, or
alternatively it is possible to do a
first gain calibration after having
installed the pump and the probe in
the plant and then do the definite
calibration after 24 hours of work of
the probe. After having stabilized the
flow and the pH and having stabilized
the chlorine concentration at the
optimal and desired value, wait for the
stabilization of the reading on the
display.
Do a DPD1 test on the water sample taken from the Tap of the probe holder. Push and quickly release CAL button
and then scroll the menu till the display shows “Electro. Calibr.” Push CAL to enter the submenu and then the
button +to do the GAIN calibration of the probe. If it is necessary you can modify the value shown in the second row
of the display by buttons +or -till the value is equal to that of DPD1 tester. Push CAL to confirm.
If the display shows the message “Imposs. Calibr.” the probe calibration is not saved. Read the following paragraph
named “MESSAGES FROM THE PUMP”. If no error message appears the calibration has been performed.
MESSAGES FROM THE PUMP
THIS MESSAGE MEANS THAT THE CALIBRATION IS IMPOSSIBLE AND HAS TO BE
DONE AGAIN.
If after the calibration repetition the display shows again this message:
a) Check that the flow and pH conditions are right.
b) Check the connection of the probe on the pump is correct.
c) Repeat the DPD1 test and then repeat the gain calibration.

Rev 3.0 Cod. 00.008.255
14
FRANÇAIS
DESCRIPTION DE LA FACE AVANT
1.Afficheur à LCD 8 x 2 rétro-éclairé
2. Led verte:▪ allumé fixe =POMPE EN MARCHE
▪ Clignotant = ÉTAT D’ALARME
3. Led rouge: indique les injections
4. Touche CAL: ▪ pour accéder à la programmation
▪ pour confirmer le choix
5/6. Touche –e +: ▪ pour naviguer dans le menu
▪ Modifiez la valeur des paramètres
7. Touche ESC/SBY: ▪ met la pompe en stand-by
▪Pour quitter le menu
CARACTÉRISTIQUES GÉNÉRALES DE LA POMPE:
- MENU EN 4 LANGUES : ITALIEN, ANGLAIS, FRANÇAIS, ESPAGNOL
- 3 TYPES POSSIBLES DE FONCTIONNEMENT: CONSTANT, ON / OFF, PROPORTIONNELLE
- ALARME DE SURDOSAGE
- DÉMARRAGE TARDIF
- RETABLISSEMENT DES PARAMETRES DE DÉFAUT
- CONTRÔLE DES FLUX DE L'EAU
- CONTRÔLE DE NIVEAU
- STOP DE DOSAGE (STAND_BY)
- AFFICHAGE DE DÉBIT % INSTANT POUR INSTANT
REGLAGE D’USINE
OPÉRATION: ON-OFF
POINT DE CONSIGNE: 1.20ppM
DOSAGE DIRECTION: CHLORATION
FRÉQUENCE D’INJECTIONS À LA MINUTE: 100% (150 imp/min)
TEMPS D’ALARME: 0 unit (désactivé)
RETARD D’ALLUMAGE: 0 minutes
RETABLISSEMENT DE RÉGLAGE D’USINE
Pressez et relâchez rapidement la touche CAL puis le boutons + et –
jusqu 'à ce que apparaît l'inscription «Rem. Init. Enter". Appuyez sur
CAL pour confirmer. La pompe revient automatiquement à mesurer avec
les valeurs de programmation de la mémoire et l'étalonnage d’usine.
CONNEXIONS DE LA POMPE
A - Alimentation électrique, 230V-50 Hz (sur demande : 115 ~ )
B - Connecteur de la sonde de niveau (contacts 3 et 4). OPTION
C - Connecteur du capteur de flux (contacts 3 et 4). OPTION
D - Connecteur BNC de la sonde du Chlore
E - Interrupteur ON_OFF. OPTION

Rev 3.0 Cod. 00.008.255
15
STAND BY (STOP)
La pression prolongée de 2 secondes de la touche ESC/SBY pendant le fonctionnement met la
pompe en état de stand by:
1) CESSE LE DOSAGE
2) LED vert de ON clignotant
3) Dans le fonctionnement Proportionnel l’affichage indique: "Stop 0%" sur la première ligne et la
mesure réelle sur la deuxième ligne (voir la figure à côté)
3) Dans le fonctionnement Manuel et ON-OFF, l’affichage indique: "Stop" et le % de la fréquence
programmée sur la première ligne et la mesure réelle sur la deuxième ligne (voir figure à gauche).
La nouvelle pression de la touche ESC / SBY de 2 secondes fait revenir la pompe dans l'état de
fonctionnement initial
STRUCTURE DU MENU
Pressez et relâchez rapidement la
touche CAL pour entrez dans la
programmation. Naviguez dans le
menu avec les touches +et - .
Entrez dans les sous-menus en
appuyant sur la touche CAL.
CHOIX DE LA LANGUE
Pressez et relâchez rapidement la touche CAL et défilez le menu avec les boutons + et - jusqu'à
ce que apparaît l'inscription de le choix de la langue. Appuyez sur la touche CAL et avec le
boutons +et -choisir: Language Français. Appuyer sur CAL pour confirmer et ESC pour revenir à
la mesure
RETARD D’ALLUMAGE
Qu'est-ce que c'est? Le Retard d'Allumage est le temps en minutes (0-
999min) que la pompe attend après l'allumage avant le dosage du produit
chimique. Pendant ce temps apparaît l'inscription "Retard" sur la première
ligne de l'affichage et la mesure sur la deuxième ligne. (Voir figure). Pendant
ce temps, la pompe ne peut pas doser mais vous pouvez accéder au menu
pour modifier les paramètres et les étalonnages.
MODIFICATION DU RETARD D’ ALLUMAGE
Pressez et relâchez rapidement la touche CAL et faire défiler le menu avec
les touches +et -jusqu'à ce que apparaît l'inscription “Retard Allumage".
Appuyer sur CAL pour entrer et avec les touches + et - choisir le retard à
partir de 0 à 999 minutes. Appuyez sur CAL pour confirmer et ESC pour
revenir à la mesure.
Rev 3.0 Cod. 00.008.255
16
ALARME À TEMPS
Qu'est-ce que c'est? Le temps d'alarme est exprimée en unit (unités) de
dosage. 1 Unité de dosage est équivalent à 150 injections de produits
chimiques. Le comptage de ces injections commence à 0 à partir du moment
où la pompe commence le dosage après l'allumage, il est incrémenté au
cours du traitement, il est suspendue pendant l’alarme de niveau et au cours
de l’état de stand-by, est remis à zéro si l’alimentation électrique est coupée,
si la mesure atteint le point de consigne et au cours de l'alarme de flux d’eau.
Lorsque le comptage rejoint la valeur mémorisée dans Temps Alarme, la
pompe entre en état d’alarme temporal :
1) LE DOSAGE CESSE (aucune tension du aimant)
2) LED vert de ON clignotant
3) LE DISPLAY visualise :“Tal ”et la % du débit sur la première ligne et la
mesure sur la deuxième ligne.(Voir figure).
La pression prolongée de la touche ESC de 2 secondes remet la pompe en
marche et remet à zéro le comptage qui repart immédiatement quand la
pompe recommence à doser.
MODIFICATION DU TEMPS D’ALARME
Pressez et relâchez rapidement la touche CAL et faire défiler le menu avec
les touches + et - jusqu'à ce que apparaît l'inscription “Temps Alarme".
Appuyer sur CAL pour entrer et avec les touches + et - choisir le Temps à
partir de 0 à 120 unités. Appuyez sur CAL pour confirmer et ESC pour revenir
à la mesure.
EXEMPLE de calcul du Temps d’Alarme si l’on veut injecter 2
litres (=2000cc) de produits chimiques à la pression de la
plaque signalétique de la pompe.
REMARQUE : Le Temps d’Alarme n’a aucun effet sur le
type de Opération Manuel
MOD
l/h
1 unit
Tempe Alarme=
2000cc :(cc_unit)
ME3-ppM 04/12
4
66.6cc
30 unit
ME3-ppM 04/18
4
66.6cc
30 unit
ME3-ppM 05/10
5
83.3cc
24 unit
ME3-ppM 06/15
6
100cc
20 unit
ME3-ppM 10/2
10
166.6cc
12 unit
ME3-ppM 26/2
26
433.3cc
5 unit
ME3-ppM 30/1
30
500cc
4 unit
CONTRÔLE DU FIN NIVEAU (OPTION)
La fermeture du contact de niveau, libre de tension, pendant le fonctionnement de la pompe,
dans n'importe laquelle modalité elle se trouve, provoque:
1) la cessation de l'activité de dosage
2) l'allumage clignotant du led vert on.
3) le display visualise l'inscription "NIVEAU" sur la première ligne et la mesure réelle sur la
deuxième ligne (voir la figure à coté).
La rentrée du contact de niveau fait revenir la pompe dans l'état de FONCTIONNEMENT
congruent avec les entrées actuelles de la pompe. NOTER: l’alarme de niveau provoque la
suspension (mais pas réinitialisation) du comptage d’alarme de surdosage.
CONTRÔLE DU FLUX D’EAU (OPTION)
La fermeture du contact de flux, libre de tension, pendant le fonctionnement de la pompe, dans
n'importe laquelle modalité elle se trouve, provoque:
1) la cessation de l'activité de dosage
2) l'allumage clignotant du led vert on.
3) le display visualise l'inscription "Flux" sur la première ligne et la mesure réelle sur la deuxième
ligne (voir la figure à coté).
La rentrée du contact de niveau fait revenir la pompe dans l'état de FONCTIONNEMENT
congruent avec les entrées actuelles de la pompe.
NOTER: l’alarme de flux provoque la remis à zéro du comptage d’alarme de surdosage.

Rev 3.0 Cod. 00.008.255
17
FONCTIONNEMENT POSSIBLES
l y a 3 modes possibles:
Manuel: dosage constant. Le nombre d'impulsions par minute est défini dans
la programmation comme est expliqué dans la section suivante.
Proportionnel: dosage proportionnel à la distance de mesure du point de
consigne désirée. Gamme de proportionnalité: 1ppM
ON-OFF: dosage de type constante qui est activée lorsque la mesure
s'éloigne de la valeur de consigne. Hystérésis centrée sur le point de
consigne: 0.1ppM
PROGRAMMATION MANUELLE (CONSTANTE) ET AFFICHAGE
Pressez et relâchez rapidement la touche CAL et faire défiler le menu avec les
touches +et - jusqu'à ce que apparaît l'inscription “Type de Operat.". Appuyer
sur CAL pour entrer et avec les touches +et -choisir “Type Manual" et
confirmer avec CAL. Apparaît l'inscription "Freq." et la valeur %
précédemment mémorisée. Réglez avec +et - cette valeur et confirmez la
sélection avec CAL. Appuyez sur ESC pour sortir de la programmation et
revenir à la mesure avec le fonctionnement Manuel programmée.
Le nombre d'injections par minute de la pompe est égal à la pourcentage
sélectionné de la fréquence maximale. Exemple: 80% signifie que 120
impulsions par minute : 150imp/min x 0,8 = 120 impulsions / min
Pendant le fonctionnement manuel l'affichage écrit sur la première ligne "Man."
et le pourcentage de la fréquence d'injection programmée.
La deuxième ligne montre la mesure.
PROGRAMMATION DU TYPE D’ OPÉRATION
PROGRAMMATION DU FONCTIONNEMENT ON-OFF ppM ET VISUALISATION
Pressez et relâchez rapidement la touche CAL et faire défiler le menu avec les
touches +et - jusqu'à ce que apparaît l'inscription “Type de Operat.". Appuyer
sur CAL pour entrer et avec les touches + et - choisir “Type On-Off" et
confirmer avec CAL.
Apparaît l'inscription "SetPoint" et la valeur du point de consigne précédemment
mémorisée. Réglez avec +et - cette valeur et confirmez la sélection avec CAL.
Apparaît l'inscription de la direction d’injection "SetPoint Chlor" ou "SetPoint
DeChlor" précédemment mémorisée. Choisir avec +et -cette valeur et
confirmez la sélection avec CAL.
Choisir DeChlor si vous voulez de dosage pour valeurs de ppM au-dessus du
point de consigne.
Choisir Chlor si vous voulez de dosage pour des valeurs de ppM dessous du
point de consigne.
Apparaît l'inscription "Freq." et la valeur % de la fréquence maximale d'injection
(150 imp / min) précédemment mémorisée. Réglez avec +et -cette valeur et
confirmez la sélection avec CAL. Appuyez sur ESC pour sortir de la
programmation et revenir à la mesure avec le fonctionnement On-Off
programmée.
Pendant le fonctionnement On-Off si la pompe est en dosage l'affichage écrit sur
la première ligne "On" et la % de la fréquence d'injection programmée.
Si la pompe n'est pas en dosage l'affichage écrit sur la première ligne "Off" et le
pourcentage de la fréquence d'injection programmée.
La deuxième ligne montre la mesure.
Rev 3.0 Cod. 00.008.255
18
PROGRAMMATION DU FONCTIONNEMENT PROPORTIONNEL AU ppM ET VISUALISATION
Gamme de proportionnalité=1ppM
Pressez et relâchez rapidement la touche CAL et faire défiler le menu avec les
touches + et - jusqu'à ce que apparaît l'inscription “Type de Operat.". Appuyer
sur CAL pour entrer et avec les touches + et - choisir “Type Prop" et confirmer
avec CAL.
Apparaît l'inscription "SetPoint" et la valeur du point de consigne précédemment
mémorisée. Réglez avec + et -cette valeur et confirmez la sélection avec CAL.
Apparaît l'inscription de la direction d’injection "SetPoint Chlor" ou "SetPoint
DeChlor" précédemment mémorisée. Choisir avec +et -cette valeur et
confirmez la sélection avec CAL.
Choisir DeChlor si vous voulez de dosage pour valeurs de ppM au-dessus du
point de consigne.
Choisir Chlor si vous voulez de dosage pour des valeurs de ppM dessous du
point de consigne.
Apparaît l'inscription "Freq." et la valeur % de la fréquence maximale d'injection
(150 imp / min) précédemment mémorisée. Réglez avec +et -cette valeur et
confirmez la sélection avec CAL. Appuyez sur ESC pour sortir de la
programmation revenir à la mesure avec le fonctionnement On-Off programmée.
Pendant le fonctionnement Proportionnelle l'affichage écrit sur la première ligne
"Prop" et la % de la fréquence d'injections que l'aimant fait par rapport à la
fréquence des injections programmée.
La deuxième ligne montre la mesure.
En n'importe quel point de programmation, si aucune touche n’est pressée (+, -, CAL) pendant 60
secondes, la pompe sort du réglage avec les nouveaux paramètres jusqu'à ce moment mémorisés
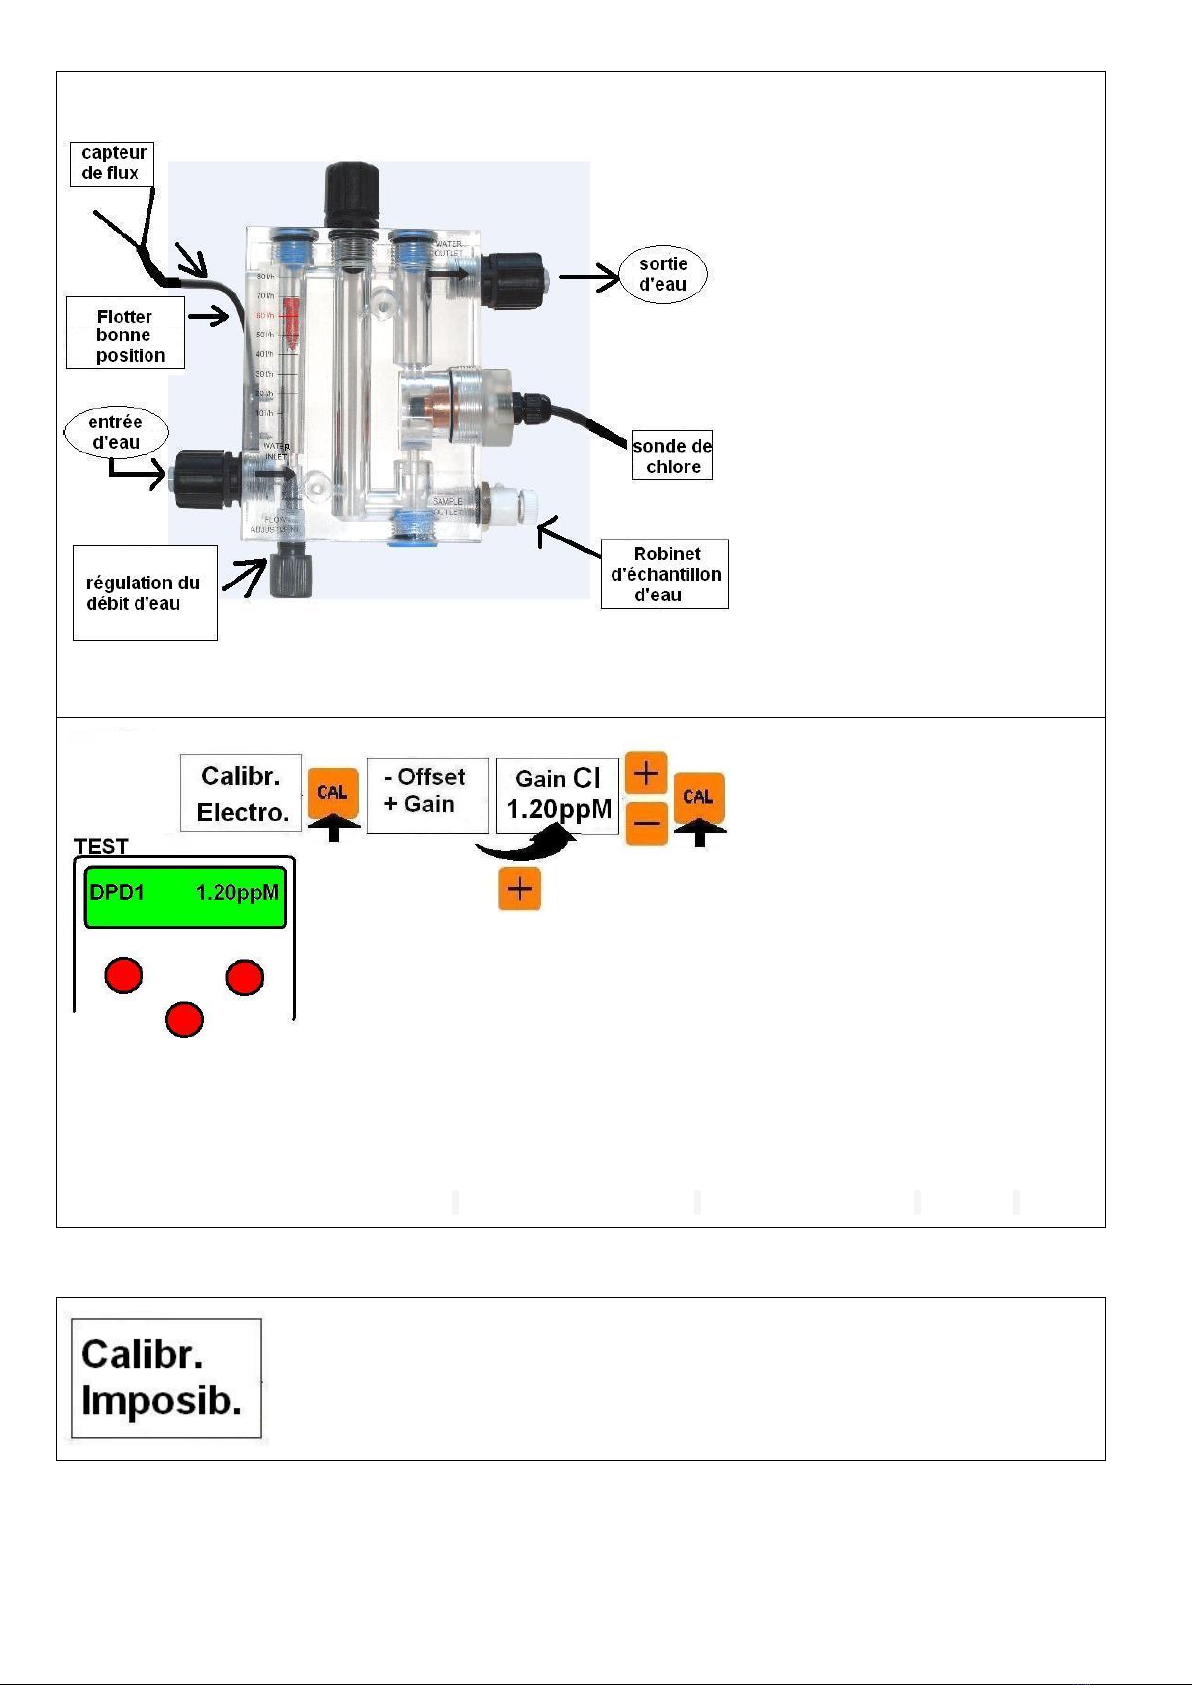
CALIBRAGE D’ ELECTRODE Du Chlore
Attention,
il est nécessaire de faire un test comparatif pour le contrôle du chlore libre (par exemple Test DP1).
L'étalonnage de ZERO est effectué en usine donc passer directement à l’ étalonnage du gain.
Mais si c’est vraiment nécessaire l’étallonage du zéro on doit considerer que la pompe a été conçus de manière à
ce que le zéro électrique coïncide avec le zéro électrochimique.
Nous ne recommandons pas de faire l'étalonnage de ZERO mais si vous voulez faire suivez ces étapes:
Débranchez l'entrée de la sonde de chlore:
1) Attendez que l'écran atteint une valeur stable (quelconque valeur).
Appuyez et relâchez rapidement la touche CAL et puis les touches +et -jusqu'à ce que vous voyez
“Calibr.Electro.”. Appuyer sur la touche CAL et donc la touche –pour effectuer l'étalonnage de l'offset de la
sonde. Régulier (si nécessaire) la valeur de la lecture á 0.00ppM, puis validez avec CAL. Si vous voyez le
message “Calibr.Imposib.” le calibrage n'a pas été effectuée. Essayez de répéter. Si aucun message d'erreur
apparaît, l'étalonnage a été effectué
Rev 3.0 Cod. 00.008.255
19
RECOMMANDATIONS: Avant de
calibrer le gain VEILLER À SUIVRE
CES INSTRUCTIONS:
1) Il est recommandé de stabiliser le
débit d'eau dans le support de sonde
jusqu'à amener le flotteur en position
haute (60l/h). Cela permettra aux billes
de verre de nettoyer correctement la
surface de cuivre.
2) Stabiliser le pH au valeur du travail
avant d'effectuer l'étalonnage du gain
(Nous recommandons de choisir une
valeur comprise entre 7,0 et 7,3 pH).
3) L'étalonnage de gain doit être
effectuée à des valeurs de chlore aussi
proche que possible de la valeur de
consigne souhaitée. Par exemple, si
vous voulez une concentration de
chlore du 1.20ppM il est conseillé de
calibrer le gain de l'eau autour de ces
conditions. Utilisez un test
photométrique DPD1 sur
l'échantillon d'eau prélevé dans le
boîtier du robinet du porte sonde.
(voir la figure) pour contrôler les
ppM de chlore présent dans le
réservoir.
REGLAGE DU GAIN. Nous vous
recommandons de calibrer le gain
après au moins 2,3 heures de travail
dans des conditions optimales ou
vous pouvez aussi faire un
étalonnage initial après l'installation
de la sonde et de la pompe, puis
revenir en arrière pour affiner le
calibrage après 24 heures.
Une fois stabilisés débit et le pH
et vérifier que le chlore est dans les
conditions optimales de concentration,
procéder à l'étalonnage du GAIN.
Attendre que la lecture se stabilise sur
l'affichage.
Do a DPD1 test on the water sample taken from the Tap of the probe holder. Push and quickly release CAL button
and then scroll the menu till the display shows “Electro. Calibr.” Push CAL to enter the submenu and then the
button +to do the GAIN calibration of the probe. If it is necessary you can modify the value shown in the second row
of the display by buttons +or -till the value is equal to that of DPD1 tester. Push CAL to confirm.
If the display shows the message “Imposs. Calibr.” the probe calibration is not saved. Read the following paragraph
named “MESSAGES FROM THE PUMP”. If no error message appears the calibration has been performed.
MESSAGES DE LA POMPE
Signifie que l'étalonnage ÉLECTRODE ET 'IMPOSSIBLE. C 'est nécessaire de
répéter.
Si après avoir répété le message de calibrage apparaît encore, suivez ces étapes:
a) Assurez-vous que les conditions d'écoulement et le pH sont corrects.
b) Vérifiez les connexions correctes de la pompe avec la sonde
c) Répétez le test DPD1 et répéter l'étalonnage du gain de la pompe.
Rev 3.0 Cod. 00.008.255
20
ESPAÑOL
DESCRIPCIÓN DEL PANEL FRONTAL
1. Display LCD 8 x 2 con luz de fondo
2. Led verde: ▪ fijo = BOMBA EN ON
▪ intermitente= BOMBA EN ALARMA
3. Led rojo: señala las inyecciones
4. Tecla CAL: ▪ para entrar en la programación
▪ Para salvar los cambios
5/6.Tecla –e +: ▪ Para explorar el menú
▪ Cambie el valor de los parámetros
7. Tecla ESC/SBY: ▪ pone la bomba en stand_by
▪ sale del menu
CARACTERÍSTICAS GENERALES DE LA BOMBA:
- MENU EN 4 IDIOMAS: ITALIANO, INGLÉS, FRANCÉS, ESPAÑOL
- 3 TIPOS DE OPERACIÓN POSIBLES: CONSTANTE, ON / OFF, PROPORCIONAL
- ALARMA DE SOBREDOSIS
- INICIO TARDÍO
- RESTAURACIÓN VALORES DE FÁBRICA
- CONTROL DEL FLUJO DE AGUA
- CONTROL DE NIVEL
- STOP DE DOSIFICACIÓN (STAND BY)
- SEÑAL DE CAUDAL % INSTANTÁNEO
VALORES DE FÁBRICA
•FUNCIONAMENTO: ON-OFF
•SETPOINT: 1.20ppM
•DIRECCIÓN DE DOSIFICACIÓN : Chlor (cloración)
•FRECUENCIA DE INYECCIÓN: 100% (150 imp / min)
•TIEMPO DE ALARMA: 0unit (desactivado)
•RETARDO INICIAL: 0 minutos
RESTAURACIÓN VALORES DE FÁBRICA
Comprimir y suelte rápidamente la tecla CAL y luego +y -hasta que
aparezca “Restaur. Enter”. Comprimir CAL para confirmar. La bomba
vuelve automáticamente a medir con los valores de la programación y
calibración de fábrica.
LAS CONEXIONES DE LA BOMBA
A - cable de alimentación eléctrica de 230V-50Hz (a petición: 115 ~ )
B - conector de la sonda de nivel (contactos 3 y 4). OPCIONAL
C - conector del sensor de flujo (contactos 3 y 4). OPCIONAL
D - conector BNC sonda de Cloro
E - on_off interruptor. OPCIONAL
Table of contents
Languages:
Other CPA Water Pump manuals


Popular Water Pump manuals by other brands

Danfoss
Danfoss RSA 28 installation guide

Allweiler
Allweiler NAM-F Series operating manual

GORMAN-RUPP PUMPS
GORMAN-RUPP PUMPS 80 Series Installation, operation and maintenance manual

JABSCO
JABSCO 17860 Series quick start guide

Binks
Binks Maple 60/3 instruction manual

Edwards
Edwards XDD 1 115/230 V instruction manual


