CPAC RapidCyde RapidHeat RH-Pro11 User manual
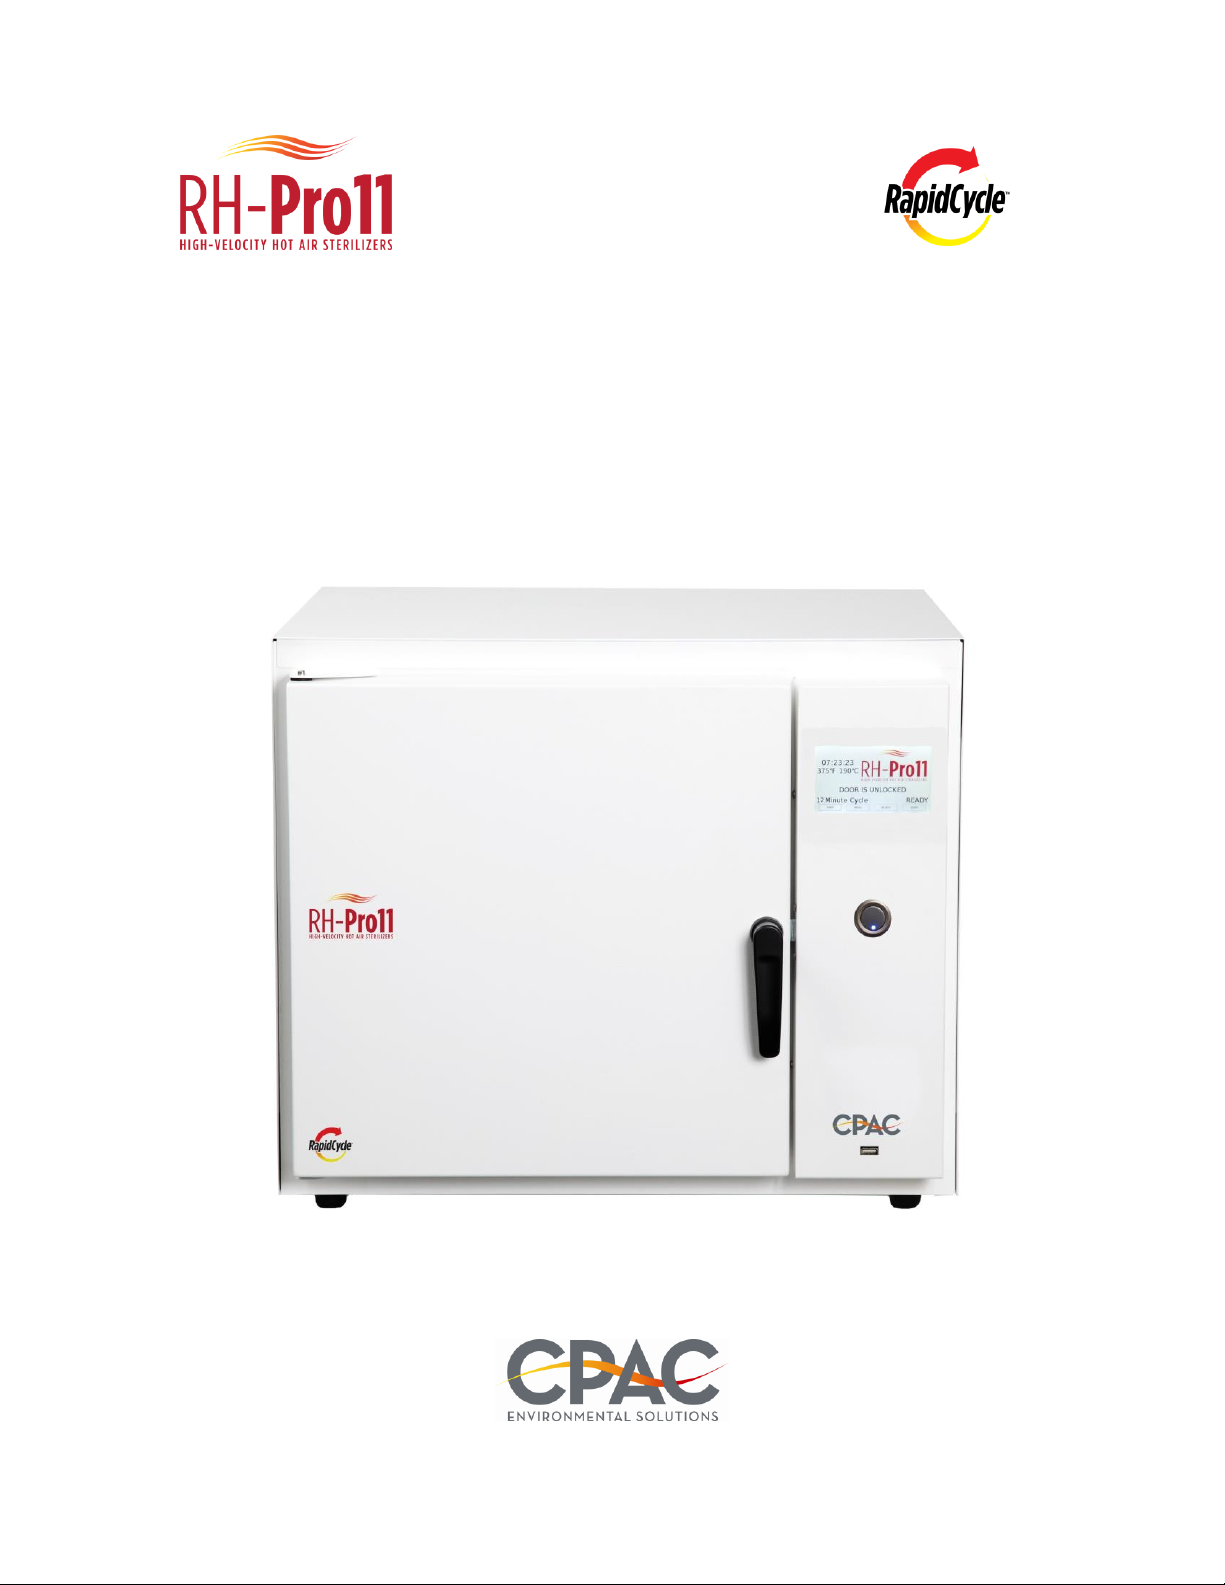
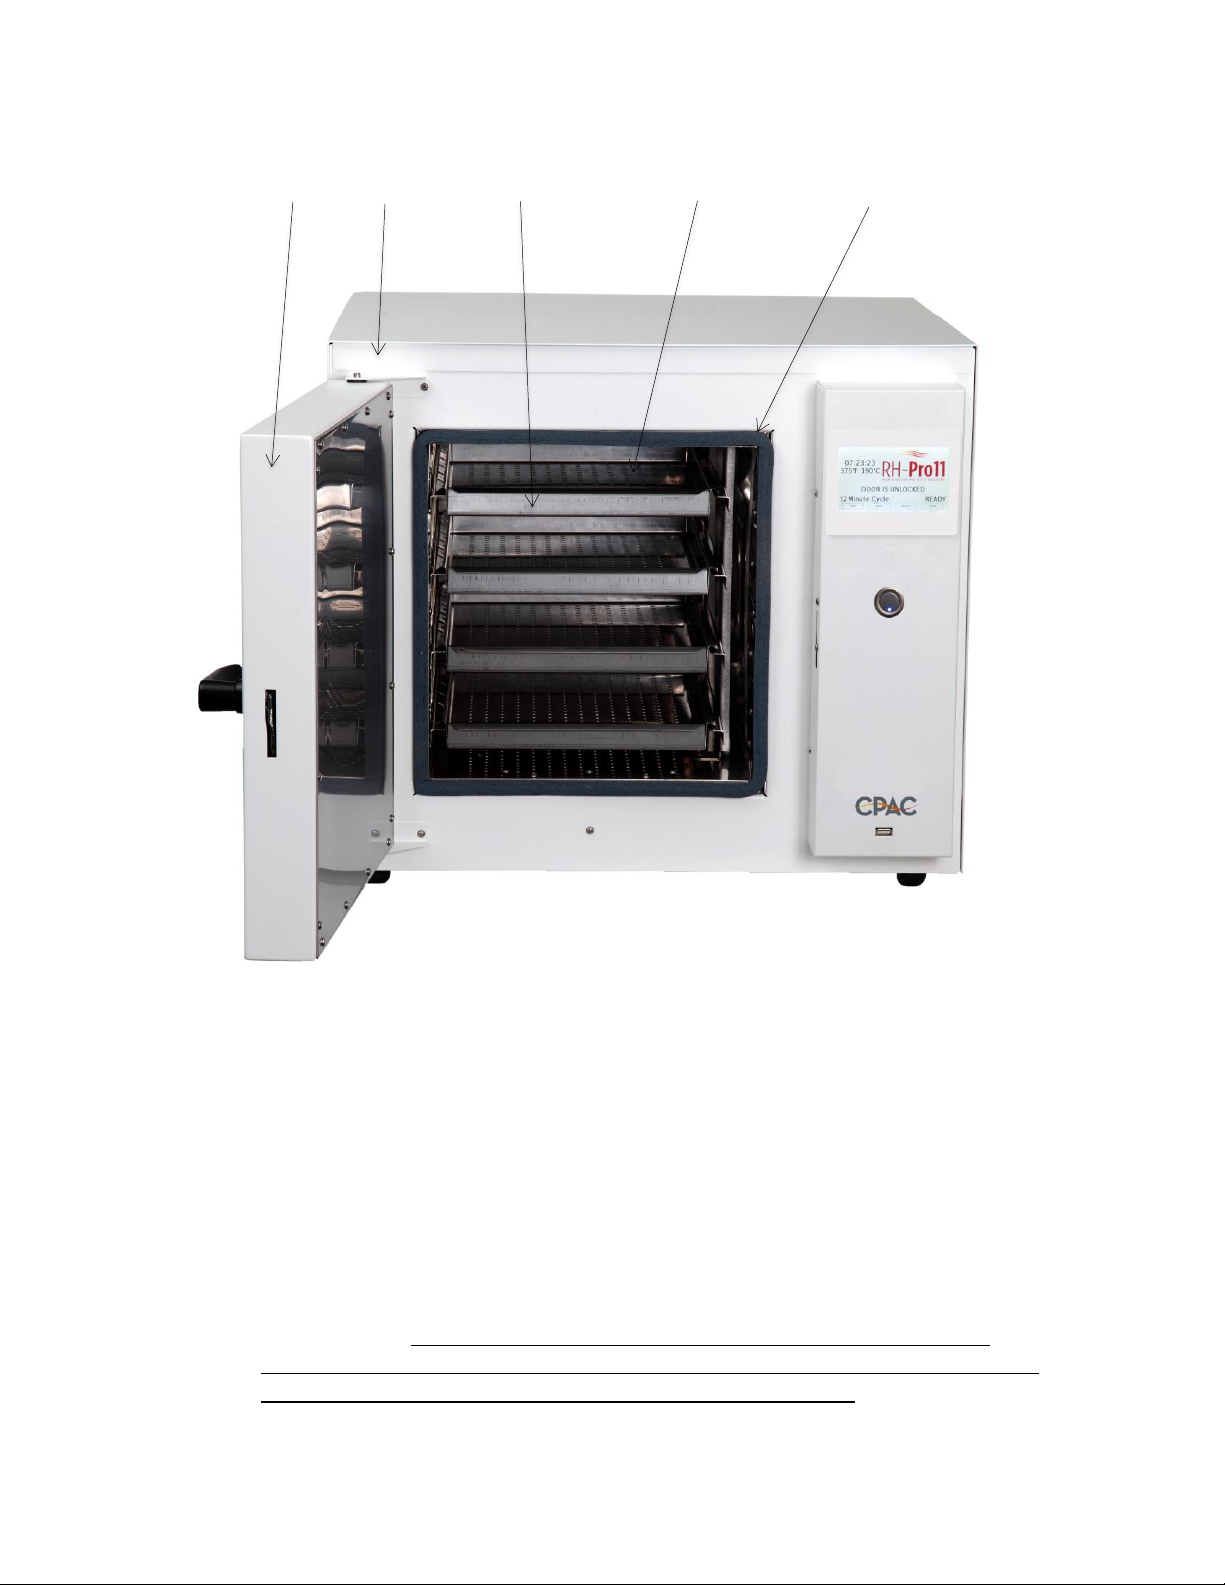
2364 Leicester Road, PO Box 175, Leicester, NY 14481 800-828-6011 585-382-3223
CPAC.com
Printed in U.S.A. Copyright 2018
RH-Pro 11 OPERATION MANUAL
High-Velocity Hot Air™(“HVHA”) Sterilizers
Model: RapidHeat™RH-Pro11

2
TABLE OF CONTENTS
Important Information…………………………………………………………………………….…………...4
Safety Information………………………………………………………………………………………...……..5
Accessories and Consumables………………………………………………………………………………8
Components and Control Functions………………………………………………………………………9
Installation………………………………………………………………………………………….……………..10
Operation…………………………………………………………………………………………………………..12
Sterilization Validation Guidelines………………………………………………………………………25
Maintenance ………………………..……………………………………………………………………………29
Cycle Documentation………………………………………………………………………………..………..29
Troubleshooting…………………………………………………………………………………………….…..32
RH-Pro11 Specifications……………………………………………………………………………………..33
RH-Pro11 Warranty…………………………………………………………………………………….……..34
APPENDIX I Sterilization Verification –Microbiological Inactivation Efficacy……..36
Checklist for Weekly/Monthly Biological Indicator Testing…...….……38
APPENDIX II Cabinet Installation of the RH-PRO11………………………………………….....39

3
CONGRATULATIONS on selecting an RH-Pro11™ High-Velocity Hot Air Sterilizer.
The RH-Pro11™ Sterilizer employs High-Velocity Hot Air (HVHA) to sterilize
medical and dental instruments. Radically different than steam sterilization,
HVHA technology uses fluidized hot, dry air that transfers heat energy to
instruments by a combination of convection and conductive processes. Microbial
destruction by dry heat results from DNA damage preventing microbial cells to
reproduce through the disruption of genetic replication. Conventional practices
necessary for the sterilization of instruments by steam do not apply to HVHA
technology and in many instances are contrary to HVHA protocols provided in
this user manual.
The RH-Pro11 has been designed to meet the expanding capacity needs of the
dental and healthcare practitioner. Based on the technology ingrained in the Cox
RapidHeat Transfer Sterilizer, the RH-Pro11 retains the same pre-set sterilization
cycles for unwrapped (6 minutes), wrapped (12 minutes), and dental handpieces
(8 minutes) as documented by spore inactivation rate studies. Total treatment
time for all HVHA sterilizers is a composite of (1) the time required for
instruments to achieve and maintain the temperature necessary to initiate
bacterial spore kill (Kill Initiation Temperature) and (2) the holding time
necessary at this temperature (or above) to achieve a 12-Log bacterial spore kill.
Both time activation and an internal thermal sensor are employed to ensure that
instrument Kill Initiation Temperature is achieved for each load. Once bacterial
spore kill is initiated, the pre-selected sterilization cycle is initiated and displayed
with countdown timer. Cycle times and temperatures are recorded internally
with data availability for external downloading or printer access.
Please read this manual carefully, paying particular attention to the
requirements for instrument preparation, packaging, and loading of the RH-
Pro11™ Sterilizer. Failure to follow the operating instructions in this manual can
result in damaged instruments, damage to the sterilizer, user injury, and
sterilization efficacy. Following these instructions will result in a worry-free
sterilization process
CUSTOMER WARNING!
PLEASE retain the shipping carton, packing materials and straps in the event this
product may need to be returned to the manufacturer for repairs. Failure to retain
the carton and materials will result in additional charges for the items in the event
a return may be necessary.

4
IMPORTANT INFORMATION
1.1 Contact Information
Dealer: _________________________________________
Authorized Service Representative: _________________________________
1.2 User Reference Information
Date of Purchase: ___________________________
Model Number*: ______________________________
Serial Number*: _______________________________
*Located on the right back side of the sterilizer
1.3 Limited Warranty
CPAC Equipment, Inc. provides a limited three-year warranty for the RH-
Pro11 on parts and labor as described in Section 12 of this manual.
PLEASE READ THE FOLLOWING INSTRUCTIONS FOR USE PRIOR TO INSTALLATION
AND OPERATION OF YOUR RH-PRO11 STERILIZER. BE SURE TO RETAIN A COPY OF
THIS USER MANUAL FOR FUTURE REFERENCE.

5
1. SAFETY INFORMATION
The RapidHeat RH-Pro11 is designed for easy operation and
maintenance. For safe and reliable operation, please read and
understand the installation and operating instructions contained in this
User Guide. All personnel charged with the operation of the RH-Pro11
should be aware of this User Guide and follow its contents.
2.1 Sterilizer Use
The RH-Pro11 is for the sterilization of medical devices that are not heat-
sensitive and that can withstand sterilization at temperatures of 350 degrees
F (177 degrees C) wrapped or pouched and 375 degrees F (190 degrees C)
unwrapped. Never use the RH-Pro11 for sterilizing liquids, chemicals or
radioactive materials.
2.1 Safety Symbols
WARNING
INDICATES A POTENTIALLY HAZARDOUS SITUATION THAT
COULD LEAD TO INJURY OR EQUIPMENT DAMAGE
ELECTRICAL HAZARD WARNING
INDICATES A POTENTIALLY HAZARDOUS ELECTRICAL SHOCK
POTENTIAL THAT COULD LEAD TO INJURY
HOT SURFACE WARNING
INDICATES THAT A SURFACE OR ARTICLE MAY BE HOT ENOUGH
TO CAUSE DISCOMFORT OR INJURY
FIRE/EXPLOSION WARNING
INDICATES A SITUATION COULD EXIST THAT COULD LEAD TO A
FIRE OR EXPLOSION THAT COULD CAUSE INJURY OR
EQUIPMENT DAMAGE

6
2.2.1 Cautions
During operation, the exterior surface of the sterilizer remains
comfortable to the touch; however, the tray and the sterilized
instruments will be hot. Use only the provided heat-resistant
gloves for removing the instrument tray and sterilized instruments.
Use caution when handling hot instruments.
The sterilizer is designed for use with metal instruments. Many
plastics (e.g. nylon, polyester), and silicone rubber products can be
used in this high temperature environment, but extreme care
should be used in sterilizing these materials until compatibility has
been confirmed by the manufacturer.
When sterilizing packaged instruments, use only dry heat
packaging material suitable for 375°F (190°C) temperatures.
Instruments must be dry before being placed into the sterilizer.
Water (moisture) interferes with the sterilization process.
Instruments that have been wiped with alcohol, or any combustible
solution, must be rinsed and allowed to thoroughly dry before
being placed in the sterilizer. Absolutely no combustible liquids in
any quantity are to be placed into the sterilizer.
2.2.2 Temperature Safety Features
The temperature in the RapidHeat™ Pro11 sterilizer is controlled
by computer logic, which is programmed to maintain uniform
temperature throughout the sterilizer chamber. The temperature
control maintains a uniform temperature of 375°F (190 °C) as
indicated on the keypad display with a variability of +/- 2-3°F.
After room temperature instruments are placed in the sterilizer,
the temperature may drop a few degrees depending on the size of
the load and the time during which the door is open between
cycles. If the temperature drops below 372°F (189°C) at any time,
the cycle will not begin or the sterilization cycle will restart after
375°F (190°C) has been reestablished. It is important to note that
the displayed temperature is the chamber air temperature and not
the temperature of the instrument(s).
The sterilizer is designed to maintain a temperature of 375°F
(190°C) within the chamber during sterilization. The door must be
in the “LOCKED” position between cycles to avoid the heating
element from shutting off which will result in chamber cool-down
and possible re-initiation of the initial chamber heating sequence.

7
The door cannot be opened during a sterilization cycle without the
operator pressing “Cancel” on the key pad. In the event that the
temperature drops below 372°F, the cycle timer will reset and the
sterilization cycle will restart after reaching the 375°F operating
temperature. A temperature drop below 372°F during a
sterilization cycle will result in a cycle interruption error and
notification which will be documented in memory.
2.2.3 General Recommendations
Read the entire instruction manual before installation or operation of
the RapidHeat™ Pro11 Sterilizer. It will help you to understand the
operation of the system, how various sub-assemblies work in concert,
and the operating sequence of the controls.
2.3 Important Safeguards
When using your RapidHeat™ Pro11 Sterilizer, follow these basic safety
precautions:
Read and understand all instructions.
Take care to avoid burns resulting from touching hot parts.
Do not operate this appliance with a damaged cord, or if appliance has
been dropped or damaged, until it has been examined by a qualified
service technician.
Do not let the power cord hang over sharp edges, the edge of a table or
counter, or touch hot surfaces.
DO NOT USE an extension cord with this unit. The unit should be
plugged directly into a power outlet. Only use a properly grounded
fuse/breaker protected outlet (110V, 60 cycles, or a 220/240V, 50
cycles). A separate circuit is recommended for this unit.
To protect against electrical shock hazard, do not immerse in water or
subject the sterilizer to water or other liquids. Do not place any liquid
on the top of the sterilizer or in cabinetry above the unit.
To avoid electrical shock hazard, do not disassemble this appliance. Call
a qualified service technician when service or repair work is required.
Incorrect reassembly can cause electric shock hazard.
WARNING:
NEVER ATTEMPT TO PERFORM ANY ELECTRICAL
TROUBLESHOOTING, ADJUSTMENT, OR SERVICE UNLESS YOU
ARE A FACTORY TRAINED SERVICE TECHNICIAN.

8
Do not lift unit by the door opening in front of unit. Hold securely by
the bottom when lifting or moving the sterilizer. The sterilizer weighs
approximately 90 pounds and is best lifted by two individuals.
3. ACCESSORIES AND CONSUMMABLES
3.1 Accessories
DESCRIPTION
PART NUMBER
RH-Pro11 Instrument Tray
PR0057
Epson TM-U220B Printer with Auto Cutter
400674
Epson TM-U220A Printer with Journal and Auto Cutter
Auto Cutter
400675
USB Cable A to B Type, 6’ Length
400676
3” 1-Ply Printer Paper/case (50 rolls)
400677
Heat-Resistant Gloves
400672
3.2 Consumables (Contact CPAC Equipment for More Information)
DESCRIPTION
RAPIDHEAT PEEL POUCHES
RAPIDHEAT STERILIZATION WRAP
NYLON (TEAR) POUCHES
CHEMICAL INDICATORS
BIOLOGICAL SPORE TEST INDICATORS
BIOLOGICAL SPORE TEST MONITORING SYSTEM
HANDPIECE LUBICANT
PRINTER PAPER KIT
3.3 Included With the Sterilizer
DESCRIPTION
POWER CORD
FOUR (4) LARGE TRAYS
HEAT PROTECTIVE GLOVES (ONE PAIR)
USER MANUAL
OPERATOR QUICK START GUIDE

9
4. COMPONENTS AND CONTROL FUNCTIONS
4.1 Components
FRONT ELEVATION
REAR ELEVATION
Touch Pad Display
Door
On/Standby Button
Door Handle and Lock
USB Port
Blower Motor
Cooling Air Exhaust
Model & S/N # Plate
Blower Motor
Cooling Air Supply
Circuit Breaker
Power Cord

10
5. INSTALLATION
5.1 Unpacking the Sterilizer
* DO NOT CUT THE BOX OPEN OR AWAY FROM THE STERILIZER! *
The RH-Pro11 weighs approximately 95 pounds and with its dimensions,
makes the unit difficult to be lifted by one person. To remove from the
shipping carton, it is best to remove the top packing cushion and use the (2)
two nylon lifting slings (see picture below) encompassing the sterilizer to
make lifting the unit out easier. It is recommended that two individuals pair
to lift the unit. Once the unit has been removed from the carton, place the
protective cushioning in the carton and store the shipping carton in a safe, dry
location should the unit need to be returned for any repairs.
Open Door Instrument Sterilization Door
Door Hinge Tray Chamber Gasket

11
5.2 Location
The RH-Pro11 is designed for operation indoors in a protected,
relatively dust-free ambient temperature environment at a relative
humidity of < 80% up to 880F (310C).
Surface Support –Level and of sufficient construction for weight of
loaded sterilizer (approximately 100 pounds) and ancillary equipment.
5.3 Sterilizer Dimensions and Required Clearances
Outer dimension: 22.5” (572mm)W x 25” (625mm)D x 19.5” (492mm)H
Back of Unit to Back Wall: 3”(75mm)
Front Support Surface to Front Sterilizer: 1” (25mm)
Sides of Unit to Side Wall: 3”(75mm) –See Note below
Distance Above the Unit: 3”(75mm)
NOTE: The main power on/off circuit breaker is located at the right rear of
the sterilizer. Install the sterilizer with enough clearance to permit reaching
past the right side of the sterilizer to operate the switch. This is an infrequent
need since there is a front-panel On/Standby button, but the rear panel
circuit breaker should remain accessible. About 3.5-4.0 inches of side space is
sufficient reach-past for most individuals.
The cooling air supply filter (pictured on page 9) requires occasional rinsing
to remove accumulated dust. Installation should include consideration of
access to that filter.
Sterilizer
Nylon Lifting Straps
Cushioning

12
5.4Electrical Requirements
115 VAC Unit:
110-120 VAC, 12 amp, 60Hz
1400 W warm-up
300 W operating
230 VAC Unit:
220-240 VAC, 6 amp, 50/60Hz
1400 W warm-up
300 W operating
NOTE: The unit must be connected to a properly polarized and
grounded receptacle. Always use a power cord with grounding
connections that match the receptacles in your location.
6. OPERATION
6.1 Cautions
ELECTRICAL WARNING!
For 115 VAC Models: Use 110-120 VAC, 60Hz alternating current only.
For 230 VAC Models: Use 220-240 VAC, 50/60Hz alternating current only.
Failure to do so may result in electrical shock or sterilizer damage.
WARNING!
HVHA technology is radically different than steam sterilization and conventional
practices associated with steam sterilization do not necessarily apply to HVHA
technology. Read and employ all safety and operation instructions to maintain
employee safety, required treatment efficacy, and equipment efficiency.
WARNING –FIRE OR EXPLOSION HAZARD!
Do not use this sterilizer for sterilizing any liquid, volatile or solid chemical, or
radioactive substance. Use this sterilizer only as specified in these user
instructions. Ensure that all instruments are dry and free of any organic,
chemical, or liquid residue before sterilizing.

13
6.2 General Guidelines for Instrument Loading
6.2.1 Instrument and Materials Compatibility
For a high-velocity hot air (HVHA™) sterilizer operating at 3750F, most
of today’s instruments and their components are constructed of
materials that are not subject to damage at this elevated temperature.
Standard hand pieces, pliers, and cutters are typically composed of
440-C stainless steel or other high-temperature resistant metals
(including solders) and high-temperature materials such as
fluoropolymers, polyamide-imides (Torlon), Viton, phenolics,
polyimides, and silicones.
6.2.2 Cleaning Instruments
All instruments are to be cleaned, rinsed and dried thoroughly
according to manufacturer’s instructions. Excess water will
vaporize at the sterilizer’s elevated temperatures and potentially
inhibit the sterilization process.
All instruments, including those that have been placed in a
holding, ultrasonic, or cold chemical disinfectant solution, must be
thoroughly rinsed in water (preferably distilled or de-ionized
water to minimize instrument staining or spotting) and
thoroughly dried before sterilization.
Any instrument that has been alcohol rinsed must be thoroughly
dried before placement in the sterilizer. Any instrument subjected
with any other chemical solvent must have that solvent removed
before instrument placement into the sterilizer. Failure to
remove alcohol of any other chemical solvent may cause a
WARNING –INSTRUMENT PROTECTION
Before sterilizing instruments in the RH-Pro11, check with the instrument
manufacture to ensure material compatibility with the high-temperature process.
Always use instrument pouches and wrap compatible with 3750F (1910C).
temperatures.
The sterilizer’s interior, doorway, trays, and the sterilized instruments will
be hot. Use heat-protective gloves when touching hot surfaces or objects.
WARNING –HOT SURFACES!

14
flammable or explosive incident, causing instrument/
sterilizer damage, or injury to the operator.
Failure to thoroughly remove extraneous agents prior to
sterilization could lead to surface staining of instruments.
6.2.3 Loading Instrument Trays
The RH-Pro11 is capable of sterilizing unwrapped instruments,
unwrapped handpieces, and wrapped instruments.
Pouches or sterile wrap must be compatible with the higher
temperatures used in the RH-Pro11 (3750F; 1900C) and must be
cleared by the FDA for use in a dry heat environment. It is
recommended that the pouches and wrap offered by CPAC
Equipment, Inc. be used for assurance of quality.
Use instrument trays provided with the RH-Pro11 that have been
designed to provide required hot airflow from all directions to
unwrapped and wrapped/pouched instruments.
Wrapped or pouched instruments are to be placed flat within the
tray, but instruments must not be stacked or have any overlap to
provide the airflow necessary for sterilization.
Instruments or pouches must fit within the tray.
Trays must be fully inserted into the sterilization chamber to
assure full airflow to instruments.
6.2.4 Before Running Your First Sterilization Cycle
Before turning the sterilizer on, open the door and visually inspect
the heating chamber. Clean and wipe as needed with mild soap
and a damp cloth or any non-abrasive cleaner. Unit can be
externally disinfected with the disinfectant of your choice.
Check for obstructions to air supply on back panel (clean filter and
maintained distance from wall) and interior air exhaust port.
Check seal around door to ensure it is clean and free of
obstructions.
Close sterilizer door and latch into closed position.
Start the unit by pressing the on/Standby button and allowing the
sterilizer to heat to 375°F (191°C) via the “Start-Up” chamber
heating sequence. (See 6.3.4.2) The keypad will indicate when the
chamber is properly heated (approximately 22 minutes).

15
6.3 Operation of the RH-Pro11
6.3.1 High-Velocity Hot Air Sterilization Principles
The RapidHeat™ Pro11 sterilizer utilizes dry, rapidly flowing air to
sterilize instruments. This process is both a heat conduction and
heat convection process and requires that all instruments be
directly subjected to the hot, high-velocity moving air. In the RH-
Pro11 sterilizer, airflow moves constantly through the instrument
tray from the left to right of the sterilizer chamber.
Airflow can be restricted by the misplacement of instruments and
packaging, which may interfere with the performance of the
sterilizer. The three sterilization cycles offered are each unique in
their capacity, loading limitations, and restrictions.
Adherence to these limitations and restrictions is required for
assuring performance specifications.
As with any sterilization technology, it is imperative that all
instruments be clean, dry, and free of any organic or chemical
residues.
Only those instruments and pouches that have been demonstrated
to be compatible with a temperature of 375°F can be sterilized in
the RH-Pro11 sterilizer.
6.3.2 Pre-set Sterilization Cycles
The RapidHeat™ Pro11 sterilizer is equipped with three pre-
programmed sterilization cycles, each representing the time required
to achieve a 6-Log reduction of bacterial spores plus a Sterility
Assurance Level (SAL) of 6 additional Logs for:
Unwrapped Instruments;
Unwrapped Handpieces; and
Wrapped Instruments.
Note: The conditions presented below for Unwrapped Solid
Instruments, Wrapped Handpieces, and Wrapped (Pouched)
Solid Instruments have been derived from thermocouple and
biological efficacy studies to assure the sterility performance of
the sterilizer. It is the responsibility of the operator to adhere to
the conditions set below under each cycle setting. Any deviation
in the pre-set times, sterilization temperature, maximum

16
instrument weights per tray or per instrument, or load
configuration may jeopardize the efficiency of treatment.
6.3.3 Sterilization Cycles - Capacity Restrictions and Limitations
UNWRAPPED INSTRUMENT CYCLE
Unwrapped Instruments Sterilization Instructions
To sterilize unwrapped instruments, place them into the
instrument tray under the loading and capacity limitations and
restrictions noted below for the UNWRAPPED Cycle.
Instruments sterilized in the UNWRAPPED Cycle may reach
375°F by the completion of the cycle.
Place the tray into sterilizer by sliding the tray all the way to
the rear of the heating chamber using heat-resistant gloves.
Close the door ensuring the handle is in the fully closed
(vertical) position.
Touch Cycle Menu tab on keypad, select UNWRAPPED, and
touch to start. Door will lock and sterilization cycle will initiate
once the chamber has reached 375°F.
At the end of the cycle, a beep will sound and “Sterilized” will
appear on the keypad. The door will unlock for instrument
removal.
Immediately after opening the door, use heat-resistant gloves
to slide the tray out of the chamber. The tray containing the
sterilized instruments will remain hot-to-the-touch for
approximately 10 minutes.
After the sterilization cycle, immediately cover the unwrapped
instrument(s) with a sterile cover to prevent environmental
pathogens from causing instrument contamination. After
cooling, retain sterile covering while transporting for
immediate use to patient. Do Not Store Instruments for Future
Use.
Shut sterilizer door and turn handle to the vertical, or closed
position to retain temperature in the sterilizer chamber.

17
Unwrapped Instruments
Instrument Weight Limitation Per Tray: 800 g or 1.75 lbs.; Limit 4
Trays
Single Instrument Weight Should Not Exceed 220 g or 0.5 lbs.
Instruments Cannot Overlap or Be Layered, Piled, or Stacked
Instruments Must Lay Directly on Tray Bottom
Burs, Diamonds And Other Small Items May Be Placed In an
Accessory Mesh Basket
UNWRAPPED HANDPIECE CYCLE
Unwrapped Handpieces Sterilization Instructions
To sterilize unwrapped handpieces, place them into the
instrument tray under the loading and capacity limitations and
restrictions noted below for the UNWRAPPED HANDPIECE
Cycle. Instruments in the UNWRAPPED HANDPIECE Cycle may
reach 3750F by the completion of the cycle.
Place the tray into sterilizer by sliding the tray all the way to
the rear of the heating chamber using heat-resistant gloves.
Close the door ensuring the handle is in the fully closed
(vertical) position.
Touch Cycle Menu tab on keypad, select UNWRAPED
HANDPIECE, and touch to start. Door will lock and sterilization
cycle will initiate once the chamber has reached 375°F.
At the end of the cycle, a beep will sound and “Sterilized” will
appear on the keypad. The door will unlock for instrument
removal.
Immediately after opening the door, use heat-resistant gloves
to slide the tray out of the chamber. The tray containing the
sterilized handpieces will remain hot-to-the-touch for
approximately 10 minutes.
After the sterilization cycle, immediately cover the unwrapped
instrument(s) with a sterile cover to prevent environmental
pathogens from causing instrument contamination. After
cooling, retain sterile covering while transporting for
immediate use to patient. Do Not Store Instruments for Future
Use.
Shut sterilizer door and turn handle to the CLOSE position to
retain chamber temperature.

18
Unwrapped Handpieces
Handpiece Weight Limitation Per Tray: 800 g or 1.75 lbs.; Limit 4
Trays
Single Instrument Weight Should Not Exceed 220 g or 0.5 lbs.
Handpieces Cannot Overlap or Be Layered, Piled, or Stacked
Handpieces Must Lay Directly on Tray Bottom
WRAPPED INSTRUMENT CYCLE
Wrapped Instrument Sterilization Instructions
To sterilize pouched instrument carriers or pouched
instruments, place them into the instrument tray under the
loading and capacity limitations and restrictions noted below
for the WRAPPED INSTRUMENT Cycle. Instruments in the
WRAPPED INSTRUMENT Cycle will not exceed 375°F by the
completion of the cycle.
Place the tray into sterilizer by sliding the tray all the way to
the rear of the heating chamber using heat-resistant gloves.
Close the door ensuring the handle is in the fully closed
(vertical) position.
Touch Cycle Menu tab on keypad, select WRAPPED
INSTRUMENT, and touch to start. Door will lock and
sterilization cycle will initiate once the chamber has reached
375°F.
At the end of the cycle, a beep will sound and “Sterilized” will
appear on the keypad. The door will unlock for instrument
removal.
Immediately after opening the door, use heat-resistant gloves
to slide the tray out of the chamber. The tray containing the
sterilized instruments will remain hot-to-the-touch for
approximately 10 minutes.
Shut sterilizer door and turn handle to the CLOSE position to
retain chamber temperature.
Pouched Instruments Laying Horizontal in Tray
Instrument Weight Limitation Per Tray: 800 g or 1.75 lbs.; Limit 4
Trays: Limit 160 g (0.35) per Pouch
Single Instrument Weight Should Not Exceed 140 g or 0.3 lbs.;
Limit 4 Trays; Limit 800 g (1.75 lbs.) per Tray
Pouched Instruments Cannot Overlap or Be Layered, Piled, or
Stacked
Pouched Instruments Must Lay Directly on Tray Bottom

19
Pouched Handpieces Laying Horizontal in Tray Bottom
Handpiece Weight Limitation Per Tray: 800 g or 1.75 lbs.; Limit 4
Trays: Limit 160 g (0.35) per Pouch
Single Instrument Weight Should Not Exceed 140 g or 0.3 lbs.;
Limit 4 Trays; Limit 800 g (1.75 lbs.) per Tray
Pouched Handpieces Cannot Overlap or Be Layered, Piled, or
Stacked
Pouched Handpieces Must Lay Directly on Tray Bottom
Pouched Instruments Carriers Laying Horizontal in Tray
CPAC 2.5” x 8” Instrument Carrier (With Instruments) Weight
Limitation Per Tray: 800 g or 1.75 lbs.; Limit 4 Instrument Carriers
per Tray; Limit 4 Trays: Limit 200 g per Pouch
Single Instrument Weight Should Not Exceed 140 g or 0.3 lbs.;
Limit 4 Trays; Limit 800 g (1.75 lbs.) per Tray
Pouched Instrument Carriers Cannot Overlap or Be Layered, Piled,
or Stacked
Pouched Instrument Carriers Must Lay Directly on Tray Bottom
Instrument Carriers Must Be Open (No Lid)
6.3.4 Detailed Cycle Operation
Before turning the sterilizer on, open the door and visually inspect
the heating chamber and gasket (Sec. 6.2.4). Close the door, ensuring
the handle is in the fully closed (vertical) position.
6.3.4.1 Turning On the RH-Pro11
The On/Standby button will show an illuminated blue LED when
electric power is present and the sterilizer is in its “standby” mode.
With the door closed and handle in full vertical position, press the
On/Standby button to activate the sterilizer. The blue LED in the
On/Standby button will go dark after being pressed.
Allowing about 15-20 seconds after pressing the On/Standby button
will result in the following screen sequence:

20
6.3.4.2 “Start-of-Day” Sterilizer Preheating Procedures
At the start of the day the RH-Pro11 will require time to pre-heat the
internal metal and insular components that serve as a heat sink to the
heated air of the system. “Start-of-Day” sterilizer heating process
includes the heating of the chamber to 375°F and holding it through a
sterilization cycle (see below). The complete process takes about 22
minutes. Pressing “START” on the “READY” screen initiates the ‘cold
start’ heating sequence as depicted:
Once the “STERILIZED” screen appears, the door is unlocked and is
opened by turning the handle clockwise to its full horizontal position.
At this point instrument trays may be inserted for sterilization. If no
immediate use of the sterilizer is planned, it is best to keep the door
closed to minimize temperature loss to the sterilization chamber. The
blower and heater will remain on, keeping the sterilization chamber
at 350°F. The door may be opened at any time during the “PREHEAT”,
“STERILIZED-UNLOCKED”, or “READY” displays.
6.3.4.3 Instrument Sterilization Cycle Sequence
Before setting the proper sterilization cycle, see Section 6.3.3 for
details in the proper use of each cycle, the load configuration required
for each, and instrument packaging and/or loading requirements. The
default sterilization cycle is “WRAPPED.” To select another cycle press
“SELECT” on any screen displaying “READY” or “OPEN” which will
give the follow sequence:
Door handle can then
be turned clockwise to
the full horizontal
position to open door.
Table of contents
Other CPAC Laboratory Equipment manuals
Popular Laboratory Equipment manuals by other brands

LiCONiC
LiCONiC StoreX STX1000 quick start guide

DoorBird
DoorBird A1091 Series installation manual

Extron electronics
Extron electronics XTP PI 400 user guide

Elitech
Elitech AEROSPRAY CYTOLOGY 7522 user manual

Silfradent
Silfradent MEDIFUGE CGF user manual

R-Biopharm
R-Biopharm RIDA qLine autoBlot user manual

Okolab
Okolab H301-KEYENCE-BZX user manual

Excelitas Technologies
Excelitas Technologies X-Cite NOVEM Series user guide

REITEL
REITEL DUSTY MINI operating instructions

Selecta
Selecta BATERIA KJELDAHL 6003294 manual

mpw
mpw MPW-54 user manual

Endress+Hauser
Endress+Hauser Analytik Jena Biometra TRIO operating manual