Craft+Main MARINA User manual
COPY THE MODEL NUMBER FOR YOUR RECORDS HERE #
ROLLER
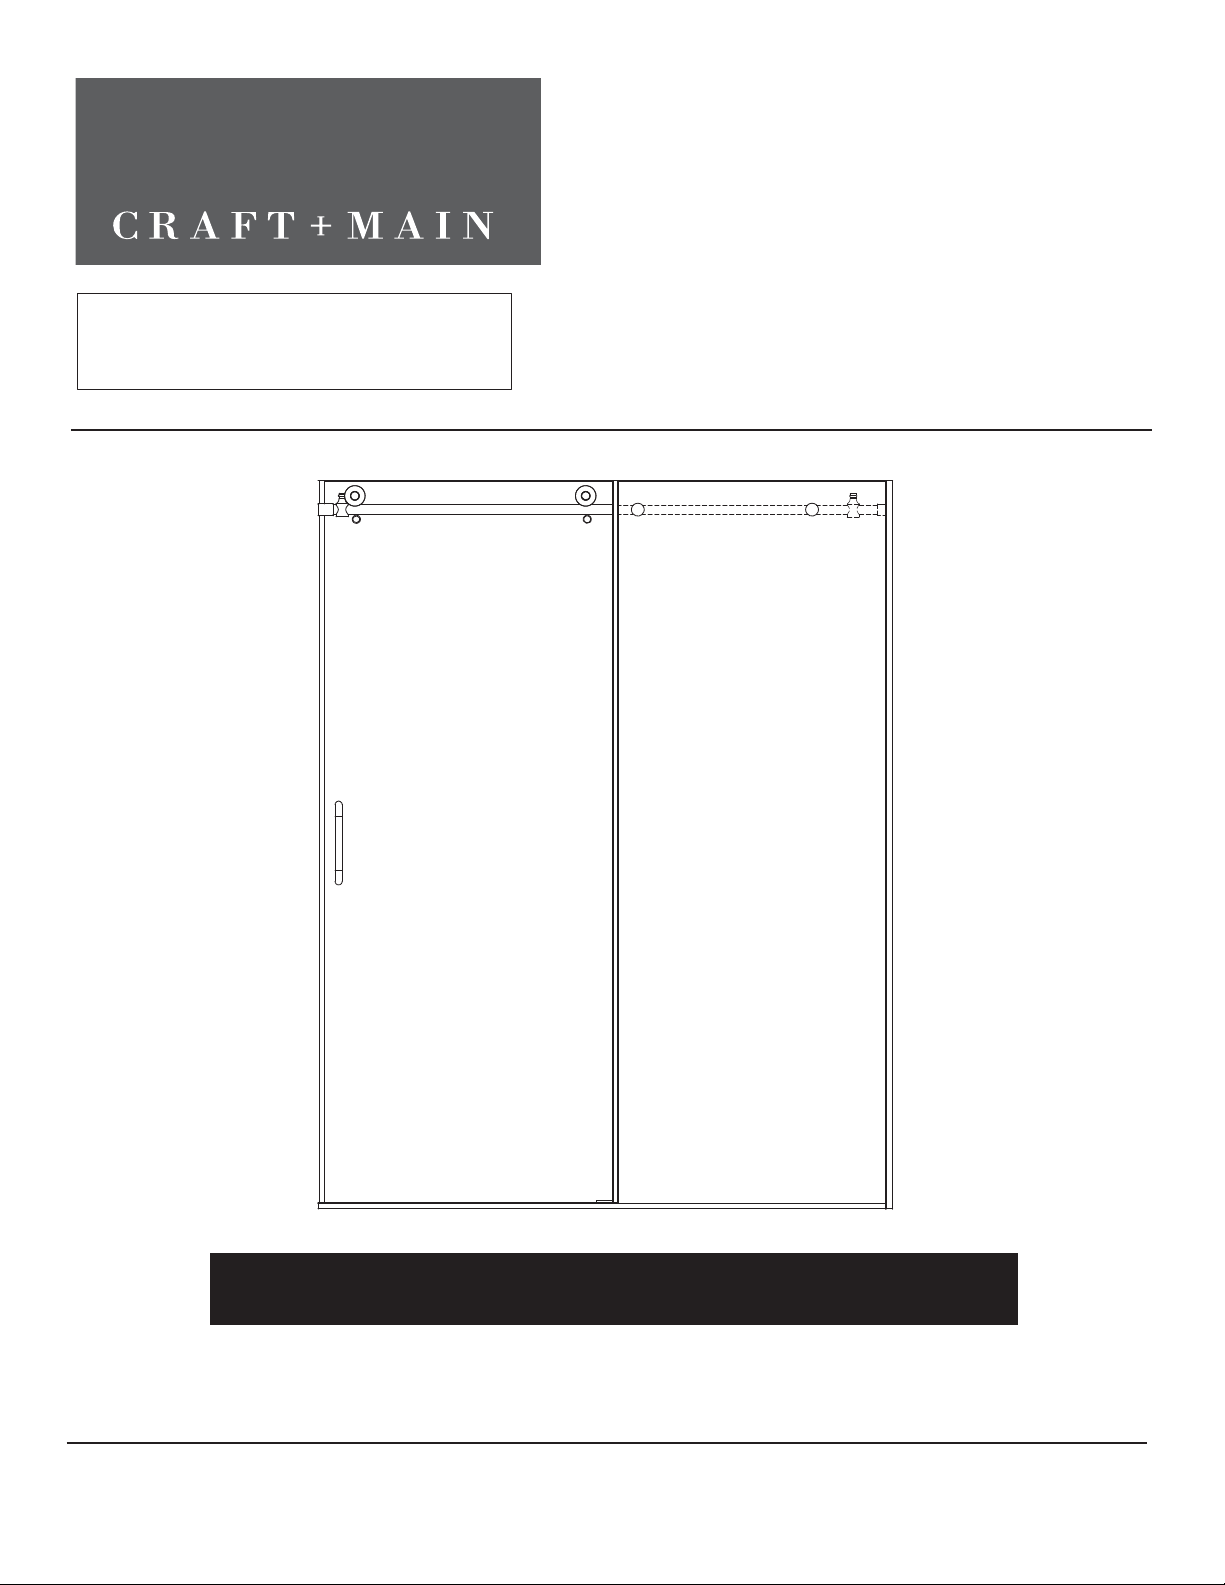
SHOWER & TUB DOOR
READ THE INSTRUCTIONS CAREFULLY
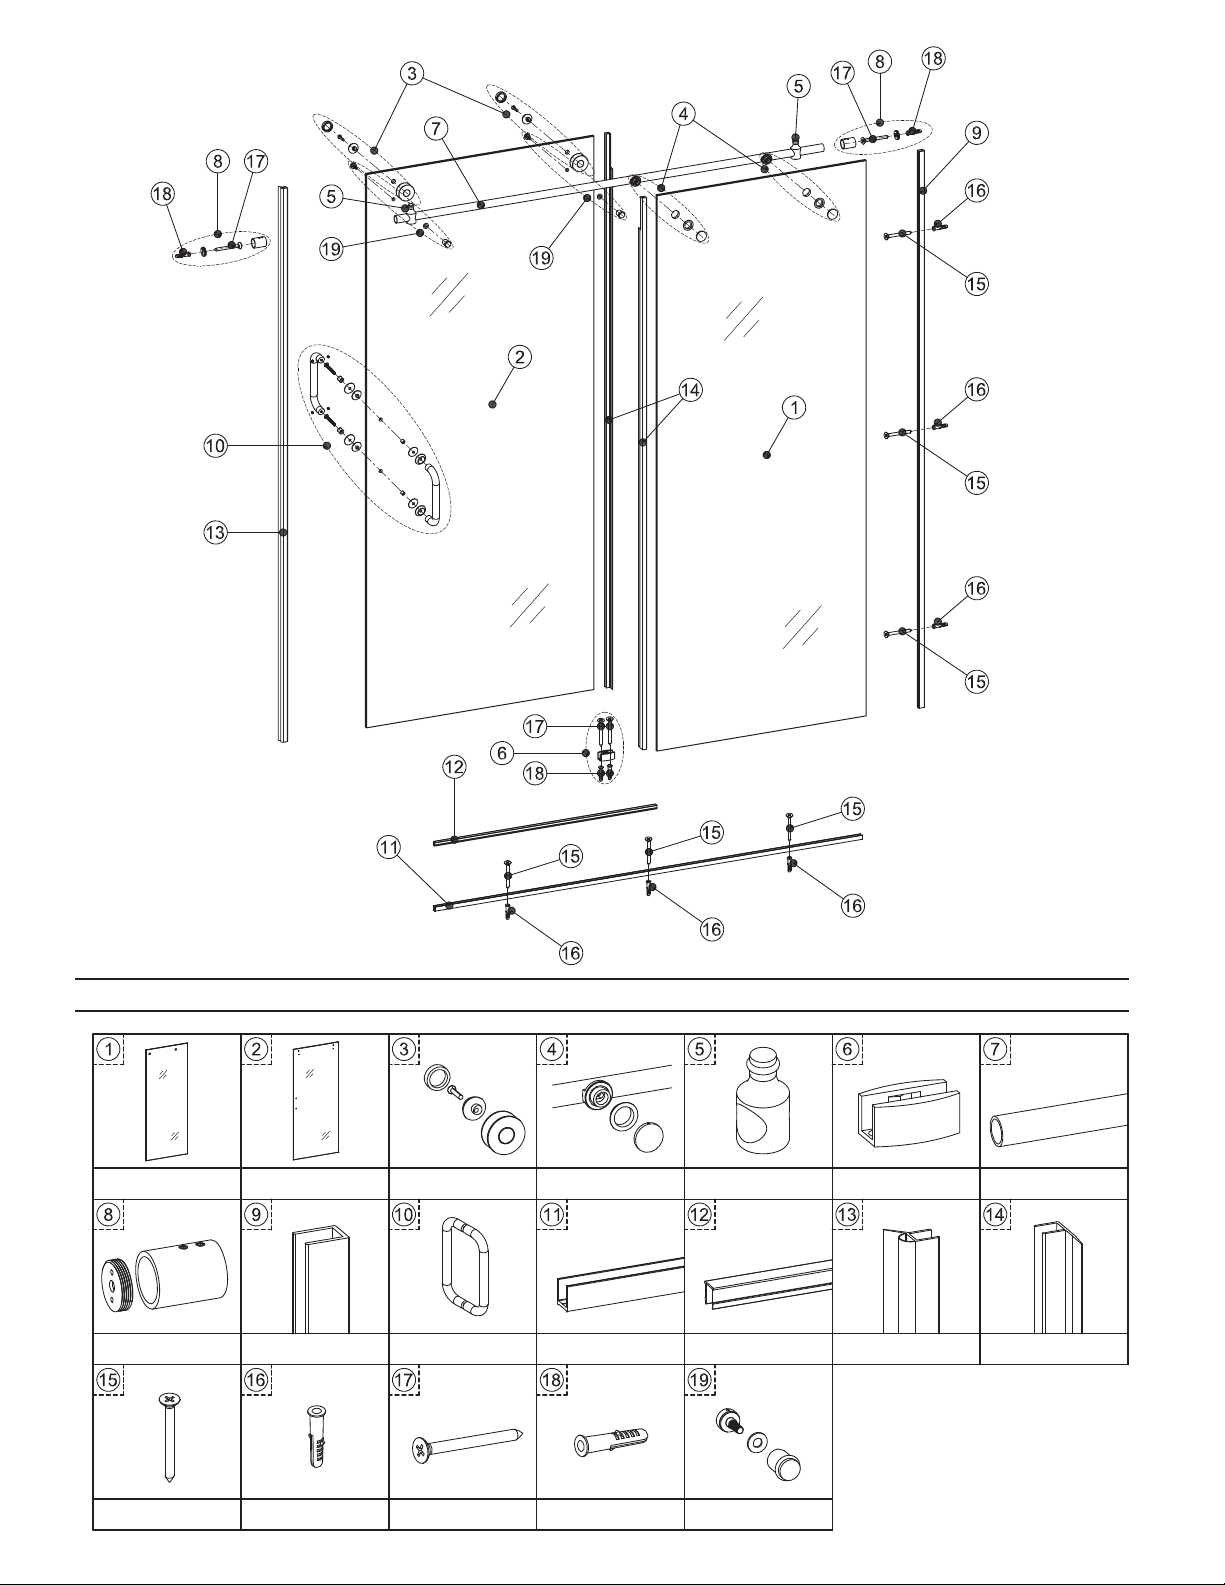
Familiarize yourself with all the parts as shown in the exploded
view. The exploded view will also provide a helpful reference
when relating to the location of the various parts and how
they are mounted.
MARINA
Toll Free Customer Assistance 1-888-620-3667 US Customers
1-888-256-7551 Canada Customers
Monday-Friday, 7:30 a.m. To 5:00 p.m. CST
Please visit us on YouTube and view our shower door installation videos.
One may be available for your installation. www.youtube.com/c/CRAFTANDMAIN
TM
by
© 2022 FGI Industries, Ltd. | CRAFT + MAIN™, MARINA™, and logo designs are trademarks or registered trademarks of FGI Industries, Ltd.
6241 Northwind Parkway, Hobart, IN USA 46342
USA: www.craftandmain.com
5970 Chedworth Way, Unit B, Mississauga, Ontario, Canada L5R 4G5
CANADA: www.craftandmain.ca
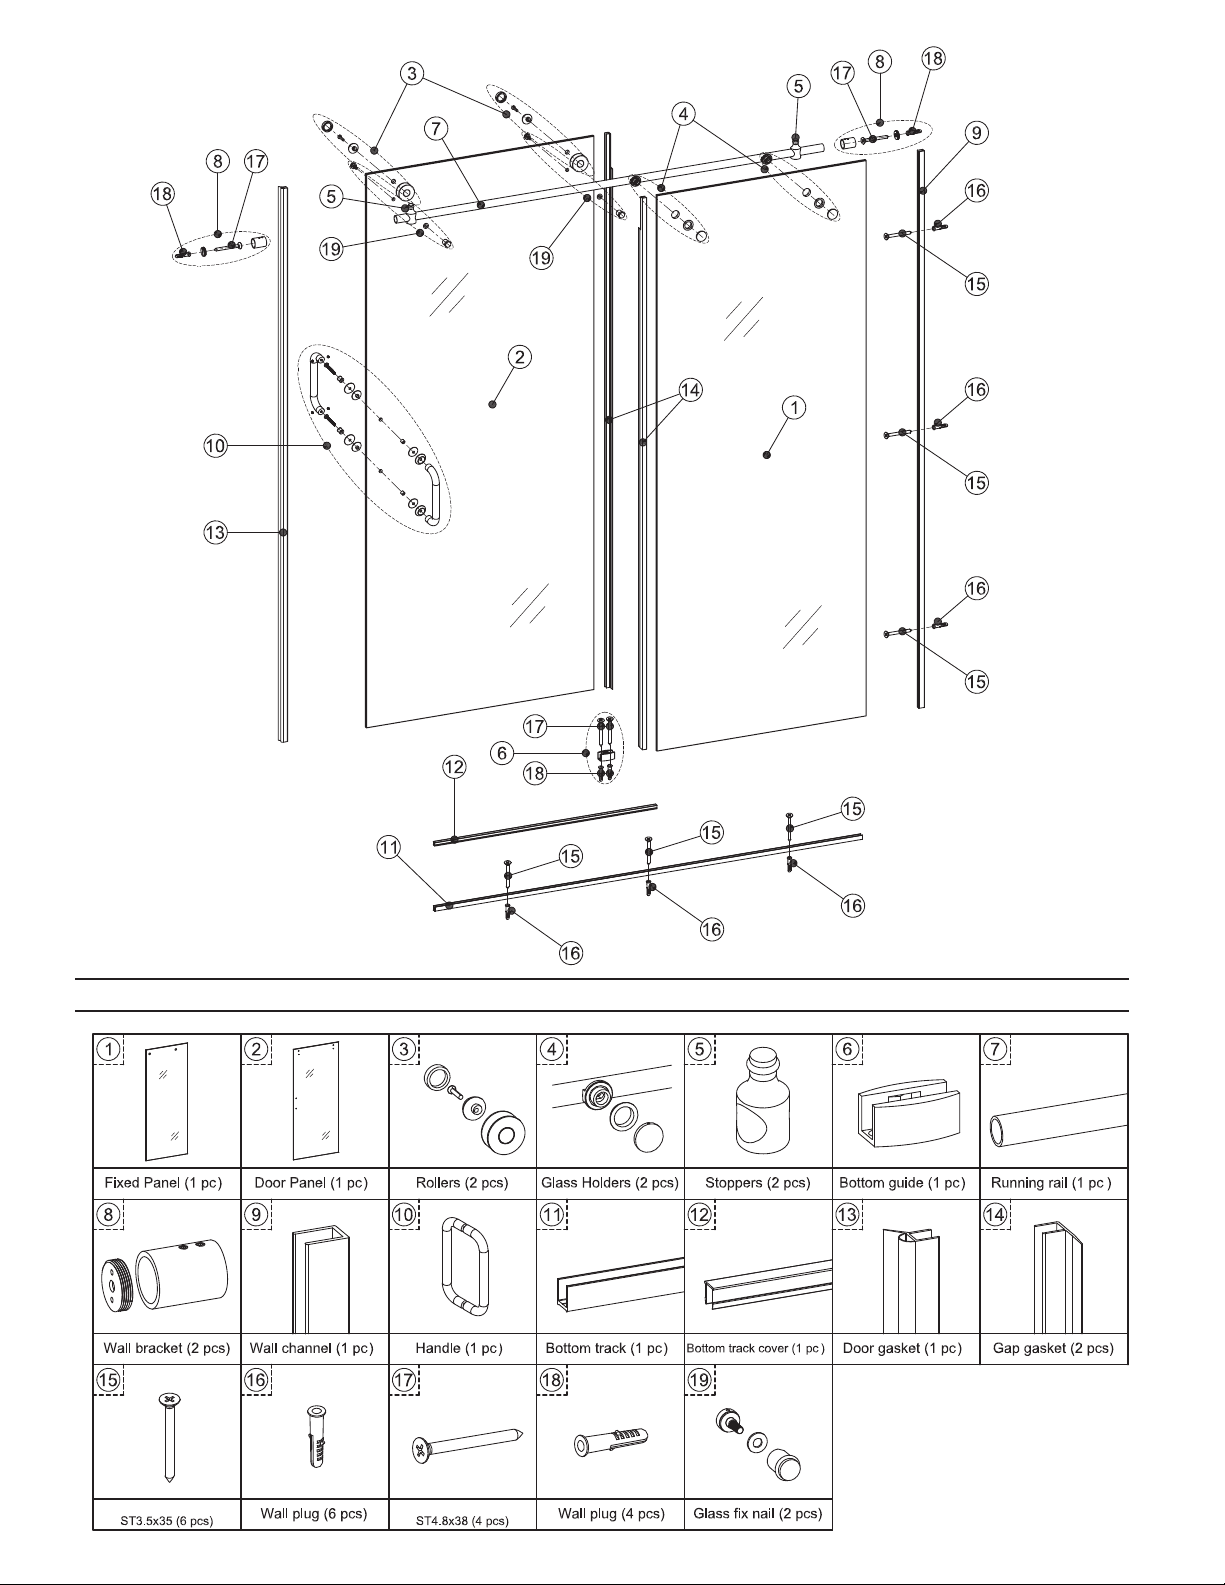
PARTS LIST
Flat Head Screw Flat Head Screw

SILICONEDRILLTAPE MEASURE RUBBER MALLETDRILL BITSKNIFE
LEVELPENCILSCREW DRIVERSHEX KEYS INSTALL ROD POSITIONER
RECOMMENDED TOOLS
WARNING: Safety glasses should always be worn when working with tempered glass.
- 2 -
BEFORE YOU BEGIN
CAUTION: Risk of injury or product damage. Unframed tempered glass should not contact hard
surfaces or it may shatter. Do not touch the edge of the tempered glass panel with tools or any hard
objects. Do not set the unframed tempered glass edge directly on the floor.
CAUTION: Risk of injury or product damage. Do not attempt to cut tempered glass. Tempered glass
shatters when it is cut.
CAUTION: Risk of product damage and properly damage. This shower door is very heavy, Do not install
it to plastic shower modules or drywall unless additional support is provided behind the wall.
IMPORTANT NOTE: This door requires a 3" wide flat surface for proper installation.
Before starting the installation, lay out and identify all of the parts. Inspect them for damage.
Closely follow the instructions pertaining to the sealant application on the door.
Sealing areas other than those shown may cause leakage.
Two people should perform this installation.
1/4” (6mm)
3/16” (8mm)
13 14

. .
- 3 -
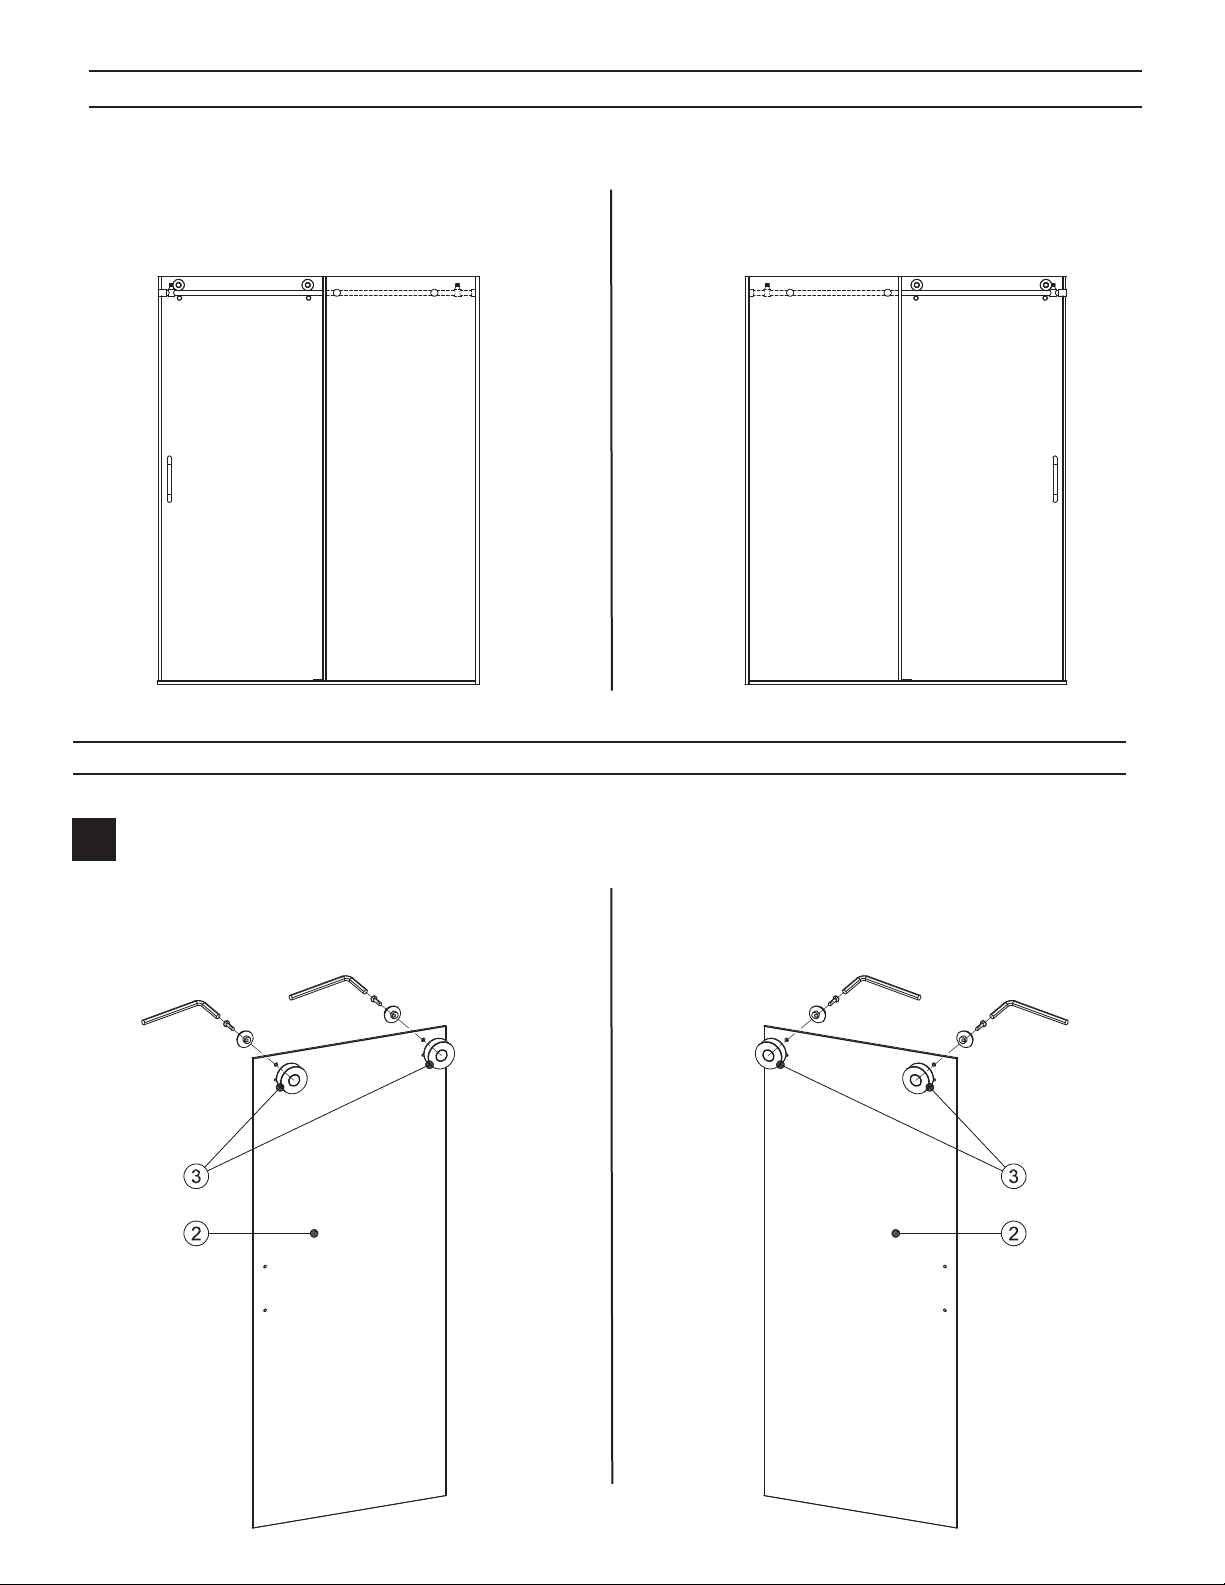
CHOOSE THE SHOWER DOOR OPEN DIRECTION - LEFT OR RIGHT SHOWER DOOR
FOLLOW THE APPROPRIATE DIAGRAM BELOW
LEFT HAND ASSEMBLY RIGHT HAND ASSEMBLY
INSTALLATION PROCEDURE / STEP 1
1
LEFT HAND ASSEMBLY RIGHT HAND ASSEMBLY
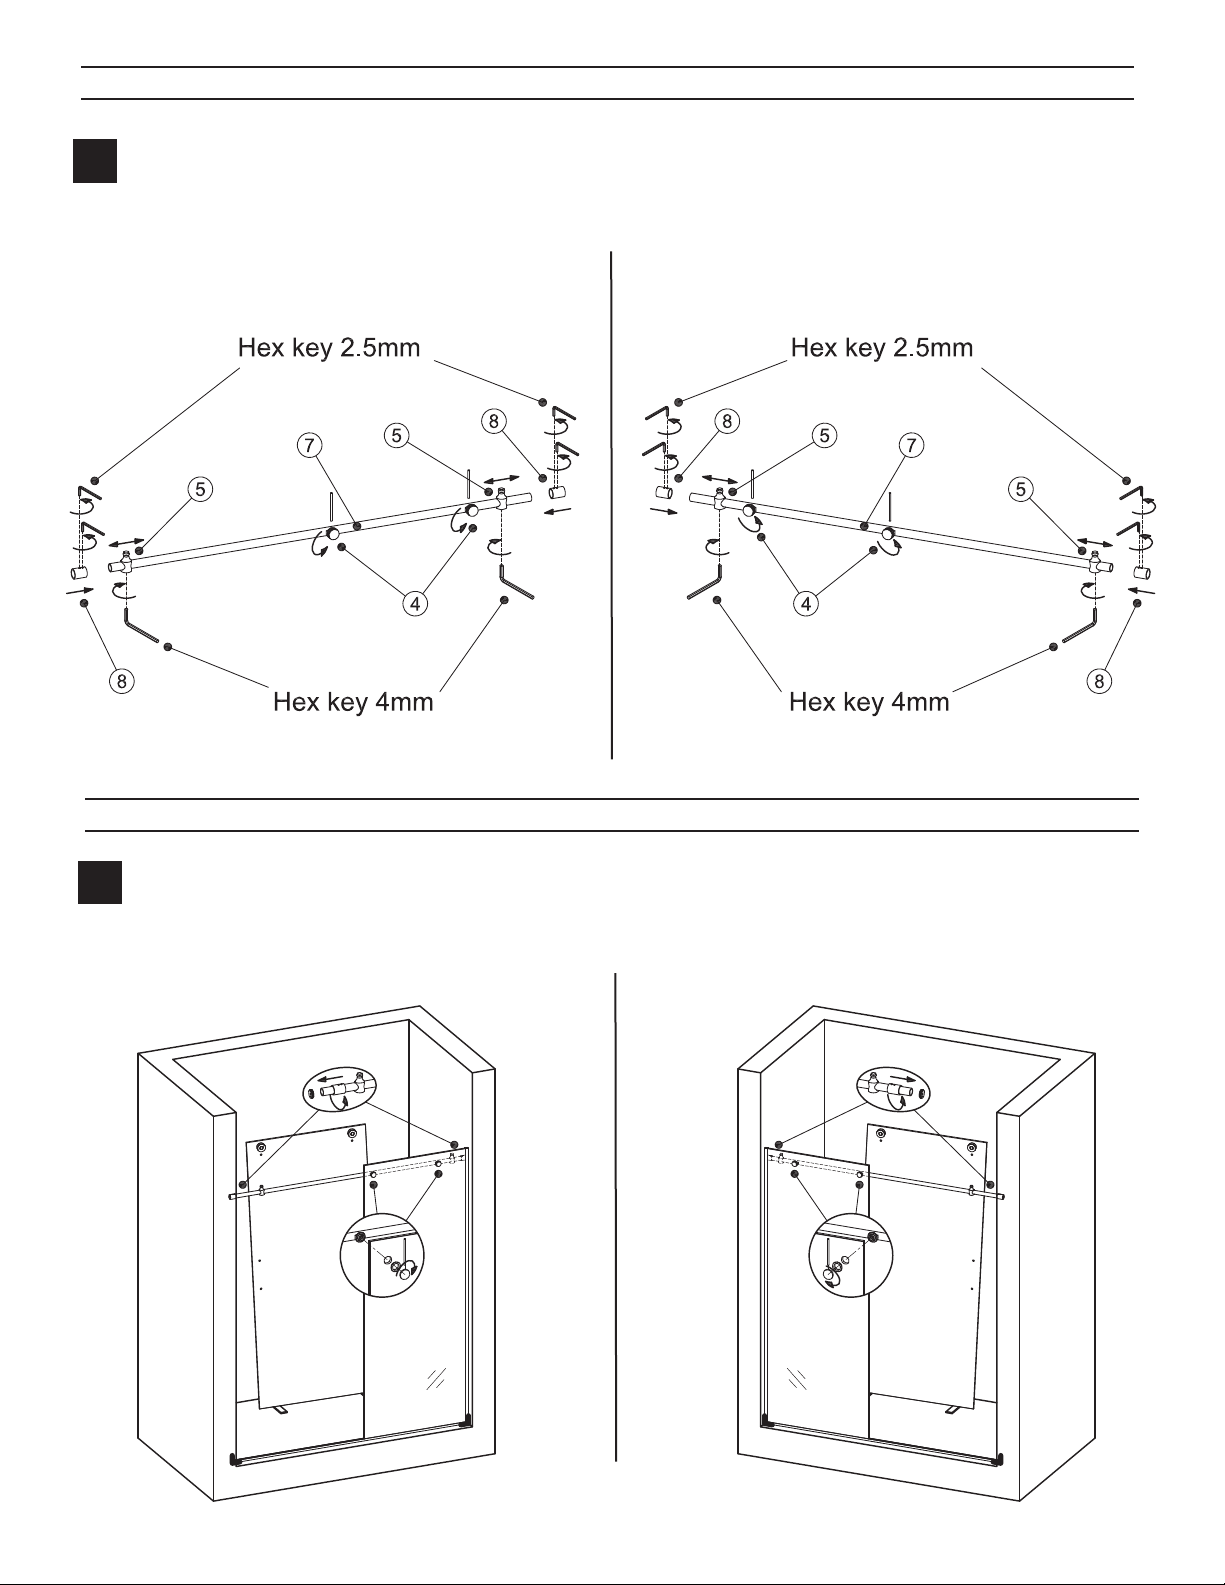
Install rollers to door. Pick up the rollers from the package, install them to door panel as illustrated,
fastened by hex key 4mm.

INSTALLATION PROCEDURE / STEP 2
2
LEFT HAND ASSEMBLY RIGHT HAND ASSEMBLY
Put the door panel inside your shower and have the wood blocks set under the bottom of the panel
as illustrated.
- 4 -
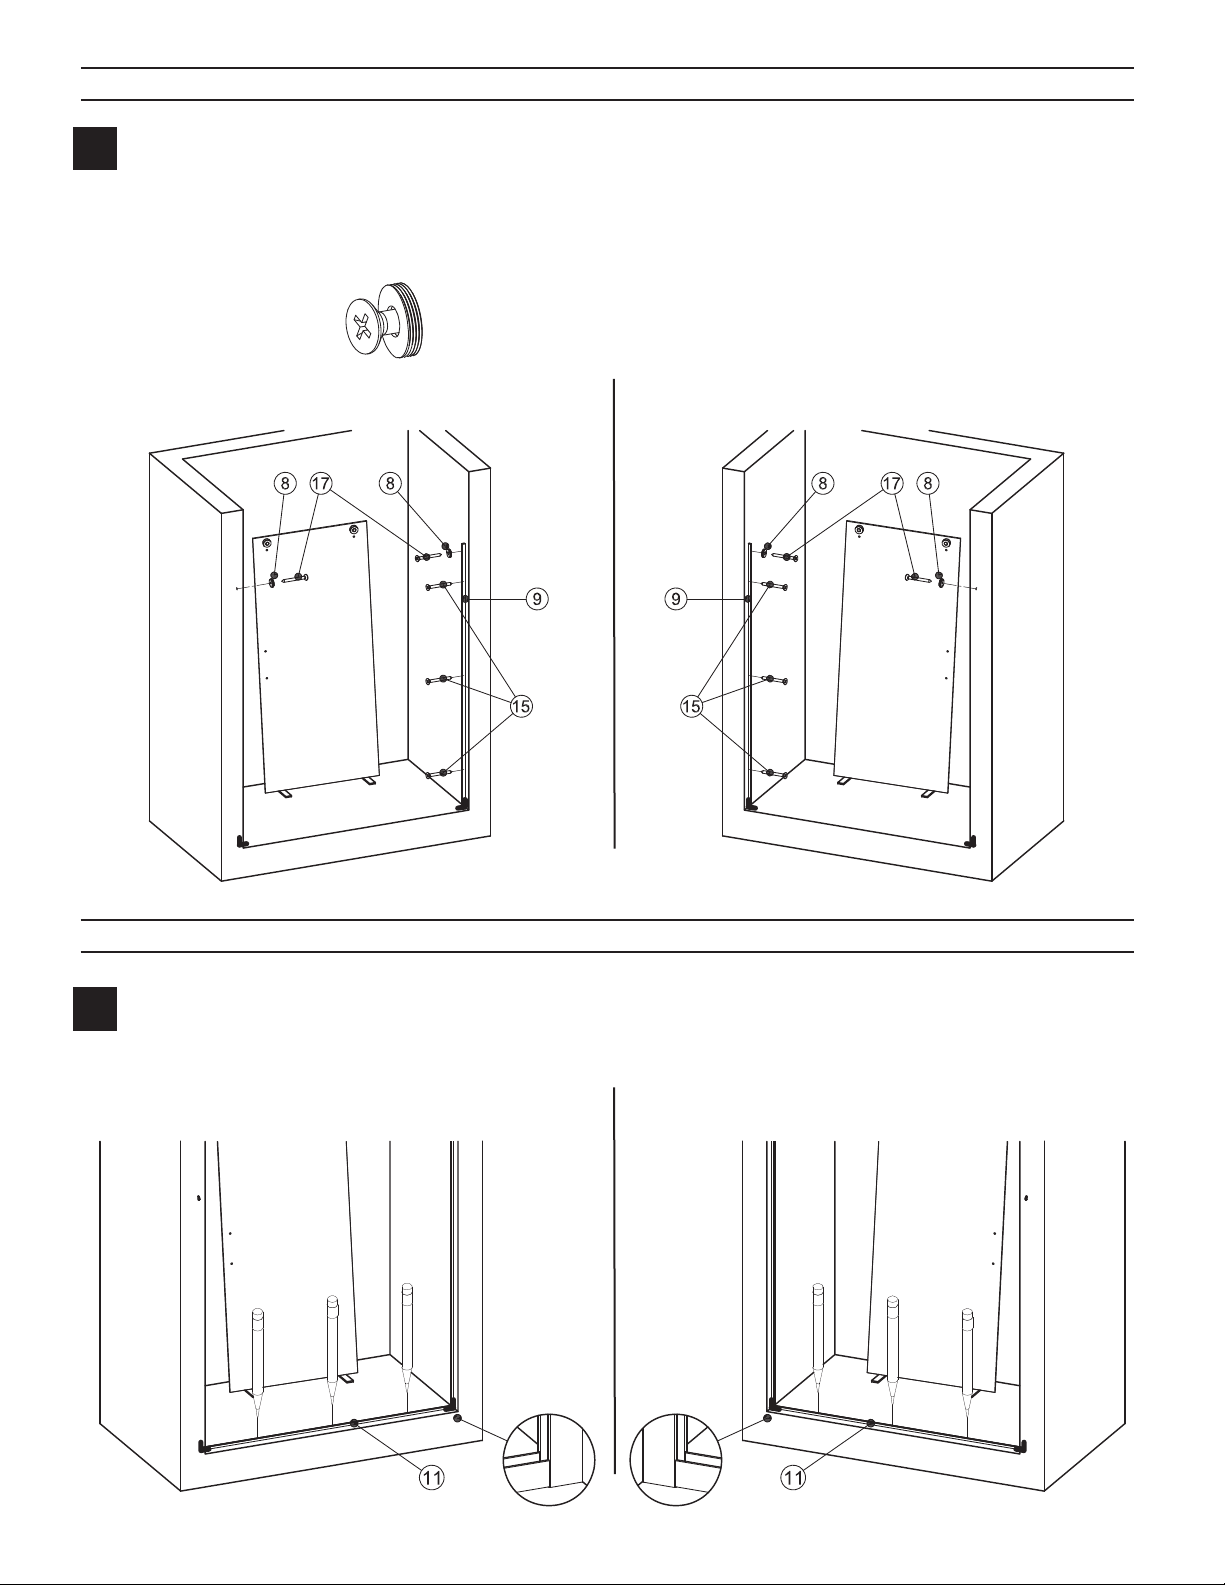
INSTALLATION PROCEDURE / STEP 3
3Use a professional level and the provided cardboard positioner for this step. Before installing the wall
channel, determine the position of both (right and left) wall brackets. Use the bottom hole only to mark
the wall bracket placement. (Approx. 73). You need 3of base width to mount the bottom rail to the
shower base (see page 11). Mount as close to the outside of the shower base threshold as possible.
LEFT HAND ASSEMBLY RIGHT HAND ASSEMBLY

INSTALLATION PROCEDURE / STEP 4
- 5 -
4
LEFT HAND ASSEMBLY RIGHT HAND ASSEMBLY
Mark and drill holes for wall channel with 1/4"(6mm) drill bit.
Drill holes for wall bracket with 5/16"(8mm) drill bit.
INSTALLATION PROCEDURE / STEP 5
5Install the wall plugs.
LEFT HAND ASSEMBLY RIGHT HAND ASSEMBLY
1/4" (6mm)
drill bit 1/4" (6mm)
drill bit
5/16" (8mm)
drill bit
5/16" (8mm)
drill bit
INSTALLATION PROCEDURE / STEP 6
- 6 -
6
LEFT HAND ASSEMBLY RIGHT HAND ASSEMBLY
The bracket base mounting hole can slip.
Epoxy or shim might be necessary.
INSTALLATION PROCEDURE / STEP 7
7Measure and cut the bottom track. Measure from wall to wall channel at the bottom. Mark the bottom
track at the determined distance, and cut from end. Smooth the rough edges (avoid damaging
finished surfaces). Install bottom track.
LEFT HAND ASSEMBLY RIGHT HAND ASSEMBLY
Install the wall channel. Fasten the wall channel according to the holes from above steps by ST3.5x35
flat head screws.
Install the wall bracket. The wall bracket has two parts, take out inner part of the bracket base as the
pics shown. Bracket base will slip down on the single mounting screw. Once you have the height
determined (gap at bottom of door has to be big enough to slide easily through bottom guide) take it
all apart and mix up the epoxy putty and push some in the slotted hole above the screw head on both
bracket base.

- 7 -
LEFT HAND ASSEMBLY RIGHT HAND ASSEMBLY
INSTALLATION PROCEDURE / STEP 8
8Drill holes for bottom track with 1/4(6mm) drill bit.
LEFT HAND ASSEMBLY RIGHT HAND ASSEMBLY
INSTALLATION PROCEDURE / STEP 9
9Install the wall plugs (16).
1/4" (6mm) drill bit 1/4" (6mm) drill bit
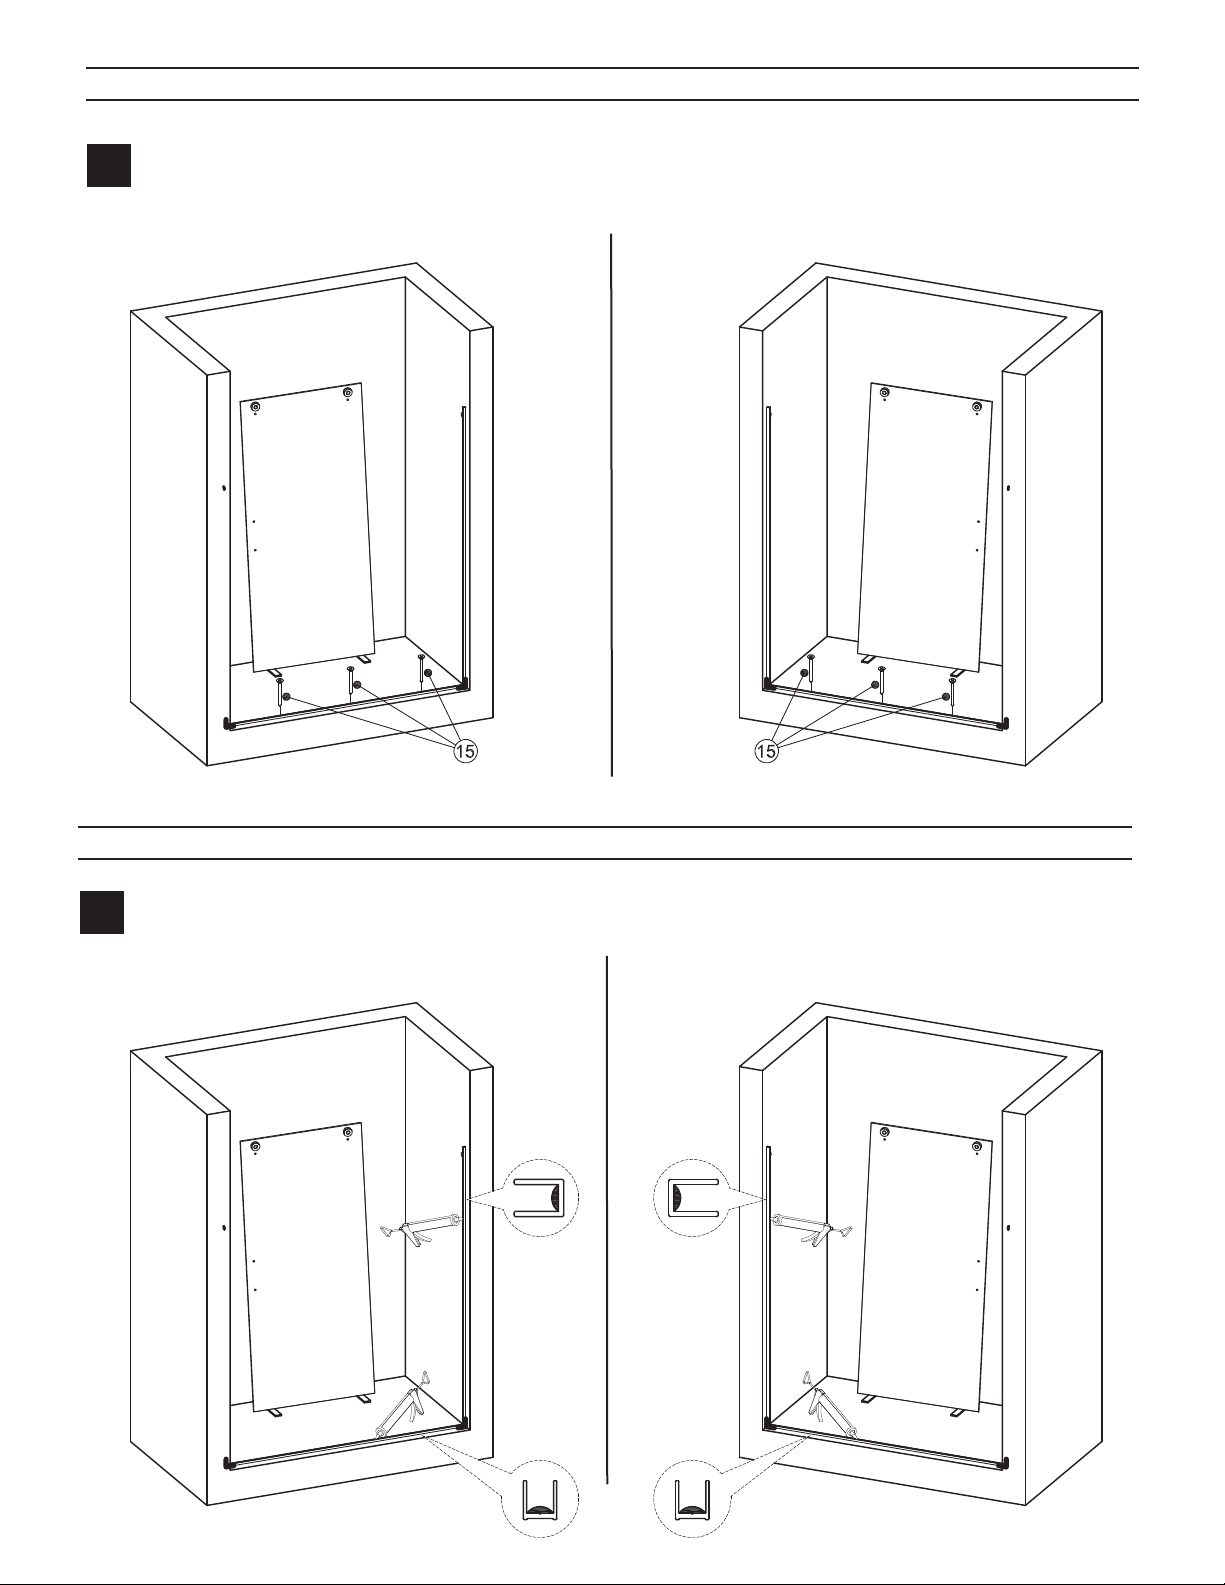
Install the bottom track.
Fasten the bottom track according to the holes with ST3.5x35 flat head screws.
INSTALLATION PROCEDURE / STEP 10
10
LEFT HAND ASSEMBLY RIGHT HAND ASSEMBLY
- 8 -
Use caulk gun to inject clear silicone sealant to the wall channel and bottom track.
INSTALLATION PROCEDURE / STEP 11
11
LEFT HAND ASSEMBLY RIGHT HAND ASSEMBLY

- 9 -
Measure and cut the running rail. Measure from wall to wall at the top of the shower door opening.
Mark the running rail at the determined distance and cut. Smooth the rough edges where the
running rail was cut. Taking care to avoid damaging finished surfaces. Install running rail.
NOTE: Recommend bi-metal hacksaw/reciprocating/bandsaw blade to cut the stainless steel header.
INSTALLATION PROCEDURE / STEP 13
13
LEFT HAND ASSEMBLY RIGHT HAND ASSEMBLY
Install the fixed panel. Put the fixed panel into the bottom track and the wall channel.
INSTALLATION PROCEDURE / STEP 12
12
LEFT HAND ASSEMBLY RIGHT HAND ASSEMBLY
Only cut this side if necessary! Only cut this side if necessary!
.
INSTALLATION PROCEDURE / STEP 14
- 10 -
Prepare the running rail. Position the stoppers on the running rail. Secure them temporarily in place,
pointing upright. Take the glass holders apart using the install rod. Place the outer part of wall bracket
onto the running rail.
14
LEFT HAND ASSEMBLY RIGHT HAND ASSEMBLY
.
INSTALLATION PROCEDURE / STEP 15
Mount the running rail. Fasten the running rail to the fixed panel with the glass holders.
Then, fasten the outer parts of the wall brackets to the wall bracket bases.
Tighten all hex screws for the wall brackets.
15
LEFT HAND ASSEMBLY RIGHT HAND ASSEMBLY

- 11 -
INSTALLATION PROCEDURE / STEP 16
Install the bottom guide. Use positioner to determine the bottom guide's position as illustrated (1).
Drill holes with 8mm drill bit as illustrated (2). Fasten the bottom guide according to the holes from
above steps by wall plugs and ST4.8x38 flat head screws, as illustrated (3) & (4).
16
LEFT HAND ASSEMBLY RIGHT HAND ASSEMBLY
Check the bottom guide. Put the black rubber to 10mm position. This bottom guide
fit for 3 dierent thickness. Secure the thickness is for 10mm glass.
Fasten the bottom guide as illustrated.
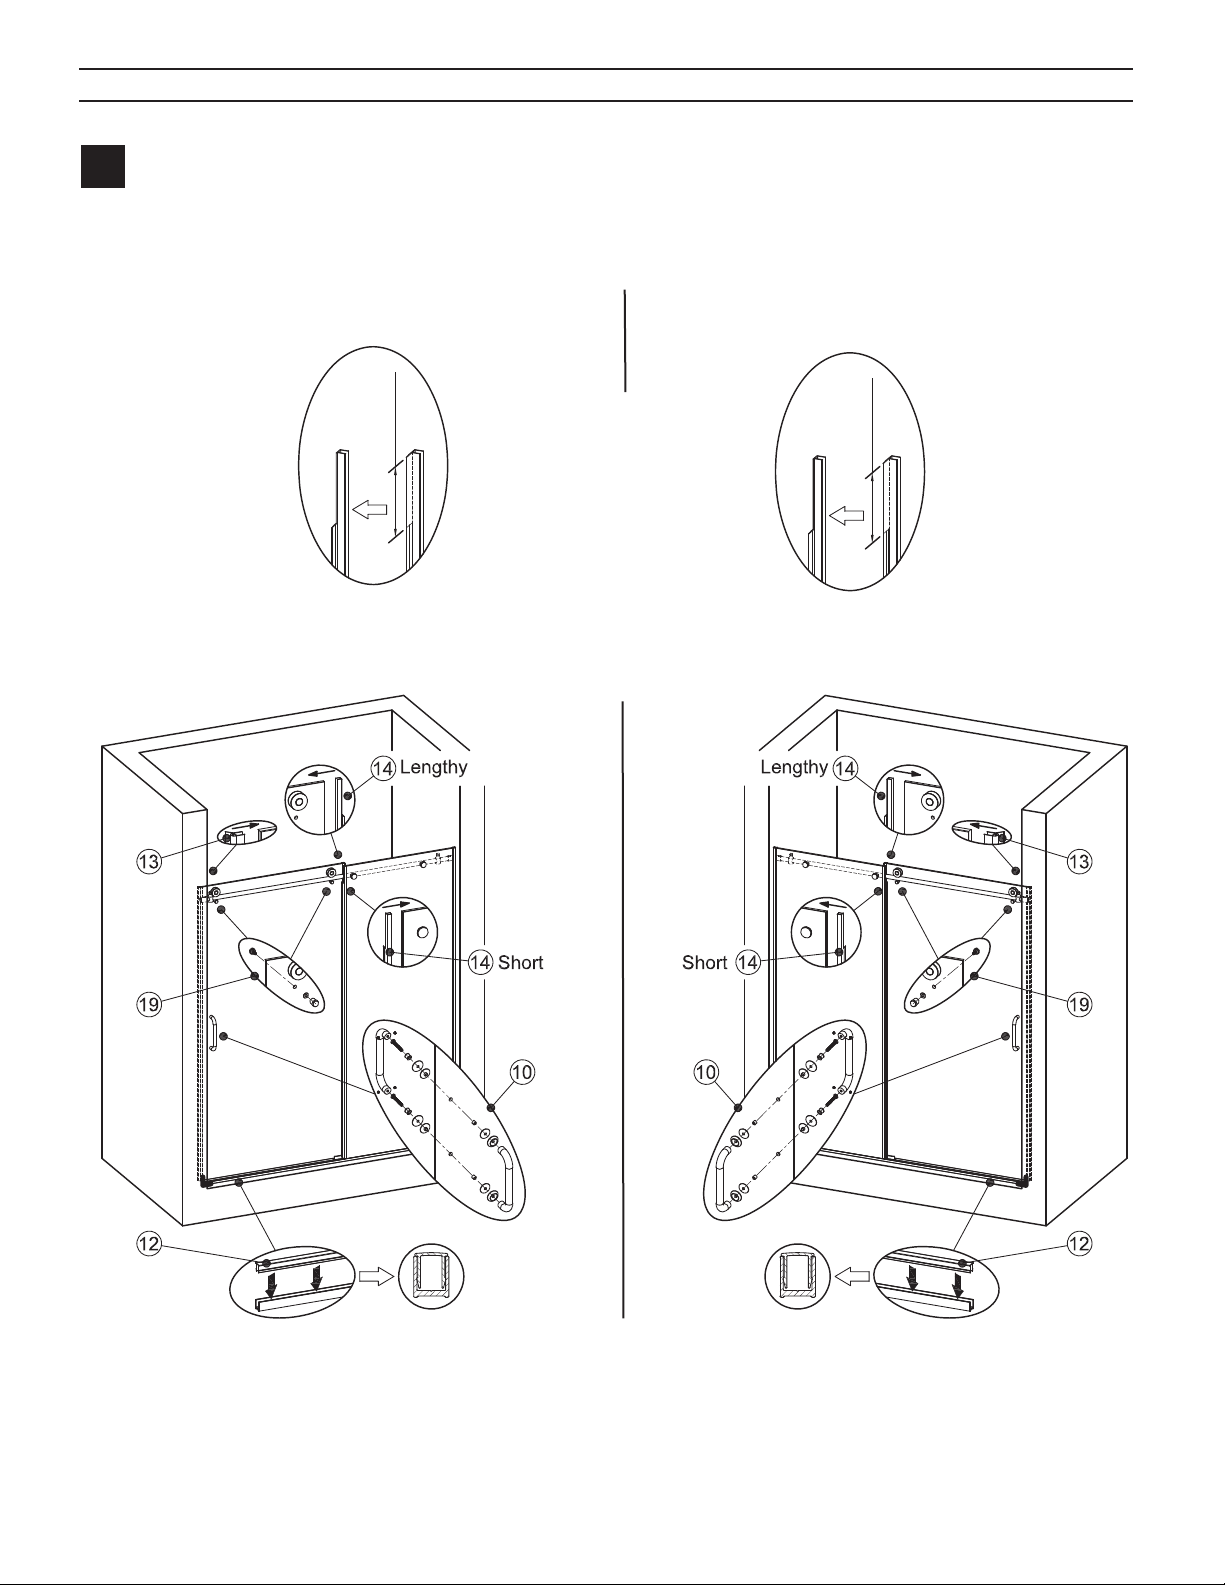
Install the door panel. Install sliding door ensuring that rollers are fixed over the running rail.
Ensure that sliding door is placed within the bottom guide.
17
LEFT HAND ASSEMBLY RIGHT HAND ASSEMBLY
INSTALLATION PROCEDURE / STEP 17
- 12 -
Install the handle as illustrated.
Install the door gasket and gap gaskets. Install the door gasket on the wall side. Install another
gap gasket to other side of glass door. Install gap gasket to the fixed panel.
INSTALLATION PROCEDURE / STEP 18
18
LEFT HAND ASSEMBLY RIGHT HAND ASSEMBLY
Cut the gap gaskets
as illustrated.
Install the glass fix nails as illustrated.
Measure and cut the bottom track cover. Measure from wall to fixed panel at the bottom track.
Mark the bottom track cover at the determined distance and cut. Smooth the rough edges where the
bottom track cover was cut. Taking care to avoid damaging finished surfaces.
Install the bottom track cover as illustrated.
4-11/32"
(115mm)
4-11/32"
(115mm)
- 13 -
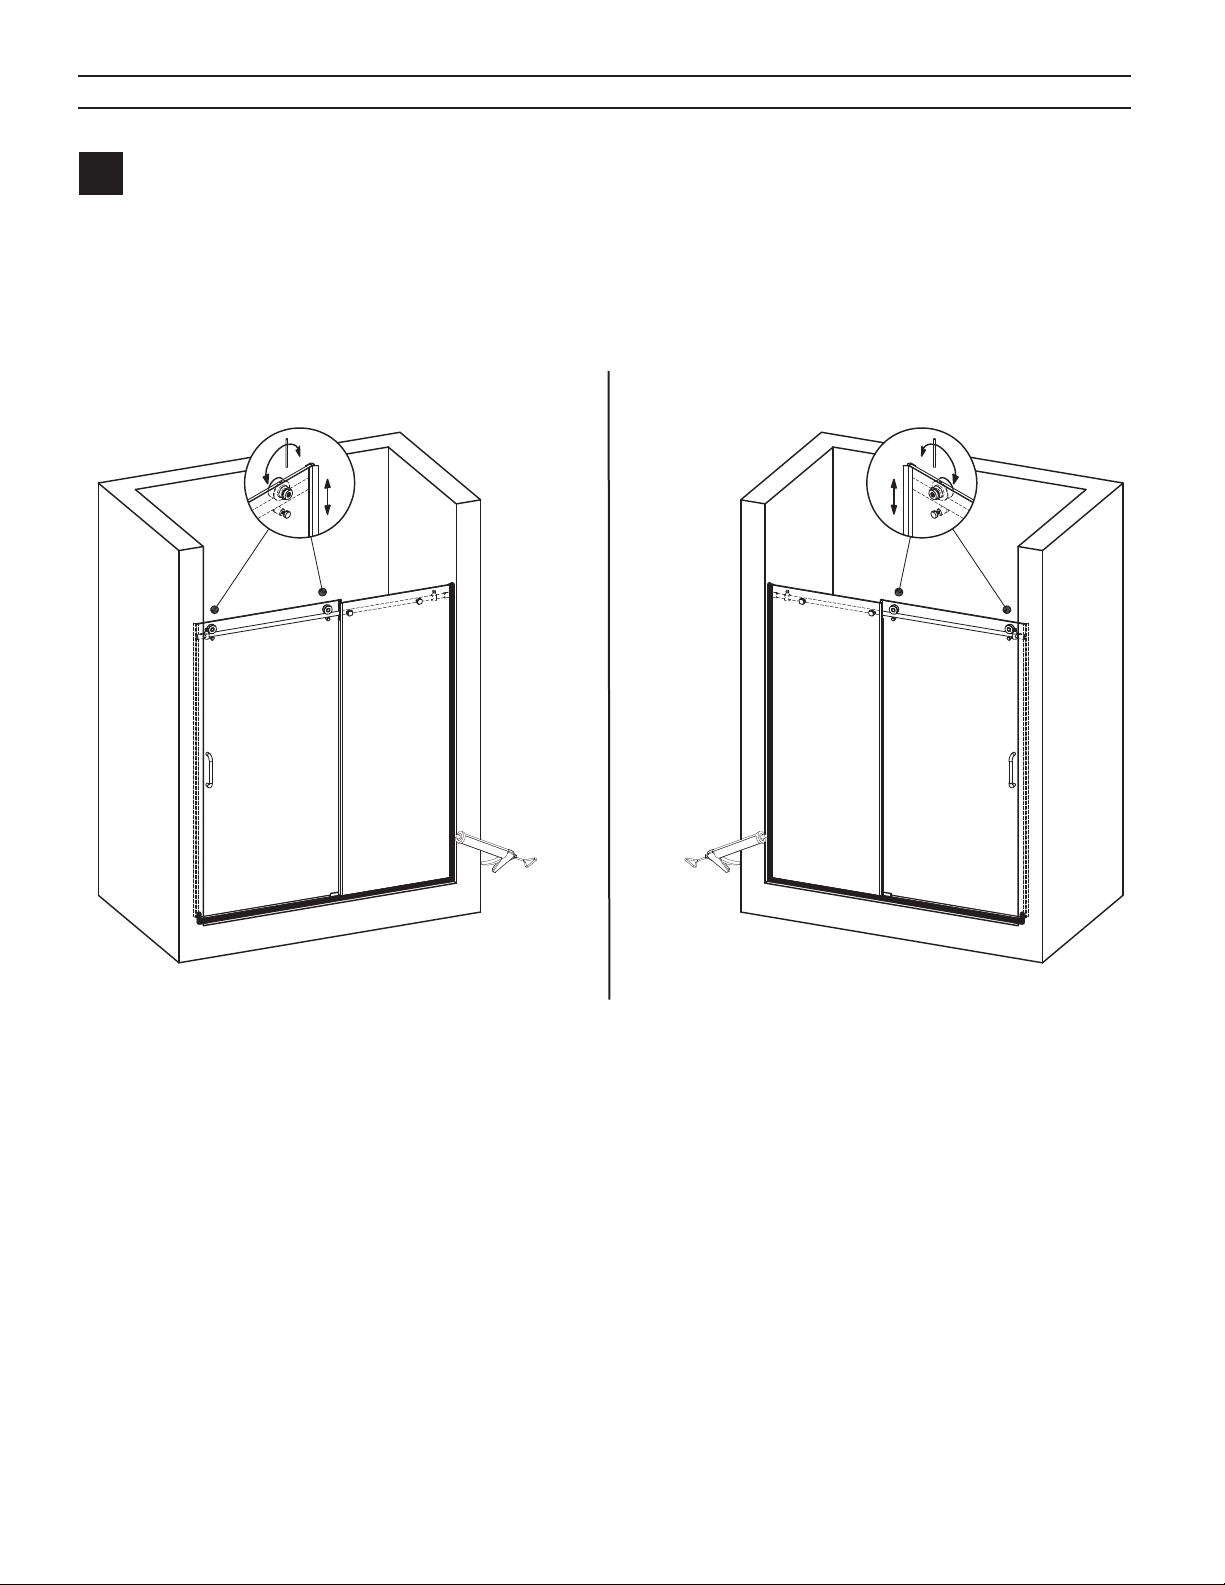
Adjust the door panel. Using adjustment cams, use a hex key or install rod to straighten the door
panel tightly against the shower wall.
Fasten the stopper and rollers. Adjust the stoppers so the glass door panel does not contact the
shower wall.
Note: Use hex key 2.5mm to tighten the roller.
Seal the door assembly.
Apply silicone between the bottom of the fixed panel and the base. Silicone application along the
wall channel is also suggested. In both cases, it is done from the outside of the shower area.
Keep the entire area dry for a minimum of 24 hours.
INSTALLATION PROCEDURE / STEP 19
19
LEFT HAND ASSEMBLY RIGHT HAND ASSEMBLY

© 2022 FGI Industries, Ltd. | CRAFT + MAIN™, MARINA™, and logo designs are trademarks or registered trademarks of FGI Industries, Ltd.
Thank you for your purchase of a shower door
from FGI Industries, Ltd.
In order to be eligible for product warranty, please register
your door on our website within two (2) weeks of installation.
Go to:
www.craftmandmain.com/registration
and follow the instructions.
For any questions or comments
about your new shower door,
please contact our Customer Service at:
ATTENTION
CONSUMER:
IMPORTANT SHOWER ENCLOSURE
WARRANTY INFORMATION
PLEASE DO NOT DISCARD
6241 Northwind Parkway
Hobart, IN USA 46342
US CUSTOMERS:
1-888-620-3667
CANADA CUSTOMERS:
1-888-256-7551
5970 Chedworth Way, Unit B
Mississauga, Ontario, Canada L5R 4G5
PUERTA CORREDIZA
PARA DUCHA Y
BAÑERA
COPIA EL NÚMERO DE MODELO PARA TUS REGISTROS AQUÍ # LEE DETENIDAMENTE LAS INSTRUCCIONES
Familiarízate con todas las piezas tal como se muestran en la
vista ampliada. La vista ampliada sirve también como útil
referencia para conocer la ubicación de varias piezas y cómo
se instalan.
Asistencia gratuita al cliente 1-888-620-3667 Clientes de EE. UU.
1-888-256-7551 Clientes de Canadá
De lunes a viernes de 7:30 a.m. a 5:00 p.m. CST.
Visítenos en YouTube y vea nuestros vídeos de instalación de la puerta de la ducha.
Uno puede estar disponible para su installation. www.youtube.com/c/CRAFTANDMAIN
MARINA
TM
by
© 2022 FGI Industries, Ltd. | CRAFT + MAIN™, MARINA™, and logo designs are trademarks or registered trademarks of FGI Industries, Ltd.
6241 Northwind Parkway, Hobart, IN USA 46342
USA: www.craftandmain.com
5970 Chedworth Way, Unit B, Mississauga, Ontario, Canada L5R 4G5
CANADA: www.craftandmain.ca
LISTA DE PIEZAS
Panel fijo (1 pieza) Panel de la puerta
(1 pieza) Rodillos (2 piezas) Agarraderas para vidrio
(2 piezas) Topes (2 piezas) Guía inferior (1 pieza) Riel rodante (1 pieza)
Soporte de pared
(2 piezas) Canal de pared (1 pieza) Manija (1 pieza) Riel inferior (1 pieza) Cubierta de riel inferior
(1 pieza) Junta de puerta (1 pieza) Junta de separación
(2 piezas)
Tornillos de cabeza plana
(6 piezas) Tacos de pared (6 piezas) Tornillos de cabeza plana
(4 piezas) Tacos de pared (4 piezas) Clavos de fijación de
vidrio (2 piezas)

HERRAMIENTAS RECOMENDADAS
ADVERTENCIA: Siempre se deben usar gafas de seguridad cuando se trabaja
con vidrio templado.
- 2 -
ANTES DE COMENZAR
CUIDADO: Riesgo de lesiones o daños al producto. El vidrio templado sin marco no debe entrar en
contacto con superficies duras o puede romperse. No tocar el borde del panel de vidrio templado
con herramientas u objetos duros. No colocar el borde de vidrio templado sin marco directamente
sobre el piso.
CUIDADO: Riesgo de lesiones o daños al producto. No trates de cortar el vidrio templado.
El vidrio templado se rompe cuando se corta.
CUIDADO: Riesgo de daño del producto y de la propiedad. Esta puerta para ducha es muy pesada.
No la instales en módulos de ducha de plástico o paneles de yeso a menos que se proporcione un
soporte adicional detrás de la pared.
NOTA IMPORTANTE: Esta puerta requiere una superficie plana de 3 (7.62 cm) de ancho para una
instalación adecuada.
Antes de comenzar la instalación, distribuye e identifica todas las piezas.
Inspecciónalas por si tienen daños.
Sigue de cerca las instrucciones correspondientes a la aplicación del sellador en la puerta.
Las áreas de sellado distintas a las que se muestran pueden causar fugas.
Dos personas deben realizar esta instalación.
1/4” (6mm)
3/16” (8mm)
SILICONA TALADRO CINTA DE MEDIR MARTILLO DE GOMA BROCAS DE TALADRO
NIVEL LÁPIZ DESTORNILLADORES
CUCHILLO
LLAVES HEXAGONALES BARRA DE INSTALACIÓN
POSICIONADOR
SIERRA DE MANO GAFAS DE SEGURIDAD
13 14
. .
- 3 -
ELIGE LA DIRECCIÓN DE APERTURA DE LA PUERTA DE LA DUCHA: IZQUIERDA O DERECHA
SIGUE EL DIAGRAMA APROPIADO A CONTINUACIÓN
MONTAJE A MANO IZQUIERDA MONTAJE A MANO DERECHA
PROCEDIMIENTO PARA LA INSTALACIÓN / PASO 1
1Instala las rodillos en la puerta. Toma las rodillos del paquete, instálalas en el panel de la puerta como
se muestra en la ilustración, fijándolas con una llave hexagonal de 4 mm.
MONTAJE A MANO IZQUIERDA MONTAJE A MANO DERECHA

PROCEDIMIENTO PARA LA INSTALACIÓN / PASO 2
2Coloca el panel de la puerta dentro de la ducha y coloca los bloques de madera debajo de la parte
inferior del panel como se muestra en la ilustración.
- 4 -
PROCEDIMIENTO PARA LA INSTALACIÓN / PASO 3
3Utiliza un nivel profesional y el posicionador de cartón proporcionado para este paso. Antes de
instalar el canal de la pared, determina la posición de ambos soportes de pared (derecho e izquierdo).
Utiliza el orificio inferior solo para marcar la ubicación del soporte de pared. [Aprox. 73(1.85 m)].
Necesitas 3(7.62 cm) de ancho de base para montar el riel inferior a la base de la ducha (ver la
página 11). Móntalo lo más cerca posible del exterior del umbral de la base de ducha.
MONTAJE A MANO IZQUIERDA MONTAJE A MANO DERECHA
MONTAJE A MANO IZQUIERDA MONTAJE A MANO DERECHA
Other manuals for MARINA
1
Table of contents
Languages:
Other Craft+Main Bathroom Fixture manuals


