manuals.online logo
Brands
  1. Home
  2. •
  3. Brands
  4. •
  5. Crestron
  6. •
  7. Accessories
  8. •
  9. Crestron C2N-RTHS User manual

Crestron C2N-RTHS User manual

C2N-RTHS
Temperature and Humidity Sensor
Installation Guide
Wiring
Make the necessary connections as called out in the illustration. Apply power after all
connections have been made.
CAUTION: Insufcient power can lead to unpredictable results or damage to the
equipment. Use the Crestron Power Calculator to help calculate how much power is
needed for the system (www.crestron.com/calculators).
NOTE: When wiring the Cresnet network, consider the following:
• Use Crestron Certied Wire.
• Use Crestron power supplies for Crestron equipment.
• Provide sufcient power to the system.
Wiring the C2N-RTHS
Description
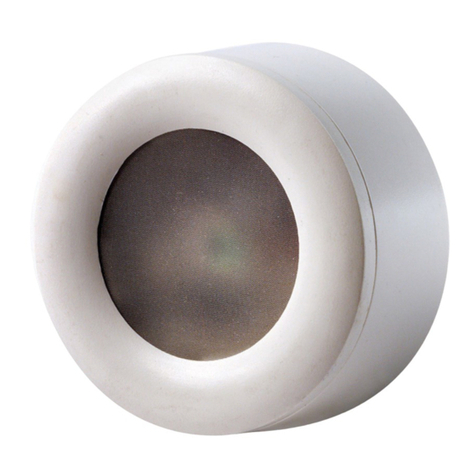
The Crestron® C2N-RTHS is a wall-mounted temperature and relative humidity sensor that
communicates directly with any Crestron control system via the Cresnet®control network.
One-piece mounting makes the C2N-RTHS simple to install. The 1-1/2 in (38.1 mm)
diameter face protrudes just 1/8 in (3.2 mm) from the wall surface and is easily painted or
wallpapered to blend into the wall surface.
C2N-RTHS Specications
Installation
NOTES: Ensure the installation location is not close to a heat or humidity source and is
away from direct sunlight, skylights, and windows. When mounting the sensor outdoors,
do not place in direct sunlight, and do not place where the sensor will be directly
exposed to precipitation. Sensors are suitable for mounting in dry or damp locations as
dened by the National Electrical Code.
• Install and use this product in accordance with appropriate electrical codes and
regulations.
• A licensed electrician should install this product.
• Mount sensors on a vibration-free surface.
NOTE: Before using the C2N-RTHS, ensure the device is using the latest rmware.
Check for the latest rmware for the C2N-RTHS at www.crestron.com/rmware. Load
the rmware onto the device using Crestron Toolbox™ software.
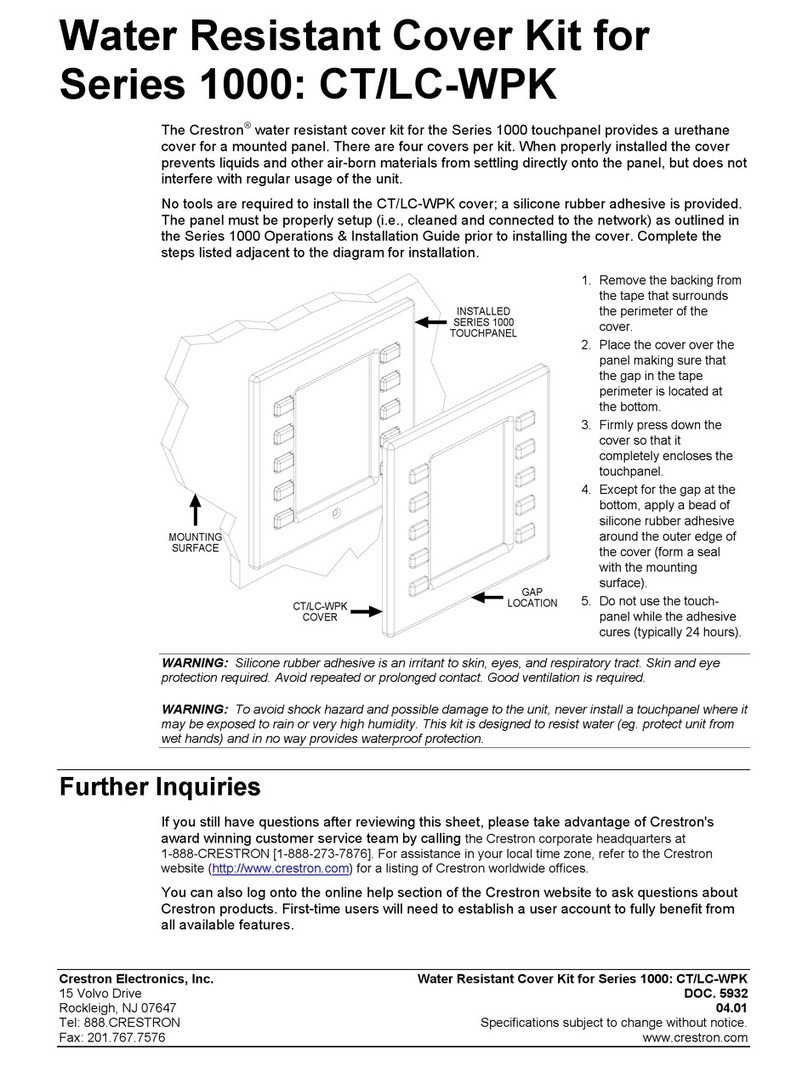
Complete the following procedure to install the C2N-RTHS:
1. Locate an area on the wall that is free of miscellaneous wiring and studs.
2. Make a small hole near the center of the designated mounting site to verify that the
location is suitable.
3. Drill or cut a 1 in (26 mm) diameter circular hole in the wall at the desired position.
4. Route the Cresnet wires to the sensor. Use the four wire nuts included to connect
the wires (red to red, white to white, blue to blue, and black to black).
Cresnet Wiring for the C2N-RTHS
Additional Resources
Visit the product page on the Crestron website (www.crestron.com)
for additional information and the latest rmware updates. Use a QR
reader application on your mobile device to scan the QR image.
Black Ground
Red 24 V
White Y
Blue Z
Wire nuts
Cresnet
wires
Pigtail wires
from sensor
Mounting clips
1 in (26 mm) hole
C2N-RTHS Front and Angled View
NOTE: The miniature setup button and red LED are used for setting the network ID
for the initial conguration or when the device is being added or replaced. They are
also used for touch-settable ID (TSID).
Mounting clips
Setup
button
Red
LED
C2N-RTHS Rear and Angled Views
10 in
(254 mm)
5. Press t the sensor into the hole; the clips on either side of the sensor hold it in
place.
NOTE: The face of the sensor may be painted or wallpapered to match the wall.
Ensure that paint does not enter (or that wallpaper does not cover) the perimeter
gap or the holes for the setup button and LED.
SPECIFICATION DETAILS
Measuring Range
Temperature -40º to 176 ºF (-40º to 80 ºC)
Humidity 0% to 100% RH
Output Resolution 0.1 ºF (0.1 ºC); 1% RH
Accuracy ±1.0 ºF (0.5 ºC); 5% RH
Temperature Accuracy
Over Full Range ±0.9 °F (0.5 °C)
At Room Temperature +0.2/-0.7 °F (+0.1/-0.4 °C)
Humidity Accuracy ±5%
Connection ~10 in (~25 cm) 4-wire pigtail;
Connects to Cresnet control network
Power Requirements
Cresnet Power Usage 0.25 W (0.01 Amps @ 24 Vdc)
As of the date of manufacture, the device has been tested and found to comply with specications for
CE marking.
Federal Communications Commission (FCC) Compliance Statement
This device complies with part 15 of the FCC Rules. Operation is subject to the following
conditions:(1) This device may not cause harmful interference and (2) this device must accept any
interference received, including interference that may cause undesired operation.
CAUTION: Changes or modications not expressly approved by the manufacturer responsible for
compliance could void the user’s authority to operate the equipment.
NOTE: This equipment has been tested and found to comply with the limits for a Class B digital
device, pursuant to part 15 of the FCC Rules. These limits are designed to provide reasonable
protection against harmful interference in a residential installation. This equipment generates, uses
and can radiate radio frequency energy and, if not installed and used in accordance with the
instructions, may cause harmful interference to radio communications. However, there is no guarantee
that interference will not occur in a particular installation. If this equipment does cause harmful
interference to radio or television reception, which can be determined by turning the equipment off
and on, the user is encouraged to try to correct the interference by one or more of the following
measures:
• Reorient or relocate the receiving antenna.
• Increase the separation between the equipment and receiver.
• Connect the equipment into an outlet on a circuit different from that to which the receiver is
connected.
• Consult the dealer or an experienced radio/TV technician for help.
Industry Canada (IC) Compliance Statement
This Class B digital apparatus complies with Canadian ICES-003.
Cet appareil numérique de la classe B est conforme à la norme NMB-003 du Canada
The product warranty can be found at www.crestron.com/warranty.
The specic patents that cover Crestron products are listed at patents.crestron.com.
Certain Crestron products contain open source software. For specic information, please visit
www.crestron.com/opensource.
Crestron, the Crestron logo, Cresnet, and Crestron Toolbox are either trademarks or registered
trademarks of Crestron Electronics, Inc. in the United States and/or other countries. Other trademarks,
registered trademarks, and trade names may be used in this document to refer to either the entities
claiming the marks and names or their products. Crestron disclaims any proprietary interest in the
marks and names of others. Crestron is not responsible for errors in typography or photography.
This document was written by the Technical Publications department at Crestron.
©2016 Crestron Electronics, Inc.
Crestron Electronics, Inc. Installation Guide - DOC. 6232C
15 Volvo Drive Rockleigh, NJ 07647 (2009412)
Tel: 888.CRESTRON 10.16
Fax: 201.767.7576 Specications subject to
www.crestron.com change without notice.
Troubleshooting
The following table provides corrective actions for possible trouble situations. If further
assistance is required, please contact a Crestron customer service representative.
C2N-RTHS Troubleshooting
TROUBLE POSSIBLE CAUSE(S) CORRECTIVE ACTION
There is no temperature
or humidity reading.
The wiring is not
properly connected.
Check the connection;
refer to the “Wiring”
section.
The Cresnet ID is
incorrect.
Check the Cresnet ID.
The programming is
incorrect.
Check the SIMPL
Windows program.

Other manuals for C2N-RTHS

1

Other Crestron Accessories manuals

Crestron CNLEDS Operating and installation instructions

Crestron

Crestron CNLEDS Operating and installation instructions

Crestron ST-CS User manual

Crestron

Crestron ST-CS User manual

Crestron Zum ZUMMESH-PIR-OCCUPANCY-BATT User manual

Crestron

Crestron Zum ZUMMESH-PIR-OCCUPANCY-BATT User manual

Crestron GLS-ODT-C-CN User manual

Crestron

Crestron GLS-ODT-C-CN User manual

Crestron 1700C-BEZEL How to use

Crestron

Crestron 1700C-BEZEL How to use

Crestron GLS-LCL Operating instructions

Crestron

Crestron GLS-LCL Operating instructions

Crestron INETS-IOEX-DOOR-BATT User manual

Crestron

Crestron INETS-IOEX-DOOR-BATT User manual

Crestron FT2A-PWR-US-2-BX User manual

Crestron

Crestron FT2A-PWR-US-2-BX User manual

Crestron AirBoard CCS-WB-1 Dimensional drawing

Crestron

Crestron AirBoard CCS-WB-1 Dimensional drawing

Crestron CT/LC-FPAR1000 User manual

Crestron

Crestron CT/LC-FPAR1000 User manual

Crestron CEN-IDOC User manual

Crestron

Crestron CEN-IDOC User manual

Crestron GLS-OIR-C-450 How to use

Crestron

Crestron GLS-OIR-C-450 How to use

Crestron CNTV-CS User manual

Crestron

Crestron CNTV-CS User manual

Crestron B-G1-FPAR User manual

Crestron

Crestron B-G1-FPAR User manual

Crestron GLS-ODT-C-2000 How to use

Crestron

Crestron GLS-ODT-C-2000 How to use

Crestron CNCS User manual

Crestron

Crestron CNCS User manual

Crestron B-G2-FP User manual

Crestron

Crestron B-G2-FP User manual

Crestron AAE User manual

Crestron

Crestron AAE User manual

Crestron CHV-RSS User manual

Crestron

Crestron CHV-RSS User manual

Crestron CNXRMCS User manual

Crestron

Crestron CNXRMCS User manual

Crestron AirBoard CCS-WB-1 Owner's manual

Crestron

Crestron AirBoard CCS-WB-1 Owner's manual

Crestron GLS-OIR-CSM-EX-BATT User manual

Crestron

Crestron GLS-OIR-CSM-EX-BATT User manual

Crestron 1700C-BTNB-BEZELS How to use

Crestron

Crestron 1700C-BTNB-BEZELS How to use

Crestron ST-VS User manual

Crestron

Crestron ST-VS User manual

Popular Accessories manuals by other brands

Lightolier Calculite RM-INC specification

Lightolier

Lightolier Calculite RM-INC specification

Thermo Scientific Precision 818 Operating and maintenance manual

Thermo Scientific

Thermo Scientific Precision 818 Operating and maintenance manual

Pil Sensoren P41-350-U-CM12 manual

Pil Sensoren

Pil Sensoren P41-350-U-CM12 manual

Knick SensoGate WA 133 Series user manual

Knick

Knick SensoGate WA 133 Series user manual

JMTek PBW200 instruction manual

JMTek

JMTek PBW200 instruction manual

2DI TV2 user guide

2DI

2DI TV2 user guide

WIKA A2G-60 operating instructions

WIKA

WIKA A2G-60 operating instructions

MICRO-EPSILON colorSENSOR-LT-1-ST instruction manual

MICRO-EPSILON

MICRO-EPSILON colorSENSOR-LT-1-ST instruction manual

Compur Statox 501 Operation & instruction manual

Compur

Compur Statox 501 Operation & instruction manual

SECO-LARM SD-9163-KSQ installation manual

SECO-LARM

SECO-LARM SD-9163-KSQ installation manual

FieldBee RTK user manual

FieldBee

FieldBee RTK user manual

DeLOCK 11497 user manual

DeLOCK

DeLOCK 11497 user manual

Fracarro DT1000 quick start guide

Fracarro

Fracarro DT1000 quick start guide

Orion SkyLine 5696 instruction manual

Orion

Orion SkyLine 5696 instruction manual

Hytronik HIM35 Installation and instruction manual

Hytronik

Hytronik HIM35 Installation and instruction manual

DEGREE C Rooster Sensor 100 user manual

DEGREE C

DEGREE C Rooster Sensor 100 user manual

Goalsetter Signature Series Installation and owner's instructions

Goalsetter

Goalsetter Signature Series Installation and owner's instructions

Joolz footmuff instruction manual

Joolz

Joolz footmuff instruction manual

manuals.online logo
manuals.online logoBrands
  • About & Mission
  • Contact us
  • Privacy Policy
  • Terms and Conditions

Copyright 2025 Manuals.Online. All Rights Reserved.